Postcards from March 8th are the most
March 8 is a holiday of flowers and smiles. Women, give your smiles, and let men take care of the flowers for you.
March 8 is International Women's Day of admiration and worship of all the weaker sex. It is a holiday on which people keep pouring in wishes, giving flowers, and sending postcards from morning to evening. Every woman dreams of receiving attention.
Any woman secretly hopes for congratulations from men and awaits them with trepidation. Therefore, representatives of the stronger sex simply do not have the right to deprive someone on this day.
You need to give a small present to every girl in your circle. But with the hassle and choice of gifts for loved ones - mother, grandmother, beloved, friend, it is not always possible to buy at least a bouquet for others.
But send beautiful cards or funny photos, pictures with poems for March 8 all gentlemen can do it. Moreover, they are very easy to download now and absolutely free.
Perfume in a box,
Shampoo, vodka...
Favorite flowers,
There is spring in my soul...
A hundred times you with ease
You will pass over the abyss,
Let them envy -
Send everyone to...
Leave your doubts
Forget opinions:
Praise or criticism -
Just words...
Believe that you are the best
Believe that you are cooler than everyone else
After all, you are a Woman -
And so right!


The choice is great - official, touching, funny and kind, big and small. Here you will find pictures for every taste that will melt the hearts of even the most fastidious beauties.


How convenient is such a little surprise?
- It is universal, always relevant and loved by everyone.
- Doesn't take much time, quick search, wide selection.
- Provides an opportunity to congratulate even those who are very far away.


Wishes in pictures with beautiful poems
What could be more important than warm words on International Women's Day? Congratulations with wishes of happiness, peace and goodness, describing beauty, expressing gratitude to women - will warm the soul of your beloved mother, will please your best friend, and will make your daughter happy.


Photos and postcards from March 8 with quatrains can be sent out early in the morning to all the ladies you know, thereby providing them with a wonderful mood for the whole day.
Cool congratulations on March 8
Young people do not always understand and accept romance. All these cute cards, bouquets of flowers, gifts tied with a ribbon are boring for them and are relics of the past. But young acquaintances also need to be congratulated somehow. Otherwise you will be on their blacklist forever.There is a way out and it is quite simple - pick up interesting funny pictures and comic wishes. The girls will be delighted with them, appreciate the gift and remember the giver as a creative person who keeps up with the times. They are suitable as a sign of attention for a best friend who loves jokes and practical jokes.


Official congratulations
Beautiful postcards and funny photos are not always appropriate. They can be presented to your mother, friend, or someone you know well. But if you need to congratulate a boss, a children’s teacher, a doctor or an unfamiliar woman on International Women’s Day, they become inappropriate. Something more standard and strict is needed here.Pictures with poems in an official style with universal words that will be appropriate for every lady will come to the rescue. These are not banal wishes that have long been familiar, but specially selected congratulations without frills, interesting and catchy.


All the best to the family
Who does everyone rush to congratulate first? Of course, members of your family. International Women's Day is another opportunity to prove your love to your household. Therefore, preparation for March 8 in the family circle begins long before the holiday. Along with the morning flowers bought for your beloved mother, wife, or daughter, you should definitely please them with heartfelt congratulations in pictures.
Affectionate words, funny images and cool inscriptions are a great way to unite your loved ones and express your feelings. And in the evening at dinner all that remains is to present gifts and take a family photo as a keepsake.


You shouldn’t be irresponsible when choosing postcards, sending the first ones that catch your eye to your mother, friend, sister, or just acquaintances. Carefully selected photos, pictures and words on a festive March day will help the female sex feel the care and love with which they were chosen.
This will leave the most wonderful impressions, and will once again allow the woman to understand how valued and respected she is.
On a warm spring day on March 8, we celebrate the holiday of the female half of humanity. On this day, every man strives to please and surprise, first of all, his family and beloved women. But women around us, be they colleagues or just acquaintances, do not stand aside either. A holiday is not complete without bouquets of flowers and pleasant surprises.
Postcards are an important part of a gift. In them you can write wishes that will keep your soul and warmth for many years. After all, many people, including me, like to put gift cards in a separate box. And then from time to time look into it and remember pleasant moments from life.
The stores certainly have a huge selection of postcards for every taste. But just think about how much warmth, tenderness and positive energy a postcard made by your own hands contains. How nice it is for a mother or grandmother to receive a postcard made by their children or grandchildren. This creative process will captivate anyone. There are a lot of ideas on this matter, I will offer only a small part of them today.
Making beautiful postcards for March 8 from paper - 5 master classes
Paper is a material that is always at hand. When choosing materials for postcards, paper, of course, comes first. For the base of the card, I recommend choosing thicker paper so that it holds its shape well.
Volumetric card “Bouquet of flowers”
A very cute and voluminous card. It’s not difficult to do, involve children in your work, they will be interested.

Necessary materials:
- Cardboard for base
- Colored and white paper
- Scissors
- Compass
- Markers or colored pencils
- Ruler
- Glue, glue gun
- Leg-split
The very first thing we will do for the card is flowers. To do this, arm yourself with colored paper, a compass, scissors and get started.
Choose the color of the flower. Using a compass, measure a diameter of 1.5 cm and draw a circle from the edge of the sheet.

Fold the sheet to the size of the circle 2 times to make an accordion and cut it out.
Then roll it again to the size of the circle 2 times with an accordion and cut it.
From the resulting square, cut out circles along the drawn outline.

You should have 9 circles. Each one needs to be cut in the middle from the bottom about 1 cm from the edge.
Glue the cut together so that you get a voluminous petal. It is not at all necessary to make them the same; overlap more or less.

When all the petals are glued together, cut out a few more circles of the same diameter from the remaining paper. They will serve as the beginning of the flower to make it look more flowing. There is no need to cut and glue them.
Glue the petals together in a chaotic manner, and glue the circles at the bottom along the edges.

Now let's get to the core. To do this, take a white sheet, bend it in half about 1.5 cm from the edge and cut it off.
The width of the sheet is 20 cm, 10 cm is enough for one flower. Therefore, we fold it in half and cut it off again.

For a natural look, use a yellow felt-tip pen to shade one side of the strip from the bottom of the fold.
Make frequent cuts from the fold side along the entire length, but carefully leaving a little space at the bottom. It will turn out like weed.
Roll it up and secure the end with glue.

Straighten the edges and glue the core to the center of the flower. Hold for a while until the glue sets. The first flower is ready, similarly make 2 more for the card.
Let's start with the base for the bouquet. Take a colored sheet of paper measuring 20x15 cm and bend it like an accordion. We will attach the bouquet to this base.
Then for the leaves you need green paper. Fold the sheet 4 cm from the edge and cut.

Cut the folded sheet in half and cut out a semi-oval from it, and cut leaves from it into thin strips along the edge.

Tie the base of the bouquet with a piece of twine and tie a bow.
Attach the base for the bouquet to the cardboard base of the postcard with glue.
Glue leaves to it, and glue flowers on top of them.

Glue rhinestones along the contour of the card. Glue rhinestones onto the base of the bouquet in a chaotic manner.
Wrap the tops of the leaves inward and glue them.
On the upper free part of the postcard, first use a simple pencil to write “March 8”, and then use a marker or black felt-tip pen to outline the outline.

Shade the inscription with colored pencils; using several colors the inscription will look more voluminous.
Draw a heart and color it.

This is such a wonderful postcard - it turned out to be a bouquet.
Postcards “Dresses”
An original postcard with outfits - dresses. Of course, this will be a congratulation for women. Such a postcard can serve as a congratulation on March 8, on Mother's Day or a birthday, as well as for an invitation to an event. I will present you with three options for making such a postcard; if you wish, use your imagination and make your own version using the same principle.

Necessary materials:
- Colored cardboard - the basis of the postcard
- Colored paper
- Scissors
- Satin ribbons, rhinestones, beads - for decoration
For the first option, fold a piece of colored cardboard in half and cut it. Fold half of the piece in half, this will be the basis for the postcard. You choose the color at your discretion.
For contrast, you can cut a rectangle from a white sheet inside the card and paste it on the side where the congratulation text will be.
Using a ruler on the front of the card, mark where the outline of the dress will be.

Draw the outline of the dress using a simple pencil. Draw a wave at the bottom of the hem, and draw a neckline at the top.
Cut along the drawn outline of the dress.
In place of the belt, on the fold, make an incision with nail scissors.
Insert a satin ribbon, tie a bow and trim off any excess edges.

The card is ready, you can decorate it with stickers, glue rhinestones or decorate it. Or you can leave it like this. Write a congratulation and delight the recipient with an interesting postcard.
For the second option you will need dress templates. You can draw them yourself.
Transfer the templates onto colored paper and cut them out.
Using a ruler, bend the skirt template along the lines to create folds.

Glue the finished parts of the dress onto the base of the card in the center.
Decorate the belt with glue-based beads.

It’s very simple and quick, and most importantly, the stylish postcard will appeal to female representatives of any age category.
For the last version of a postcard with a dress, you need a mini CD or a compass, in general, whatever you have at hand.
Take a sheet of colored paper, preferably in different colors on both sides, this will add volume to the future bottom of the dress.
Trace the disk or use a compass to draw a large circle and a small one inside.
Draw petals inside this circle, then cut along the outline.
You need 2 of these blanks.

Fold the resulting flower in half so that the petals are not symmetrical.
Using scissors, fold the edges of the petals inward.
Repeat the procedure with the second part and connect them together with glue.
Cut the top into an oval shape so that the shape resembles a skirt.
Cut out the desired top of the dress, in our case it is a corset, and connect the parts together by gluing them to the card.
The final touch will be a bow made of satin ribbon; we glue it to the waistband of the dress.

Beauty is ready and waiting for its recipient.
Postcard “Field bouquet”
A very simple version of a postcard. It can be done quickly, and even a child can easily cope with this task.
Necessary materials:
- Cardboard for base
- Colored and white paper
- Scissors
Cut thin strips from colored paper of different colors.
Using a toothpick, twist the strips, leaving a small space at the end and secure with glue.
On the cardboard base of the postcard on the bottom right, glue curly ovals made of colored paper on the bottom and white on top. Make an inscription there.

Glue strips of green paper onto a postcard for a future bouquet.
Start decorating with curls of different colors, these will be buds.
Decorate the bouquet with a bow; it can be made of paper or satin ribbon.

A cute bouquet on a postcard looks very tender.
Postcard "Butterflies"
A simple, but at the same time very original and unusual spring card.

Necessary materials:
- Cardboard for base
- Colored and white paper
- Scissors
- Glue or double-sided tape
- Colored pencils, felt-tip pens
- Black marker
- Rhinestones for decoration
Draw butterflies around the edge of the card base. Let them have different slopes, it will be even more interesting. Use a simple pencil so you can correct any imperfections.
Trace the outline with a marker and to make the butterflies more beautiful, add a pattern on the wings, for me these are circles.
Trim the edge along the contour of the butterflies.
Glue a sheet of colored paper inside the card for contrast; it can be anything. Use glue or double-sided tape.

Now comes the most creative design process. Decorate your butterflies or let the children do it. Decorate the middles of the butterflies with rhinestones.
Using a pre-prepared figure eight stencil, transfer it onto the card. A stencil is completely optional; you can easily draw the number yourself.
Trace the outline with a black marker and color it.

For a voluminous appearance of the figure eight, you can shade the sides of the figure eight with a pencil one tone darker.

A very interesting postcard, in my opinion.
Postcard “Spring tulips”
The last option for paper postcards will be made in applique style. Choose soft and pleasant colors for the background and flowers.

Necessary materials:
- Cardboard for base
- Colored and white paper
- Satin ribbon
- Scissors
Prepare all the necessary materials and get started.
Fold the colored cardboard in half, thus this will be our future postcard.
Now let's start cutting out the tulip buds. To do this, cut small rectangles, fold them in half and cut out the petals on top of the fold.
Cut flower stems from green paper.

Cut out the bottom of the bouquet separately. Cut the leaves.
For now, just lay out the details on the postcard to have an idea of what it will be like and if you need to add elements.
Cut small circles from white paper and place them over the buds.

When you are satisfied with the result, glue all the parts.
Decorate the bouquet with a satin ribbon bow.
Glue the inscription below.

Beautiful three-dimensional bouquets of tulips - as a symbol of spring and warmth.
How to make a postcard in scrapbooking style for March 8th - video instructions
Scrapbooking is a very interesting type of homemade handicraft. In this way they decorate photo albums and make folders for documents. In this style, individual photographs or drawings and a lot more are decorated. Scrapbooking helps turn ordinary and ordinary things into a masterpiece with its own story.
From year to year, this hobby begins to turn into real art. This is a great way to express yourself by expressing your imagination without the usual framework. To create things in this style, there is now a wide range of materials and decorations in stores, which greatly simplifies the task.
The video shows every step of creating a scrapbooking style card. Try to make such a postcard yourself and you will definitely succeed.
Volumetric 3D postcard - step-by-step technique
A voluminous postcard captivates with its unusualness, but not many people know how to make it. But nothing is impossible, the main thing is to want it. And my instructions with photos step by step will help you with this.

Necessary materials:
- Cardboard for base
- Colored or white paper - 9 sheets
- Scissors
- Pencil
- PVA glue
- Rhinestones with adhesive or regular
First you need to make a flower template. It's not at all difficult to make.
Take a sheet of colored or white paper, fold it in half and in half again.
Then fold the corner and fold the top one leaf in half again, you get a kind of triangle.
Draw a curved line with a pencil as shown in the photo.

Take scissors and cut along the drawn line.
Bend the leaf and trim along the edge as well.
When you unfold it you will get a flower like this.
Using this template, trace on the remaining sheets of paper folded in half and cut out the remaining 8 flowers. One of them will need to be cut in half.

Take colored cardboard - the base of the postcard and bend it in half.
Apply drops of glue to the petals of the first flower and glue them to the card along the fold line of the flower and the card.
The following flowers need to be glued to the flower alternating petals. A drop of glue will be enough.

When you have glued all 8 flowers, apply a thin strip of glue to the fold line and glue half of the 9th flower.
Apply drops of glue to the petals, alternating.
Close the card and hold it until the glue sets.
Decorate the card with rhinestones - glue-based drops.

The 3D 3D postcard is ready. Everything is simpler than you might think. Make your loved ones happy.
Original 3D 3D postcard for mom and grandma - video
DIY postcard ideas for children - congratulations to mother and grandmother on March 8
I want to share with you ideas for children's creativity. Children can and should be attracted to art, it helps them develop. These cards are easy to make and your kids will have a blast making them. And how nice it will be to give to your mother, grandmothers, sisters and, perhaps, a teacher or educator.
The first idea is to draw using fingerprints. Children will certainly appreciate this idea.

To create such cards, you can use both paper and felt. We make blanks and glue them to the base.

You can use thin strips of colored paper, roll it into spirals and make such beautiful appliqués. Or draw a bouquet of handprints, very cute.

Napkins rolled into small balls and an original mimosa bouquet on a card are almost ready, add leaves, a bow and beauty.
A mug with a flower also looks quite original.
Bouquet of koalas using cotton swabs.
And a very interesting idea - a flower on the palm.

The following card ideas are very simple. It will be nice to receive tulips in a bouquet from your son, and dad can very well help him with this.
You can make a cool card using cardboard, a needle and thread.
Or maybe you like the idea of a clearing with tulips? Does it really look like spring?

As you may have noticed, absolutely any materials can be used for postcards and it will be a small work of art for you and your child. Believe me, you won’t spend much time on this. But what a surprise you will give to your beloved mothers, grandmothers, girlfriends or just acquaintances.

International Women's Day is a celebration of the fair half of humanity. Every woman expects gifts on this day, but this is not the main thing. The main thing is attention and that you congratulate her from the bottom of your heart. A DIY postcard will warm the souls of your beloved women and girls with its warmth for a long time.
In the spring, one of the brightest and most beloved holidays is celebrated on March 8th. On this day it is customary to congratulate your loved ones and beloved women. It is customary to give cards. One option could be a photo postcard. A photo postcard for March 8 will delight mothers, grandmothers, girlfriends, and beloved girls.
Mimosas, tulips, snowdrops are spring flowers, suitable for holiday pictures; they can be bought in a regular store.

Types of photo postcards
- Only with a picture. You need to write your wishes yourself.
- With already printed poems.
- The picture says who it is addressed to: grandmother, mother, friend, sister.

As an alternative to purchasing one, you can make a postcard with your own hands. It will especially please my mother.


- Quilling.
- Origami.
- Application.
- Using ribbons.

Application
One of the easiest techniques when working with paper. A base is selected from cardboard, details are cut out from colored paper: flowers, a big eight. Using glue, the elements are glued to the base. You can write a text of congratulations.

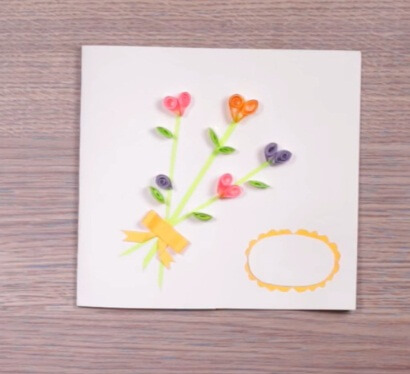
Quilling
Beautiful cards for March 8th can be made using the quilling technique. Blanks are purchased at a stationery store, but you can cut colored sheets of paper into thin long pieces.

Part of quilling is paper rolling. Use corrugated paper, cut into strips, and glue to the base. A quick way to create a surprise. It's easy to make a variety of flowers and inscriptions.

Origami
Using the origami technique you can make beautiful greeting cards for March 8th. Using this technique it is easy to make voluminous tulips and snowdrops. Snowdrops are suitable for postcards; they are glued to the background, resulting in a three-dimensional picture.

Ribbons
Ribbons are arranged together with the paper. You can wrap them around a figure eight cut out of cardboard and then glue it on. It will look much more beautiful.

How to make a postcard for March 8 using origami technique
This is the easiest and fastest way to create masterpieces, suitable for both adults and small children.
For this technique you will need a minimum number of components: glue, colored paper, scissors, cardboard. It is better to use a glue stick; it glues the paper well, requires a minimum amount of time to dry, and will not spoil the appearance of the postcard.


Flowers in a vase
To decorate the card, you can use decorative elements: beads, sparkles, sequins. Fold the cardboard in half, cut out a part that resembles a vase, the shape can be any. You can cut out a template from paper in advance and trace it on cardboard. One of the parts of the cardboard vase is two centimeters longer.

Glue the parts of the vase together, only along the edge, to create a pocket. Decorate the vase with ornaments. Cut out a rectangle from cardboard, the width of which is equal to the width of the neck, and the length is three centimeters greater than the height of the vase. Insert into pocket.

Cut out leaves from green paper. Glue to the protruding part of the rectangle. For more volume, add a few long leaves. Glue flowers on top, use different shades.

You can glue a bead, button or sequin into the middle of each flower and decorate it with sparkles. Write congratulations on March 8th on the vase.

Lilac with paper lumps
Made from napkin or corrugated paper. Cut into small squares and scoop into lumps. For lilac use purple, red shades, light background. The lumps are glued to form flowers. Decorate with leaves and inscriptions.

Eight
Take a sheet of colored cardboard and fold it in half. Cut out a double figure eight, leave rectangles at the bottom, bending them into the middle, the number will stand. Glue the base parts together. You can decorate with mimosa flowers from multi-colored napkins. Cut each into four parts and form into lumps.

Glue a thuja sprig to the bottom of the card. Decorate with mimosa flowers from the prepared lumps. You can complement the composition with figurines of butterflies, and write a congratulation to your mother on the reverse side.

Postcard from plasticine
You will need cardboard and plasticine. Choose a suitable background that differs from the tone of the flowers.

Roll out thin sticks from green plasticine and draw grass and leaves on cardboard. Swing the petal sticks in the same way. Twist each petal separately in a spiral, you can combine shades. Fast and easy way.

Using your imagination and the means at hand, you can make various works to please your mother on this bright holiday.

Photos of postcards for March 8th with your own hands


