Various ways to make a crown from leaves. "Crown for Autumn". Master class on making a headdress for a costume "Autumn
A crown made of paper, beads, autumn leaves is made quickly. From the article you will learn what icing is and how to make a sweet tiara from fondant for a cake.
DIY beaded crown
Choose any of the options presented and go for it. See how easy it is to make a princess crown.
Here's what you need to get the job done:
- 2 types of wire: thick section for the base and thin, on which we will string decoration elements;
- pliers;
- beads;
- pearls;
- beads.

Attach it with thin wire to the base. This is the crown of a princess or queen you should get at this stage.

Next, string beads onto a thin wire. Attach these jewelry to the base by placing a pearl or large bead inside.

Here is such a pretty crown of the queen turned out.

If you do not have beads, but there are other materials, you can quickly make a decoration for a girl's head.

For it we use the following:
- various beads with a large hole diameter;
- tubes for cleaning - 5 pcs.;
- wire cutters.

Now you need to cut the 3 remaining tubes as follows:
- the first - in half;
- the second - into 3 identical parts;
- from thirds - cut off 2/3 of its length.

Fold each blank in half and fix them on the crown as in the photo. In this case, the longest tube will be in the center.

String beads on the decoration, and the princess crown is ready.
How to make a keychain with your own hands?
If you need a crown for a girl, but want to practice making a little jewelry, then start by making a keychain. This thing will also come in handy. You will be able to get the keys and admire the keychain, which will be made in a single copy.
Here is a list of what you need for such needlework:
- beads of three colors;
- fishing line;
- wire;
- pliers or round nose pliers.
Before buying a bead, check if it has a hole large enough for a 2-turn wire to pass through it unhindered.

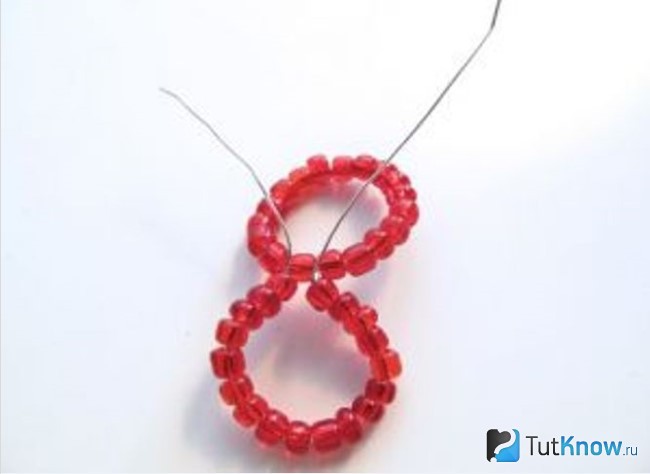
Cut the wire to the desired length, string 18 red beads onto it. Then pass its end through their holes, tighten the loop.

Dial 18 more beads of the same color on this wire, also pass its free end through their holes, as a result, you will get such a figure eight.
Lay one circle of these small beads on top of the other. Tie them together with the ends of the wire, cut off the excess edge.

On the remaining one, string 7 white beads, then one red one, then again 7 white beads. Bend this segment to the opposite side of the ring, fix it.

Now, to the place where there is one red bead at the top, tie 2 more identical pieces of wire crosswise. Since it is bent in half, you will get 4 more fragments of the crown, string 7 white beads on each of them, fasten the wire.

Attach another piece of wire to the top of the crown, on which put on 12 blue beads. If this is a keychain, then first thread the key ring, and then secure the wire.
Here's how to make a crown so that it becomes a small decoration or also a keychain.

Read how, literally, in half an hour to make a brilliant decoration on your head.
Paper crown - master class

It is amazing how such an elegant product turned out from this simple material. Of course, in addition to this basis, you will need something else, namely:
- gold wrapping paper;
- necklace made of artificial pearls;
- glue;
- decorative large pebbles in the shape of hearts, rhombuses and small ones;
- glue gun;
- scissors;
- and, of course, thick white cardboard for the base.
You can first measure the child's head with a flexible centimeter tape, and then transfer the size to cardboard. Cut with an allowance so that you can connect the edges and glue.
But don't fasten them yet. Lay the cardboard blank on the work surface, apply a pattern that will be inside the crown and on top of it. Cut along these lines. If you want the work to be perfectly neat, then first apply the drawing to the template, then attach it to the cardboard, cut it out.
The same template will help you arrange the desired curls from gold wrapping paper. Lubricate it from the inside with glue, attach it to a cardboard blank, connect it. Glue the 2 pieces of the crown together and at the back.
Now apply melted silicone from the glue gun to the lower edge of the crown, place a bead necklace in this place. If you do not have one, then use separate beads, gluing them at the same distance.
A glue gun will also help to attach large and small pebbles. When the work dries, you can put it on the head of a girl or boy. After all, this product can be created not only for a young lady. The crown of the king for the holiday is also made.
The templates below will help you make the top cutouts on your headgear so that they are neat and even.

Choose the outlines that you like best and make a template according to them.

Jewelry from mastic
Housewives know that this sweet mass helps to arrange confectionery products so that they turn into works of culinary art.

At first glance, it seems that making such a cake is very difficult, but it is not. Cakes are baked from biscuit dough in a round shape. If you don't have one, an appropriately sized pan designed for oven cooking will do. You can even bake it in a slow cooker, in a bowl.
Then the biscuit is cooled a little, removed from the mold, cut with a sharp long knife into 3-4 cakes. When they are completely cool, grease with butter cream, put in the refrigerator. You can buy mastic or make your own from marshmallows or powdered sugar. Food coloring will help achieve the desired shade.
To keep the mastic better, grease the cakes with butter cream not only to connect with each other, but also the top and sides of the cake. Cool it down.
After you put the mastic on baking, you need to roll it out with a silicone rolling pin so that it lies on the cake evenly and stretched, and cut off the excess at the bottom. On this confectionery, decorations are made of pink mastic in the shape of rhombuses. Their wrong side is moistened with water and glued to the main layer, and then decorated with sugar pearls.
Making a magic wand from mastic is also not difficult to make, like a crown. Such children's mastic cakes will become a bright and unforgettable moment of the holiday. Let's take a closer look at how to make a homemade cake decoration in the form of a crown. There are several ways to make it.
Such a mastic crown, as in the photo, you will succeed if you stop at this method. For it you will need:
- plastic bottle;
- food film;
- tassel;
- kandurin;
- mastic.

Now sprinkle a board or table with powdered sugar, roll thin “sausages” out of it and immediately place them on the bottle. Place the first one in the form of a diadem rim, the rest form and decorate it.

When the plan is implemented, you need to leave the crown to dry for 1-2 days, then cover it with kandurin and lay it on the cake.

Decorations from mastic on this topic can be done a little differently. For the second, you will need gold food paint. Roll out the mastic into a triangular layer. We cut it with a knife so that the workpiece turns out to be of such a shape and is even.

Now, applying a glass, cut out the same round holes along the upper edge of the crown, and using a small stencil, small circles. We decorate the crown with sugar pearls and leave it to dry well on a plastic bottle or jug.

What is icing and mold?
Very soon you will find out the answers to these questions and learn how to make incomparable cake decorations from fondant. This is the product you get if you use icing. For him, you need to draw a crown yourself or download an image you like from the Internet.

After that, it is removed into a transparent file, and then the real magic begins. We roll up sweet cords from white mastic and apply each fragment to the corresponding drawing in the file.

Now you need to carefully transfer the still straight crown to a rounded surface, give it this shape and dry it for 1-2 days.

You can leave the tiara white or cover it with food paint, then you get a golden crown.

You can get acquainted with molds - special forms right now. They will help to make a mastic crown, which will turn out to be very elegant; a cake with such decoration will look expensive, as if made by great professionals.

Here is a list of what you need for this creative work:
- silicone mold;
- glass wine bottle;
- glassine;
- food glue;
- mastic.
Lay the pieces of mastic in those elements of the mold that are most suitable for the crown. In this example, a mold was used to create a rose, you can take another one.
Start laying out the elements of the tiara on glassine, fastening them with food glue.

After the crown is ready, it will remain with a brush to cover it with kandurin and dry it.
DIY leaf wreath
If you are walking with children in the autumn square, in the yard, invite them to make a crown. Such creativity will help children develop their imagination, learn to love the surrounding nature, and grow up as creative people.

You will need quite a bit of materials and equipment, here's what:
- Maple leaves;
- scissors or pliers.
Spread the leaves out in front of you. Cut off the thick ends with scissors or pliers.

Fasten the leg of the last sheet in the first, and the crown for the queen of the autumn ball is ready. It's time to start the holiday!

You can make a more magnificent decoration on the head.

Here's how to make a wreath with autumn maple leaves. In addition to them, you will need:
- thin willow branches;
- wire;
- ribbons.

Fold the willow branches into a ring. Secure with wire.

This wreath of leaves is woven in the same way as of flowers - the first petiole wraps around the base, then the second one is woven, and so on.
Olga Zhurbenko
Origami"Modules for autumn leaves ev"
1 step. We take colored paper, in this case red. Cut out the square so that all sides are equal. presented here module size 9*9.


3 step. Then, bend along the fold line in the next photo.

4 step. Then we bend the right and left corner to the middle and bend the bottom corner, as in the photo.

5 step. We wrap this lower corner from step No. 4 inward and bend the lower right and left corner along the fold line as in the photo to the middle.

6 step. Then you need to try and turn the corners outward, as in the photo.

7 step. You should end up with the corners looking down, then fold them back up so they look up. As in the photo.

8 step. This is how it turned out module.

9 step. Then from three identical modules we glue a figure similar to autumn leaf.

10 step. Of such leaves I made a crown for the autumn holidays.

The idea is not mine.
The children were delighted!
Autumn
(excerpt)
October has already come - the grove is already shaking off
Latest sheets from their bare branches;
died autumn cold - the road freezes through.
The murmuring stream still runs behind the mill,
But the pond was already frozen; my neighbor is in a hurry
In the departing fields with his hunt,
And they suffer winter from mad fun,
And the barking of dogs wakes the sleeping oak forests.
Related publications:
Well, finally, I decided to make the Crown of the Russian Empire, I went to this for a long time, I was afraid everything would work out or not, even the master did it.
Here comes autumn. The first signs of autumn have appeared. Yellow leaves are visible on the birches, a cool breeze blew, the sonorous subsides.
Yes, winter is just around the corner, and although it is beautiful in its own way. I don’t want to part with the most mysterious time - autumn. Like romantic.
To make a basket we need: a plastic bottle (large 5 liters, two types of glue, scissors, adhesive tape, "gifts of autumn" (.
Master class "Colors of autumn" Purpose: To show the beauty of autumn nature. Tasks: 1. To consolidate the ability of children to work in a team, to distribute work.
Good afternoon dear colleagues. Winter is a fabulous season. Every day either a blizzard, or a snowfall, or decorate the trees with frost. And all this is tricks.
Good evening! We want to show you a master class crafts from cotton buds "Autumn Flower". Autumn is a wonderful time. Leaf fall, Indian summer. Maybe.
It has become a tradition in kindergartens to hold matinees dedicated to the arrival of Autumn. The children are diligently preparing for the holiday, learning numbers and doing crafts. Parents are not left out. They are tasked with inventing, and, most importantly, making, a costume for a son or daughter. A crown, which is perfect for an autumn ball made of real leaves or paper ones, can successfully complement the outfit.
An interesting idea is to dress up all the children in the group in autumn crowns. The idea is good because the production of hats can be put on stream, since crowns for a boy and a girl are no different.
Work begins with the choice of material for the headdress. By making a crown out of cardboard, you will provide it with sufficient strength and you can easily attach the decor. Of course, it would be nice to decorate the product for the holiday with autumn leaves, but often the outfit is made in a hurry. It's OK. The leaves, made of paper and painted with colored gouache, are very similar in appearance to the real ones.
And another important note - make the crown with the child. So you instill in him a love for things made with your own hands.
We collect a bright crown for the autumn ball: the principle of manufacture
The crown is made in several steps.
- A strip is cut out of cardboard or thick paper according to the size of the child's head. If white cardboard is taken, it is pasted over with colored paper - yellow, gold, red.
- Leaves are glued to the base. Or you can fix the leaves with a stapler.
- The final step (optional) is to cover the crown with transparent tape so that the dry leaves do not crumble.
- Additionally, the headdress is decorated with cones, rowan twigs and other autumn paraphernalia.
The rule is simple - the brighter the leaves, the better. You can collect leaves in the nearest park, the most impressive is the crown of maple leaves, which have an easily recognizable shape.
So, we collect autumn leaves of all possible colors - red, burgundy, yellow, orange. You can include a couple of green leaves for a change.
To make the decorations for the crown easy to attach to the base, we remove the thickenings on their stems.

Thus, gain the desired length of the product. In conclusion, the last sheet is connected to the first. Autumn crown is ready!
It is not always possible to prepare the autumn herbarium in time, but this is not a reason to refuse to participate in the holiday. The outfit can be prepared from improvised means.
To make such a modest and fairly simple crown you will need:
- whatman;
- thick cardboard;
- fabric and braid of autumn shades;
- needle, scissors, thread;
- PVA glue;
- brilliant decor - sequins, beads, sequins.
The headdress is carried out in several simple steps.
- A maple leaf is drawn on a piece of drawing paper.
- Having cut out the template blank, a similar sheet is cut out of the fabric.
- A rectangle is cut out of cardboard, the length of the rectangle should correspond to the circumference of the child's head. A similar rectangle is cut out of the fabric.
- The base-rectangle and the autumn leaf are attached to the fabric details.
- The final stage is the decoration of the headdress with gold braid and sequins. You can use sequins in the form of leaves. This will be very important!

Such a crown can be worn not only by a child participating in the holiday. It is also suitable for an adult. Thanks to thick cardboard, the crown will last for several years.
Instead of one large leaf, many small autumn leaves are often made. Leaves are cut out of colored paper. If white sheets are used, then they must be painted. A great idea is to use herbarium leaves as a stencil.

Consider simple options for the execution of the autumn crown
Previously, classic options for making a headdress for a holiday in kindergarten were given. They can be slightly modified.
For example, abandon the traditional crown and make a headband in autumn colors. This decoration looks exquisite and will surely appeal to a little fashionista.
A crown made of felt is quickly made and looks impressive. Another advantage is that by sewing in an elastic band, you can adjust the size of the crown according to the child's head. Thus, it will not fall off when moving. The leaves of such a dress are also made of felt. To give them naturalness, the veins are stitched with thick threads.

Video selection on the topic of the article
Nothing should limit the imagination of the needlewoman, so various techniques can be used to make the crown. You will find even more ideas for creativity for the autumn ball in the proposed video.
Page content
The crown is a wonderful decoration for a holiday, photography, theatrical performances, showing all the originality of the owner. From ancient times, a vicious circle meant power, immortality and eternity, and the chosen stones carried a secret meaning. Golden royal jewelry is associated with the bright sun. Different types of them can be made for an affordable budget from improvised materials: cardboard, beads, paper, shells, ribbons, feathers, etc.
Today we will consider how to make a crown with your own hands for kings and queens and also for their little princesses.
The paper crown is a budget and lightweight option. There are many ways to implement.
The first. To make, you will need non-adhesive colored square stickers, sold at any stationery store, as well as glue for fixing.
Instruction:
1 step. Fold the square of paper in half diagonally, fix the upper corners with glue. We make the required number of blanks, depending on the size of the head.
2 step. We insert one blank into another approximately to the middle and fix it with glue until we reach the end.
For the second method, you will need a stencil, scissors and decoration materials. It's simple: cut out the stencil, glue the ends, if necessary, and decorate the top. If it is not possible to connect with glue, you can use a stapler to fix the thread along the edges.


The third way allows you to create a real masterpiece. For manufacturing, we use the technique of twisting strips of paper - quilling.
Tools:
- scissors;
- quilling paper - strips;
- pencil;
- ruler;
- glue.
Instruction:
- We measure the girth of the head and cut out a strip of cardboard. For now, put it aside and take strips for quilling. If there are no ready-made ones, they are easy to make at home: we draw colored sheets into strips of the same width and cut them. If the desired color was not found, but you want to, we take white, and with the help of paints, markers or a color printer we give it various shades.
- We make the main element: tightly wind the strip on an awl or needle. After that, you can give the resulting spiral any shape by holding different corners at the same time: a triangle, a square, an eye, an arrow, etc. We fix the end of the tape with glue.
- We make a lot of these items. Volumetric parts are drawn out and well coated with glue from the inside. It will take some time to dry.
- We will form a pattern by connecting and fixing the blanks to each other. It can be like a chaotic drawing, there is also an ornament thought out in advance: a flower, lines, stars.
- As soon as the top is ready, cut out a strip of cardboard for the base and glue the resulting base to it.
- We place the remaining blanks in the free places.
- We give the product time to dry.
The royal symbol in the quilling technique will look like a piece of jewelry. It is important to fix all the details inside and among themselves so that the structure does not collapse. With the right connection, the decoration will last a long time.


To create decorations in the following technique, we will use cardboard - its quantity determines the volume of the product, foil, scissors and glue.
You need to be prepared that the craft may not work the first time. To solve the problem, we take additional sheets in stock.
Instruction:
- We create the basis: we measure the girth of the head, add a couple of centimeters for the error and cut out a strip of cardboard.
- Let's think of a top. Fantasy is used: you can cut out a unique contour yourself or use ready-made templates.
- We glue the cardboard and apply foil, fix it with glue. After drying, remove excess areas with scissors.
- Once the top is dry, you can glue it to the base.
- For additional decoration, firmly glued pebbles, beads, buttons, a bead pattern, sparkles, drawing with felt-tip pens or threads are suitable. Pieces of garlands, rains, layers of cotton wool are suitable for the atmosphere of the New Year holiday.


This is not the only way, the photos below show other embodiments of the crown and examples for inspiration.


To create an autumn crown with our own hands, we need:
- Maple leaves;
- glue;
- colored cardboard.
Instruction:
- As usual, we start by measuring the girth of the head.
- We draw a pattern on cardboard with cloves or any other pattern that you like. If fantasy does not suggest ideas, we print a ready-made stencil from the Internet. When the length is not enough, we make two blanks and fix them with tape.
- The paper frame is ready. Now the most creative stage: we glue the leaves, placing them in any order and creating a unique pattern.
Here's what might happen.

In the last paragraph, there was a do-it-yourself crown for the autumn ball from tree leaves. However, when it is not possible to find beautiful leaves, they can also be made from white paper.
1. We measure the girth of the head.
2. Draw leaves on white paper or find a ready-made template that we print.
3. Cut out and paint them with bright colors: red, orange, yellow, green, after mixing everything in the palette beforehand.

4. Gently bend the leaves and attach with a stapler to the rim.
Here is such a beauty.


For crowns, there are a large number of stencils that allow you to achieve an excellent product in a short period of time. Ready-made templates can be scaled, creating the desired size immediately. In some cases, they are used as blanks. By combining the ideas of different options, you can come up with your own stencil.


Below are examples of work for inspiration, where you can get new ideas and techniques for creating royal jewelry.


Autumn is the most beautiful time of the year. Despite the dank weather and rain, autumn is filled with a wonderful atmosphere, a huge abundance of colors and tart smells. The multi-colored forest and frosty air stir our soul. With bated breath we meet and see off every sunny day. This is the time of quiet family evenings, comfort and warm hugs. And we associate this time with the autumn ball. This is one of the most anticipated holidays for schoolchildren. It provides an excellent opportunity to demonstrate their talents and beautiful outfits, welcome autumn in kindergartens, holding matinees. For our little fidgets, this is the beginning of a creative journey. They are diligently preparing: they learn poems and songs, act out skits, thereby trying on various images for themselves. And parents are responsible for creating a suitable costume and selecting the right accessories. The crown for the autumn ball will be a great addition to any look for both a girl and a boy.
Parsing the stages

Before starting work, decide what material you will be doing it from. A paper crown is made very easily and quickly. You will need to print a suitable template from the Internet and, after choosing the color of the product, cut out the sketch. Glue the edges, decorate with various things, and you're done.
But these are children, they are in a constant rhythm. One awkward move and your work will be irreparably damaged. Paper is good, but its main drawback is that it is easily wrinkled, quickly torn.
Another thing is cardboard, because it is dense and reliable. You can already be calm for your creation. And another plus of a cardboard crown is that it will not bend under an abundance of jewelry. So do not be stingy and boldly create.
- cut a rectangle of the desired width according to the volume of your child's head. If you do not have the desired color of cardboard, then you can paste over it with paper of the desired shade;
- we attach the leaves in any order, in any way that suits you;
- so that the leaves do not shrink, after they dry, cover them with a large transparent tape.

Real autumn leaves will serve as an excellent decoration. For a girl, you can fill the leaves with glitter hairspray.
Don't get frustrated if you don't have what you need at hand. They can be cut out of colored paper, and they will be no worse than real ones. Look at the pictures for more details.
One important tip: involve your child in the craft and do it together. This will help develop accuracy and frugality in things. And it's just fun and interesting, and this day will remain in children's memory for a long time.
leaf decoration
To make this product, take your baby and go for a walk in the park. Well, in front of you is a rich multi-colored carpet of leaves, but we only need maple ones. Try to collect the brightest and most beautiful ones. Optionally, you can add a couple of green leaves, it will turn out very original.
So, you came home with a colorful bouquet. Put it on the table, taking one leaf at a time, start weaving a crown. We think many of you wove wreaths of flowers in childhood, or at least have an idea about it, here is almost the same principle.
First remove the bulge on the stems, then gently bend a small part of the leaf and pierce it in two places with the adjacent stem. It feels like you are sewing, only instead of a needle you have stalks. When doing these actions, rely on this photo.

Whatman variant
To make such a headdress with your own hands, follow these steps:
- take a drawing paper and draw a maple leaf on it;
- cut out the sketch and the same from the fabric. The fabric should be shades of autumn;
- then cut out a rectangle from these two materials, which will correspond to the volume of the head;
- connect the two main parts with fabric cutouts;
- it remains only to decorate. To do this, you can use sparkles and golden braid.


Even an adult can try on such a crown, it will look relevant and will last for several years. If desired, you can replace one large sheet with three small ones. The principle of operation is the same, only the stencil is different.

From felt
Another simple and quick way is a felt crown. Felt is an indispensable material in creativity. It is easy to work with him, he is not whimsical and the same from all sides. Your product will look original and luxurious. Another plus is that you can insert an elastic band or ribbon here. This will allow you to conveniently fix the crown on the head of the child.
All decorations will also be made of felt. And to make your leaves look natural, sew their outline and veins with threads.


Video on the topic of the article
Here are videos that will be of interest to study this topic: