Volumetric paper star: six ways to fold or glue. Do-it-yourself volumetric paper star: a step-by-step master class
The approaching holidays of the New Year and Christmas, of course, cannot be imagined without a smart Christmas tree! Well, what is a Christmas tree without a beautiful star on top? Of course, you can crown your Christmas tree with a beautiful spire. However, the star - Bethlehem Christmas or "Soviet", red five-pointed - traditionally remains the most popular decoration.
In our review, we will talk about how you can make a star to decorate the Christmas tree yourself. In this case, you can use both the most common materials: cardboard, paper, glue, sparkles, and unexpected ones - for example, old books or twigs brought from the forest.
The most common version of a homemade star is a voluminous five-pointed star made of cardboard. For a base pattern, you can use one of the templates: 
photo from svoimi-rukamy.com

photo from liveinternet.ru
The color of the star can be different - silver, gold, red ... 

photo from mizrah.ru

photo from ine-red74.ru
And one more option for making a similar New Year's star on the Christmas tree. Here, two identical five-pointed stars are bent to create volume, crumpled paper is placed inside, as well as a wire spiral (for strengthening at the top). The halves are glued together with adhesive tape, on top the star is treated with glue, sparkles, tinsel. 

photo from ykdom.ru
And here is another version of the star pattern, not from two halves, but with separate rays: 


photo from infoniac.ru

photo from pinterest.com
In this master class, a star with a surprise backlight, which looks especially interesting thanks to the carved holes:


To view the photo in full size, click on the image
photo from infoniac.ru
On the basis of such a cardboard five-pointed star, you can create an unusual masterpiece from the pouches-pages of old books. Of course, instead of collected works of classics, it is better to take old magazines or outdated textbooks. 

To view the photo in full size, click on the image

photo from infoniac.ru
Or decorate it in the "forest style". Thin dry twigs cut with secateurs are carefully glued to the surface of a cardboard star, the gaps are filled with their small pieces.

To view the photo in full size, click on the image

photo from lovegrowswild.com
Flat star, cardboard contour wrapped with a thread fixed with glue: 
photo from infoniac.ru
A very simple three-dimensional star can be made from two cardboard stars: 

photo from infoniac.ru
Another version of the already six-pointed compound star, more complicated: 


photo from funny-new-year.ru
Eight-pointed stars are also popular, especially as Christmas decorations.
Here is an easy-to-make, but requiring patience and precision paper star. Squares of 4 sizes (8 squares of each size) must be folded as in the picture, and then glued. 

photo from infoniac.ru
The following eight-pointed three-dimensional star is glued together from two halves: 


photo from infoniac.ru
On the basis of such a pattern, you can make a real masterpiece! This star is made of cardboard using glue, gold spray, fabric, beads. The star is attached to the Christmas tree with a wire glued on the back. 
photo from kinder.sumy.ua
But this paper eight-pointed star is made quite simply: four paper templates are tied with a wire in the middle, then straightened with adhesive tape. It is attached to the tree with the help of the same wire. 
photo from youtube.com
For origami lovers, there are workshops on folding a star on a Christmas tree without glue and scissors! If you use colored paper, the asterisk will look bright and very elegant: 

photo from infoniac.ru
This star is suitable for the top of the spruce, and for Christmas days, when, according to tradition, it is customary to go to friends with congratulations: durable, sawn out of plywood and decorated with paints and tinsel, such an asterisk will withstand even a journey through the frost. 
photo from ykdom.ru
In such a voluminous New Year's hedgehog star made of old postcards, there are not five, not six, or even eight rays, but how many - count for yourself! 


photo from the site ruk-tvorchestvo.ru
Well, in this star-ball for the Christmas tree, the number of rays cannot be counted at all!
The halves of sheets of white A4 paper are twisted into a "bag", then the edges are smeared with glue and twisted more tightly.
From 50 sheets, 100 "rays" for the star will be obtained. Three beams are fastened with a stapler so that a small fan is obtained. Fans are strung
on a thread, tightly pulled together and tied .. 
photo from bolshoyvopros.ru
In addition to the options given, a variety of different ideas can be used to make a Christmas star.
For example, these are quite strict stars from branches: 

To view the photo in full size, click on the image
photo from the site de-korol.ru
fabric star: 
photo from livemaster.ru
Star made using quilling technique: 
photo from the site podarki.ru
You can make an asterisk from beads, or you can use for its base ... a metal clothes hanger bent in the right way! The main thing is that the festive mood and fantasy do not leave you while preparing for the holiday - and everything will definitely work out!
TEAM
15.12.16
Website materials used:
kinder.sumy.ua
bolshoyvopros.ru
ykdom.ru
infoniac.ru
ruco.ru
de-korol.ru
RELATED LINKS

The star is one of the most important symbols of the New Year and Christmas. No Christmas tree is complete without this beautiful decoration. In addition, numerous stars can decorate your home, office and any other room. And if you start making stars with your child, it will be doubly useful. Firstly, the child will develop fine motor skills of hands and his imagination. Secondly, you can have a good time with your baby. In this article, you can see different ways to create a star out of paper with your own hands.
How to make a paper star
 Paper- a very popular material for creating various crafts and for making a three-dimensional star, this material is indispensable. And it is not necessary to use paper in its pure form. It can be cardboard, an old magazine or book, colored paper or newspapers. Anyone who has cutting skills can make such a craft.
Method 1
In order to make a five-pointed star in the easiest way, you need to take thick paper or colored cardboard and cut out two identical five-pointed stars using a stencil. On each of them make incisions: on one - from top to bottom to the middle, and on the second - from bottom to top to the middle. It remains to connect two stars by inserting one into the other.
Method 2
 To create the next volumetric star with your own hands, you need to take several sheets of white or colored paper. Cut out two squares. These squares must be folded in half twice, then straightened and bent diagonally. Then the sheets of paper need to be unrolled again and make small cuts on each side of both sheets of paper. It is important to make cuts of the same length, otherwise the star will turn out to be a curve. Now rays are formed by bending the cut sides to the corners of the square. So it should turn out 4 rays from each square.
To fix and give the rays volume, their sides are smeared with glue and glued together with an overlap. At the end, both parts are glued together so that each ray is separate.
Method 3

This way of creating a three-dimensional Christmas star is also very simple. First print out the template and cut out two parts of a five-pointed star on it. According to the drawn lines, it is necessary to bend each part so that the outer corners are bent up, and the inner corners are bent down. Places for gluing parts are folded to the wrong side. Next, with the help of glue, two parts are connected and the star is ready.
Method 4
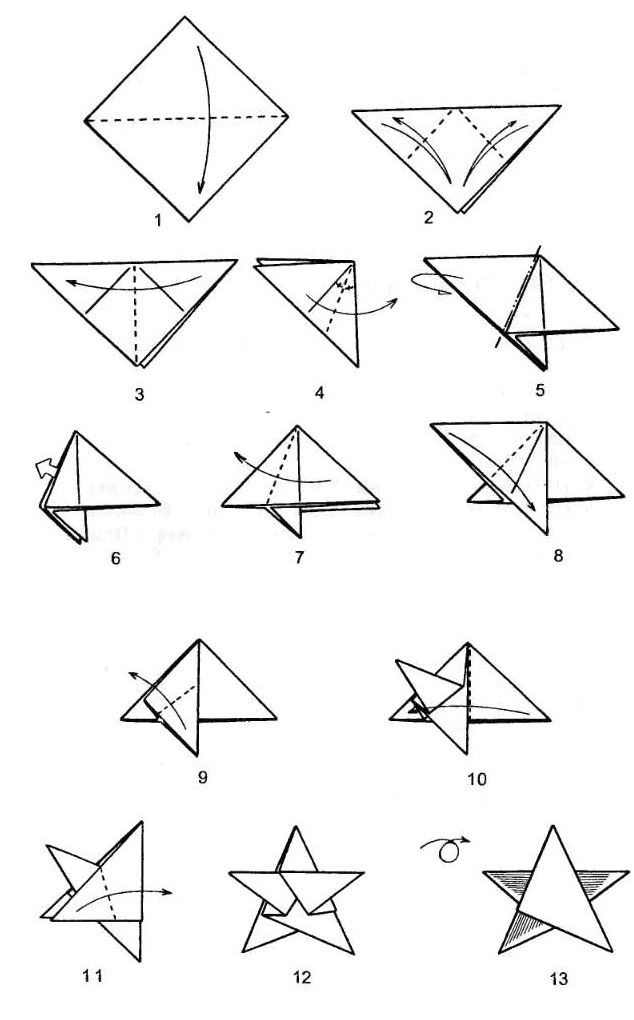
One way to make a five-pointed star is origami. To work, you need five square sheets of colored paper. Each sheet is processed separately.
So, taking a sheet of paper, it is folded along one of the diagonals. Then the sheet is straightened and all corners are bent to this diagonal. Now they take the upper corner of the resulting figure and bend it to the right, and then to the left side. After such manipulations, two intersecting lines should be obtained. The workpiece must be turned over and the lower corner bent up and to the left, after which it must be straightened. It remains to bend the upper corner in this way and smooth the part. According to the same scheme, four more blanks are made with their own hands and the finished parts are connected to each other.
Method 5
 In order to make such a voluminous star you will need:
- A large amount of paper (about 50 sheets);
- Scissors;
- Stationery glue;
- Threads to match the color of the paper;
- stapler.
This method is quite laborious and requires some patience. Each sheet of paper must be cut lengthwise into two equal parts. Then all resulting the leaves need to be twisted into tubes, in which one tip is sharp, and the second is wide. All tubes must be twisted tightly and the edge fixed with glue. When all the parts are ready, you can start assembling. First you need to fasten three beams with a stapler, then three more, and so on until all the details are over. In the second stage, the resulting fans are strung on a thread and pulled together. Thus, the rays take the form of a ball. This DIY Christmas star will look great near the ceiling.
Method 6
One of the variants of the previous method is creating a five-pointed star from old and unnecessary books. To get started, you need a star template cut out of thick paper or cardboard. Depending on the size of the template, the pages of the book can be cut into equal parts or left unchanged. As in the previous version, the leaves are twisted into tubes with their own hands, but not too tight. The finished tubes are glued to the paper blank, starting from the outer corners and moving towards the middle. To make the decoration more New Year's, it can be decorated with multi-colored sparkles.
Method 7
 The most unusual and interesting option for making a volumetric star with your own hands. With the help of this master class, you can create small stars that are convenient to use to decorate postcards, gifts or interiors.
First of all, you need to cut strips of colored paper measuring 9 mm by 220 mm. It is important that the stripes are even. Next, you need to act according to the scheme:
- Take a strip of paper and roll a loop out of it. One tip should be long, the other short.
- The short tip is wrapped inward and gently tightened, making a knot. Press down on the knot with your fingers to straighten it out. The remaining tip is tucked to the middle and hidden inside. You should get a pentagonal shape.
- Now, with the remaining long tip, wrap the resulting pentagon. Wrap each side in turn until the strip of paper runs out. When a short tip remains, it must be tucked inside the previous layer of paper.
- At the final stage, the asterisk is taken with two fingers and with one finger of the second hand they press on the middle of one of the faces. This manipulation is done with all faces.
There are a lot of ways to make a three-dimensional star and you can choose the one that suits you. A handmade craft will always please the eye.
For interior decoration or themed holidays, such a decorative element as a star is often used. There are a lot of variations on the theme of making a star: large and small, voluminous and flat, double or single. Materials for making crafts also vary significantly. It can be paper, cloth, foil, wire and other improvised means. In this article, we will consider the most popular formats for making paper stars. Well, a selection of thematic photos, detailed diagrams and video material of a master class on making a star with your own hands will make the task easier.
How to make a small paper star
Such stars are small (1.5 cm), but in large numbers they look very impressive and original.
To work, you will need colored or glossy paper (you can also use old glossy magazines) and scissors.
- First, blanks are made: paper strips are cut, 29x1.1 cm in size. The width and length of the strips can be changed according to the desired size of the future star.
- Make a small loop from the strip (at the edge), then bend the protruding short end. It turns out a pentagonal figure, press it slightly.
- Turn the product over (pentagon) and continue working with the long end of the strip.
- With a strip, we begin to tightly, gradually wrap the pentagonal figure, without pinching it too much. At least 10 such wraps are obtained, that is, each face of the star is wrapped twice.
- Hide the remaining edge of the strip under the bottom.
- The next stage: the transformation of the pentagon into a full-fledged star. Holding the workpiece with one hand, with the nail of the other hand, press on the middle of the face of the pentagon, forming the rays of an asterisk. Five pressures - and the star is ready!


- Such stars look very stylish in the interior: they can fill a glass vase or a jar. And if you do this business with the children, the motor skills of the fingers are perfectly trained.

How to make a paper star
To make such three-dimensional stars, you will need thick decorative paper, scissors and glue.
- Draw blanks for the rays of the star, print and transfer to the desired paper.
- Bend along the lines and glue along the edge (gluing allowances are given).
- Then, glue the five prepared templates together, getting a three-dimensional star.


- The size of the stars can be adjusted independently by increasing or decreasing the size of the template.


How to make an origami paper star
Such stars look great and stylish from newsprint or music paper.
- Fold a square-shaped sheet in half, then bend the triangle of one of the vertices.
- Do the same maneuver with the other vertex of the rectangle.
- Attach the opposite corner of the rectangle to the intersection point of the previous folds.


- Next, bend the rays of the future star along the drawn lines. The remaining shapeless tail of the workpiece is cut off.
- With the correct execution of all the folds, on the spread you can see the pentagon pattern.

- The final stage is the most difficult. To get a star, you need to carefully bend and wrap the resulting template along the lines.


So, in this article, the most popular ways of making a paper star were considered. Completely different in appearance and manufacturing method, the presented options will ideally fit into the festive interior and become a spectacular decoration.
The star of Bethlehem, according to the Gospel of Matthew, illuminated Judea with divine light at the very moment when Jesus was born. But today we will not talk about the Nativity of Christ at all, but rather about how to make a star out of paper, if there is nothing to crown the dome of the Christmas tree. Or about how to make 3D stars of different sizes for an original bedroom pendant. Small ones can be folded from foil, and large ones can be painted with acrylic paints and sprinkled with sparkles - you get a luxurious interior decoration.
It will also be useful for you to learn how to make a three-dimensional paper star for an action-packed ninja game. Decide for yourself how to use a paper star: a small one should be hung on a Christmas tree, and let a large three-dimensional star, for example, adequately decorate the top of the Christmas symbol. Or let it hang from the ceiling, being surrounded by origami balls, symbolizing all the planets of the solar system. Let's start, perhaps, with the simplest scheme - a four-pointed star. This scheme for beginners will please many with its simplicity, so ...
Four-pointed origami star
Our scheme 1 invites you to make a shuriken star - a ninja smashing weapon (By the way, you and your little warrior may be interested). However, you can endow these paper stars with your own semantic variations. You will need 4 square-shaped sheets to assemble individual modules, from which you will get a modular origami shuriken star. Consider fig. 1 take a closer look and then proceed step by step:

- Fold the square blank in half diagonally, one of the corners will be sharpened along it by bending the planes to the median deflection;
- Bend the bottom corner up, forming a triangular shape of paper crafts. The resulting triangle must be folded in half along the vertical axis to make an asterisk;
- Along the line of a small triangle, bend the lower edge towards you, squeeze the place of the crease. Expand the lower part of the workpiece and screw the convex triangle inward (see Fig. 1). Make 3 more such paper crafts (same size, random color);
- Assemble a convex star from colored paper by inserting the lower corners into the sinuses-pockets of an adjacent part, then seal the joints and straighten the arrows, giving them the desired volume.
How to make a five pointed star out of paper
Shuriken, as you can see, has developed into one or two. But the classic origami invites you to make a heavenly body from a single square sheet without connecting blocks. How to make a five-pointed star out of paper, will tell our detailed review below and fig. 2:
- Fold a square sheet (can be made from standard A4 office paper) along both diagonals, then in half and again in half to a small square - the markup is ready, unfold the workpiece to its original position;
- Fold the workpiece into a triangle, bending inward the opposite side planes from the top of the diagonal intersection;
- Bend one of the equal edges of the triangle inward, equaling it to the central axis. Repeat the action on the reverse side, but with the opposite edge.
When adding curves, move aside one vertex from the front side and the second from the back side - a five-pointed origami star in your hands. And the voluminous five-pointed pentagram is the result of the adjustment of the “rays”. Bend them so that from a distance the craft looks voluminous.
DIY star of Bethlehem
A Christmas star from a pre-prepared paper square folds in a peculiar way, but it does not bode well for you. Folding an eight-pointed star from separate modules will be more difficult, but we will soon conquer this peak. And the hexagonal star folds like this:

- Your reference outline is fig. 3. He clearly shows how to make a Bethlehem companion of the Magi. To begin with, fold the sheet (square) exactly in half, then unfold it to the designated horizontal position;
- Fold the upper corners forward, aligning the corner itself with the line of the central deflection. At the same time, the lower corners should remain even, significantly sharpening. Repeat the action with the second top corner;
- Return the sheet to the original, then again bend the first bend of the corner towards you. Without unbending the structure, break the second upper corner on top of the first. Bend the section that protrudes beyond the edges of the workpiece towards you, equaling it along the edge of the triangle;
- Wrap the same protruding section inward, in the opposite direction. The star has acquired half of the peaks. Now bend the top corner of the convolution towards you, equaling it to the center of the base of the triangle;
- It is almost possible to collect an asterisk from paper. It remains to bend the lower, freshly bent corner upward again, bringing out the tip - one of the peaks of the nascent star. Take the lower left acute corner to the opposite blunt one and again bend it towards you, forming another vertex;
- The remaining "free" section also bend to the opposite corner and take the last peak to yourself. Ready!
Let's add volume!
How to make a three-dimensional paper star? An eight-pointed modular star made of colored paper is folded according to the principle of the designer. We have to make a complex luminary from separate blocks, each of which is folded like parts for a shuriken (see Fig. 4).
Stars have always played an important role in our lives. Stars give light, heat, show direction. Someone is born under a lucky star, someone makes a wish when the star falls, someone worships them, and someone just admires them on dark nights. We are all, in fact, children of the stars, because without them we would not exist ... This symbol can be found everywhere on Earth. That is why, and also because it is just beautiful, we will make paper stars of happiness.
To do this, we need strips of paper and a little time. The size of the strips is 1 cm x 23 cm or other sizes with a similar ratio of width to length (1:23). Of course, the width can be larger, for example, if you use A4 paper, then with a strip length of 297 mm, its width can be made 11-12 mm.
To determine the size of the future star, you need to multiply the width of the strip of paper by 1.67.
Here are some ready-made calculations (width | length | star size):
- 1,0 | 23,0 | 1,67
- 1,1 | 25,3 | 1,84
- 1,2 | 27,6 | 2,00
- 1,5 | 34,5 | 2,50
Making an asterisk
1-4. We bend a strip of paper around the finger and thread the tip of the paper into the resulting loop. The resulting knot is carefully tightened so that a neat pentagon is obtained.

5. It is desirable that the tip does not go beyond the pentagon at all, but if this happens, then we simply bend it in the opposite direction (step 5). And even easier - cut off the excess)))
6-8. With the free end of the strip, we start wrapping the pentagon in a circle, in total you should wrap 10 times in this way.

9-11. If the tip remains, you need to bend it (or cut off the excess) and hide it.
12. Here we have a blank star.

13, 14. Holding the workpiece, press the edge of the star with your fingernail, pressing it inward.

Repeat the same with the rest of the faces. Here you need to act especially carefully so as not to spoil the asterisk.