Slippers slippers for men do it yourself. Beautiful slippers with their own hands. How to sew home slippers ugg
We have a special attitude towards my home shoes. Slippers are associated with homemade comfort, resting in a family circle, warm and comfort for tired legs. Often, they dream about the working day and ladies, forced to wear high heel in the office, and those who at work wears boots or heavy shoes, and scoop in narrow boots. For someone, a symbol of simple happiness is a dog that meets the owner with homemade slippers in the teeth. Sneakers start their history from oriental harem, where soft silent shoes wore their inhabitants. In Europe, in the budairs, fashionable elegant, decorated with exquisite embroidery, cozy homemade shoes. Well, in the 19th century, the sneakers turned into a familiar and necessary subject.


And in order to sew such slippers, you can take a special pattern for printing on the thermotransfer. Its use greatly simplifies and speeds up the process and reduces almost zeros of all possible difficulties and errors in the details. 
In addition to the pattern, it will take a light felt to transfer the transfer, any suitable (I had only white today) felt for insoles and, my main inspiration of this week is a cork sheet. In this case, 3 mm thick. Well, the glue, I liked to maximize the "moment of crystal".

First of all, we will transfer the pattern to the felt. Due to the fact that recently I began to ask more questions on the translation technology, I will allow myself a little more about it today. 
To begin with, we will need to arrange the pattern face in the felt and heat the iron to almost the maximum temperature. We begin to iron a hot iron thoroughly, not passing the edges of the corner. 
In my opinion, it is better to overheat a few iron and during ironing to notice that the felt began to be bred (this is not an instant process and you will always have time to weaken the heating, nothing terrible will happen) than to stroke the whole cold iron and get a fragmentary translated image, The most spoiling and pattern, and felt.
We will define for about a minute of the whole design, then cool it to a slightly warm state and remove the upper checkered layer of paper. The picture is translated.

Cut the parts of slippers without allowances on the seams.
Since the pattern I did the most universal, then the principle of "better more than less" was adhered to. Therefore, at this stage of work, I recommend trying it at least about and if it is more than it is necessary to trim the sides, as shown in the photo. The size of the top and bottom is, as a rule, there is no need to reduce, only in the event that it will be slippers for the kid. 
Patterns for both slippers placing on a plate of felt. It is no longer necessary to take white, you can any color.

And add a semicircular suture detail. Only at the top edge.

Now cut the detail along the contour, getting a double top for future slippers.


Now we need a pattern for insoles. It is very simple to get it. It is enough just to circle your foot on a sheet of paper with a decent margin or just take any finished slippers that you consider the most comfortable and break the sole.

The insole is only requested, but do not cut out. It turned out to be more convenient to sew in such a sequence.
Now take a double top slipper. We take into two approaches, starting each of them from the middle of the sock.

The sour cream will be very easy to shoot the top. After executing the machine lines, you can pull the mixture thread.

Now slippers with the insole can be cut, retreating 2-3 mm from the edge of the line. The same is done with the second slipper.

Now the time has come to the final stage. We will make the sole for slippers. After a variety of searches for a suitable material, I stopped on a traffic jam. As practice has shown, this is quite convenient in the work material, very light. In the sock, it is very practical, especially in the proclarant. The tube has good shock absorbing properties and even the thin layer is sufficient to use slippers was convenient.
We take glue and as you can lubricate the bottom surface of the fetal insole. Adhesive, among other things, it will greatly stabilize the cork, reducing its fragility and preventing the possibility of cracking during the inflection in the future.

We glue the insole to the leaf of the cork. Cut it rather rude enough, just to have the opportunity to put clips.

The plug is glued well and quickly, after the glue is tightly grabbed, you can remove the clips and cut the slippers along the contour of the insoles.

You can stay at this stage of work or additionally snapped the perimeter slipper on the sewing machine. The plug is sewn very easily, despite the thickness.

That's all, slippers are ready. In the next photo, I tried to demonstrate that the plug, glued to the felt, was strong enough on bending. 
Slippers turned out these:


This idea of \u200b\u200bhome slippers will be useful to everyone who has often guests. After all, to share with their home shoes with guests - not only a bad tone, it is also unhygienically!
On the elementary pattern of slippers, you can put as much as it takes. Those that will be designed for men immediately do large size. 
You will need:
any dense fabric (felt, jeans, tarpaulin, leatherette ...).
paper for building patterns.
scissors, threads, needle.
sewing machine.
PERFORMANCE:
Apply the drawing of the pattern on paper. You do not need to draw separate and right slippers, just turn the pattern and cut out the workpiece.
With the help of a sewing machine with the edge of the future slippers.
The sole can be sealing additionally felt insoles and sew them to the finished slippers of the usual marking seam.
Slippers are ready!
Show fantasy! You can create a real exclusive collection! The big plus such slippers is that they can be washed in a washing machine.
Patterns Slippers:


And I also offer you a wonderful master class in sewing such charming home slippers:

These patterns will help to sew wonderful slippers. If necessary, you can change the size of the details.


You will need
lower rubber band
shoe insoles (preferably washable)
syntheton
silicone fabric
sewing machine
Progress
Print the pattern and cut down all the details indicated on it. There should be 4 parts for the top of the shoes and 6 parts for the sole. If there is a need to dohen shoe insoles in the form of the sole. 
Sognte parts from flannel front face inside. Put seam as shown in the photo. 
Placing over the part with a silicone coating of a synthetic insole. 
Connecting and fixing the resulting sole with a vertex part as shown in the photo (use for this pin). Stretching seam, sewing the sole to the top, then remove the product on the front side. 
The same procedure is repeated with parts from a fleece for interior decoration. 


Placing internal slippers in the external (face side to each other). Make a seam along the outer edge of the product. Do not forget to leave an unimpressed hole in the heel area so that you can put a solid insole. 
Remove almost finished sneakers on the front side and close a hilt hole for turning. Make a neat seam along the upper edge of the product, retreating from the edge by 0.6-0.7 cm. It is necessary to turn the rubber band in the sneakers. 
Insert a solid insole in the sneakers and close a hole in the heel area with a machine seam. 
That's all, charming room slippers are ready! They can be decorate with small tissue colors, as well as beads and beads.
And finally, this master class in pictures will tell you how to sew soft home slippers. In such tapiki, it is very comfortable to walk in the cold season around the house, and even putting them on your feet after the bed one pleasure is not zyabko. All you need is the sole of shale (new or used), terry towels (again new or old), artificial leather and batting. 
From the tools will be required:
Sewing machine, scissors for cutting fabric, marker for labels, needle (sewer), dummy knife, centimeter.
Progress
Cut the track of the skin, on the layout of the shale.
Now cut the sidewalls.
On tracks cut out blanks for socks sneakers.
Now we need to fit out the billets soles and sock. Vatin invest in the middle of terry blanks.
At the next stage, we prepare boxing for shale, the soles of the shale are inserted into such boxes.
After the soft details are collected and stitched, through an unimproved piece of the backs insert the shale into the body of the slipper, then sew the product.


Save not to lose.

To keep your fingers in warm this winter will help 10 original ideas of slippers, which you can make with your own hands.
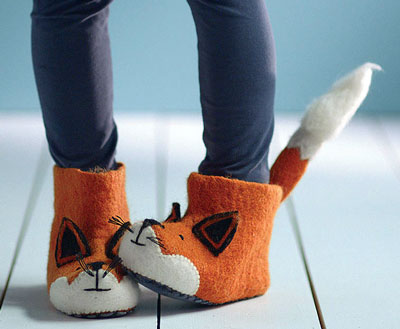
1. Sneakers-kittens
Your old slippers, two pairs of scissors (alone for fabric, other paper), glue, fabric paint (you can take batik-acrylic on the fabric), a piece of felt, handle or pencil and a pair of paper sheets.
1. In addition to what you start decoring your sneakers, it is to attach a sheet of paper to one slipper from the pair and circle its contour with a handle. Then, on the paper, draw the head of the cat over the board the sneaker and cut down. After that, attach a template to the felt and cut the figure on it the tight.
2. Draw a cat's muzzle on felt and leave it to dry.
3. When make sure that everything is dried, you can stick the muzzle on the sneakers. Use so much glue as you need to be sure that the muzzles are glued to press them with hand. Well, here and slippers are ready.
2. How to sew home slippers from a sweater

Before you a very economical and creative way, how to use an old unnecessary sweater and sew cozy slippers-boots.
3. How to sew home slippers "Slips"

Here you have to work a little on the typewriter, but the method is also rather simple. For these slippers you will need Old sweater, scissors, double-sided tape, chalk or pencil, shoe sturdy insoles or a large piece of tight fabric and sewing machine.
Step 1. As well as in the case above, we supply the foot on paper, and cut two parts for one sneaker on a dense tissue for another.
Step 2. We apply the template to the switch and supply it, but we leave a centimeter 3-4 for the walls of the slips. Cut.
Step 3. Apply to the soles cut cut from the sweater, one bottom, the other from above, and we flash them with a typewriter.
Step 4. Cut from the sleeve a rug, and form a tongue from it, stitch both halves, and to do the same with another.
Step 5. We sew all parts, that is, we sew the front part to the tongue, and the rear cut into three parts to the sole and stitch together.
Step 6. The final stage for beauty. Cutting the bottom of the sweater is about 3 cm strip width, long as part of a slipper from the tongue. We stick to her tape and sculpt it on slippers. Slips are ready.
4. How to make slippers from the fabric

Very beautiful slippers, but require time much more than the first three. For their manufacture you need fabric and sewing machine.
5. Taps of towels

Slippers are comfortable home shoes. Unfortunately, shopping options are very often not satisfying with their functionality and convenience. Therefore, you have to take this thing in your hands and make home slippers yourself. In addition, slippers with their own hands can be made as a special gift to someone, at least a thing and outstanding, but it has "warmth" of your hands, which may be more nice than the usual store fabric.
How to make slippers with their own hands, we will tell you in this article, while we will offer you several options. Choose what suitable for you.
Slippers "Lasso Slippers" from the designer Gaspard Tiné-Berès

To create slippers, you will need a piece of soft felt and a long lace.

The first stage lies in the pattern from a piece of felt. The base is made on the size of the foot, the height of the sides of the slippers to your taste is 6-7cm or more or less.

Then cutting the feet. Probably, it is worth first to make the outline operation on the utility material, and when it will arrange you, already cut felt. Well, and then, just link the parts of the slippers with a shoe.

Here, in fact, all.

Knitted slippers

Support perforated insoles, a piece of fabric, hook and thread.

The insoles are applied to the fabric, and cut the inner part.

We estimate fabric with an insole.

Knit the details of slippers. Five air loops are recruited, and then searched in size.

The front parts of the slippers are decorated with knitted bows.


Takes edging ...

... and pad slippers.

Send the front of the slippers to the sidewalls.

All is ready.

Slippers "Sunflower" with their own hands

As you understand, the felt of different colors will need for such bright slippers. Prepare it. Remove the measurements from the legs and make the pattern.

Green felt is on the manufacture of the soles, backs, front. Yellow felt goes on the sole and for the manufacture of sunflower. Brown felt, just goes to the manufacture of sunflower. Then we sew an apron and a back to the sole of the "RANT" line. Green sole and yellow are also connected by a "RANN" seam or glued.
How to make sunflower, probably not worth telling. Everything is quite obvious.

As we see, it turned out unusual bright slippers.
Slippers "Floral ornament" do it yourself

Remove the measurements from the legs and make the pattern.

Yellow felt is on the manufacture of the sole and the front. From the brown felt, cut out soles slippers. The front is sewn to the brown sole. Then the yellow side of the sole is sewn or glued. And the last touch is the sewing of the braid. Ornament Choose yourself.

Slippers "Roses" with their own hands

Pink fleece, pink lining fabric, white felt, satin ribbons of half acetimeter width will be used. Remove the measurements from your feet and make this pattern.

From the fleece, the top of the slippers are cut, from the lining fabric - the details for the tongue. The sole and edges of slippers are cut out of white felt. In the section of the section we connect the parts with pink ribbon horizontal stitches and we are wearing the edges of slippers and from above and below. Then we sew the top slip of the satin ribbon. We glue the second layer of the sole. Top slippers can be decorated with some flower with satin fabric.

Another option of domestic slippers with your own hands

We harvest insoles, natural skin, seed, thread, glue.

Having putting the insole to the skin, cut out two leather insoles (the skin is blue in blue)

Then there is a foam or felt insole between two leather insoles and fasten the glue droplets. And then carefully coach the edges of the sole.

Now we make the top of the slippers. It is necessary to know the input width and the distance from the thumb to the entry point.


On the manufactured pattern, we cut out two skin blanks.


The edges of the upper parts are cozy like a sole - a column without a nakid.

The next step is to cross the details.

And the last stage is the gluing of the foam sole.

In fact, home slippers are a great set, we led only part of the possible options. Perhaps you will come up with something your or use the already available idea, in any case, these slippers will be obtained special, we are confident about it.
If you like to make original and unusual bags, covers, mittens and other products with your own hands, then make home slippers you will not be much difficult. Moreover, to sew homemade sneakers, warm children's boots, uggs can be from any hematic materials, such as the old sheepskin, or the top of the leather female boots.
Do not forget that old things, clothes, shoes are free material for sewing new clothes and needlework. See what can be sewed from the old one.
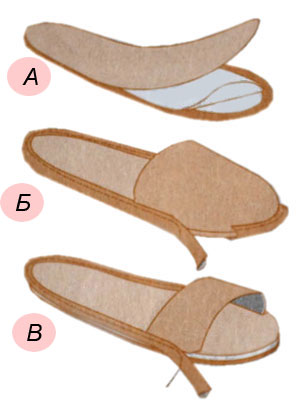
This article gives two types of patterns of household slippers, as well as the technology of their sewing. There are advice from what and how to make housekeeping slippers, warm baby boots.

To make the pattern of slipper slippers with an open sock or closed take a sheet of paper and circle the contour of your foot. You can take old slippers (without a heel) of the right size to put them on paper and outline the sole.
If you find your foot on paper, it is better if it is in a sock or a stuff and desirable to sit on the chair to reduce the load on the foot. Then on the pattern there will be no distortion of the size of future slippers.
Observe the foot contour, and then check it. To do this, you need to measure a centimeter ribbon or ruler the distance from the edge of the thumb to the heel. This value must comply with the size of your shoes, for example, for shoes 43 sizes, this distance will be equal to 28 cm with an error in a half-meter.
To build a pattern of slippers, you can use the calculations given by the calculations, to fit them under your sizes. If you have slippers you need a banner, and you would like to sew exactly the same with your own hands, then this pattern is not necessarily.
Tightly wrap the top of the slippers with paper or cloth, draw the contour of this part with a pencil or a felt-tip pen and allow the stamps to the seams. After that you can cut this item, once again attach it to the top of the slippers and check if it repeats its outline. If you need to apply.
2. From what can be done slippers
To sewing home slippers you need to use various materials. The right and left details of the bottom of the soles are linked from shoe leather, sprocket, leatherette. Insoles (the upper part of the soles of slippers) is made of sprocket, suede or cloth. There should be another gasket between the insole and the sole. It is usually cut out of cardboard and wattin (sintepon, thin foam rubber).
Details of the top of the slippers are lined with leather and lining, you can also duplicate them with soft pads, then set up.
If the top of the slippers consists of two halves, they steal them or join the braid. Glue with gasket and lining, sections erected or fluttered (in closed slippers, one, at the open - two). Then perform the decorative finish.
3. Threads and tools

In order to sew durable slippers, you need to use special especially strong threads. Cotton threads are suitable for sewing slippers at 6,9,12 additions No. 30, 40, 50. Cottopal auto threads No. 44 LH-1, 65 lh-1 or lavsanov № 22 l, 33 l, 55 liters, 90 L. for stealing parts The top of the slippers are best suited by the categorous threads No. 65 K, 95 K. For the feeding of the sole, you need more durable traversal threads No. 470 K, 565 K.

Details of the vertex, edging sections can be performed on a sewing machine, but you will have to be touched and kant to the sole. Therefore, get a special sequel in the store fittings. With it, you can sew strong and durable slippers from any materials.
After the pattern of the sole and the top of the slippers is ready, you can begin to crumble the parts. With a starting sole, let me allow for edge processing 0.5 cm.
The pattern of laying is reduced by 0.7 cm all over the contour so that the gaskets are unnecessarily thicken. Bonded the soles, carved out of leather, cardboard, batting, spilock and smoothly cut the edges (Fig. A).
Bloom the sole along the edge with the top of the slippers with a seam outside (Fig. B), combining control tags. On the closed model, the excess length of the upper part of the weeding part is pre-covered. If with the top closed you can allow some freedom to foot, then in the model with an open toe, you need to adjust the length of the upper part so that it fits tightly.
Connect the top with the soles of the edge braid, edging, straight line. The rant can be performed as edging or overlays along the edge of the sole from a narrow leather strip (Fig. B). The seams can be closed with decorative pigtail woven from thin leather straps, cords, ribbons, etc. To secure the finishing elements, you can use a glue gun for needlework.
As in any work with pair products, operations are performed simultaneously on a single slipper.
5. How to make a pattern of warm home boots
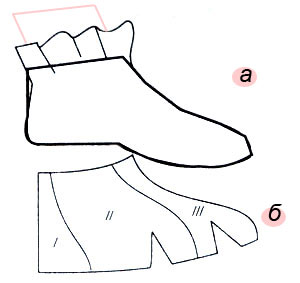 For those who have slippers with an open back, prefers warmer homemade boots to work harder. How to make the pattern of the soles you already know, it is enough to simply describe the leg and add an inlet to the seam. But to make the pattern of the top of such slippers (such as ugg), complex calculations are needed. Therefore, we will use it better by the "wrapping" method.
 Since home shoes do not require dense fit to the leg, and even on the contrary, the template for removing the pattern of the upper part and further modeling can be served boots or boots on a flat sole.
First you need to remember the paper so that it is better laid out on the convex surface of the shoe. Then wrap it around your chosen shoe or legs. It is not very convenient to wrap the leg, but the pattern turns out to be accurate. If you are satisfied with the loose and spacious boots, then use shoes for the template.
During the wrapping of the template, the folds can be laid, fixing them with glue or paper tape, pins. The line of compounds with the sole is described, the middle line on the front of the boot and the heel, the contour of the upper edge of the boots (Fig. A).
Remove paper (without splitting pin), if it does not lie flat. Make penetrations along the connection line with the sole in the sock region, adjust the lines of the pattern. The resulting patterns can be divided into several details depending on the model you have developed (Fig. B).
6. From what and how to make homemade boots
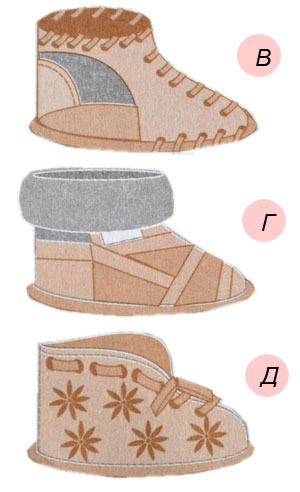
Details of the top of homemade boots from leather, sprocket, felt, dense cloth, leather set (from different skin slices). In the details of the vertex you can include pieces of tapestry, venels, cloth, fur. Do not forget about the allowances on the seams 0.5-0.7 cm.
According to the same patterns, the lining is cut off using spillation, cloth, bike, wool knitwear, fur.
Stop separate items and lining. For the backs, the leather groove is preached to the backs inside the booze. Along the edge of the boots, the lining with the upper part of the inner seam is connected, then turned on the front side, give the fixing line.
The edges of the cutter can be treated with a braid or edging strip of leather, leather braid, if the lining is made of sprocket, fur or knitted tanks (Fig. D).
Fix the upper part of the booze to the sole as well as slippers, the top of the top in the sock portion and a little in the heel area. Seam is paved from the sock to the heel in both directions. If you take off in a circle, because of the landing, the shape of a booze may be deformed, to twist in one strand.
If the circumference of the upper part of the booze turned out to be more than the soles, then the surplus is taken into the heel seam.
In order for children's homemade boots, they do not fall out from the child during active movements, drive to them or pull the strap, extended through the pierced in the upper part of the opening. If the lining is from the tissue, then put metal blocks into the holes.
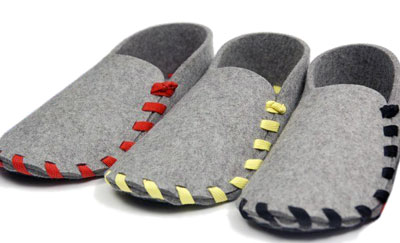
It is easy to make it yourself such slippers from felt or coarse cloth, suede. To do this, only you need to remove the pattern of the top with any shoes and buy several meters of color tape. Holes can be pounding with a special flatbed or cut through the narrow and sharp knife blade. As a material, any materials can be used, insulation and strengthening them with gaskets, including the sheepskin fur, and for the protective gasket of the bottom of the soles - the skin from the top of women's boots.
A little more difficult to make such warm homemade boots, but they will not only look original and stylish, but also to warm your legs reliably. Sust first ordinary slippers, after you learn technology and techniques of work, you will easily sew with your own hands and other models of slippers.