Afghan plaid crochet pattern and description. Crochet Afghan blanket: knitting pattern for beginners. What can be knitted from motives
It will not be difficult for both experienced craftswomen and beginners to make an afghan crocheted blanket; the execution pattern always makes the process easier and more enjoyable. The article will offer two options for execution: one-piece and made up of motifs. First, you need to decide which version of the blanket it will be - either a lighter version, accordingly, thin threads are selected, or a warm one - you will need thick yarn.
One-piece version
This blanket uses different colors, which the craftswoman chooses according to her taste. You can choose absolutely any combination:
- multicolor, as in the photo;
- choose one or many of its shades, you get a gradient (transition from light to dark);
- apply two shades, thereby making a striped blanket.
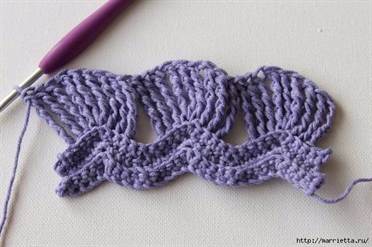
As you can see in the photo, the pattern of the product is voluminous, this is facilitated by the knitting method, in which the stitches are knitted behind the back wall of the loop. Having decided on the size of the planned item, you need to calculate how many initial loops will need to be cast on. To do this, knit a test sample, always with the same threads and crochet hook that will be used for the main blanket.

For the test specimen, 27 chain stitches are cast (hereinafter referred to as chain stitches).

First row. 1st century p. rise (v. p. p.), in the next 4 loops of the cast-on row, knit 1 single crochet (st. b/n), in the fifth loop - 3 tbsp. b/n, then 8 tbsp. b/n., again in one - 3 tbsp. b/n. and so on, ending with row 4 tbsp. b/n.

Second row. Initially in. pp into the second loop from the hook. Then 4 tbsp. b/n., 3 tbsp. b/n. in one loop and again 4 tbsp. b/n. Without knitting 2 loops 4 tbsp. b/n., 3 tbsp. b/n. in one loop, etc. Until the end of the row, where there is no need to knit the outer loop.

The third row is similar to the second.

Fourth row. 1 vp, in the next 3 columns of the previous row, knit 1 connecting loop. Immediately type 6 vp, then 2 tbsp. with 4 yarn overs (st. 4/n.). Then in one loop 3 tbsp. 4/n., 3 tbsp. 4/n in each stitch, skip 4 stitches. Thus, we fill the entire row, leaving the 2 end loops untouched.


If necessary, the color of the thread changes and the pattern is duplicated from the fifth row, starting to be reproduced from the second row.


By measuring the length of the resulting sample and the height of the first and second stripes of two colors, you can calculate how many loops of the cast-on row will be needed for the entire product. For clarity, below are videos that demonstrate the implementation of the above technique.
Working with motives
Before you begin to study the description of the motif, you need to decide on the size of the square itself and its color scheme. If we talk about a children's blanket, then here you can choose a small element size and a delicate or bright, cheerful color scheme, but for an adult item you can knit a larger motif and play with color.

First row. Knitting starts from the central square. You need to dial a chain of 5 v. p., which we close in a circle. Knit into the resulting ring the number of loops that can be divided into 4 sides of the square by an equal number. In this case, alternate 1 tbsp. s/n, 1 tbsp. 2/n to the end of the row.
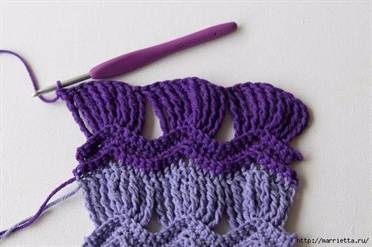
Second row. Divide the loops into 4 parts and mark the corner loops with a marker (threads of a contrasting color or paper clips). According to the top photo, the thread changes to a different color. Only two sides of the square are knitted. b/n., on the corner 3 c. p. and continue the second side of the st. b/n. Thus, it is knitted up to the fourth row inclusive. At the same time, after passing one row, the knitting unfolds and continues in the opposite direction. The fifth and sixth row must be done with half double crochets, at the corner 3 in. P.
Returning to the corner from which knitting began, change colors and knit 4 rows of stitches. b/n all with the same 3p. in the corners. The next two rows consist of alternating 1 tbsp. 1/n, 1 tbsp. 2/n and 3 c. n on the corners to the end of the rows. Thus, changing colors according to the idea, the motif is knitted to the desired size. And at the end, walk around the entire perimeter of the square next to st 1/n.
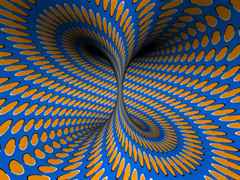
Having knitted the required number of blanks, you can begin assembling the blanket. Thanks to the different selection of colors used, you can create a varied overall picture. For example, the optical illusion of a deep well, when the colors go from light to dark in the center, or, conversely, the top - where the light will be in the center. Moreover, such an effect can be created both inside each square and the entire product as a whole. Thus, by playing with color, you can create a great variety of beautiful patterns that, looking at the finished blanket, no one will guess that its implementation is quite simple.
Below you will find a selection of photos of finished products that can serve as inspiration and an idea for a future blanket.


To summarize, I would like to say that the options described above will rightfully become a worthy addition to the collection of techniques for both beginners and experienced craftswomen. And the products themselves will be a wonderful gift for loved ones and friends.
Video on the topic of the article
It will not be difficult for both experienced craftswomen and beginners to make an afghan crocheted blanket; the execution pattern always makes the process easier and more enjoyable. The article will offer two options for execution: one-piece and made up of motifs. First, you need to decide which version of the blanket it will be - either a lighter version, accordingly, thin threads are selected, or a warm one - you will need thick yarn.
One-piece version
This blanket uses different colors, which the craftswoman chooses according to her taste. You can choose absolutely any combination:
- multicolor, as in the photo;
- choose one or many of its shades, you get a gradient (transition from light to dark);
- apply two shades, thereby making a striped blanket.
As you can see in the photo, the pattern of the product is voluminous, this is facilitated by the knitting method, in which the stitches are knitted behind the back wall of the loop. Having decided on the size of the planned item, you need to calculate how many initial loops will need to be cast on. To do this, knit a test sample, always with the same threads and crochet hook that will be used for the main blanket.

For the test specimen, 27 chain stitches are cast (hereinafter referred to as chain stitches).

First row. 1st century p. rise (v. p. p.), in the next 4 loops of the cast-on row, knit 1 single crochet (st. b/n), in the fifth loop - 3 tbsp. b/n, then 8 tbsp. b/n., again in one - 3 tbsp. b/n. and so on, ending with row 4 tbsp. b/n.

Second row. Initially in. pp into the second loop from the hook. Then 4 tbsp. b/n., 3 tbsp. b/n. in one loop and again 4 tbsp. b/n. Without knitting 2 loops 4 tbsp. b/n., 3 tbsp. b/n. in one loop, etc. Until the end of the row, where there is no need to knit the outer loop.

The third row is similar to the second.

Fourth row. 1 vp, in the next 3 columns of the previous row, knit 1 connecting loop. Immediately type 6 vp, then 2 tbsp. with 4 yarn overs (st. 4/n.). Then in one loop 3 tbsp. 4/n., 3 tbsp. 4/n in each stitch, skip 4 stitches. Thus, we fill the entire row, leaving the 2 end loops untouched.

If necessary, the color of the thread changes and the pattern is duplicated from the fifth row, starting to be reproduced from the second row.

By measuring the length of the resulting sample and the height of the first and second stripes of two colors, you can calculate how many loops of the cast-on row will be needed for the entire product. For clarity, below are videos that demonstrate the implementation of the above technique.
Working with motives
Before you begin to study the description of the motif, you need to decide on the size of the square itself and its color scheme. If we talk about a children's blanket, then here you can choose a small element size and a delicate or bright, cheerful color scheme, but for an adult item you can knit a larger motif and play with color.

First row. Knitting starts from the central square. You need to dial a chain of 5 v. p., which we close in a circle. Knit into the resulting ring the number of loops that can be divided into 4 sides of the square by an equal number. In this case, alternate 1 tbsp. s/n, 1 tbsp. 2/n to the end of the row.
Second row. Divide the loops into 4 parts and mark the corner loops with a marker (threads of a contrasting color or paper clips). According to the top photo, the thread changes to a different color. Only two sides of the square are knitted. b/n., on the corner 3 c. p. and continue the second side of the st. b/n. Thus, it is knitted up to the fourth row inclusive. At the same time, after passing one row, the knitting unfolds and continues in the opposite direction. The fifth and sixth row must be done with half double crochets, at the corner 3 in. P.
Returning to the corner from which knitting began, change colors and knit 4 rows of stitches. b/n all with the same 3p. in the corners. The next two rows consist of alternating 1 tbsp. 1/n, 1 tbsp. 2/n and 3 c. n on the corners to the end of the rows. Thus, changing colors according to the idea, the motif is knitted to the desired size. And at the end, walk around the entire perimeter of the square next to st 1/n.
Having knitted the required number of blanks, you can begin assembling the blanket. Thanks to the different selection of colors used, you can create a varied overall picture. For example, the optical illusion of a deep well, when the colors go from light to dark in the center, or, conversely, the top - where the light will be in the center. Moreover, such an effect can be created both inside each square and the entire product as a whole. Thus, by playing with color, you can create a great variety of beautiful patterns that, looking at the finished blanket, no one will guess that its implementation is quite simple.


Source: Drops 181 (2017)
Knitting density: 17 loops = 10 cm
Size: 96 x 128 cm
Size of one square is approximately 32 x 32 cm
You will need: DROPS ALPACA yarn from Garnstudio - 400 g white, 400 g gray pearl.
Garter stitch (straight and reverse rows):
1 rib = knit 2 rows - all knits.
SQUARE A:
Cast on 55 stitches in 1 thread of white + 1 thread of gray (= 2 threads). Work 3 scars in garter stitch in straight and reverse rows
Knit next. row next way from the front side: 3 edge loops in garter stitch, knit according to pattern A.1A (= 12 sts), knit according to pattern A.1B on the next. 24 sts (= 2 reps of 12 sts), work according to pattern A.1C (= 13 sts) and finish with 3 cro. n garter stitch.
Remember the knitting density!
At a piece height of approximately 30 cm in height, make 3 ribs in straight and reverse rows on all loops. Close the loops on the front side. The length of the square will be approximately 32 x 32 cm.
Complete 4 squares in total.
SQUARE B:
Cast on 55 stitches in 2 white threads. Make 3 stitches.
Knit next. row next way from the front side: 3 edge loops in garter stitch, knit according to pattern A.2A (= 3 sts), knit according to pattern A.2B on the next. 42 sts (= 7 reps of 6 sts), work according to pattern A.2C (= 4 sts) and finish with 3 cro. n garter stitch.
Continue the pattern in the same way.
At a piece height of approximately 30 cm, make 3 ribs in straight and reverse rows on all loops. Close the loops on the front side.
Complete 4 squares in total.
SQUARE C:
Cast on 55 stitches in 2 gray threads. Make 3 stitches. Knit next. row next image from the front side:
3 edge loops in garter stitch, knit according to pattern A.3 on next. 49 sts (= 7 reps of 7 sts), and finish with 3 krom. n garter stitch.
Continue the pattern in the same way.
At a piece height of approximately 30 cm, adjust the length in height according to the size of squares A and B, sew 3 ribs in straight and reverse rows on all loops.
Bind off the stitches with knit stitches on the front side.
The length of the square will be approximately 32 x 32 cm.
Complete 4 squares in total.
Afghan knitting originated in Great Britain during the reign of Queen Victoria in the 19th century. The British were very inspired by imported bedspreads and blankets with Afghan motifs, and a new direction in needlework soon appeared. To this day it is widely used, especially when creating large scarves and capes. On the Internet you can find numerous patterns for a blanket made from crochet motifs, which is one of the most popular and simple products.
There are no strict limits in this type of knitting; the pattern is selected depending on the level of skill and taste preferences. Even a novice craftswoman can cope with making an Afghan blanket, the main thing is to use her creative imagination. An important advantage is that you can use yarn rationally, that is, use its remnants that are no longer suitable for other patterns. This, in turn, will add bright colors to the creation.
The last point reminds us of the family connection between Afghan knitting and the so-called granny square. It is believed that the blankets were knitted exactly in this way. Such a square can be either an independent product or a separate part of it, a piece of a puzzle.
What motifs can be connected?
The possibilities with granny squares are truly endless! You can use them to make not only blankets, but also sofa cushions, rugs, covers for chairs, armchairs and poufs, napkins, potholders, coasters, lampshades, toys, wallets and bags.
This knitting technique is also used to create items of clothing, for example, cardigans, ponchos, shawls, dresses, gloves, slippers, etc. Knitted clothes for animals look interesting. Curtains made of squares with a color scheme perfectly matched to the interior will look very elegant. Also, any crafts in this style can be monochromatic, which does not make them boring and ugly.

The idea of creating canvases from many threads was loved by many and very quickly entered the world of fashion and design. A surge in popularity occurred in the mid-20th century, when samples of clothes knitted from squares could be found on the pages of fashion magazines. Gradually, public tastes have changed, but even now you can find many descriptions of these patterns and their varieties.
Currently, there are modifications of granny squares called textured ones. Traditional and updated knitting are united by a square shape, starting from the center and using at least two colors.
Crochet variations of afghan blankets
Afghan rugs are very difficult to attribute to any one direction; only the author of the work can do this. The border between them and tapestries or, for example, patchwork techniques is blurred.
In modern paintings with elegant patterns, only upon careful study can one discover a familiar square. A striking illustration of this is plaids knitted from identical squares forming a gradient. In this case, the combination of colors can be selected both from dark to light, and in completely unexpected options. In this case, you can choose the simplest pattern.

Afghan plaids and floral motifs did not go unnoticed. This is especially true for rose buds, which have long been used as decorations. Another example of the unrecognizability of the square knitting style is an optical illusion pattern. This thing looks very impressive, you literally can’t take your eyes off it.
Afghan knitting includes not only the assembly of squares, but also one-piece knitting from edge to edge with multi-colored stripes or hexagons. This once again shows how wide the scope for creativity is in this technique.
Subtleties of assembling squares when crocheting an Afghan blanket
When crocheting a blanket, especially if the thread was changed frequently, the wrong side may not turn out very beautiful. In this case, you should take a smaller hook and hide the ends of the threads inside the product, after lubricating them with suitable glue. The appearance will immediately become neater and even remain unchanged after washing. The washed and still damp square must be stretched on an ironing board, pinned and steamed.
If a blanket of several elements was planned, then the next step would be assembly. The parts need to be placed next to each other and then the edges are knitted; in this case, you can make a black dividing line. This is just one of the possible ways to add squares; you can learn more about this from the training videos.
Afghan knitting and granny squares are still relevant and very interesting techniques. Using a crochet hook you can create amazing things for home interiors and fashion design. Such squares using yarn of different colors look unusual and expressive. Finding patterns for Afghan-style blankets is not difficult, and making them is very exciting. Such things will never lose their originality and beauty.
Video on the topic of the article