Panel of autumn leaves. Unusual trees from cereals
Look at the photos, study simple step-by-step master classes, get ideas and the muse will definitely visit you! And do not forget to collect during walks everything that comes under your feet - interesting pebbles, twigs, flowers, berries, nuts and other natural material. Take a separate box for these treasures - they will definitely come in handy, you'll see.
Golden autumn is the best time for long walks and creativity. Enjoy nature, be inspired to create stunning masterpieces with your own hands.
The most beautiful autumn crafts from vegetables and fruits with your own hands
With the advent of autumn, kindergartens and elementary schools often organize exhibitions of crafts made from natural materials. Recently, a special niche has been occupied by crafts made from fruits and vegetables. They turn out very bright and quite interesting.
Most often, parents learn about such creative exhibitions the day before. And you have to quickly collect your thoughts, the necessary materials and create something beautiful in haste.
I want to offer you a few master classes of simple vegetable crafts. You do not have to run around the neighbors in search of the necessary material. Also, the creative process will not take too much time, and you will even have time for a night's sleep.
mushroom meadow
A simple craft that will require the following materials:
- Cardboard sheet or box lid
- Leaves or greens for grass
- Carrot
- Apple
- Potato
- toothpicks
In the lid from under the box we will make a clearing for which you can collect fallen leaves on the way home from the garden or school.
Let's make mushrooms. Legs are pieces of carrots, hats are halves of potatoes or apples.
We fasten all the details together with toothpicks. The mushrooms themselves are installed in a clearing with pieces of plasticine.
You can also make bugs out of plasticine and put them on mushrooms.
piglets
For this craft, prepare the following materials:
- Potato
- Plasticine
- plastic plate
- Paper napkin (or corrugated paper)
From a plate and a napkin we make the basis on which our “pigs” will sit.
For piglets, we make triangle ears, patches, eyes, tails from plasticine.
Very simple and fast. You don’t even have to suffer - your baby will blind all the necessary components with pleasure.
funny little men
But what kind of cute can be made from potatoes. You will need:
- Potato
- Pumpkin or large zucchini
- felt-tip pens
- White paper
We cut the pumpkin in half, make a "boat" for funny little men.
For funny faces from white paper, cut out circles-eyes, draw pupils on them, glue them to potatoes.
With felt-tip pens we finish everything else - noses, mouths.
Kids will love this unusual drawing on vegetables, so be sure to involve them in making crafts.
Potatoes are a great vegetable that is easy to work with and a variety of fantasies are born easily. For example, here are such simple cockerel and dog. or a cute ant that can be made in just 10 minutes. Just first go to the yard "to hunt" for sticks.
Or cut out such candlesticks from large potatoes:
Caterpillars made of apples and grapes are beautiful and bright.
Caterpillar
For such a beauty, we need:
- Apples
- grape berries
- Carrot
- Toothpicks, skewers
- In the apple, which will be the muzzle, we cut out the “eye sockets”, into which we insert grape eyes with the help of toothpicks. For the mouth, we also make a small horizontal incision, insert a “smile” into it.
- We string grapes on skewers - we make “horns”.
- We connect the apples together - this will be the "torso", to which we attach the "head".
- Cut the carrot into slices. We make our caterpillar "legs".
- You can seat such a beauty in an impromptu clearing. Which can be easily made from a plastic plate and leaves. A little imagination, additional materials and such caterpillars are obtained from apples.
On the theme of animals, you can fantasize a lot. Hedgehogs are especially popular. They can be made from any material - potatoes, pears, apples.
Hedgehog
To create a cute forest dweller, we need:
- vegetable marrow
- Apple
- rowan berries
- Twigs, leaves
- Toothpicks, plasticine
From the leaves and twigs we will make a clearing in the lid from under the box.
The hedgehog itself is made from zucchini. We sculpt the eyes and nose from plasticine, pin with toothpicks. After that, you can make "thorns".
Everything is simple here - insert toothpicks into the zucchini and you're done!
We put a small apple on the back of the hedgehog, decorate with rowan berries. If you have dried mushrooms, they can also come in handy.
In fact, creating a masterpiece from the gifts of the garden is very simple. Lay out the vegetables that you have in the refrigerator in front of you and, together with your child, think about what they look like or who they can turn into. Children are known to have a rich imagination, so in a couple of minutes you will have enough brilliant ideas.
Autumn paper crafts for kindergarten
Paper is an excellent material for creativity. Therefore, if you were unable to collect a herbarium or natural materials, do not be discouraged. Plain colored paper, cardboard, glue, scissors - everything you need to create an application on the theme "Autumn".
The first application that I want to offer you, I call
Tree
For its manufacture you will need:
- Sheet (A 4) of light blue or blue cardboard
- Colored paper - red, yellow, green, orange, brown
- Glue, scissors
Cut out a rectangle from brown paper - this will be the trunk of the tree. We also cut out two green rectangles - this will be the grass.
Cut out rectangles from red, yellow, orange paper, glue them in the form of rings.
After that, we glue the prepared elements on cardboard in the form of an autumn tree.
A few more variations on the theme of autumn trees:
Another of autumn's associations is harvesting. Therefore, consider another interesting application idea called
Harvest
A variety of fruits can be stored with you all year round. All you need for this:
- colored paper
- Scissors
Help the child - draw these simple details for 3D fruits. Cut them out together and stick them on pieces of cardboard - you get cute postcards.
And you can put fruit in a “jar” - and a compote will come out that will amuse your baby, and he will want to “roll up” more than one such jar!
Umbrella
It often rains in autumn. In order not to get wet, let's make a bright voluminous umbrella out of colored paper and cardboard. For this craft we will need:
- Sheet A 4 green cardboard
- Squares (8 * 8 cm) - 5 pieces of different colors
- Rectangles (2 * 10 - 15 cm) - 1 white and 2 pieces blue
- Cocktail tube
- Scissors
- Double-sided tape
- simple pencil
Using adhesive tape, glue the tube to a sheet of cardboard at a distance of 2 - 3 cm from the bottom edge.
We make an umbrella from multi-colored squares. To do this, each leaf is twisted in the shape of a cone, fastened with glue.
Then we glue the blanks together.
Then glue the umbrella to the cardboard.
We fold the rectangles of white and blue paper with an accordion. On the fold, draw a half of the "raindrop" and cut it out.
Let's make the droplets voluminous. Take three drops - 2 blue, 1 white, glue them together.
To do this, take a blue droplet, fold it in half, grease one of the halves with glue, glue a white droplet. Similarly, glue the second blue droplet to the white one.
We glue the finished droplets on a sheet of cardboard above the umbrella. A simple, beautiful autumn application is ready!
Joint creativity with children charges with positive emotions and brings you closer to the baby. Do not miss the opportunity to fill the rainy autumn days with warmth. Your child will remember such family evenings for a lifetime. So, having received a task in the garden to do some kind of craft, do not rush to do it yourself, because it’s faster, more accurate ... Be sure to involve your baby!
Original works from cones, acorns and chestnuts
Another craft material that parents often meet is cones, acorns, chestnuts. From simple stick figures to complex compositions, the fantasy world is rich and varied. Crafts made from natural materials become especially relevant in autumn, when the gifts of nature can be easily collected during a walk.
Let's make chestnuts
"Merry Caterpillar"
For this we need:
- chestnuts
- Plasticine
We roll out multi-colored circles from plasticine, with the help of which we connect the chestnuts - this will be the body of the caterpillar.
From plasticine we make "eyes" and a "smile".
From two plasticine "sausages", for example, green and orange, we make "horns" for the caterpillar.
A simple craft is ready! Arrange for her a clearing of dry leaves and other natural material and you can take it to the exhibition.
Autumn flowers from cones
Another simple master class for joint creativity with children.
- cones
- Acrylic paints or gouache
- Large wide brush
- Green colored paper
- Scissors
For "flowers" it is best to collect open cones. Clean them from dirt, rinse if necessary, dry well. After such a preparatory procedure, you can begin to be creative.
The first step is to paint the cones and let them dry well.
We cut the paper into rectangles 5 * 15 cm. We make “leaves”, which we twist into a ring. Fold the top outward.
Place a cone in the center of the leaf.
Make some of these autumn flowers, place them on a stand "flower bed". A simple, bright, original craft is ready!
Vase of acorns
Let's look at a simple acorn craft that can be made in one evening, leaving the most difficult work to your child.
We will need:
- Bank (any size)
- Plasticine
- acorns
For this craft, it is not necessary to take a new plasticine. Leftovers from an old box will do just fine. Since we will just need to stick around the jar on all sides with plasticine mass.
If your acorns have lost their hats, it doesn't matter! Glue them on.
As a result, the entire bank must be sealed. If you get large gaps between the acorns, fill them with hats. The neck of the jar can also be glued with hats.
Place a bouquet of autumn leaves or any composition of autumn gifts in a vase.
It is not necessary to use one thing in compositions from natural materials. Naturally, you can safely combine everything you can find in one craft. Do not be afraid - fantasize!
The main thing here is to start, to take the first step. And then you will be unstoppable! You yourself will not notice how ideas begin to be born in your head. And when you are engaged in such creativity with a child, then a sea of positive emotions is provided. Little geniuses are sure to surprise you - they are capable of more than you think. Therefore, never do instead of a child - do with him!
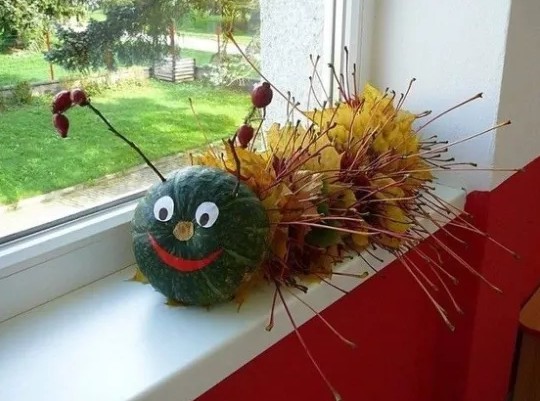
Crafts from a pumpkin
Pumpkin is an excellent material for bright, beautiful crafts. Working with this vegetable is a pleasure! For example, taking a small pumpkin and modeling mass, you can make a cute "vampire". An old hat, paints, any material at hand - and the fabulous Scarecrow from Oz is ready.
Dry leaves, rowan berries, matches, a little plasticine, shells that were collected in the summer by the sea - and here we have a teremok.
Or you can carve a whole flying saucer with garlic heads of alien creatures.
I really like pumpkin vases. They are made quite simply. Everything that you can find in the garden or park goes into business. The result is just fabulous!
Let's make a colorful autumn bouquet in a pumpkin together. It can not only be sent to the exhibition, but also presented as an original gift to your favorite teacher or educator on Teacher's Day, which is celebrated on the first Sunday of October.
For crafts you will need the following materials:
- small pumpkin
- floral sponge
- Scissors
- Glass of water
- Any autumn flowers
Cut off the top of the pumpkin and clean it well from the pulp.
Cut off the floral sponge, place inside the pumpkin. Let's pour water.
We cut the stems of flowers, we collect a bouquet.
Do not forget to gently moisten the floral sponge, and such a bouquet will delight you with its beauty for a long time. If you create a similar composition from dry leaves and twigs, then to fix them, place ordinary foam or modeling mass in the pumpkin. For a stronger structure, you can additionally lubricate the tips of the branches with glue. Enjoy your creative moments!
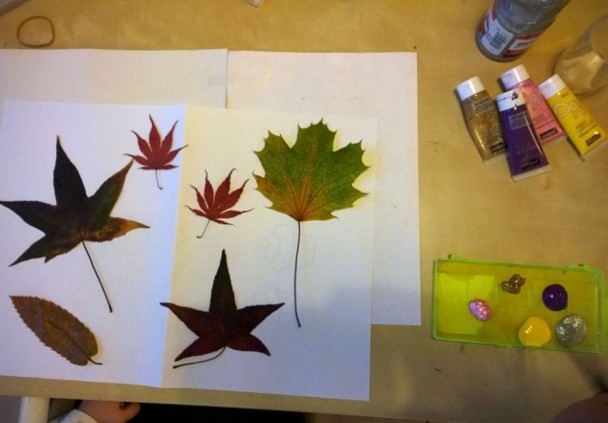
Autumn crafts in kindergarten from leaves
I start collecting and drying leaves, herbs, flowers with my children in the summer. By autumn, we have a rather impressive collection, which gradually turns into original applications.
All you need for such applications is cardboard base, PVA glue or glue stick, scissors and, of course, a herbarium. Children really like to take part in the creation of leaf paintings that literally come to life on a piece of paper.
The youngest children can draw, for example, the contour of a hedgehog or a butterfly and let it be sealed with leaves. The older the child, the more complex compositions you can offer him.
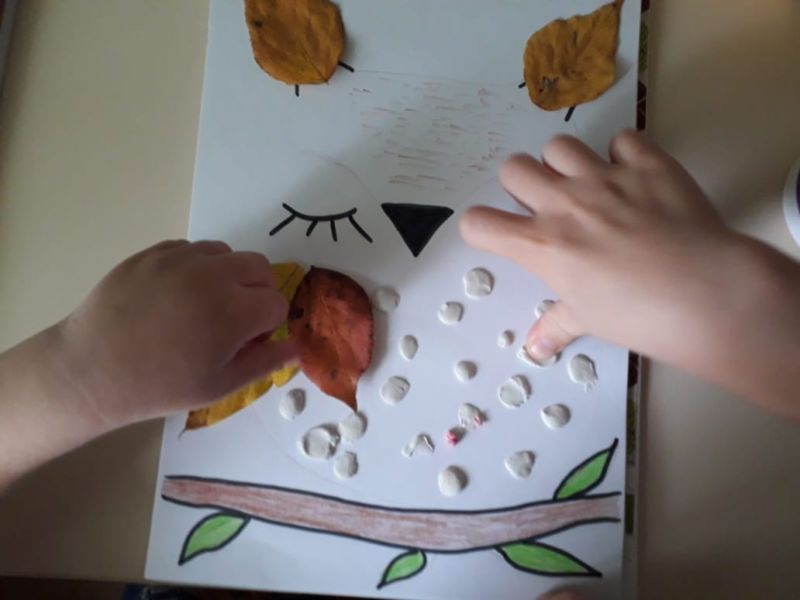
Let's make an original voluminous owl out of leaves for kindergarten.
owl
We will need the following materials:
- Colorful leaves
- rowan berries
- File (for documents) format A 4
- Ribbons 30 cm long - 2 pieces
- Colored cardboard - yellow and brown
- Double-sided tape
- Scissors
- Cut out the paws and eyes of an owl from cardboard.
- Cut off the white stripe from the file. We do this carefully, the file should remain intact.
- Open the file like a bag and fill it with leaves and berries.
- Inside the file (in the upper corners) we put triangles-ears, we tie them with ribbons.
- We tuck the bottom of the file, seal it with tape.
- Using adhesive tape, glue the eyes, beak and paws.
Charming owl is ready!
It's so easy to revive autumn leaves and create a little miracle with your child.
Beautiful autumn crafts for kindergarten and school
When you have enough time left, real miracles can be created from natural materials. In schools and kindergartens, with the advent of cold weather, they are often asked to make bird feeders, which are then hung out in the yard.
feeder
Let's make an original craft together. For this we need:
- 5 liter plastic bottle
- Broom
- Leg-split
- Scissors and stationery knife
- Acrylic paints
- Scotch
- We cut the bottle into 3 parts.
- The upper part is completely painted over with acrylic paint. At the bottom, you need to color the bottom and grab a few centimeters from the bottom. Then we apply glue and wrap the bottom with twine, leaving about 2 - 3 centimeters free from the top.
- After the glued twine dries well, cut out a window with scissors and put on the roof of the feeder house.
- We fix the roof with tape.
- We disassemble the broom, decorate our house.
- We wrap the handle with twine - for it we will hang the feeder on the tree.
A beautiful bird feeder is ready!
Autumn panel
For the manufacture we need the following materials:
- Dry leaves, grass
- rowan berries
- rose hip
- wooden sticks
- glue gun
- Rope
Making such a juicy autumn bouquet is quite simple.
- To begin with, we will make two square frames of wooden sticks, which we will tightly tie together.
- Connect the frames together.
- We take several branches, tie them together, and then attach them to the base.
- On the other side and in the center we tie dry grass.
- From above, with the help of a rope, we attach rowan branches.
- Under the rowan berries we place a sprig of fir and fix it.
- Using a glue gun, we decorate the panels with leaves in random order, starting with the largest.
The more various elements you use to make such a panel, the more beautiful and interesting it will be. So today go in search of autumn treasures and you can easily create your own masterpiece!
Autumn crafts in kindergarten fake from the natural material of the autumn forest (video)
See a detailed step-by-step master class on creating wonderful hedgehogs in a clearing. To repeat such a composition, you will need: plasticine, seeds, a sheet of thick cardboard, a plastic bottle, leaves, autumn berries and everything that you can find on a walk with your baby. Also, grab a great mood and get creative! A great family evening is guaranteed.
I hope this modest selection of simple master classes was useful to you and was able to inspire you to create your own unique and vibrant autumn masterpieces.
4 234 799
The evening is an amazing time when the whole family gets together and unsuspecting parents find out that they need to bring autumn crafts to the kindergarten for tomorrow. So that this situation does not take you by surprise, we recommend that you prepare in advance and familiarize yourself with the ideas of children's homemade products.
We have prepared for you a lot of step-by-step and colorful master classes of different difficulty levels. We are sure that you will definitely find something worthwhile for yourself.
Hedgehogs are different
Did you know that the Soviet cartoon "Hedgehog in the Fog" 15 years ago was recognized as the best animated film of all time? See what a difficult animal this hedgehog is. It is definitely worthy of repeated incarnation with the help of various natural materials.Volumetric hedgehog from seeds and plasticine
A cheerful and thrifty hedgehog, cheerfully carrying mushrooms on its back, can come to visit your apartment in the fall. To do this, you need to stock up on simple natural materials, an hour of free time and involve young assistants in the work. For co-creation you will need:
- foil;
- leg-split;
- black and brown
- unpeeled seeds;
- PVA glue;
- acorns and leaves for decoration.

Cover the body of the hedgehog with black plasticine, and the muzzle with brown. This crucial stage can be safely entrusted to the child, nothing will be spoiled, and then all the flaws will disappear.

Grease the muzzle with a thin layer of PVA. Moisten the twine with a little glue and tightly, row by row, wrap it around the face, starting from the spout. At this point, you have to stop and let the glue dry. Remember that this must happen naturally. On a battery or when dried with a hairdryer, the plasticine will melt.
The next stage is design. From the seeds you need to make a hedgehog needle. Start work from the head, arrange the rows of seeds in a checkerboard pattern. Stick the "needles" into the plasticine as tightly as possible to each other.

Decorate the muzzle with plasticine eyes and a nose.
Mushrooms are easy to make from acorns by simply covering their caps with brown plasticine. You can attach real leaflets to them if you wish. Using plasticine, attach the fungi to the back of the hedgehog.
Such a handsome man will surely please your child, and will also allow you to enjoy joint creativity.
Hedgehog application from dry leaves
On a walk in the autumn park, did you pick up a beautiful bouquet of yellow leaves? Great, add more glue and cardboard to them - we will make a cute hedgehog.All you need is to draw an outline. Your kid will be happy to glue the leaves. Just show him how it's done.

You can download the hedgehog template, we offer you 4 options:


Hedgehog application from seeds
Do you like the idea of using seeds for hedgehog needles, but the voluminous craft seems too complicated to implement? We have prepared another simple MK, which features a funny hedgehog, seeds and plasticine.A little perseverance and you can make a surprisingly cute and simple craft for kindergarten.

paper hedgehog
We bring to your attention another idea that even the kids from the younger group can handle. An original and cute application using autumn leaves will not take you much time. It also comes with a paper cut template to make it even easier for parents.
template:

mushrooms
You have already loaded your head with what else to surprise worldly-wise kindergarten teachers who again and again expect crafts from your child? We offer to amaze their imagination with surprisingly realistic mushrooms from the simplest materials at hand.
For work you will need:
- cotton wool;
- water; starch;
- long nails or thick wire;
- cardboard;
- paints and brushes;
- PVA glue;
- dry brew or poppy.

Pierce each circle in the middle with a nail. It will serve as the base for the legs. Instead, you can take a thick steel wire. But it’s better not to bother and purchase a dozen or two potential “mushroom legs” at the nearest hardware store.

Now it's time to cook the paste. Boil a liter of water. Stir in a glass of cold water 5 tbsp. with a slide of potato starch. While stirring the boiling water, pour the starch into it in a stream. While stirring, bring the paste to a boil. It is ready to use, it remains only to wait until it cools down to room temperature.

Coat the mushroom blank with a paste. Roll a hat ball out of cotton, dip it in paste and glue it to the hat. Wrap the stem of the mushroom with moistened cotton. Repeat this procedure several times until you get the desired size and shape of the fungus.

Don't forget to wring out excess glue from the cotton! The resulting blanks must be completely dried on a battery or in a warm oven. Already at this stage, the mushrooms are very pretty.

The moment of creative work has come - painting. It is she who will turn faded blanks into real autumn mushrooms. You can paint crafts with any paint: acrylic, gouache or watercolor.
Color the hats according to the mushrooms of your choice.

Wait for the paint to dry completely. Cover the end of the leg with a thin layer of PVA and dip it in dry poppy seeds or tea leaves - this will imitate the remnants of the earth.

For extra shine and chic, you can cover the mushroom caps with any colorless varnish.
You can arrange a beautiful basket with mushrooms - your craft will not go unnoticed. And the secret of making realistic mushrooms will long excite the imagination of everyone who was lucky enough to see them.
These hand made beauties are obtained as a result of the efforts made.

Don't have the right basket? No problem! The most beautiful composition using moss, coniferous or dry twigs and real dry leaves can be arranged in an ordinary cardboard box or on a small stump, or on your own.

Fantasize and think outside the box - in kindergarten, and indeed in any other, creativity, this is only welcome.
autumn trees
Has your child already wondered why in autumn the trees change their green attire to a bright yellow-orange decoration? So it's time to satisfy his curiosity, and at the same time craving for creativity.plasticine tree
We offer you a beautiful and uncomplicated plasticine application that even the youngest naturalists can handle.
For work, prepare colored plasticine and cardboard.
Draw a tree trunk on thick cardboard. Now let the child roll up many thin and long plasticine sausages 2-3 shades of brown.

Glue them along the tree trunk, alternating shades for realism. Fill in the entire contour of the trunk and do not forget about the twigs.

Add some more branches for a lush crown.

Roll out many thin sausages in red, orange and yellow. Roll each sausage into a spiral. You will see, the child will really like this exciting activity.

Glue the spirals on the crown of the tree in random order. Form a tree of the desired size.

Make blades of green plasticine. "Plant" grass near the tree.

Complete the appliqué with falling leaves.

Here is such a man-made beauty we got. A bright frame will make the picture even more expressive.
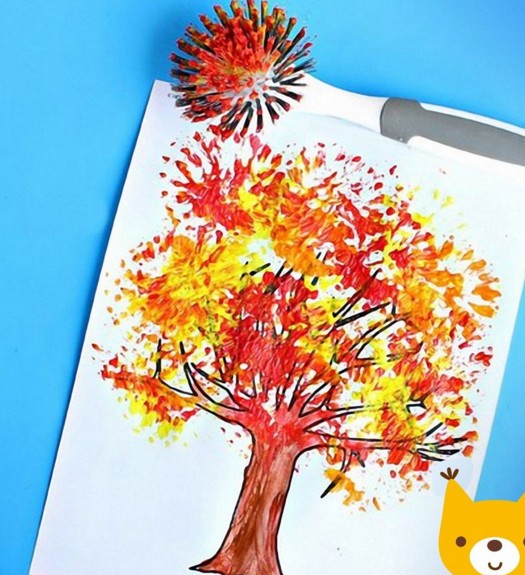
Application "Tree of confetti"
The original idea of an autumn tree is to decorate it with paper confetti. Check out the step-by-step master class by watching our video. Confetti can be easily and simply cut with a regular hole punch. In this technique, you will quickly be able to grow a whole fantasy forest.pumpkin seed trees
Have you noticed how pumpkin seed looks like a leaf? And creative personalities not only noticed this, but also used the similarity to create an original application from this natural material.See our step-by-step photo of MK and be inspired by your own masterpieces.


Unusual trees from cereals
We continue to heat up the degree of creativity. Now, to create crafts, colored cereals will be used. Do you have rice, semolina or millet in stock? Then try to master this method of creating an application.Or this option:
"Macaroni" tree
The unusual shape and safe composition of various pasta products makes it possible to use them in preschool creativity. Find pasta in the form of bows or leaves and "grow" your own unique tree.
Unusual "button" trees
And if you accidentally have a lot of unnecessary multi-colored buttons lying around at your house, then we know how to use them for a good cause. Try to create a bright panel that will decorate a summer house or nursery. And armed with wire and pliers, you can comprehend the art of button bonsai.


Pumpkin
Autumn is harvest time. And even if you didn’t plan to harvest a real crop, surprise everyone with a realistic nylon pumpkin. You can make it both for the competition of children's autumn crafts, and just for the soul, and at the same time get acquainted with an interesting technique for making nylon vegetables and fruits.
For work you will need:
- dyed nylon;
- filler (foam rubber or synthetic winterizer, even ordinary cotton wool will do);
- needle and thread;
- thin wire;
- a small piece of wire;
- green teip tape;
- scissors;
- brush and paints.

Using a needle, make jumpers with a thread. Make them at the same distance until you go around the entire workpiece in a circle.

From small pieces of thin wire, make round blanks for leaves.

Cover them with green nylon, fix its ends with a thread and cut off the excess. Slightly deform the edges of the leaves, giving them a realistic look. Wrap the ends of the wire with tape.

Wrap a piece of wire with teip tape. Wrap it around the handle and carefully remove the resulting spiral. It turned out a branch-antennae, which we will attach to the pumpkin.

Gather a branch of a pumpkin, gradually connecting the leaves and tendrils with teip tape in random order.

At the top of the pumpkin, fix a piece of wire and wrap it with teip tape. Attach a branch with leaves to the tail.

To achieve realism, tint the depressions with orange. Blot excess moisture with a tissue.

As a result of the efforts made, a wonderful gift of autumn, made by hand, turned out.
Ideas for inspiration
We have prepared for you a photo selection of unusual autumn crafts to motivate you to action. Watch and get inspired to work together.Spectacular composition of natural materials
Dry twigs and grass, a bunch of viburnum, some smooth pebbles, a pine cone and sand, thanks to fantasy, turn into a cozy rural courtyard with a wooden house under a thatched roof. This craft looks very unusual, and you can get it absolutely free. It is enough just to get out for a walk in the nearest park.
Yellow leaf bird:
Printable bird:


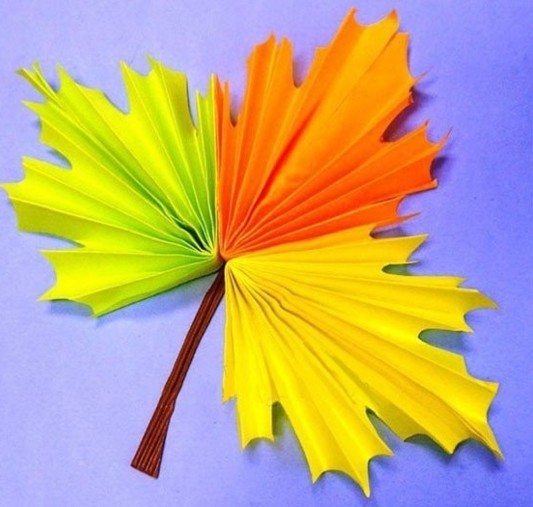
Bouquet of maple leaves
In autumn, fallen golden leaves are just asking for your hands. Walking in the park, it is so easy to collect a whole maple bouquet, but its natural beauty instantly disappears in the apartment. It can be fixed. We will teach you how to make beautiful maple leaf roses. Such a bouquet will create an atmosphere of autumn comfort in the room and will delight you with its warmth for a long time.
Autumn crafts from twigs and threads
A little imagination - and dry twigs collected on a walk can be turned not only into crafts for the garden, but also into spectacular souvenirs or bright interior decorations.
Simple paper crafts
Unusual autumn leaves can be created with your own hands, and an empty paper bag can be turned into a picturesque tree with a spreading crown.A few more templates to print:


Just let your imagination run wild and follow the step by step photo instructions.
Hello!
Today I again propose to make crafts in the autumn theme. Look out the window, how many colorful foliage is already lying. Memories and lines from immediately grab, for example, these:
“It suddenly became twice as bright,
Yard as in the sun.
This dress is golden
At the birch on the shoulders .... "
This time of year is good because there is something to craft from. Because you can take any and tadam you have, for example, a little man made of cones, or maybe you love? Then you can also easily make a souvenir for the exhibition, for example.
You can even take ordinary leaves and make a masterpiece on paper. In general, you can list indefinitely. Therefore, let me present you with a lot of cool and beautiful ideas on this topic.
I hope you will be saturated with inspiration, and as soon as you decide, you will immediately start tinkering with your children. After all, children at any age are very fond of such work, whether it is younger schoolchildren or preschoolers.
In my previous note, we have already considered many options for what you can do with your own hands from various kinds of material, it can be natural, fruits, vegetables, and even junk. This time I will show you a few more options that are also no less beautiful and attractive.
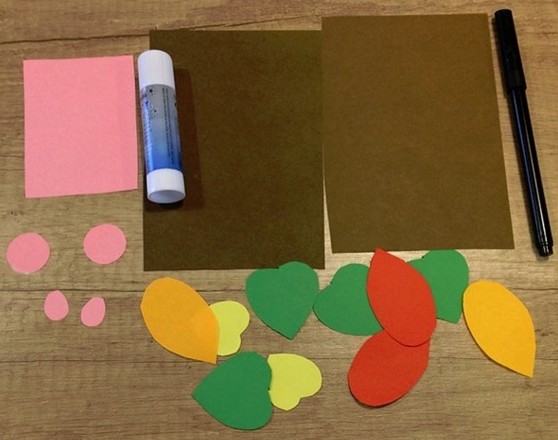
And perhaps I'll start with an unconventional, but paper-plasticine miracle. Take cardboard and make blanks of maple and oak leaves. Also needed for work will be glue for ceiling tiles, a CD disk.

Take plasticine of different colors in your hand and roll it into a ball.
Advice! You can take modeling dough instead of plasticine.

Roll out with your hands, as if painting the surface of the leaves.

Glue the finished blanks onto the disk with glue.

Mask the middle with oak leaves, and roll up red rowan berries. Here is such a cool masterpiece turned out in the autumn theme.

Do you want to build something unusually cool from real rowan berries? I propose to make a picture of mountain ash in the form of a squirrel. You need to draw an image of a squirrel on cardboard (from under the box, thick), and then cut it out.
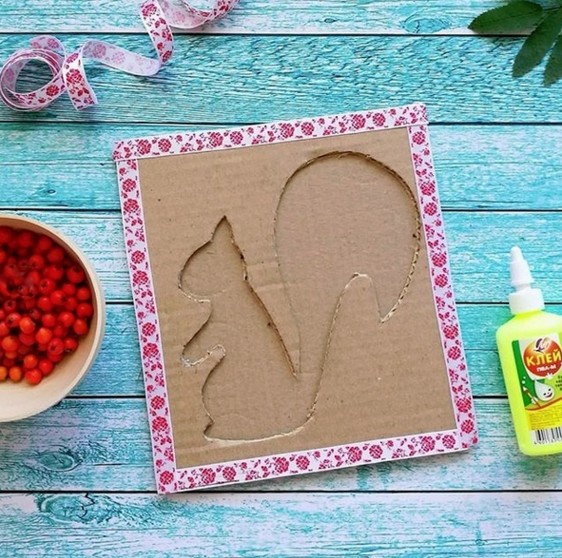
Use decorative tape to connect the edges of two cardboards. Or glue with ordinary PVA. And then start the image of the animal with berries. Looks original and beautiful! Charming came out, didn't she?

The next craft is a vase for flowers, you can do it yourself. Take any glass container and wrap it with woolen thread or twine. In this case, first paint over the jar with glue. You can see the stages of work below in this figure:

Now prepare the bouquet and place it in a vase. And a gift or souvenir for the exhibition will be ready. Good luck!


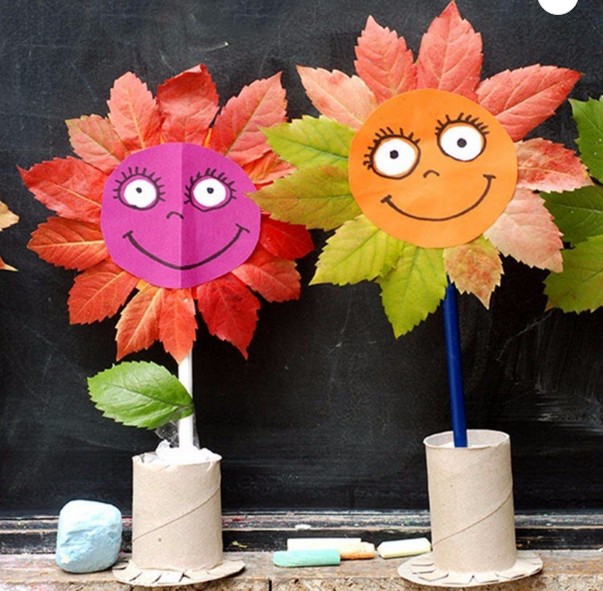
Now make a funny weirdo, in the form of a sun. Cut out a circle from colored paper, glue eyes, mouth, nose on it. Or you can draw all these details with a marker.

Then glue the dry leaves along the diameter of the circle.

Also, in order to comfortably hold the sun with your hands, glue a stick. Or then stick it in a glass, which you can also build yourself.
With preschool children in the park, collect dry foliage and then invite them to decorate them with felt-tip pens, and preferably with acrylic paints.

It turns out it's quite wonderful and cool, you can't take your eyes off it!

You can go the other way and make a cool bouquet. I remember that I have already shown you something similar. But, I repeat.


You can give this to your mother, grandmother, or your favorite teacher.
DIY crafts in kindergarten on the theme "Autumn" (all new items)
With preschool children, you can just dream up. Take and lay out magical multi-colored trees from plasticine balls. And indeed there will be a golden autumn.

In addition, you can also use paints and cotton swabs for hygiene, they can create pictures and plots on any subject.

Agree, there is nothing difficult in this, just sit and put it on a sheet of paper.

Another fun craft made from improvised materials at home, such as millet, is what the author suggests.


You can also build pictures of rice and semolina, or pasta in the same way.


Everyone knows that kids love to play with prints, so why not take advantage of it. Dip dry leaves wounded from the ground and dip in liquid paint, an excellent print will come out.

See how bright and elegant you can decorate any picture.

Or you can go the other way, put the leaves (either real or paper) and use them as stencils, that is, paint directly on them, you will get prints.

Popular work from the palms. Well, let's use this idea.

You need to take a disposable white paper cup and recolor it green. Make a barrel out of a toilet sleeve and glue it to the plate.

Draw children's hands on cardboard and cut them out.

Glue one of them brown on the trunk.

And then, in this order, all the others.

Alternatively, you can make work in the form of acorns and even squirrels, cool!


Also, kids love to use natural material in their creations, for example, you can get by with pumpkin seeds. Print a picture with wheat or rye on an A4 sheet, and decorate it with such branches. Doesn't it look creative? And most importantly, simple and charming!

Ready description with materials and description, read below:

Do you want to use only colored paper? So you will need to cut strips of different colors and a couple of circles. Decide on the sizes yourself.

Fold each circle in half.

Then draw the trunk and make the crown of the tree, cut like this as shown in the photo with scissors.

Glue the trunk on white paper, and the crown, that is, two circles with each other, only asymmetrically.

What is missing, of course, colorful leaves! Cut them out in red, yellow and green.

So, what else, and here's what. You can take disposable paper plates, these are sold in a fixed price list or in any hardware store. Paint them in the color you want, for example brown, and then let dry. Cut out the body of a hedgehog or other animal from white cardboard, draw parts of the body, and let him hold a cone or an acorn with his paws.

Probably the most primitive, but also so bright will be a souvenir from cotton pads. Dilute the paint in a glass beaker and take the pipettes. Carefully color the discs with them. Let them dry.

And then glue it on any background, wow, beautiful! And the mood even rose, so bright and cool!

In classmates, I met another such landscape, only it was made in a different technique.

Original works from cones and acorns
Of course, wood material or waste is always in great demand. Especially during the autumn period. Because the gifts of nature can be found on the paths and in the park, forest. If you have a desire to create something ingenious from ordinary cones, then here's an idea for you, go for it.
Pour acrylic paint into a cup and dip each blank. After dry it, put it on any tray covered with oilcloth.

Then, from durable cardboard, you can even use a box, cut out the ring and decorate it with bumps, they are glued with a glue gun. Just be careful not to burn yourself.
This procedure is carried out only together with adults.

Try to glue the cones tightly to each other so that there is not a lot of space between them.

Here's a wreath for you, nice? I really liked it. By the way, you can also use

You can also make a bouquet out of them, who would have thought, but it looks so great, besides, if the vase is created by your own hands.

There are a great many ideas of what else can be done on this topic, I recently showed you here. It can be bunnies, hedgehogs, owls, chanterelles, etc., and any other animals. Here are a few more ideas for inspiration.


I want to show you one more video. In it you will see a bunch of new products this year. Enjoy watching.
As for acorns, there are also options for creations. Usually people or animals are made, but also cutlery and cups. Plus, matches or twigs are also used.


Well, if you want to distinguish yourself, then make an original thing, this is a brooch. Good luck.
Crafts "Autumn fantasies" for school (grades 1-4)
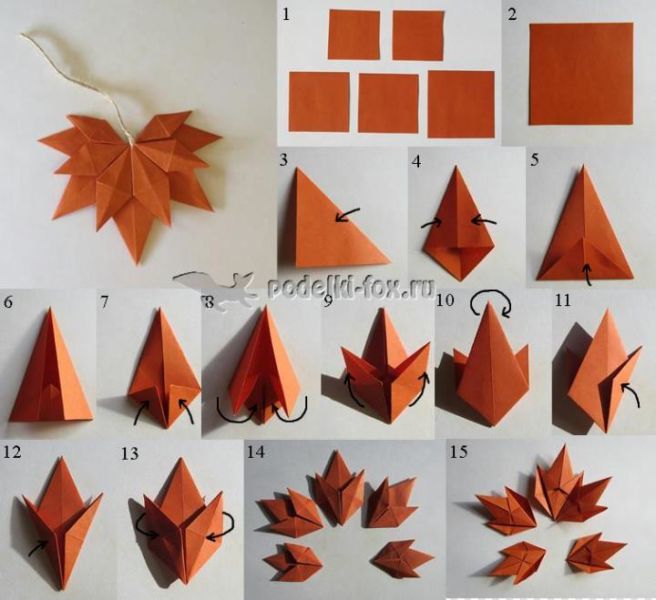
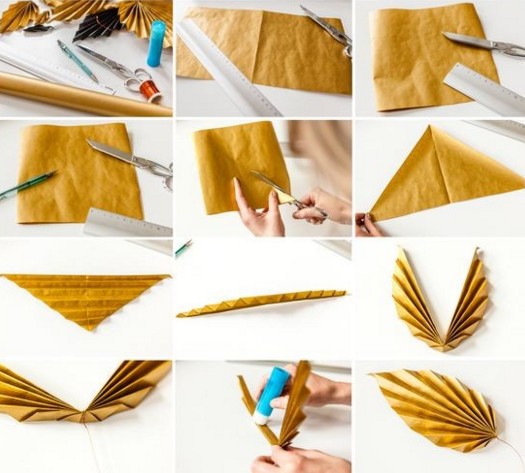
And now I propose to perform crafts according to this master class in the style of modular origami. Wow, I have been asked for a long time to show how you can quickly and easily make such maple leaves out of paper. So take note, because it is with such blanks that you can decorate the interior in a group, class, and even at a gala event, a matinee.
And then please, take and fantasize. Here's how they decorated the Country of Masters website.

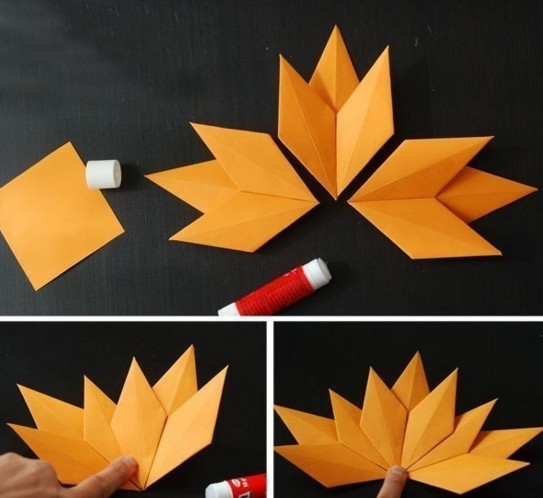
The next option that younger students love is, of course, the main character - a hedgehog.

In order to create it, you will need everything that you see in the figure below. This is colored paper, glue stick, felt-tip pen.
Take brown colored paper and fold it in half. Cut along the fold line with scissors, you get two rectangles.

Then glue them in such a way that you get a stand.

After the glue has dried, draw and make round edges on the workpiece. Cut along the line. From pink paper, also draw outlines in the form of a semi-oval.

It is also necessary to cut round ears and paws from it. Position the parts in the correct ratio as shown below and glue onto the base. Scatter real dry leaves or cut them out of colored paper.

Now it remains for the hedgehog to make thorns, make cuts along the edge of the brown paper.

Draw eyes and muzzle. Your fabulous little animal is ready.

With the help of an accordion, do the work in the form of trees. See how original it looks.

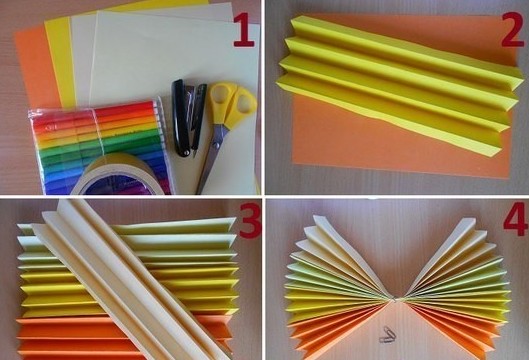
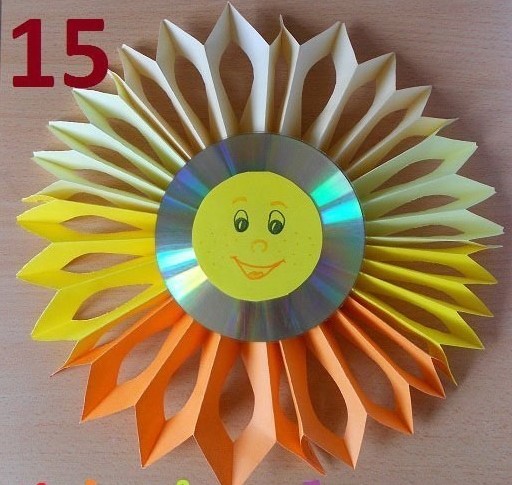
It also remains one of the favorite characters among children at any time of the year. I propose to make it this time from a CD. And again, the paper will have to be folded like an accordion, in general, see the instructions in the pictures and create.


What an unrealistically charming sun turned out, the mood rises at the sight of it.
And if there is no colored paper, then use napkins, though take them in a single color. Cut into small squares and roll each piece into balls.

Draw any still life, in this case the author depicted trees and a river. And painstakingly sit and glue each ball until the whole image is formed.


The next idea, work from cotton buds, which, as you can see, were originally painted, their heads, in the desired color.

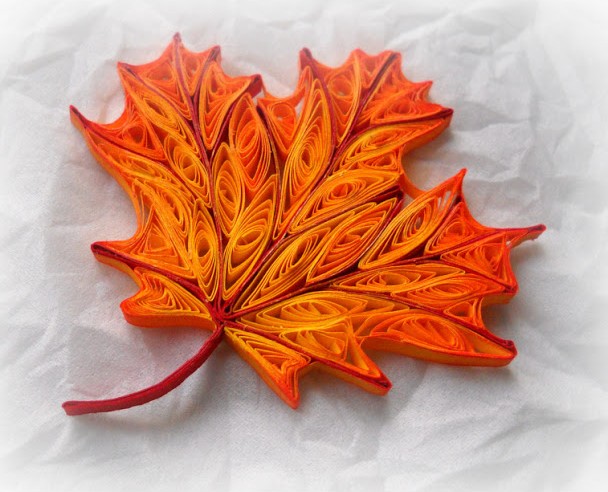
And for those who want to comprehend quilling, or are keen on it, I want to suggest considering such a masterpiece.


Here is another enchanted idea, look how cool the author came up with. Do you want to implement? Then get down to business. It will turn out to be a living corner.


And if this is too difficult for you, then take a regular package and follow the photo description.


Beautiful souvenirs made from natural materials and vegetables
I think that every time you visit such exhibitions you always rejoice. Because these events are always fun. Thank you for your positive and creative work. Which are made from all sorts of things.
You can take absolutely any vegetables and fruits and build from them
The simplest and easiest idea is a basket with such characters. As you can see, the author used a lot of vegetables that are in any home.


And even build the heroes of Smeshariki and Minions, catch the description:


Here are a few more thoughts that will push you to the next creation. The rest you can see here. By the way, you can also create from! There would be a desire.
Well, I want you to build Gena the crocodile. Especially when there is an instruction with a description. We will need not so much: carrots, cucumbers, tomatoes and toothpicks.
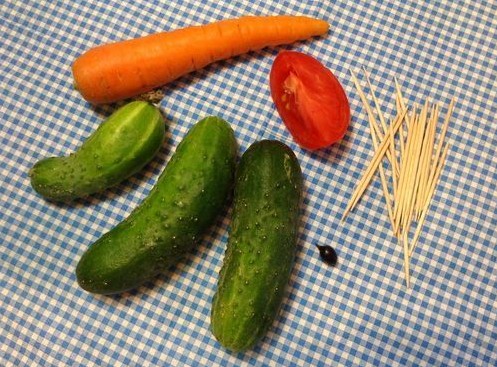
With a knife, cut a piece in the shape of a cylinder from a carrot, and then make something similar to a fungus.

Cut off the tip of the cucumber, and cut the vegetable in half, but not completely.

Connect the resulting parts with a toothpick. It turned out the head of a crocodile.

Then make eyes, from the pulp of the cucumber and black olives.
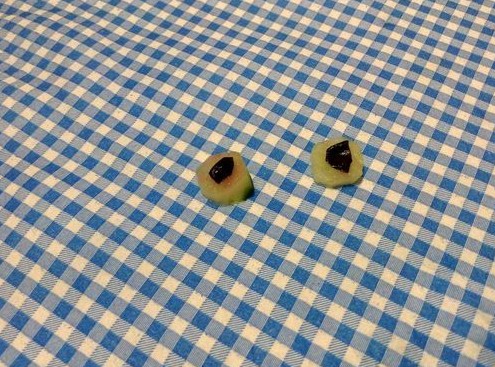
Stick them also in the head using wooden sticks. Cut out the tongue from the tomato.

For the body, use a slightly rounded cucumber, and shape the paws like this.

You can also build an accordion from the pulp of greens, but this is optional.

Put the weirdo on a plate and run to school or kindergarten to amaze everyone.

And here are some more such faces, oh, when I saw them, I was really scared). And you?

How to make an application from leaves: quickly and beautifully
For such work, you can take absolutely any character and easily decorate it with dry leaves that you have collected in the park. For example, you can lay out funny owls using cardboard and paper.
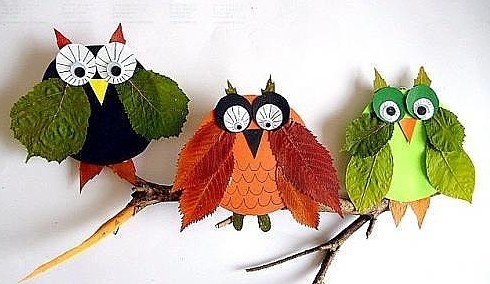
And you can directly make a huge owl out of leaves.

Or plant birds on a branch decorated with rowan clusters.

You can take any face, better than some animal, cut it out, and then decorate it.

And than, of course, leaves. Gather them and lay them on a sheet of newspaper so that they do not shrink when dried.
Maple leaves are best suited as decoration, for example, a lion.

Or perhaps you will be interested in the work in the form of a small lion cub.

Today my kids and I made these creations. And in general, they sat down to do it, and then mom remembers that she forgot to buy glue. Here I think what to do, mine will now go broke))). It's good that there was plasticine. And that's what happened.

You can easily build a vase using a balloon.

Or make an application of seeds and plasticine.

And you can imagine the work in the form of a voluminous toy.


Autumn paper crafts for kids with templates
So we got to another subtopic in which you can safely take templates and print them on a printer. And of course, to create, to receive new masterpieces, introducing some kind of zest.
If you use this picture, then later you can color it, or you can safely make a greeting card and write in it

For a sample, you can take absolutely any leaf you like, you can draw it yourself with a pencil. Fold a blank sheet in half, and then cut out the image of the workpiece on one side. Cut crayons into squares from office colored paper.

Scatter them randomly and stick with glue stick.

This is how mysterious the postcard looks.

Now let's take a closer look at one more master class, before that I already gave you some instructions, but this one is more understandable and the technology is different in addition.

You need to cut 10 squares.

And then fold each of them like this.

This work takes little time, do not worry, you can do it in 20 minutes.

And then you have to glue each blank with each other.

Of course, looking at the pictures, everything becomes clear.

Do not forget about other options, by the way, something like this craft looks like


You can fold the leaf in the form of a butterfly.
Also difficult, as you can see, there is nothing, fold it with an accordion and glue it together.


Moreover, you can do absolutely different forms, then connect your imagination.


You can build even more interesting to make the sheet tricolor.


Or bookmark a book using thread.


In addition to everything, you can make a pumpkin out of paper if you cut a bunch of long strips with scissors.


And how you will decorate it is your business, you can use a toothbrush.
Well, finally, take these ideas, dress up your favorite cartoon characters and fairy tales.


Well, according to tradition, I give you a few coloring pages, they will suddenly come in handy at your leisure.


Or use anti-stress coloring for creativity.

That's all, dear creators! I want a creative approach to business. And let the autumn crafts win your heart and you will want to do more next year. I wish you success and patience! Bye.
Best regards, Ekaterina
Click Class
Tell VK
Let's get down to it and consider from what it is generally possible to create a composition on the theme "Autumn".
The simplest thing is to rummage in the pantry or refrigerator and fish out a couple of beautiful vegetable fruits.
With a small amount of imagination, you can create an incredible variety of compositions from them.
For example, a family of eggplant penguins.

Girlfriends from beets, onions, pumpkins and cabbage. 
Funny farmers from corn.

Miss Charm from watermelon. 
This idea just blew my mind. What a beauty! But they just painted the apples with gold paint.

Such a panel can be created from any autumn berries: cranberries, rutabaga, mountain ash or rose hips. 
A teddy bear made of potatoes greets guests at the door of the pumpkin house. 
A fruit hedgehog will not please everyone for long, because they immediately eat it. 
Ladybug from mountain ash and black bird cherry. 
A couple of boiled corn minions. 
A real friendly family of onion heads. 
Now let's take a closer look at ideas from pumpkin and zucchini.
What can be done from zucchini
There were quite a lot of zucchini this year, so it’s not a pity to use a couple of pieces for crafts. Moreover, we have already prepared enough of it.
Here is a train carrying a wagon with gifts of autumn.

And this cutie just attracts the eye. 
A friendly onion family rides in a squash car.

The craft is worthy of a prize at any exhibition. it even felt folk motifs. 
A sports team of pepper frogs ride zucchini to the competition. 
The minions, beloved by everyone, began to be often found in crafts. 
And Miss Elegance generally strikes on the spot! 
Like this "man". 
Girls are happy to sculpt such a snail. 
after all, crafts can be decorated by everyone: beads, ribbons, natural or improvised material.
Unusual DIY pumpkin crafts
A lot has already been written about the pumpkin, so the selection will not be very large, but interesting.
Someone's family recreated a fragment of the famous fairy tale about the turnip.

I don’t know how they achieved such expressive eyes, but I just couldn’t help but show you this picture.

A gourd ship with a carrot anchor and a sail of leaves. 
Kittens look out of the basket. 
Another cute face for inspiration. 
Even just by drawing a face on a pumpkin, you can achieve originality and comedy. 
Pumpkin bird and stand made of natural materials are made very carefully and harmoniously.

How to insert bouquets into a pumpkin, I wrote a little earlier. The main thing is to pull out the pulp from the fruit, otherwise it will quickly ferment and smell. We also use seeds for crafts, below I will show how to do this. Inside the hollow pumpkin we insert a jar, a glass or a floral sponge so that the flowers stand longer. 
The pumpkin, like the apples above, can be dyed to make a golden carriage for the doll.

For me, no princess would refuse such a thing.
Autumn crafts from natural material
as soon as you go for a walk in a park or a forest, you can immediately collect a bunch of material for crafts. And sometimes you don’t need to go anywhere, everything at home is at hand.
From walnuts
I remember that my mother used to keep walnut shells especially for crafts. And not in vain. See how many of them you can sculpt.

Hedgehog with buckwheat needles. 
They must be peacocks. 
Plasticine and a shell will make a beautiful swan swimming in the lake.

The detailed description shows how to make a bird.
From branches
Of course, branches help to create whole compositions. We never cut them from a living tree. We collect only those that are already lying on the ground or dried up on the tree itself.
And now the composition with Baba Yaga in a mortar is made entirely of them.

Another composition of natural materials and a branch of birch.

This autumn clock also has a frame made of wood.

This photo shows a whole exposition of many materials. 
And now a small master class on how to make such a house from branches.

To begin with, we take a lot of plasticine. It can be replaced with foam or polyurethane foam. The main thing is that branches are well stuck into this material.
From plasticine we make a thick flat foundation. In which we stick branches around the perimeter. We determine where the passage and the door will be.

We completely cover the walls with branches.

We make a roof. We connect the ends of the "beams" with a clerical elastic band.
If necessary, you can use a glue gun. 
We make crossovers.

And cover the roof with leaves. 
A small craft made of twigs that imitate the web of a spider.

This masterpiece makes you look at yourself for a long time!

Hut on chicken legs from twigs and needles and Baba Yaga from a cone.

Nice nest for a family of birds.

The ideas are just inspiring!
Wreaths made from natural materials
But you can make autumn wreaths. Not even in the garden, but as a home decor. Not all the same to sculpt them before.

Idea with fresh and artificial flowers.


Such an original idea from twigs and dried flowers.

You can use a bundle or thin wire for the base. 
Wreaths came to us from Europe and have not yet lost their originality.
From seeds
Sunflower seeds make cute hedgehogs. They can be made the center of the appliqué or panel.

Or a whole composition with a pair of hedgehogs. By the way, it turned out very bright and positive.

And here are the sunflowers corrugated paper with a center of real seeds.

From pumpkin seeds
If we use the pumpkin itself as a vase for a bouquet, we will send the seeds to crafts.

Seeds can be painted over with watercolor or gouache and dried. Then the child will be very interested in creating applications.

For this panel, I immediately give a tree template.

Cut it out and decorate it with multi-colored seeds.

This basket was made from pistachio shells, but seeds will also perfectly replace them.

bowls of abundance
These bowls are simply amazing. You can use any natural materials - cones, branches, berries. And you can take felt and artificial flowers and fruits. In general, there are a lot of ideas.

Or such an option.

Here is a detailed master class, where the whole process of its manufacture is very clear.
From mountain ash
Many details can be made from rowan leaves and fruits. Their bright colors often help to diversify and decorate the craft.

You can not particularly bother, but simply glue such an application from the herbarium.

With grits
Ideas are also created from leaves, blades of grass and cereals. For example, this panel is made using a variety of materials. Which are glued to PVA glue.

Lion cub surrounded by dried flowers. 
All cereals hold well on double-sided tape and glue.
From dried flowers and fresh flowers
Well, we can't do without them. Look at the beauty that parents and children create.

Another pond with swans!

Another hedgehog surrounded by fresh flowers. And now there are still quite a few blooms: asters, yarrow, septembers, etc.

A very neat house with a fence made of ice cream sticks and a roof made of twigs.

Basket with a hedgehog and roses from leaves.

Cute mushroom from a good fairy tale. 
More mushrooms. Made from paste and cotton. 
Candy box panel. It turns out a 3D effect.

Well, everyone will definitely recognize these heroes!

It is very convenient to attach the material to the burlap. You can use both thread and thin wire. 
Hedgehog again, today we have a lot of them.

The duck conquered everyone with its realism.

This portrait looks very nice.

A variant of crafts from a hat decorated with dried flowers, fruits and a ribbon.

Fragment from life. After the harvest.

The original idea was to make a roof from ears of corn! 
The imagination of some creative people is simply mesmerizing. It's great that they share their results with us.
From plastic spoons
This is not a natural material, but this idea may come in handy for someone.

The handles are cut off, and the spoons themselves are painted with gouache or acrylic. You can connect them with plasticine or hot glue.

They can decorate a lot of crafts.
Light cone compositions for kindergarten children
Cones are also very affordable material. And for many ideas, a large number of them is not necessary.
As a child, there were Soviet books with pictures describing step-by-step actions. Here are some of these simple master classes.


Such a simple lamb.

Immediately many variations with cones. 
From them you can also collect a basket of flowers.
By the way, if you want the bump to open, put it in water for a day. True, when it dries, it will close again. But such an experiment will definitely surprise a child.

Lumberjack idea.

Or such a forest dweller.

Composition of a hedgehog and a squirrel.

original deer.

And here is how to make such a dog.

More ideas with cones, chestnuts and acorns.

funny helicopter

Cute animals with fluffy faces. 
Glade with gifts of autumn from spruce branches.

From cones and candies.

Another piece from the story.

Glade with a hedgehog and her children.

And this handsome man has apples made of thread and PVA glue on his back.

Another hedgehog with prey.

It seems to me that it is the crafts from cones that are easiest for small children to do.
How to make autumn crafts from acorns
From chestnuts and acorns, it turns out, too, a lot of things can be done. They are not very frequent guests in our Urals. However, they also meet.

These similarities of animals can be made from acorns.

Do you love owls? Maybe this idea will inspire you.

Plasticine will help to fasten the elements.

Everyone will love this dog for sure.

Here are some more easily recognizable characters from fairy tales. 
They can be supplemented with everything: leaves, feathers, wire.

Pencil holder with smiling leaves. 
Lots of the same people.

Fairytale friends in red caps.

Butterflies and dragonflies are very easy to make.

Kind grandfathers with a finger. 
Another butterfly idea. 
From the same Soviet book, ideas of different animals and birds. 

This is already enough to make an independent craft, right?
Leaf Crafts New
Certainly. now you are waiting for a lot of ideas from the leaves. That's really what material is enough, so it's them.
For any crafts, it is better to take leaves that are still elastic, which do not break when folded.
How do you like such a luxurious owl?

This is a rear view.

Of course, again the idea of a topiary with a crown of leaves.

By applying different leaves, you can collect many animals and birds, for example, such an elephant. 
Make a lion's mane out of them. He reminded me a lot of Simba.

Or such a goldfish in the sea-ocean.

The parrot looks like a real one.

Hanging hedgehog from birch bark. 
Panel of roses from leaves and needles.

Another app idea.

Nice version of the panel in a frame.

Three owls on a branch.

Lion from hot Africa.

For a change, whole leaves can be dyed. Or draw beautiful patterns on them. Acrylic and stained glass paints are suitable.

Not only the lion's mane, but also the clown's hair can be trusted with autumn leaves.

This bird reminds me of a cockatoo.

For the smallest children, I offer a variant of such a simple bird.

Schoolchildren can try to repeat such a turkey.

Decorate a snail house.

Easy crafts from a couple of leaves. When you just need to take the child for half an hour.

A beautiful fluffy tail turned out to be a squirrel. 
Galchat from Prostokvashino.

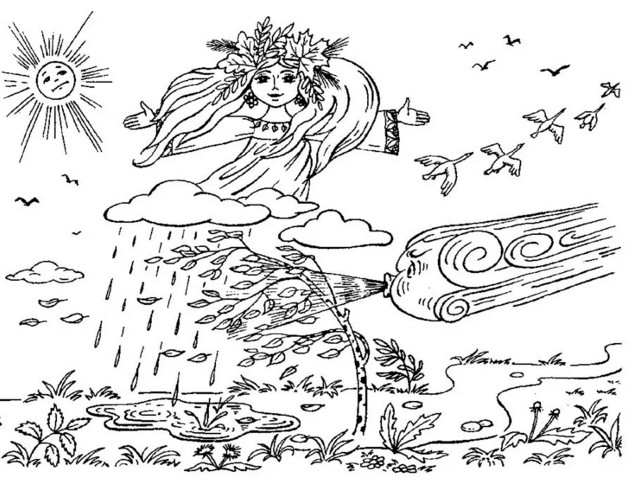
Panel where Autumn swings on a swing.

Or embodied in the form of such a cheerful little girl.

The idea of a tree with twigs.

Another bouquet of leaves.

Application with hedgehogs.

To give volume, it is better to use the material in layers.
You can also decorate the jar and use it as a candlestick on an autumn evening. 
The idea of a panel with bunnies. 
A family of birds. I think it's chickens.

This photo shows the step-by-step steps for creating a peacock.

Original dancers and ballerinas in leaf costumes.

Watercolor landscape.

Maybe autumn looks like this.

Preschoolers will be interested in doing such crafts.

Template for a lion.

Template for a hedgehog. 
You can glue all the leaves on PVA glue. This is the safest type of glue that even the smallest children can use. It is completely non-toxic.

This is the finished hedgehog.

Another version of the king of beasts.

And you can make a card with a maple leaf.

To do this, an A4 sheet is folded in half. On the front side, a leaf shape is cut out. And on the inside you glue all the autumn leaves. Then cover with the first sheet and get a picture. 
Let's make such joyful daisies or sunflowers.

We will need:
- colored cardboard,
- leaves,
- paper towel roll,
- cotton wool or gauze,
- lollipop tube,
- glue.
Cut out two identical circles from colored cardboard. 4 cm in diameter. Draw a muzzle on one part. Glue the leaves and a lollipop stick to it on the wrong side. Glue the leaves with the outer side up. And we close the entire wrong side with the second round part.

Now we make a stand. We cut out a circle from cardboard that exceeds the diameter of the sleeve by 2 cm.
At the sleeve itself, we make cuts of 1 cm from one edge and bend them outward. Fill with cotton wool or gauze.

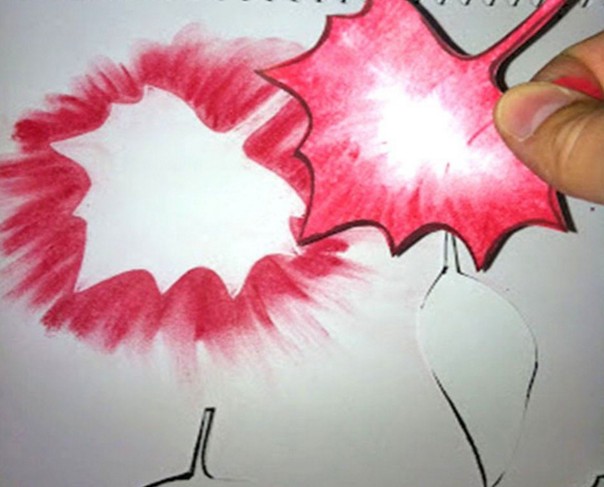
A student can make such a panel.

It is done with a toothbrush, paint and leaves.

We put a template on paper. We apply paint to the brush and drive along the bristles with a stick. In childhood, we drove the brush over a comb with large teeth. If you take a lot of water, drops will appear on the application. It is better to squeeze the brush a little. 
You can use several layers of different intensity and color.

Another beautiful autumn in human form.

Nice paper umbrella idea.

Options for creating insects and flowers.

You can depict the beauty of autumn in the form of Barbie.

Application with a goldfish.

May all wishes come true!
Paper ideas for school
You can make a lot of crafts out of paper. Moreover, this material is now sold in different formats. Paper can be corrugated, self-adhesive, velvet, metallic, etc.

You choose the material that fits the idea.

Offer your child this craft.

Let's take:
- toilet paper roll,
- PVA glue,
- stapler,
- markers.
You need to cut out this pattern. And roll along the line indicated by the dotted line. 
Autumn is a great time for needlework, because it gives us so many beautiful materials: leaves, vegetables, fruits, flowers, acorns, cones and twigs. And how cozy the house becomes if it is decorated with decor in yellow and crimson tones. In this article you will find 6 DIY autumn craft ideas for adults and children with step-by-step master classes and a selection of photos for inspiration.
Idea 1. Autumn topiary
Topiary is an ornamental tree that can be used to decorate a dining table, mantel or front door space. To make it, you can use natural or artificial materials, for example: leaves, berries on twigs, acorns, cones, chestnuts, flowers, dried citrus slices, as well as felt, sisal, linen and everything that your imagination tells you. In the next slider you can see some examples of such fall crafts.

Materials:
- clay pot;
- Wooden stick or branch;
- Two balls of styrofoam or floral foam;
- Materials for decorating the crown;
- Dry moss (you can replace it with sisal);
- Glue gun and a few sticks of glue;
- Scissors;
- Side cutters or secateurs;
- Acrylic paints for painting the barrel, bowl and pot (optional).
Instruction:
Step 1. Cut a hole in the base ball with a sharp object about a third of its diameter deep. Drop hot glue into the hole and insert the barrel into it.
Step 2. Insert the second ball into the pot. If the ball is not tight enough in the pot, lay newspaper around it. Cut a hole in the ball for the trunk 2-3 cm deep. Insert the trunk with the crown into the hole and adjust its length. Next, drop glue into the hole of the ball, place the barrel in it and start filling the hole with glue, placing small pieces of paper around the barrel. This is necessary so that the hot glue does not deepen the hole too much.

Step 3. Paint the pot in the desired color if you do not like its original appearance. In this project, the pot was painted with spray paint in a shade of dark bronze from Rustoleum (sold in building stores, for example, in Leroy Merlin).

Remember that the design of the pot should be simple and unpretentious so as not to distract attention from the crown. If necessary, paint the barrel and/or balls at this stage. It is desirable to paint the balls so that the gaps between the decorative details are invisible.
Step 4. While the paint on our blank dries, sort the decorative details by type and size. If you use artificial leaves, flowers and berries with a wire base, then when cutting them off, leave “stems” about 2 cm long. This is necessary in order not only to glue the parts, but also to stick them into the ball - then they will hold more securely . If the "stems" do not have wire, then it is better to cut the parts "under the root".
Step 5. Now it's time for the fun part - creating the crown. First, evenly distribute and glue the largest parts onto the ball, then the medium ones. Lastly, fill in the gaps with small decorations.

Step 6. Well, that's all, it remains only to decorate the ball in a pot with dry moss or sisal, having previously treated it with glue.
Idea 2. Pumpkins from toilet paper rolls
And here is another idea for an autumn vegetable-themed craft that you can make with children - pumpkins from toilet paper rolls. The possibilities for decorating these crafts are endless. For example, children can use colored paper, gouache or glitter, while adults can use gold leaf, fabric or lace.

Materials:
- Bushings from toilet paper or paper towels;
- Scissors;
- Leg-split;
- For decor: brushes, gouache or acrylic paints, PVA glue and sequins or book pages, etc .;
- Cinnamon sticks or sprigs (to create the core of the vegetable);
- Burlap, felt or cardboard (to create leaves).
Step 1. Flatten the toilet paper roll and cut into rings.

Step 2. Decorate the rings with whatever material you like, such as kraft paper, scrapbooking paper, fabric, ribbons, or simply paint them with acrylic paint. You can also decorate the pumpkins exactly as in this master class - with sequins and stripes of book pages.
Method 1. Using a brush, grease the outer sides of all the rings with PVA glue, and then generously sprinkle glitter on them. Wait for the blanks to dry, and then cover the sparkles with a second layer of PVA glue to protect them from shedding.

Method 2. Cut out thin strips of paper from book pages and glue them to the rings with PVA glue or glue stick.

Step 3. To form your pumpkin, pass the twine through the rings, then tighten the two ends and tie a knot as shown in the photo.

Step 4. Now glue cinnamon sticks or cut branches into the center of the pumpkin.

Step 5. Hooray, your pumpkins are almost ready, it remains only to add to them the leaves cut out of burlap, felt, cardboard or any other material at hand.

By the same principle, you can make a pumpkin from rings of any material.

Idea 3. Panel of leaves
Next, we present you the idea of \u200b\u200bcrafts from autumn leaves. Since this master class does not use hot glue and sharp objects, you can safely involve children in the work, and especially in collecting material.

An idea for an autumn craft made from natural materials that you can make with your children and use for seasonal home decoration
Materials:
Instruction:
Step 1. Cut the tree with a jigsaw and sand the ends with sandpaper.
Step 2. Paint the board with stain and leave to dry.
Step 3 With a marker, draw a maple leaf on the board by hand, using a template or stencil.

Step 4. Start gluing the pre-dried leaves (see how to dry them at the end of the article) like a fan, trying to place them so that their edges coincide with the outline of the picture. At the same time, you should not glue the leaves completely, let their tops be a little free so that the panel acquires some volume. On each glued leaflet, put some suitable size press for a minute.

Keep in mind that the leaves will not stick immediately, but after the glue dries they will stick well.

Step 5. To make the contours of the picture clearer, trim the leaves in some places. However, try to resort to such correction as little as possible so as not to lose the beauty of natural lines.
Step 6. Now attach a branch to your panel in place of the stem, break off the excess and glue it.

The following selection of photos presents examples of no less original autumn panels.

And finally, we suggest watching a video tutorial on how to make an autumn craft in the form of a panel of leaves with a frame of acorns with your own hands.
Idea 4. Wind music from natural materials and not only
The following project is an example of an interesting, but very easy-to-make craft from natural materials and ready-made parts, which a child can do almost independently.

Materials:
- Two or one sticks;
- Natural and factory-made materials for decorating threads: pine cones, flat stones, acorns, wooden beads, metal small candle holders (used in this project) and everything that comes to hand and matches the theme of autumn;
- Leg-split;
- Hot glue gun and glue sticks.

Step 1. Paint some elements of the future wind music, if necessary. In this master class, the author painted the pebbles in bright yellow and red colors.

Step 2. While the jewelry is drying, tie two sticks crosswise and tie the center of the cross with twine as shown in the photo below. You can also use just one long stick or, say, a hoop.

Step 3. Cut 9 ropes of twine to the desired length with a small margin for knots, so that in the future you get two rows on each branch and one in the middle.
Step 4. To create one row of wind chimes, take a piece of twine and start stringing beads or other details on it, passing the ropes through the holes twice or tightening them well into knots. Stones should be additionally fixed with hot glue. In order not to be mistaken with the order, the parts should first be decomposed in the desired order. By the way, it is better to place especially sonorous elements opposite each other so that their chime in the wind can be heard better.


Step 5. Tie knots at the end of each rope.

Step 6. After each thread is finished, tie them to the branches in double knots with the addition of a drop of glue.


Below are other examples of this unusual decoration made from cones, acorns and leaves.

Idea 5. Candlesticks in the form of autumn leaves from salt dough
Leaves can be used not only as a decorative or finishing material, but also as a template and stamp for creating crafts from any mass for modeling. Take note of the idea of autumn crafts with children in the form of such cute leaves from salt dough. By the way, they are not only beautiful in themselves, but can also perform a practical function, for example, you can store various decorations on them or put candles on them.


Materials:
- Salt Dough Ingredients: ½ cup salt, ½ cup water, 1 cup flour;
- Container for kneading dough;
- glass bowl;
- rolling pin;
- Large leaves;
- Vegetable oil;
- Acrylic paints in yellow, red, orange and brown.
Instruction:
Step 1. The first thing to do is go for a walk with the whole family and find at least two beautiful large leaves.
Step 2. Then knead the salty dough. To do this, simply mix all the ingredients and roll out the dough to about 6 mm thick (no less), so that it is not too thick, but not too brittle.
Step 3. Spread your leaves on the dough and go over it with a rolling pin with light pressure.


Step 4 The next step is to cut out the shape around the sheet. Use a sharp knife and, of course, take this part of the work yourself.

Step 5. Remove the leaves. Turn the glass bowl over and brush it with a thin layer of vegetable oil.

Step 6 Carefully lift the sheets and place them on the bowls.

Step 7. Put the bowls of dough in the oven, preheated to 250 degrees and leave them to bake for 2-3 hours.

Step 8 Remove your pastries from the oven and let them cool without removing them from the bowls for about 15 minutes. Then carefully lift the leaves and leave to cool completely.

Blanks
Step 9 Once the bowls are cool, start painting. To do this, pour the paints of each color into cups and let the children mix them themselves and paint the inside of the leaves first, and then the outside. Salt dough crafts are quite fragile, so you need to paint them carefully, without pressure. Wait until the paint dries and, if desired, cover the bowls with a layer of PVA glue. It will give the craft a haze and make it a little stronger.

bowl painting
Leaf shapes may vary.

By the way, if you do not want to mess with salt dough, then you can replace it with soft plasticine. The photo below shows an example of such a craft.

Idea 6. Felt garland
Felt, although it is not a natural material, crafts from it turn out to be the most autumnal. Today we offer you to make the simplest garland of felt leaves.

Materials:
- Several sheets of felt in autumn colors;
- Leg-split;
- Scissors;
- Glue;
- Thick threads with a needle;
- Pencil.
Instruction:
Step 1. Download and print the leaf templates (see template for download below), then cut them out and outline the outlines.
Step 2. Cut out the blanks.
Step 3. Sew the veins by hand with large stitches.
Step 4. Now, maintaining an equal interval, hang the leaves on the twine. To do this, wrap the tail of each leaf around the twine and fix with glue. You can sew on details if you wish. Voila, the autumn felt garland is ready!

Following the principles of this simple master class, you can create a variety of garlands with decorations in the form of acorns, cones, pumpkins, etc. The following selection of photos shows some examples of autumn felt garlands.

How to dry leaves and flowers
Method 1. This method is suitable if you want applications or other bulky crafts. Spread sheets or flowers between the pages of the book at a distance of about 3 mm from each other and shift them to other pages every day (also observing an interval of 3 mm). Within a week, the paper will absorb all the moisture from the plants, and you can use them for creativity.
Method 2. If your craft does not involve the use of flat leaves, then you can dry them by simply gathering them in a bunch and hanging upside down in a dry but ventilated area. At the same time, keep in mind that from the sun's rays the leaves will lose their color completely, and in the shade they will remain.
Method 3. This method is suitable for drying and preserving the color of leaves and cornflowers. Blot fresh, freshly picked leaves / cornflowers with a napkin if they are wet. Place each sheet between two layers of waxed paper, and place a paper towel on top of the resulting "sandwich". Preheat the iron and make sure the steam mode is off. Iron the paper towel with pressure for 2-5 minutes. Turn the "sandwich" over and iron it through the paper towel again, then carefully remove the wax paper.
- So that the dried leaves and flowers do not break, they must be dipped in a solution of water and PVA glue, diluted in a 4: 1 ratio, and then left to dry.