Big paper snowflake. Instructions for a step-by-step snowflake master class from a book for the New Year. White-blue snowflake from modules
Without what it is impossible to imagine the New Year? Definitely without a Christmas tree, tangerines and paper snowflakes. Every citizen of the post-Soviet space at least once in his life made such paper snowflakes. Unpretentious or filigree, similar to the finest lace or voluminous. All of them perfectly coped with their vocation - they brought the New Year mood to any room.
We offer to remember virginity and make a couple of such paper snowflakes. They can be hung on a Christmas tree or around the room, or even given to friends as New Year's souvenirs. Call the kids, let's make paper snowflakes!

- Scissors.
- Stapler or glue or tape.
- Simple pencil.
- Ruler.
Let's start making snowflakes
Prepare 6 identical paper squares. Bend each such square diagonally. Depending on how big the snowflake you plan to make, the sides of the paper squares can be 10 centimeters, if you are planning a small snowflake and 20-30 centimeters if the snowflake you have planned should be impressive.
For training, it is best to stop at a snowflake that is not very large.

Using a simple pencil and a ruler, draw three parallel lines. Make notes, starting from the edges of the folded paper triangles. Markings are superimposed on the triangle from the side of short edges. The spaces between the lines should be equal. If you are planning to make a large snowflake of notes, you can do more.

Now you need to make cuts according to the marks. Using scissors, cut the lines, but at the bluntest vertex of the paper triangle, do not cut them to the end. It's about 3-5 mm.

Expand the triangle with the cuts made back into a square. And starting from the middle, fasten together the free corners of the figures that were formed after cutting through the marks. These should be the same squares, only small and fastened together with a left uncut canvas. You can fasten the corners of the squares with glue, tape or a stapler.

After you have finished pinning the strips on one side, flip the cut paper square over to the other side and repeat the above steps.
So you learned the algorithm for collecting snowflakes. Work the remaining five paper triangles like the very first one.

You should have six identical parts, shaped like three-dimensional diamonds. All these six parts need to be combined into one three-dimensional figure. To do this, sequentially fasten in the center, with adhesive tape, a stapler or glue, first three parts, then three more parts separately. Well, in the end, two details. Attach in the center. Do not disregard other places of contact between the details of the snowflake. This is required so that your snowflake does not lose its shape.

Well, as a completion, you can add decor. Glitter or shiny stickers will look good.

You can use glue that is already filled with multi-colored shiny particles. That's all. You can safely hang your masterpiece on a Christmas tree or a window, or you can give it as a gift. Happy New Year.
Here is another, very original version for volumetric snowflakes. Such a snowflake is also easy to make.

So, let's begin. You will need:
- Thick paper, color choice is up to you. You can choose classic white or blue, or you can choose yellow or red.
- Scissors.
- Glue.
Prepare exactly 12 identical paper strips. The length of each strip should be equal to 20 centimeters, and the width 1 centimeter. You can use another aspect ratio: 1.5 - width and 30 centimeters - length. Accordingly, in the second case, you will get a large snowflake.

The assembly of the snowflake starts from the center to the edges. You need to cross two stripes. In the center they need to be glued.

Add two more to the crossed stripes on each side. Weave them, placing one under the other. For greater structural strength, fasten the paper strips at the crossing points with glue.

The ends of the strips, which are located at right angles to one another, must be grabbed at the very edge with glue.

The paper strips from which you started assembling the snowflake should remain free. This will be one half of the snowflake. Repeat the steps and collect the same half.

Well, the final stage of the assembly is the connection of the two halves into one snowflake. To do this, glue the remaining consolidated ends together. The halves will need to be rotated in relation to one another by 45 degrees. If you glue your snowflake also in the middle with glue. She will become more like a flower.

Assembling paper snowflakes will require attention and perseverance, as well as accuracy, which will be a great workout for kids.
That's all. Decorate your Christmas tree or room with your snowflake, or create a composition with the previous snowflake. Happy New Year.

Here you are sitting and thinking about what else to come up with to amuse your family and bring the New Year mood into your life. Many ideas have already been tested, I want some frills, but, of course, I am reluctant to start any grandiose projects. Which will require a lot of time, finances and parts from adamantium.
Great, you found what you were looking for. It is in this article that we will tell you how to make cute and original snowflakes from ordinary pasta. Such snowflakes will perfectly play the role of a gift, decor or just an excuse to sit with the family and with cocoa and funny stories.

- Glue. You can take superglue or any other analogue of such glue. Hot glue works well.
- PVA glue.
- Paints. It is best to take acrylic. Their main quality is that it is acrylic paints that perfectly cover any surface. But spray paints in cans can be a great alternative. Especially it is necessary, by the way, silver.
- Tassel.
- Additional elements for decoration at your discretion (sparkles, artificial snow, sugar, salt, etc.).
- Lace/ribbon or something similar.

If you called on the help of children, then first cover the work surface with paper to protect it.
We turn on the fantasy and right on the surface of the table we compose snowflakes from different pasta. Be sure to consider which connections will hold together and which will not.

After such as future snowflakes have found their shapes, we glue the individual components with glue. We start the assembly from the center, gradually attaching the parts, approaching the outer perimeter.

Wait until the glue is completely dry so as not to destroy fragile joints.
Do not create large compositions, as pasta can simply fall apart, unable to withstand the weight of its own kind. Therefore, limit yourself to a few rows.
After the snowflakes have completely dried, it's time to cover them with paint. An unsuccessful choice would be to use gouache. This paint will take a long time to dry and may crack if applied thick enough.

If you will be painting your snowflakes with non-spray paint, then it would be appropriate to choose long-haired brushes. This will help to color hard-to-reach places of snowflakes. The most practical will be to pick up several options for brushes, small large and thick.
But if you decide to paint products with spray paint, then this process must be done outdoors. It is for this paint that the advantage remains. Since the fine particles sprayed into the fog lay down in a thin layer, which will allow the product to dry quickly and get into the smallest cracks of your snowflakes.
After the paint has dried, you can proceed to the final stage of manufacturing. Namely, decoration. Apply a thin layer of PVA to the painted snowflakes. And then sprinkle with sparkles or artificial snow. Regular sugar will look great. Its particles will magically sparkle, giving the snowflake realism.

In order for your snowflake to be more resistant to external influences, you can cover it with a layer of varnish. You can again take varnish in a spray can.
Don't forget to attach a loop to your creation so you can hang your snowflake.
New Year is the most favorite holiday for most people. They begin to prepare for it in a few more weeks, or even months. Often on the eve of the holiday, apartments, offices, schools and kindergartens are decorated with various New Year's figurines. Among them, the most beautiful and interesting are do-it-yourself voluminous snowflakes made of paper. They are hung under the ceiling or in the window opening. It adds a festive atmosphere to the room and uplifts the mood. Due to their large size, they are often used in a single copy. Additionally, snowflakes are decorated with bright and shiny materials.
Before making a big paper snowflake, you need to choose the right materials. The appearance of the future snowflake will depend on this. To make a large volumetric snowflake, we need the following materials and tools:
- white paper. You can use a different color if you want to make a custom craft;
- scissors;
- glue;
- ruler;
- simple pencil;
- stationery stapler.
An example of that what can be made from paper and a stapler:

Volumetric craft round shape
Making a three-dimensional snowflake is a rather laborious process that will take a lot of time. If you don’t have it, but you want to decorate your house with an original product, then you can choose easier way to make a snowflake. It will have a round shape and will perfectly complement your interior. To create it, you need the following materials and tools:
- a sheet of white thick paper;
- compass;
- needle and thread;
- Ruler and pencil;
- colored fabric (preferably red or yellow).

Origami and kirigami technique
Not everyone knows that using the origami technique, you can simply and quickly make a beautiful snowflake.

Kirigami is a slightly more complex type of technique. It assumes sequential folding of the sheet and precise cutting of the pattern. It is better for beginners to draw a future pattern, and then start cutting it out. The easiest way to do this is with nail scissors. They are small and thin, which will allow you to cut out the pattern as accurately as possible. If you successfully coped with this, then feel free to bend the extra parts and enjoy the beauty of the snowflake.
paper strip product
To achieve the maximum 3D effect on crafts, use paper strips. This option is very convenient, since you can adjust the size of the protruding part and the bent ends. To make this Christmas decoration you need:
- glue;
- scissors;
- thin strips of paper.
To add lightness and airiness to your snowflake, use strips no more than five millimeters wide. For more voluminous and massive products, strips with a width of at least 8 mm should be taken.
The manufacturing process consists of the following steps:

A snowflake from paper strips can be made in another way:

How to make a snowflake in the form of an accordion is one of the easiest. To implement it, you can involve your child. We perform the following actions:

New Year crafts from modules
A beautiful craft turns out when using triangular modules. To create such a craft, you need to do the following:
- We prepare all the modules necessary for the snowflake.
- We connect the modules to each other, forming a future snowflake.
- If the result satisfied you, we glue all the details.
 The advantage of this method is the ability to make changes in the course of work. By adding or removing modules, you can achieve the desired size and shape.
DIY large paper snowflakes They are wonderful Christmas decorations. With their help, you can create a holiday atmosphere even in the simplest room. By combining snowflakes made in various ways, you can easily achieve the desired result and give joy and fun to the people around you.
Attention, only TODAY!
One of our most common New Year's memories "comes from childhood" are the numerous paper snowflakes on glass that adorned the windows of houses, kindergartens and schools. Their carved rays, even in the complete absence of real snow on the street, gave everyone a feeling of an approaching holiday, forcing them to believe in future miracles. But the years go by, and now it’s not us, but our children who cut out snowflakes, decorating their classrooms and their rooms with them. In recent years, the so-called voluminous paper snowflakes have come into fashion. Their creation, of course, takes a little more time than simple cutting. But such paper creations look much more spectacular than flat counterparts. Yes, and you can mount them not only on glass. Volumetric snowflakes can become Christmas decorations, and pendants that complement the festive tinsel, and decorations for lamps in spacious offices for the New Year.
It doesn't take much to make any of these snowflakes:
- paper (office white, color or wrapping);
- scissors;
- glue and/or stapler.
- In order to make such a voluminous snowflake with your own hands, you will need six paper squares of any size and color. It is better to collect a medium-sized snowflake from ordinary office paper - 2 squares per sheet A 4. If you still want to decorate the house with a large voluminous beauty (1 square is cut out of sheet A 4), then it is better to take paper of greater density, since the weight of 6 sheets of snowflake will sag and lose in effectiveness.
- Each square must first be folded diagonally, and then again to make a triangle.
- Now, with a pencil from the fold, you should draw a line parallel to the base of the triangle, about 1 cm short of the edge. The distance between the lines is 1.5–2 centimeters (depending on the size of the future snowflake).
- cut through. By and large, the lines can not be drawn, but immediately cut the workpiece into strips of equal width.
- Roll up and staple the first strips together. Of course, the stapler staples do not look very elegant, but they significantly save the time of the one who makes the voluminous snowflake, because he does not have to wait until the glue “grabs”.
- Turn the part over and fasten the next two (closest to the center) strips together.
- Continue to turn the workpiece until all the strips of the workpiece are fastened together. There should be such a ray.
- Now you should do the same 5 more times. It turned out 6 rays.
- With the help of the same stapler, you should connect the rays to each other at the bottom. First, three pieces, and then combine two large parts.
- And finally, it is necessary to connect the rays at the points of contact with each other.


Do-it-yourself volumetric snowflake is ready! Of course, you can make such an ornament not only from white, but also from colored paper. If you make cuts not with ordinary, but with curly scissors, the voluminous snowflake will look even more elegant.

Volumetric snowflake cut out with curly scissors (close)

Volumetric snowflake. Option 2
This voluminous snowflake is made from thin strips of paper. An A4 sheet should be cut into strips 0.6–0.8 cm thick. For a smaller snowflake, 12 paper strips will be required, and for a larger one - 20.
Work plan:
- Weave the strips together with a lattice, fastening the places of weaving with glue. This is a preparation. Each snowflake will consist of two cross-shaped pieces. For a small snowflake, the lattice is woven 3 X 3, and for a large 5 X 5 strips.
- One grate must be put on top of the other, shifting, as in the photo. Glue the joints of the parts again.
- Now rays. The two extreme strips of the lower part should be wrapped up and attached to the central strip of the upper part with a stapler. If the lattices were woven from five strips, then with the next extreme strips you need to do the same. If the lattices were woven 3 X 3, then you can start creating the next ray.
- After 3 beams are ready, the snowflake must be turned over and do the same with free stripes.


Volumetric snowflake from paper strips
This is how ready-made small and large snowflakes look.
Volumetric snowflake "in haste"

Perhaps this is the easiest and fastest way to create a three-dimensional paper snowflake.
For a small snowflake, an A4 sheet must be cut in half and made into a square from each half. It should be folded in half, and then again to make a rectangle.
Now you need to cut out the "ears". It is better to first draw them with a pencil so that the detail is symmetrical. Each "ear" must be cut twice, slightly short of the center, and unfold the details.
The tip of the resulting central strip of each ray should be glued in the center. The same must be done with all rays.
Each snowflake consists of two parts glued to each other crosswise with the volume side out. In principle, you can glue the parts on top of each other, but that's how you like it.


The volumetric snowflake is ready, and it took no more than 10 minutes to create it.
Update as of November 27, 2015
An extremely simple and at the same time very nice voluminous snowflake is obtained from two "accordions".
Necessary materials: two sheets of paper, a simple pencil, scissors, an elastic band and a stapler.
- We fold two sheets of A4 paper with an accordion 2.8 cm wide. With this interval, the accordion will consist of 10 stripes. By and large, the size of the paper and the thickness of the strips do not matter. The main thing is that there should be an even number of strips (8, 10, 12, 14, etc.)
- On one half, draw a pattern with a pencil and cut it out (you can also do this with curly scissors).
- We bend the accordion in half so that the edges match, and draw a pattern on the second half with a pencil. So the picture will be symmetrical. Cut out.
- Since this voluminous snowflake requires two accordions, we put the cut and not cut accordions on top of each other. Duplicate the drawing with a pencil and cut it out.
- We put the accordions together one after the other and tighten it with an elastic band in the middle.
- Using a stapler, we fasten the accordions to each other to make a circle.
1. We fold it with an accordion 2.8 cm wide 2. We need to make 2 identical accordions 3. We assemble the accordion 4. We draw a pattern for the future snowball
5. Bend in half and draw the same pattern 6. Cut out the pattern from the second side of the accordion 7. It should look like this 8. Transfer the pattern to the second folded accordion
9. Draw symmetrically from 2 sides 10. Cut out the pattern on the second harmonica 11. Make sure that both harmonicas are the same 12. Put both harmonicas together and tighten with an elastic band  13. Both harmonicas after screed
  14. We connect the edges of the sheets with a stapler
  15. This is how the connection should turn out
  16. We connect the remaining edges of the sheets
  17. Gently fasten all the edges of the sheets 18. Straighten all the folds evenly 19. Turn over the resulting snowflake 20. Volumetric snowflake "pea" is ready
Soon, very soon, the first heralds of the Queen of snowfalls and frosts will whirl in the air. They will be full of fluff in a dance with the last leaves and drops of freezing rain.
Snowflakes are an essential attribute of Winter and New Year. Well, without them? And although they are the first to tell us about the change of seasons, we feel some kind of joyful excitement and tender feeling for them. We can admire these fragile crystals for a long, long time.
And, of course, we simply cannot exclude them from decorations for the New Year holiday. They create a mood, fill the house with lightness, beauty and airiness, create a feeling of a miracle, extraordinary transformations and magic.
They are so beautiful - carved, graceful and charming that you can't take your eyes off. Although they are made of paper.
Today I have prepared for you schemes for creating three-dimensional snowflakes. They can be made in different sizes. It all depends on what kind of room you are decorating. If this is an assembly hall or a group, a class in a kindergarten or school, then such decorations should be large in size.
And for the home decor of an ordinary room, you can make it smaller. One thing is certain - these beautiful products will create the coziness and charm of a fairy tale.
Involve your children in the creation of these amazing crafts. After all, the New Year is a family holiday, and everyone, “from young to old”, participates in the preparation for it. From this, the expectation of a festive miracle will be even greater and more significant.
Well, let's get started.
We can create the most beautiful New Year's decorations ourselves using sheets of ordinary paper, scissors, glue and a pencil. Decorating our home with our own creations, we fill it with warmth and goodness. After all, we put our soul and love into every craft, trying to make our house smart, to convey all the festive mood and New Year's excitement.

We will make with you an amazing snowflake, so quivering and tender. And very beautiful.
We will need:
- 6 square sheets of paper
- Scissors
- 2 threads (can be taken from tinsel - silver rain)
You can cut out squares from sheets of A4 paper. It is better to take colored double-sided office paper or the same for origami. But even from simple white sheets, a snowflake turns out to be just as beautiful.

When the squares are cut, we begin to create beauty. Fold the square diagonally. We check that all the corners match and there is no skew.
Then we make cuts. the width of the strips is about 0.8-1 cm. When cutting the folded square into strips, leave about 1 cm to the fold line. Make the last cut so that the corner remains about 2 cm. Unfold.

Set aside the scissors, we won't need them anymore. And armed with glue.
The effect of volume is created by the fact that each strip must be glued, while alternating sides. Let's start from the top corner.
To glue it neatly, you can use a pencil or pen. Lubricate the tip of the sidewall with glue, place a pencil, as if winding paper on it, and connect it to the other end. Press the glued ends to the pencil.

Now we turn our part over to the other side. And glue the next two strips. We carefully adjust the corners so that they do not go beyond the stripes. Dealt with it.

Turn the workpiece over again and glue the next two strips. And so we continue to the end of the detail.

We should get such a voluminous figure. We do the same with the rest of the paper squares. As a result, we should have six blanks.

It remains for us to connect all the details together. We take two blanks, grease the lower corner with glue and apply the same corner of the next blank to it. Pay attention to the direction of each detail. Bonding points should face the same direction.

We continue to connect the parts of the snowflake. Carefully glue the blanks one by one in turn. It remains to glue the last detail. Its corner is applied opposite to all glued parts. And it sticks.

Here are all the pieces put together. And we got a beautiful voluminous snowflake.

Now you can attach a silver thread or a tinsel raindrop to one segment. And you can decorate the interior.
Volumetric snowflake for the New Year - easy paper craft
This voluminous, fluffy, beautiful product is created very simply. Here we will not meet any intricate moments and details. Everything is very simple. The finished snowflake consists of several parts. Each part is made according to the same scheme and differs only in size.
A snowflake that combines two colors looks great. Usually these are cold colors of winter nature - white, silver, blue, blue. But you can experiment and use other colors.
Let's make this miracle together.

We will take:
- 1 sheet of A4 blue paper
- 1 sheet of A4 white paper
- Scissors
- A few rhinestones or beads for decoration
From a blue sheet we cut out a square measuring 20 cm by 20 cm. Do not rush to throw away the cut piece of paper. We will need it for one more workpiece. Fold the square diagonally. Then we turn the resulting triangle in half. We do the same with the resulting triangle. Then, in the direction from the fold line, we fold our workpiece into a sharp triangle.

Now we cut off the unnecessary part at an angle of about 45⁰. And we make cuts, not reaching 0.5-0.8 cm to the fold line. Carefully unfold the first piece. Before us is such a fluffy snowflake.

We take a sheet of white paper and cut out a square measuring 15 cm by 15 cm from it. And we repeat all the steps as when creating a blue snowflake. We first fold the square diagonally, then bend it into one triangle, then into another. We fold the last figure into an acute triangle. And cut off the unnecessary part obliquely.

Then, as in the previous case, we make cuts. And carefully unfold the snowflake. Here is the second blank and ready.

When we put it on the blue, you can already see what beauty we get.

Let's move on to the third part. We cut out a square of 10 cm by 10 cm from blue paper. You can use our remaining piece.
And we do everything from the beginning. We fold in turn into three triangles. We bend the last triangle into a sharp arrow. And we make cuts.
Carefully unfold so as not to damage the thin parts. And another smaller blank is ready.

You can optionally make another small snowflake. Now grease the place in the center of each workpiece with glue. Thus, we will connect them all so that the volumetric snowflake does not fall apart. Fluff thin parts. And our snowflake is ready.

In the center of the upper part, you can glue a bead or a rhinestone. From this, the product will be even more beautiful. You can attach a silver thread to the snowflake and decorate it with a Christmas tree or home interior.
Video on how to make a paper snowflake
Gorgeous volumetric creations for the New Year's celebration can be made from simple strips of paper. Is it really possible? Certainly! A creative attitude will help you create an incredibly beautiful craft. And the video will help to fulfill the plan. Look, repeat all the actions, create. And literally, in a few minutes, a beautiful elegant decoration will appear in your house.
three-dimensional snowflake for the new year
It is not difficult to make this wonderful craft. Performing all the manipulations on the pictures, you can easily cope with this task. The asterisk consists of six parts, each of which can already serve as a beautiful three-dimensional decoration-flashlight. And when connected together, they will become a magnificent design in the form of multifaceted stars shimmering in the multi-colored lights of Christmas tree garlands.

A beautiful voluminous figurine can become not only a decoration for a room for the holiday. It's perfect for a wrapped gift. Make a smaller star and attach it to the gift wrapping paper.
Use for crafts not only plain paper. If you still have pieces of packing lists from past holidays, feel free to model decoration from them.
Well, let's get started. We need:
- 3 sheets of paper (A4 format)
- Scissors
- Ruler
- Pencil
- Eraser
Fold each sheet in half and cut into two equal parts. We take one part. Cut out a square from it. We fold the figure diagonally. Fold the resulting triangle in half. We arm ourselves with a pencil and a ruler and make markings. We mark 2 cm from the edge. Then we set aside 1 cm from the middle. We draw lines as shown in the picture.

Now we need to do the same with the rest of the blanks. We fold the halves of the sheets, cut out the squares and mark the folded triangles.

We take scissors and make cuts along the marked lines. Pencil marks can be removed with an eraser. Open and straighten the square.
Now we need glue. We glue the central part first. We skip the next strips and glue the third parts. Flip the figurine. And glue the second and fourth parts.

We have got such a flashlight. It can already be hung on a Christmas tree or on a window. He's so cute. But our task is different. Go ahead.

We turn the remaining blanks into cute lanterns. We should have six. We glue three lanterns each, smearing the lower sharp part with glue. Then we connect the two halves of the star.
So that the snowflake does not fall apart, we will connect the side strips with glue.

Well, well, we did it. Look how beautiful it turned out. Now is the time to attach a thread or tinsel to it. And you can start decorating the room.

And attach a smaller star to the gift. Your loved ones will be very pleased to receive a gift in such a package.
Christmas paper accordion star
This beautiful decoration will incredibly accurately convey the fabulous atmosphere of a winter fairy tale. Spectacular, pointed snowflake stars, whirling and fluttering, will fascinate anyone who casts a glance at them. It's easy to make them. They can be both monophonic and multi-colored.
You can add your own zest - make a pattern, change the shape of the sharp part of the figure, combine different colors of paper. From this, the product will shine even more in an elegant room.

We will need:
- 12 square notes from a block of office paper for notes (color)
- 1 same white sheet for the template
- Scissors
- Ruler 3 cm wide
- Ruler side 2 cm
The snowflake consists of 12 parts. First we will make one blank. All others are performed in the same way.
We take a square with a side of 10 cm. We put a ruler 3 cm wide in the middle. We bend the ends of the sheet on both sides. Lubricate one edge with glue and connect both edges. Pull out the line.
Change the line to a narrower one. I put it in the middle. And we bend the edges, somewhere in 0.5 cm.
We use rulers for convenience. It is easier to bend paper on them, and the place of the fold will be smoother.
Now let's open the details. And bend the fold lines on both sides inward.

We need to prepare a template according to which we will shape all the blanks.
We take a white square. We put our glued blank on it and cut it out along the contour. Fold the cut rectangle in half along the long side.
Stepping back from the bottom edge of 1 cm, cut out a small triangle. From the triangle we make an indent of about 0.5-0.8 cm. We cut off the corner obliquely. We have a pattern that looks like a spade.
Now we apply this template to the workpiece and cut out the part according to it. Here is our first piece of snowflake ready.

Now we are working on the remaining 11 blanks. When all the parts are ready, we proceed to assemble the snowflake. We take a detail, and coat the entire length in the center with glue. Place the next piece on top. Lubricate with glue and connect with the next part. And so we fasten all the parts.
Let the glue dry. And the last step: grease the accordion on one side with glue. And we connect the two ends, revealing the entire accordion snowflake and closing it in a circle.

You can attach thread or tinsel to the star.
Here is our lovely snowflake ready to decorate your Christmas tree or window.

From several of these beauties you can make cute compositions. Let them create a joyful atmosphere of celebration and miracle.
DIY snowflake pendant
Another elegant item to add to your collection of Christmas decorations. Fragile and delicate, it resembles a real snowflake. You can create such beauty in a few minutes. Complete the pendant with shiny elements - beads, rhinestones, sequins. And she will play, sparkle in the lights of garlands and candles.

We need:
- 1 sheet of colored double-sided paper (A4)
- Scissors
- Thread or stapler
Fold the sheet in half. Then we fold two more times. Bend the resulting strip in the center. Cut corners off both ends.

Then we rewind the place of the fold with a thread so that our craft does not fall apart and disperse.
You can use a stapler instead of a thread and fasten the place in the center with a bracket.
Cut all the folds with scissors. Now each petal needs to be folded in half and glued in the center of the craft, as shown in the picture.

We have such a circular fan. From the outer edge on each petal we make two cuts. The extreme parts-cuts are turned out and bent. So we do with all the petals. And our snowflake is almost ready. Now we glue shiny beads to it from one side and the other.

You can already look for a place for our crafts. We attach a silver or gold thread to it. The pendant is ready to decorate your home.

Make a few more of these snowflakes in different sizes. hang at different height. Your home will sparkle with New Year's holiday attributes.
We all want something unusual, wonderful, festive in the New Year. Let's create this atmosphere of fabulous wonders ourselves. We will decorate your home, make it cozy, decorated and warm.
Let each of us in the New Year happen at least a small, but a miracle.
After all, everyone wants the next year to be calm, kind, stable and prosperous. Find out in what exactly the ruler of 2019 has prepared for you.
Let everythnig will be alright! Let's ask Pig to make us such a gift.
Perfectly convey the winter fairy-tale atmosphere of snowflakes. To make them look spectacular, make them voluminous. In this article we will look at: how to make voluminous paper snowflakes with your own hands.
You will need: shiny cardboard in blue and purple, stationery knife, glue gun, ruler, pencil, toothpick.

Master Class

A shiny volumetric snowflake is ready!
exquisite snowflake

You will need: 6 blue square sheets, 6 white square sheets, blue paper circle, pva glue, rhinestone.
Master Class

Exquisite voluminous paper snowflake is ready! I recommend watching this video!
beautiful snowflake

You will need: 2 square sheets of blue paper, scissors, glue stick, pencil, rhinestone.
Master Class

A beautiful voluminous paper snowflake is ready! I recommend watching this video!
3D snowflake with Christmas trees

You will need: 6 green sheets 8x8 cm in size, scissors, a simple pencil, glue stick, rhinestone.
Master Class

original snowflake

You will need: 2 sheets of yellow A4 paper, scissors, a simple pencil, white thread, glue stick.
Master Class

The original voluminous paper snowflake is ready! I recommend watching this video!
Volumetric snowflake

You will need: white and blue paper, scissors, ruler, glue stick, decoration elements - sequins, beads, flowers ...
Master Class


You will need: 2 sheets of colored paper, scissors, glue stick.
Master Class

Volumetric snowflake from components
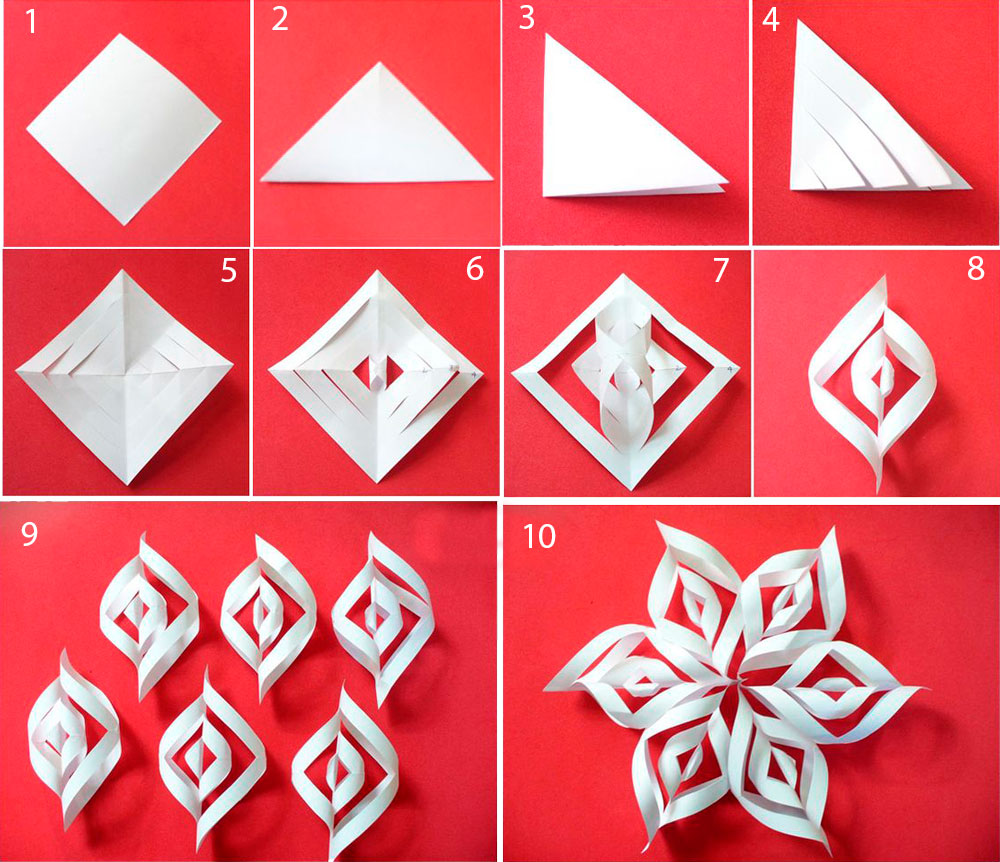
You will need: 6 square sheets of paper, scissors, glue.
Master Class
- Take a piece of paper and fold it diagonally, then in half.
- Make 3 cuts and unfold the workpiece.
- Glue the ends of the smallest strips, then glue the others through one strip on each side.
- Connect the remaining strips on the other side in the same way.
- Repeat this process with the rest of the sheets, then assemble the snowflake by gluing 6 blanks together.

You will need: paper. scissors, ruler, glue.
Master Class

The paper strip snowflake is ready!I recommend watching this video!

You will need: sheets of paper, circle template, glue, pencil, thread, needle, ruler.
Master Class
- Cut out 8 identical circles from paper.
- Divide the circle into 8 equal parts and make cuts.
- Twist each part of the circle into a cone using a pencil, fixing with glue.
- Repeat this process with the rest of the blanks.
- String the blanks on a thread with a needle, fasten and form a ball.

Modular origami is considered more difficult than ordinary origami. Fold the first module according to the photo scheme, make a huge number of them and start assembling according to the photo master class. Creating such a masterpiece requires a lot of time and patience. There are also huge advantages - you develop fine motor skills of your hands and will be able to surprise others with such a chic snowflake.

Master Class
- Start assembly from the middle by forming the center of 12 modules.
- Insert the edges of the module into the pocket of the other modules.
- Attach the modules in a checkerboard pattern from one edge, a chain of two fastened rows should form - the outer row of 6 modules, and the outer 5.
- Unscrew the remaining module and connect the ends of the chain with it, forming a ring.
- Increase the length of the beams by attaching modules.
- Add a module of a different color to each beam and continue building with the main one.
- Add modules until the snowflake is the desired size.


Snowflake in the technique of modular origami is ready! I recommend watching this video!
Snowflakes are always pleasing to the eye and uplifting. Make the best, original volumetric snowflakes and present them as a gift. Then your loved ones will feel a fairy tale at home, remembering you.