How to draw a dog step by step with a pen. How to draw a dog with a pencil step by step. Step by step image of a dog
In childhood, each of us created our own masterpieces on paper, and sometimes not only, using paints, pencils, felt-tip pens and everything that could leave its mark on the surface of interest. Not many have carried their hobby into adulthood, and most have left their skills at the initial stages of development. Of course, with the advent of children already in their own family and regular requests to draw someone to the baby, parents begin to think about how to do it beautifully and at the same time quickly. It is for this that detailed instructions are offered on how to draw a sitting dog with a pencil in stages.
Why a dog? Yes, because this animal has been the most devoted to man for more than one millennium and it deserves that everyone learns to portray it in the most realistic and attractive way.
Selecting the main tool
Why in pencil? The fact is that the pencil leaves behind a trace that is easy to erase when creating an incorrect line or shade. Neither with colored pencils, nor even with felt-tip pens, it will be possible to quickly correct the mistake, and the entire drawing will have to be redone. Before you draw a sitting dog, you should also understand the notation of this tool. Pencils come in different hardness and are labeled accordingly. Soft rods (letter B) are needed for shading and creating shadows, hard ones (letter H) - for outlining. The number next to each letter designation determines the degree of its softness or rigidity.

In order to draw a dog with a pencil for children (sitting, lying or standing, it doesn’t matter), you need to choose a tool of medium hardness marked HB. It will be easy to wipe it if necessary, and the contours will remain clear.
Tool preparation
In addition to the pencil itself, you should also prepare a sheet of paper and an eraser. The latter should also be taken seriously, because its quality will also determine how well it will erase extra lines when adjusting the drawing. You can immediately prepare a lot of papers, it is quite possible that after the kid sees how his parent painted a sitting dog, he himself will want to create his own masterpiece.
Option one. head contours
To simplify the task for an inexperienced artist, it is better to start practicing with less realistic pictures. To do this, below is a detailed instruction on how to draw a dog sitting sideways.
- So let's start with the eyes. To do this, put a bold dot on paper, closer to the upper right corner.
- After that, above the point, you need to draw a semicircle, which will be the head of the animal, as shown in the figure.
- The next step involves tracing the contours of the dog's muzzle and its nose. To do this, draw a curved line from the end of the semicircle, which is located closer to the dog's eye. You can also draw the dog's mouth right there by drawing the second line a little lower.
- When the head has already received animal-like outlines, you should draw the dog's ear. Since he sits sideways, it will be one. You can choose any form for this at your discretion, since the variety of breeds makes it possible to roam your imagination.

Outline of body contours
- After that, from the bottom of the ear, if it hangs, or from the end of the free end of the semicircle, if the ear sticks out, you need to draw a curved line down, which will be the back of the animal.
- Now, on the opposite side, the contours of the chest and the tail are outlined at the bottom of the back.
- After that, the artist should draw the even front paw of the dog, and then the bent back.
- The final step will be to trace the contour of the animal's abdomen and paint on the paws of the opposite side.
If it is still not clear how to draw a sitting dog step by step, you should take a look at the photo above.
Instruction for experienced artists
If you managed to cope with the previous task very quickly and there were no difficulties in the process, then next time you can try a more complex drawing. Here, before you draw a sitting dog, even if you are confident in your lines, it is imperative to prepare an eraser, since all work will take place like real artists.

The instructions below will describe the process of creating a puppy on paper, but changing certain outlines can result in a completely different animal.
Beginning of work
The creation of every true masterpiece begins with a sketch. To do this, you just need to draw two circles on the sheet one above the other so that the top one is slightly smaller and they must be in contact. The lines should be soft so that later some of them can be erased without a trace. In the future, they will be the head and torso of the puppy.
After that, the dog should draw paws and a muzzle. The latter is an oval between the two previous circles, which captures the surface of both. The paws, since the animal is sitting, are drawn in three, in the form of lines and ovals at their ends.
Drawing details
How to draw a sitting dog with a pencil next? To do this, you need to add detail to the drawing and outline the outlines of the ears and nose of the animal. To make everything symmetrical and natural, a cross is drawn in the middle of the head. The ends of the horizontal line will indicate the location of the ears, and the middle of the vertical line, which runs through the muzzle, will indicate the place of the future nose. In the centers of the two parts of the horizontal line, you need to draw the eyes, and under the nose - the line of the mouth. It must necessarily pass strictly in the center of the previously indicated

Among the important details are also the puppy's toes, the fourth leg, which will be slightly visible, and its tail. You can make any shape of the tail, depending on the breed being drawn, and if you want to “revive” the drawing, you can add ruffled fur here and there.
Final stage
Correction of the drawing begins with erasing all additional lines and painting on the auxiliary outlines of the coat already on the puppy itself. Also, in order to give the picture maximum realism, you should add shadows to it. This should be done only with a soft pencil, which can be easily shaded. The volume of the puppy will be given by shadows near the muzzle, on the paws, ears and in the eye area. To make the drawing as realistic as possible, the painted shadows should be rubbed well with your fingers or an unnecessary clean piece of paper. Also, claws are painted on the paws, and with the help of an eraser, you can make glare of light in the eyes and on the nose.
Conclusion
After a detailed study of step-by-step instructions, it turns out to look at any process from a completely different perspective. Now the question of how to draw a sitting dog no longer seems so difficult even for an inexperienced person or child.

The main thing in creating your own masterpiece is to follow the correct sequence of actions and not to rush. Every detail must be worked out with maximum clarity and concentration, then the drawing will turn out to be as realistic as possible. Also in drawing, great attention should be paid to details, because they make the drawings “alive”.
Now, in order to draw a real friend of a person and the most devoted animal, you do not need to work for a long time and constantly be disappointed in yourself. It is enough just to use detailed instructions from already experienced artists who are happy to help novice creators and just dog lovers create their own masterpieces.
A lesson on the topic "How to draw a dog" will surely interest a child of any age. After all, the dream of a real, reliable, understanding furry friend accompanies us from early childhood. All dogs, from a thoroughbred aristocrat to a simple mongrel, faithfully serve the owner. Watching the fun play of a funny puppy, the graceful and swift running of an adult animal is a very exciting experience. This is the picture I want to capture on paper.
It is not so easy to draw a dog from life: not a single animal, even a trained one, is able to stay in one position for a long time, it constantly needs to run somewhere. In addition, you can’t take a dog to school or kindergarten. Therefore, in a lesson or lesson, visual aids, illustrations, slides, photo and video materials are needed.
It is much easier for a preschooler to solve the problem if he completes the construction of the drawing in stages, simultaneously with the teacher. You can inspire a child to create a masterpiece by reading poems, stories, watching a cartoon.
Externally, dogs of different breeds are very different from each other. Before performing a pencil drawing, it is necessary to note the characteristic features of a particular animal. This determines not only the shape and size of body parts, but also the length, thickness and color of the coat.
From this article you will learn
How to draw a German Shepherd

German Shepherds have been among the most popular breeds for decades. These are loyal, strong and intelligent representatives of the dog tribe. According to scientists, this breed is one of the three smartest. Their capabilities are universal: they are able to be reliable guards, companions, shepherds and guides.
The body of the shepherd dog is powerful, elongated, tapering towards the tail. The neck is strong and wide, the back is slightly sloping, the paws are long and muscular, the tail is fluffy and large, with long hair. The body is covered with rather thick fur.
You need to start drawing a dog, as usual, with the location of the main figure on the sheet. If you want to add details to the composition, for example, draw a bowl, a bone or a ball near the dog, you need to leave free space for them.
Step 1
To depict the figure of a dog, we need to draw three circles of different sizes step by step. The first, largest, is located slightly to the side of the center of the sheet. This is the basis of the front part of the body, which is quite massive in a shepherd dog.
Stepping back a little, next to the first circle, make a second, slightly smaller one. The centers of the circles should be about the same level. The head of the shepherd dog, when it is standing upright, is at an angle of 45 ° from the body. Draw a short line from the front and draw a third circle.

Step 2
The forelimbs are easy to draw: drop two lines from the first third of the large circle. The hind legs of a shepherd dog are the most difficult part of the image.
First, from the center of the circle, you need to draw the direction of the upper limb, this segment will be the longest. Then lower the line down and finish with a short stroke, as shown in the diagram. Please note: dogs lean on the pads of their paws in the same way that women walk in heels. Draw the tail as a continuation of the back.

Step 3
Draw the ears of a shepherd dog in the form of two triangles. The muzzle of the dog is in the form of an elongated trapezoid with rounded edges. Don't make the dog's nose too long or flat, otherwise it won't look like a sheepdog. Its top should be longer than the bottom. Draw the lower jaw. Connect smoothly and consistently all three circles. The lines of the back and neck are not drawn straight, but arcuate.

Step 4
Give shape to the paws. The upper part of the hind limbs is massive and wide. Dogs have feet with toes ending in claws. Mark them on the picture.

Step 5
Erase all auxiliary lines. Finish the muzzle: draw the eyes, nose, long protruding tongue and eyebrows, giving the shepherd dog a characteristic expression of "face". The noses of almost all dog breeds are similar, they are triangular in shape with round nostrils. Don't forget your teeth.

Step 6
Finish the pencil drawing: mark the direction of the hair on the back and legs with jerky lines, add details as desired.

Step 7
The color of the German Shepherd varies from white, light yellow and gray to brown and black. The most common is the so-called black-backed. A dog in such “clothes” seems to be dressed up in a blanket that covers the neck, back and tail, and a black mask. Highlight these areas with thin lines for convenience.

Step 8
For coloring work, use all shades of brown, beige, black and orange. When coloring the picture, pay attention to the direction of hair growth.

Step 9
The last step in drawing will be the hatching of individual areas. Cover the lower part of the body, the lateral zones of the paws with a dark tone, make certain areas lighter, as if light falls on them. To make the pencil mark brighter, increase the pressure. Use short strokes. So the image will be voluminous and more realistic.
How to draw a husky puppy
Husky is a breed that has become popular due to its cheerful disposition and memorable appearance. Many films and animated films are devoted to these charming dogs. Children are probably familiar with the cute puppy Everest from the cartoon "Paw Patrol", and Jenna from "Balto", and Hachiko from the picture of the same name.
Husky ancestors are northern dogs and wolves, so the appearance of these animals retains the features of their wild relatives. They say they don't know how to bark, but only howl, like their ancestors. No breed has such expressive and beautiful blue eyes, almond-shaped, brightly outlined against the background of snow-white wool. However, the eyes of a husky can also be brown, and the color can change from white to gray-steel, red, black, brown.

You can conduct a lesson on the topic “How to draw a husky puppy” in the senior group of kindergarten or in elementary school, in grades 1–2.
Step 1
The contour of a sitting puppy can be divided into several geometric shapes. The head of the animal is like a ball, and the body is trapezoidal.

Step 2
Now it's the turn of other parts of the body: draw the hind legs with two lines, the direction of the front legs, triangular ears.

Step 3
Outline the eyes with two small circles and the muzzle of the dog with a larger circle.

Step 4
It's time to move on to the details: draw the paws with semicircular pads.

Step 5
Change the shape of the head: in a husky, it tapers slightly upwards. Then draw the puppy's eyes with pupils, tongue, nose, lower jaw, eyebrows.

Step 6
The color of the husky muzzle is a bizarre combination of dark and light zones. To depict them, first select a light strip from the nose to the forehead, then the area of the eyes and the sides of the muzzle. For expressiveness, highlight the eyes with a wide dark line.

Step 7
Remove the auxiliary lines, apply jerky lines along the contour that imitate wool.

Step 8
The last step: color the drawing with colored pencils, using shades of blue for light areas, black, blue, brown for dark areas. Try to draw with jerky movements so that the strokes resemble the fur of an animal.
This cute puppy can decorate a nursery or be the basis for a greeting card.
A selection of drawings of dogs for sketching
Here you can download dog templates and use them for sketching (click on the picture - it will enlarge and download):


Video Instructions for Drawing a Dog with a Pencil
Video-1
Video-2
Video-3
- If you have a dog, keep a constant eye on it, noticing how different parts of the body are positioned as they move.
- In parallel with drawing, sculpt an animal. So you will quickly feel the shape.
- To learn how to draw animals professionally and beautifully, you need to be able to make quick, light pencil sketches, since animals are constantly in motion.
- In elementary school, it’s too early to talk about anatomy, of course. But the schematic structure of the skeleton can be studied. This is necessary so that the pose of the animal is conveyed as accurately as possible.
- It is easy to learn from scratch using video master classes from the Web, if it is not possible to visit an art studio. But it is better to try to work with different masters, otherwise the images will be stereotyped.
- Before drawing the details, make sure that the main parts of the body are depicted correctly. It is better to make several sketches than to redo an almost finished work.
- Draw a dog at home when she is sleeping or just lying down. In other cases, take a few photos, select the most successful ones, print them out and use them for sketching.
- In addition to the fact that each breed has its own characteristics, age characteristics must also be taken into account in the drawing. Puppies have disproportionately large paws and head, in young animals the stomach is retracted, in older dogs the coat becomes lighter, especially on the muzzle, chest, front legs.
- Try to keep the proportions right: short legs are only in small dogs such as dachshund, pug and French bulldog, hind limbs in representatives of all breeds are shorter than the front ones, even in puppies the head is at least three times smaller than the body.
IMPORTANT! *when copying article materials, be sure to indicate an active link to the first
Probably, since the advent of "Carlson" Lindgren, all parents know exactly what is needed for the happiness of the whole family. Dog for kids! It is for this reason that a year ago we had a sandy-gold lump, a Rhodesian Ridgeback, which was named Gray. This miracle quickly became a member of the family and everyone's favorite. And that is why, when we decided to learn how to draw a dog with a pencil, the choice fell on the representative of this breed.
The history of the appearance of the "portrait" of Gray
For a week we “ran” after our dog, recalling “Prostokvashino” with a more than prophetic statement about our case: “I ran after her for half a day to take pictures!” But we never got a good photo. Our tomboy managed to successfully avoid imprinting. That tail, then his nose all the time turned out to be closer to the lens. Having suffered, we went another, simpler way. It turned out that finding a suitable photo on the Internet, similar to our Gray dog, is easy. It is for him that we can draw a dog in stages.
But while we were looking for "Gray", my child and I saw that the choice of potential models is huge. We could draw a husky with a pencil in stages, or a German shepherd, or even a husky. All of these are beautiful, graceful and intelligent dogs. Each of the representatives of their breed has characteristic features that are unique to them, but there are also personal qualities and features common to all dogs, for which we love them so much and value their friendship. For example, loyalty and the ability to rejoice at the owner, obedience and frankness (they cannot hide their emotions at all).
Already at the initial stages of working on a drawing of a dog, when we just examined the varieties of these pets, we learned that they also differ in temperament, for example, there are choleric, sanguine, melancholic and phlegmatic, we got carried away. We wanted to learn how to draw not just an animal with four legs, ears and a tail, but also learn how to draw kind and grinning dogs, we wanted to try to draw a spaniel, a dachshund or a shepherd dog in stages with a pencil. But it will be later. In the meantime, our "test of the pen." Today we will show the dog in pencil in stages, and it will be our one-year-old Rhodesian Ridgeback. We took him as a model.
Work plan
It turned out to be not at all difficult to draw a dog with a pencil in stages, if you move exactly according to the plan. What does it include:
- Preparation;
- Image of the paws and body of the animal;
- Work on the muzzle of our pet;
- Picture formatting.
The step-by-step work plan is clear and simple, it helps even people and children inexperienced in art to quickly master the technique of depicting dogs.
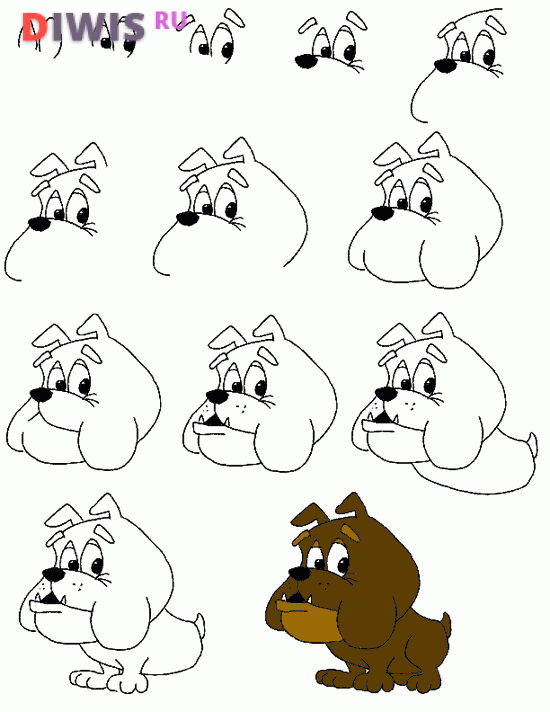
Step by step image of a dog
Stage 1. Preparation
It includes, first of all, the organization of the workplace.

Learning to draw, starting with auxiliary lines. We make two ovals that only touch each other. Required: the upper oval is almost 2 times smaller in size than the lower one. And it looks more like an uneven circle.
Even for beginners, this stage will not be difficult, and even a child will cope with it. But in the future, it would be nice if parents helped their baby in step-by-step drawing.

Stage 2. Image of the paws and body of the animal
How to draw paws for a dog? To do this, draw lines down from the lower oval, at the end of which there will be soft pads. The front paws are fully visible, we make them in their entire length, taking into account the proportions. Back - only one is visible, and since it is bent, we depict its upper part as an egg-shaped figure along the lower right side of the oval. And already a small part of the dog's paw comes from it.
Draw the dog's neck with two curved lines. On the left side, we make the body a little larger.
We make a small circle at the bottom of the upper oval, which will also go to the lower one.

Stage 3. Work on the muzzle of our pet
How to correctly complete all the details of the head? To do this, we divide the upper oval with two arcuate lines, horizontal and vertical, into 4 parts.
On the one that runs horizontally, the eyes will be located.
The drawn small circle is also divided in half by a vertical line. In the middle of it will be located the nose of the dog.
On the sides of the muzzle we make hanging ears characteristic of the Rhodesian Ridgeback.

We depict the eyes, we perform the nose of the animal more accurately.

Stage 4. Designing the picture
We have mastered the basic principles that help us understand how to draw. There are nuances left that will make our picture look like the original. Namely, we perform “fingers” on the paws, do not forget about the tail.

We remove all unnecessary lines. We provide the necessary details.

Outline each part of the picture with the desired color. Do not forget that the Rhodesian Ridgeback, although a smooth-haired breed, still has tiny hairs.

Now, having selected the desired color, decorate the picture. Our Gray appears before us.

This picture is quite simple. Having already mastered a little, you can try more complex models, for example, figure out how to draw husky dog or some other breed. Good luck with this!

We will show you how to draw a dog. Our step by step photos will help you with this.
For practice, you need to use soft pencil, eraser, colored pencils or watercolor.
Before starting the drawing process, discuss with your child the sequence of creating an image.
We begin to draw from simple to complex.
Puppy in a collar. Step by step drawing
Any artist can not do without the skills of drawing a dog - the most devoted friend of man. First, let's try to portray a funny cartoon puppy
.jpg)
Draw the main details
.jpg)
.jpg)
.jpg)
Coloring the image
.jpg)
I have excellent hearing
Smart look and subtle scent.
I immediately get into a fight with a cat,
Because I am a dog
Smiling dog. Step by step drawing
Now let's try to take a different angle and change the puppy's facial expression - let him smile from the top of his head, sticking out his tongue.
First, make a light sketch with a pencil

Draw the main details

Erase unwanted lines with an eraser

Draw the final outline

Coloring the image

Man's best friend
Faithful dog.
And suddenly he sees a cat -
Get into a fight with him.
A friend's nose is very sensitive,
The dog will help in trouble
Can live in a doghouse
Or in our hallway
Drawing "Puppy with a bow" step by step with a photo
You also need to learn how to draw hair in dogs. A playful lapdog with a bow at the top will help us with this.
First, make a light sketch with a pencil
.jpg)
Draw the main details
.jpg)
Erase unwanted lines with an eraser
.jpg)
Draw the final outline
.jpg)
Coloring the image
.jpg)
Drawing "Service Dog" step by step with a photo
We haven't drawn a sitting dog yet. So let's portray a serious service dog. What breeds of dogs do you think serve people?
First, make a light sketch with a pencil

Draw the main details

Erase unwanted lines with an eraser

Draw the final outline

Coloring the image

The dog is a watchman hot where,
She also has a sharp nose.
People, objects without difficulty
There will always be a learned dog!
Drawing a Puppy step by step with a photo
This puppy can become a true friend.
First, with a pencil, we make a light sketch of the head.
.jpg)
Finishing the torso and paw
.jpg)
Draw the rest of the paws and tail.
.jpg)
The contour is drawn finally. Add a nose, eye, collar.
.jpg)
Coloring the image
.jpg)
Drawing a Dog with a pencil step by step
Stage 1
We draw a schematic silhouette of a puppy
.jpg)
Stage 2
Draw details in more detail
.jpg)
Stage 3
Add colors, draw details
.jpg)
Stage 4
Coloring the drawing
.jpg)
You can easily, quickly and beautifully draw a dog even with a simple pencil. In the article, we just gave a few step-by-step lessons, guided by which, you can effortlessly recreate the image of your favorite pet on a piece of paper.
Choosing the right tool is already half the battle. Therefore, when deciding to draw this or that drawing, you should first choose a quality pencil. For example, a tool of medium hardness is suitable for drawing contours. Most often, it is marked in the form of the letter "H". But the marking “B” means that the pencil is soft and suitable only for sketching the internal elements of the picture.
Important! It is better for beginners to give their preference to tools of medium hardness marked “HB”.
Also, do not forget about the eraser. It must be of high quality and quickly remove the blot without leaving marks.
How to draw a dog: step by step lessons
It would seem that for novice artists, depicting a portrait of a dog on a blank sheet of paper is a rather difficult task. However, if you follow the lessons below, you can greatly simplify the drawing process.
Cheerful puppy
- Choose a place on a sheet of paper where the image of the puppy will be located. Draw a small oval (this will be the head). Next, draw on top of the main one, two more small ovals.
- In the center of the main oval, put two black dots (eyes) and draw a small circle, and then shade it. Add emotion to your puppy by drawing a smile in the form of a thin arc line.
- Draw the torso. It should look like a rectangle with soft corners. Do not forget to “break” the lower straight line into several segments, thereby leaving room for the paws.

- Draw paws in the form of oblong rectangles and a small triangular tail with soft lines.
cartoon hero
Everyone can recreate a small cartoon puppy on a blank sheet of paper. The main thing is to follow the instructions below step by step.
- Draw two ovals next to each other, one of which should be slightly larger in size.
- On a large oval, draw two more small ones (ears).

- Inside the large oval, place two more, only small ones. Color them in, and draw two arcs on top. You get eyes and eyebrows.
- Draw a nose in the form of a small triangle, a smile in the form of an arc and a small tongue.
- With an eraser, remove part of the line below to get two small transparent segments on the belly area. Draw the front and hind legs, as well as the tail.

sitting dog
And now let's look at how you can draw a sitting dog. The procedure is as follows:
- in the place where the future drawing will be located, put one bold dot;
- above the finished eye, draw an arcuate line, and then draw it down a little.
- draw another small straight line (as in the photo below) to form an angle. Put a second bold point, which will be the nose of the dog;
- from the upper straight line of the already finished muzzle, draw two parallel curved lines and connect them together. You should end up with a hanging ear;
- starting from the bottom of the muzzle, draw two curved lines - the back and chest. From the bottom, draw the tail;
- Complete the drawing by adding paws to the dog. From the front they look like parallel straight lines, and from behind they are curved.
dog from cages
Ideal for children, because in this case the child will not only be busy drawing, but also develop fine motor skills, attentiveness and logical thinking.
- Put one dot on a piece of paper in a cage. Count two cells from it and put another one. Draw a line between them.
- From the right extreme point, stretch the line one cell up and to the right.
- Count down five cells, put a dot and connect with a line.
- Draw a straight line to the right, seven cells long.
- Select two cells up and two more to the right.

- Go down three spaces and right one.
- Draw a line seven cells down.
- Move two cells to the left, and then one up and connect them.
- Put a dot in the right cell, and after counting up another one, draw a line.
- Count six cells to the left.
- Draw a line four cells down and two more to the left.
- Place one point up and to the right.
- Next, extend a zigzag line three points up, one point to the left, and five points up again.
- We complete the muzzle with a line of three points to the left and two up.
Husky
With a simple pencil, you can even draw such a thoroughbred dog as a husky.
- Draw an oblong oval that will be the body and a small circle on top - the head.
- Draw paws. They should be next to each other in parallel. To do this, simply draw two straight lines under the torso.

How to draw a husky step by step
- Draw a small oval at the bottom of each paw. Mark the fingers with lines.
- Give the dog's chest and back a curved shape by drawing new curved lines and erasing the old ones with an eraser.
- Draw two small triangles on the head.
- Slightly lengthen the head and point the extreme point.
- Darken the areas with a pencil so that the finished drawing is more realistic.

Sheepdog
You can easily and beautifully draw a German Shepherd with a simple pencil.
- Take a sheet of paper and draw it according to the diagram below.
- Draw the ears in the form of small triangles. Draw lines from them with thin strokes so that you get a head, mouth, tongue. Complete the muzzle by drawing in the teeth and eyes.
- Draw a line for the back and neck. Draw a paw.

- Draw a line that will be the underbelly, hind leg and tail.
- Draw dark spots and darken them.

Pug
Fans of small decorative dogs can please themselves with a picture of a beautiful pug.
- Draw a rectangle and place a circle on top of it. This will be a kind of mock-up of the head and torso.

An easy way to draw a pug
- On the sides of the circle, add two triangles - ears, and in the center - two more even circles (eyes).
- At eye level, draw a wide triangular nose and lines imitating the folds on the muzzle, characteristic of this breed.
- With small curls, add wrinkles on the forehead.

- Draw the back along the top line of the rectangle. Add a tail and lower paw.
- Draw the belly and paws. Do not forget to highlight the membranes with small vertical stripes.
- Shade the eyes, ears and body to make the image more graphic.