Detailed crochet for beginners lesson 1. Crochet for beginners - how to learn from scratch. Single crochet
We invite you to familiarize yourself with a small crochet course for beginners. Master Irina will help you take the first steps with her illustrative examples. Lesson #1: The most loop So let's start knitting together. Mmm... where to start? I hope that the necessary devices are right at your fingertips, well, at least some old hook. The main thing is that it should not be rusty and not cling, otherwise, while knitting, it will distort its hands into blood. So let's start knitting. Forward and with a song! We take the thread in the right hand, and the hook in the left. For lefties, it's the other way around. We turn on the first video knitting lesson and start knitting together! Ahh... I remembered! Lefties will have a hard time. But there are no hopeless situations! In order for them to learn to knit, too, you need to put a large mirror near the monitor! And watch the video lesson of knitting in reflection. Then everything will work out!
Lesson #2: Chain of air loops So the first step has been taken! The first loop is connected. What's next? We begin to knit a chain of air loops. There is nothing easier! We start the hook on the left, sketch the thread and stretch it into the loop. That's all! The first air loop was born. And then we repeat, repeat, repeat. Everything is faster and faster! Until it comes out like machine gun shots. And finally, how should I put it, the rope got tied. Only it is not called a rope, but nobly - "a chain of air loops."
Lesson #3: Single crochet What good fellows we are! The hard science of knitting chains of air loops has been overcome. Do you think I'm kidding? Of course not! The first steps are always very difficult. The new is given oh how difficult! But then it will be easier than a lung! And now we will not rest on our laurels, although we are able to impose a chain-rope in length, and although around the entire globe! Well, some do! But still, let's not get carried away with nonsense and go further, so to speak, by leaps and bounds. And today we start knitting in a serious way! In this lesson - knitting a single crochet. Well, what is there to tell? You yourself see everything.
Lesson #4: Increase loops Well, we already have the most minimal knowledge of where to start knitting, and now we can be a little smarter! After all, it’s not just that all these loops and chains are needed, they are needed for something useful. Well, knit a hat, for example, or other necessary clothes according to your size. But as? This is where another video lesson on how to add loops in knitting comes in handy. Sit down and start knitting! I showed how to increase the number of loops in a row using the example of single crochets. Well, I think it is not necessary to explain that this principle is suitable not only for them, but for the whole variety of other loops.
Lesson #5: Loop reduction All patterns are good if you want to knit something shapeless, say a simple scarf. Or whatever… a blanket! But in order to knit a hat, and so that his head fits in and does not fall out, here you need to make more efforts. And this will help the video lesson on how to decrease loops in a row. We sit on the sofa and start knitting together.
Lesson #6: Double crochet To learn how to crochet a double crochet, first prepare a chain of air loops. How it knits was described in lesson number 2. At the end of the chain, 2 additional air loops will be knitted, because ... well, how would it be correct to say ... Because at the end of the chain there is always not enough loop and you need to imitate it, well, we knit like this, as I said, God forbid in your own way. However, I'm joking, as always :). It’s also impossible in your own way, because innovation begins with the fact that everything is the same for everyone, but you are not like everyone else! Yes, yes, I didn’t make a reservation, there are also innovators in knitting. Well, now it's time to turn on the video lesson and start learning to knit a single crochet.
Lesson #7: Column with two crochets If you already learned how to knit a single crochet last time, then today's lesson will seem quite simple. After all, knitting differs only in the number of crochets on the hook. But the result is completely different. Double crochets are taller and for this reason the knitting process is much more fun. How nice it is when things fit faster, and at the same time they look beautiful!
Lesson #8: Column with three crochets Well, let's move on. It is not so difficult now to tie a column with three crochets. See how this is done in a new video tutorial. You just need to increase the number of yarns on the hook. This could be done indefinitely if the hook were longer. As an independent pattern, this technique is usually not used, the holes are too large. But in some patterns, it is very often used. And about the column with four crochets, I will not shoot the lesson - you can definitely learn this yourself.
Lesson #9: Pivstovpchik In this video crochet tutorial, we will learn how to crochet a beer. Masters often use this knitting technique when they need to make an imperceptible transition in order to continue knitting from another place. And all because the beer has a small height. Due to such properties, it is also called the "transitional loop". Well, whatever you call it, the sum does not change from a change in the places of the terms. The beer is knitted like this. We extract the loop through the initial chain as usual, and immediately stretch it further into the loop that hangs on our hook. See for yourself how it's done.
Lesson #10: Double crochet beer Here’s how I’ll say it in spirit, if a simple “pivot” is a very useful crochet technique and is used very often, then a “double crochet” ... is, to put it mildly, perversions. Because it is inconvenient to knit, it is of little use, it is not worth the house and does not give milk either. Mmm ... well, perhaps, you can tie the edge of the product with such a double crochet beer. Oh, I almost broke out with "such cancer." Well, let's talk about crayfish another time. I really, really respect them! So a new video knitting lesson for those who have nothing to do today.
Lesson #11: Column through half the loop Well, what's special here? A column through half a loop ... Almost the same as a simple column, only it fits in with such a small aspect. But no! The result is a completely different pattern - with a pronounced stiffener. I say this as a design engineer. And what's good about this is that many fragments of the famous Irish lace are based on this knitting technique. Like this. Now let's figure it out!
Lesson #12: Double crochet through half loop last time we learned a wonderful technique - how to knit a column through half a loop. Today's task is a little more complicated, we will add more yarn. Well, we get comfortable and start crocheting. At the beginning of each row, do not forget to add additional air loops. Nothing without them! The hook is pulled in by the bottom half of the loop - this is the most important thing. It is possible for the front half - but it is very inconvenient. Therefore, we do as I show.
Lesson #13: Column with two crochets through half the loop
In this video knitting lesson, we complicate the task even more. Let's introduce one more additional yarn and see how our pattern changes as a result. Well ... do experiment! This time it turned out with what. Huge holes and potholes like on a roller coaster! Well ... a matter of taste, maybe this idea will come in handy for someone!
Lesson #14: crayfish step Remember how I bragged about how much I love crayfish? And now you will know why! Crayfish are delicious not only on the table, but also in knitting. With the help of the special knitting technique “Rachiy step”, you can super-well decorate the edge of the product: for example, make an edging in hats or a neckline of some nice jumper. Well, not only. The "cray step" is called so because crayfish move unusually - backwards. We will also knit backwards. But how, you will now see for yourself in the next video lesson.
Lesson #15: Crayfish step with a crochet We complicate the knitting technique. And the usual crayfish step add one crochet. This is usually used when the thread with which we knit is thin, and we want to highlight the edge of the product, we decorate, somehow more prominently. We knit almost the same way as the Rachey step, in Arabic, from left to right, and not from right to left. It would be possible to continue experiments in the same spirit, but it will not work. A column with two crochets to knit in the opposite direction is somehow not very convenient. However, check for yourself. So, sit down and start a new knitting lesson!
Lesson #16: Lush column A lush column is, so to speak, collections of several columns with one crochet, which have a common beginning and a common end. And it really turns out a magnificent column. It is as if one and as if there are many of them inside. It fits in almost the same way as a double crochet, only the column is knitted to the end. And when a whole bunch of them gather, that's when they are knitted with the final loop all together. In this video tutorial, I showed how to make a triple column, but this does not mean that all magnificent columns are triple. They can consist of any number of double crochets, depending on the thickness of the thread. They can be knitted from different distances, closer or further away from each other. So we sat down on the sofa, and went, we begin to knit together.
Lesson #17: Three double crochets, connected from one point So, let's concentrate and start knitting. At the beginning of the row, we knit 2 air loops, we make a yarn over, we stretch the hook into the extreme loop of knitting and we stretch a new loop, we stretch the thread through 2 loops on the hook. Yarn over and pull the hook through to the next stitch. We stretch a loop through it, again we stretch the loop through 2 loops on the hook. Yarn over again and pull the hook through to the next stitch and pull through a loop. Pull another loop through two loops on the hook. And now, finally, we stretch the loop through the four loops remaining on the hook. This is roughly how it's done. It is easier to show this whole process in a video knitting lesson than to explain it in text. So watch and learn! And here is what the resulting sample looks like.
Lesson #18: Popcorn Today we move on to more complicated knitting - in this lesson we begin to knit "popcorn". The pattern got such an interesting name because it really resembles that voluminous, as lush as corn, well, look and evaluate for yourself.
Theoretically, popcorn is knitted like this: first, three or four double crochet stitches are knitted into one loop of the chain, then we connect the first and last double crochet stitches together. But theoretically, no one has yet learned anything, so it is better to see and do once than to read a hundred times. Then everything will become clear. So, to business!
Lesson #19: twisted bollard And today's video crochet lesson will be difficult and even very difficult. Because for knitting a twisted column you need to know one secret. There is no way to tie it with the usual crochet, even if you break your forehead. The hook must be special, such are sold in stores - if you find them, then you are very lucky. What is the trick? And the fact that a simple hook has so many bends and bulges that they cling to the thread. As if it's good, but not in our case. So which hook should you choose? Pay attention to its shape - it should be cone-shaped - thicker to the handle, and thinner to the hook. This is the ideal case. You can also take an ordinary knitting needle or some other stick and make a drink in it. I did something like this, it was a pity to spend money on the hook. Well, it's time for the brother's work. So, attention, we start knitting, let's go!
Lesson #20: Convex double crochet To provide relief to patterns in knitting, a rare technique is sometimes used, which is called the “convex double crochet”. In essence, this is the most common column, but it clings very strangely. And the result is also quite interesting. And now you will see for yourself.
Lesson #21: Concave double crochet last time we did a little magic and learned how to crochet a convex column. And today we will learn how to knit concave. Honestly, the result of knitting will be exactly the same, with one small exception - the front and wrong sides of knitting will simply swap places. Why is this needed? You ask, and of course you will be right. And all this is done in order to alternate convex and concave columns during knitting, and thus invent new patterns. And now let's get started!
Lesson #22: Flagellum In today's lesson, beginners will have to work very hard, but nevertheless, the result will thank all the efforts. We will knit a flagellum. And not some simple, but very good, and I would even say well-fed. True, true, now we will no longer have a thin thread, but a very strong and thick decorative pigtail.

Such beauty can be used not only as laces and ribbons, but surprisingly beautiful lace can be made from it. However, now the story is not about them. Let's start knitting.
Lesson #23: In this beginner crochet tutorial, I'm going to show you the simplest ribbon lace. The pattern for knitting it can be varied, but the principle is absolutely the same.
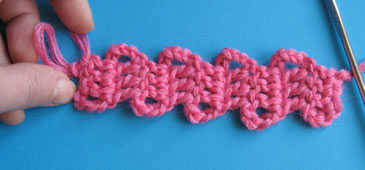
Ribbon lace is knitted in the form of a narrow strip with loops of air loops on the sides. Thanks to this shape, the lace can be bent, creating various beautiful patterns, and the loops help to connect the ribbons to each other and thus create an ornament, and you can also use them to continue knitting further in the usual way. Watch the new video knitting lesson. True, there is absolutely nothing complicated here!
Lesson #24: Connecting loop How did I forget to talk about such an important loop as the connecting one! This must be corrected. Her Highness should devote a separate lesson! Why such an honor? Yes, because this little eyelet has several important functions at once: 1. Of course, connect! But not just to connect, but also to be unnoticed at the same time. Agree, not all loops can do this. This finds application in a wide variety of patterns, though not often. But still ... 2. And with connecting loops, you can quietly return to the other end of the knitting or go down a little to the side. 3. Connecting loops can be used to process the edge of the product, and it stops stretching, loses elasticity, and becomes denser. This can be useful for processing armholes or necklines. But not much! 4. And with the help of this loop, you can make a smooth transition (descent or ascent) so that there are no zigzag jumps in the pattern. Where appropriate, of course. That's how much good can be done from one small loop. On diagrams, such a loop is often depicted as a thick bold dot. And now go ahead - turn on the video crochet lesson for beginners, and ... well, yes, well, yes ... let's start!
Lesson #25: Flat double crochet
And from this video crochet tutorial for beginners, you will learn how to knit a flat crochet. This variation of the usual double crochet is different in that the stitches are not knitted as usual through the loops of the previous row. Instead, they are knitted in the gap between the columns of the previous row. Which is generally even easier and faster. As a result, knitting is not the same as usual, but more loosened, fluffy, embossed. However, whoever likes it!
Lesson #26:
A mesh of air loops is an elegant, openwork and at the same time very simple pattern that we are starting to crochet together today.
A dress knitted with a mesh of air loops will not save you from the cold, but a stole ... you can already think about it! As always, we start knitting with a chain of air loops, but will we continue to do it? .. However, bolder, we collect more air into the lungs, and let's go!
Lesson #27:
Networks, like people, are different. And today we will learn how to knit a new mesh, it is called sirloin. This mesh is special, you can play with it. Yes Yes! Like in children's coloring games. If you fool around and fill the gaps in the grid with double crochets, then you can draw any pattern in this way. Even a portrait. What did you think?
And you can also stretch ribbons, good or fluffy threads or even knitted chains inside the mesh holes - as your soul asks. Ha, and that's not all! Fillet mesh is an excellent basis for freeforms. And if you tie to the grid here and there multi-colored frills or laces .... Ooooh, this is a masterpiece of pure beauty! The sirloin mesh is knitted very simply - one air loop and one double crochet. Absolutely no wisdom. But it's still better to see with your own eyes.
Lesson #28: Pico Well, the turn has come to talk about a small and cute subtlety. Today's knitting lesson is dedicated to pico. Pico is a small decorative bulge along the edge of the product. Picot is knitted very simply, three single crochet and three air loops. Of course, you can use another numerical combination, but no matter how much I try, it turns out more beautiful. And now the hook in hand!
Lesson #29: In a new video crochet tutorial for beginners, we will learn how to knit such a pretty pink spiral. Do not be alarmed that in the image it looks like a thick sausage. This is because I chose the thickest thread for the demonstration. So that everyone can see everything. In fact, by choosing a thread of a different thickness, we can achieve a different effect.
Such spiral pendants will very effectively decorate a scarf or stole, if used as terrycloths. But this beautiful Freeform handbag is also decorated with spiral elements.

But do not think that the fantasy is limited to this! I came across very interesting floral patterns, which were based on this particular spiral element. So knitting needles in hand, and we begin to learn how to knit this useful and beautiful spiral!
Lesson #30: Knitting in a circle This video crochet tutorial for beginners will be very interesting. No, I would even say differently. It will be very helpful! For a small technique, which I will now talk about, is used for knitting hats. To do this, you need to knit a circle of the required size, adding neatly 6 loops in each row to form the top, and then knit the rows without adding. Here is the hat. And then you can come up with some fields for it. There are two more hat secrets. The addition in each row must be done very carefully so that in each new row the loops line up one after the other evenly and are not randomly located. Then it will look very nice. And the second secret for knitting hats is that the thread must be thick, the hook is large, and the rows must be knitted very, very tightly. Then the hat will have a beautiful and dense shape. But you better watch the video.
Evgenia Smirnova
To send light into the depths of the human heart - this is the purpose of the artist
Content
Compared with knitting needles, crocheting for beginners will be much easier. The main thing in any master class is not to be afraid of "multi-story" schemes with large descriptions. Knowing the conventions, you can easily deal with any of them. If you want to learn how to crochet from scratch, the recommendations and lessons from the video below will help you.
Crochet for Beginners
Whatever kind of needlework you want to do from scratch, first you should learn more about its technology - watch lessons with photos and videos, study the types, necessary materials and tools. Crocheting for beginners will be much easier if you learn how to hold the hook first:
- You need to use the hand that is the main one. For right-handed people, it is right-handed and vice versa.
- For convenience, the tool is fixed between the thumb and forefinger. They have it both above the brush and below it - as you like. It is better to rest your hands on your elbows so that they are not on weight.
- Further, when knitting, it is important to learn how to properly fix the thread - on the outside of the palm between the ring finger and little finger.
Types of crochet
In addition to different types of tools and materials, crochet basics include various tricks and techniques. The main one is straight and reverse rows. It resembles knitting and purl knitting when using knitting needles. In addition to the main technique, you can learn a few more techniques. Crochet methods:
- Loin. It consists in performing straight and reverse rows, only in them air loops and double crochets alternate. If you learn this technique, you can create large and small openwork patterns.
- Round. With this technique, work is done in one direction. Knit in a circle or in a spiral, depending on the pattern. This technique is used to create carpets or napkins.
- Expansion or contraction of the canvas. Loops are added and decreased either inside the canvas or along the edges. And this is done on one side or on two at once. To add, you need to knit several columns under one base, and to decrease, on the contrary, from two adjacent ones, knit only the second.

How to read crochet patterns
The most "terrible" for beginners in the instructions on how to learn to crochet from scratch are patterns. Due to ignorance of the conventions, it is very difficult to understand how to read them. To do this, you should know a few basic rules:
- Unlike a book, diagrams are read from bottom to top and from right to left. In knitting in a circle, the rows are indicated clockwise.
- You need to know what rapport is. This is a repeating part of the pattern, it is indicated on the diagram with asterisks, which immediately indicates how many times this element needs to be knitted.
The most difficult thing in the “learning to crochet” section will be to remember the symbols, but it is not necessary to memorize them, because in almost any lesson there is a decoding of crochet patterns in the form of footnotes. Here are a few basic types of loops that you need to learn:
- Initial. To do this, place the end of the thread on the index finger, then put a hook under it on the left side, turn it over, make a crochet from the main thread on top and stretch it through the resulting loop.
- Air (VP). It is knitted almost like the initial one, you need to make a crochet on the right side and stretch the thread through the loop.
- Connecting column (SS). To do this, the hook is inserted into the second loop in the row, the working thread is pulled through it. It turns out two loops. Through them it is necessary to stretch the working thread again.
- Single crochet (RLS). With the help of them, the number of loops is reduced. The beginning is like that of a connecting column, only the thread is pulled through the 2nd and 3rd loop of the row, and only then they are knitted.
- Double crochet (CCH). A loop is thrown onto the tool, and then you need to repeat the steps on the principle of a single crochet table.
Types of crochet hooks
There are several different types of crochet hooks. The first classification separates them by material. So this tool can be:
- aluminum;
- wooden;
- bamboo;
- plastic;
- steel;
- bone.
There is also a division according to the size of the tool head. Its dimensions match the number. If the size of the head is 2 mm, then this is hook number 2. In general, the dimensions can be from 0.5 to 15 mm. The length of the tool can also be different. Short hooks - 125-200 mm, long - 350-450 mm. It is important that the tool is not too sharp or blunt - this is inconvenient for work and even traumatic, and learning to knit will be more difficult. In addition, there should be no mechanical damage. So crocheting for beginners will be more comfortable.

What can be crocheted
In the piggy bank of your ideas that you can crochet quickly and easily, you should add small children's toys, potholders, tablecloths, napkins, a blanket or a bedspread. The best option for beginner needlewomen is a scarf, baby booties or a hat. All of them fit very easily, especially if you understand the scheme and description. Having trained on simple things, over time you can move on to more complex ones - create a dress, cardigans, vests or warm sweaters.
Crochet booties for beginners
Any mommy always wants to dress up her baby in something special. What could be better than handmade things. For example, booties are the most affordable version of a knitted product. The list of required materials includes:
- scissors;
- working hook 3.5 mm;
- cotton yarn in two different colors.
How to learn to crochet booties? This is a very easy and fast process. A diagram and a detailed description for it will help you in the manufacture. Crochet booties are done like this:
- Cast on 12 chs, tie them with double crochets, making additions to the first and last loop and 3 lifting chs on one side.
- After 3 rows, introduce a thread of the second color. Pass 3 circles with single crochets.
- On the 4th row, start making decreases from the side of the sock, skipping half the loops. To form it to the end, you need to knit 12 double crochets with a common top. Tighten the stitches at the end.
- Next, knit a rectangle of RLS of the size you would like a bow. Tie in the center with thread. Sew a bow to the booties.
- Knit a second slipper according to the same instructions.

Crochet scarf for beginners
The simplest crochet scarf model for beginners is knitted from just two types of loops - a double crochet and without. If you have already mastered them, then very quickly cope with the tutorial. It will require:
- wool fine yarn 100% 4 shades of your choice;
- hooks numbered 4,5 and 4.
To knit a scarf, you need to follow these steps step by step:
- First, make a chain of VP as long as the width of the scarf. The value of 17 cm is taken as an example.
- Knit the first row with single crochets, as shown in the diagram. At the end, do 3 VP lifts. Colors can be changed both in the longitudinal and in the transverse direction.
- Then continue to knit already with double crochets to the desired length of the scarf. Run the last row again with single crochets. Decorate the scarf with tassels.
Crochet doily for beginners
The interior of any room will become cozier if you add a couple of homemade napkins to it. It is very easy to learn how to knit. The process won't take long. To crochet a doily, you will need:
- cotton threads;
- hook number 5.
Knitting starts with the same chain of air loops - you need to dial 6 pieces, then form a circle with a connecting column. The next steps are:
- The first row is 3 VP lifts, and then the alternation of 11 CCH and air loops, as seen in the picture.
- Climb up VP 3 again. Next, knit already with alternating 2 CCH and 1 VP.
- Knit 2 more rows in this way, in each increasing the number of knitted CCHs by 1, as shown in the photo.
- In the next round, alternate 5 VP and 1 CCH under each air loop of the previous row.
- On the last circle, alternately knit the following - 2 CCHs in 3 central loops of the arch, and then - 1 RLS under the central loop of the next arch. Finish with a connecting column.

Crochet hat for beginners
Another way to learn how to crochet is to practice making a simple beanie. In this master class, it looks more like a funny cap, so it's perfect for a New Year's outfit for a small child, girl or boy. For knitting you will need:
- scissors;
- white and burgundy yarn;
- hook number 5.
This crochet hat for beginners is perfect, because learning to knit it is very simple. You need to do the following step by step:
- Dial a chain of air loops from burgundy threads of such a length that corresponds to the girth of the head.
- Connect with a ring, then knit 1 row of dc.
- Then climb 3 VPs, then alternate 1 CCH and 1 embossed front column. So knit 5 rows.
- Insert a white thread, go 1 circle with simple double crochets. Next, take the burgundy yarn again. Knit 1 more row, do not break the white thread.
- After 3 circles, start decreasing loops. Remove through as many loops as possible, if their total number is divided by 6. For example, 72: 6 \u003d 12, it means to decrease every 12 loops.
- Next, alternate rows with and without decreases up to 15-16 pieces. Then knit a few circles with just double crochets to form the tip.
- Make a pompom from two types of yarn, sew to the cap.
- For beauty, the edges of the cap can be tied with half-columns without a crochet.
Video: how to crochet for beginners
Did you find an error in the text? Select it, press Ctrl + Enter and we'll fix it!In ancient times, people, trying to decorate their homes and at least somehow diversify their lives, tried to use the simplest materials for this. They made objects of simple shapes with unpretentious patterns and gradually reached the heights of mastery in this area. Having arisen as a simple necessity, hand knitting eventually turned into a real art. And this is not an exaggeration!
Nowadays, many are fascinated by this interesting and useful activity, so beginners in this business are interested in how to crochet. For beginners, a large number of master classes have been created on the Internet, as well as printed publications with lessons on this type of needlework.
A bit of history
It is not known for certain who, where and when invented and made the first loop, but scientists say that knitted things appeared long before our era. In one of the ancient Egyptian tombs, a children's knitted slippers were found. Archaeologists were very surprised when it was found that this little thing is more than 4 thousand years old.
For many, it will come as a surprise to learn that initially only men were engaged in knitting. They even tried to fight female competition and entered into agreements between themselves. So, in 1612, the hosiers of Prague swore that they would not hire a single female representative.
How to choose a tool
The first crochet lesson for beginners is usually about choosing the right tools. Do not immediately delve into their great variety. Over time, everyone will learn to understand this. Now the main thing is to choose a convenient tool to start learning the basics of this type of needlework.
For training, you need to take a not very thick, but not too thin hook. In this case, the numbers are ideal: 3, 3.5 and 4. The numbers indicate the thickness of the head in millimeters.
A rod length of 12-15 cm will be enough to comfortably hold the hook. When the tool is selected, you can begin to learn the very basics of crochet for beginners. Longer hooks (30-45 cm) are used in Tunisian weaving. To comfortably hold the hook rod in your hand, it should be slightly flattened and expanded in the middle.

It is best if it is made of stainless steel or aluminum with a special coating of Teflon, silver-plated, etc. Simple aluminum hooks will not work, as they will stain not only hands, but also yarn. In addition, the tool head should be slightly rounded, not sharp. This is very important as it can hurt your fingers.
The hook number must match the thickness of the yarn. Usually the threads are chosen 1.5-2 times thinner than the tool itself. To make simple crochet for beginners convenient, it is recommended to take yarn of light colors, smooth texture and medium thickness. It can be acrylic or a woolen thread mixed with it.
air chain
The first lesson on "How to crochet for beginners" always includes learning how to knit an air chain. Work on any product begins with it. The only difference is how many loops are needed for each product.

To tie the air chain, it is necessary to throw the thread over the index finger of the left hand, and lightly hold its free end in the palm of your hand. Then they take the hook with their right hand and wind it under the thread, then turn it and twist it so that a loop is obtained. A thread is pulled into it. The last action is repeated until a whole chain of the desired length is formed.
Single crochet
Step by step crochet for beginners is to demonstrate how to weave the simplest fabric. After the air chain is ready, it's time to proceed directly to knitting the pattern. It can be both solid and openwork. The density of knitting depends on the type of columns and combinations in which they will be used. There are only a few types of columns, but in combination with air loops, they can form a huge number of a wide variety of patterns.

First you need to learn how to make a single crochet. It is performed in two steps. First of all, the hook is inserted into the loop of the base. This can be either an air chain or a loop of the previous row. Then they grab the already working thread and pull it through it. There are now two loops on the hook. Next, the working thread is again hooked and pulled through them.
It should be noted that in order to form a neat edge of the future product, the column at the beginning of the first row is knitted into the fourth loop from the hook. For the second row, such an indent will no longer be needed. For him, it is enough to tie just one loop for lifting, and then follow the description.
Air loops with a crochet
Their knitting is very similar to the posts, but before pulling the working thread from the base, a thread is thrown onto the hook itself. This can be done one or more times, depending on how many yarn overs you need to make.

Next, with a working thread, you need to knit the first pair of loops on the hook, that is, the working one and one yarn over, and then two more - the resulting one and the next one. If it is a column with a single crochet, then we can say that work with it is completed. With two or more loops thrown over, you will have to knit two loops until only one remains on the hook.
The edge of the canvas should in no case be tightened. To do this, knit lifting loops for each new row. Their number directly depends on the number of crochets.
Knitting in a circle
In addition to the fact that there are things that are woven in straight rows, there are also products that are made in a circle. To fasten their rows together, they use connecting posts. They are knitted in the same way as single crochets, but only in one step. This means that the loop on the hook is knitted with a thread stretched through the base.
Web expansion and contraction
It is very important to know how to increase and decrease the size of products by adding or decreasing loops. This is especially true for those who want to become an expert on how to crochet. For beginners, such subtractions and additions will not present any difficulty.

To expand the detail, the columns, with or without crochets, are knitted from a common loop of the base. According to this principle, for example, patterns such as "fan" or "shell" are performed. In this case, the hook is inserted into the same loop of the base and a column is knitted. This action is repeated as many times as necessary according to the pattern scheme.
If the detail of the product needs to be narrowed, then the columns are knitted, making them a common top. To do this, leave not one, but two loops on the hook. Next, make the next column in the adjacent loop of the base. At the very end, they knit all the loops together and perform another additional air loop.
Schemes: how to read them
There are special symbols for different types of loops for those who love crocheting. For beginners, diagrams simply need to learn how to read. What are they?
For better clarity of sequential knitting of loops, rapport is usually depicted in the form of a diagram. It is a constantly repeating part of the pattern. Usually rapport is distinguished either by a different color, or by various brackets and asterisks. In addition, there are edge or edge loops on the knitting patterns, which will subsequently go into the seam. They often contain other information as well. For example, where to start knitting a pattern or fasten loops, the direction of work is also usually indicated. Everyone who is interested in crocheting knows this. Patterns for beginners are best taken simpler until there is some experience in this matter. Over time, it will be possible to take on more complex knitting.
Calculations
In order to make a product of the desired size, it is necessary to make some measurements and calculations. Despite the fact that a knitted model always comes with a description with a ready-made number of loops, you still need to do the calculations yourself.
Experienced craftsmen know that everyone has their own so-called knitting handwriting. This means that one person can tighten the loops tightly, and the other loosely. Therefore, experts in how to crochet, for beginners, give advice not to do it too weakly, since the hand is still not used to this type of needlework, and patterns, even the simplest ones, will look a little sloppy due to the different size of the loops.

To calculate the density of knitting, it is necessary to make a pattern repeat sample. If the conceived product is large, for example, a jacket or dress, then the knitting fragment should be no less than 10 x 10 cm. -8 rows high.
The next step is to wash the sample. If the yarn is cotton, linen or wool, then the knitted sample can be steamed or lightly ironed. If the yarn contains acrylic or other synthetic fibers, then the iron should not be used. After complete drying of the sample, you can safely proceed to the calculation.
For example, it is necessary to tie a canvas 30 cm wide. A ruler is taken and an integer number of columns is marked in just a few centimeters. Let's say it turned out 19 pieces in 10 cm. Then the number of columns in 1 cm is calculated: 19: 10 = 1.9. It should be noted that the numbers after the decimal point are very important to consider, otherwise we risk getting a canvas larger than necessary. And the final calculation: 1.9 x 30 cm = 57 columns. The calculation of the canvas in height is done in the same way.
Despite the fact that the industrial production of knitwear has reached an unprecedented pace, hand knitting remains a very original and attractive type of needlework. It allows you to create truly unique and unique models. In addition to clothes, with the help of a hook, you can also crochet many different decorative items, such as toys, bags, napkins, lace, bedspreads. This is a real creativity in which everyone can express their vision of beauty through color, texture, weave and model.
Hello, dear visitors of the site "Knitting Lessons"!
If you have experience in knitting, then most likely you will not find anything new for yourself in this section of the site. I am very pleased that you have looked here, but the "Crochet Lessons" section is addressed to those who are just about to pick up a hook for the first time. More experienced needlewomen will find Crochet Secrets useful. Unfortunately there isn't much information out there right now. I'm working on it, and soon the section will be replenished with new detailed lessons.
And now I turn to you, dear beginner needlewomen, who are starting to master the basics of craftsmanship. How badly do you want to learn to crochet? If the aspiration is great, nothing is easier. Don't believe? But in vain! Of course, looking at the intricate models found on the web, it's hard for you to imagine that someday you will be able to repeat them. But if there is a desire, nothing is impossible!
How easy is it to learn to crochet from scratch?
Look at the problem from the other side. You can master the simplest tricks quite quickly, and immediately try them in action. I am sure that you will not want to endlessly knit pattern patterns. Do you think that a beautiful thing can only be knitted with complex patterns? Nothing like this. Here are just a few examples of easy-to-make, but spectacular-looking scarves. Want to try knitting something similar after a few lessons? Then get to work!


Why am I confident that I can teach you to knit?
Firstly, I know how to knit by myself, I have been knitting and crocheting for many years. And secondly, I think that, in fact, knitting is easy! And if someone didn’t succeed before, it means that they will definitely succeed now.
They are easier to knit than knitting. (When I talk about ease, I only refer to beginners in knitting.)
The point is not only that there is one hook, but two knitting needles, and it will be easier to coordinate movements. And not even that when crocheting, at almost any moment you are dealing with only one loop, which means you won’t lose it and won’t go astray. When knitting, the appearance of the product depends very much on the uniformity of the thread tension, on how smoothly and beautifully the loops lie. And since at first it is not easy to achieve beautiful and even loops, you are unlikely to get a good result on the knitting needles after the very first lessons. With a hook, the chances of ruining the canvas are small. Even if you hold the tool in your hand incorrectly, nothing bad will happen. But more on that later.
Also, crochet is more comfortable than knitting. It takes up less space and can be knitted anywhere. This tablecloth consists of square motifs. Motives can be knitted anywhere - on the beach, on the train, expecting a child at a music school or swimming pool, and of course at home in front of the TV. It's not difficult - a small ball, a small hook, a simple scheme. When the motives are connected, they only need to be put together and tied with a border. Of course, this work must be done at home, it is too cumbersome.

Do you like the result? To me - very much. But this is loin knitting, a very simple technique.
I will immediately answer the question that you may already be mentally asking. Why do I need it? Why should I help you learn to knit? I have no material benefit from this, only moral satisfaction. And this is a lot.
And now that we are done with the introductory questions, let's get down to business. Detailed lessons are regularly published on the website. Study them starting from the first and gradually move on. And even if now you absolutely do not know how to crochet - believe me: in the section for beginners, the knitting steps are given step by step, with photos, diagrams and detailed explanations. You will definitely succeed!
Questions, remarks and comments are welcome.
So where do we start? You will need a hook and yarn. Do not take too thin. Even if you like the graceful work of experienced craftswomen, it is better to take a thicker hook and yarn for training. Which? About this in
If you have any questions - ask in the comments, I will be happy to answer.
Crochet is one of the most popular and sought-after types of handicrafts. Decorative napkins and openwork cardigans, small toys and huge tablecloths - for crochet craftswomen there are no limits for the realization of fantasies. Learning simple techniques is just not difficult at all. But it takes time to achieve the filigree of large products. So let's not just dream and start the first lesson of acquaintance with crochet technique.
Beginners tend to save on materials and tools. But in this case, you shouldn't. Old threads or a bad hook will not add skill and desire to continue learning.
How to choose a hook
Cheap plastic hooks are bad helpers. They are never smooth enough, and fine serrations constantly pull the yarn. In addition, plastic is quite unreliable in operation and can simply break. The tip of the hook must be metal.
Pay attention to the details of the crochet hook:


The handle can be made from different materials - plastic or wood. But for training lessons, it is better to take a hook with a monolithic handle. So in the process of learning you can feel the correct thread tension and form the same loops.

Standard hooks are 12-16 cm long. For Tunisian knitting, longer hooks up to 40 cm long are produced.
How to choose yarn
Yarn is synthetic, cotton and wool. The first thing you need to pay attention to is the presence of a pile. The smallest villi will interfere with you, so wool as a material is not suitable for beginners. Fully synthetic threads can be very unpleasant to work with and on the canvas. But they are the brightest of all.

The yarn should be evenly dyed and have the same thickness along the entire length. For hand knitting, you should not choose a strongly twisted thread - it is collected in loops and does not allow you to create uniform links when knitting.
Bouqueled threads with thickenings will not fit unequivocally, but melange yarn will reliably hide small flaws in the work.
When buying yarn, always read the ingredients on the label. Do not discard labels until the job is complete. You may simply not have enough threads, and it will be much easier to pick up the same ones with a label. In addition, on the label you can note for yourself information about the quality of the yarn, which will later help you make the right choice.
How to get started
- Start training in a comfortable position: it is difficult to keep your elbows in a canopy all the time, so it is better to sit on a chair with armrests.
- Sit closer to the window - in daylight, all the patterns are visible much more clearly.
- On yarn of black or dark blue, the loops are poorly visible. It is better to choose a light or bright thread.
- If you are right-handed, then hold the hook in your right hand, and take the working thread in your left hand.
Crochet patterns for beginners with detailed explanations
Each element in the diagram has its own execution technique and its own designation. On the basis of simple elements, you can create simple gizmos. So you will not only master the technique of knitting, but also see the real result of your efforts.
The basics of crochet for beginners
The chain is the most important basic element in all knitting patterns. But it's not as simple as it seems. Uneven loops immediately catch the eye and spoil the impression of the work done. So advice for the very beginners in crochet: knit the braid until you see that it is the same along the entire length. And no matter how many meters of finished pigtail you get, practice, loosen and train again. How the chain knitting technique looks like and its designation on the diagrams can be seen in the photo.

For a change, you can master the double crochet chain. How to do this, look at the photo.

The chain is made as a basic element (like a set of loops in knitting) and for air connection of different elements of the product.
The column is another important element of technology., with which you can knit a canvas from a pigtail. Columns are used to form transitions between knitting details, to fasten individual details, and in some other cases.
A simple single crochet is performed as shown in the diagram.

A double crochet is already a decorative element. There can be 1 or more double crochets, and they are designated as follows. The number of serifs in the diagram indicates how many yarns need to be made on the column.

Slingshot - several double crochets, which are made from one loop. They will help you tie a round center or a beautiful petal for a flower.


Knitting can go in a circle, or can be done using a transition column. How to perform the transition correctly in order to get a perfectly even edge of the product can be seen in the photo.

Loin Crochet for Beginners
Fillet knitting is a sequential alternation of chains and columns with one crochet. As a result of the work, you will get a grid with different types of cells, as shown in the diagram.

Simple at first glance, the pattern is the basis for crocheting clothing details and beautiful decor elements. Upon closer examination, it seems that the details are not crocheted, but embroidered with plain threads. See what basic elements can be made using the fillet knitting technique.

And here is an example of a finished product based on the same small fragments.


An interesting combination of colors and a detailed scheme will help you create a quilt using the patchwork technique, but based on knitted fragments.


Crochet flowers and petals for beginners (step by step with photo)
Flowers and floral ornaments are the first thing that all beginners surely get. On simple products, you can learn to knit and read - crochet patterns -.


Here are examples of the simplest colors with knitting patterns. But do not be discouraged that your efforts will be spent only on training. See what compositions can be made from the simplest elements.


You already know how to knit a simple circle based on columns and a simple chain. Now from flat schemes you can move on to voluminous toys. Even if you do not have small children, you can tie a small keychain for yourself and your loved ones.


Crochet is so practical that you can create even the smallest details.


For details of the body and legs, you need to tie a kind of cylinder. The base is still the same circle as in the middle of the flower. When the diameter of the base is sufficient, simply stop adding loops. Knit the walls of the cylinder with a simple column using the loop in the loop method. To narrow or expand the loops, perform an even addition-decrease of the loops.


Toys can be knitted not only voluminous. There are several ways to decorate a children's room with beautiful panels with all the kids' favorite characters. Funny owls can be simple.


Having mastered "crochet toys" you can create many holiday characters for kids and their friends.


Probably, crochet was invented by lovers of openwork napkins. Our grandmothers had no other way to decorate their home and make it cozy, but with the help of crocheted doilies. Openwork details require careful adherence to the scheme. Otherwise, you will get a convex hemisphere, pulled together at the edges, or a wavy edge.


Before you start knitting napkins, you can start with simple coasters for plates or glasses. Please note that the basic element according to a simple scheme can be used separately. And you can fold a chic tablecloth from a sufficient number of fragments.


Napkins as an element of decor have already slightly lost their relevance. But lace weaving, with which you can decorate dinner napkins, tablecloths, or even clothing items, is valued more than ever today.

Check out some simple chains and columns that will help you create not just utilitarian, but also fashionable design elements.

On the eve of the New Year and Christmas holidays, everyone is preoccupied with decorating the house. You can create marvelous balls from fragments, as shown in the diagram. In order for the parts to keep the shape of a ball, you need to go for a little trick: starch the finished fragments and dry them under pressure.


How to Learn to Crochet Practical Things (Beginner's Guide)
For many modern needlewomen, the mention of decorative napkins does not cause any enthusiasm. Art for art's sake is no longer so popular, many prefer utilitarian products. And with the help of crochet, you can make not only beautiful, but also useful things that will also perform a decorative function.

- To work, you will need a special type of yarn - yarn "tape". The thread is very thick 7-9 mm, holds its shape well in the product and allows you to quickly create a conceived model. And ribbon yarn has a lot of beautiful pastel shades, so fashionable today in interior design. She needs a special hook under No. 12 or under No. 15.


- So, for example, several multi-colored skeins of thick yarn and a crochet hook will help knit baskets that you can use as an organizer.


- A handy shopping bag will help out those. Who doesn't like to visit supermarkets with plastic bags.

- You can create several interior items - a rug, capes for stools and storage boxes with lids.

- On the diagram you can see the diagram for the base of the bag or box. The scheme can be adjusted according to the size of the product.

- The diagram shows a step-by-step knitting technique, according to which you can knit a basket of any diameter.


Socks in the classical sense cannot be crocheted. The technique does not include knitting gum. But tying high closed slippers with soft soles is quite realistic. And you can start training on socks for the little ones. With a minimum set of basic techniques and imagination, you can knit cute slippers, sneakers or even boots based on one pattern for your baby.


- . Tie a chain of the required length - this will be the central part of the sole. Start knitting according to the scheme, adding loops where necessary. As a result, you should get a sole according to the size of your baby's legs. You can just attach a leg to make sure everything is done correctly.

- For edges, continue to knit according to the chart or just work columns without adding loops. The height should be sufficient so that the sock does not cover the foot too tightly. After that, go to the design of the upper part of the sock.


- Or knit a high freebie in the form of a boot. But you need to provide for the possibility of putting on a sock.

- Socks for adults are knitted according to the same principle. They are not suitable for walking on the street, but they may well replace homemade “crocheted slippers” or warm your feet in the cold season.


- Booties can be worn outdoors, but this requires factory-made soles. Buy flip flops and pull the straps out of them. You will need an awl to pierce the sole. Make punctures evenly around the entire perimeter of the sole, immediately pulling the thread through them. Then knit booties according to the chosen pattern.


- But the sole from the flip flops is very thin and quickly deforms. And you have old booties or espadrilles worn on your fingers. So what to do? Take the sole to a shoe shop and ask for stitching around the perimeter. Or make a blank from felt and sew along the edge with threads. Now you have a blank with which you can start working.


- Look at several knitting patterns and the finished results of the work of economical craftswomen.


Tunisian knitting technique is a mix of crochet and knitting. The work will need a hook, but its length allows you to knit a fabric with more than one working loop. With the help of Tunisian knitting, craftswomen create large canvases that can be assembled and sewn together to create different patterns.


If you describe Tunisian knitting in words, then we can say the following:


And here are a few examples of finished products made using the Tunisian knitting technique.


Video with free crochet lessons for beginners
- A video with a crochet circle tutorial, which is a base for beginners in the technique of creating napkins. An example on large yarn will help you master the lifting loops and correctly calculate the number of capes in each turn. This will help you to knit perfect circles without waves or tightness.
- A kind bear and a little sad bear will definitely become a friend for your baby. Video with a lesson for beginners in crocheting different toys based on one simple pattern. For a bear, you can knit clothes, a hat, and even small shoes. Not only toys, but also clothes can be created by mastering the technique of "crocheting for children".
- A video with a step-by-step tutorial on crocheting booties for the little ones - what else could be nicer for beginner craftswomen. Ruffles and laces will add cuteness to the product and help mom master the technique of working with a hook.
- High booties for an adult with a step-by-step video for beginners in crochet and a lesson in connecting individual fragments. The author of the video introduces several techniques at once - knitting patterns, connecting parts according to a pattern and attaching finished booties to a felt sole. And using this technique, you can also knit short slippers.
- Video with a lesson for beginners in crocheting a snood from pink yarn. Simple elements, made with great skill, add up to a beautiful pattern. If you are interested in the topic of hats, learn more about - crochet hats -.