How to make a Christmas tree from tinsel with your own hands on the wall with video and photo in photo. Christmas tree on the wall: an unusual do-it-yourself Christmas tree
1. From thin tape - in 10 minutes
Absolutely any adhesive-based tape will do: decorative paper, colored or masking tape, and even electrical tape. The main thing is to first make sure that it will stick well on the wall and will not leave marks after removal. Dress her up with the same "minimalist" decorations from scraps of multi-colored ribbons and light paper flags. We glue the star to the top, and the tree is ready!
2. From colored tape
By cutting colored adhesive tape or “self-adhesive” into equal triangles and sticking them on the wall, we get a Christmas tree with a geometric pattern that has been relevant recently. Let's add a few triangles that differ in color - that's the "hung up toys." If you have wallpaper on the wall, the Christmas tree can be glued to the front of the cabinet or on the door.
3. Creative stickers
An option for those who do not want to mess with a ruler and scissors is to buy ready-made stickers. This is what the owners of this Scandinavian-style chalet did. They decorated the wall with a Christmas tree made from paper copies of deer antlers.
4. Christmas tree on carnations
Instead of glue, you can use thin nails or push pins. Hang cardboard stars on them with twine. For the holidays, let the bobbin or coil become the trunk of the tree. Perhaps this is a good example of New Year's improvisation - a Christmas tree can be assembled from any materials at hand with your own hands.
5. In traditional attire
You must have already understood that everything you stick, stick or stuff on the wall in the form of a Christmas tree will turn into a Christmas tree! So why then not use ordinary New Year's toys and garlands for these purposes? Lots of colorful balloons, glittery snowflakes and an electric garland - that's it, a classic! But unusual...
You can easily make the basis for Christmas decorations with your own hands. Take three wooden slats, cut the edges at an angle and connect them together with a plate. Fill the entire perimeter with golden carnations at the same distance from each other and randomly pull a woolen thread between them. Now you can hang Christmas decorations on the thread.
16. Letters on the wall
New Year's greetings, laid out in the form of a tree on the wall, will also perfectly replace the traditional Christmas tree: simple, bright and creative. Light letters can be cut out, for example, from foam, and then painted in different colors.
17. Toys on branches
If you tie several branches together, and then hang toys on them, you will get a cute New Year's craft with your own hands. By the way, this thing is sold and costs almost 25,000. An additional motivation to go into the forest and pick up snags.
19. Shelves for toys
Even more unusual: do on each branch"trees" smooth longitudinal cut, clean and varnish, and then fix it on the wall so that the aligned sides look up. You will get small shelves on which you can arrange New Year's toys and decorations.
20. Christmas tree shelf
This stylish and original Christmas tree is made of painted boards. Its charm is that toys can not only be placed on shelves specially created for this, but also hung on nails and pinned with pushpins. And most importantly - every year you can change the outfit, as well as on traditional Christmas trees. If it is problematic to make such a Christmas tree at home, order it in a furniture workshop.
21. Christmas tree - pioneer fire
For such a Christmas tree, you will have to collect a whole bunch of branches, so the option is suitable, quicker, for residents of country houses. After you fold the branches with a “pioneer fire”, fan them with a luminous garland and attach to bitches toys.
22. Christmas trees without needles
This photo is a demonstration of how to create an image of a Christmas tree. Choose objects of a suitable shape (for example, paper cones with five-pointed stars) or decorate any dry branch or small tree with Christmas tree decorations. The best part about these trees is that you don't have to remove the needles after them, and they cost almost nothing.
23. Christmas tree made of cones
A fairly common New Year's craft is a Christmas tree made of cones. It is done very simply: stick pine cones on a cardboard cone with a hot gun. You need to glue them as tightly as possible to each other so that there are no gaps left. Then decorate the Christmas tree with beads and small balls, or use natural materials - juniper twigs and rowan berries.
24. Wooden table tree
The triangular frame for this Christmas tree is glued together from three bars with edges sawn at an angle. But before gluing the bars, drill holes in two of them at the same distance from each other. Insert a gold-colored wire into the holes and hang Christmas toys on it. To put the Christmas tree on the table, additionally glue two wooden cubes and a small wooden support base from below. Using a fishing line, fasten spruce branches to the frame: they will “revive” the Christmas tree and fill the room with a New Year's aroma.
25. Christmas tree made of plywood
If you know how to work with a jigsaw, you can cut a Christmas tree out of a sheet of plywood. To do this, draw a picture of a Christmas tree on plywood with a pencil and cut it first along the outer contour, and then along the inner one. Sand the cut pieces with sandpaper. To make the tree last for more than one year, varnish the plywood. Such a two-dimensional tree can be mounted on the wall or hung from the ceiling. Dress her up to your taste with toys, garlands and tinsel.
In this step-by-step master class, we will show you how to make a Christmas tree from tinsel with your own hands. This unusual, but very pretty tinsel Christmas tree looks beautiful and solemn. No one will even guess what is actually at its core.
Tools and materials Time: 1 hour Difficulty: 4/10
- wire hangers - 8 pieces;
- Christmas garland with multi-colored or white lights;
- New Year's tinsel - 8 meters;
- insulating tape;
- scissors.
A Christmas tree made of tinsel and hangers is a chic option if you urgently need a Christmas tree, small and not necessarily natural.
Also, such a Christmas tree is suitable for adults, those who do not have children and do not need to buy a live Christmas tree. But the spirit of Christmas makes itself felt, and you can’t do without a Christmas tree, at least some, at least the smallest one!

And this Christmas tree can be used as a decoration at work, in a shop or office! In general, there are a lot of options for how it can be applied!

Step by step instructions with photo
So, let's get to work. You will spend quite a bit of time, because the tinsel Christmas tree is quite simple to make.
Step 1: fasten the hangers
Take two coat hangers and tape them together (see photo below). Make sure the hangers are symmetrically fastened to each other.
In the same way, glue all the other hangers two by two.

Step 2: assemble the structure
When you fasten all your hangers 2 by 2, take 2 formed shapes and insert them into each other crosswise.
Then paste the two remaining shapes. Fasten all the hangers at the top with tape so that they are at the same distance from each other.

Step 3: add lights
Now it's time to add Christmas lights to the design!
Figure out how many light bulbs should be on each hanger. Spread them out evenly, and don't forget to glue the bulb to the top of the tree.

Tape all the bulbs, one by one. We started at the bottom on one of the hangers, working our way up to the top, then moved down to the next hanger, and so on until we had gone full circle.

Step 4: add tinsel
Now plug in your Christmas lights!
When all the lights are on, add a shiny garland to the design. Start at the top and wrap the top bulb in glitter. Then lead the tinsel in circles, circle after circle. Keep in mind that the light bulbs should be on top of the shiny tinsel.
Continue wrapping the structure with tinsel until it is completely covered in glitter.

That's all, a do-it-yourself Christmas tree made of tinsel and metal hangers is ready! In this technique, we made 2 Christmas trees, one with white lights, and the second with multi-colored ones. And I must say that they look completely different!
There are New Year's traditions that we cannot but observe, because without them the holiday will not be truly New Year's. These traditions can be safely attributed - the clink of glasses of champagne, under the New Year's beauty and, of course, the New Year tree.
 In this article, the Site news portal has prepared for you some unusual, but very original ways to implement one of the most important traditions - installing a Christmas tree in an apartment, office, country house and other premises. The Christmas tree in our case will not be simple, but wall. Yes, yes, the Christmas tree will be placed in all its glory on the wall.
This way of placing a Christmas tree would be appropriate in small apartments, rooms, offices, shops, or where everything unusual and original is appreciated and loved.
Christmas tree made of pom-poms
 This decision of the Christmas tree will give warmth and comfort in your home. Opt for multi-colored pompoms, which are best made from yarn, but you can also try using decorative crepe paper.
Fasten the made pompoms on a strong thread or fishing line and attach to the wall in the form of a Christmas tree silhouette.
Christmas tree from clothespins
 Who would have thought that ordinary wooden clothespins could be a great decoration for a New Year's interior.
Use decorative ribbon or wide elastic, pre-decorated clothespins, to create a Christmas tree on the wall in the form of a holiday calendar.
It is very convenient to attach small gifts and greeting cards to clothespins.
Christmas tree made of paper
 To create such a fluffy paper Christmas tree, use a fringe made from decorative paper. Attach the fringe to the wall in the form of a Christmas tree with double-sided tape. The finished Christmas tree can be decorated with an electric or paper garland.
Christmas tree poster
 One of the easiest options is to use a Christmas tree poster. Attach the poster to the wall with adhesive tape, and then decorate it with Christmas tree decorations, beads and an electric garland.
Wrapping paper Christmas tree
 Each of us is often presented with souvenirs and gifts in beautifully wrapped wrapping paper. If you have such paper left and gathering dust lying in the closet, then right now it can get its second life.
Cut out individual parts of the future wall Christmas tree from wrapping paper. Attach the finished parts to the wall with double-sided tape and decorate with decorative ribbons, bows and small Christmas tree decorations.
Christmas tree from a paper garland
 Cut out circles of the same size from colored paper and glue them on a strong thread, thereby creating different colors.
From the finished garland, lay out the silhouette of a Christmas tree on the wall.
Christmas tree shelf
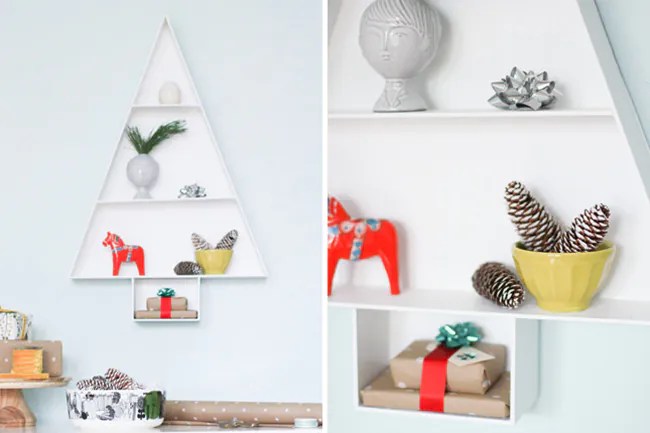 In this design, the Christmas tree can become a real piece of furniture that will not only decorate, but also carry the useful function of a bookshelf. Arrange New Year's souvenirs, Christmas decorations and, of course, gifts on the "branches" of the Christmas tree-shelves.
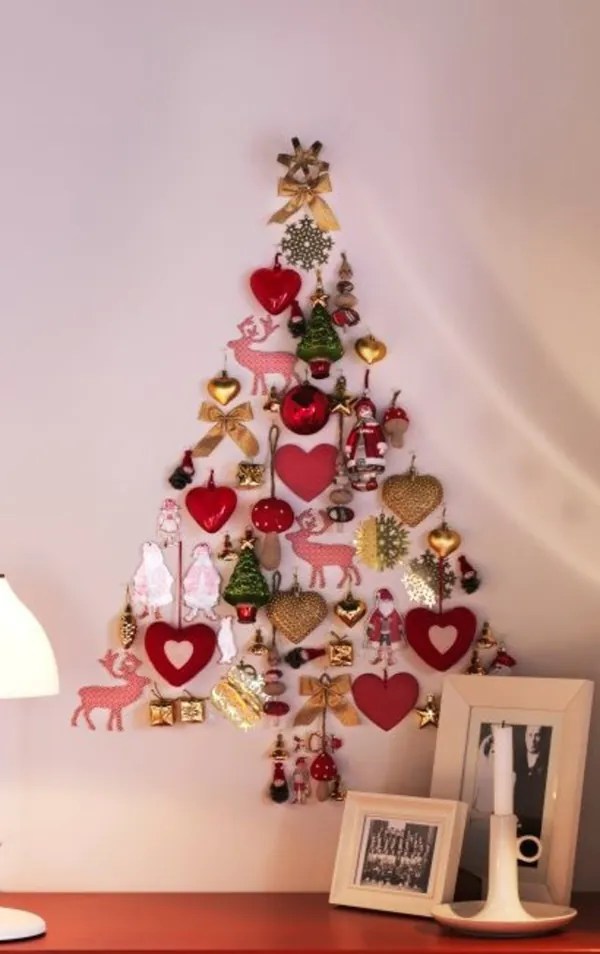
Christmas tree made of small souvenirs
 If you have a lot of interesting things at home, such as magnets, pictures, mugs, key chains, unusual figurines and figurines, then it's time to use them to create a real designer Christmas tree wall.
Christmas tree from an electric garland
 This option will appeal to those who appreciate brilliance and light. To create such a Christmas tree, use ordinary Christmas tree electric garlands, which, in the shape of a Christmas tree, attach to the wall with adhesive tape.
Decorate the finished luminous Christmas tree with small Christmas decorations, snowflakes and beads.
Christmas tree drawn in chalk
 A great option to decorate the classroom.
Draw a New Year's beauty with chalk on a school board, and then use tape to attach Christmas tree decorations to it.
tree made of wood
 This version of the Christmas tree will be very useful in a country house or in the country. Attach chopped pieces of logs to the wall creating a silhouette of a Christmas tree.
 You can come up with your own unique Christmas tree wall, because you can make it from anything - photographs, sweets, fabrics, Christmas tinsel, decorative ribbons and plaits ...
A Christmas tree was born in the forest, it grew in the forest ... And let it grow further. In order to celebrate the New Year, it is not necessary to cut down a living tree. It is much more reasonable to create a symbol of the new year on your own from improvised means. Moreover, for the Christmas tree you need to free up a separate corner in the room, constantly sweep out crumbling thorns. For a wall model, all this is not required. Only a little imagination, improvised means and desire.

In the first case, the Christmas tree is simply painted with oil paint on a pallet. A few nails, toys, an asterisk on top, and an unpainted wooden lattice turn into a symbol of the New Year.

Nails come in handy here too. You need to drive them directly into the wall in the shape of a Christmas tree, and then pull the knitting threads onto the resulting metal frame. Then you can decorate with toys to taste or give an impromptu Christmas tree to the children. Let them hang Kinder toys and candy wrappers on it.

A few wooden slats, nails, a luminous garland, and quite a pretty Christmas tree looms on the wall.

For those who have no time to bother with the design of the wall, you can lay out books in the closet in the form of a Christmas tree.

And again a ball of thread. This time it is taped to the wall and decorated with New Year's cards and paper figurines.

If children's toys are lying around the house, you can attach them to the wall in the form of the same Christmas tree.

Every housewife will surely find paper molds for cupcakes. But a Christmas tree from these molds will not be found in every home.

The same Christmas tree, only laid out from cash tapes. Looks truly impressive. Worth a penny.

Very often in garages or closets you can find fragments of wooden rulers that have failed.
If you nail them on the door in the shape of a Christmas tree, you can get a good New Year's decoration.

The shelf in the shape of a Christmas tree looks quite original. You can put together (however, as well as decorate) it yourself.

In the children's room, you can stick paper decorative balls in the shape of a Christmas tree on the wall. And you don't need to decorate. Wall application will look bright.

Probably, this is what the wall tree looks like for the most patient people. Indeed, in order to cut out so many fragments from paper, one desire is not enough. It takes a lot of time, effort and patience.

It is much easier to draw the outline of a Christmas tree on the wall and glue a paper garland to it. Moreover, this design looks no worse than the previous one.

What could be more original than a Christmas tree from the rulers? Only a Christmas tree made of wooden clothespins, on which you can hang both New Year's gifts and glass balls.

Or you can just lay out a Christmas tree on the wall from a luminous garland. Both bright and beautiful.

If there is no place in the apartment for a real Christmas tree, you can make it on the wall with your own hands from a wide variety of materials. How to make a Christmas tree on the wall from improvised materials - read this article. And for children, you always want to come up with something original for the New Year holiday. I offer several simple and affordable options for creating a Christmas tree on the wall in the form of decor.
The easiest way to create a Christmas tree on the wall from improvised materials:
- handmade snowflakes  - all kinds of small children's toys,
Bells, - Christmas garlands,
- or from crafts that you can do with your child, 
From disks. 
An excellent option for creating a Christmas tree on the wall can be plastic plates. They need to be pre-decorated.
Christmas tree from plastic plates
To create such a Christmas tree, you need to have 6 red and 4 green plastic plates, multi-colored paper, Christmas decorations, small toys, photographs, New Year's pictures and ribbons for bows. For fastening, you need glue, double-sided tape or pins. 
If you are going to make such a Christmas tree on the wall with wallpaper, then do not make the plates too heavy with decor so that you can attach them to the wallpaper with pins. If such a Christmas tree is placed in the kitchen, then you can use double-sided tape.
Each plate can be decorated with circles of colored paper, small photos or other pictures. You can use whatever your imagination suggests. Everything will need to be glued to the plate. Make a hole on one side of the plate, pull the ribbon into it and tie a bow. Bows decorate only red plates. 
Stick green plates on a long sheet of multi-colored paper, this will be the base of the Christmas tree. Now you can decorate the wall, trying to form the appearance of a tree from red plates on a stand of green plates.
In the same way, you can make a Christmas tree from any decorative plates or other items. 

Christmas tree from different tinsel and buttons
If it is not possible to make a Christmas tree on the wall, then you can make a picture or an application from carved figures. 
You can stick different buttons on the drawing of the Christmas tree, which will imitate balls or in the form of a Christmas tree. 
 Such a picture can be a great gift for the New Year.