How to make original nail polish? How to make DIY nail polish from eye shadow, starch and clear polish How to make black polish at home
A man, maybe, in the conditions of repair knows how to make varnish, while girls, in turn, learned how to make nail polish. This solution saves a lot of money and provides an opportunity to choose from a large palette of colors. Creating a perfect image is one of the main tasks of a modern girl. This helps her feel more confident and feminine. But sometimes it happens that it is impossible to find the right one in the store, for example, the right shade of varnish. And this often becomes an obstacle to creating an image and placing the necessary accents. There is a way that will save money and, most importantly, help you use materials that you may have been sitting on the back burner for a long time and are waiting in the wings.
Making your own nail polish
In order to make nail polish with your own hands, you need to prepare the following:
- Tea spoon.
- Paper.
- Colorless varnish.
- Toothpicks.
- Eyeshadow in the right shade.
This simple tutorial will help you understand how to make nail polish at home. First you need to take a small sheet of paper. It can be an A4 sheet. It will be needed in order to keep the horizontal surface clean. In the list of necessary things there are shadows. In this case, they are needed in order to give the varnish the desired shade. Some makeup lovers have a wide variety of shadows in their arsenal, which are distinguished by the richness of color palettes. And among them there are shadows that are not used. They can be used in the process of creating varnish.
 So, let's get to work. To begin with, the shadows need to be pulled out of the cells of the palette and thoroughly crushed so that no lumps remain. That is why you need a teaspoon - it will help you easily pull the shadows out of the forms, crush them and at the same time leave your hands clean. If the shadows are crumbly, this is not necessary. Then you need to open the colorless varnish and briefly put the brush aside. It is advisable to control how the brush stands so that the varnish does not hit and spoil the surface.
After that, the sheet with shadows must be rolled up into a tube so that its diameter fits into the neck of the bottle. Or you can make a special funnel that will help pour all the shadows into the bottle. When all the contents are inside the container, you need to thoroughly mix the varnish with the shadows. It is not recommended to use a brush for this, as lumps can get stuck in it, and then it will be difficult to get rid of them. To do this, it is better to use toothpicks. You need to mix thoroughly to achieve an even color. It must be remembered that some brands mix instantly, while others take time to cook well at home.
Thus, every fashionista can create a varnish with her favorite shade, spending a minimum of time and money on it, but at the same time achieve the desired result.
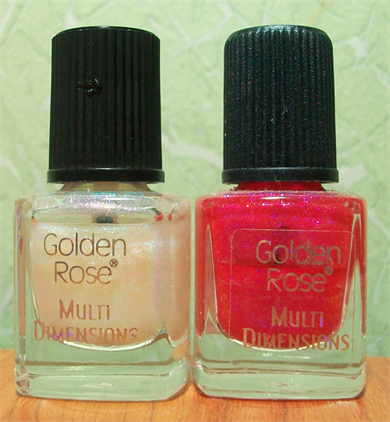
A nice detail in all this work can be sparkles. They perfectly complement the image, most importantly, they will focus on the hands.
How to make a luminous coating
 Very often, girls are interested in the question of whether it is possible to make luminous varnish at home. Can. And this process is very simple and interesting.
To do this, you will need to take:
- A clean bottle of varnish.
- Toothpicks.
- Paint that does not contain UV filters.
- Glowing powder (luminescent pigment).
Before you start creating a decorative coating at home, you need to take a completely clean and dry nail polish jar and a funnel, as when creating a regular nail polish. Then put in a jar in a ratio of one to four powder and paint and then mix everything thoroughly. After that, close the jar tightly and wait until all the contents turn into a single mass. This can also be done on a colored coating, but in this case the glow will be much weaker.
How to make natural nail polish
This will require:
- Olive oil - 1 tbsp. l.
- White clay - 0.5 tbsp. l.
To prepare a decorative coating for nails at home from natural ingredients, you need to mix olive oil and white clay until the consistency of a smooth dough. Then apply the resulting mixture on the nails and let dry for 15 minutes.
After that, wipe the nail plates with a damp cotton pad. To achieve a more visible result of colored nails, you need to repeat this procedure several times during the week. Each of the components performs its function in this “mask” for nails: olive oil moisturizes the skin and cuticles, and clay refreshes the color of the nails.
For another recipe for creating varnish at home, you will need:
- Half a spoonful of alkane root.
- 3 tablespoons of olive oil.
- A quarter tablespoon of beeswax.
- 2 drops of vitamin E oil.
First you need to heat the olive oil and alkane roots in a water bath. After the ingredients have become warm, they must be removed from the water bath and allowed to cool, then strain through a fine sieve to get rid of the roots of the plant. Then you should put the mixture on a steam bath and add beeswax.
After it melts, add 2 drops of vitamin E oil. Then the mixture should be mixed well, removed from the steam bath and allowed to cool. The varnish must be distributed evenly over the entire surface of the nail plate, while making sure that nothing gets on the skin. These coatings will give your nails a shine.
It’s easier to buy a ready-made varnish, but if you need a varnish of a rare shade, or you want to use a varnish that does not contain chemical impurities and will make your nails healthier, then you need to try to make it yourself. The article contains tips on how to make nail polish, how to avoid common mistakes in making nail polish and achieve the best result.

Where to begin?
You need to prepare in advance:
- Clear nail polish;
- Dyes - eye shadow, ink, remnants of colored varnishes, you can blush;
- A funnel made of paper for adding dye to a bottle of varnish;
- Toothpick for stirring, you can match, but a toothpick is more reliable;
- A sharp object for scraping shadows;
- Napkin for cleanliness on the table.
Advice! All procedures with varnish must be done in the absence of children, because some of the items and substances listed above should not fall into their hands.
Lacquer making process
Pour a little liquid from a bottle of clear varnish to make room for the dye. If you have chosen eye shadow, then scrape them onto paper with a sharp object. Pour into a funnel and carefully pour a bottle of clear varnish into the neck. We help with a toothpick or a knitting needle so that the shadows do not get stuck in the funnel hole.
Then we mix with a toothpick, but rather shake it with our own hands, beat it, roll it between our palms until the shadows evenly dissolve.
If you like the shade of varnish, you can use it. If desired, you can make the color darker by adding a little more shadows.


Fast and economical
At home, you can make a matte manicure or varnish. The manicure becomes dull if the nails, without waiting for the varnish to dry, are held over a saucepan of boiling water. Steam from it will make the manicure matte. Manicure from water is obtained quickly, simply and economically.
To make the varnish matte, you need to add corn or potato starch. The quality of matte varnish will be improved if starch is added to the one varnish. Now you can do your favorite manicure whenever you need it, because starch varnish is stored and used more than once.


Lacquer can be made matte with powder. Add it to a bottle of varnish, stir and use.

Video on how to make a matte manicure from a glossy manicure.
"Neon" manicure
How to make a glowing manicure at home. You need to take acrylic fluorescent paint and cover your nails over clear or white varnish. If the varnish is colored, then the acrylic paint should be the same color. A clear lacquer can be applied over the top for protection.
You can use gel pens with the same effect.


Glitter manicure
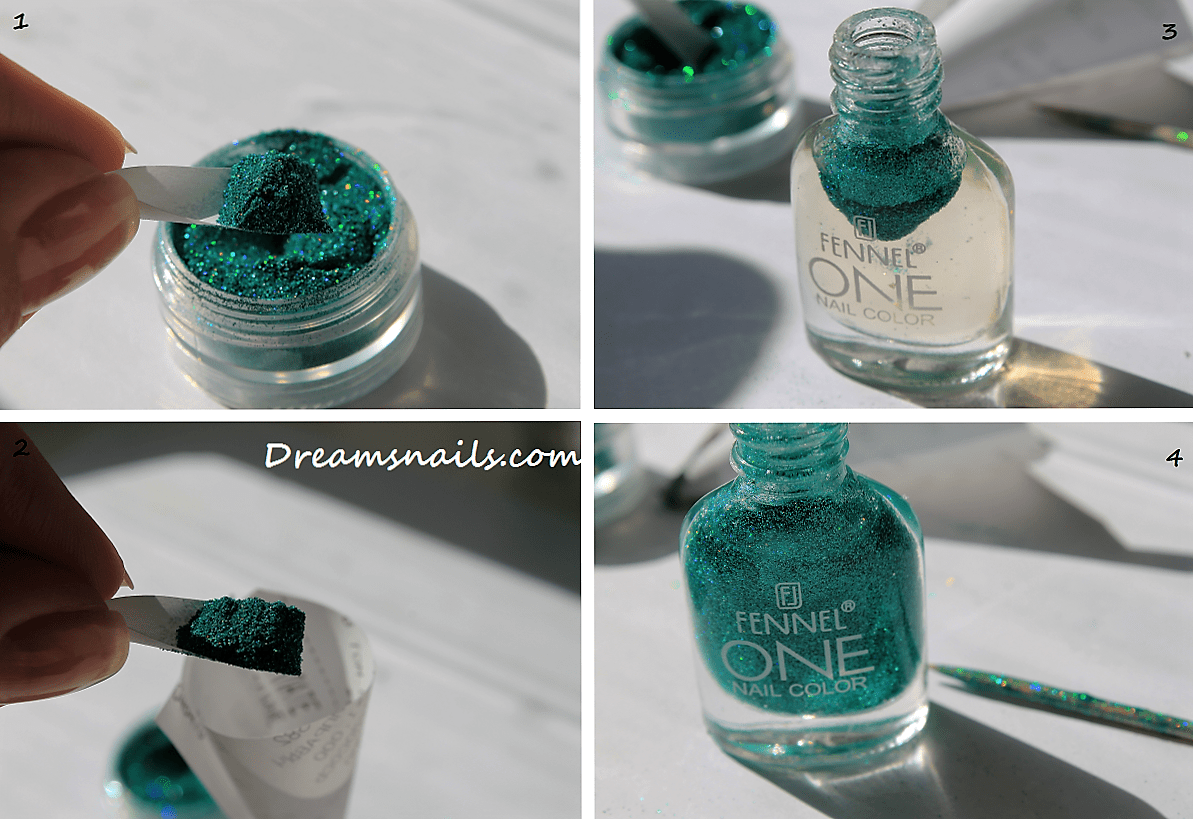
Some fashionistas love glitter manicures. Varnish for such a manicure is easy to make at home. Sequins are poured into a bottle of varnish, shaken and applied to the nails. It can be even simpler: pour glitter on fresh varnish or just on the tips of the nails. Manicure becomes colorful and shiny.
Attention! The sequins gradually sink to the bottom, each time before applying the varnish, you need to shake it well.


New varnish from two old ones
Pour the varnish from two vials into one and mix. To make the old varnish liquid, add acetone. The color of the "new" varnish may surprise you. The colors will blend and be brighter or darker or a different color altogether. To make it lighter, you can not do without a transparent varnish.
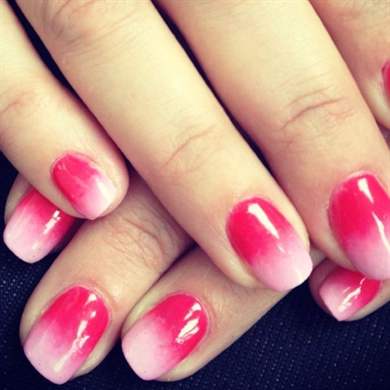
By adding varnish or paint, you can achieve a transition from dark to light, or vice versa. Such varnish is used for gradient manicure. Make a manicure in pink, turning into dark pink or cherry. The transition from paint to paint should be blurry, smooth. The photo shows examples of gradient manicure.

Advice! Gradient manicure is difficult to do at home, so you can practice with old varnishes. It will not be a pity to erase them, and start again until you learn.
Watch a video on how to make a varnish yourself. It will be clearer if you can not only read, but also watch this process.
Making your own varnish is easy, fast and economical. And most importantly, you can always achieve the desired shade and perform any manicure.
If you are engaged in the independent manufacture of furniture or want to restore some old furniture, you will need to cover it with a good varnish at some point.
The market today is full of various varnishes. However, this tool can be created by your own efforts and at home. At home, you can create different varnishes. The following are recipes for the most popular types.
Five Minute
Designed for wood. Acetone is poured into a container (preferably 100 ml) (approximately 30% of the volume of the container). Then foam is added to it. It is better to take it from the packaging of electronics. It should be finely chopped before adding. Its approximate proportion is 0.3 cubic dm. The end result is a jelly-like mixture. She needs to be patient for a while. Its color is transparent. After 2-3 hours, a good moisture-resistant varnish is obtained. It is also characterized by a decent ability to withstand impacts.
Oil types
In production, they are prepared from drying oils and expensive resins. Turpentine is also mixed with them. Typically, these species dry rapidly, but are weak in terms of strength and service life. At home, you can create a copal oily look. Take quality linseed oil (100 weight doses) and boil it in a pot or cauldron. Heating should be gradual. The task is to wait for bubbles to appear and maintain an even flame. The oil should boil a little. At the same time, in a water bath, it is necessary to melt the East Indian copal (15 weight doses) and also bring this element to a boil, until bubbles appear. At this moment, already hot linseed oil must be immediately introduced into it (it is also boiled in a saucepan at this time). You need to pour it in doses, and constantly stir this mixture. Then pour this composition into the oil that is being boiled.
The next required element here is manganese borate (1 weight proportion). It also goes to this large container. The required cooking time is approximately 2 hours. If foam appears in this process, then it must be eliminated. The varnish should turn out to be thick and smoothly come out with transparent threads with a golden tint. Then the fire can be weakened. The created composition should slowly cool down to +60 C. This is not the end of the matter. Turpentine is introduced into the mixture (70 weight doses). It pours in parts. After the next addition, it is necessary to check whether the cooled drop has the required viscosity. If it is weak, then more turpentine is not needed. The varnish is ready. Signs of high-quality varnish: golden tone, smooth laying on the work surface, drying after 6-8 hours.

Dammar view
It is great for light colored furniture. Components to create it:
- dammar gum (4 doses);
- turpentine (5 doses);
- white linseed oil (1/4 part).
Such a composition should be boiled until completely dissolved, then strain. For filtering, it is better to use a thin sieve made of metal. After that, the mixture settles for 2-3 hours. After this time, the varnish can be used.
Copal species
Required Ingredients:
- light-colored soft copal (1 dose);
- turpentine (2 doses);
- camphor (3%).
The third element is needed to give the varnish good elasticity. Such a composition is placed in a bottle for three quarters of it. The bottle is tightly corked and kept in a warm place, for example, near the battery. The bottle must be shaken periodically. You should get a high-quality solution from all the components. It settles and is filtered. Cotton wool serves as a filter here. If the resulting varnish is not transparent enough, then concentrate the bottle in a water bath for 10-20 minutes.

Mastic look
Required elements:
- pure mastic (12 parts);
- Venetian turpentine (1.5 doses);
- powdered camphor (0.5 doses);
- carefully crushed glass (5 doses);
- thoroughly purified turpentine (30 doses).
The composition is placed in a water bath. After - defends. A day later, it is drained and filtered. Cotton wool is used for the filter.
Castro view
If you overtake castor oil in a dry way, then a residue similar to rubber is formed. If it is dissolved in gasoline or alcohol, you get a varnish with excellent resistance to moisture and ultraviolet radiation.
Asphalt view

Required Components:
- asphalt (1 part);
- turpentine (2 parts).
The first element is melted, cooled and crushed. The second element is added to it.
Japanese look
Elements:
- turpentine (45 doses);
- dehydrated lavender oil (60 doses),
The first two components are mixed. The liquid part is separated from the precipitation, then heated. While this process is going on, you need to add camphor (1 part) and copal resin (15 parts) to the mixture. After 20-30 minutes, the composition can be filtered.
These are the basic recipes for homemade varnishes. Surely every master has a dozen more interesting recipes.
If the shade of varnish you have does not suit you, add ink of any color to it.
Nancy Wave live/youtube.com
They can be specially bought at an office supply store, but ink from a gel or regular ballpoint pen is also suitable. The main thing is not to overdo it and be careful.
2. Matte varnish
With the help of starch
Cornstarch can not only turn an ordinary glossy varnish into an elegant matte finish, but also make it lighter. Mix 4-5 drops of varnish with a small amount of starch. Apply this mixture on your nails. After drying, the varnish will become matte.
With powder or matte shadows
You can make the polish matte by adding loose powder or matte shadows to the bottle. In order to definitely not spill anything, roll a small funnel out of paper. Along with powder or eye shadow, add a couple of small steel balls to the bottle to better mix the contents.
By mixing a light loose powder with a transparent varnish, you will get a white matte varnish.
3. Sparkling or pearlescent varnish
If you want to, add glitter to the varnish or sprinkle them on nails that are not yet dry. To add originality to your manicure, sprinkle glitter only on the tips of your nails.
 thegluegungirl.blogspot.ru
 To achieve a pearlescent effect on the nails, you can use ordinary eye shadows. Grind the shadows first. Crush them in any dish with a hard object and turn them into powder. So the coverage will be uniform. Then carefully add directly to the varnish.
 3.bp.blogspot.com
 To get the exact color of eyeshadow polish, mix it with clear polish. If you apply the same shadows on your eyelids, you will get the perfect color combination.
 herbsofgrace.com
 If you feel sorry for crushing the shadows, apply them with an applicator to slightly damp nails. The same can be done with crumbly mineral shadows. Then just blow off the excess and coat your nails with a fixer or clear polish.
 www.thebeautycontext.com
 4. New varnish from several old ones
Choose two or more matching polishes and pour into one bottle, adding a little nail polish remover if needed. You can also put one bottle on top of another and go about your business while the contents flow. Shake the resulting mixture thoroughly. New varnish is ready.
 wikihow.com
 By the way, if you gradually darken the resulting mixture, you can get an ombre effect - smooth transitions of colors into each other.
5. Luminous polish
With acrylic paint
If you mix polish and fluorescent acrylic paint, your nails will glow in the dark. For this purpose, fluorescent ink from gel pens is also suitable. All this can be found in art stores and regular stationery.
 picmia.com
 The best shine gives a transparent lacquer base. If desired, it can be applied over colored varnish. With white varnish, also feel free to use fluorescent paint of any color.
With glow sticks
For this method, you will need a half-empty bottle of varnish and one glow-in-the-dark stick. If you're using colored polish, make sure it matches the color of the stick.
Warm up the glow stick well, especially if it is in the form of a thin bracelet or necklace. Cut one end of the stick with sharp scissors. Dip the cut tip into the vial and gently squeeze out the luminous liquid. Close the full vial and shake well. Then apply nail polish.
 wikihow.com
 Remember that when using sticks, the glow effect will only last a few hours. Don't forget to seal your masterpiece with a colorless polish to make it last longer.
Matte nail polish has been breaking all records of popularity lately! Technologists adore it because with a matte finish, very interesting design solutions can be realized. And we love matte nails because such a manicure perfectly hides all scratches and roughness.
First way
The most convenient way to make the varnish matte is to treat the nails with steam from boiling water. If you try, you can get a matte effect comparable to a professional manicure matte nails. The main thing in this method is that you do not need any additional costs, and making gel polish matte is easy even at home.
In order to create a matte manicure, you do not have to buy matte nail polish. Take your favorite glossy nail polish in the desired shade, fill a saucepan with water, prepare a nail file, cotton pads and nail polish remover.
- First, remove any remaining polish from the surface of your nails and thoroughly clean your nails.
- It will be necessary to give a beautiful shape with a nail file and remove the cuticle.
- Gently, using glossy nail polish, paint your nails to your liking on one hand.
- Turn on the stove and heat a pot of water.
- While the polish is still wet, place your hand over the bowl, palm up, and hold it over the steam for about two minutes.
You need to hold your hand over the pan very carefully! Otherwise, you may get burned from hot steam. Manicure - matte nails will turn out if you drive your fingers over the steam in such a way that it completely covers each nail, and the matte coating appears on each nail.
Repeat the procedure with the other hand. So you will quickly and easily get matte nails manicure and you can enjoy it without going to a beauty salon. As you can see, making a matte varnish at home is quite simple and convenient.

Second way
Another way to make gel polish matte at home and at the same time without harm to nails is to purchase a special fixing agent for manicure. It is the matting finish that will give a velvety finish to matte nails in a manicure, fix the result and help the nail polish to stick well. With the help of a matte finish, you can make the nail polish of absolutely any manufacturer matte.
But keep in mind that although matte nails manicure hides all scratches, it perfectly emphasizes the slightest irregularities and defects in the nail plate. That is why you will first have to carefully polish your nails, and only then apply a glossy and matte finish.
How to make a moon manicure, and varnish - matte at home?
- Paint your nails with a regular glossy varnish and wait for it to dry completely.
- Glue the tips of your nails with special strips to make a jacket. If you do not have such strips for a moon manicure, then you can use adhesive tape.
- Paint over the exposed part of the nail with a matting finish and wait for it to dry completely.
- Remove the strips to complete the jacket - and you get a manicure matte nails with glossy tips.

Nail industry professionals advise choosing dark shades of nail polish for a moon manicure, as they look most impressive in a velvety finish when the task is to make the varnish matte at home.
Advice: matte nail polish and its matte finish stay on nails longer than glossy, but are more etched into the nail plate. If you do not want your natural nails to be stained with a dark pigment of varnish instead of a natural shade, then be sure to apply matte nails before manicure - a base coat for varnish.
Expert opinion
Matte nail polish goes very well with gloss. You can alternate glossy and matte tops on different nails or combine both on one nail. In order to achieve matte nails manicure, you need to use a special matte top coat. Many people want to make the varnish matte at home by adding ordinary starch, flour or baby powder to it. But it is not recommended to do this, because. you can just ruin the nail polish. "Home" components were not originally provided by the manufacturer to make the varnish matte. Most often this leads to thickening of the top coat. But even if this does not happen, then when applied to the nails, the color of the varnish will change and not for the better.