How to fold a paper boat. How to make a boat out of cardboard with your own hands. Colorful sailboat made of matchboxes and cardboard
Paper origami is the oldest and very popular art of folding funny things among children and adults. The main difference between the origami technique and other types of paper crafts is that the figure is folded from a whole sheet, without the use of glue, and as a result, if the craft is expanded, we again get an intact sheet of paper.
The most common paper craft is, of course, a boat, because everyone remembers what pleasure this fun favorite children's fun gives - to let paper or along the river.
Scheme of origami paper boat
Building a paper boat is very simple, but not everyone knows how to fold it correctly. To make it, we only need a blank sheet of white or colored paper. When building origami, it is better to be guided by a detailed diagram.

Paper boat master class
For clarity, we will show you a detailed master class on how to fold a paper boat model. Let's take a blank sheet of paper. We choose the dimensions of the sheet based on the desired size of the future craft, however, we take into account that in the process of making the boat, the paper will fold several times, and as a result, the origami will turn out to be much smaller than the sheet. For example, we use a standard A4 format casting, as a result, the boat will turn out to be no more than 10 centimeters in length.
- On a blank sheet with a simple pencil or felt-tip pen, draw a vertical line dividing it strictly in half. It will be the first bend line.
- Now, strictly along the bend line, fold the sheet in half vertically.
- We denote the next vertical axis, but you should not mark it with a pencil, since in this case the line will be visible on the future craft, this will spoil its appearance. To avoid this, just carefully fold the sheet in four, outline a line and straighten it back. Then take the two upper corners and fold them to the vertical axis as shown in the figure. The resulting bend lines should be carefully bent, for this the resulting bend lines should be carefully bent, for this it is better to use some kind of hard object, such as a paper knife.
- Under the bent corners, we have a free double strip of paper left. We first bend the upper strip, again carefully fixing the bend line.
- Then we will do the same with the bottom stripe.
- Now we begin to open the resulting triangle from below.
- Next, we fold the open triangle into a square so that the side corners are located in its center, in order to do this correctly, we are guided by the figure. Then tuck the corners of one strip under the corners of the other.
- Now let's fold the top part in half, laying it on the bottom of the figure's base, and match its top and bottom corners.
- In the same way, we fold the resulting part on the reverse side so that an isosceles triangle is formed.
- Now we will open the triangle from below, spreading the side parts to the sides.
- Having opened the figure, we bring together the lower corners, we have a double square.
- Now let's take the resulting square in our hands and carefully, so as not to tear the paper, stretch the upper corners of the figure to the sides, simultaneously raising the side of the boat.
- Let's unfold the figure and get an almost finished origami boat, it remains to finish it quite a bit.
- In order for our boat to be more stable and float well without turning over, we will give its bottom the shape of a rhombus.


Finally, the paper boat is ready to set off on an exciting journey along the fast flow of the river.
Content
Recently, decor items that are made from recycled materials or from materials that are conditionally called garbage, for example, cardboard boxes from used appliances, have been in fashion. On the other hand, it has become fashionable to create various figures and models of equipment from paper. In this article we will try to create some interesting cardboard ship models. For some of these models, you will need ready-made templates, and some products can be created without diagrams, using your imagination. At the end of the article, you will definitely find a video tutorial that will help you consolidate your knowledge and create an interesting product from improvised means. Let's not waste time, prepare materials and start creating.
Templates
Let's first try to create a ship using templates. They are easier to work with. What you need:
- thick cardboard (you can use an old box);
- scissors;
- pencil;
- ready template;
- glue or tape;
- colored paper and other decor.
First you need to print the template and transfer it to the main material. By the way, if you are using not too thick cardboard, then the template can be printed directly on it.
You should get the following details:
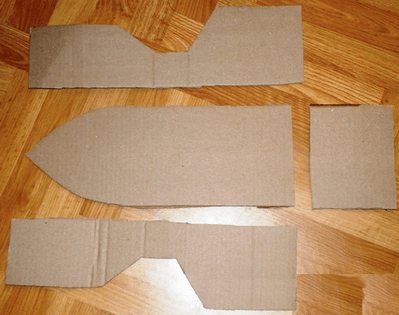
Next, you need to dilute a little PVA glue with water, cut plain paper into pieces and stick them to the base of the ship by dipping them into the solution. Remember the papier-mâché technique. The parts of the ship themselves are best connected with adhesive tape.
It remains now to arrange the blank with a prepared decor. It can be colored paper, wrapping paper, fabric. The ship can also be painted with ordinary watercolors.


You also need to make a mast for the ship. You can use a regular twig and a few round logs made of thick cardboard.
Every ship should have a flag. For it, use a fabric and an application made of paper or material. The sail can also be made from cardboard, use toilet paper rolls.

Making a big ship
This option is suitable for young children who love exciting games. For such a ship, you will need a large box. It can even be packaging from under the refrigerator or from a large TV.
First you need to connect the valves of the box and make a sharp bow of the ship. On the sides you need to cut out a few round timber to make impromptu portholes. Use a thick stick and fabric to make a flag. Use paint to paint the ship.

Do not forget about details such as the anchor - it also needs to be made of dense material and decorated. A large do-it-yourself cardboard ship is ready to sail through the vast expanses of the apartment.
We use matchboxes
Let's call it modeling, because we will create a whole ship from several matchboxes. What will be required:
- cardboard;
- glue;
- matchboxes;
- wooden skewer or thick paper;
- colored paper;
- markers;
- scissors.
First you need to glue together two matchboxes with short sides. Glue another box on top in the middle.

Now you need to cut a rectangular piece of paper and glue it to the top of the structure.

Now you need to cut out a strip from thick colored cardboard, with which we will form the bow of the ship.

Now you need to cut out a piece of cardboard that will fit the contours of the ship, take a look at the photo:

Now the bottom and top of the ship need to be fastened with glue. Next, you need to make a mast. You can use a wooden skewer or twist the A4 sheet very tightly and secure the tip so that the sheet does not unwind.

A hole must be made in the upper matchbox of the ship so that the mast can be inserted. Don't forget to use glue.
Now it remains to cut out the sails from colored paper, paint them and attach them to the mast.

The matchbox ship is ready! It can be made wider and taller if more matchboxes are used. If you use very thick cardboard for the bottom of the ship, then it is quite possible to launch it on the water and participate in competitions for the title of the fastest ship.
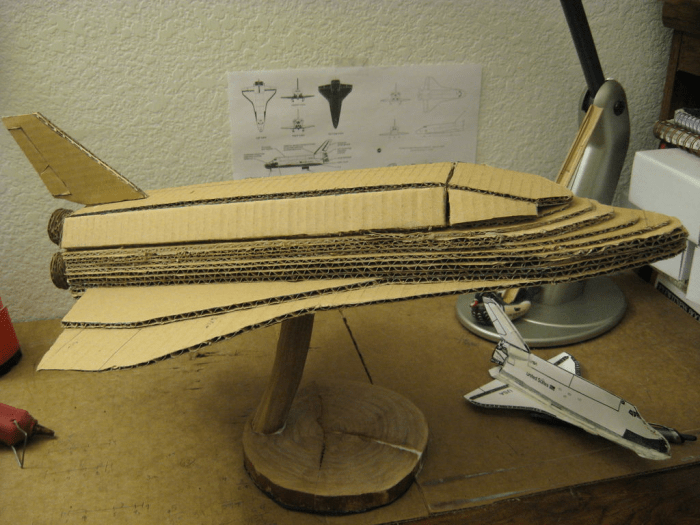
DIY cardboard spaceship
We suggest using a fairly simple option that will literally create a 3D model. To do this, it is necessary to cut out several identical parts from cardboard, but of different sizes. The parts must be fastened together, but laying between them either a thin piece of foam rubber, or a small piece of thick paper. It will turn out something like this:

Or like this:
An entire space station can be made using cardboard toilet paper rolls and scotch tape.

Use silver foil, compasses, black felt-tip pen, and a simple pencil to give the spaceship a realistic look.
Cardboard is a fairly convenient and easy-to-use material, but if you know a few nuances, the work will seem even simpler, and the product itself will turn out to be neat:
- when working with very dense material, use rather sharp scissors, and even better - a clerical knife;
- before bending the cardboard parts, it is better to draw along the dotted lines with the non-sharp side of the scissors or an old pen that does not write, then the material will bend neatly and evenly;
- Not in all cases, you can use a glue gun. For example, if you are working with thin material, then it is better to use stationery glue or PVA;
- work in a room where the humidity is not too high, otherwise your products may delaminate or parts will not stick together;
- the room should be light, it is desirable that there is a window that can be opened and ventilate the room;
- and we always advise you to work only in a good mood.
How to make a ship out of cardboard with your own hands - a few more interesting options
We want to offer some more interesting and beautiful options for ships that you can do with your own hands.


In this case, a milk carton, cardboard boxes and a sleeve were used.


And this is a luxurious boat made from an ordinary cardboard box.

A little practice and imagination, and you can get such a beautiful do-it-yourself cardboard pirate ship. We always advise you to involve children in creativity. They will be especially pleased to know that they are creating a boat just for themselves. In parallel, you can think about a pirate costume, as well as make a spyglass, a hat and a cardboard knife out of cardboard. Such participation of children in creativity helps to develop their imagination, attentiveness, perseverance, the desire to create something with their own hands for themselves. Be sure to involve the children in cleaning as well. Explain to them that they need to put all the materials after themselves, put them in their places, and also need to clean the workplace so that later they can do creativity again.
Good afternoon, dear needlewomen!
Many will remember unforgettable moments from childhood - how great it was to do paper boats and launch them along the river, or at least a puddle! Years have passed, and now your hands have forgotten how to make boats. Now that you have your own children, it's time to remember and introduce your child to this exciting spring activity - make paper boats and put them on the water!
You can come up with a game: lay down several boats with a child and let them go to the river for a bet: whose boat will sail the longest, that is the winner.
In this article, you will learn how to make a paper boat with your own hands, as well as get acquainted with the video instruction.
How to make a paper boat
Do you know that the origami technique is useful for a child in that it develops thinking, attentiveness, logic and fine motor skills? Therefore, arm yourself with a piece of A4 paper and start crafting with your own hands. For work, you can take a white sheet, which you can later repaint into any one you like, and it is also better to take paper that does not get wet after 30 seconds spent in water. There is another secret of “survivability”: a paper boat can be coated with melted beeswax or paraffin, this will give the paper moisture resistance.
First, we will introduce you to the scheme of a paper boat, then we will proceed to step-by-step photos and videos.
Paper boat folding scheme
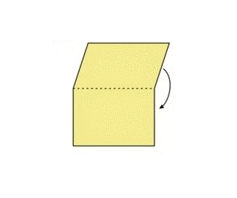
1. Fold a white sheet of paper in half. (Fig. 1) We bend the two upper corners of the rectangle at a right angle to the center point (Fig. 2)
2. We bend up on both sides the free edges of the sheet on both sides (Fig. 3)
3. Tuck the corners as shown in Figure 4 so that the whole composition folds into a triangle (Figure 4)
5. Bring the corners of the lower part of the composition together (Fig. 5), so that in the end we get a square (Fig. 6).
6. Fold the bottom part up to make a triangle again (Fig. 8)
7. Hold the composition by the corners and gently square it.
8. Pull the corners until you get a boat, do not forget to align all sides of the ship well, this will give it stability and accuracy.
Paper boat.
Perhaps every boy in childhood folded paper boats, and most likely, becoming a parent, not everyone will be able to fold a paper boat once or twice. Let's refresh our memory and origami technique and fold the boat with our own hands together with the "Master of Needlework"
As we have said, make such crafts from thick paper that will last longer on the water. Beeswax or paraffin will increase the moisture resistance of the boat.
How to make a stable and beautiful ship, how to decorate it? You can decorate the ship, firstly, with acrylic paints, and secondly, you can make a flag on the ship from toothpicks and fabric, napkins or paper and attach it so that balance is maintained.
Now let's move on to the technique of folding a paper boat.
We only need a piece of A4 paper.

Let's fold the sheet in half.
And again in half - to make a fold line.
Unfold the last fold.
We schematically denote it with a dotted line.
We bend the upper corners to this dotted line.
Carefully, so that both ends are symmetrical and converge in the middle of the craft.
Bend the lower loose ends upward on both sides.
We carefully bend the protruding corners.
Here's what happened on one side.
On the other side, do the same.
Fold the workpiece across, as shown in the photo.
Open the boat to make a rhombus.
Measure a small distance from the top corner, mark or by eye. Bend the bottom edge to this point.
On the other side we do the same.
Now we need to open our paper boat again. A little more, and the DIY craft will be ready!
Now grasp both sides of the ship with your fingers.
Pull them and open the boat.
This is how it should turn out. Now we need to straighten the boat well.
It is important to properly straighten the boat, otherwise it can lie on its side on the water, pay special attention to the bottom.
Learning how to make a boat out of paper is easy, you probably made sure of this by looking at the instructions. The systematic folding of paper using the origami technique develops creative thinking, logic, hands, horizons and an eye. In the origami technique, you can do anything: boats, planes, insects, flowers, animals, bows - whatever your heart desires!
Therefore, a paper boat is just the beginning! Next, make a paper boat with your child, a paper cruiser, and so on! Below are video tutorials on how to make them.
How to make a paper boat video
How to make a paper boat video
How to make a sailboat out of paper video
Text prepared by: Veronica
Grandparents did not know about the Japanese origami technique, but, without knowing it themselves, they easily made at least three such crafts with their own hands. Origami is the art of making a variety of crafts with your hands, by folding it out of paper without the use of scissors and glue. Using the modular principle in the origami technique, when the figures are assembled from many separately assembled paper parts, oriental craftsmen make anything from small birds to huge dragons.
- The Japanese make them from special paper, and for these most popular origami crafts in Russia, our parents took any sheet with an outline that came to hand and folded an airplane or boat for the children. This skill is still in demand today.
- In spring, when the first streams and puddles delight children, in winter, when any basin at home can be turned into a pond, not to mention summer and autumn, a paper boat will help entertain the baby, turn slush into a fairy tale. The child is willing to learn from mom and dad to make a simple boat out of paper with their own hands in one lesson. This skill develops fine motor skills of hands, spatial thinking, and the ability to read diagrams is also always useful to him.
- It is better for beginners to make a simple origami paper boat for children, especially since the step-by-step instructions for the diagram will be in front of you below. When you master this option, you can use photo lessons, diagrams and videos on the Internet to learn how to make an origami boat out of paper with pipes or under sail. Such a paper ship is easy to put in your pocket when going for a walk.
Easy Origami. Paper boat for beginners.
This classic paper boat, under the guidance of parents, may well be mastered by a child of the older group of kindergarten. Any paper will work for making a classic simple paper boat, but if you want it to be easy for a child to fold, you should not take one that is too thick, like cardboard for crafts. However, if the paper is too thin, then your ship will soften too quickly and fail, so it is better to take a sheet of medium density.
Usually crafts are made of A4 paper, but if your child wants to have a BIG ship at the exit, then choose a larger format, the main thing is that the sheet is rectangular, and the actions according to the diagram will be the same as in the instructions below.
So, look at the photo and start the lesson:
 We bend the lower corners of our rhombus again, each on its own side, transforming it into a new triangle.
 We carefully iron the folds of the resulting rhombus and prepare to move on to the next transformation.
Now we take these corners and bring them together, as a result we get a new figure - a rhombus.
 We bend the corners of the wrapped strips from each edge towards each other so that the craft blank finally takes the form of a triangle.
 The edges-strips remaining below under the resulting triangle are bent up each to its own side.
 We take the edges along the fold line and bend them down to the center to make a triangle at the top.
Take an A4 sheet and fold it in half.
 We repeat the technique from paragraph 4: holding the opposite edges, we bring them together, again, as in a fairy tale, turning the triangle into a rhombus.
 The most crucial moment in our fairy tale is coming. We take the upper corners with our hands and slowly open the rhombus, turning it into a boat.

If you want the boat to be beautiful and unique, you can make it from colored paper or paint it with wax crayons.

You can add a flag to the center, but any additions to the ship should be light so that it does not lose stability. On the Web, you can see a lot of photos of boats assembled according to this scheme, thanks to interesting paper and small additions that have become a real decoration for the children's room.
If you want the ship to last longer and not be afraid of water, dip it in melted paraffin. Or can a child make a postcard with a congratulation for dad or grandfather according to this instruction with his own hands from beautiful paper boat.
A simple paper boat assembly scheme
Now that you have mastered the assembly of a simple classic origami boat, you can try to make a steamboat according to the instructions.
Look at the photo below, follow the instructions for bending, indicated by arrows, and you will be able to do everything yourself.

It is easy to find video tutorials on the Web on how to create boats with two pipes, so that, having mastered the video instructions, a child can build a whole flotilla of steamers with one pipe, twin pipes, simple boats and sailboats.
Complex scheme with a sail
To create a sailboat, as in the diagram below, you will need special origami paper, or simply cut out a square from A4, otherwise nothing will work.

DIY colorful origami paper boat. Instructions in verse for children!
A do-it-yourself paper ship is an interesting pastime for a boy. The toy that the child himself made will become more valuable to him than the most expensive gift. There are several versions of how to make a boat. Some we know from childhood; others are more difficult and require some experience in the art of paper craft. But the most impressive models are those that are assembled from small elements - modular ships.
Paper origami? There are many ways, many techniques. For some interesting models in this article, we will give instructions and give tips on proper assembly.
Simple paper applications
First, decide which paper folding technique you will use? For preschoolers 4-6 years old, it is interesting to make applications. Elementary boats glued from cut pieces of paper do not even require any patterns. It is enough to draw a ship with felt-tip pens - two- or three-masted. Cut it out and stick it on a blank sheet of paper or cardboard, and at the bottom, offer to finish the wave for the child. Cardboard paper can be placed against the wall or folded so that the boat stands upright.
How to make a paper ship? Two schemes of origami ships
Even a schoolboy will make an ordinary ship out of colored paper. We will not focus on it. The diagram is very detailed and explains everything.
Let's better explain another scheme. This is a more unique scheme of a motor ship with two pipes. Sometimes it is called an envelope boat, because you can give gift money to a colleague or friend in it. For children, this is also an interesting surprise. This model can even be put on the water.

What do we have to do?
- We take a square sheet of any paper and make diagonal bends.
- We unfold, and bend all 2 corners exactly to the center. It turns out a smaller square.
- We turn over and in those small squares that have turned out, we bend outward each free corner. In the diagram, this step is numbered 6.
- Then you need to open a couple of lower "pockets" on the back side, all the necessary actions are shown by arrows in steps 8 and 9.
- Fold in half as shown by the black arrow in diagram #9, and this is the last step.
If your child asks how to make a paper ship, answer that it only takes 10 steps and 8 minutes of time. The result was a beautiful model of the ship.
Scheme and instructions
You can also make a sailing cute sailboat out of colored paper. There is nothing complicated in its assembly either.
- First, as always, we bend the square sheet 2 times diagonally. This step is not even illustrated, because this is the initial preparation.
- Divide the square sheet in half.
- Cut in half again on each side.
- Next, we easily bend the corners to the center fold line.
- The next bend must be made at a sharper angle. All 4 bends must be done in the same way.
- We bend the extreme remaining corners, and make such a blank, as in fig. 5.
- Then you need to fully expand this blank and make deflections along the initial diagonal lines to get the bow and stern of the ship. You will see that the boat will fold itself after all these paper manipulations.

The sail consists of one triangular leaf, dressed on a toothpick. Despite the terrifying simplicity of crafts, it still looks beautiful and neat. The child will cope with the scheme in no time. In principle, a sailboat does not have to be dressed. And you can put a passenger in a toy - some kind of Lego character, for example.

Origami is a whole art that needs to be studied and loved. This will teach the child to spend time usefully.
You can make a lot of paper ships in the form of a boat with a sail, from different colored paper. Then you get a whole flotilla of sailboats.
A real military cruiser made of paper. Instruction
This sailboat will appeal to younger children. Older guys are better off finding a pattern to create a real cruiser. There are many sites on the net where old magazines "Young Technician" are published, there are also online publications of the Polish magazine - MALY MODELARZ, where there is a step-by-step guide and all the diagrams for the ship. This ship will no longer be so easy to assemble; this will require patience. In addition, you must have a good color printer to print these models.

There is another option. Namely, find a ready-made set of models on the Internet. However, these kits cost money. How to make a paper ship that will be like a real one?
Modeling ships sometimes captures adult men. This is not surprising. Paper models of ships are created not only for entertainment and a pleasant pastime. Modeling is also development.
Since the circuit is one copy, and there are no spare parts, everything must be done carefully. Otherwise it is easy to ruin the ship. There is an instruction of paper ships in the box. The child will first have to cut out all the details with scissors, and then glue them in the order indicated in the instructions.
Modular origami. Ship of the future
Talented craftsmen make real masterpieces from modules. Modular origami (crafts made from small triangular parts) is very popular around the globe. How to make a paper ship using the modular origami technique?

Buy at least 10 sheets of colored paper first. And if you still don’t know how to make triangular modules, then first practice making even, high-quality elements. A ship will not come out of crooked paper parts.

How to make a paper ship out of paper that is too soft? This paper will not work. For modular modeling, choose a thicker, even stiffer paper.
Select the model you are interested in. And find a step-by-step video instruction for it with detailed explanations. First, choose a model with a minimum of color patterns. And try a few times. One day it will definitely turn out to be folded so that the craft does not fall apart.
How to glue modular origami ships
Large ships need to be glued. When there are a lot of details and a lot of rows, the design turns out to be too heavy and even a cardboard frame is needed. But if you have a mini-model, with a small number of modules, then it is not necessary.

If you buy glue, take regular PVA. But it is not necessary to apply to the surface of each element. Several dots are glued in each row, and then very carefully so that there are no white marks.