Simple macrame. A grid of square knots. Macrame school: thread preparation
Macrame - the technique of nodular weaving was known in antiquity. This art originated in the east, and thanks to navigators spread throughout the world. After all, macrame weaving is very strong, and sailors had to weave nets and splice cables. In addition, they often braided various ship structures with ropes.
20-30 years ago macrame was very popular in our country. This technique was used to make: key chains, handbags, clothes, tapestries ... Depending on the product, macrame schemes can be simple and complex. Now little attention is paid to this type of needlework.
For weaving macrame, you can use leather and fabric laces, sisal, twine, floss threads. The main requirement for the material is strength, because the durability of the product depends on it.
Today I will tell you about macrame for beginners .
For work you will need:
- lace,
- pillow (it is convenient to weave on it, but you can do without it),
- a few pins.
Macrame for Beginners: Flat Easy Knot
To get started, I suggest you weave a simple macrame bracelet.

Necessary: 2 twine 1 - 1.4 m.
1. Fold 2 ropes together, step back from the edge a distance equal to the planned length of the bracelet + 10 cm of stock for knots. At the intended point, tie the ropes to form a small loop (clasp). Check again if there is enough length.
2. Use a pin to secure the threads to the pillow. Put the short ends in the middle - this is the base, on the sides along the long end - working threads (they tie knots).

Macrame for beginners - step 1
3. Throw the right working thread over the warp.

Macrame for beginners - step 2
4. Lay the left working thread on the right working thread, and pass under the warp.

Macrame for beginners - step 3
5. Now bring the left thread out between the warp and the right thread.

Macrame for beginners - step 4
6. Tighten. The node is ready.

Macrame for beginners - step 5
7. The right and left threads are reversed. The next knot is tied in the same way.
8. After a few knots, you will see that the chain begins to twist.

Macrame for beginners - step 6
9. Turn the chain around its axis by 90 degrees. Secure with a pin and continue weaving.

Macrame for beginners - step 7
10. Knots can also be tied on the right side, then the chain will twist in the other direction.
11. When you get close to the end of the warp, tie a large knot (the size of the loop, you can tie a bead or button) on the main threads.

Macrame for beginners - step 8
12. To secure the weave, tie a simple knot with working threads.

Macrame for beginners - step 9

Macrame for beginners - step 10
12. Turn the bracelet over and tie another simple knot.

Macrame for beginners - step 11

Macrame for beginners - step 12
13. Trim the long ends and use glue or flame to keep them from fraying.

Macrame for beginners - step 13
This is the finished work - macrame - a simple knot:

Macrame for beginners - step 14
This is how the bracelet looks on the hand:

Macrame for beginners - step 15
And this is the same weaving using 2 multi-colored laces:

This is how bracelets woven with a flat simple knot look on the hand:

Macrame for Beginners: Flat square knot
For work, you will need 2 ropes about 1.4 m long.
1. Tie the ropes with a loop and fasten to the pillow, as indicated above.

Macrame: flat square knot - step 1

Macrame: flat square knot - step 2

Macrame: flat square knot - step 3
4. And then pass under the base.

Macrame: flat square knot - step 4
5. And bring it out to the right over the J. lace.

Macrame: flat square knot - step 5
6. Tighten the knot.

Macrame: flat square knot - step 6
7. Put J. lace on the base.

Macrame: flat square knot - step 7
8. Put R on top of J. lace.

Macrame: flat square knot - step 8
9. R. lace pass under the base

Macrame: flat square knot - step 9
10. And go through the knot, between the J. lace and the base.

Macrame: flat square knot - step 10
11. Tighten. The flat square knot is ready. You should end up with 2 alternating nodes. One of which is flat right-handed, and the second is left-handed. It doesn't matter which one to start from.

The art of weaving knots in Slavic culture was equated with pagan rites, because amulets and charms were made using this technique. Nowadays macrame art has become not only fashionable, but also a practical hobby. Modern craftsmen combine weaving with decor from beads, rhinestones and semi-precious stones. Let's try and master this interesting technique on our own.
How to make macrame according to weaving patterns
Acquaintance with patterns of weaving macrame for beginners
Weaving in the technique of nodular weaving is possible not only for panels and hammocks. Craftswomen create earrings, necklaces, belts and lace to decorate clothing items.
First you need to decide on the quality of the threads for weaving and take into account a few nuances:

To work, you will need a board or a book in landscape format. Some craftswomen attach the threads to a special tube or a small diameter rod. But in order to weave knots in a canopy, some preparation is required.
Preparation before work:

Now on this blank you can weave the first training knots.
Knots and schemes for weaving macrame for beginners
A single flat knot consists of one loop. How to do this can be seen in the diagram.

A double flat knot is used for weaving - floss baubles - or other types of threads. Pay attention to the weaving sequence: each next knot must be a mirror image of the previous one. Otherwise, the resulting flat thread will begin to twist in a spiral.


From square knots, you can weave a rhombus, as shown in the diagram.

The number of nodes is measured in tens. We will look at the basic techniques with the corresponding schemes.
Knot chain.

Knot "chameleon".

Knot "tatting".

In the diagram, you can consider and try out other, no less beautiful techniques for creating knots.

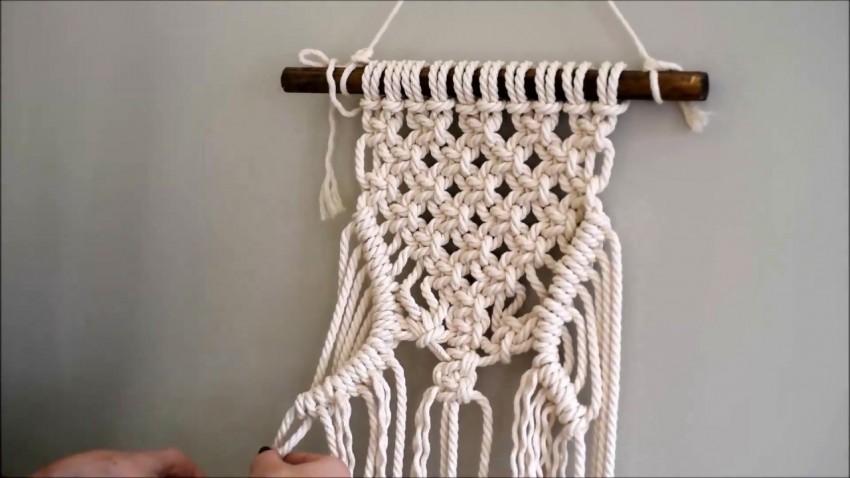
Schemes for weaving panels on the wall using the macrame technique (with step by step photos)
A wall panel is a great opportunity not only to practice weaving techniques, but also an opportunity to create an original thing for the interior with your own hands.
For the panel you will need:
- 10 threads of 5 m each; scissors;
- a wooden plank 45-50 cm long (it will become part of the future panel).

Operating procedure:

Diversify your home decor create original jewelry You can also use "flowers from beads".
How to weave a macrame belt (master class for beginners)
For work you will need:
- beautiful buckle with cross fastening for threads:
- silk or synthetic threads - 3 pcs. 10 m each;
- scissors.
Operating procedure:
- first you need to master the weaving of a double flat knot with a central thread (you can choose a different color for the central thread);

- attach the threads to the buckle, as shown in the figure;

- to finish weaving, use the “diagonal bead roller” knot, as shown in the diagram;


Using this technique, you can weave a watch strap.


Scheme for weaving macrame for flowerpots (step by step for beginners)
Do-it-yourself weaving schemes for macrame flower pots are varied and popular among craftswomen. Someone weaves a planter from the top edge, someone starts weaving from the bottom. Consider simple schemes for beginners.
For work and training use thread cut from old colored t-shirts. How to make such a yarn can be seen in the photo.


Scheme for weaving pots from below:

For work you will need:
- 8 blanks of threads, 2-3 m each (depending on the height at which you plan to hang the pot);
- a flower pot; scissors.
Operating procedure:

According to the same pattern, you can weave a flower pot, starting from the top. To do this, you will additionally need a ring for attaching threads. The lower part can be tied with a common knot and make a second tier for the second pot.


Here are some examples of interior design with simple planters.


If you have a ready-made planter, but no fresh flowers, you can make your own hands - beaded trees -.
You can create many practical and sophisticated things from knots. Designer jewelry is highly valued, and the abundance of blanks for jewelry and decorative elements in needlework stores will allow you to create original pendants and earrings. Original - beaded bracelets - will be a worthy addition to the set.
To begin with, you can practice on simple patterns and weave, for example, a key chain. For additional decoration you will need large beads, a key ring and multi-colored cords. How to do this can be seen in the diagram.


Handicraft stores are a separate universe, once in which it is already impossible to leave without a purchase. —Beaded brooches — look exquisite and elegant, because no one else in the world will have such ones.
Pendants and necklaces can be made from any materials at hand. Lace, multi-colored threads and cords, multi-colored beads and openwork jewelry are used. The order of work and the scheme can be seen in the photo.
Video with a step-by-step macrame weaving tutorial for beginners
- A macrame owl in the form of a keychain can become your friend, and a simple weaving pattern will help you to weave it in one evening. For the eyes of an owl, you will need a few large beads. Have a look at other beaded craft ideas, maybe you will find new ideas for inspiration.
- The technique of weaving a glamorous macrame leash and collar for your favorite dog is shown in a detailed master class. In this way, you can please your four-legged friend with your skills.
- The video shows a detailed master class on weaving a macrame bag using a simple pattern. A detailed story about the choice of material and additional tools that you may need in the process.
Write how you liked the idea of weaving original macrame jewelry? We will be glad to any comments.
Macrame is an ancient form of textile craft. It is based on tying knots. Ancient people used it to store and transmit information. There was even a nodular charter. And although products made using the macrame technique were found all over the world, China is still considered its homeland. This article provides a small amount of information about macrame. For beginner needlewomen, this will be quite enough to start.
Necessary materials
The main material for work are any threads. It can also be cords or even a clothesline. Only threads with a pile are not suitable, since their fluffiness will hide the entire relief of the pattern. Silk cords look nice, but are too slippery. You will have to put in a lot of effort to ensure that a knot created from such a material holds up well. So what makes the most successful macrame weaving? For beginner craftswomen, cotton rope is suitable. It is easiest to make knots from it, and the pattern is seen especially clearly.
Also, in addition to the rope, you will need pins with balls at the ends, scissors and a centimeter to measure the length of the cord used. As well as instructions for weaving using the macrame technique. A master class for beginners should be clear and understandable.
Take care of fixing your work. The base that you will use for this purpose should be stable and dense, but it is good to let the pins through. If you weave products of small sizes, then a regular pillow may well suit you.
How to prepare the thread?
There are always two types of threads in the work - the thread for the warp and the working thread. The main thread is the attachment point for the working cords. It should be slightly longer than the width of your work. The edges of this thread are tied with ordinary knots and pinned to the base with pins. Cut cords for work. They must be at least twice as long as the future product. It is usually difficult to determine the size of the working threads if you are just learning to weave macrame. Schemes for beginner craftswomen contain the required dimensions.
Sometimes the threads are so long that they bring a lot of inconvenience to the process. Then they are wound on something like a coil and attached to the base. You can also use special bobbins or curlers for this, which have an elastic band. If suddenly at some point in weaving your thread ends unexpectedly, then you can easily lengthen it. To do this, cut it at a distance of 4 cm from the edge somewhere in half. Do the same with the thread that you will attach. Lubricate the cut sections with glue and connect them to each other.
Basic macrame knots for beginners
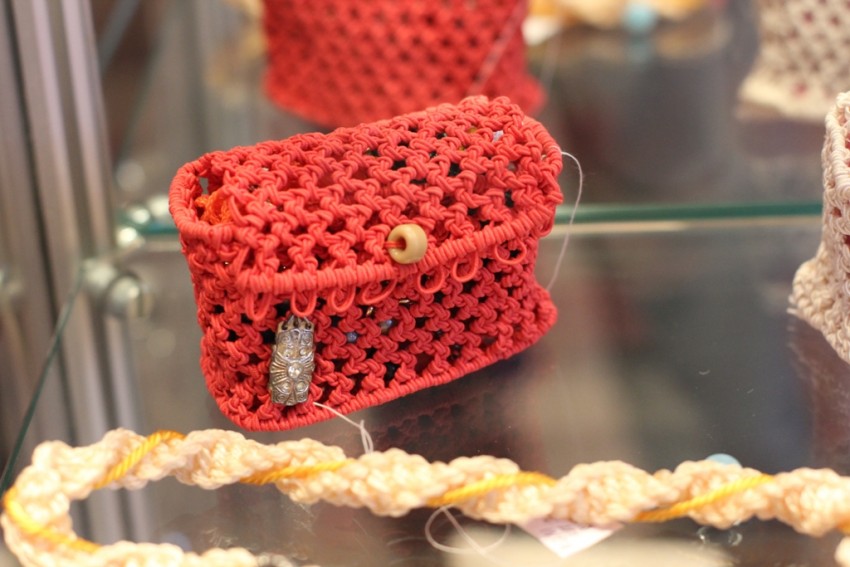
In the modern world, weaving from knots is used mainly for the purpose of making accessories. By learning how to make just a few types of knots, you can create beautiful things. Belts and capes made using this technique attract all eyes, and bags and wallets look especially original. Let's find out how to weave macrame for beginner craftswomen.
The most basic elements of the macrame technique include right-sided and left-sided flat knots, as well as a square knot, which is a sequential execution of the previous two. Sailors used such a knot to decorate something. For example, knife handles. Also, twisted and knotted chains can be attributed to the basic elements.
square knot

Fasten two threads to the base so that you get four free edges. Take the thread on the far right, pass it over the two central ones and bring it under the left one. Then we stretch the one located on the left under the central ones. We bring it out into the hole that formed between the right and central threads. The left should lie on top of the right. Now the thread that turned out to be on the right is drawn under the central ones and on top of the one on the left. The left one is placed on the central ones, after which it is passed into the hole on the other side, under the right thread. In this way, a knot is obtained, called a square, with which you can weave a chain, and if you use only half of the knot, then your chain will twist.
Materials for a macrame bracelet

Consider how easy it is to create bracelets for beginner needlewomen using the macrame technique. For our decoration, you will need a cord with a diameter of one millimeter, several beads with a hole with a diameter of about two millimeters, one large bead - about 1 cm in diameter. In order to correctly calculate how much cord we need, we need to decide how many centimeters in length the finished product will be, as well as how much is approximately needed for tying knots. To find out how much cord is needed for the job, you need to add the length of the bracelet and the amount of material spent on tying the knots, and multiply the result by 10.

Consider also the fact that the more beads you use, the less material you will need, and vice versa. In addition, you will need a piece of cord to create a fastener. Given this information, we determine that for the central part we need a segment 48 cm long, and for the side parts - 175 cm. For the fastener - 25 cm.
Instructions for weaving a bracelet
From the tools you need scissors or wire cutters, tape to secure the middle threads, as well as a folder with a clip to fix all the work. And in general, this design will allow you to move with your work anywhere.

Take two main cords (48 cm and 175 cm) and align their middles. At the same time, lay the loop of the shorter one inside the loop of the long one. Now determine the middle of the segment 25 cm and fold it in half.
Thread the loop of this segment into the loop formed by the two previous cords, and bring the free ends of your future fastener through it. Fasten this whole structure to a folder with a clip and tape the ends of the middle cord with tape. This will greatly add to your convenience in work. The whole bracelet is woven with the above described macrame square knot. Schemes for beginners are also given above.
Determine in advance how many knots will be located at the beginning, at the end and between the beads, and also choose the degree of tightening for yourself and try to do it the same way. Otherwise, your bracelet will turn out uneven. Make a few knots, then put on a bead and then alternate knots and beads in the order you intended. After the last bead is put on, weave the same number of knots as at the beginning. Now put a large bead on all four cords. Don't forget to try the bracelet on your wrist first. Tie a knot, cut the thread and add a drop of glue for strength.

Making a clasp
Try on the bracelet again. This time you need to decide on the length of the fastener. On the section of cord reserved for fastening the bracelet, tie a knot in the required place. To make the clasp adjustable, step back from the tied knot by about 1.5 cm and tie another one. Cut the cord and secure with glue.
Having completed such a simple summer bracelet, you will perfectly understand how to weave macrame. For beginner needlewomen, this is a great workout.
Making macrame harder for beginners
Once you've learned the basics of macrame as a craft option, you can take things a little harder and move on to more interesting crafts or embellishments. Traveling on the course of macrame for beginners, planters for flower pots should not be left without your attention in any case. Such an original product will certainly decorate and enliven any room and will look good, even if it is made from an ordinary clothesline.
Weave a flowerpot for a flower pot
Now let's start creating the first macrame planter. The beginner tutorial below will help you with this. For work, you will need ropes in the amount of 6 pieces. Each of them should have a length of 4 meters. Fold them in half and determine the center. Weave, using a square knot, 9 cm to one side and the other from the center. Now fold the resulting strip in half and wrap all the cords, connecting them into one bundle.

The next step is to create suspension elements. Divide the entire bundle into three groups of cords. Each of them should consist of four ropes. Using one of the options for a flat knot, weave a twisted chain. Each of the three chains should be 70 cm long.
It remains to make a basket for the pot. We take two threads from neighboring chains and weave 2-4 square knots on them at a distance of 9 cm from the edge of the hanging elements. Then we take two more threads from the next and repeat everything. And so we continue weaving in a circle and down until the height of the basket fits under your pot, which is supposed to be placed there. When the desired size is reached, again collect all the cords in a bundle and wrap them together. Leave a small brush for beauty and cut off all unnecessary.
Macrame weaving is one of the most elegant types of needlework. Products made in this style are very elegant, give the impression of lightness, delicacy, airiness. However, at the same time, this is a very time-consuming process that requires a lot of attention and patience from the craftswoman; macrame cannot be woven in a couple of hours. But if you decide to master macrame, then you need to know that all possible types of knots play the most important role there, due to which the pattern is obtained. Our today's article will be useful for beginners. We will talk about macrame for beginners, weaving patterns, knot patterns, panels, bracelets.
Weaving patterns for beginners
Before you start studying macrame patterns for beginners, you need to know what they are weaved from - the thread that will not slip is best suited for this purpose, for example, cotton or the one from which clotheslines are made. Macrame photo schemes for beginners are presented in large numbers on various sites on the Internet, but we suggest that you familiarize yourself with the video:
Node diagrams
Learning macrame should start with mastering macrame for beginners knot schemes, as you may need different types of knots in the process of creating a finished product. There are a large number of options for such nodes, and we want to introduce you to some of them:
When you know the basics of macrame for beginner knot patterns, you can try to weave something simple to start with.
Bracelet schemes
Macrame bracelets for beginners are very popular, the schemes of which are very diverse. They are not difficult to weave, they are a beautiful decoration, also having made a large number of various bracelets, you can wear them together or pick them up for different outfits. We offer you to watch a few videos with weaving macrame for beginners bracelets, patterns:
If you want to make something other than a bracelet, then we advise you to pay attention to wicker panels.
Macrame panel
A few decades ago, in almost every house you could see wicker panels made in the style of macrame. Why not resume this tradition and also make a couple of these decorations for your apartment or country house. Macrame panel schemes for beginners video tutorials will help you figure out how to do this:
Such panels will perfectly fit into the interior, made in a classic style, it will add a feeling of comfort and will cause numerous questions from your guests.
The list of things that can be done using the macrame technique is not limited to bracelets and panels. Macrame schemes for beginners include flower pots, and various necklaces, bags, belts, chair covers, wallets. Therefore, you can easily choose the right pattern for yourself and practice weaving.
Needlework has always been an integral part of our lives. And many, passing, once again through the local market, notice here and there various wonderful little things created by human hands. Among them there are clothes and decor items made using macrame technique. And the photos of macrame are simply amazing with their elegance and beauty. Today we will talk about her.
The history of macrame
Macrame was born long before you think. Even in ancient times, people used this technique for their needs. For the first time, sailors began to weave various knots, who weaved ropes among themselves in order to make the network even stronger. It is for this reason that there are so many sea knots in macrame. And only then people began to create real works of art from ordinary ropes. This is how macrame was born...

Macrame technique can be used to make a variety of things. These are wall panels, tapestries, curtains, various covers and coasters, and even clothes.


Materials and tools for macrame
Before starting any business, it is necessary to purchase materials. For weaving we need:
- Threads.
- Pillow.
- Pins.
- Scissors.
- Glue.
- Soldering iron or lighter.

Threads are the main material. You can use both special ones for macrame, and to replace them with various laces, clothesline, etc. The main thing is that the thread is quite strong, flexible and dense.

A soft surface to which you will attach the product during the weaving process. In its role can be a soft fabric with foam rubber, a special pillow, foam or foam. This is not a required attribute, but it will make the process much easier for you.

Preparation for work
After everything is ready, you can begin the process of preparing for weaving.

First, cut off the required number of threads for your work. Calculate the length of the threads so that it is about 6 times the length of the finished product. It is also necessary to singe the ends of the thread with a lighter or soldering iron (Threads made from natural fibers are processed with PVA glue).

In case you cut the thread too short or you ran out of it during the weaving process, then just gently glue another one to it.

Master class on weaving macrame
There are several types of threads in macrame. There are workers who, in fact, carry out weaving. And there is the main, or carrier, to which the working threads are attached.

Now we will analyze a few basic knots used in weaving. Everyone can master the macrame technique, for this you just need the desire, the necessary materials and a little patience.


Knot one: fixing
Not a single weaving begins and does not bypass from this knot. Its essence is to fix the working threads on the main one.

Fold all the working threads in half, place them under the carrier (main) thread with the fold up, then thread the other ends into the resulting loops. Everything, the threads are fixed.

Node two: flat
The flat knot is the most common knot in macramé weaving. Therefore, it is with him, after the fixative, that it is worth starting to learn the technique.

To make a flat knot, you will need 4 threads. Visually number them from left to right to make it easier to navigate. Then throw thread 1 over threads 2 and 3. Draw the fourth thread over 1 and under 2 and 3. Then draw it into the loop formed by the first thread and shade. The node is ready. Notice that now the fourth thread has become the first, and the first the fourth.

Now we have woven a left-sided flat knot. In order to weave a right-hand knot, it is necessary to number the threads not from left to right, but from right to left. And yes, if you continue to weave the same knots, then the whole chain will begin to twist in a certain direction.

Note! 
Knot three: rep
Another basic knot in the macrame technique. It is also divided into vertical and horizontal. A chain of reps knots is called a bred. Brides are of two types: horizontal and diagonal. For horizontal ones, it is necessary to start the main thread horizontally during the weaving process, and for diagonal ones - diagonally.

To make a horizontal rep knot, you need to put the main thread on top of the others (those that will be used to create the brida). Now the first working thread must be wrapped twice from top to bottom around the main thread and pulled through the loop between two turns. The node is ready, then exactly the same.

The manufacture of a vertical knot differs only in that not all threads will be the working thread, but only one main or auxiliary thread, which will wrap around the others.

Node Four: Square
The last main node is a square one. In theory, a square knot is an alternation of right-handed and left-handed flat knots. Therefore, its production does not require much effort. However, a square and a flat knot look completely different.

To make a square knot, first weave a right-handed straight knot, and then a left-handed straight knot.

Note! 
That's all, these were the main knots used in the macrame technique. Weaving them is not as difficult as it might seem at first glance. And the result exceeds all expectations. In the instructions and schemes for weaving macrame, many knots of varying complexity are used, however, those that we have considered today are used in all products without exception.

Photo macrame


Note! 


