How to braid beautiful hair for girls. How to braid a girl’s hair correctly: tips and tricks. Braid in braid
If you are interested in this article, then you (like me))) want to learn how to braid your daughter beautifully and stylishly. And since children often cannot do without braids when braiding their hair, we will begin to learn how to braid their hair – BRAIDS. At first glance, what’s so complicated about it, weave three strands and that’s it. I thought so too. And I was very upset when I couldn’t weave even two centimeters, everything got confused and didn’t work out. So let's learn together:
Regular braid
We will start learning from the very basics - from weaving an ordinary braid. As they say, “let’s get our hands on it” and move on to more complex options. The braiding technique is as follows: divide all the hair into 3 equal parts, take the right part and place it on the middle one, tightening them a little, then place the left part on it. So each strand alternately changes its position. We continue crossing until the very end and secure the hair at the bottom with an elastic band.


For sophistication, we can weave ribbons into braids or decorate them with bows. A regular braid can be woven on both long and medium hair. On very short ones, you can only weave along the head itself (but more on that later).
English braid
Not a difficult option either. It is a bunch of hair secured in a ponytail and braided into a regular braid. Simple and stylish. If desired, you can complicate the weaving. There are many variations. These include accessories (bows, elastic bands, ribbons...), and weaving several braids from one base or not from one, and combining them with another type of weaving.


Weaving English braids looks easy. In the diagram, this is a bunch of hair tied into a ponytail, then braided into a regular braid of 3 strands. At this stage, many descriptions end. However, this weave has many variations.

French braid
Our practice gets a little more complicated by doing French braids. All hair is involved here. First, we separate a wide strand near the forehead and begin to braid a regular simple braid. After a couple of bindings we pick up the strands from the side of the head. This continues until we weave them all into the hairstyle. And only then we weave a regular braid down. Let's look at French hair braiding for children:


As in previous weavings, interesting options are also possible in French. For example, braid 2 braids, 4 braids and combine them into one, etc.
Purl braid
It is also called the reverse French braid. The basis of the weave is the same as the usual French one, but the strands here are not laid on top of each other, but from below - under the previous one. After weaving, stretch the strands a little, making the braid wider and more voluminous. Visually, it will look like the braid is applied to the hair, which is very original. Yes, and it’s fashionable today.


Spikelet (fish tail)
It always seemed to me that the spikelet is very difficult to weave. But if you have learned how to braid French braids, then you can handle a spikelet in one or two seconds. To do this, divide the hair into two halves. Take a thin strand from the outer edge and attach it to the opposite strand of hair. And so, from left to right, or vice versa, the entire hair is intertwined. You can start from the top of the head, the back of the head, and even the tail.

In general, spikelets have many variations, especially beautiful with decoration:

Braid basket
Very convenient in the summer when it’s hot to walk around with your hair down. The basket “removes” all the hair up and opens the neck. In terms of weaving, this is an ordinary braid, only woven around the head, it looks like a basket. First, we pull all the hair into a ponytail on the top of the head, using a thin elastic band (so that the ponytail is not high). And we begin to braid the braid from the base clockwise. We take a strand from the tail and a strand from the edge of the hair growth. So we weave around the entire circumference.

We try to calculate the thickness and number of strands so that they end both at the tail and at the bottom at the same time. To do this, we regulate the process ourselves, selecting less or more hair. At the end of the braiding, we hide the ponytail under the braid with a hairpin or secure it with a hairpin.
There is an even more complex version of the basket - from the center of the head. In the form of a knuckle:

Braid-harness
Simply and easily! We distribute the hair into two strands. We twist each of them separately in one direction. For example, to the left. Like a rope. Then we connect these twisted strands together. We twist, only in the opposite direction - to the right. We secure the ends of the strands with a bow or elastic band. For variety: you can start braiding with a high ponytail, you can twist the strand into a bun at the top, you can even braid it with a basket. Very beautiful and festive:


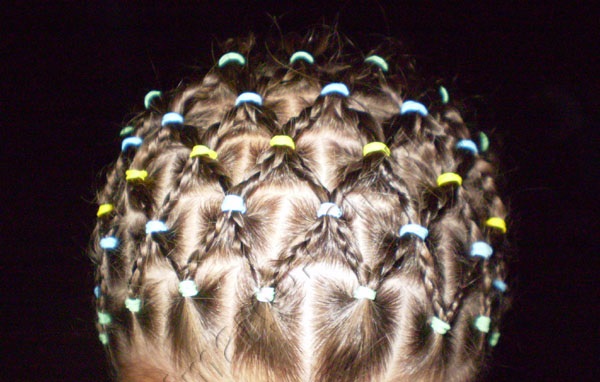
Thin braids
It seems simple, but comfortable and even elegant. Thin braids can be braided, styled, or scattered over the head. You can decorate with bright elastic bands, bows or hairpins.


Rubber braids
There is another novelty in today's weaving - this is weaving from rubber bands. Very simple and unusual. We braid a regular high ponytail. We separate strands from the right and left and tie them with a thin elastic band (preferably silicone). We straighten the braided strands a little. As if making them more voluminous. Now take the next two strands and tie them with an elastic band on top - above the previous strand. Adding volume. And so on. It turns out voluminous, a little careless, but this is the whole stylishness of this hairstyle. Try it! This is the perfect weave for beginners!

- For daily “quick” hairstyles, choose those weaves that take no more than 10-15 minutes to braid. So as not to torment both the child and yourself) because in the morning there is no time for long sittings.
- If the hair is the same length, it will be much easier to braid it than if it is of different lengths. To do this, prepare a ribbon or lace that you weave into the braid; they will hold together strands of different lengths, and will also make the braid more voluminous and elegant.
- To separate strands from all hair, use a fine-tipped comb. The braid will turn out smooth and professional.
- And finally, about choosing a braid. Tight, dense weaves are of course suitable for kindergarten-school-sports, BUT do not overdo it. Very tight hairstyles will only cause discomfort in the child. The girl will constantly think about how to unravel everything faster. And it can damage the hair structure.
No related posts.
Every mother, getting her daughter ready for school or kindergarten, wants to create the most beautiful hairstyle for her. A simple and cute option is a braid. You won’t surprise anyone with an ordinary spikelet. Therefore, young mothers should learn how to weave all kinds of French braids, waterfalls, and snakes.
Even a beginner, thanks to this article, will be able to master the art of weaving. You will be able to make hairstyles not only for every day, but also prepare your child for various celebrations yourself. A huge plus is the cost savings, and the baby will also appreciate your efforts.
Preparation


The following tools are required:
- comb;
- multi-colored elastic bands;
- ribbons;
- spray bottle with water.
Advice! To keep your braids neat for a long time, after finishing braiding, simply spray the finished hairstyle with a spray bottle. This way, you will maintain the integrity of the braid (after all, it is better not to use hairspray on children). If you unravel the braid, you will get cute curls.
Options for short hair

If your child has short hair, then you shouldn’t be upset. Even short hair can make a wonderful hairstyle. The main thing is to show your imagination. Then all the other mothers will beg you for the secret of wonderful braids.
Extraordinary simplicity
How to learn to weave different braids for children? Everyone remembers the simplest version of weaving: we divide the entire mass of hair into three parts, throw the left strand over the middle one, then the right one over the middle one (which was the left one), and so on.
Advice! To make braids on short hair last longer, braid them as tightly as possible.

There are many variations with a regular braid:
- option number 1. Braid two braids along the usual parting, secure the ends with bright bows. You can make a couple of small braids across the parting (from ear to ear), this will make the hairstyle more unusual;
- option No. 2. Divide the entire head into 4-6 parts. Braid one braid in each. Gather all the braids into one fluffy ponytail; this braiding looks very impressive against the background of bangs;
- option No. 3. Divide the head into two parts, tie each into a ponytail. Make a pigtail from each ponytail and wrap it around an elastic band, secure with a bobby pin. As a result, you will get two cute buns from braids.
French style weaving

Only the name of the hairstyle is unusual, but it is simply an inside-out braid. That is, initially the strand should not be placed on top, but tucked under the middle one. The technique is simple to perform and looks very beautiful. At the end of the braiding, you can pull out a little loop, so you get a voluminous braid.
Original snake

It’s not difficult to make such a hairstyle, just follow the step by step instructions:
- Comb your hair with a comb.
- Make any parting (wave or diagonally, even).
- Comb a small section of curls over your face, throw the rest of your hair back, and secure with a hairpin.
- Separate a small strand, divide it into three equal parts, and begin weaving.
- Place each side strand on the middle strand, add new hairs until the parting ends.
- Make 3 more partings according to the same principle, perform the manipulations as with the first strands.
- Braid your hair to the end and secure with a hairpin.
- A hanging braid can be gathered into a bun, so the hairstyle will last longer.
Cute web
This hairstyle is popular during the hot season, when the baby attends dances. The curls are neatly collected and do not interfere. It’s very easy to make such a miracle, but first carefully read the instructions:
- Gather your hair in the middle into a bun, leaving your hair loose along the contour of your head.
- There will be a round parting in the middle, with curls hanging in a circle.
- Take a small strand from the back of your head, begin to weave a regular braid, weaving into it a small strand of hair from the frame (which was left loose).
- It turns out that we simultaneously braid the curls from the tail and the strands around it.
- We hide the tip at the beginning of our creation and secure it with an invisible one. You can decorate this weaving with a bow or a bright bandage. Also, the cobweb is a beautiful quick option for the holiday.
Now you know how to braid short hair. You can please your child with new hairstyles every day.
Ideas for medium length hair

With such hair, new opportunities open up. Very simple but beautiful hairstyle:
- gather all the curls into a ponytail;
- divide it into two equal parts;
- twist each into a tight strand, secure with a thin elastic band;
- then intertwine the two resulting strands with each other and secure with a colored elastic band. This option diversifies the usual braid in a ponytail.
Waterfall

Everyone has heard about this hairstyle, but few people know that it is very simple to perform:
- To begin, comb your curls and make a side parting.
- Separate a small strand and divide it into three equal parts.
- Start weaving as usual: the top strand to the center, then the bottom strand also to the center;
- Then the strand that would need to be inserted into the braid during normal braiding is left hanging. from under the hanging curl we take a new strand and continue to weave the braid further.

The waterfall consists of leaving the lower strands hanging, thereby simulating falling streams of water. To give this hairstyle a festive look, the ends can be slightly curled. If you get the hang of it, weaving can be done in just a couple of minutes.
Crossing your braids
This hairstyle is suitable for everyday use, for a walk in the park.

The technology is very simple:
- Divide the entire head into many tails. Make sure they are symmetrical.
- We secure each ponytail with a multi-colored elastic band, which is how many girls prefer their hairstyle.
- We braid each ponytail and intertwine it with each other like lacing.
- Start with a small number of tails, this will make it easier to navigate. Then experiment with more.
- If desired, the ends of the hair can be left loose, curled or braided. It all depends on your mood and flight of fancy.
Four strand braid

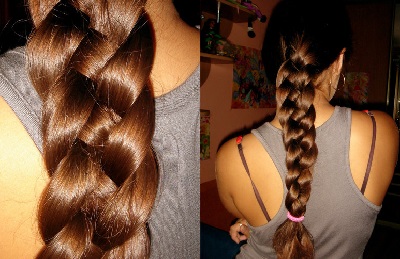
This braid looks voluminous and unusual. To learn how to weave it you will need to put in a little effort and patience. Let's make together:
- Comb your curls and sprinkle with water. Slightly damp curls are much more manageable than dry ones.
- Part your hair. Take a strand of hair from your temple and ear. Divide it into four equal parts.
- Place the outermost strand, which is the right one, on the third, then place the second on the third. At first, the technology resembles a regular scythe.
- Place the very first strand under the next one at the bottom.
- Then we do similar actions with the three right strands.
- And we put the first one on the bottom.
- Place the braid along the contour of the head, closer to the back of the head.
- Make the same braid on the other side of the parting.
- Connect two braids together with a beautiful bow or openwork elastic band.
- You can slightly stretch the braid, so it will become even more voluminous and fluffy.
- Another option: connect the braids on one side, this hairstyle looks more festive.
Hair heart

This technique is very entertaining and effective. Her can be made for any holiday.

Execution:
- Divide your hair into two parts, only horizontally. The lower hair can then be curled.
- Divide the top head of hair into two parts, make a ponytail from each.
- Braid each ponytail and secure with a small elastic band.
- Bend the braid on the right through the top to the bottom, do the same with the left, just bend it to the left.
- Secure the braids at the bottom with bobby pins. As a result, you will get a heart made of braids.
- Attach shiny pins or bobby pins along the contour of the heart (decoration + fastening).
This style of braiding is suitable for girls for any event, and school teachers will not be indignant about loose hair. Looks beautiful with or without bangs.
Options for long hair
Many little girls love to wear their hair loose. But everyone likes the weaving elements.
Headband of curls

The main part of the hair will be down, but there will be a braid element. Step-by-step instruction:
- Comb your hair, separate the curls from the frontal part of your head, and gather the rest of the hair into a ponytail.
- Toss your hair to one side at the front and start making a French braid from this hair (read the detailed technique above).
- You can finish the weaving with a regular braid.
- Hide the end of the braid under the rest of your hair and secure it with bobby pins.
- Release the rest of your curls. You can twist them, then the “rim” will look festive.
Fish tail

How to braid a fishtail braid? For beginners, it is better to braid all the curls first into a regular ponytail, and then braid it into a fishtail. Detail Technique:
- Divide the finished ponytail into a couple of parts.
- Take a small strand from the left side and place it on the right side.
- Then take a small strand of the same size from the left side and place it on the left side.
- Continue braiding the rest of the braid using the same principle.
- Secure the ponytail with a colored elastic band.
- The fish's tail can be woven without the original tail (like a regular spikelet).
Advice! The smaller the strands you take, the more beautiful the hairstyle will turn out.
Braid on a donut
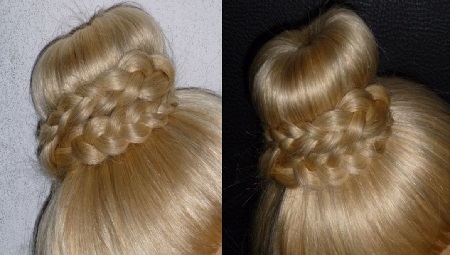
The name sounds delicious and looks very beautiful. Step-by-step instruction:
- Gather your baby's locks into a high ponytail.
- Put on a special “donut” for your hair (can be purchased at any cosmetic store).
- Distribute the curls over the donut. Leave a fairly thick strand underneath.
- Place another elastic band on the donut. Secure the remaining hair in a circle with bobby pins, except for a separate thick strand.
- Weave a French braid from this strand and wrap it around the base of the resulting bun. You can secure it with a beautiful bow, bobby pins, or hairpins with rhinestones.
This hairstyle looks very neat and is suitable for children's parties. After all, children are mischievous, they love to run and jump. And the hairstyle should last until the end of the evening.

Today you have learned many secrets of weaving beautiful braids, learned how to make simple and extraordinary hairstyles out of them for every weekday, and any holidays. Your child will definitely be the most contented and beautiful princess in kindergarten or school.
How to braid hair for beginners: video
Video - lesson on how to braid hair with ribbon:
In this article you will learn the basic techniques of braiding with step-by-step photos.
After reading it, you will be able to independently create both everyday simple and the most sophisticated and extraordinary designer hairstyles.


Braiding step by step photos: varieties
The braid is not only one of the most feminine, but also practical hairstyles. With braided hair, you can easily walk throughout the day without fear of it becoming disheveled. Moreover, such a hairstyle is quite universal and looks natural and harmonious both in a business setting and at a youth party.


There are several main types of braiding:
- classical Russian;
- European: Swiss, Greek, English, Dutch and famous French weaving;
- eastern: plaits (side braids), ropes, threads, braids, zizi, curls, rastas, etc.; the last three types can also be used for short hair;
- designer: “French waterfall”, knotted braids, Lino Russo, “basket”, “dragon”, “fishtail”, “figure eight”, etc.
The best way to master any of the techniques is to watch video tutorials on this topic or study photographs of step-by-step braiding. Moreover, for any of these weaves you can use not only your own hair, but also false strands or hairpieces. Their color can either match or contrast with your own hair color: the main thing is not to use more than three colors at the same time.


Advice! Recently, the so-called careless styling has become very popular, which can be used with any type of weaving. But even in this case, the strands should be pulled together evenly and not stray from the overall style. Otherwise, the hairstyle will look simply sloppy.
Classic braids
The traditional Russian braid has long been a frequent guest on many famous catwalks: the Valentino fashion house, theatrical shows of Victor&Rolf, Emerson, etc. Today it is presented in various variations: from braiding on the back, sides or top of the head to creating the most intricate hairstyles of the two and more braids However, it’s not difficult to master even such complex types of braiding yourself with the help of step-by-step photos.


The traditional Russian braid consists of three equal strands that are intertwined alternately. It can be not only smooth, but also voluminous, slightly disheveled, multi-colored, asymmetrical, or used in combination with other types of hairstyles. The hair can be parted straight or sideways, asymmetrically, or have no parting at all. The weaving density and the number of strands used can also vary.
One of the varieties of the Russian braid is the “spikelet” braiding: a technique that allows you to achieve volume and pomp in your hair. In this case, only two strands are used with the sequential addition of new ones. The order in which they are added may vary. However, for the hairstyle to look neat, the thickness of each new strand added should be the same.


Advice! Perfectly smooth braids look too strict, so you should let individual strands stick out a little.
Straight from Europe
Designers distinguish several options for weaving that came to us from Europe:
- Swiss braid: it is woven according to the Russian principle, but before that, each of the strands is twisted into a tight strand, due to which the hairstyle looks more voluminous; This type of weaving goes perfectly with any style and looks great with jeans or an open summer dress, as well as with a business or cocktail suit; step-by-step weaving of such braids for medium hair or hair of maximum length can be seen below;
- French weaving: unlike the “spikelet”, the strands are not woven one on top of the other, but are laid inside; the braid begins with a small bun, divided into 3 main strands, with the gradual addition of additional strands after 2-3 cm so that at the end of the braiding all the hair is collected; strands can be taken from one or both sides; weaving can be direct (towards you) or reverse (away from you); start from the crown or pass throughout the head in the form of a wreath;


- English: its only difference from the Russian version is that the braiding begins with a ponytail, attached to the back of the head or closer to the crown; Similar braiding for long hair is shown in the step-by-step photo;
- Dutch: braid “inside out”; the woven strands do not hide inside the hair, but rise above it;
- Greek: a combination of smooth hair and a braid that resembles a headband that runs across the entire head; in this case, three small strands are taken closer to the parting, the rest of the hair is pinned up for a while; small strands are gradually added in a circle, with the help of which such a headband-braid is firmly held on the head; There can be two braids, in which case they start on both sides of the parting, and then are cut into one at the back of the head.


Advice! Stylists advise doing a little backcombing at the roots before braiding. It will make your hair more voluminous and your hairstyle more feminine. This technique is especially relevant when creating evening hairstyles.
Oriental tales
A distinctive feature of such hairstyles is the intricate shapes and the presence of large, eye-catching decorations:
- strands (Sinhala braids or screw braids): the hair is divided into two equal strands, each of which is twisted in one direction; then both strands cross and twist in the opposite direction; harnesses can be used in combination with loose strands, a ponytail, side braids, etc.;

- rope braids: a side parting is made on the hair, and braiding (twisting two small strands) begins on the side where there is more hair; when passing such a braid, new small strands are added around the head; at the level of the back of the head it intertwines with the main mass of hair in the direction opposite to the main weave;
- Afro braids (braids): many small braids weaving from the back of the head to the temples; you can let them loose, create one or several thick braids from them, make a tail out of them, twist them into a shell, etc.;


- zizi: a type of braid, ultra-thin braids made of artificial hair, created using machine weaving; woven into each individual strand of their own hair;
- Curly: the method is similar to zizi, but the curls are twisted into a tight spiral; can be used for extensions.
With the help of step-by-step photos for beginners, you can master braiding quite quickly. The main thing is patience and extreme care.


Advice! Unraveling small braids is quite problematic. To make this procedure easier, before creating a hairstyle, the hair should be thoroughly washed with a cleansing shampoo, not an ordinary one, and then any high-quality balm should be applied to it.
Modern design techniques used in weaving
In recent years, braided hairstyles have received the most unexpected interpretation. However, any design techniques are, in fact, improved ethnic versions of the Russian, European and Oriental versions:
- “French waterfall”: resembles the usual one or two braids, starting at the temples and ending at the back of the head; however, each lower strand is released into “free floating” and falls freely onto the back. The hairstyle can have all sorts of variations: be asymmetrical, go over any part of the head, sag, etc. It can be used even on short hair;


- knot braid: two strands are connected to each other using a series of knots; in this case, both part of the hair can be woven (one or two small knots are used as a kind of decoration), or its entire volume;
- Lino Russo: a combination of knots and the “spikelet” technique. After each knot, new hairs are added to the already selected strands; for such a hairstyle, the hair must be cut evenly and be the same along the entire length;
- “snake”: a regular French braid is not located along one line, but meanders over the entire surface of the head; may have 2-3 or more spreads;
- “basket”: part of the hair on the top of the head is gathered into a high ponytail, then a regular French braid is woven from the temple with alternate addition of strands from the ponytail and free hair;

- cornrow braiding: classic afro braids are arranged all over the head in the form of a geometric pattern reminiscent of rows of corn (from the English corn - corn and row - row); To obtain such a pattern, each miniature braid is braided in the manner of a classic French braid.
Advice!To make it easier to weave when creating a braided hairstyle, you can use any styling products: foam, varnish or gel.


Braiding for short hair
Thanks to improved braiding methods and the availability of modern means of fixation, you can decorate yourself with braids even if you have short hair:
- “headband”: two braids are braided at the temples, and then secured with hairpins at the back of the head;
- braid parting: a weave of side strands located on one or both sides of the face;
- bangs with a double braid: the upper part of the face is framed by two small braids;
- a braid around the head: can be located in any part of it, pass over the entire head, or located to the left, right of the face, or braided only at the back of the head;
- “French bangs”: long bangs can be pulled to the side in the form of a French braid; since in the case of a short haircut the hairs will invariably stick out on the sides, you should fluff and tousle the rest of the hair so that it looks as organic as possible;
- a combination of the “punk” style and the French braid: some of the curls are combed in the form of a mohawk; the side strands are braided.
Little girls are angels, and questions of beauty are not alien to them, despite their tender age. From a very early age, little princesses show great interest in their mothers' outfits and makeup, trying to copy everything they see. For young mothers, children's hairstyles for girls from this selection provide enormous scope for creativity. Good hairstyles for little girls should combine a variety of cute buns, small braids, braids and, of course, loose hair that can be decorated with something.
Parents try to make their daughters look special at school or kindergarten. Cool hairstyles and hair accessories help them with this. We have collected 40 of the coolest children's hairstyles for the youngest fashionistas, so after reading the article you will not be left wondering what hairstyle to give your child?
What hairstyles are best for little girls?
Mostly those that don't cause inconvenience and seem nice. Choose the right haircut for your little daughter. Thin hair looks good when cut into a medium-length bob. Typically, this hairstyle does not require much styling and can be decorated with curls or small French braids that will keep hair out of the eyes.
If your daughter has beautiful thick hair or curls, let it grow out so she can create more complex hairstyles. Beautiful, long braids and luxurious ponytails have always been the envy of others.
Many parents don't like overly complicated children's hairstyles. They don't want their daughter to look like a doll with an ostentatious haircut. Parents understand that long hair shouldn't look messy and want their daughters to look neat. For formal institutions, be it the lower grades of school or kindergarten, a ponytail, double braids, just a high bun or a braided hoop are very suitable for girls. These hairstyles for little girls look very decent and do not require much time; most of them can be done at home yourself.
Small details make simple girly haircuts special. You can verify this by looking
40 girly hairstyles below that your daughter will definitely love. Whether you're getting your child ready for kindergarten on a regular day or it's graduation today, these hairstyles are suitable for all occasions.
Look, get inspired and choose the best children's hairstyles for girls for every day or special occasion! We will tell you how to do children's hairstyles for girls!
1. Fun braided hairstyle for long hair
Hairstyles for little girls with decorative braids look amazing. To do this, you need to braid three braids, starting from the forehead, and connect them together into a medium-height ponytail, located slightly to the side. This is a suitable children's hairstyle for girls in kindergarten for long hair.

In the photo there is a 5-year-old girl with braids twisted into two buns. Braids are one of the most popular hairstyles for little girls. Buns are a fun idea to add variety to little girls' braided hair. Part your hair down the center. Starting from the back of your head, braid two Dutch braids, going up, and twist their ends into buns. Hairstyle for medium hair.

What a beautiful hairstyle! There's nothing wrong with a three-strand braid, but if you want your daughter's hair to be something special, make it a little more complicated. Braid a braid using many strands diagonally. Twist the ends into a bun.

With the help of hair accessories you can create many different hairstyles, especially for girls. Try this style by braiding three lace braids diagonally across your child's head. Bring the ends of the braids together into a flat rosette. Secure in the center with a hair clip. This hairstyle is suitable for a matinee.
5. Festive braids with ribbons for medium hair

The photo shows a hairstyle that is perfect for a kindergarten graduation, and it’s also quite simple. Cute hairstyles for little girls almost always include some kind of fun decoration, such as flowers, colorful clips, or colored ribbons. Weave a ribbon into your girl's braids, and an ordinary hairstyle will immediately become festive.

French braids in the shape of a heart - this is exactly the look every little girl dreams of playing sports. The main thing in this hairstyle is precise separation and tight weaving. Secure the ends with an attractive bow. This option is perfect for a wedding or other family celebration.

This beautiful hairstyle is perfect for little princesses. A layered, pulled out braid with a standard three-strand braid will add volume to this look. A skillful combination of accessories on her head with her outfit will help the girl look even more attractive.
8. Diagonal elongated braids for girls made from elastic bands

Fun hairstyles for girls are very voluminous, especially for events. Consider experimenting with some strands pulled out of your braid if you really want a hairstyle that will literally stand out. Remember, when it comes to cute hairstyles for little girls, the best detail is an adorable bow.

The braid looks great when it's just hanging, but it can also be styled into a great hairstyle. Twist the braid into a flower shape and loosen it a little. Decorate your hair with flower clips for a more natural look. This short hairstyle is suitable for “Knowledge Day” and the first trip to school on September 1st.

Use elastic bands to tie each pair of ponytails together and connect them to the next pair to create a cute criss-cross pattern. The ends can be braided or ponytailed and decorated with your daughter’s favorite accessory. This hairstyle is suitable for short and medium length hair.

Children's hairstyles for special occasions can be beautiful and easy, as in this case. Gather the girl's hair loosely at the back of her head and curl it. Leave a few strands. If she has naturally straight hair, try curling the ends for more volume. What's the best accessory for a little girl's hair? Flower stilettos are ideal for formal events such as weddings, matinees or graduations.

Hairstyles for little ones can be quite challenging, which encourages us to learn new braiding techniques. However, we can also replace the loop braids used here with regular braids, which work well for us. A suitable hairstyle for a girl to go to school in 5 minutes.

Combine a fishtail with a zigzag braid. Leave some of your hair unbraided into a fishtail beforehand. Create a fishtail braid, then create a simple braid with the remaining hair and pin it on your head for a whimsical accent.

When it comes to updos, try twisting your hair instead of braiding it. This is one of the most beautiful hairstyles for little girls. Make a symmetrical parting in the center. Twist the hair on each side, starting at the front and adding more hair as you twist. Wrap the ends into buns and secure them with flowers.

Children love updo hairstyles, especially ones that create recognizable figures. This hairstyle will make your regular braids more interesting with double hearts. Divide your hair in half and then each section into three more square sections. Curl your hair to make heart shapes. Gather the loose ends into ponytails and decorate with bows.

The mohawk is the most fun updo hairstyle of them all. You can add some color to this look by securing your locks with bright colored pins. If your daughter has fine hair, backcomb each section a little to add thickness and volume.

This is one of those hairstyles for girls for dark hair that looks equally good on both thin and thick hair. Two Dutch braids start from the temples. When you reach the back of your head, cross the braids one over the other. Continue braiding on the opposite side, bending the braid to create a loop.

When it comes to girls' hairstyles, the placement of the braid is as important as its appearance. This elongated braid transitions dramatically from a mohawk with small elastic bands into buns. Use bright elastic bands of different colors in your hair to highlight your style.

Curled hair with bright elastic bands will delight every girl. Do a side twist instead of a forward twist to give this hairstyle a new look. Finally, tie the ends into a messy bun with a bow.

Hairstyles for little girls should look beautiful from all angles, not just the front. If your girl has long hair, make inverted braids, starting from the back of the head and secure the ends, forming a large, voluminous bun.

A cute and beloved hairstyle for both formal events and school visits, it can be complemented with a pastel-colored bow. These cute hairstyles for little girls look best on long, thick hair as it requires ample length and texture to create it.

Fishtail braids are popular among both children and teenagers. This new version of the hairstyle involves brushing your hair thoroughly before making braids. Add satin ribbons or other hair accessories to complete the look. Don't know how to braid a fishtail? It may take a little time to learn how to weave it, so be sure to practice.

Make your everyday hairstyle more interesting with braids. To do this, separate the central hair and divide it into two parts. French braid each one until you reach the top of your head. Then start weaving fish tails. Twist the ends and secure them with an elastic band.

Beautiful hairstyles can be done not only on smooth straight hair. You can also create a cute hairstyle for little girls with curly hair. This style is perfect for warm weather or special occasions and can be worn with any length of hair.
25. Braiding hair “Basket” from elastic bands

This hairstyle is not as complicated as it seems. This look is suitable for a girl with shoulder length hair and she will love it. The hardest thing about this hairstyle is getting your child to stand still while you make the basket. Use colored elastic bands to secure your hair and your hairstyle will stay in place all day.

This fancy hairstyle is made by using six braids and loose hair and then joining them two at a time. Pull the remaining hair to the side and then pull the hair from the back of your neck to the top right corner. Tie the remaining hair into a bun and add a fun accessory.
27. Double Girly Fun Hairstyle

Perfect for curly hair types. This hairstyle includes voluminous twists and buns that look great on any child. Add ribbon or flowers for a more doll-like look. You will need a lot of elastic bands and pins to secure this hairstyle. Hairspray will help her last all day.

Start with a small French braid on both sides and then pull your hair into a messy bun. Leave the rest of your hair down, and if you have time, curl it.
29. Sleek and formal buns

Many classic hairstyles for little girls are what mothers first remember from their youth. This double bun hairstyle for a little girl is a perfect example. It is ideal for fine straight hair. But you can also try this hairstyle with thicker hair. It can be done for school or for a wedding.
30. Inverted braid

Forget about the ponytail, use your imagination for something more creative. This hairstyle includes two braids that go from bottom to top, twisted into two buns. You won't be able to exercise with this hairstyle if you have short hair, but girls with long hair can wear it endlessly.
31. Loose and curled hair

Sometimes hair looks best when nothing is done to it. If your child has long, medium-thick hair, simply create cascading curls and secure a few front sections with bobby pins at the back. Ready!
32. Colored side braids

A little daring, a little punk, but still this hairstyle is quite delicate. When you're looking for hairstyles for little girls that haven't gone mainstream yet, try this simple and cute style. Don't want to dye your hair? Colored threads or hair chalks are great for your young model.
33. Quick and easy updo

This hairstyle is adorable and kids love it. Simply pull your hair away from your face, create a small backcomb and add braids on the sides. You can do waves, curls or leave your hair straight.
34. Wicker nests

This hairstyle features three wrapped braids secured with bobby pins - perfect for family photos and other special occasions. You can decorate the center of each nest with beads, flowers or bows.
35. Cute curls with a headband

Does your little girl have natural curls? Then choose hairstyles for her similar to this one. Fun curls with a fun accessory. If your hair is naturally straight, curl it using an iron or curling iron. Girls will love this look!
36. Braid twisted into a bun

This braid will look good on thick and thin hair. It extends from the upper right side of the head and twists in a spiral into a bun. Add a flower as a finishing touch.
37. African braids

It is very difficult to make such braids and it is difficult to undo them later, but a professional can make sure that a girl wears this hairstyle for a month or longer. So go to the hairdresser.

When it comes to little girls' hairstyles, it doesn't get any better than this soft vintage look. Add accessories to disguise stilettos and elastic bands.
39. Creative hairstyle with ribbons

This is another hairstyle that looks more complicated than it actually is. Braid two French braids along the hairline, you can add a thin satin ribbon to them. Tie it from the bottom around the elastic that you used to secure the braids.
40. Unique punk braid

Girls with thick hair will suit this mohawk hairstyle. Try it the next time you have an event or want something unique that's different from the usual school hairstyles.
If the presented options were not enough for you to make a decision, watch additionally this video with children's hairstyles for girls:
//www.youtube.com/watch?v=wjDxQKKntpU
Styling your daughter's hair is a fun process that you will fully appreciate once you start doing it. Some hairstyles are simple and easy that can be done in 5 minutes, others require perseverance. And don't forget to take pictures of her new hairstyles, children grow up quickly and every new moment is unique. Post the resulting photos with hairstyles in the comments, we will be very interested to see what happens.
Today, braids are again one of the most popular hairstyles, which are convenient to wear every day or braid on the occasion of a special occasion. Over the years, stylists and hairdressers have come up with many varieties of weaving for children: from the simplest, which everyone can handle, to complex ones, which require certain skills and abilities.
Classic braiding technique for children
The simplest option for braiding is classic or traditional; most mothers and even some fathers own it. In order to give a girl such a hairstyle, you need to take a comb, a beautiful elastic band or ribbon to secure it. You can also use gentle styling products to prevent excess strands from getting out of your hairstyle.The traditional braid is braided as follows:
- First, comb the strands properly, then lightly moisten them or apply styling products to them.
- Next, the curls should be gathered into a ponytail so that no strands come out of it.
- The tail is then divided into three equal parts.
- Weaving begins with the far right strand. It is placed on top of the one in the middle, and it becomes central.
- Next, the same manipulation is performed with the left strand. It is placed on top of the central one between it and the right part of the hair. This procedure must be performed alternately with both strands until the braid reaches the end.
- You need to secure the end of the braid with a ribbon or hair tie.
Braids for medium length hair
A hairstyle like a braid looks beautiful not only on long curls, but also on medium-length hair. Experts in the field of hairdressing have identified several types of weaving that will look most successful on strands of this length.This weaving creates the effect of flowing strands.

The classic pattern for weaving such a braid looks like this:


To make loose strands of hair look more attractive, you can curl their ends using a curling iron.
This hairstyle is done quite simply, but looks very original. To do this, you need to do the following:
- weave several braids;
- intertwine them together like lacing.
It is very important that the braids are done symmetrically on both sides of the head.

A hair heart looks very impressive on medium-length curls and is done like this:
- Brush your baby well.
- Tie a ponytail at the top of your head.
- Next, the tail needs to be turned out and divided into two equal parts.
- From the first part you need to braid, separating three strands from the temple area. After making the braid, add another strand from the tail. Then all the hair is taken only from the tail, and the braid should lie diagonally.
- When all the hair from the ponytail is braided into a braid, its end needs to be intercepted with an elastic band and done exactly the same on the other side.
- When both braids are ready, tie them with a ribbon, overlapping each other.

is a rather complex hairstyle. To braid it for a daughter, a parent will need patience and certain skills.
To weave a four-strand braid you need:
- Comb your hair and moisten it a little with water. This way the strands will lie better.
- Make a parting, select part of the curls from the temporal region and from the side of the ear.
- Next, divide the selected strand into four parts. The outermost one, which is on the right, must be placed on the third, and then the second must be placed on the third.
- At first, this type of weaving is similar to the usual braid, but then the first strand should be placed under the next one down.
- After the braid is braided on one side, you need to do the same on the other side and connect them together.

This beautiful hairstyle (like the famous Princess Jasmine) is best done with thick hair. But if they are thin and there are not as many of them as you would like, you can add volume using a corrugated iron.
The braid is woven according to the following pattern:
- All hair is collected in a high ponytail.
- A strand is separated from each side of the tail.
- Then they need to be tied together with an elastic band.
- Afterwards, two strands are taken from under the bottom of the already secured hair and also connected with an elastic band.
- Next, the above manipulations must be repeated until the length of the curls ends.
- The tip of the finished hairstyle is secured with an elastic band or a beautiful ribbon. After this, the braid can be stretched in different directions, giving it a little volume.

A braid called “dragon” is ideal for medium hair.

The hairstyle is done according to the following scheme:
- Curls need to be combed and moistened with water.
- Using a comb with sharp teeth, make an even parting.
- Divide the strands near the forehead into three equal parts.
- Place the left strand over the middle one and cover it with the right strand.
- Next, you should continue braiding, weaving hair into the braid from the sides.
- Once the hair on the back of the head is gone, the braid can be braided in the traditional way and tied with an elastic band.

It is worth noting that when braiding any type of braid, you should not overdo it, tightening the hair strands too much, as this can cause severe discomfort in the child.
Braids for short hair
Many mothers can't wait for their little daughters to grow long locks so they can braid their hair. But sometimes hair does not grow too quickly, and hairdressers have found a way out by coming up with numerous braids for short strands.The French braid is an ideal hairstyle for little girls, and you can braid it as follows:
- Wet your curls with water.
- Parting in the center or side.
- Next, you need to separate a small strand of hair near your left temple.
- Divide this strand into three more small parts and, that is, the curls need to be picked up from below, and not from above.
- Secure the finished braid with a ribbon.

This hairstyle can be done by following the instructions:
- Comb your curls, make a parting, comb a small number of strands forward, and throw the rest back, securing with an elastic band or hairpin.
- Next, you need to separate a small amount of hair and divide it into three strands.
- Start braiding by placing each of the side hairs on the middle part of the hair. Add new strands until the parting ends.
- Using the above pattern, make three more partings and braid all the hair to the end. The remaining tip can be secured with an elastic band and hidden inside the resulting hairstyle.

This braid looks very cute and original on the heads of little girls. You can weave it by following the step-by-step instructions:
- Gather your hair into a bun in the middle of your head, leaving the curls around your head loose. There will be a bun in the middle of the head, and the strands will remain hanging in a circle.
- Next, take a strand from the back of the head and begin to weave a regular braid, into which you need to weave the hair hanging along the contour of the head.
- Then simultaneously weave strands from the ponytail located at the back of the head and the hair around it into a braid. Secure the remaining tip with a bobby pin.
Also for children's short curls, a braided braid is suitable, but it should be noted that this braiding option should not be used for trips to kindergarten or active walks. You can do this hairstyle when going to visit or go to the cinema. And it is done like this:
- A strand of hair is separated slightly above the ear, and a regular braid is braided.
- On the other side, exactly the same braid is woven, which is connected to the first.
- The finished hairstyle is secured with a hairpin.

Braids for long hair
Braiding long hair is a real pleasure, as here you can give free rein to your imagination. Also, long curls are good because hairdressers have developed a large number of braided hairstyles for them, so there is plenty to choose from.This braiding option does not require a huge amount of time; it is perfect both as a daily hairstyle and as a hair decoration for a special occasion. You can braid such a braid for a child in five stages:
- To begin, wash and dry your hair and comb it. Straighten curly curls, and add volume to thin ones by combing them.
- Next, select three equal strands from the temple and apply styling product to them.
- Then you can begin weaving the headband, which is done in exactly the same way as a French braid. That is, it is necessary to capture and weave new strands into the main braid, which are taken from the side of the bangs. The first strand is placed on the second, and a new strand taken from the hair on the side is woven between them.
- The braid is braided until it reaches the second temple.
- At the last stage, you need to secure the end of the braid with an elastic band.

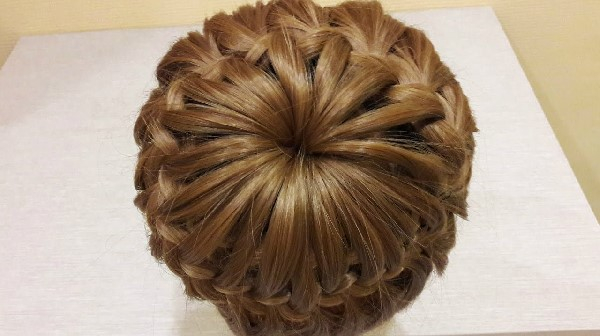
Hairstyles using a donut are very popular today, as they allow you to add volume to even thin curls. They are also suitable for any occasion.
To make a donut braid, you need to follow several steps:
- Create a classic high ponytail.
- The hair is then braided into a traditional braid.
- Next, a foam rubber band (donut) is put on the ponytail with a braid.
- The braid is carefully wrapped around the donut and secured with hairpins. Her ponytail is hidden under a bun.
- At the final stage, the hairstyle can be fixed with hairspray.
If desired, this hairstyle can be decorated with various hair accessories.

The fishtail braid is one of the most popular and famous hairstyles, suitable for all occasions.
There are many ways to weave it, the simplest and most advantageous is the classic one:
- First, you need to divide your hair into two equal strands.
- Next, take one thin strand from the left side of the parting and bring it over the right side.
- Then do the same manipulation as above with the right side of the hair.
- The braid is braided to the end using the above method and secured with tape.

The basket hairstyle is one of the most stylish and versatile options. You can weave it as follows:
- In the area of the crown you need to select a circle-shaped area, collect the curls and make a tail out of them.
- Next, you need to separate a small part from the loose strands and divide them into two more, adding part of the hair from the tail to them.
- Then you can begin to weave a traditional braid, adding a free strand from the tail.
- When braiding a braid, you need to move in a circle, but do not take thick strands from the ponytail. You need to calculate the hair so that it is enough to cover the entire circumference of your head.
- When the braid is braided to the starting point, start braiding again according to the traditional version.
- The classic braid must be secured as an extension of the basket using bobby pins.

This type of weaving is based on a French braid and perfectly diversifies everyday hairstyles. In order to braid this braid, you need to follow the following pattern:
- You need to braid your hair from the temple area. To do this, take a small part of the hair from the side and carefully divide it into three equal strands.
- Next, the braid is braided to the side, each time a small part of the strand is grabbed from the side and attached to the main ones.
- The pigtail is gradually rounded to the right. After it approaches the right ear, you need to turn it down and continue braiding again.
- When the zigzag comes to an end, the remaining strands need to be woven into a regular braid and secured with an elastic band.

This braid is woven in the same way as the French braid, but when grabbing the next strand of loose hair, it is not tightened, but left in a weakened version.

- When choosing an everyday braid, you should give preference to the one whose weaving does not take longer than 15 minutes. This will allow you to get enough sleep and not be late for kindergarten or school.
- Long hair of the same length is best suited for braiding. If the child’s haircut is multi-layered or graduated, then hairpins and bobby pins should be used.
- Ribbons and braids woven into the braid make it more voluminous and beautiful.
- It is more convenient to do the parting with a comb with a thin end. This will allow him to be more careful.
Also read.