DIY paper applique panel. Paper flowers. Volume applique for children. Applique Apple made of paper
One of the most popular materials for children's crafts is colored paper. Children's crafts made from colored paper perfectly develop imagination, perseverance and fine motor skills, and this activity allows you to have fun.
The advantages of colored paper as a material for crafts can be listed and listed, but we won’t waste time on this, but will immediately offer you the best ideas for crafts made from colored paper that you can implement with your child.


Crafts from children's hands
A child may really enjoy making various crafts from palms cut out of colored paper. This is where your imagination really can run wild! After all, palms can make very interesting works!

Crafts from circles
Another way to develop children's imagination. Invite your child to make a shape out of circles of colored paper. The circles can be glued whole or divided into halves.

As for ideas, the simplest thing is to make a snowman out of circles; you can also make animals, fish and birds. You will find photos of crafts made from colored paper both on our website and on the Internet.

Mosaic made of colored paper
Very beautiful DIY crafts can be made from mosaics. You can download ready-made templates for laying out mosaics or draw them by hand.

The youngest children can be asked to tear off pieces of colored paper and stick them onto a paper base with a template, while older children can cut neat squares using scissors.


Crafts from colored paper accordions
Everything is simple here, you need to fold a sheet of colored paper like an accordion, and then straighten it a little and make a fish, bird, or butterfly out of it.

These crafts can be independent, for example, glued to skewers, or they can be used for original applications. Simple and interesting master classes on crafts made from colored paper can be easily found.

Crafts from lumps of colored paper
A great way to develop fine motor skills in your baby's hands. For crafts, it is better to use thin colored paper, napkins or corrugated paper.

Simply tear off pieces of paper and roll them into balls, and then glue them onto the template using PVA glue. The works turn out beautiful and voluminous.


Quilling
Older children can be encouraged to master the quilling technique, which is when a spring is rolled out of thin strips of colored paper using a knitting needle, pencil or thin stick, and then various compositions for postcards are made from these fragments. Trains fine motor skills and perseverance.


Volumetric crafts made from colored paper
Despite the fact that the paper is flat, you can make various three-dimensional crafts from it. For garlands and cards, as a rule, several identical parts are cut out, folded in half, and then glued together.

You can make three-dimensional shapes from strips, glued together like a ring.

And another type of three-dimensional paper crafts is to print ready-made templates of 3D shapes, cut and glue them according to the instructions. Nowadays they even sell entire albums with templates for voluminous paper figures, and they also contain detailed instructions on how to make the craft.

Garlands made of colored paper
Since we're on the subject of garlands, colored paper is ideal for these purposes. You can quickly make various figures from it, and the price of such a garland will be much cheaper than if you use, say, felt or corrugated paper.

Crafts from paper rings
Remember how we made long New Year's garlands from rings as children? It turns out that from these rings you can make not only a chick, but also very interesting crafts: fruits, tree crowns, hair for dolls drawn on a sheet of paper, make three-dimensional snakes, lambs and other animals.


Cards made of colored paper
For the holidays, you can easily make various cards from colored paper. Children 2-3 years old can make simple postcards in the form of an appliqué; older children can do complex work with three-dimensional elements. Here, for example, is how to make a three-dimensional card with daisies from colored paper.

Volumetric paper card with daisies
For the craft you will need:
- Colored paper, a sheet of cardboard, as well as a regular white sheet of office paper;
- Glue stick;
- Children's safety scissors.

First of all, you need to cut strips of white paper. To make the strips even, mark the same width, and then draw cutting lines using a ruler and a simple pencil.

Now, cut out circles from yellow paper - these will be the centers of our daisies. We return to the white stripes, from which we will make chamomile petals. We glue each strip with two ends in the form of a loop, and then glue it to the middle, which we made yellow.

When the chamomile is ready, you can cut out several leaves from green paper. For a postcard you will need 3-5 daisies. We make the card itself from any sheet of colored paper, fold it in half, and stick our daisies on it.


You can add a butterfly to the card. Cut out a butterfly from brightly colored paper. Butterfly patterns are easy to find on the Internet. To make the butterfly also gain volume, bend it in half and stick it on the postcard.

Applique postcard with a rabbit
The next card will be with a bunny, it can be made as a gift for Easter. You will need all the same materials, as well as doll eyes. By the way, below I’ll tell you how you can make doll eyes yourself.

Using the template, we cut out all the necessary elements of the postcard from paper: a bunny’s face, two ears from white paper. From pink paper we cut out a nose and a smaller silhouette of ears. Cut out grass from green paper.

We assemble the figure of a bunny on a sheet of bright-colored paper. Glue doll eyes to the bunny and draw mustaches using a felt-tip pen or a black ballpoint pen.

Now let’s digress a little, I’ll tell you how you can make doll eyes for children’s crafts yourself. They are made from a regular tablet plate, two cells are cut out, and beads, small beads or peppercorns can be used as pupils.

Origami
And the last type of crafts made from colored paper is origami. For beginners and small children, there are simple schemes for folding various shapes; for older children, you can suggest doing something more complicated.

For origami, it is best to use double-sided colored paper so as not to “shine” the pale side of the sheet. If your child is seriously interested in this art, then you can purchase special paper for origami.

Photos of crafts made from colored paper


I apologize for the quality of the photo, laziness as always, phone as always. And some of the crafts had already begun to crumble, so I didn’t take them out of the files and left behind reflections.
Creativity from the Baby Club:
1. Coloring large simple pictures with paints
2. We make appliqué balls from colored paper, and then draw strings for them - learn to draw straight lines

3. Fireworks. First we draw it with wax pencils, and then with dark watercolor we draw the night sky on top. Watercolors do not paint on wax, so everything is very simple.

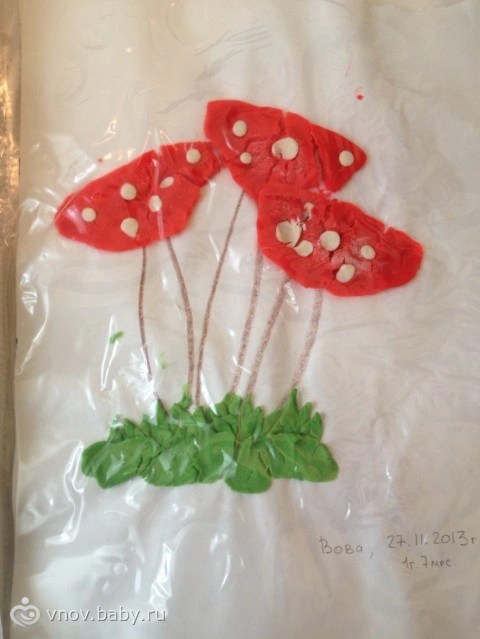
4. Fly agaric. We make an applique from colored paper on cardboard, and then glue on plasticine spots

5. Learn to trace your palms and count your fingers

6. Aquarium. We put plasticine pebbles on the bottom of the aquarium, and then put the fish there. Don't forget to draw a fish eye))

7. An airplane made of colored paper and cotton wool clouds

8. Olympic medal. We make a medal from plasticine. We print some symbol on it using improvised means, and then cover it with gold paint (preferably with the help of an adult)

9. Draw through a stencil. Painting is very simple. But then you can learn to draw figures with a pencil along the contour of a stencil, which greatly develops coordination.

10. Snowman. Colored paper, colored cardboard, cotton wool, cotton pads, a twig, plasticine and beans.

11. Repeat colors and learn to draw using a ruler. We glue the application of balloons from colored paper, and then we draw baskets of the corresponding color with them, and then more strings along the ruler.

12. Chickens. Cotton pads, paints, marker

13. Mimosa. Finger painting

14. Snowdrop made from cotton wool

15. Getting ready for the carnival. Coloring the mask

16. Marinate vegetables. A drawn or printed jar, bay leaf, cloves, plasticine, ribbon. The craft is very fragrant)

17. Shaggy bear. It was painted using something similar to semolina. Unfortunately, it has already crumbled. But the kid liked the process.
Apply glue to the bear and sprinkle with something small

18. Caterpillar. Colored paper and plasticine

19. Rain. Funny. Just an applique

20. Coloring with plasticine

21. Heart penguins

22. And again fireworks. This time using round sponges

23. Snow. Wood and cotton wool

24. Chicken again. Feathers from small yellow pieces of paper. Apply glue and sprinkle

25. Just a shoe for gifts

26. Flower. Plasticine and colored paper

Creativity from kindergarten:
1. Sponge again. We learned to press it to the paper and make circular movements with it

2. I forgot the name of the technique (if anyone knows, write). Some kind of garbage, such as ox bile, is poured into a large container of water. Then they spray paint on top and begin to draw on the water with a thin object. The resulting patterns are like this. Then a sheet of paper is placed on this water, and the film with the pattern remains on it.
This can be used for all kinds of backgrounds, cards, etc.

3. The actual postcards. And here’s everything: scrap, and decoupage, and the previous unknown crap
Bus for dad:


Emptiness for mom:


4. Easter egg. Decoupage. The equipment is grown-up, but the baby helped a lot

5. Felting wool. While I was felting the petals, Vova helped a lot with the balls.

Homemade creativity:
1. Plasticine drawings. Our P “lei Do” is more dough, so it dried out and cracked. Learning to mix colors (we made green ourselves)
2. New Year's card. Carefully glued the letters

3. Our advent calendar. The numbers from 1 to 31 are hidden under the beard, and every day of December we glued a piece of cotton wool until a full beard grew.

4. Learn the colors of the rainbow. We sculpt and draw with plasticine

5. And about the weather

6. Fish. We sculpt dough or plasticine onto a piece of cardboard in the shape of a fish. Then we decorate with sparkles, beads, etc.

7. Just sunshine for dad. I made it entirely myself a little over a year ago (only I cut it out)

8. Ladybug. I preferred to leave my legs on one side, it turned out to be almost a side view)))))

9. These are New Year's cone animals. They were wrinkled in the folder, but they were cones)

10. Frog

11. Butterfly. Paints, brushes for creativity and colored rice

12. Penguins from semicircles

13. Crazy pasta hedgehog

I wish everyone fresh ideas and more time for creativity.
Every mother and father tries to choose an exciting activity for their child that will not only occupy him for a while, but will also have a beneficial effect on the all-round development of the baby, will force the child to improve creative thinking, think, fantasize, and learn to concentrate.
Applications made from colored paper are an excellent option for your child’s useful pastime. Older children can engage in this creative activity on their own; children as young as one year old will create their first works together with their parents.

The role of applications in child development
Paper applique involves the step-by-step creation of a picture by gluing elements of different shapes and colors onto a cardboard or paper base. After looking at various photos of paper appliqués for children, you will understand what this type of activity is and what kind of finished work you can get at the end of the process.

The paper applique technology is quite simple. The child himself, or with the help of his parents, nanny, or teacher, must come up with what kind of picture he would like to depict, prepare the tools necessary for the creative process, make patterns of elements, alternately cut out small details from paper sheets that will be needed to recreate the intended image and successively glue them onto the chosen base.


So what is the benefit of such an activity?
Application creation process:
- develops perseverance;
- improves fine motor skills;
- allows you to remember and distinguish colors and shapes;
- teaches independence;
- instills neatness;
- teaches patience;
- forms creative and imaginative thinking, etc.

The role of applications in the development of a child is undoubtedly great. They contribute to the multifaceted and diverse development of the child.

Here are some simple paper applique templates that may be useful for first lessons and introducing kids to the concept of appliqué.

Examples of applications
We will try to make a presentation of some of the easiest paper applications with which you can begin the process of learning this business.


Ice cream
To create such an application you need to prepare:
- cardboard or paper base;
- glue;
- pencil;
- scissors;
- colored paper of various shades.

To begin with, on colored pieces of paper you need to sketch the main elements of the future picture: a separate cone and separate ice cream balls. Afterwards, using scissors, you need to cut out these parts. At the next stage, you need to glue the small elements in a strict sequence: the horn is attached to the base first, then, one by one, the popsicle balls.

After completing the steps, the resulting picture can be decorated with additional details: a cherry, chocolate chips (which also need to be cut out of paper).

Using such a simple algorithm of actions, you can make applications of different types: a plate of fruit, a fish, a bunny, and a house.

Volume applique
This version is a little more complicated, but the result is worth it. Let's look at how to make an unusually beautiful three-dimensional paper flower. To create it, you will need the materials indicated above, the only clarification is that the colored paper should be as thin as possible.

From the base you need to cut out the shape of a flower, this could be, for example, a rose bud or a chamomile inflorescence. Afterwards, you need to cut a lot of small pieces from paper of different colors and crumple them with your fingers.


Volumetric winter paper applications look very beautiful and believable and will be a wonderful gift for grandparents for the New Year holidays. On a cardboard base, you can depict a Christmas tree decorated with multi-colored balls, and with the help of crumpled pieces of white paper, you can recreate a snowfall or install a snowman.


There are a huge variety of options for applications created from colored paper, so the child will not get bored with this activity; every day he will discover something new and interesting, while improving imaginative and creative thinking, quick wits, perseverance, discipline and intelligence.

Photos of paper applications


We make voluminous applications from paper
There are 2 ways to make a volumetric applique with your own hands, and I will be happy to tell you about them.
How to make volume? Method 1
Printing the templates clouds and a balloon for appliques, fold the paper like an accordion and cut it out.
We glue our three-dimensional blanks onto the background. It should look something like this (only our balloons will be solid colors):

Method 2
We draw and cut out clouds and balloons, as if we were going to make a regular one paper applique. Now let’s add volume to the details: take two identical balls or clouds, bend them in the middle and sew them together. Like this:

Let's launch planes into the sky
Clouds and balloons are not all the paper crafts that I will talk about today. Next is the plane.

Let's use the template to prepare the parts for the paper appliqué.

Now let's put it all together!

Small birds
You can also make birds out of paper! You can use this template.
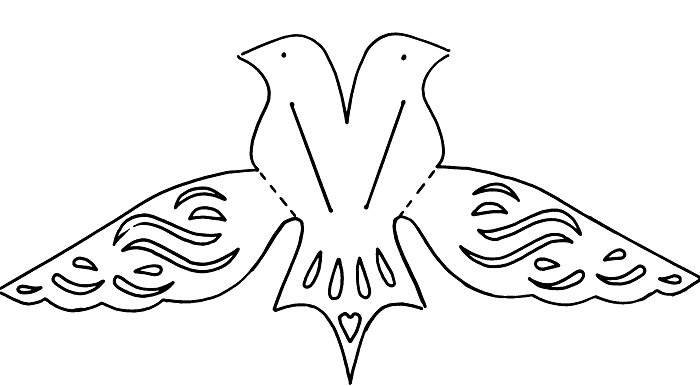
Cut out the bird along the outline. Bend it exactly in half and glue it together, leaving the wings. Now carefully bend the wings along the dotted line. We tie a string, and that’s it – the bird is ready to fly!

Get creative by combining volumetric origami in unique applications or interior decorations. For example, you can add not balloons or airplanes to the clouds, but simply a multi-colored rainbow:

Applications made from colored paper have long been a traditional creative activity for children.
It allows you to develop skills in handling scissors, improve the work of children's hands and make the baby more careful. Every child will be able to make appliqués from colored paper with their own hands if they are given a feasible task.
So, the most affordable options for colored paper applique for children 4-5 years old can be:

Volumetric applications made of colored paper
Ladybugs. Cut out two red circles and a black semi-oval. Black dots are placed on the circles, after which one circle is glued exactly above the black semi-oval, and the second is bent in half and glued to the first circle. We complement the bug with toy eyes and antennae.
 Materials for the “Ladybug” applique
 We complement the bug with toy eyes and antennae.
 Application "Ladybug"
 Look at the video on how to make a ladybug applique using a different technique:
Application made from pieces of colored paper
Chanterelle. Cut out a triangle from a paper plate, and use a stapler to attach two triangles of orange cardboard to its round edge. Then cover the plate with pieces of orange thin colored paper.

Fill out the entire piece of paper.

Triangles are ears and circles are eyes
All that remains is to attach the round eyes - and the fox is ready!

Ice cream. We draw or cut out ice cream cups from colored paper in advance and glue round cupcake molds to them, like creme brulee balls. With these molds you can make other applications of dishes if you use them as plates.
 Application "Ice cream"
 Application made from colored paper using a template
Bunny. We cut out the ears, head and triangular nose of the bunny in advance according to the template, as well as a bush of grass behind which it will hide.

We assemble the picture on a sheet of white paper, glue all the details and animate the bunny with toy eyes.
 Application "Bunny"
 Polar bear. Using a template, we cut out a round body, a head with ears, a muzzle and paws of a bear from white paper.

Let's complete the necessary details. We cover a sheet of white cardboard with blue watercolor, creating a background.

Against this background, we assemble our bear and complement it with toy eyes.
 Application "Polar Bear"
 Multilayer applications made of colored paper
As an applique made of colored paper for children 5-6 years old, you can use more complex, multi-layered paintings containing small details. Preschoolers are quite capable of creating characters such as:
Fish. We cut out a triangular fragment from a disposable plate, cover the remaining part with “scales” - semi-oval pieces of colored paper of different colors, which need to be applied, slightly overlapping each other. We attach the tail and fins with a stapler, and glue the eye. Ready!

Here is another fabulous fish with colored scales.

Dragonfly. From thin paper we cut out the body of a dragonfly with a head and eight multi-colored wings.

Glue it all to a white sheet, complement the image with mustaches and toy eyes.
 Application "Dragonfly"
 Application made of colored paper and disposable plate
Chicks in the nest. Glue half of a disposable paper plate to a sheet of cardboard. We cut out three oval figures of chicks from blue paper.

We cover the figures with lumps of crumpled thin blue paper, and the nest with decorative shavings.

All that remains is to glue the eyes and beaks of the chicks - and the applique is ready!
 Craft “Chicks in the nest”
 In the “autumn tree” applique, a disposable plate serves as the background.
 Application "autumn tree"
 Applications made of colored paper using a complex pattern
Girl in the rain. This application is based on working with complex templates, according to which you need to cut out an umbrella, boots, head, dress, hair and hands of a girl.
 What needs to be cut out for the “Girl in the Rain” craft
 We assemble the picture on a sheet of blue cardboard, gluing the parts one by one.
 Application “Girl in the rain”
 Combined applique made of colored paper
Chicken with an umbrella. This application also involves working with templates, but if it is difficult for children to cope with such a task, teachers or parents can prepare templates in advance.
 Materials for crafts “Chicken”
 We decorate the umbrella with pieces of translucent colored paper, which will make the image more interesting.

All that remains is to collect the picture.
 Application “Chicken with an umbrella”
 Volumetric applique made from pieces of colored paper
Flower. Cut out the outlines of a flower from a disposable plate or sheet of cardboard.

Cut small pieces of colored paper and roll them into lumps. One by one we glue the lumps onto the glue.

Carefully fill the entire space of the flower.
 Application made of colored paper “Flower”
 Another craft option is “sunflower”. Draw the outline of a sunflower on a piece of paper. Cut pieces of yellow and green paper.

Glue a black circle in the center. We begin to decorate the craft with pieces of paper. Before gluing the paper, crumple it a little - this will give the craft additional volume.

Sunflower applique made of colored paper.
 Sunflower applique made of colored paper
 Rainbow. It is made in much the same way as a flower: the child crumples colored paper and carefully places it in rows, observing the sequence of colors in the rainbow.
 Application "Rainbow"
 Using the 3D appliqué technique from colored paper, an autumn tree turns out to be very beautiful.

You can make a heart applique from pieces of red and pink paper. We use a heart made of cardboard as the basis.

We crumple the pieces a little and glue them to the base. The craft will look interesting if you alternate red and pink lumps.

Excellent appliques are obtained using the cutting technique. Small pieces of paper are glued tightly to one another using a thin stick.

This is the kind of airplane that can be folded from pieces of paper using the cutting technique.

Instead of glue, small pieces of paper can be fixed to a plasticine base.

Flat applications from pieces of paper
The herringbone applique from colored paper is made using a very interesting technique. Pieces of thin tissue paper are glued onto triangular bases. In this case, the pieces can seal the edges of the Christmas trees and stick to one another. Only after this the triangular base is glued onto the pre-painted background.
 Christmas tree applique made of colored paper
 Straw man. The application is made using the mosaic technique. Glue the hat and head of the stuffed animal cut out according to the template to the sheet, and draw the contours of the body.
 Materials for the “Straw Scarecrow” craft
 The child’s task is to fill the body with pieces of colored paper, gluing them next to each other. We lay out the stuffed animal’s hair and beard using the same yellow pieces.

Sunset. We lay out sand and purple sunset with pieces of yellow color.


A small palm tree will complement the landscape.
 Application "Sea" made of paper
 Applique with quilling elements “heart”
Applications with elements of quilling or paper rolling look very impressive. In order to make an applique we will need colored paper, a pencil, scissors and glue.
Cutting paper curls
Glue the paper curls onto a pre-prepared base - a paper heart.

Decorate the curls with rolled green paper. The curls begin to resemble graceful roses framed by petals. We create an interesting applique using the paper rolling technique.
Application “Vase with flowers”From colored corrugated paper and wire you can make a very impressive “Summer Meadow” applique postcard. The technique for making it is very unusual. We wrap corrugated paper several times around an easily bendable rod or wire. Fix the end of the paper with glue.

Squeeze the paper onto the wire. Cut off the excess wire and tuck the ends. We should get colored thick sausages.
 "Sausages" made of corrugated paper
 From these “sausages” we lay out an applique on paper.

You can make a very beautiful wall panel with yellow flowers from colored corrugated paper.
Applique on a paper plate “bed with carrots”
Very beautiful applications are obtained if they are based on a background painted in watercolors.
 Application and drawing “spring”
 Using different techniques and combining ideas in your own way, you can create unique paintings that will become a real manifestation of children's talent.