DIY paper tulip: a new approach to origami technique. How to make a tulip out of paper
A tulip or a bouquet of tulips made of paper is a wonderful, original addition to a gift for any occasion. This article will present master classes with step-by-step instructions for making a paper tulip.


Videos for inspiration and learning
In the selection of videos offered below, needlewomen will share their experience and talk about several options for making paper tulips from different types of paper.
Paper tulip: folding patterns
In order to understand the basic principles of working when folding a flower, you will need a diagram and a sheet of white paper.
First you need to make a square sheet, but you should not throw out the extra strip of paper. Then the resulting square should be bent twice diagonally, then the side edges must be bent inward so that the center of the square is the apex of the triangle. Further, the lower corners of the triangle must be bent upward, that is, towards the center.
Then the figure should be turned over and similarly bend the lower corners of the other triangle. After that, the corners should be moved inward, that is, the opposite corners must be folded.
The previously set aside strip of paper must be folded, this is how the stem will turn out, it remains to connect the flower with the stem and the work can be considered complete. Below will be illustrated the process of making a paper tulip in stages.

A bright bouquet of tulips made of colored paper looks beautiful. For work, you can pick up sheets of paper of different colors and always a sheet of green paper to make the stems. Below will be an instruction in which each stage of work is described in detail.


Bulky flowers from corrugated paper
Voluminous tulips made of corrugated paper look festive. For work you will need: corrugated paper, as well as scissors, glue and wire. First of all, you need to make flower petals, for this, a strip three centimeters wide and eighteen centimeters long should be cut out of a sheet of paper. Then the resulting strip must be folded several times until the width is four centimeters.
Then you should outline the contour of the petal, then cut the petals with scissors. Next, you need to give the petals a more natural shape, narrowing at the bottom and expanding at the top. In order to form a bud, eight petals should be put together.
In order to make a stem, you need to cut off a strip of green paper and wrap the wire with it, and a leaf should also be cut from the strip. The leaf is attached to the stem with glue. The finished bud must be attached to the stem, and the flower is ready. To make a blossoming bud, stamens can be made from yellow paper and attached to the inside of the bud.
There is another origami technique for making a tulip flower. You need to cut off several strips of paper four centimeters wide, then each strip must be twisted in the middle and folded in half. Next, each layer of paper must be stretched a little so that the flower turns out to be voluminous, the base of the flower should be twisted.
To make the stems, the pieces of wire must be wrapped in green strips. Then the petals need to be fixed around the stem with glue. You can also glue the leaves, and the flowers are ready.


The most popular spring flower is the tulip. You can make tulips from crepe paper, from corrugated paper, make origami - such a craft will be very useful for a women's holiday or birthday. We offer a simple lesson on how you can make a tulip out of paper.
Paper tulips: master class
Paper crafts like a tulip can be classified as simple, but quite effective. For work, you need a sheet of thick paper, scissors and a pencil. Now let's look at a step-by-step instruction on how paper tulips are made:
1. For work, prepare a sheet of paper measuring 20x28cm. You choose the color at your discretion, preferably close to the real color of the tulip. There is only one requirement for paper - it must be strong enough.
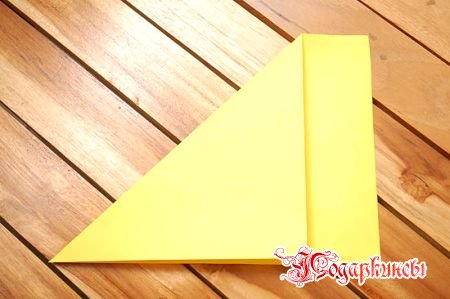
2. Make a triangle out of paper. A strip of paper that has gone beyond the edges of the triangle should be cut off and set aside. We will use it a little later.
3. Now let's look at how to fold a paper tulip. First you need to unfold the triangle, then fold it again, but in the other direction. As a result, you should get a square with diagonals.

4. To fold the paper tulip bud, fold the folds well again. Flip the piece of paper over so the center of the paper is facing up.

5. Fold the paper in half. We wrap one corner to the fold line. Thus, a new triangle is formed. We carry out this procedure with a different angle.

6. Tulip and other similar paper crafts require constant contact with the material, folds should be clearly visible. Here's what you should end up with:

7. Join the sides of the tulip and align them well.
8. Turn the triangle with the base up.

9. The wings of the paper should be folded on top so that they meet in the corners.

10. Turn over the other side and do the same.

11. Turn one wing of the paper to the right. On the other hand, we duplicate.
12. Carefully tuck the end of one wing into the other.

13.On the other hand, we do the same. We iron everything well. At this stage, the workpiece already begins to resemble a tulip head, only slightly flattened.

14. Now let's look at how to make a volumetric tulip out of paper from this blank. Hold the folded wings with your index finger and press down with your thumb.

15. Now for the important point. There is a hole in the center of the paper, it should be hit hard. Then the structure will be filled with air, you can also use a pencil.
Tulips are amazing spring flowers that bring a sense of celebration and comfort to our homes. True, their splendor is fleeting - they quickly fade. Do you want to admire the beauty of flowers all year round? Make paper tulips that will not only liven up the interior, but will also be a great addition to a gift for March 8 or a birthday.
How to make an origami paper tulip
First, decide on the color of the tulip - choose the required colored paper, since it is difficult to paint a finished craft. In addition, you need scissors.
- Fold the sheet diagonally to form a triangle. Cut off excess paper and set aside.
- Expand the triangle and bend it to the other side, then straighten it - a square with the indicated rays came out. Fold the paper in half, wrap the corners to the middle line, straighten the sheet - the intended folds are clearly visible on it.


- Connect the workpiece along the squashed lines so that two equilateral triangles come out. Turn the shape with the base up and fold the wings so that they meet in the corners, do the same on the other side.


- Fold the wing to the right, to the left - duplicate, and stick the tip of one wing into the other. Repeat the procedure from the bottom side and smooth the base with your fingers - you get a pyramid.


- Grasp the wings with your index and thumb and spread the pockets slightly apart. Turn the blank over, in the middle of the bottom you will see a hole, blow into it - and the flower will take shape.

- Roll each petal onto a pencil and the tulip will bloom. Fold the stem from the set aside piece of paper, insert it into the bud - the volumetric tulip is ready.


- Make some colorful paper tulips that can be placed in a vase, attached to a summer hat, or decorated with a photo frame.


How to make a corrugated paper tulip
Tulips made of compressed paper, collected in bouquets, perfectly decorate a festive table or gift wrapping, and filled with sweets, they will become an exceptional present for any person. For a sweet bouquet you will need: corrugated paper, round candy wrapped in wrappers, scotch tape, scissors, tape tape, wire, wire cutters.
- Cut the pink paper into 20 x 2 cm strips. Roll the middle of each piece of paper, then fold it in half. Bite off a 15 cm long wire and tape the candy to it.


- Form a bud by tape securing the petals to the stem, overlapping each other in two rows. Wrap the base of the flower with the same Velcro.


- Prepare leaves from green paper and attach them to the stem wire. Collect a bouquet of tulips and you can go to congratulate a loved one.


How to make a tulip from colored paper
This is a simple option for making a tulip, so get the kids to do it. Materials needed: colored paper, scissors, glue, pencil, wooden skewers, green tape.
- Prepare a flower template from white cardboard. Place it on a piece of red paper and cut out 4 petals.


- Fold each piece in half and glue it on the sides. Wrap the stick with adhesive tape, dip the sharp end of it in the glue and insert into the middle of the flower. Glue the second part of the bud on top.


- Cut out two light green leaves and glue them to the stem on both sides. Decorate the product with a ribbon, rhinestones, a bow - and an original gift is made.


As you can see, you can create colorful, living-like tulips from plain paper that will not cease to delight you with their flowering and give you a wonderful mood every day.
Spring is a real miracle! Nature awakens and fills the world with the sun, picturesque colors, flowering, and a handsome tulip shows up. That is why the tulip is associated with this magical time of the year. But what to do if there is a different season outside the window, and so would like to let a drop of spring into the house?
Spring is a real miracle! Nature awakens and fills the world with the sun, picturesque colors, flowering, and a handsome tulip shows up. That is why the tulip is associated with this magical time of the year. But what to do if there is a different season outside the window, and so would like to let a drop of spring into the house? You don't have to wait for this wonderful time, but make paper tulips with your own hands. For this, nothing special is required, of course, except for inspiration and creative mood!

Hand-made paper tulips are an interesting, creative activity for children and their parents, which can keep the whole family busy. Sit back more comfortably, now we will tell you how to make a paper tulip or even a whole bunch of flowers with your own hands. So, let's begin.
The muse is such a fastidious lady that it is worth letting in even a drop of doubt, and everything will disappear without a trace. Therefore, "seize" the moment and do not fall into the traps of mind games.
Materials:
We take a regular (or corrugated, that is, whatever the "muse" wishes), but always a thick sheet of A4 colored paper and mark the dimensions - 20cm by 28cm. Note. If this is not done, but simply add up what is, i.e. A4, then the tulip will come out too big and awkward, checked.
Tulip color. There is such a thing as "color language". For example, red is love, the strength of feelings, etc. In other words, if you need to express feelings or your mood, then it is better to take the appropriate tone.
Next, we fold it into a triangle.

The rest is cut off (it can be used for the stem). It turns out a square folded diagonally into a triangle.

We unfold the square and again fold it along the other diagonal (folds in the form of an X).

The folds should be deep enough. Turn the square over so that the center is at the top, like a pyramid.


After checking the folds, we repeat the same with the other side of the workpiece.

Fold as shown in the photo above.

Align the sides of the triangle.

We turn the corner down.

We fold the corners from the base of the triangle to its apex.

We repeat the same on the reverse side.

The result is four triangles. We take one and turn right.


We turn the other to the left.
Next, we insert the vertex into one another.
Fold and smooth the folds. We repeat the same on the other side. The workpiece should resemble a tulip bud.
We take an unfinished tulip, supporting the vertices rolled into each other so that they do not open.

At the base of the flower, where the stem will be, you need to make a hole. We apply a cotton blow to the center of the base so that it is filled with air. If it did not work out with a blow, then you need to blow sharply into the hole.

We open the petals of the bud.


Video: handmade tulip master class
The same technique for creating a tulip from paper as described above, but from the usual - white. If suddenly at any of the steps you have a hitch - look at the master class in a short video and it will immediately become clear to you how to make a tulip out of paper with your own hands.
This paper flower master class will give the joy of creativity not only to children, but also to adults. We are all children, regardless of age, status and position in society. And in in this case you can get into that feeling of childish enthusiasm and joy, which, though not one hundred percent, is at least very close to the real feeling of childhood. Remember that joy of the first creativity, novelty. Joy not only for your successes, that you could, but also primarily because you gave a piece of yourself and pleased the recipient of the gift. And this is doubly pleasant!
Such a bouquet will be a charming gift for March 8 for a grandmother, mother or any other woman. Doubts about the choice of a flower, discard, because tulip is a symbol of love and happiness, it will be appropriate in any setting.
We often lack warmth and gratitude. Let's break off the "shackles" of the adult world for a moment and become who we really are - children of our universe.
What could be better than a gift of flowers? Flowers always evoke the most pleasant emotions. A paper flower will stand in a vase for a long time. In our master class, we will introduce you to the origami technique and show you step by step how to make a beautiful tulip out of paper.
We will need:
- colored paper (we'll use yellow)
- scissors
- good mood
- Take a piece of paper. Choose the sizes yourself, it depends on what kind of flower you want to make. You can take a sheet of A4 paper. Fold the sheets into a triangle as shown in the photo.

- Use scissors to cut a rectangle and set it aside.

- Expand the triangle. You have a square. Fold it back into a triangle, but this time with different sides. When you unfold your work, you will clearly see the cross.

- Turn the sheet over. The work at this stage will look like a pyramid. Fold the work in half. Flip and unfold. Then fold from left to right again. You should have four lines all over the work surface. A kind of star made of stripes.

- Now we need to make a triangle. We need to press a little on the center of the square from below. As a result, you will have a pyramid. You need to bend the corners of one triangle towards the center, smoothing them with your fingers.

- Flip the triangle at an acute angle towards you. Do the same with the other two triangles. Then fold the corners in the middle, as shown in the figure.

- Turn the craft over and do the same with the second, lower triangle. After all these manipulations, you should get a rhombus.

- Now grab a small triangle on top of the diamond and bend it towards the center. Next, turn the work over and do the same with the other triangle.

- Take a good look at the picture. You need to insert the corner on the left into the corner on the right. Then spread it with your fingers. You will get a triangle on top of the rhombus. Next, turn the work over and insert one end into the other in the same way.

- And now the fun begins. Draw more air into your lungs and blow into the hole at the bottom of the tulip. Turn the edges of the petals away from you.

- Our flower is ready, it remains to make a petal. Take the rectangle that you cut off at the beginning of the work. Bend it into a tube. Insert the flower bud into the hole. Unless you want to make a paper stem. You can use a simple straw or a thin twig. The branch only needs to be painted green to make the craft look more realistic.

That's all! Our flower is ready. You can make several tulips and collect them in a gift basket.
You can clearly see all the steps in the video: