How to pack a box yourself in inexpensive gift paper. How to pack a gift in gift paper beautifully with your own hands: without a box, in an envelope, in the form of a candy. Round, flat, large: step by step instructions
We present gifts to relatives, friends, colleagues for birthdays, New Year, and other holidays. Those who believe that content is more important than form think that it is quite possible to do without a beautiful wrapper. Candy in candy wrapper and without is equally delicious! However, even a very serious and respectable person will be sincerely delighted with an exquisitely and ingeniously packaged gift.
The most popular "container" for him, like hundreds of years ago, remains paper. Let's see how to wrap a gift in paper.
Paper, which did not dream of the ancient Chinese
The choice of paper is enormous. The stores offer wrapping paper thin and durable, glossy and matte, corrugated and embossed.

Sheet glossy paper
The most convenient for our purpose. It comes in a variety of colors and patterns.
craft
Kraft is designed specifically for gift wrapping. This type of paper is slightly ribbed to the touch, with transverse embossing. Produced in rolls of ten meters in length.
Silence
Silence is thin, light, airy. Therefore, it is also used as a filler. Objects of complex shape are wrapped in silence, which this type of container fits elegantly and in relief.
Polysilk
Irregularly shaped gifts are often also packaged in polysilk. From it create large decorative bows. It resembles a dense film, stretches a little. For these not quite paper properties, polysilk is loved by designers and stylists.
corrugated paper
Monochromatic rough corrugated paper is familiar to everyone as an element of packaging of flower bouquets. It is often used to decorate souvenir bottles and other narrow elongated gifts packed in boxes and tubes.
mulberry
Mulberry is a type of handmade paper made in Thailand. The color range is extensive. Often has a pattern or ornament, sometimes - inserts of floristic materials (dried flowers, fragments of stems, leaves).
These varieties of wrapping paper do not exhaust the entire selection. There is also mother-of-pearl, silk, crinkled, embossed, gel ... The inventors of paper, the ancient Chinese, never dreamed of such a thing!
Packing square or rectangular box

First, let's learn how to properly pack a gift with our own hands, if it is in a square or rectangular box.
We will need:
- packaging paper
- ribbons, cords for decoration
- tape measure or centimeter
- scissors
- adhesive tape (preferably double-sided - the ordinary one will be too noticeable, and it remains to be seen whether it can be carefully disguised enough).

We pack a box of round or oval shape
Let's figure out how to wrap a round gift. Hats, tea or coffee sets, sweets, cookies, tea are sold in a round or oval box. Not every professional packer will cope with a box of this shape, so again, practice first on junk paper.

We measure the height of the box. Cut a strip of gift paper 2-3 cm wider. We glue the box around with this strip, not forgetting to tuck 1 cm under the bottom, 1-2 cm inside. Remove the lid, of course. Cut out a circle or oval from wrapping paper a little smaller than the bottom. We glue the bottom of the box so that the folded allowance is not visible.
With a lid, it's the other way around. Cut a slightly larger circle or oval, glue it and the allowance on the sides, laying neat folds. We cut out a paper strip 1 cm wider than the height of the lid. We glue it flush with the top of the lid, tuck the protruding allowance inward.
Here is another master class in pictures using corrugated paper

Finishing touch - box design
We figured out how to properly pack a gift in paper. Now you need to decorate it in an original way. Let's look at a few ideas.
The box can be tied with a ribbon or ribbon. No, it's too banal. And if with several ribbons or ribbons of different colors and textures?

If you chose plain, unpatterned wrapping paper, drag the box with a thin thread or ribbon and attach a flower or bow on top. This bright accent will give ordinary paper a special charm.

For a men's gift, more restrained packaging is more suitable. Tiny plastic Christmas tree balls can be tied to the New Year; for the birthday - small bows or other decorative ornaments. Anyone can do it in an hour, it will look spectacular!

It is better to put a children's gift in a bright textile bag or arrange it in the form of a large candy. Kids love to extract all sorts of interesting surprises from packages.

Souvenir shops sell ready-made packing boxes. If your gift is oversized, look there: what if you guess by the size?
In general, it is useful to go shopping in search of fresh ideas on how to advantageously complement gift wrapping. Among various cute little things, you can sometimes find something that is useful to you. Brightly colored natural bird feathers or miniature butterfly brooches, for example. And you can delve into home stocks and find original ribbons, decorative laces, miniature souvenirs that are enough to stick on a gift box. For those who know how to crochet, making a round flower is a matter of minutes, and glued together with ribbons to the package, it will look like a designer exclusive.


Slow down your imagination, and your efforts and experiments on how to pack a gift will not be in vain, but will be appreciated.
There are times when there is a need to somehow decorate simple cardboard boxes. Therefore, we suggest that you familiarize yourself with several master classes showing how to beautifully paste over a box with paper.
What is it for?
Boxes can be used for the following purposes:
- as organizers (for example, sort documents and so on);
- put things in them that are not used every day (for example, New Year's toys);
- as gift wrapping (to give gifts in them, for which factory packaging is not provided).
Most often, hard packaging is used from under shoes that have already worn out and got rid of, household appliances, and so on. By and large, any packaging can be used. But to make everything look neat and orderly, the box should be decorated.
The simplest and most budgetary way of decorating is just pasting the box with paper. And there are a lot of options and ways.
What kind of paper is suitable for pasting a box?

To transform a cardboard box, you can take absolutely any paper. For this purpose, everything is suitable:
- colored paper;
- gift;
- paper for decoupage and crafting;
- self-adhesive paper;
- wallpaper (vinyl, paper, non-woven, textile and so on);
- napkins and more.
What tools and materials are still needed?
In addition to paper and the cardboard box itself, the following tools and materials are needed:
- scissors and/or ;
- ruler;
- pencil.

Depending on the type of paper you will be decorating the boxes with, you will need to stock up on:
- double tape;
- PVA glue;
- glue gun;
- (sometimes depends on their type);
- glue brush.
The easiest way
A master class showing how to glue a box with paper can be seen in the presented photo.

- Unfold the roll of paper and place your box on it.
- Measure how much material you need so that it completely covers the bottom of the box, its walls and bends a little inward (Figure 1). This can also be done with a ruler. To do this, measure the height and width of the box and measure on the sheet a length equal to these parameters plus one more width and plus six to ten centimeters per bend.
- Cut out the desired piece of paper (Figure 2).
- Place the box in the center of the cut out piece of paper and cut out the excess pieces at the corners (Figure 3).
- Cut four small pieces of paper and stick them on the corners of the box (Figure 4).
- Now coat the walls with glue and glue the paper (Figure 5).
- Coat the inside of the box and wrap the paper (Figure 6).
- Glue the lid in the same way.
- Let the box dry.
Everything is ready! Now you can use the box at your discretion.
Tip: Don't use too much glue or the paper may warp and ruin the whole look.
The second way to decorate with paper
Here is another instruction on how to glue the box with paper:

- Attach the bottom of the box to the selected paper and circle it (Illustration 1).
- Cut out the bottom piece so that there is a margin of two to three centimeters on each side (Figure 2).
- Glue the piece to the bottom of the box and fold over the exposed edges (Figures 3 and 4).
- Attach one side to the paper and outline it. Cut out the part with a margin of a few centimeters on all sides. Glue the paper on one of the sides (illustrations 5 and 6).
- Gently fold the edges of the paper (to the bottom, to the sides, and inward). If necessary, make small cuts (Figure 7).
- Tape all sides of the box in the same way (illustrations 8 and 9).
- You can paint the inside of the box with a paint that matches the color. It is better to use acrylic (Figure 10).
- Let the glue and paint dry completely.
The decorated box is ready!
Decoupage technique for decorating cardboard packaging
Some people are in a hurry to throw away not only the shoes, boots and other shoes that were demolished, but also the box from under it. But if you glue a shoe box with paper, then it will change and become an indispensable thing. It can be used as a box or a place to store various little things that tend to get lost.
The master class will show how to glue the box with paper in:

- Take a clean shoebox and clean it of tape and other stickers.
- Take two shades of paint (preferably acrylic) and cover the sides and lid of your box with it. Paint the sides black and the top white.
- Frame the lid in the same color as the sides of the box. To do this, step back from the edge of the top by a few centimeters and stick a square from. Cover the indents with black. Then remove the tape. As a result, you have a frame for a white square in the middle with smooth edges.
- Choose the right picture. It can be depicted on a napkin, plain paper, wallpaper, and so on.
- Cut out the picture and put it in water.
- Then take the picture out of the water, put it on a piece of oilcloth (an A4 file is perfect for this purpose) face down, and blot the top several times with a cotton or paper towel to remove excess moisture.
- Cover the picture with PVA or decoupage glue.
- Also glue the cover where the picture will be glued with glue.
- Transfer the oilcloth with the image to the lid. To do this, simply turn the picture over and spread it with your fingers.
- Carefully remove the adhesive.
- When the picture dries, the entire cover should be covered with acrylic varnish.
- So that the borders of the picture do not stand out too much and are not conspicuous, apply white paint to the edges of the image and gently blend it with a large brush or sponge (you can take a piece of foam rubber).
- To make the picture look harmonious, you can additionally paint some strokes with acrylic paint (for example, shadows and highlights, background).
- When you're done with the background and image, varnish the entire surface of the box lid.
- Decorate the walls as you wish.
When everything is dry, the box can be used.
Sheets with mulberry fibers: how to glue a box with paper?
Master class on pasting a box with mulberry leaves:

- Mulberry paper has a number of features that should be considered when working with it. Most importantly, the material is very thin. Therefore, if you decorate not a plain surface, but with different images, then you need to cover it all with paint.
- When the paint is dry, cover the surface with PVA or decoupage glue.
- Tear the mulberry paper into pieces of different sizes and paste them over the box.
- If you want, additionally decorate the surface using the decoupage technique with napkins or other pictures. This should be done after the layer of mulberry paper has completely dried.
- In conclusion, you need to cover the box with a layer of varnish.
This box looks old and will fit perfectly into any interior.
Is it possible to decorate a box of a different shape?
How to wrap a round box with paper:

- Place a box on a sheet of paper and outline its bottom.
- Cut out two of these circles.
- Then cut off a rectangular strip. Its height should be equal to the height of the sides of the box plus four extra centimeters.
- Cover the rectangular piece of paper and the sides of the box with glue.
- Glue the rectangle to the side step by step so that it extends beyond the edges from the bottom and top.
- Make cuts around the entire perimeter on the protruding edges of the paper and wrap them on the box.
- Glue the cut out circles to the bottom and lid of the round box.
- How to glue the box with colored paper if there is no other? With such sheets, you can decorate cardboard packaging in two ways: as usual or using decoupage technique.
- To paste over the box with wallpaper, use a special one. So you will be sure that the paper will not move away from the walls over time.
- How to paste over a box with gift paper or corrugated paper? Such sheets are very thin, and tearing them, as is the case with mulberries, is not recommended. This decor does not look too nice and neat. In this case, it is better to take a thin one and stick it around the entire perimeter of the box. Then the protective layer is removed from it, on which paper is applied. So the whole box is gradually pasted over.
- How to glue the box with paper so that it does not delaminate? To do this, you need to choose the right glue and carefully glue the sheets to the surface. Then the craft must be well dried.
How to wrap a gift - a repository of ideas for all occasions will give you a useful reminder. Here you will learn how to wrap a gift, make it beautiful and bright. Even the most insignificant surprises will now become memorable in terms of presentation - unusual forms of weaving ribbons, bow ties and much more. And practical tips and tricks will help wrap even the most complex item without taking much time and effort.
Recently, special attention has been paid to creative and unusual types of packaging. These can be simple plastic or paper bags, and even designer boxes made of thick embossed cardboard. In general, as they say, the taste and color ...

For example, here's how to creatively wrap a gift to avoid wasting time looking for the right package. Using the origami technique, a package is created from ordinary thick paper with a container inside, and the outside is decorated with fabric leaves and beads. Such packaging is also called eco - its environmental properties are equated with the use of natural materials.

If you have been thinking for a long time how to pack a gift without a box, and the ideas seemed meaningless to you, here it is a variation - simple colorful wrapping paper. A layer of unnecessary printed sheets is superimposed on top of it. Instead, you can use a newspaper or old magazines.

Wondering how to wrap a gift in foil? This option will not be difficult. Just wrap the present with a film or cellophane products.
To fix an arbitrary bow, use ribbons, threads, adhesive tape. Decorate the resulting surprise to your liking. And the video in this article will show you how else to transform a stylish present for giving.

It looks like a simple package, but it differs in environmental properties. There is a plastic cover as well as cardboard material. If you still have a question about how to wrap a gift in an unusual way, try diversifying the packaging with ribbons to match the national pattern or cards with signatures.

Homemade cards folded in half from cardboard will be a great addition to the signature of the presents. They can also be single packs for small parts.
If you want to wrap socks or underwear, but do not know how interesting it is to wrap a gift of this kind, just connect the cards with a thread and attach a caption with a picture or a finished image.

How to properly pack a gift if it is intended for several people? The same chocolate for colleagues can be interestingly wrapped in boxes, add bright colors and make a wish list with congratulations and kind words.

Even the simplest gift should be packaged according to its shape and purpose. But how to pack a gift that already has a designer box with a beautiful laminated finish or three-dimensional letters? It's simple - create unique memo cards. They will be the highlight of your gift for friends and relatives.

Surely, everyone knows how to pack a rectangular gift (see), but not everyone thinks about what exactly to wrap it in. There is such a magic paper that shimmers and glitters, and when certain light rays hit it changes coloring.
Chameleon paper is not sold everywhere - you can order it in a store, buy it with delivery, or create it yourself using glue and acrylic paints.

How to quickly pack a gift so as not to be late for the celebration? In the course is your favorite newsprint. The main thing is that the former subject of reading is clean and not wrinkled. Then you can create quite a decent ornament and decorate everything with badges and signatures.
Now you can confidently state how to properly pack a gift for a particular occasion. And then we will tell you how shapeless sweaters and hats are wrapped, how accessories and clothes of luxury brands are forged.
Original packaging of clothes and accessories
For packing clothes or accessories, sellers always give a package or a native box in which the goods are stored before purchase. At best, it will be sold with a hanger; at worst, it will be wrapped in paper.
Some exclusive accessories or things that cost more than a few dollars have beautiful boxes with labels and company labels. But is it worth giving a brand name if you can beautifully pack a gift in an original hand-made package.

A simple wrapping for a towel or a knitted sweater can become an integral part at the time of presentation. Imagine that the recipient of the surprise already knows what he will be given. And here we need the right approach - additional items.
It can be small hotel soaps and creams in bottles and boxes, attach a bag of wardrobe fragrance to a sweater, etc. This is how we simply answer the question of how to pack a towel as a gift.

There is a subtle hint of a surprise hidden in the box here. A shirt or other item of clothing can be disguised by leaving a hint on the surface.
Use packaging to make the shell look attractive and inviting. If you know how to gift-wrap a shirt using similar methods, feel free to use them.

Woolen or knitted, terry or flannelette - it would be interesting to present socks in any of their weaving and color in this way. If at first it is not clear what it is, then later, opening the present, the recipient of the gift will smile in equal proportions more and more widely as the gift is opened.
Now you know how to pack socks as a gift, as well as small towels and other bath accessories.

Wanted to give a worthy present, but do not understand how to pack a belt as a gift, which, in principle, is difficult to arrange somehow in an original way? Use it for other than its intended purpose - let it be a means for creating packaging, and place some distracting goods "inside" such a design.

How to pack a scarf as a gift so that it is delighted at first sight? Apply the previous technique - tie a dummy or a secondary present with a handkerchief - an inflatable ball, an empty box. The base will serve as a form for the tie.

The very case when you know how to pack a tie as a gift, but all ideas have already outlived their usefulness due to originality and obsession. In such cases, a distraction comes to the rescue - a flat envelope in which, it would seem, money should lie on the subconscious. But it was not there - the surprise still lurked and asks for a neck to the hero of the occasion.

When wondering how to pack a scarf as a gift, remember a few rules - you can not use plastic bags, shopping bags and boxes with sharp corners. Take an inflated bag that will be different in color from the rest. Tie a rope and that's it - give the lightness of charm in a plain dress.

Any thing can be packed quite simply - as a wrapper, use a box that holds its shape. And for decor - fabric, canvas or something of a textile direction.
A cloth pouch is the perfect tool for solving the issue of how to pack clothes as a gift. Here, too, there is a clue to the content of the surprise.

And again, the task is how to pack gloves as a gift so that the idea is not banal and ordinary. If you're going to give rubber gloves, fill them with candy. Textile and leather will look beautiful with flowers inside, and winter with a membrane surface - with pieces of ice or artificial snow.
Caution - glass, or packaging of fragile items
Another type of surprise that requires a special approach to appearance. Since glass and other breakable containers may be premature for the recipient of the present, it is better to take the time to make the right box in advance. Drinks or even sweets in glass jars can be wrapped in a soft cloth, and ceramics and porcelain in thick paper with multi-layered soft floors.

Complex paper packaging can also create a festive mood and solve the problem of how to pack a bottle as a gift in an original way. If you want to mark the origin of the drink, add some pictures of the country - French champagne looks beautiful in accordion notes, and Italian wine in a wrapper with a photo of the landscapes of Rome.

Here's how to gift wrap a mug in a quick and easy way. You just need cardboard to work - fold it according to the scheme or a homemade sketch, fasten the handle and place the cup inside. Nothing simpler can be invented; skill, as you know, is the merit of professionals, and simplicity is the lot of lazy geniuses.

Small square glass bottles can be wrapped in dense colored pieces of paper, complemented with an interesting ornament in the form of contrasting figures. With thin decorative ribbons, you can thread several cardboard boxes with a description or a picture to complete the overall picture.

How to pack perfumes that do not have their own packaging as a gift? You may want to present them not in an ordinary cardboard box, but in a masterfully made wrapper in the form of carved lines and figures.

The very famous Kirigami technique, which involves modeling flat figures from paper and cardboard, will help create an original watch packaging. Small accessories with a dial can simply be placed inside the box.
How to pack a watch as a gift is even easier - just add colors and emotions. And even the most ordinary paper will become a magical tool in your hands.

A well-deserved option on how to pack a vase as a gift, so as not to damage it on any side. The packaging was created by scientists from the Technical University of Russia, the idea has already been patented and put into production under a tender.
Soon such packages will be available in every store. Similar types of packaging can be created at home by modeling cardboard assemblies or wooden blanks.
Difficult ideas always come at the moment when you least think about it. Therefore, stock up on a source of inspiration in advance, put a mug of tea next to it and create masterpieces around your presentations.
Unusual gift wrapping
As a rule, accessories and home decor items are packaged in translucent packages so that the recipient of the gift can immediately see what is being presented to him.
Knowing the etiquette, you can beat the packaging in terms of design:
- Transparent packaging can be combined with cardboard products;
- Plus size accessories can be packed in simple shapeless wrappers;
- Home decor and other items can be wrapped in ribbons, showing what the decorative insert “hides”, as well as in a fabric cover so that the recipient of the present knows that there is an item for use in the house.

How to pack a bag as a gift so that the packaging is chosen according to etiquette correctly, but does not raise questions regarding the content. If you imagine a bag or purse as something special, add an exclusive note to the package - hair sticks with a hint of a fashion present or something else.

A small or large backpack can be wrapped in plain paper using improvised decor. How to pack a backpack as a gift without unnecessary losses - just wrap it up and tie it with ribbons. You can decorate the wrapper with patterns or buttons.

Soft large sleeping pillows are usually given in a paper wrapper. Do not place pillows in boxes and pack them in shiny materials. It is also customary to give them in simple loose shells - in this case, the gift should “breathe”, and not be clogged with dust.
How to pack a pillow as a gift if it is small decorative and serves only as an interior decoration? In such cases, use spacious bags with ornaments and patterns.

Pictures of different sizes with different baguettes (according to the complexity of execution) can be packed in kraft paper. For safety reasons for the carrier - the picture will not hurt him with its sharp corners of the frame, to protect the picture from damage - the paper protects from dust and scratches.

How to pack a painting as a gift if it needs to be transported over long distances? It's simple - for this, make a simple cardboard package with handles. It will be comfortable to wear for a long period of time.
Simple packaging methods, as you can see, are not suitable for everyone and not always. Therefore, let's move on to the section of unusual packages that are suitable for your gifts.
Let's eat in an interesting way
Shapeless soft gifts can be beautifully packaged in kraft paper. The only decorative element will be the external highlight.
It can be:
- Drawings in the form of butterflies;
- Simple lacing;
- stickers;
- Scrapbooking elements;
- Children's drawings.
The advantage should be given to dense packaging components that can keep their shape. Also, do not wrap gifts very tightly - they can already be wrinkled or lose their shape. Dresses and hats are best presented in large boxes filled with artificial flowers.

Here's how to pack a children's gift without any special notions A child's eye sees what is depicted, but fantasy is always to add bright colors.
Therefore, you should not approach the choice of children's packaging like fireworks - remove bright and luminous details, the only silhouette on the box will be important for the child. These can be cartoon characters, best friends from childhood, prototypes of children's toys.

How to pack a round gift when there are no appropriate boxes at hand? There are two options for solving the problem - create such a package yourself or buy it.
The second option is to wrap it in a round shape, creating a "bridgehead" of paper and newspapers. They will keep their shape well, preventing the present from deforming.

For the image of men's presents, you can choose textile packaging. If a woman knows the sewing technique, you can decorate the canvas with ribbons and decorative fabric inserts.

Another option is how to pack a men's gift in the form of a cardboard suitcase. Similar additions in the open form can be found on the Internet, then folding a whole cardboard along the edges.

How to pack a square gift for a girl? An interesting way will be the technique of wrapping with fabric - an elegant thing can make even the simplest present interesting and tempting.

A homemade method showing how to wrap a soft gift that is easy to hide inside a plush toy. If you need to wrap a fragile small item, use old toys, or sew new ones.
With regards to small surprises, we will continue the discussion and tell you how else you can wrap small surprises in order to make them pleasant and interesting.
Small surprise packaging
To pack any thing, you need at least a box and the present itself. But what to do when the gift is too small, and often only factory paper packaging is offered for it without elegant ribbons and cute bows? On this account, too, everything is provided.

A great option showing how to wrap a small gift. It is easy to place it inside a deflated balloon, then inflate the balloon and present a present to the hero of the occasion.

A small stationery item can be handed in a self-sewn handbag. You already understood how to pack a pen as a gift. Further - it's up to you. Beautifully congratulate the birthday man and enjoy his emotions.

A simple postcard will show you how to gift-wrap tickets. Traditional packaging in the form of a greeting card will open up a wide range of possibilities for you. Tickets can be attached outside or inside.

A simple box can be folded according to the origami technique sketch. Now you know how to pack a keychain as a gift. And on the Internet there is an instruction on how to create several different similar fruits.

The cute vintage box showcases the luxury of a gift and is great for gifting small jewelry or clothing accessories. It will accurately reflect the mood of the present, and how to pack the brooch as a gift in an alternative way - you will learn further.

Another way to show how to gift-wrap mascara, eye shadow, or other makeup items.

For accessories from the jewelry section, a more complex packaging composition is suitable. Given that you know how to make such handbags out of paper, it will not be difficult for you to make such a present. And how to pack a bracelet as a gift for a sister or mother - proceed from the variety of color palettes.

How to pack shampoo as a gift if the bottle has a straight round shape? A rather uninteresting container can be beautifully laced up like a corset. It is also suitable for lacing other bottle shapes.
These simple and mouth-watering packages can be created in just a few hours. By the way, about goodies - then we will consider how you can wrap edible things as a gift.
Delicious food packaging
For packaging edible surprises (see), many manufacturers create colorful factory packaging. Often, they already contain goods.
This applies to:
- muffins;
- baking;
- cakes;
- cakes;
- flour products;
- Handmade chocolate.
If you decide to prepare an edible gift yourself, then the choice of packaging should be approached taking into account the shape. Dishes that can fall apart or spoil are best packed in a box made of rigid material.
Sweets and cookies, fruits and berry compositions can be packed in simple cornets or homemade paper baskets. But not all sweets require tightly closed boxes - it is better to give preference to something easy to open in the form of bags with transparent film windows.

A complete break in the template, or how to pack sweets as a gift to make fun of a friend. We will present the girls with a simplified view of the task - glue all the details together by placing the guy's favorite candy inside the "punishment cell".

Having prepared goodies, the difficult task remains - how to pack cookies as a gift or other sweets? Indeed, for such products, you need to use special paper or a gasket between the gift and the package itself. No, this is not always the case - just choose thick paper with an interesting print or shape.

If you don’t know how to pack fruit as a gift, use Chinese advice - put everything you can eat in one day in wrapping paper. It crunches treacherously when unfolded.

How to pack tea as a gift so that it is beautiful and original? Packing and cartons, bags and cornets are removed to the side. Let the packaging here be a minimum, but a maximum of practicality.
Attach the tea bags with clothespins, and glue them to the colored cardboard base. A palette of delicious tea drinking is provided.

Packaging of sweets in the form of a cylinder is not only original, but also appetizing. The creator's approach was clearly creative, otherwise how would he get candy without using the magic of this hat?

How to pack a cake as a gift so as not to crush it on the way? To do this, we change the factory plastic boxes for strong cardboard packaging.
Designer packaging - with the world on a string
No one can forbid catching luck by the tail, borrowing the idea of \u200b\u200bpackaging a present from famous designers (see). In addition, by wrapping a present in a similar box, few people will distinguish it from the original. We will present several options for marketing moves that will appeal to everyone.
The latest packaging confirms the talent of the designers. Only they can prove the naturalness of the product with the help of ideal female naturalness. It’s a pity to even eat such chocolate - it’s a pure ecological product, after all!
Now it remains to receive dishes as a gift, from which you can taste culinary masterpieces in the packages noted above. By the way, then we will talk about plates and other kitchen utensils.
Elegant tableware packaging
Gifts such as kitchen knives or forks require special attention in terms of packaging. Often, buyers take not a set, but a unit of goods.
Therefore, the question arises, how to pack a knife as a gift or such a dangerous product? And if you decide to buy a service or children's dishes - this is the real antique of our time - you can not throw, throw and transport without special precautions.
Fortunately, even at home, you can create a box filler that will hold a ceramic super sharp knife or a couple of other kitchen utensils.

A stack of plates would be best wrapped in a bandage that will hold each dish immobile.

And here is an interesting option on how to pack a spoon as a gift. As you have already noticed, it is on the surface. Inside there may be a main surprise in the form of additional spoons or in the form of a sweet for the dessert table.

Somehow we have already talked about how to pack a bottle. And here is another immodest option that makes you really make a choice - a book or alcohol. The dilemma follows immediately.

To understand how to pack dishes as a gift, decide what you will give as a gift from this. It is better to wrap plates and bowls in paper separately, and then in a box. If you have a set, put it in foam and a box. Come up with a design in the theme of a holiday or on the occasion of a celebration - New Year, March 8, etc.

How to pack the plates as a gift, so as not to beat them? Take advantage of the pizza delivery idea - they have a wonderful container for transporting round dishes. It is also suitable for packing plates, saucers, salad bowls, etc.

The most delicate question is how to pack a knife as a gift so that no one gets hurt. Well, perhaps, such presentations are best given in factory boxes, and a ready-made present can be wrapped in beautiful gift paper or made with several prints with signatures on the outside.
How it's done - we make the packaging ourselves
Interesting unusual packaging is also created by people, and it is not necessary to purchase professional products for sketches and printouts. Some parts of the box can be ordered at the store, paper with ribbons can be bought at the mall, and templates of interesting designs can be borrowed from world brands.
The Internet is full of ideas, and it will tell you what are the most interesting and popular methods and ways of packing surprises today.
Master class №1
|
|
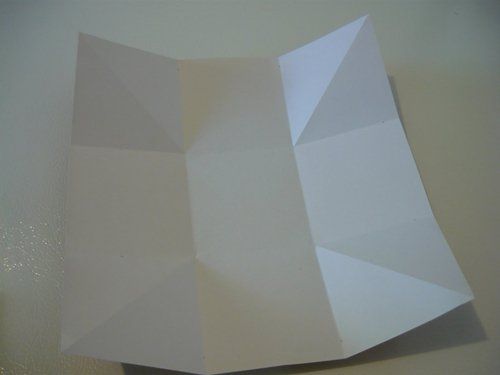
To work, you need paper with the dimensions of the sides equal to each other. |
|
|
Mark the approximate folds so that you can further know how to arrange gift wrapping. |
|
|
Cut out small squares for decoration. You can use the Internet and print drawings from cartoons or films. It all depends on the theme of the gift. |
|
|
Make holes in the corners with a hole punch. |
|
|
Connect one side of the square, leaving a free wall on the side of the corner. |
|
|
Repeat the same on the other side. This will lift the open sides due to the tension of the threads. |
|
|
Fasten the laces tightly, place a present inside. You can make untied knots from ribbons. |
|
|
Outside, you can also add decor, and instead of threads, take ribbons or decorative strips for dressing flower bouquets. |


Tip: Here's how to do your own gift wrapping in just a few minutes. Use different paper - in most cases, a lot depends on the density - the higher it is, the harder the present can be put inside.
Master class №2
How can you pack a gift with your own hands, if the present is too fragile, it is difficult and dangerous to work with it. Everything is pretty simple. After all, with the help of the next master class, you will reliably protect the future surprise from opening and hacking. Definitely not going to break it.
|
|
For work you will need:
|
|
|
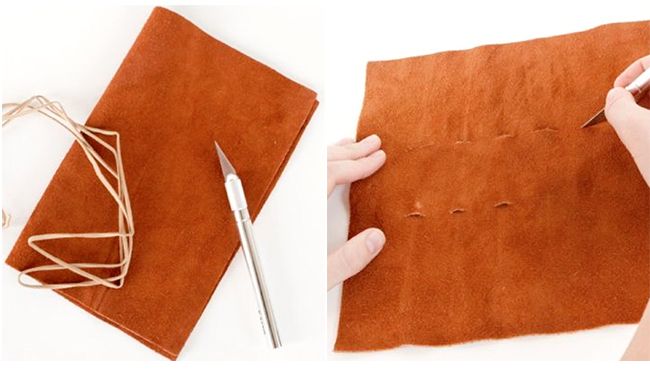
Mark the height of the bottle. |
|
|
Cut out a sketch of the pattern, so that later you can sew all the details from the material. |
|
|
Circle the bottom of the bottle to create a pattern. |
|
|
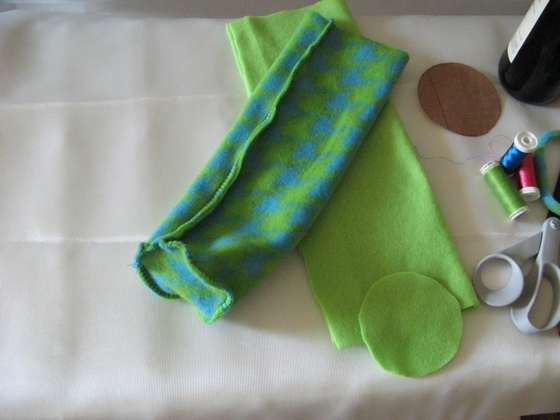
Prepare all the details of the fabric. |
|
|
Sew the bottom and base together. |
|
|
Place the bottle inside, tie the fabric at the neck. |
|
|
Soft packaging for the bottle is already ready. You can safely present a present as a gift. |


Tip: These gift bags can be created for different items, paying attention to decorative inserts and the fabric itself. Drawing plays a special role here.
So, how to pack a gift for a particular occasion - we figured it out. Now you have to decide on the choice of packaging material, the form and option for presenting the presentation.
Since there is a large selection, try to combine several ideas into one. So you can achieve the best original result, and the hero of the occasion will be happy to open a surprise for you, which will please the guests.
Presenting a present in an original and beautiful way is not as difficult as it often seems at first glance. It is quite possible to pack a gift in a box and gift paper with your own hands. Using step-by-step recommendations, accompanied by photos and videos, you can beautifully arrange a present. Thanks to simple and visual tips, it will not be difficult to wrap both large and small gifts in special paper. Moreover, the form of the presentation is not fundamental. The following are recommendations for wrapping rectangular and round gifts.
Step-by-step instructions for wrapping a gift in gift paper
Check out three detailed step-by-step instructions on how to properly and beautifully wrap a gift, and then you will definitely do it!
Standard box packaging

Everyone can beautifully pack a gift in gift paper if you use the proposed step-by-step instructions.
For packing you need to prepare:
- beautiful ribbon;
- wrapping paper;
- scissors;
- double sided tape.
If wrapping a presentation is done for the first time, you should first practice on a newspaper or unnecessary sheets. This will allow you to adapt to work and avoid mistakes when the gift itself is issued directly.
- Beautiful gift paper is taken as the basis. You will need to cut the right amount of material. Then lay it upside down. It has a gift box on it. Its bottom should look up.

- Next, you need to wrap the box with the gift from the far side. To attach gift paper, you need to cut off a piece of double-sided tape. Then, over the gift, the material is thoroughly stretched so that there are no folds and “waves”.

- Now you need to thoroughly close the seam so that the wrong side of the wrapping paper is not visible in the gap. For this, the edge is bent. The width of the fold should vary from 0.5 to 1 cm. Then the material is well stretched and fixed with pieces of adhesive tape.

- Next, you need to mask the sides of the gift. It is most convenient to fold the wrapping paper along the top edge of the box. That is why it is recommended to start from the top. First of all, you need to wrap the material along the height of the box. Gift paper is tucked inward so that sharp corners of about 45 degrees are formed. The resulting strips must be glued to the box body. The same steps must be repeated on the opposite side.

- This is the basis of the packaging.

- When packing a presentation in paper with your own hands, you can use a visual diagram. Such a step-by-step instruction will help those who decide to pack a gift in paper for the first time.

- Now you need to decorate the package. To make everything beautiful, you need to take the tape as a basis. Its length should be about 5 times the longest side of the gift. Lay the box upside down in the middle of the tape. The right end of the tape should be placed over the left edge. Decor needs to be tightened up.

- The box is then turned over. Both edges of the tape must be slipped under the strip, which is already well stretched.

- Then you need to tie a bow and gently straighten it.

- With the help of scissors, you need to trim the free sides of the ribbon.

- That's all! A gift wrapped in bright and stylish gift paper is ready!
Round box packing

It is quite difficult to wrap round-shaped gifts beautifully and neatly. However, this problem can be solved quickly and creatively. The attractiveness of the method proposed below lies in the fact that such decoration of a souvenir involves the use of a minimum amount of paper and the almost complete rejection of additional decor. This packaging option is self-sufficient in its simplicity and conciseness.
To decorate a round gift, you will need to prepare a glue gun, paper with a bright pattern, a cardboard circle, scissors, ribbon or twine, a stapler.
- Getting started, first you need to measure the diameter and height of the box. In accordance with the dimensions obtained, you need to cut a rectangle out of gift paper. The height of this part should be the figure obtained from the height of the box, which has been multiplied by 1.5. The length of the figure is equal to the diameter of the souvenir. The resulting rectangle should be cut into strips. Their width should not exceed 3 cm.

- In all the resulting strips you need to make a small hole. It is performed on the narrow side with a hole punch. The other edge is fixed to the cardboard circle so that a voluminous fan is obtained from all the cut blanks. Then you need to wait a bit for the glue to dry.

- Put a souvenir in the center of the resulting design. Cut out a ribbon or piece of twine. Pass the material through the holes on all strips. To make it convenient, you should alternately wrap the workpieces to the center of the circle. The twine (tape) must be tightened quite strongly.

- When all the stripes are gathered together, the ribbon (twine) must be tied into a knot. This will fix the structure and prevent it from "spreading". The excess amount of material should be cut off, and the workpiece itself is fixed on a knot, which is best masked with a bow. It can be formed from the remnants of the tape.

- That's all! Round gift wrapping is ready.
Big gift wrapping

If the gift is large enough and bulky, this is not at all a reason to give it in an unsightly way. Such a present can also be stylishly and beautifully decorated using gift paper.
- Before you pack a present, you will need to measure the required amount of gift paper.

- The gift box is placed on the reverse side of the packaging material. On top of the box, a strip of double-sided tape should be fixed along the entire length, after which the protective film is removed from it.

- Now the short edge of the gift paper needs to be folded onto the package. At the location of the adhesive tape, it must be smoothed, and the fold lines should be pressed with your hands.

- Next, the opposite edge of the paper is wrapped by 2 cm and fixed along the fold line with adhesive tape, from which the protective film is removed.

- Paper is tightly stretched around the souvenir, and its edges are folded onto the lid of a large box and glued.

- It is necessary to close the sides of the presentation. Previously, the material is bent from above, and the resulting inversions are ironed by hand. The corners are fixed with tape or glue.

- The corners of the gift wrap are fixed alternately.

- The sides of the resulting triangle are drawn from the inside with double-sided tape.

- The resulting workpiece is pressed tightly against the base of the box, after which all the same actions are repeated from the opposite side.

- It remains only to decorate the gift with a bow and special ribbons.
Video: how to beautifully pack a gift in gift paper
Watch the video on how to properly and beautifully wrap a gift in gift paper, and then you will definitely have no questions left!
Those who like to present a gift are divided into two categories - those who buy ready-made packaging and others who prefer to make packaging with their own hands. Moreover, manufacturers offer a lot of options for packaging materials that can make your gift attractive and exclusive. Of course, buying ready-made packaging is faster and easier, but a gift wrapped by yourself will be remembered more.
In order to unmistakably wrap a gift and not spoil the packaging material, we advise you to practice on paper, which, in which case, it will not be a pity to throw it away, for example, on a newspaper. In addition, you will immediately see how the folds will look, how much material you need to reserve for the edges, and how your wrapped gift will ultimately look like. For packaging, you will need scissors, double-sided tape and wrapping paper (you can use: craft, designer, crepe or tissue paper), as well as decorative details.
- Before you start, you need to decide on the size of the paper. To do this, unwind the packaging material, put the box in the middle of the material and measure the required piece, taking it with a margin.
- The cut long edges of the packaging material must be slightly folded over and glued on the inside.
- After this, the edges must be joined in the middle of the box and attached with double-sided tape. Press the sides to the box and wrap in the shape of a trapezoid, do not bend the remaining sharp corners.
- Turn the packaging material on the bottom side by 2 cm. Turn the top side to the box and fasten it with double-sided tape.
- After - attach the bottom side to the top side with an overlap and also fix it with tape. Similarly, it is necessary to process the other edge of the box. If desired, tie a box packed in paper with a multi-colored ribbon or decorate to your liking.
 For packaging, you will need scissors, thin double-sided tape and paper - parchment, tracing paper or kraft paper.
 - First you need to wrap the box lengthwise and secure its free edges.
- Holding the left corner of the paper, fold the right corner in the same way.
- Next - folding the paper with a fan to the center of the box, move from the left edge to the right. As soon as the "accordion" reaches the right edge, it is necessary to fill the remaining, not folded edge under the other edge of the paper, and secure everything with tape. If desired, decorate the middle of the box with a bow or decorate with a ribbon.
 You can also pack an ordinary box of chocolates in an original and elegant way. To do this, you will need scissors, double-sided tape and decorative elements.
 - Place the box of chocolates in the middle of the paper, fold over the edges on all sides to determine how many centimeters of paper you need to leave.
- Next - bend the short edge to the surface of the box, press it, seal it with tape.
- It is also necessary to repeat with the opposite side, but before that it is necessary to fold the edge of the paper inward by 1.5 cm to hide the cut side of the material. After that, it is necessary to stretch the resulting "case" around the box so that the edge of the paper that is folded and sealed with tape is on the ledge of the box, it can be either the left or the right edge.
- Next, we process the side parts of the package. To do this, it is necessary to bend the material from above, press it well against the edge of the box and seal it with adhesive tape. Also fix all the corners of the paper on the box one by one. Smooth the remaining triangle of paper on the box and stick double-sided tape on the inside. Then press it firmly against the box. Decorate a gift from above - you can use a ribbon or a bow as a decorative element.
 A long box can be packed in the shape of a large candy. Such a present always looks attractive and non-trivial.
 You will need scissors, transparent tape, thin tape and paper (corrugated or polysilk). Corrugated material will add originality to the gift, and polysilk will add brightness and festivity.
- Place the box in the middle of the material and wrap it twice. This will make up the required footage, which will be needed for packaging.
- The cut of paper in the middle must be fixed on the box with transparent tape. Secure the wrapping paper on both sides with decorative tape, if you want to make curls, use the edges of the scissors.
- Close the paper cut with decorative details. You can wrap the resulting candy-shaped package several times with a multi-colored ribbon or decorate with any other decor.