Making soles for shoes with your own hands. Manufacturing process: How shoes are made. Materials used for the manufacture of soles
The leather jacket has come apart at the seams, is pretty worn, and there is no way to put it in order? Do not rush to part with her. It is quite possible that some of its fragments will serve you for more than one year - in the form of a handbag, wallet, jewelry, and even sandals. Do you think that handmade shoes are a troublesome and time-consuming task? It's not all that scary. With simple models, you can certainly handle it. Or maybe it is you who will have an interesting design idea that can conquer the world? About what shoes can be sewn if there is not enough experience, we will tell in the article.
What is the skin like?
Before you make shoes, it is very helpful to understand what material you may be facing. There are several types of leather. Its quality is influenced by many factors. For example, according to the age of the animal, the following types are distinguished:
- residue;
- flasks;
- outgrowth;
- don't vomit;
- half-skinner;
- full weight skin.
Important! The residue is the skin of an animal in the womb. The skin of a newborn lamb or calf is called a three-month-old calf, and one that was fed plant food is an outgrowth. Nebluy is the skin of a six-month-old animal, half-skin is a one-year-old. Finally, the full weight hide is made from the skin of mature cattle.
Finishing quality
As you know, leather shoes and clothes are made from the skins of various animals - goats, cows, sheep, buffaloes. You may come across such names:
- morocco;
- Moroccan;
- shagreen;
- parchment;
- yuft.
Important! Saffiano, morocco and shagreen are made from goatskin, with a low fat content. However, shagreen is also sheep. Calfskin is parchment, in ancient times they not only sewed clothes and shoes from it with their own hands, but also made books that have survived to this day. It is still used in bookbinding today.
Yuft is made from horse, pig or deer skin with a good fat content. This material is tanned with willow bark. There are different thicknesses. For thick yuft, you can do, for example, engraving.

Differences in the type of raw materials and the method of manufacture
In the leather business, different processing methods are used. Sometimes different varieties are obtained from the same skins, depending on the technology. These are the types:
- like;
- kid;
- chevret;
- goat;
- velours;
- suede ;
- split.
Here's what makes them different:
- Laika is a very thin material. They make it from the skin of unborn animals or from the calf.
- Goatskins are used for goatskin and chevro, but chevret, despite the similarity of names, is made from sheepskins.
- For velor, chrome tanning is used. The top side is sanded.
- To obtain suede, fat tanning is used. To make suede, they take elk or deer skins, but maybe the skin of a wild goat. Very high quality material, soft and light, but able to stretch a lot.
- If you separate the layer from the suede, you get a split.
What kind of skin is needed for what?
Before sewing shoes, you need to choose the right material:
- For the manufacture of gloves, husky is usually used, since it is extremely elastic and perfectly conveys all the curves.
- Everything is suitable for jewelry, yuft or morocco is suitable for bags, but for shoes?
You are unlikely to be satisfied with one kind of skin. The sole must be resistant to abrasion, so the material for it should be chosen thicker and harder. For example, yuft. What to make the top out of? The best material is morocco, but a lot depends on what exactly you are going to sew.
Important! Morocco boots in ancient times were worn by both men and women, this material is beautiful and durable. For men's boots, yuft was also used, especially if a person had to walk on rough roads in any weather. But for graceful female legs, for example, suede is suitable.
Tools
Confused about how to sew shoes yourself, think about tools. Leather shoes or boots will have to be made by hand - it is unlikely that you have a machine at home that can work with such materials. Although the old household machines "Singer" or "Podolsk" perfectly stitched even the toughest leather. But in any case, part of the work has to be done without a machine.
You will need tools and devices to sew shoes with your own hands. At home you can find:
- screwdrivers of different sizes;
- nails;
- pliers;
- metal tubes;
- elements of a children's metal designer.
The most important thing is knives, especially if you are not going to be limited to one product. You will need several:
- crooked;
- several straight lines;
- shoe knife with one-sided sharpening, without a handle;
- crescent-shaped knife.
Important! All of them are for different lines. For instance:
- Straight knives make straight cuts, as well as blanks for belts, laces.
- A curved knife allows you to make curved lines, a shoe knife is used to cut thick leather, and it is convenient to grind with a crescent knife.
In addition, you will need scissors:
- tailor;
- profiled;
- "zigzag".
Important! Profiled leather scissors are more convenient than regular tailor's scissors because they have fine teeth that allow for a very precise and neat cut.

Awl, bar, sandpaper
In addition to knives and scissors, you need other tools and tools to sew shoes with your own hands:
- wooden bars;
- sandpaper with different grains;
- bone;
- round awl;
- cross awl;
- round awl;
- compass;
- metal ruler;
- scalpel;
- tweezers;
- metal hammer;
- wooden hammer;
- metal ruler;
- ball pen.
All the tools are quite ordinary, except for the bone - you will have to do it yourself. It is not difficult, it is a small polished block. In addition, you will need punches - these are specific tools for punching holes, they can be of different diameters. A useful thing is gear knurling. You can buy them at an art or craft supply store.
Important! Make sure that you have a manicure set on hand - almost everything that is there will come in handy.
Adhesives
You will fasten some of the details with seams. But for do-it-yourself shoes, you also need good glue. Several fit:
- "Moment";
- "Mars";
- "Unique";
- Plantar.

Other means
To make your shoes look like brand new, take care of dyes and care products in advance - creams, castor oil, and dyes. In addition, it is useful to prepare the bark of some trees, which can be both dyes and tanning agents.
Important! Small things like regular household bleach and tooth powder will also come in handy.
Cooking threads
Experienced shoemakers who make shoes to order sew the details with thread. Prepare it like this.
- Cotton threads are folded into four strands.
- Rubbed with var.
- Wax.
Important! Shoes sewn with dratva are stronger and less susceptible to negative climatic influences. You can also use nylon threads, but they can cut through thin skin.
Taking measurements
How to make boots, shoes or just slippers so that they fit and do not rub anywhere? First you need to take measurements, for which you need the most common centimeter tape:
- Measure the widest part of the foot - for this you need to wrap a centimeter around the base of the fingers, and so that it does not twist.
- Measure the circumference of your foot where the highest point of instep is.
- Determine the height of the instep by wrapping the centimeter from the highest point through the heel.
- Find and measure the bottleneck.
- Measure the length of the foot (you can stand on a sheet of cardboard or paper and circle the foot - only the handle should be strictly vertical).
- Determine the width of the foot (you can follow the trail in the widest part).
- Calculate the distance from the toes to the instep.
- Measure the protrusion of the heel.
- Determine your maximum heel height.
Important! If you are going to sew shoes with your own hands in the future, it is best to make a wooden block according to your foot - the board must be carefully planed and sanded, and the line must be cut to your measurements.
Slippers
If you want to sew home shoes with your own hands, the master class will not take much time. To begin with, it is better to try to make slippers without soles. No stitching is required - the top is formed thanks to the folds. To do this, you need a single piece of leather, quite soft, but durable. A pattern for this model is also not needed:
- Lay the skin inside out.
- Step up and circle your foot.
- Divide the contour into approximately equal segments.
- From each point, draw a perpendicular towards the edges of the piece.
- Set aside segments of equal length on each line - from 7 to 12 cm.
- Connect the marks with a smooth line - you have a double foot.
- Cut the workpiece along the outer contour.
- At the back, make a cut from the most protruding point of the heel to the top edge.
- Try on what you got, and put it in folds up.
- If there are a lot of folds, make wedge-shaped cuts and sew the edges.
- Connect the back with a strap.
- Braid the free edge.
- At a distance of 0.5 cm from the top cut, punch holes and thread a leather cord through them.
- Separately cut out the insole - it is better to glue or stitch it.
Important! The folds should be located no more than 1-1.5 cm apart.
That's how easy it is to sew shoes with your own hands.
Flip flops with soles
From what and how to make a sole for shoes with your own hands? Made from smooth thick leather. The option is simple - you can cut it according to the pattern, you can draw the insole directly on the skin. As for the top, it is better to choose soft leather for it, but other materials can be used - cloth or any other dense fabric:
- Cut out the sole.
- Cut out the top from leather or thick fabric.
- Sew the upper to the sole by hand.
In this case, the question inevitably arises: how to cut out the top? It is a trapezoid. It needs measurements:
- girth of the foot at the level of the instep;
- girth of fingers;
- the distance from the highest point of instep to the base of the toes.
Now consider how to sew shoes with your own hands step by step:
- Draw a straight line - this will be the top cut.
- Put on it the girth of your fingers.
- Divide the segment in half.
- Draw a perpendicular to the middle.
- Set aside on it the distance from the rise to the base of the fingers.
- Through this point, draw a line parallel to the first.
- Put on it the girth of the foot at the level of the instep.
- After that, you just have to assemble the product - sew the top to the sole.
- You can lay a braid along the stitching line.
These pantolet slippers are excellent summer shoes with your own hands, you can already conduct a master class yourself.
Important! The top can also be cut out simply in the form of a strip, trying it on already along the leg, and then cutting off the excess.
Slippers with closed toe
They are sewn almost the same as the previous ones. If you don't really feel like building the pattern yourself, spread out some old slippers of a similar style and circle the top over them. They can be with a seam in the middle or without it.
The sequence of work will be the same as in the previous case. True, you can decorate the product in a variety of ways - from appliqué to embossing.
Sew sneakers with your own hands
Sneakers are more complex shoes. But there is nothing impossible in making it with your own hands. Lightweight sneakers consist of 8 parts:
- soles;
- insoles;
- 2 symmetrical sidewalls;
- 2 front parts;
- 2 tongues.
The sole and insole are made in the same way as for any other shoe. Only a small heel is needed - for sneakers it is glued inside, for boots - outside. The heel is cut along the sole, and its edge is ground off. Cut out the tongue approximately, and then adjust it to the desired size - this can be done after everything else is ready.
Important! Make an allowance of 0.5 cm along the edge of the sole.
Top part
In order to make a pattern of the upper part and sew such shoes with your own hands, you will need measurements:
- lifting height;
- distance from the highest part of the instep to the end of the thumb:
- the distance from the sole to the highest part of the instep on the outside of the foot;
- the distance from the sole to the highest point of instep on the inside of the foot.
Important! The upper part can also be composite, then the pattern must be cut into several parts and cut out individual elements, and then sew them together.
We draw a pattern
To build a pattern for the outer part, draw a straight line - this will be the front seam:
- Set aside on this line the distance from the highest point of the rise to the end of the thumb and set point A.
- Draw a perpendicular to the opposite end of the midline.
- Set aside half the height of the lift on it.
- Connect this point to point A with an arc, the convex part of which is directed from the middle seam.
- Similarly, cut out the second part of the front, using the appropriate measurements for this.
- Mark the alignment points on the sole along the outer and inner sides of the foot - they are located where the front parts begin and end.

sidewalls
The sidewalls are the same and are stripes. The length of each is equal to the distance from the alignment point to the middle of the heel, the width is 7-8 cm. Perhaps, when fitting, you will need to align those sections that will be sewn to the front parts obliquely.
Important! If you want to sew insulated shoes with your own hands, you can glue the leather parts, for example, with fleece. Leave an allowance at the bottom.
Assembly
To make shoes with your own hands, first punch holes in the front for lacing. They should be located strictly opposite each other and end 5-6 centimeters before the toe:
- Sew the front seam.
- Sew the sides together.
- You can strengthen the heel with a soft pad - it is made in the form of an oval or rhombus.
- Sew the sides to the front pieces.
- Sew the top to the sole by connecting the matching points.
- Align the allowances.
- Trim and sew the tongue - 1-2 cm below the lacing.
Important! Sneakers will look good without embellishment, but nothing prevents you from sticking an appliqué and even attaching glowing elements.
Sandals
Summer leather shoes should be with a heel. Cut it out according to the pattern of the sole, circling only the back, and glue it well:
- Cut out a long piece of paper.
- Wrap it around your leg and see which strap arrangement you like best.
- Determine where the straps will attach to the sole.
- Make holes in the appropriate places.
- Cut out the desired number of straps.
- Glue their ends into the holes.
- Try on the model on the leg and lay the straps in patterns, one of them should wrap around the ankle, while being attached to the others.
Now handicrafts are in great fashion. This applies not only to clothing and jewelry, but also shoes. The simplest models are available even to a not very experienced person. It is better to start with simple but spectacular models, and then move on to more complex ones that require additional tools and good leather working skills.
Handmade shoes are in high demand due to their quality and durability - usually handmade shoes are based on natural materials, requiring higher quality requirements for the finished product. Accordingly, the price of hand-sewn shoes will be higher in comparison with products sewn in automated production.
Handmade footwear companies
Even in an age of maximum automation, handmade shoes are not outlandish. Classic English productions that are highly valued all over the world:
- loake;
They produce shoes made of genuine leather and suede, sewn by hand. In this case, there are much more stages of production than in mass automated production. A pair can be made within a month, depending on the type of material and the complexity of the shape.
In terms of shapes and designs, the most popular handmade boots are:
They differ in the type of lacing. Oxfords have closed lacing, hidden by the front of the boot. The side parts are sewn in a wedge shape, perforation is possible.


Derbies, on the contrary, have open lacing, and the side parts are sewn over the front part in such a way that when the laces are untied, the boots diverge freely. Derbies can also be perforated and are considered the most versatile shoe for any occasion.
The entire structure of the shoe is divided into upper and lower parts. The upper part consists of the following elements:
- Sock - closes the toes, withstands the greatest mechanical stress when worn.
- Vamp - covers the back of the foot and connects the toe, tongue and ankle boots.
- Ankle boots - close the ankle joint, they are sewn to the vamp.
- Grommet - the upper part of the shoe, designed for holes or lacing hooks.
- Heel - protects the heel and foot, fixes the heel, made of hard leather.
- Tongue - covers the upper part of the foot, sewn to the vamp.
- Insole - connects the upper and lower parts.
As part of the bottom of the product:
- Sole - sewn along the contour with the upper part, divided into soles, shank, welt and filler.
- Heel - raises the heel and is attached to the sole, the top layer can be rubber.
- Heel - protects the heel from rubbing.
- Welt is a connecting element between parts.
- Protective inserts - prevent abrasion of the lower layer of the heel.
- Filler - fills the space under the insole, increases comfort during operation.
- An arch support is a wooden or metal part fixed between the sole and the insole.

Knowing the design of shoes allows you to make every detail more efficiently, in accordance with its purpose.
Manufacturing steps
It will take a lot of time to make shoes with your own hands, but the process itself is simple and depends mainly on the correct measurements and the quality of the raw materials. The whole process can be divided into nine stages.
Without this stage, tailoring of shoes by individual order is not complete, the same applies to clothing. Taking measurements is carried out mainly to measure the parameters of the future block.
Having prepared the block according to the standards, they sew a preliminary layout. To create it, they sew on a finished block of thin genuine leather. Here you should decide what kind of model the model will have, how the seams are located, whether there is a pattern or perforation.


A blank for a future pair of boots is cut from a sheet of natural suede or leather. It is important to leave a small allowance for compression and a seam - it is impossible to cut strictly along the contour of the measurements, otherwise the shoes will be at least a size small.
Overcasting stage
The upper parts of the future pair of boots, sewn according to the patterns, are connected together. This is a time-consuming part of the work, since when overcasting the upper part of the boots, it may be necessary to turn the leather, trim the edge, and tint it.
Stretching the workpiece
At this stage, the block for the future pair of boots is already ready, as well as its upper part. Now this upper part is literally pulled end-to-end on a previously prepared block. At this stage, the most important step is the installation of the insole, since the comfort of using shoes depends on the correct installation of the insole.
Welt patch
A welt is a thin leather strip that connects all parts of the boot, already stretched over the block. This invention belongs to Charles Goodyear - thanks to his technology, shoes can be embroidered at the joints with a welt and repaired in case of, for example, a cracked last, sole.
The sole can be made of different materials - they should be clarified with the customer in advance, suggesting to him the most suitable option for the desired pair. Often make leather or rubber soles.
The sewn-on soles are strengthened with small studs - the craftsmen use them for the straightness and reliability of the heel. The latter is recruited from thick leather in several layers.

Sole coloring
After sewing on the sole and stuffing the heel, it is necessary to paint them with the desired color - the choice of color depends on the tone of the shoes. When the applied paint dries, the pillow is polished to apply the signature of the master.
Polishing
Manual production of boots ends with the most important stage - polishing and bringing the finished pair to the ideal state. After polishing, an even, elastic, perfectly cleaned pair with strong joints is obtained.
You will need
- - Well finished leather upper
- - thick leather sole
- - felt or felt
- - strong threads
- - awl
- - two needles
- - universal glue
- - tape measure
- - several sheets of paper
- - pencil
Instruction
Take measurements. You need to know the length, foot width, instep height, leg girth through and highest point of instep, heel prominence, heel width and height, distance from end of thumb to instep, distance from end of thumb to shin, height. Place foot on sheet paper and circle the foot. Cut out 5 mm from the line.
Make a sweep. To do this, circle the template on another sheet of paper. Connect the most convex points of the heel and toe. This will be the center line. Set aside on it the distance from the end of the thumb to the lower leg and draw a perpendicular through this point in both directions. Mark the lines of intersection of the perpendicular with the side cuts. This will be the lift line. Draw a heel line parallel to it through the most convex point of the heel. From the intersections of the instep line and cuts of the insole, set aside the height of the side walls. Set aside 6 cm from the instep line towards the toe on both sides of the insole and trace the contour of the toe through these points.
From the most convex point of the heel, set aside half the width of the heel in one direction and the other. From the same point, set aside the height of the side walls. Draw a line parallel to the instep line. Calculate the nose insert. To do this, circle the insole on a separate sheet. Measure the insole from the most convex part of the toe to the instep line. Set aside 5-6 cm from the intersection of the rise line in each direction and circle the bow through these points. Make the tongue as you wish. Round all right angles and circle the pattern along the outer line. Cut out the pattern and transfer it to the skin. Mark the line of the sole and insole. Mark the connection points with dots at equal distances. Poke holes with an awl.

Mark the line of the sole and insole. Mark the connection points with dots at equal distances. Pierce holes with an awl. Decorate the insert. Make slits along the edges of the insert for the cord. Make the same cuts at the top of the tongue.

Cut out the sole from thick leather. Cut out the insole from the felt. Stick the sole on the outside of the insert, and the insole on the inside.
Put the resulting part under the press.
Pick up the nose of the reamer with a thick waxed thread. Try on the shoe and tighten the thread. Tie the ends with strong knots. Sew on the insert. Pass the cord through and tie.
note
Leather shoes can be sewn both manually and on a typewriter. Of household machines, the old Singer or Podolsk is most suitable.
If you are going to sew more than one pair of shoes, make or order a last.
Useful advice
As a material, you can use the tops of old boots. Dense fabrics, like denim, are also quite suitable.
Rubber is also suitable for the sole.
If you are sewing shoes for the first time, first try to sew slippers from some unnecessary fabric using this pattern.
Instead of a foot, you can circle the insole of a shoe in which you are comfortable.
You can decorate the insert with applique, embossing or fur. A strip of fur can also be sewn on top of the shoes.
The folds on the bow of the shoe should be located at a distance of 1-1.5 cm from each other.
Sources:
- how to make your own shoes
Some time ago I posted this description in my journal.
Here, I share .. 8))
I will make a reservation right away - I am not a professional shoemaker - 100% self-taught.
I will gladly answer your questions.
An image of a future model was born in your head ...
But I. 1, 2006 | 07:53 p.m.
The very first stage is drawing ideas on paper.
Although often - the block itself suggests interesting solutions.
Here we take it in our hands. It's an amazing feeling!
Smooth streamlined lines fascinate and take away the imagination for .. Hmm .. Sorry, I got carried away .. 8)
More often, I cover the block with a cloth, but you can glue it with masking tape.
This is necessary in order to apply model lines to the block (it itself is made of polyethylene - not really
draw..).
Take the cover off and cut it. It turned out something similar to patterns.
And now - we transfer all this goodness to thick paper. We add allowances for false seams, allowances for
tightening (these are the edges of the top that are tucked under the insole and the sole is glued / sewn to them).
We take the best leather, Spanish \ Italian \ Korean - ours, domestic, of good quality comes across
rarely.
We transfer patterns to the skin. If necessary, we "duplicate" the details with thin lining leather - gluing it with
the reverse side with small allowances, 5-7 mm each. We carry out decorative stitching with shoe threads -
twisted nylon or nylon with moisture-resistant impregnation, allowances are cut to the edge.
Making the top does not require special skills - everything is the same as when sewing bags, maybe, except that the sizes are not
familiar - the details are small and,
naturally - mirror-paired.
They put buckles, rivets and, lo and behold! - the top is ready.
There is such a tricky material - leatherboard. It is made from leather waste. crushed
leather scraps are mixed with an adhesive base and pressed like ordinary cardboard. The material is durable and moisture resistant.
Heel pads, toes and insoles for tightening are made from it.
Here is our task - we cut out the insoles according to the shape of the footprint. The edge must be edged with the same skin as the top.
We fasten them to the trail of the block with small carnations and coat with glue.
A special word about glue. Most often used "Nairit" or "Rapid".
As practice has shown, Italian nairite is better.
The average cost is 100 rubles / liter
We coat with glue and puff allowances at the top of our sandals.
Dry the glue completely - from 30 to 60 minutes,
because he works in a "hot" - i.e. before gluing, the parts must be heated to 80-90 *.
We put the workpiece on the block, if necessary, fix it with carnations in those places where the remaining
holes will not be visible.
With special pliers (I use ordinary electrical narrow-nosed wire cutters) we tighten the allowances on
pre-fixed insole.
We nail the formed folds with nails, cut off the excess folds with a knife. Leave for a couple of hours - for
adhesive setting.
We cover the heel with leather. The development is done very simply - with chalk we pass along the edges of the heel - from above
(a wide platform for attaching to the sole) and from below (a place for a heel) and then we roll it over the skin.
We sew without allowance - it turns out a cone - "stocking" - we pull it on the heel, allowances on top and bottom
glue, and the entire surface is "burned" over the fire (you can use a lighter or over gas) - the skin sits down and tightly
wraps around plastic.
Putting this whole thing together.
But first of all - we take out ALL the nails with which we fastened the workpiece.
We attach the instep support to the tightened workpiece with glue. This is such a piece of iron to stiffen the heel
shoes and that the heel does not "leave" back.
The first sign - if your heel "dangles" - the instep support is broken or poorly fixed. We pierce with an awl
the insole through the holes in the arch support - we will need them when attaching the heel.
Now the sole.
I only make it out of leather. I use a thick saddlecloth - 4-5 mm.
Oh yes! Welt! These sandals are welted. A welt is a decorative edging between the upper and the sole. Welt
is done in a circle or, as in our case - only in the front and side parts - when gluing, we
as if "leading" under the arch of the foot. We glue it. And now we make a template for a leather sole. In fact -
a copy of the first insole (long) but with an allowance for the welt. Be sure to sand all surfaces of the skin before
coating with glue.
Glued, dried, heated, pressed very hard. If you want to make the sole thicker - glue the dobor
In the size of the front of the shoe - from the cape to the arch of the foot.
To increase strength - we sew all layers with harsh threads - and the insole, on which we tightened the top, and
leather soles. Awl plus shoe hook.
Now we glue the prevention - a finished plate made of high-tech polymer. I use
Italian, famous company "VIBRAM".
The excess is cut off with a knife and the entire side cut of the sole is skinned. I do it by hand, in the workshops - on
grinders and finishing mills.
Glue on the heel. On the insole, on the inside, we glue the heel metal plate. holes
on it we combine with the previously pinned holes in the insole. With a thin drill we drill into the heel and
we wrap hardened steel dowels there (or screws, but not construction black ones - they are weak).
Thus, we firmly connected the heel with the sole and arch support.
It remains to make the upper decorative insole.
We cut it out of leatherboard and fit it with the same skin as the top.
Glue it in place and enjoy your creation!
If the shoes are closed - in the process of assembling and planting the workpiece on the block, the heel and toe parts
strengthened by the "heel" and "toe", respectively. They serve to ensure that the shoes keep their shape and
did not stumble. These pieces are made from molded leatherboard.
You can also find virtually any ready-made sole, both male and female - from sports styles to
classics.
Conclusion - almost ANY shoe model can be made by yourself.
Dare! eight)
After learning how to make shoes with your own hands, you can sew summer shoes, warm slippers, and even make wool boots for yourself. It will be in your power to paint both men's and women's shoes.
How to decorate wedding shoes with your own hands?
You can turn even the simplest shoes into wonderful shoes if you show diligence.

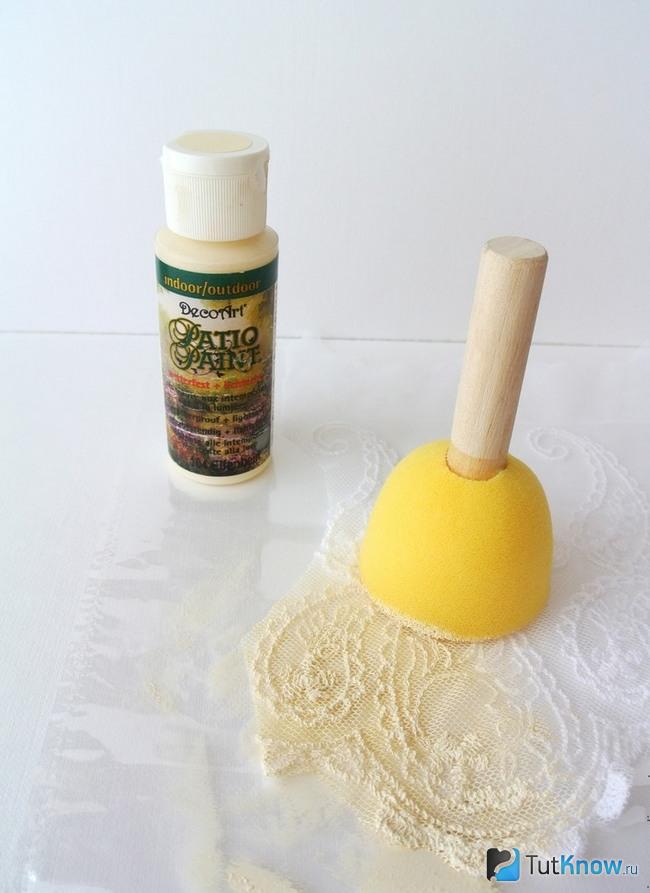
To make these, you will need to take:
- shoes;
- lace or guipure;
- rhinestones;
- hard tulle;
- acrylic paint;
- thread with a needle;
- acrylic outline;
- universal colorless glue;
- glue gun.
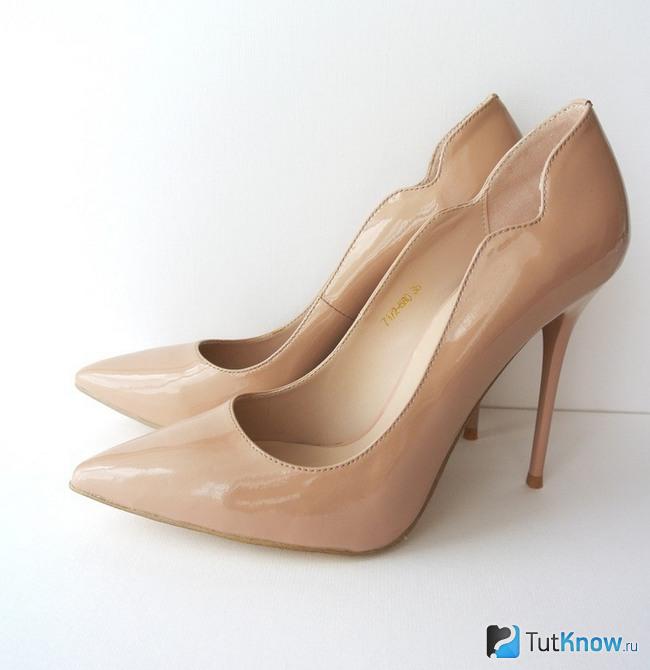
See what the shoes were like in the beginning. As you can see, the model is very simple and not suitable for a wedding. See how to make shoes more beautiful. With your own hands, you have to paint tulle and guipure with beige acrylic paints using a brush or sponge.
If you want, for example, the finished product to be pink, then take the paint of this shade. Now attach a piece of openwork to the shoe. Lubricate the outside of the shoes with a clear glue that is water repellent. Then cut off the excess material located between the top of the shoes and the sole.

Also glue the guipure fabric to the heel on only one side so far and cut off the fabric near the seam.

Now you need to glue this lace fabric on the other side of the shoes. It is necessary to cut off the excess in the middle of the shoes and highlight the patterns with scissors.

When gluing the guipure, stretch it slightly so that it fits well on the surface of the shoes.
Make the edges of the lace more rigid by smearing them with a matte varnish.

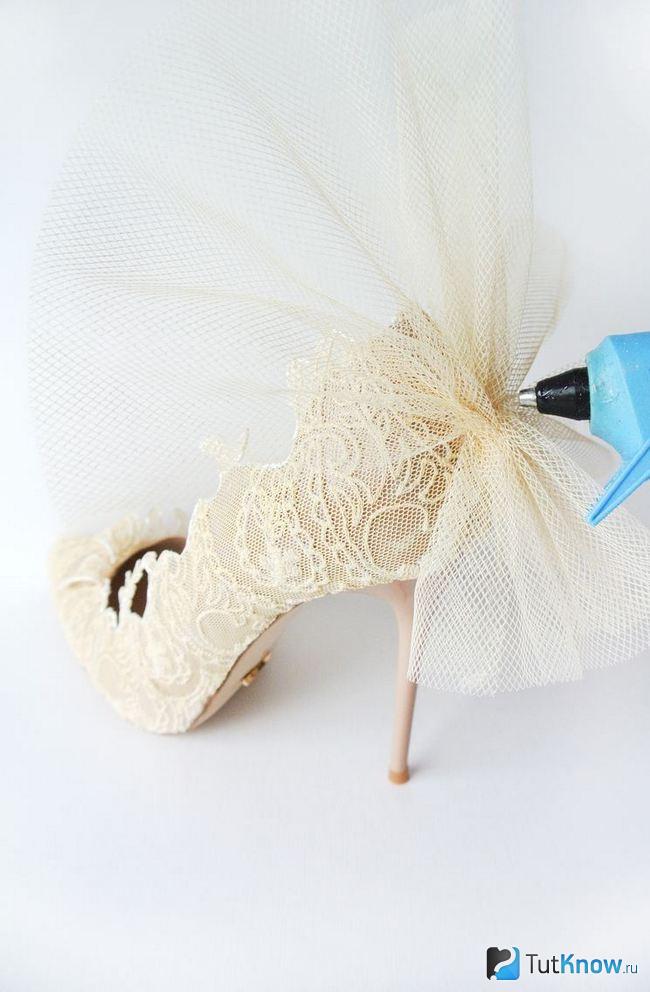
Now you need to process the sections with an acrylic contour and decorate the wedding shoes further. To do this, cut a piece of fabric from tulle measuring 20 by 40 cm and collect it just below the middle on a thread with a needle.

Using a hot gun, attach a tulle bow to the heel so that the smaller part looks towards the heel, and the larger part looks up.
To make the bow more magnificent, make the second part of tulle for it. Decorate it in the same way, gathering on a thread almost in the middle.

You also need to sew this part from the side of the heel, but already positioned not vertically, but horizontally. Go over the cuts with an acrylic outline to stiffen and decorate.

It remains to glue a little rhinestones on wedding shoes and you can put them on your legs.

Here's how to decorate wedding shoes with your own hands. Completely creating shoes is no less interesting. Watch the master class that will teach you this.
How to sew slippers quickly?

A pattern made on a thermal transfer will greatly simplify the work. But if you don't have one, you can use the regular one. Here's what you need to create homemade shoes:
- pattern;
- felt;
- cork sheet;
- glue moment "Crystal";
- scissors;
- iron.

Here's how to make homemade shoes for home use next. You iron the pattern with an iron, heating it well so that all the details are printed on the fabric. Now you need to cool the structure and remove the top sheet into the box.

See how well the pattern should transfer to the fabric. Now cut out the details of the slippers, remembering to leave a small seam allowance on all sides.

For slippers to keep their shape well, make the upper parts for them double. To do this, you need to attach these details to the felt and cut this dense fabric according to this template.

To sew slippers to your size, place your foot on a piece of paper and outline it. But at the same time you need to make a good stock. You can use any slippers that are comfortable for you as a template.

It is better not to cut the insole yet, but to bast the top of the slippers to it when the insole is on the sheet.

Sew along the basting on the sewing machine. Now you can cut out the insoles.

Make the sole of the slippers out of a cork sheet. To do this, you need to glue the insole to this material.

Cut out the sole with an allowance and attach it to the insole with paper clips on all sides so that the two materials stick. When this happens, remove these clips and cut the slippers to fit the insole.

Now you can flaunt them around the house. If your apartment is cold in winter, then warm shoes will certainly come in handy. Right now you will learn how to create it.
How to dump slippers?

They will turn out to be so original, similar to pieces of cheese into which mice have made their way. For work, take:
- 200 g of yellow merino wool;
- 50 g gray carded wool;
- yarn for tying;
- grid;
- bamboo rug;
- hook;
- vinyl gloves;
- substrate template;
- massage roller;
- soapy water;
- film;
- spray;
- beads;
- towel.
Lay it out either vertically or horizontally, alternating rows in this way.
Make soapy water in a ratio of 1:10, pour it into a spray bottle and spray wool blanks.

Cover the future slippers with a mesh and start rubbing them with a massage roller. In this case, hands must be in gloves.

When the wool becomes dense, finish this process. Turn the blanks over to the reverse side, bend the wool and lay out 4 layers of wool here as well, alternating it vertically and horizontally. Also cover the blanks with a net and roll them with a massage roller so that the wool falls off.

Now you need to lay and roll the bright yellow wool on both sides.

Be patient and roll the wool about 100 times on each side. At the same time, it should fall off well. Then make cutouts in the slippers and remove the template from them.
Blot excess liquid with a towel, putting slippers on it and rolling this design into a roll. Now roll this blank for a long time, and you will see that the slippers will become smaller.

Here's how to make DIY shoes for the house next. Again, you need to moisten with soapy water and beat with a hammer to beat the meat of the workpiece from all sides. Beat them with your hand, Rub them on a bamboo mat so that the wool fibers fall off evenly. Now rinse the slippers in water and dry them with a towel, rolled up.

Take some rest and start cutting round holes in the slippers. In this case, you need to capture only the upper bright layers so that the lower light yellow is visible. Wet the slippers again and roll them in the towel.

Beat these blanks with a hammer, at the same time shaping the socks and heels. Here's what you should have by now.

Now you need to dry this soft indoor shoes in a warm place for a day. Once the felt is dry, the leather sole can be sewn on. To do this, open it to fit the bottom of the slippers, cut it out and sew it to them with a seam “over the edge”.

With a yellow thread, you need to tie them at the top in a circle. To do this, you can make a small hole with a hole punch or take a strong needle and carry out the procedure with this tool.

From yellow wool, make a family of mice, using gray wool and a sponge for washing dishes. Make the lower parts of the ears, noses from pink wool, and use beads as eyes, which also need to be sewn into place.

See what funny slippers you get as a result.

If you like felting wool, then check out how to make outdoor shoes that are just as warm and cozy.

To make such beautiful ankle boots, you need to cook:
- 240 g of one-color Latvian carded wool or 120 g each of two contrasting colors;
- a flap of the substrate under the laminate;
- pattern of slippers;
- long line;
- block or own leg for fitting;
- felting tools, such as: sponge, garbage bags, gloves, soap, bubble wrap.

To make shoes, you will need a pattern of ballet slippers. This one is for size 37. If you have it a little more or a little less, then you can slightly modify this pattern.

To better recognize the labels of this pattern, look at what the numbers in the designations are equal to:
- One - 37 cm.
- The number 2 means a distance of 10–11 cm.
- 3 is 20 cm.
- 4 is equal to 16 cm.

Spray the spread out wool with soapy water, cover it with a film and start felting with gloved hands. Now carefully turn this piece over to the other side. Bend the edges of the wool up and also roll the wool here to cover the entire surface of the felt boot.

Brown wool should be laid on yellow wool. Roll it in this way on both sides.

Now you need to properly dump the workpiece. If you have a grinder, this is a great tool to help you make shoes.

If there is no such device, when you put a pimply film on top of the shoe, roll it all up, wrap it in a towel and roll it with a rolling pin.

You need to roll this roll on each side 50 times, then unfold it and get the patterns. You can use them next time if needed, so don't throw them away.

Work especially well on the seams. Now put these blanks in a trash bag and you can throw away your negative energy. After all, now you will need to knead these boots, like dough.
Don't push too hard at first, but then get more and more confident. In total, you need to click on the bag a hundred times, do not forget to periodically smooth these boots.
When you need to finish this manipulation, you will understand. Valenki will begin to become more solid and stiffen. Then you can make the first fitting by putting them on the block or on the leg.

If you have good glue and skills, then try gluing the resulting boot to the platform yourself. If not, use the help of a shoemaker. It can not only stick, but also sew the top to the bottom.

When this stage is completed, you will need to mark in small places where you will make cuts. Create them and you can carry out the final fitting.

In this way, you can create boots of different styles and colors on the platform. If you wish, stick a label on them or sew on lace to be pleated.

All these models are great for girls and women. In order not to ignore your men, study the following master class, from which you will learn how to make leather shoe decor with your own hands. You will transform the surface of the boots by applying contrasting colors here.
How to decorate shoes for men?

If you want to please a dear person, then you can present him with these shoes. But look what they were in the beginning.
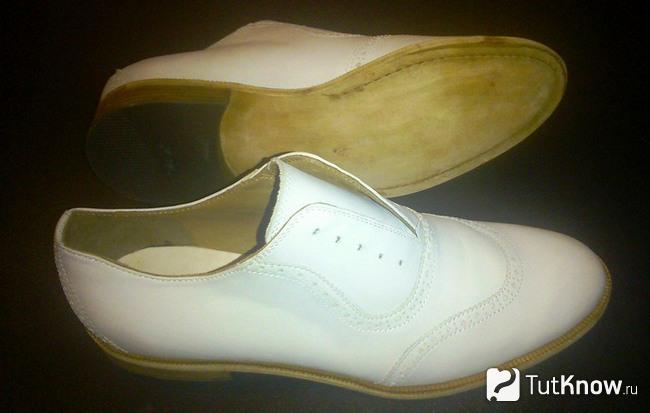
In order for them to change so dramatically, it will be necessary to perform the following manipulations.
- Clean your boots first. To do this, you need to walk on them with a brush, and then with a cloth dipped in a solvent.
- Wait 20 minutes for the shoes to dry. Now you need to cover it with base tone paint. Apply with a sponge, brush or airbrush.
- Wait for it to dry for 20 minutes, then apply a second layer if the tone is too light.

SAPHIR leather paint is perfect for painting men's shoes, so it's better to use it.
For the first tone, take a lighter paint, and then apply the darker one along the seams.
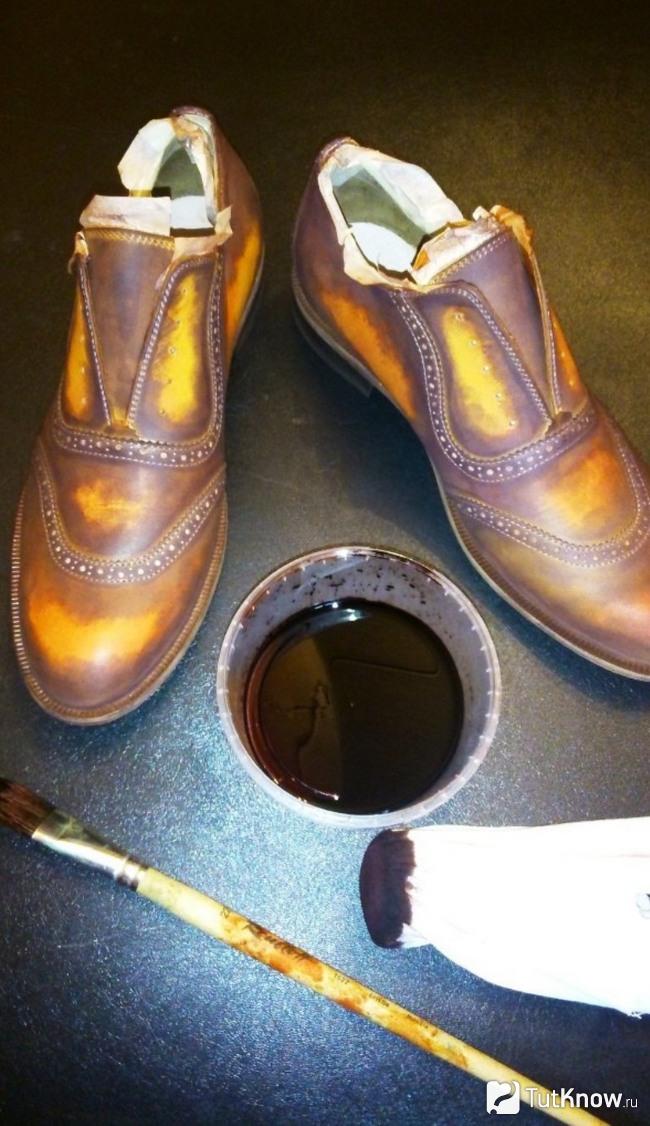
Arm yourself with a sponge, brush, or airbrush to soften the tones of paint with their help.

Now apply cream on the skin of the boots and polish to a shine after 20 minutes. You can finally apply a special wax designed for shoes to the shoes.
If this is your first time doing such a transformation, then it is better to practice on old shoes or on an old bag. When you succeed, then you can move on to more expensive boots.
Of course, in this way you can decorate not only men's, but also women's shoes.
How to dye shoes at home?

You see, they were a little boring, monochromatic, black. With the onset of spring, you want brighter colors, so transform these by taking shoes:
- ordinary black shoes;
- acrylic sky blue paint;
- brush;
- a jar of water;
- glossy varnish;
- alcohol.

Alcohol will be needed in order to degrease the surface of the shoes. You can also use gasoline for this.
Clean all shoes of dirt and degrease their surface. Paint the shoes blue in the indicated places. Try to be careful not to stain other areas of the shoe. If this happens, immediately wipe off the paint. When the first layer dries, paint the shoes a second time, but for this, take a paint slightly diluted with water, this will lie more evenly.
See how the shoes look, painted once and twice. Of course, the difference is visible.

Wait for the paint to dry completely, then cover the surface of the shoe with a glossy varnish.
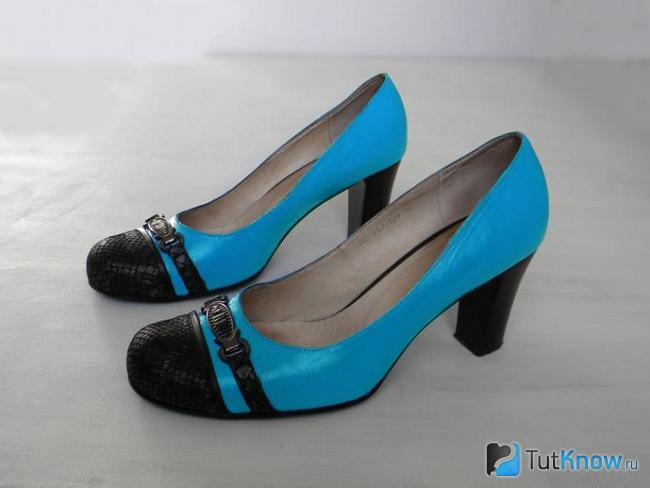
These are such funny shoes instead of boring black ones.
If you like the idea of transforming and creating shoes, then check out another tutorial.
How to make shoes with your own hands - we sew summer slippers
First you will need to redraw the presented pattern. It consists of 2 parts.

The first detail is the bottom of the shoes with a strap, and the second is the top.
Attach each pattern to the suede. In total, you will need to make two blanks of each type, but always in a mirror image.

To make the legs comfortable, you need to sew such oval details to the place of the notches of the sole, under which you put the foam rubber. Decide for yourself where exactly they should be. To do this, put your foot on the suede and mark these places.
To connect the parts, you will need to make holes in them. On the top they will be 5 mm in diameter and also 5 mm from the edge. For large parts, the distance from the edge is the same, and between the holes it is larger, 7-8 mm. The number of holes in the blanks of the first and second types is the same.

Here's how to make shoes of this type next. Be sure to arm yourself with very strong threads and start sewing the details. You can see the technology of this stage in the next photo.

Here's what you should get.

To the straps on the heel you need to sew elastic bands for the right and left legs. Customize this piece for yourself so that the shoes fit.

Now you can put on these slippers and be glad that in the heat you will not be hot in them.
Here are how many ideas on how to sew slippers and decorate shoes with your own hands were presented to your attention. We invite you to watch a video on this topic. The first plot will teach you how to sew ballet flats.
Video number two will reveal the secrets of how to decorate shoes with your own hands. As a result, you will get wonderful golden shoes.