Volumetric hair bands. How to make children's hair bands. What to make hair bands
Hair bands are a common and everyday thing. But even such a trifle can become a bright accent in your image, add charm, sophistication, unusualness and originality to it. Of course, you can pick them up in a store or order on the Internet, or you can sew and decorate rubber bands with your own hands. Such a product will be unique and inimitable.
Master class on making accessories
There are many different types of hair bands. They can be satin, textile, lace and even plastic. Depending on the style and purpose, they can be supplemented with feathers, beads, rhinestones and other interesting details. But first you need to learn how to make the basis for the gum.
Gum base
The basis of an elastic band for hair from an ordinary linen elastic band is the first thing you need to learn how to do when creating unusual hair jewelry with your own hands.
For this you will need:

To make the base of the scrunchie, you first need to make a fabric "wrap" for it so that it looks aesthetically pleasing.
Take a rectangular piece of fabric. Fold it in half along the long side right side in and sew along the long edge.
If the workpiece turns out to be wide, you can connect the ends of the workpiece and flash it approximately to the middle, leaving a small hole for eversion.
Now the workpiece needs to be turned out, insert an elastic band, tie its ends and sew the opposite ends of the product. The finished product can be supplemented and decorated with various decorative elements.
Satin bow
Do-it-yourself rubber bands made of satin ribbons are perfect for a light and delicate summer dress. For their manufacture, you will need the following materials and tools:
- finished workpiece;
- satin ribbons and lace of any length;
- beads in the color of lace or contrasting, but combined with them;
- needle;
- threads.
Rubber bands can be in the form of a bow or a flower.

For everyday wear, you can make rubber bands from rep ribbons with your own hands. This is almost the same as satin ribbons, but they are matte and denser, they can have a variety of colors. In addition, this material is much more docile and does not require processing - the edges of the tape can simply be burned.
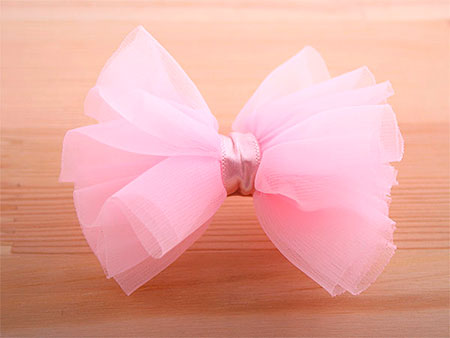
- Option 3. Take a wide satin ribbon or a strip of delicate chiffon. Make a tie in the middle of the strip, along its entire length with a “forward needle” seam and tighten the thread. Should form a cute fluffy bow. Tie the middle with ribbon.
It is not necessary to make a new base for each gum on your own, you can use ready-made gum from the store.
flower decoration
 To make a flower, you will need a ribbon, as well as a small base. You can take, for example, cardboard.
Cut a circle the size of the core of a flower, prepare threads, a needle and a button or a large bead in the center.
To make a flower, you need to pick up the ribbon along one edge so that when you tighten the thread, a circle forms. Do this twice with two different patches.
Now they need to be glued to the cardboard base so that it is in the middle. To disguise inaccuracies, place a beautiful button or bead in the center. Sew the finished flower to the base.
For an exquisite outfit and hairstyle, a rosebud in the hair of a young lady will look great. It is also made from satin ribbon. You will need a ribbon, a needle, threads in color. The step-by-step manufacturing process is shown in the photo.
Party decoration for a little girl
For a delicate summer or puffy ball gown, a headband with a rosebud made of thin translucent fabric is ideal. For example, you can use chiffon. For work you will need scissors, threads, a needle and a candle. Cut out squares of different sizes from the fabric (from 3x3 to 6x6, for example). Each type of 5-7 pieces at your discretion.
 Now each of them must be carefully brought with tweezers to a burning candle so that its edges are slightly scorched and change shape. Do not forget about safety when working with fire.
When all the details are processed, collect them on a thread from the largest to the smallest. Sew a large bead or a beautiful button into the core. To finish, use soft green ribbons to create an imitation of leaves. This rose looks very impressive and will perfectly complement your outfit.
In a similar way, you can make not only a children's elastic band or bandage, but also a hairpin or even a brooch with a bud for an adult lady.
original approach
 Very interesting and original rubber bands for girls with their own hands - ears. They will require a base made in advance, and a small patch of bright fabric. The material can be any, for example, cotton. From the fabric you will need to cut out 2 parts according to the pattern.
Since only half of the part is shown on the pattern, the fabric must be folded in half along the fold line before cutting.
Sew both parts, right sides inward, but not completely, but leaving a small hole in the middle. Through it, the product will need to be turned out, if desired, fill the ears with a small amount of padding polyester or other filler. Only after that it should also be sewn up.
Pull the middle of the ears with a small strip of fabric or tape. Using it, sew the ears to the base.
Master class on creating an elastic band for hair


Felt accessories
 Another material that is great for making cute homemade hair ornaments is felt. From it you can make bows, flowers, muzzles of various animals that will look original and unusual on any hairstyle. Felt does not crumble and keeps its shape well, as it is very dense. This allows you to not process cut parts.
To make a flower, you need to draw 2-4 patterns in the shape of a flower of various sizes and cut them out along the contour. And then sew together in order from largest to smallest. Add a button, rhinestones or a bead to the center.
You can make several flowers and attach them all to one elastic band. You can sew them around the perimeter or connect 3 flowers into a small bunch, and then attach to the base.
To make rubber bands with animals, use the simplest patterns. You can sew several pieces of felt to give the figure thickness, or join 2 identical pieces and add some filler inside. For example, you can make a cat. He does not need to make a tail, use only the main part of the pattern.
A set of beautiful and bright hair ties can serve as a wonderful gift or a nice bonus to a great gift for your good friend, sister, niece, daughter. A small child will be delighted with a bright product, and adults will appreciate your creativity and attentiveness.
Attention, only TODAY!
A universal selection of gift ideas for every occasion and occasion. Surprise your friends and loved ones! ;)
Hello everyone! My friends, although it is not spring yet on the street, the time is not far off when we will all walk around without hats. It is worth taking care of how your little head will look in advance, especially if you have very long hair. That is why today we will make hair ties with our own hands!
We will move, so to speak, from the most elementary to something more complicated. In any case, you will definitely cope with all types of these rubber bands, because I will describe in detail how to make each of them.
In fact, there is simply an incredibly huge number of ideas for creating rubber bands (and not only). And almost every one of them can be realized with the help of simple manipulations. In general, I will show you a lot of hair accessories. Sit back, I'll open the door for you to the amazing (actually!) world of hair accessories (no matter how strange it may sound :))
Before you get started, take a look here. Come back when inspired :)
Scrunchie base or the simplest model
In order to make the base, you will need first of all:
- underwear or just a thin elastic band (15-20 cm);
- a piece of fabric (the length is about 2-3 times greater than the length of the elastic band, the width is arbitrary);
- threads in the color of the fabric;
- needle;
- pin;
- scissors.
Take the prepared piece of fabric, fold it in half lengthwise, sew along the edge. Then fold the stitched piece with the holes facing each other and sew along the edge, leaving an opening to turn inside out. Turn out the workpiece.
Now insert the rubber band. Tie it up, sew up the hole. That's all. Such a model can be used as an independent product or as a basis for a more sophisticated elastic band.

DIY hair bands: master classes and photos
How many rubber bands can be made, you simply cannot imagine! Now let's look at the options for elastic bands that can be made without even having serious knowledge in the art of sewing.
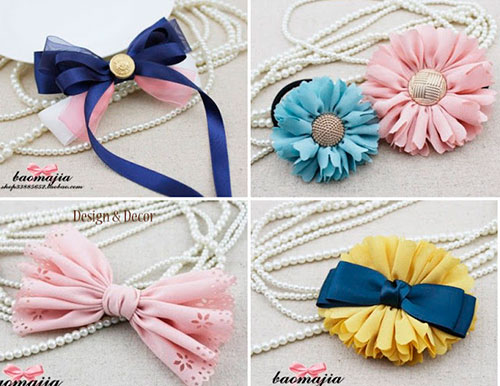
Four Variations
To plunge into creativity right away, I suggest you look at these four options for rubber bands. One way or another, you can find each of them in my articles about homemade gifts. At the end of the article, I just give links to those master classes.
In short: bows are made with multiple folds. In the first case, several ribbons are folded, and in the second, the folds are formed from one strip. The flowers are assembled from a heavily gathered ribbon glued to a base circle. In the latter case, a bow is also placed on top.
Here is another version of the bow:
Beautiful and fashionable
I see this model very often now. Want to be the center of attention? Then make this beautiful and catchy hair band. Prepare a piece of fabric, wire, warp and thread with scissors.
Cut out two ovals from the fabric, which are sewn together along the edge, leaving a hole. Put a wire in there. Place the future bow in an elastic band and tie.

elegant
It is not a shame to wear such an accessory for the evening. For it, prepare the base, shiny (optional) yarn, various kinds of beads and a crochet hook (although if the yarn is thick enough, you can handle it with your hands).
The most important thing here is how to tie the base. I don’t know what this type of strapping is called correctly, but it reminded me of a voluminous looped seam. In the course of weaving, gradually add beads (this can be done later by pulling a thread through the elastic band, gradually stringing them on it).

Children's rubber bands for little girls
A five-leaf flower can be created by a simple operation: take a circle, sweep it along the edge, pull it together and stuff it. At the end, sew up and make a few tightenings from the center. 
Such flowers are very fond of attaching to bandages for newborns and, in general, for small children. Take several circles of different sizes, cut them along the edge and burn them. It remains only to fasten in the center with a bead.

Button happiness
Are there a few original buttons that are definitely not useful for clothes, but do not give rest to your creativity? Then let them go! Everything is as easy as shelling pears: take an elastic band, a button and sew one to the other. If the buttons are small and the base is wide, then you can simply make a button decoration.
All sorts of additional decorations are welcome: ribbons, rhinestones, etc.

Lace elastic
An elastic band can be sewn in the same way as the basis for an elastic band, but with one difference: after stitching, the woven blank does not turn out. With the help of lace, a very light and playful look is obtained.

The second option is with lace: this time only a flower is made from this wonderful material, and not the entire elastic band. To do this, it is enough to pick up the lace and sew it in the center, the rest is a matter of decor.

Elastic band "Bow"
An elastic band with a bow can be sewn from absolutely any fabric! I decided to experiment with fur
Below I decided to show you on the diagram how I made the bow. First, you make the base for the elastic band, and then for the bow, take a wide strip of fabric, sew it in half (as well as for the base).

Then sew the ends of the bow, folding the workpiece in half again. Turn the elastic inside out and tie it in the center with a strip of fabric.
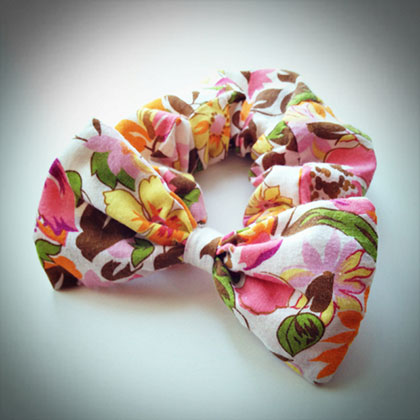
It turns out this cuteness:
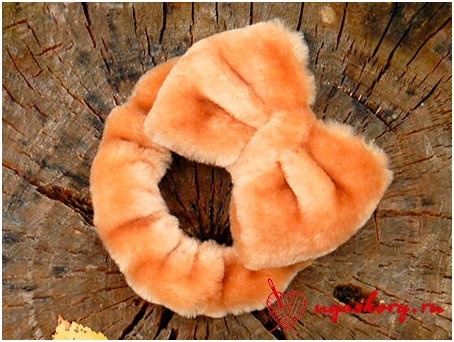
From ordinary cotton fabric, you get the following:
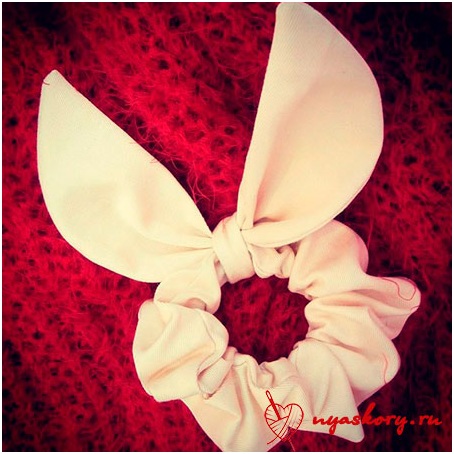
Elastic band "Hare ears"
Somehow I wandered into a free master class as part of the BiblioTime project (I talked about it). The topic of the handicraft meeting was rubber bands. But if everyone decorated the cut with beads, then I decided to excel, remembering the “eared” specimens.
Unfortunately, I don’t have photos of that product, but I can tell you about the creation of an elastic band with ears
To make such an elastic band, you will need a pattern:

Again, you need a base for the gum. The ears are tied with a knot around her and a romantic and girlishly gentle image is obtained. What you need for spring
Elastic band "Jack" ("Halloween")
I think many watched the cartoon "The Nightmare Before Christmas" by Tim Burton. As for me, the work is specific, but very bright and memorable.
Especially the main character is Jack Skellington, who you see below.
There are a large number of a wide variety of hair bands on sale, but it is much more interesting to make this accessory with your own hands, and besides, this will allow you to take into account all individual preferences and make sure that it is in harmony with a certain style.
The manufacturing process is quite simple and anyone can handle it, even without skills in the field of needlework, but first you need to make sure that everything you need is available.
The minimum list of tools and materials is given below:
- an elastic band with a small thickness or a piece of clothesline about 15-20 cm long, which will be required to make the base;
- colored fabric. The width does not really matter, but the length should be several times greater than that of the finished product;
- a set of threads that match the color of the selected fabric;
- needle;
- scissors;
- pin;
- beads or other decorative elements, if they are planned to be used;
How to make a gum base

Regardless of what kind of gum you plan to create with your own hands, you will first need to make the basis for it.
Detailed instructions describing each stage are given below:
- It is necessary to take the selected fabric and fold it in half lengthwise.
- The folded piece of fabric is sewn along the edge.
- The resulting workpiece must be folded in such a way that the holes are opposite each other.
- The workpiece is again stitched along the edge, but it is necessary to leave a hole for eversion.
- After the done actions, the base must be turned out.
- A pre-prepared piece of clothesline or elastic is inserted into the hole.
- A rope or elastic band is tied, after which the hole can be sewn up.
The resulting base can be used to make more complex options for hair ties or used for its intended purpose as a simple model.
A selection of the best workshops for creating rubber bands with your own hands
Gum-flower

The flower-shaped accessory is distinguished not only by its practicality, but also by its visual appeal; this model is one of the most popular options.
The manufacturing process is described below:
- A ribbon is cut from a piece of the selected fabric, its width should not exceed 5 cm.
- On one side of the tape with scissors, you need to make a pattern that will decorate the petals of the future flower.
- A strip of fabric is required to be collected on a thread. This can be done by passing a needle through the opposite edge of the pattern, with a thread inserted into it.
- The thread is pulled so that the strip takes the form of a semicircle.
- Now you need to cut out a small suede circle, to which a ribbon will be glued around the circumference, which is the future flower.
- A large bead, pebble or any other decorative element is glued to the center.
- A base is taken, which in any area is torn in length by 1 cm.
- The base is glued on the back of the suede circle.
- It is necessary to wait until the glue is completely dry, after which the accessory is completely ready.
tissue model

This option is made even easier, but this will require more free time and the ability to use a sewing machine.
Detailed instructions are given below.:
- A piece of 10x50 cm is cut out of the selected fabric.
- The edges of the segment are folded from the wrong side and stitched along the edges; for these purposes, you will need to use a sewing machine. At this stage, it is necessary to ensure that the indentation is no more than 1 cm.
- The fabric is tucked to the middle of the segment. It is necessary to hold it in this position, simultaneously turning its remnants inward, as a result of which the strip will fold in half.
- It is necessary to use the sewing machine again to sew the edge from the side of the already sewn part of the workpiece. As this process progresses, it is required to get the inside of the fabric, continuing to stitch the edge.
- It is necessary to stop when at least 3 cm remains before the beginning of the stitch, this hole must be saved, otherwise at later stages it will not be possible to insert the elastic.
- All fabrics are hand-turned right side out.
- An elastic band is threaded through the hole left, after which its ends are connected to each other.
- Now the hole is no longer needed and can be sewn on a sewing machine to ensure the integrity of the accessory.
- It remains only to straighten the resulting accessory, after which it is completely ready for use.
Model with petals

Such an accessory is essentially a kind of flower, but a completely different technology is used to make it.
A detailed description of this process is given below:
- Initially, you will need to cut out three circles from colored cardboard, which will differ in diameter: the recommended figures are 5cm, 6.5cm and 8cm.
- 15 circles are cut out of the fabric - 5 for each diameter. To maintain dimensions, it is recommended to apply cardboard blanks to the fabric and cut them along the contour.
- Any circle is taken from the fabric and folded in half, then this action must be repeated again.
- As a result of the described actions, a petal is obtained, which must be sewn along the edges with a needle forward to fix and maintain the desired shape.
- The thread should be long enough, because another 5 petals will be passed through it, which are collected in the same way from the remaining circles with an identical diameter.
- Using the described algorithm of actions, you need to get two more flowers, which are collected from the remaining circles with different diameters.
- The resulting flowers are stacked in the form of a pyramid: the largest element is located below, on it there is a medium and a small one.
- All three flowers are sewn together.
- An elastic band is sewn or glued to the largest flower from the bottom.
- At the final stage, a bead, a pebble or any other decorative element is glued to the center of a small flower.
- It remains only to wait for the glue to dry completely, after which the stylish and attractive accessory is completely ready.

Summing up, we can give the following tips and tricks for the manufacture and use of hair ties:
- In the absence of experience in the manufacture of such accessories, it is best to try to make a few basic models. As soon as the appropriate skill is acquired, and this process begins to be carried out without apparent difficulties, you can proceed to the creation of more complex options.
- It's best not to spare the fabric, which is used to create an accessory, taking it with a sufficient supply. It is better to have a surplus than to feel a lack of material at the most inopportune moment.
- Even before the start of manufacturing, it is recommended to sew a small piece of fabric with selected threads. to visually evaluate the combination of colors.
- Elastic band can be twisted on the head and thread several invisible hairpins through its loops, which are then pinned to the hair. This is a secret used by professional hairdressers, it allows you to securely fix the position of the elastic on the hair.
- Hair band is not the most noticeable accessory, but, despite this, it is necessary to ensure that it successfully combines and harmonizes both with the general style and with the features of the chosen clothing.
Those girls whom nature has awarded with gorgeous hair, probably tried to decorate them by any method in order to vary the daily styling a little. The most successful and most common option is an elastic band.
Store shelves are full of a variety of these accessories - there are for every taste.
- If you are looking for a special piece of jewelry that will blend in with your outfit and overall look;
- Or if you want to have such a device that no one else will have -
This is where your hands and imagination will correct the situation, because making beautiful hair ties with your own hands is much more fun if you just buy them.
Elastic band - a common hair decoration
Different ways to create cute rubber bands

Photo: such an elastic band almost always serves as the basis for creating decorations
Making rubber bands for hair with your own hands is a real pleasure, all the more so the cost of creating them is at least - the cost of some materials is mere pennies compared to a purchased accessory. In addition, maybe at home you will find beautiful, but useless things from which you can make your product, then the budget will be completely saved.
What rubber bands are not made of:
- from beads,
- fabrics,
- tapes,
- yarn,
- tulle,
- pebbles,
- button...
In general, the scope for imagination is huge, so you can safely get down to business. The color also depends on the materials with which the product will be decorated.
But it is better to share the scenery for the summer and winter periods:
- for summer, choose colorful color palettes;
- for winter - something more restrained.
You will learn how to sew a hair band with your own hands using different techniques below.
Advice! For the base of the decoration, an ordinary, but high-quality elastic band is chosen, the width of which depends on your personal preferences, it is better if it is still of medium thickness so that you can work comfortably with it.
Ribbon poppy band
Hair bands made from ribbons with your own hands look great. Satin ribbons look festive and bright, and children's hairstyles will sparkle with colorful colors. Decoration with poppy flower is suitable for both little princesses and women.
To create it, you will need the following tools:

Charming poppy will attract the attention of everyone around
- Reddish satin ribbon - 5 cm wide.
- Greenish felt or ribbon - a square measuring 5 by 5 cm.
- Dark and brown threads.
- Glue - PVA or Moment.
- Small snow-white sparkles for nail design or semolina.
- Clip up to 6 cm.
So, how to make a bright poppy?
Step by step production process below:
- Manufacturing is best to start with the creation of flower stamens - wrap the threads between your fingers in the shape of a figure eight. Bandage the middle and cut off the edges with nightstands, try to keep them even. Gently smear the edges with glue using a brush and dip them in semolina or nail glitter.
Let the stamens dry for about a quarter of an hour.

Making stamens
- Now you need to start making the core of the flower. From the prepared square of felt or ribbon, cut out a circle. Burn the edges very carefully over the flame of a candle (matches or lighters).
Sew a circle, put a little cotton inside, pull the thread and fasten it. As a result, you should get a small greenish ball - this will be the middle of the poppy. In this case, if you have the ability to felt out of felt, make the core in the same way.
- With dark brown threads, carefully wrap the middle, fasten the tip of the thread from the wrong side. Wrap the ball in such a way that any 4th part is divided by half. When the middle is processed with a thread, proceed to fixing the stamen - stick it with Moment glue from the wrong side.
- The next and more responsible step is the manufacture of flower petals.. To do this, at first it is better to make a paper pattern-template. Then transfer the form to the tape. Petals should be placed on an oblique thread.
Make 10 petals on the first pattern and eight on the other. Burn the edges of the purchased blanks from all sides, slightly stretching them.

flower picking
- The assembly of the flower is as follows. Lubricate the front side of the lower petals made according to the first template with a small amount of glue. Glue the petals together, making a small overlap.
The 1st row should consist of 5 petals, which will be placed in a circle, the 2nd one is the same. They need to be glued together so that the crossings of the first row are inconspicuous.
The 3rd row must be formed from eight petals made according to the second template. They should be pasted with a huge overlap.
- If your idea has leaves, then you need to cut a circle out of greenish material, the diameter of which should be approximately 4 cm. Burn the edges and stretch. From the wrong side of the mug, close it by applying a little glue, preferably in the middle. This will turn out a skirt, which will also play the role of a sepal.
- Tape the clip, which then stick to the resulting poppy. Let the flower dry for about a couple of hours. After that, you can attach it to an elastic band or immediately decorate your hair with it.
Fundamentally! It is necessary to burn the petals very carefully and carefully over the flame. Be careful, the tape may flare up, so follow safety precautions.
Plain rubber band
The most ordinary fabric elastic is sewn very quickly, it can be made trivially without experience in cutting and sewing. And, despite its simplicity, such a decoration will become personal to you, because the fabric can be chosen exactly with the subject of your wardrobe - a dress, blouse or skirt.
- Ordinary elastic band with a diameter of less than 3 mm.
- Fabric of your choice - length 50 cm and width 10 cm.
- Threads - according to the color of the fabric.
- Scissors.
Creation annotation:

So you need to lay down the fabric - hold the middle with your finger
- Fold a piece of fabric in half so that the right side is inside. Sew the material on the machine, stepping back from the edge of half a centimeter. Fold the fabric towards the center and hold with your fingers. Tuck the rest inside to fold the fabric in half in this way.

The rest must be wrapped inside
- On the typewriter, stitch the product again from the side of the already stitched part along the entire edge. With all this, it is important not to sew up the internal folds. During the stitching, take out the inner particles of the fabric, continuing the line evenly.
Be sure to leave a hole about a couple of cm in size 3 cm before the start of the seam for the introduction of the elastic band.

Stitched product
- Unscrew the purchased product on the front side, insert an elastic band inside and tie it. You can sew the hole with a machine or manually. The hairpin is ready! Adjust the sewn case and, if necessary, take a walk with the iron.

At the step of retracting the gum
Rubber bands in kanzashi technique
Do-it-yourself hair ties made using the kanzashi technique are very beautiful. This method makes it possible to create indescribable scenery from various ribbons.
Many are wondering how to make gum in this technique. We would like to note right off the bat that everything is quite easy, but accuracy and patience are fundamental here.
For production you will need:

Hairpins and elastic bands made in the technique of kanzashi
- Snow-white and satin ribbon - pieces 55 cm long and 5 cm wide.
- A pair of thin pink elastic bands.
- Scissors and tweezers.
- Pearl beads - 12 pieces.
- Candle or lighter.
- Silicone glue (for a gun) or superglue.

Design can vary
Technique:
- Cut out blanks from ribbons - make 10 similar squares from both ribbons.
Pay attention! For production, you can use a variety of color combinations, especially contrasting colors look great.
- Burn the edges over the fire.
- Assemble the petal - fold each square diagonally and connect the opposite corners.
- Lay the snow-white and pink triangles on top of each other so that the last one is on the bottom. Grab the opposite bent corner with tweezers.
- Collect two corners in the middle and fix with tweezers. Fold the resulting figure in half. Trim the edges and burn.
- Correct also the edges of the petals from the wrong side, so that they do not break off in the future.
- Glue 5 petals together. It is better to use silicone glue - it sticks everything together tightly, and it is even more convenient to use it.
- Fasten the elastic bands to the flowers from the inside out. Attach beads to the center of the flower.
Results

DIY rubber bands will help you feel personal
Making rubber bands is not such a difficult process as it seems at first glance. Here you can give free rein to creativity and bring to life any of your fantasies. Everything depends on your thoughts, as well as on the materials available (see also the article “Kanzashi hair bands and other decorations”).
We want inspiration and creative success for you, but the video in this article will help you make rubber bands using more complex techniques.
Evgenia Smirnova
To send light into the depths of the human heart - this is the purpose of the artist
Modern needlewomen make such skillful jewelry that one can only be surprised. They are able to make a hair ornament that will emphasize the beauty of the hairstyle, in several different techniques. Satin ribbons for elastic bands are considered a convenient material, because you can create from them from a flower to a decoration for a beam using simple techniques.
How to make rubber bands from satin ribbons
Craftswomen are able to make rubber bands with their own hands from ribbons in several techniques, which, upon careful consideration, become quite simple. The main thing in this business is to learn the basic skills, follow the schemes and master classes and use your imagination to get a beautiful decoration that is distinguished by its individuality and spectacular appearance.
The basis of the manufacture of elastic bands is the technique of weaving, folding and collecting elements into one large pattern. It is better for beginner craftswomen to take basic skills as a basis, learn them, and then start to complicate. Even simple rubber bands can look spectacular on a girl's hair if they are skillfully decorated. Options for decorating finished products are embroidery, weaving, beads, beads, sequins. You can try a variety of decoration options to make beautiful decorations.
The materials for the manufacture of rubber bands are satin ribbons of different colors and shades, beads, beads, decor elements. Of the auxiliary tools, you will need textile glue, scissors, a glue gun, a fire source (lighter candle) and skillful hands. Sometimes craftswomen take a ready-made rubber band bought in a regular store and decorate it in their own way. In this case, you will need a base where the elements will be attached - cardboard, metal hairpins, plastic crabs.

Elastic bands from ribbons using the kanzashi technique
A well-known technique for creating elastic bands from satin ribbons is the Japanese art of kanzashi. To make a beautiful children's hair accessory that resembles a dahlia or chamomile, girls need to follow the master class:
- From a satin or silk cut, make 16 square patches 5 * 5 cm in size, run along the edges with a lighter so that the threads do not come out. Repeat for the other color (inner petals).
- For the outer row of petals, bend each square diagonally, repeat, fire over the corner. For the inner row of petals, the squares are bent diagonally three times.
- Fold the smaller workpiece inside the large one, glue it.
- Make 12 single-layer blanks for additional decoration.
- From thick cardboard cut out 2 circles with a diameter of 3.5 cm and 2.5 cm, glue over with a cloth.
- Glue each two-layer petal to a large base in a circle. Repeat for the second tier. Glue single-layer petals to a smaller base. Glue 2 bases together.
- Decorate with beads, glue the resulting flower on a hairpin or crab.

Elastic bands for hair from ribbons of different widths
Do-it-yourself rubber bands from satin ribbons, made of material of different widths, are spectacular and voluminous. There is a master class for making an accessory:
- Cut out a rectangular blank 9 * 16 cm from cardboard, draw a horizontal line in the middle. Wrap ribbon around it.
- Remove the skein without damaging the coils, stitch the middle, pull it off until a bow is formed.
- Repeat the technology for making a bow from a different material and a narrower ribbon.
- From a fabric of a contrasting color, cut out pieces of the same length and width as the resulting bow, singe the edges.
- Collect all the elements on a string.
- Cut out a cardboard circle, cover with a cloth, sew to the rubber band.
- Use a glue gun to glue a bow on a circle, decorate with small beads, rhinestones, buttons or pebbles.

Elastic band on a bunch of satin ribbons
To make rubber bands from satin ribbons with your own hands, decorating a bun-bun, girls will need to follow the step-by-step instructions
- Cut 6 pieces of green ribbon 4 * 2.5 cm into a dome, singe from 2 sides to create a wave - these will be leaves. Bend the bottom edge in two places, glue in the center to get a concave even part.
- Cut 12 pieces of white ribbon 4*2.5 cm and 5 pieces 3.5*2.5 cm in a semicircle, singe, glue into a droplet.
- Glue 5 blanks together by overlapping each other, decorate with stamens.
- Repeat for 14 rose petals from 4.5 x 2.5 cm pieces.
- Round off the first layer of white details, glue the remaining petals, make the second layer around the circle from pink elements. Glue on the leaves.
- Make 5 similar blanks.
- Bend 4 pink segments 10 * 5 in half, glue the ends with a fold, connect with a bow. Repeat for 2 white blanks 9 * 5 cm.
- Fasten 2 white ribbons 8.5 * 5 cm and pink 9 * 5 cm with a white overlay on the pink layer, form a fold, decorate the bottom with beads. Glue the bow, masking the middle.
- Glue felt circles with a diameter of 3.5 and 2.5 cm to the back of the bow and flowers, sew all the elements onto the sewn lace elastic. Decorate the bun.

Ribbon bands with bows
Bow decorations look spectacular on the hair, which can be made by following the instructions:
- Take 2 ribbons 2.5 and 0.8 cm wide, 1 meter long; 1 ribbon 8 mm wide and 50 cm long.
- Make 2 cardboard templates in the form of the letter P, 6 and 8 cm in size, cut off the edge of the wide ribbon along the oblique, lay it on a large template so that the cut and 2 folds are from each edge.
- Fasten the ribbon in the center with pins, sew a “needle forward” seam, assemble, fasten.
- Repeat for the second bow, sew together, attach a bead in the middle.
Check out tutorials on how to make