What can be made from corrugated paper? DIY corrugated paper flowers that are indistinguishable from real ones
Topiary is a decorative handmade product that looks like a tree. It is also called the "tree of happiness" or "money tree", symbolizing wealth and prosperity in the family. It is a ball on the base, fixed in a flowerpot or pot.
In ancient Rome, the cutting of garden trees was called topiary art, and the slave who followed this and maintained their ideal appearance was called a topiary. Later, the fashion for curly cutting trees appeared in Europe. To this day, interest in topiary does not fade away. Your attention is invited to a master class on creating this unusual item for interior decoration with your own hands. The most popular options are topiary made from napkins, multi-colored corrugated paper and cotton pads. Step-by-step photos will help you recreate the masterpiece yourself.
Master class on creating a topiary from paper napkins
The easiest and most inexpensive option for creating a decorative tree is to use paper napkins as the main material. This method is suitable for beginners who want to try their hand at creating a topiary with their own hands. It’s not scary if the first time you don’t get a masterpiece, as in the photo. Experience comes with time, and spoiled napkins will not be a pity, because this is an affordable material that many have in abundance.

From paper napkins, by connecting fantasy, you can create real masterpieces
But in addition to paper napkins of different sizes, you will need the following materials and tools:


Topiary set: tree base
The size of the tree flowers depends on the size of the paper napkins. The larger they are, the larger the flower will turn out. So, let's get down to business.

Advice. Small cuts can be made around the circle of the napkin with scissors. This is done to give a velvety texture to the petals.

Advice. To disguise the gypsum in the pot, you can pour transparent decorative pebbles on it.
We make a "money tree" from corrugated paper
Another no less interesting activity is the manufacture of topiary from multi-colored corrugated paper. To create a tree, you need to prepare:
Styrofoam ball or balloon and mounting foam.
- Pins or heat gun.
- corrugated paper.
- Wire.
- Stick.

Corrugated Paper Topiary Set
- Satin ribbons.
- Moss, tinsel (for decoration).
- Pot.
Almost every topiary creation begins with the purchase or DIY making of the base. Of course, the easiest way to buy it in the store. But in our master class, we will clearly explain how to do everything with our own hands. Follow the step by step instructions.
- The newspaper version has already been successfully tested. It's time to create the base of the topiary from polyurethane foam. To do this, you need an ordinary balloon, you need to slightly moisten it with water inside. Slightly inflate the balloon, put it on a balloon with construction foam and release the required amount of it. The curing process will take about 12 hours, maybe a little less. After drying, remove the ball, an excellent round base will remain.

Foam topiary ball
- The next step is to make paper flowers. You can use one shade of corrugated sheet for all flowers or several different ones.
- Cut off a paper strip 3 cm wide and tuck 2/3 from one edge.

Making roses from strips of corrugated paper
- Carefully twist the ribbon into a spiral. In the middle, it should be tighter, and on the sides you can make it looser. It should turn out to be a very beautiful delicate rose. Fix the free edge with glue or thread. It will take a lot of these flowers. Therefore, it is necessary to make them for future use.
Advice. To make the roses look natural, you need to spread the petals a little with your hands.
- With the help of pins or a thermal gun, the flowers are attached to the base. There should be no free space left on the ball.
- The trunk of the future tree should be wrapped with a white satin ribbon. To keep it well as you wind it onto the barrel, fix it with a thermal gun or ordinary glue.

Installing the topiary stem on the foam
- We connect the trunk to the ball and install it in a pot. First, you need to put a piece of foam in it so that it fills the entire inner surface of the pot. From above, mask the foam base with moss or tinsel.
- Another magnificent tree is ready.

Corrugated paper topiary
We make a "tree of happiness" from cotton pads
Every girl who takes care of her appearance always has cotton pads. So, why not make your own topiary from them? Prepare the materials needed to create the tree:

Let's move on to the next creation. This option is as popular as making paper napkin topiary. The master class will appeal to both beginners and experienced craftsmen.
Attention! Cotton pads are usually sold in white, but if necessary, they can be painted with special paints or improvised means. So, you can get a green material by dipping the disk in a solution of brilliant green. Brown, respectively, in iodine.
- Let's make the flowers first. Roll up a cotton pad in the form of a roll, and fasten it with a stapler or tie with threads at the bottom. Unfold the top of the roll and shape into a flower. Make 10-15 of these roses.

Making roses from cotton pads
- Another option for making the base for the topiary is to use knitting yarn. A ball of thread must be wrapped with plain paper. It is advisable to make several layers. Then wrap the resulting ball well with tape. The basis is ready and you can proceed to further steps.
- Fasten the ball and the barrel, and fix its base in a pot with plaster.

Base ball for topiary
- The ball must be decorated with roses from cotton pads. They are attached to it with glue.
- The tree trunk is decorated with a satin ribbon. It can be replaced with wrapping paper or foil. Instead of a wooden stick used as a trunk, you can use a strong wire, well fastened in several layers.
- The gypsum base is decorated with decorative greenery or tinsel. It is best to attach it with glue.

Topiary options from cotton pads
- Instead of a pot, you can use improvised materials: a can of paint or a plastic bucket of mayonnaise. You can give them a proper appearance with the help of fabric or wrapping. And tie a satin ribbon bow on top.
Advice. To make the roses on the ball look different, cover them with a small layer of hairspray with a sparkle effect, stick on beads or beads. Decorative figurines can be placed on the crown of the money tree or its trunk.
Topiary Care
Topiary is just the kind of tree that requires absolutely no maintenance. It does not need to be watered, fertilized or transplanted. It will delight you with its appearance, regardless of the season. Care for it is to place it away from direct sunlight, as the material may fade. Infrequently, it will have to be blown off or dusted off.

Topiary care is to remove dust
Decorative "tree of happiness", made by hand, will become the talisman of your home. It is also suitable as a holiday gift for family or friends. For some time now, the topiary has become widespread in wedding floristry. Bridal bouquets are made not from natural flowers, but from decorative materials. Their advantage is that the flowers on them will not wither during the day or will not freeze in the winter. In general, the creation of a topiary is a fascinating process that captivates many, regardless of age and gender. Ease of action, inexpensive and beautiful materials and excellent results are the main motivators to master a new hobby.
Do-it-yourself corrugated paper topiary: video
Do-it-yourself topiary: photo


Children's birthday party, photo session or school exhibition without corrugated paper products would be dull and uninteresting. Bright, malleable material is always at hand for those who like to create. It is not surprising, because even the most sour look at the sight of corrugated crafts is instantly replaced by a smile.
But with crepe paper crafts? Yes, I have just a couple of ideas for you.

Anything can be made from corrugated paper - a delicate flower, a colorful picture, and even a mischievous baby elephant.
A little patience, perseverance - and you have such a cute toy on your table. Beautiful, is not it?

Make it easy. Prepare foam balls and a blank for the trunk, corrugated paper, cardboard (for the ears), rolls of paper towels (for the legs), toothpicks, and a glue gun.

Glue the foam base with corrugated paper roses, after tying each of them with a thread and inserting a toothpick. Paste the ears and legs with corrugated paper with a figured edge, without folding it into flowers. Make eyes and mouth from colored cardboard.


Light, airy, simply unique - corrugated paper ice cream. The perfect decor for a kids party!
Making decorations in the shape of ice cream cones is very simple: fill a paper cone with crumpled newspaper to the top, cover it with corrugated paper, tie it with a thread so that the top holds, tie the ice cream to the ceiling.
Another option: simply fill the horn with multi-colored corrugation, twisting it in a spiral and slightly stretching the top edge.

Any children's holiday will become even more beautiful and interesting if decorate walls and ceiling rooms with corrugated paper products. All kinds of flowers, pompoms and mobiles will be the highlight of the festive interior.


garland everyone probably did it from corrugated paper: you cut the folded roll into several wide segments and make a fringe from two sides. And how pompoms are made from corrugated paper, and there is no need to explain.


The table for the birthday boy and his friends can be decorated with your own hands. It is not at all necessary to involve professional decorators.


With corrugated paper, you can create cool images for photo shoots. Any girl will like the idea of turning into a gentle cornflower, Alice in Wonderland or a fairy tale.


And how do you like the idea to create an original photozone with the help of corrugation? Wandering between giant flowers, “managing” time on a huge clock, making faces and laughing at the top in the company of friends and family, and then printing out all this beauty - this is how memories will remain!


About the numbers and words made of foam and corrugated paper, even mentioning is superfluous. They are used with might and main in preparation for children's holidays. And here comes to the rescue. Have you forgotten what its essence is?


A nautical-style party is not complete without such a funny crab. But remember: you have to work! Indeed, in addition to a bright pompom, it will also be necessary to make him claws and eyes from cardboard.

Turtle from corrugated paper - the charm itself! Another idea when creating scenery for a fabulous children's performance.

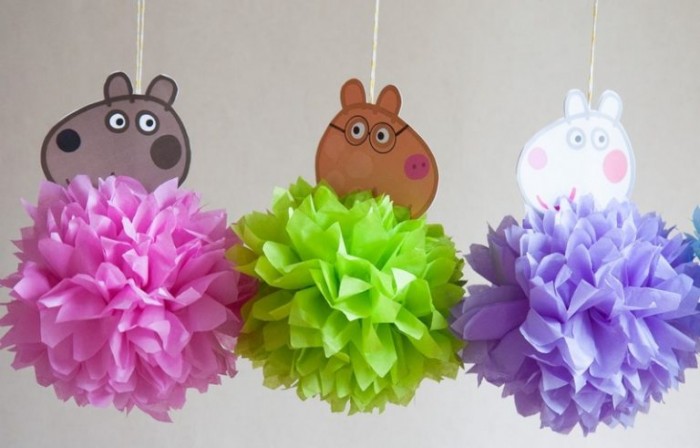
By adding paws, ears, horns, a ponytail and other body parts, a corrugated paper pom-pom can be turned into any character. How about Smeshariki or Peppa Pig?
Volumetric paintings from corrugated paper- top of perfection! Such works can be made using the trimming technique or by crumpling and gluing individual pieces of corrugation. But first, do not forget to mark the boundaries of all the details of the picture by drawing an image on a cardboard base.


Corrugated paper crafts for the little ones - what could be easier? The teacher prints out a simple picture from the network, and the kids enthusiastically fill it with multi-colored paper wads.
Pay attention! Glue needs to be taken quite a bit so that the corrugation does not melt in the hands.


The combination of different techniques when creating an application is the best option!


Quality made indistinguishable from the real. With them you can effectively decorate your room or gift wrapping.


And how nice it will be to receive a corrugated paper bouquet for your mother on her birthday!

Girls can make a luxurious wreath out of bright corrugations, especially since it is just around the corner. A real wreath will quickly wither (or float away if, according to tradition, let it fetch water). But the colorful crafts made of corrugated paper will delight the eyes of others for a long time to come.
Candy bouquet for your favorite teacher? I have a better idea. Let's make a whole sweets basket! Ask your classmates for help. , and a delicious craft is ready.

Enjoy your creativity and summer inspiration!
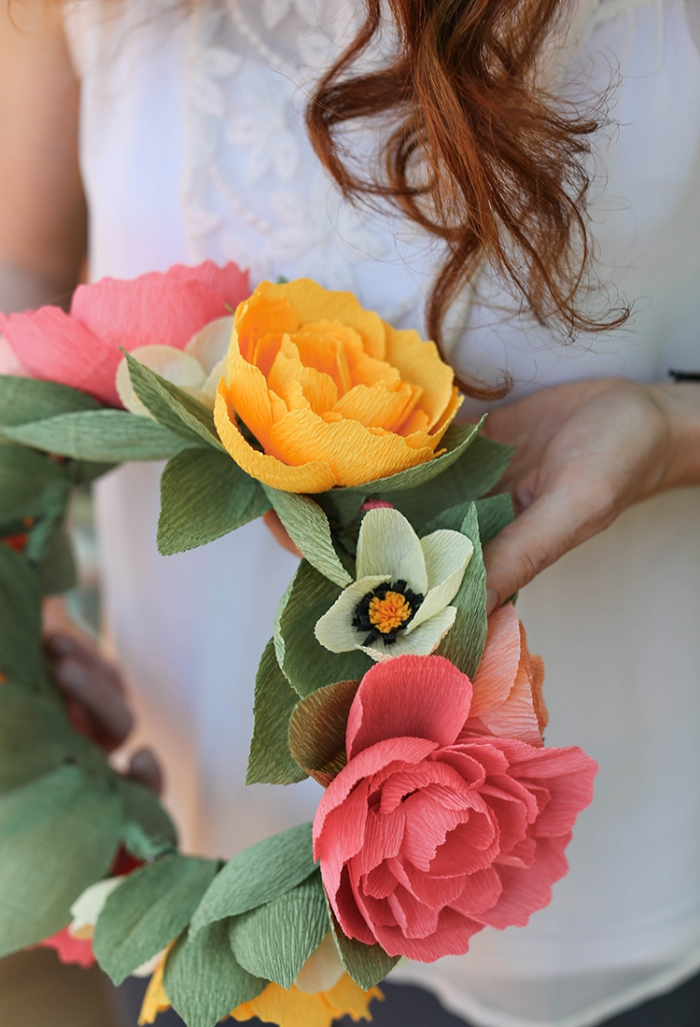
A bright beautiful bouquet will be a wonderful gift. With the help of flower arrangements, festive tables are decorated. They are used in the design of various events. Such products can be made by hand. They will not fade over time, they will delight others with their impeccable appearance for a long time.
To create an interesting composition, consider a photo of corrugated paper flowers. Experienced craftswomen offer different options for the manufacture and layout of plant elements.

The structure of corrugated paper allows you to create three-dimensional compositions. The material holds its shape well and is suitable for decorating bouquets. It will take quite a bit of time to create your own unique flower.

Materials and tools
To start the creative process, get corrugated paper. It is inexpensive and easy to get in the store. Corrugated material is produced in a wide range of colors.


You can buy plain options or rolls with a soft transition of shades. They open up almost unlimited possibilities for translating interesting ideas into reality.

To make flowers, you need the following materials:
- corrugated paper;
- cardboard;
- wire;
- glue;
- cotton wool;
- paperclips;
- threads.

If you plan to make bouquets with sweets, then they purchase sweets in advance, which will become an important component of the product.

To work, you will need the following tools:
- scissors;
- simple pencil;
- pliers;
- silicone gun.

To make beautiful flowers, carefully observe living plants. Each has its own structural features, which is taken into account in the manufacture. To get large flowers from corrugated paper, increase the standard pattern to the desired size.

The technology for performing the work is no different from the usual procedure for making flowers. But for a bouquet of large plants, more materials will be needed. They will be a great decoration of the interior at the celebration.

Corrugated Paper Rose
The Queen of Flowers always looks great in a single copy and in bouquets. This delicate flower is easy to make yourself.

Step-by-step instruction:
- Petals and leaves are drawn on cardboard. To do this, you can use ready-made patterns or remove them from a real rose.
- In the blanks of the petals, small indentations are made with the fingers to give the elements the desired shape.
- The length of the leg is chosen at the request of the craftswoman; for this, the wire is carefully cut with pliers.
- Prepare small pieces of wire of smaller diameter, on which green leaves will be attached.
- The end of the wire is bent with pliers to form a bud. For this, cotton wool is used, or the middle of the flower is simply wrapped in paper.
- Alternately, they begin to glue the petals to the core, starting with the smallest detail. To securely fasten the elements, a strong matching thread is used.
- The flower is ready. Now you need to take a small strip of corrugated paper. It is wound around the stem, on which pre-prepared leaves are attached. This is the final stage of the build.
- Petals and leaves are neatly straightened.


If you make several flowers, then they are collected in a bouquet. There is an easier way to make a rose. It only takes 15 minutes for one flower.

A strip 10 cm wide is cut out of paper of great length. The edge of the workpiece is made uneven, pinching with fingers along the entire length. After this operation, the strip is folded into a bud, it is attached to the wire with a thread. You can create an amazing composition in just 1 hour.

Novice craftswomen are concerned about the question of how to make flowers from corrugated paper. This requires preparing materials and tools, be patient and get to work. If you follow the instructions exactly, you can get excellent results.

Corrugated paper peony
For a luxurious peony, you need paper of different shades. A strip is cut from each roll. The element size depends on its distance from the core. The dark color is located closer to the center, after which there is a transition to lighter shades. The resulting elements are folded like an accordion, they should all have the same width.


The edge of each component is shaped into a petal. The middle parts of the obtained blanks are connected and stacked in size. All components are rewound with a thread, a flower is formed.

Corrugated paper tulips
Take a template and cut out the petals. Each of them twist the tip, give the shape of a cup at the base. Then they begin to form a bud, when performing this operation, glue is used.


Elements are alternately wound to the core. After this operation, a stem is wrapped with a strip of green paper. Cut sheets are attached to the stem.
Corrugated paper flowers with candies
A rectangle is cut out of paper, folded in half, on one side the edges are cut with scissors. Candy is placed in such a blank. The material in the center is slightly stretched by hand. On the one hand, the edge is fixed with an elastic band. A wire is used as a stem, it is attached to the base of the flower. To do this, you can use a silicone gun.


Cut out the petals. They need to be shaped by stretching the middle and twisting the edges of the workpiece. For a lush flower, cut out more petals. They are attached to the bud with threads and glue. This fixation ensures a reliable connection of all components. You can also use rubber bands for this.

Leaves are cut out of green paper and fastened at the base. The stem is wrapped in green paper. A bouquet of flowers will be a great gift for the holiday. Small bows will give the composition a festive look, they are fastened with skewers. Such a surprise is sure to be appreciated.


Finding ready-made stencils is easy, you can make them yourself. Don't worry if the elements are different. In nature, there are no two absolutely identical leaves. To speed up the process of cutting out the details, fold the paper several times.

You can achieve a natural color of the petal if you apply a darker paint to the base with a brush. Using a variety of shades in one flower will give it a natural look.

Patterns are sorted and put into separate envelopes, which are signed. When a certain element is needed again, it will not be necessary to start the process by developing a template.

Conclusion
Amazing compositions for the holiday, unusual gifts are made from corrugated paper. Simple flowers will help decorate the table, complement the interior.

An unusual option will turn out if you use different plants. Bright poppies, delicate cornflowers and chamomile are combined into a field bouquet. Multi-colored asters are complemented with greenery to give the composition a finished look.


Bouquets made of corrugated paper and sweets are especially popular. Sweet tooths will love them. You can collect any flower. It is only important to choose the right shape, size and number of petals.

To create flowers, you do not need to attend expensive courses, purchase tool kits. The manufacturing technology is simple and understandable even for beginner craftswomen. Working with such material will bring pleasure to adults and children.

Photo of corrugated paper flowers


Author : Hi all! Paper greenery is gaining momentum in candy bouquets. And I am infinitely glad that more and more craftsmen share my philosophy with handmade greenery and assembly without plastic inserts!
Just for you, creative people, experimenters, my next master class.
Coincidentally, the tropics are the trend of spring and summer. With different leaves, large and small, greenery decorates everything: from interiors, prints and fashion magazines, to Sveta's T-shirt in the photo below. :)
For my bouquets, I developed sedge leaves using a new interesting technique. The technique is simple in execution, but with a twist! I am happy to share my tutorial with you!
Making time: 2 minutes

From the materials we need corrugated grassy paper and scissors. In the master class, I took light green paper Cartotecnica Rossi No. 562 and scissors.

For a sedge leaf, we need a strip of corrugated paper 2.5 cm wide, 40 cm long.
In fact, you can choose the length yourself. It all depends on what size greens you need. I recommend making leaves of different lengths - everything is like in nature!

With scissors, cut out the shape of a leaf from the strip. Do not forget about the leg of the sheet 10-15 cm.

And now the most important point! Attention, highlight!
To make the sedge leaf look naturalistic, we will stretch the blank in a special way.
We will stretch only the sheet plate. I highlighted the stretching points in the photo with white.

To quickly and conveniently stretch a sedge leaf, fold it in half and shape it with your fingers.

Remain unstretched - the stem, the stalk in the center of the sheet is 5 mm and the edges of the sheet are 3 mm each.

Thus, it turns out that the stretched leaf plate will become lighter, and the stem and edges will become darker. This will give additional volume and zest to our greenery.

Sedge can be inserted into hand bouquets, and after playing with the size, even into desktop compositions. You can attach a wire or a toothpick to the leg if desired.

Make more sedge leaves of different sizes and collect your own unique bouquet!

Traditionally, I am waiting for your comments, questions and I will not be disingenuous, I also like praise. If you get sedges - send photos in the comments, I will admire with great pleasure and comment if necessary!