How to make a Christmas boot out of felt. New Year's felt boots - interior decoration or crafts for kindergarten: we kill two birds with one stone
A New Year's gift requires especially bright and festive packaging. After all, this holiday is magical, and therefore everything should correspond to the fabulous surroundings: home decoration, outfits, and gifts that we give to each other. Any schoolboy can make a wonderful boot for the New Year with his own hands - this is a simple and interesting task. But first, let's look through the history books: where did such an unusual design of New Year's presents come from?

The past does not reveal all the secrets, and therefore only a legend has come down to us. Three sisters lived in a distant country. The girls were in dire need of money, but there was nowhere to get it from. On the night before Christmas, they went to bed with no hope for the future, but still believing that miracles could happen and their lives would change.
The sisters' expectations came true! At night, Santa Claus walked around the houses of sleeping residents. Looking into the sisters' house, he saw that there was absolutely nothing there. The good wizard with a generous hand threw three gold ingots into the chimney - one for each beauty - and so that they would not fall into the burning fireplace, the nimble Santa Claus threw them straight into the stockings drying by the dying fire. Probably, the morning after that night was one of the best events in the life of the sisters! Since then, boots for the New Year (or rather, at first - for Christmas) have become a good tradition: children and adults leave them near the Christmas tree so that the wizard has somewhere to put his gifts.
Let's sew a boot for the New Year with our own hands and act as a good Santa Claus or our Santa Claus, putting some wonderful surprise for loved ones into the "shoes". Perhaps it will be a boot made of felt or felt, or maybe just made of cardboard. Read, watch the patterns and choose your version of the New Year's "gift wrapping".
materials

How to make a boot for the New Year? You will need materials from the list:
- cardboard;
- felt;
- felt;
- colored ribbons;
- web fabric;
- bright threads;
- beautiful stickers.
Stencils for boots for Christmas gifts can be found on the Internet - there are a great many variations. Well, let's master the art of sewing "shoes" with our own hands? Let's start with felt boots - they are easy to make even for those who have not held a needle and thread in their hands since school.
Felt boots for the new year

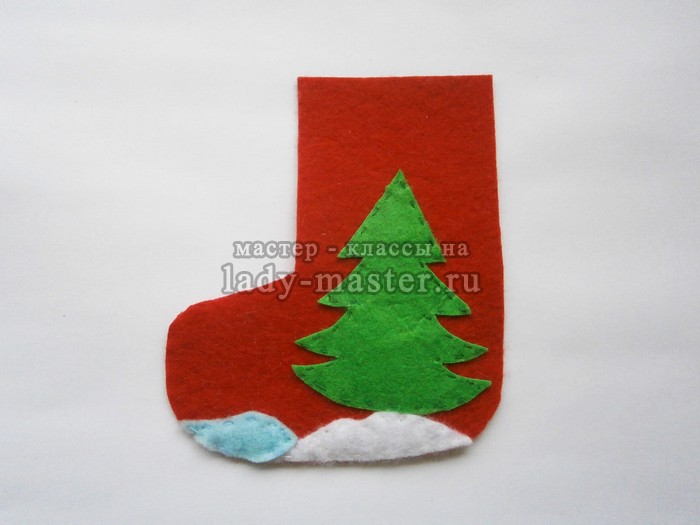
First of all, we need a boot stencil for the New Year. You can draw it from any picture. Take cardboard or thick paper and depict a felt boot - remember how you drew as a child? The dimensions will be such that your gift is freely placed in this "package". So, we have prepared a template for the New Year's boot.
- red felt (for the base);
- white felt (for "edge");
- green felt (for the pattern);
- threads (preferably white, for contrast with the main background);
- needle;
- scissors.
We take our stencil of a New Year's boot. We put it on the red felt, which is folded in half, outline along the contour, cut it out. We make the top from white - it will depict the finish of the top, and therefore we cut it out a little wider than the top itself. We sew the felt boot with white threads with a chain stitch along the edges. We imperceptibly sew the “edge” with white threads.
If you have several potential recipients of gifts, you can prepare similar boots for them, but, for example, in a different color. If two children are the same, but different sizes.
After the boots for the New Year are ready, you need to decorate them. We cut out a Christmas tree from green felt and attach it to the “shoes”. In general, it all depends on your imagination - you can cut out white snowflakes, a twig with cones, a figure of Santa Claus, a snowman, a slide with a sled, a cheerful skier ...
A felt boot for the new year, the patterns of which can be simpler and more complicated, will be sewn by any child under the guidance of an adult. Help your child prepare holiday gift wrapping for friends!
Do-it-yourself boot for the new year: pattern patterns from ribbons
Having a ready-made pattern cut out of cardboard at hand, you can make a festive “wrapper” for the New Year with your own hands from multi-colored ribbons. The boot pattern is already there. You don't even have to sew! Still easier.
We lay the “spider web” fabric on the template cardboard. On top of the weaving method, lay out any ribbons: satin, braid, scraps of fabric left over from children's crafts. Color combinations - as you like. We carry out on our future boot with a hot iron.
Now cut along the contour of the pattern and prepare the second side in the same way. We sew the details. It remains to process the product along the edge with an oblique inlay (choose a color close or contrasting to the main tone of the ribbons) and build a loop from the same inlay.
Boot template for the new year for "shoes" made of felt

How to make a boot with your own hands for the New Year holiday from felt? Draw the outline of the future "shoes" directly on the felt. Cut and sew both halves with large stitches.
You can not be limited to the usual form of felt boots. Create, for example, an elegant high-heeled women's boot. Be sure to decorate it: wash white and silver beads on top, lay out tinsel and rain figures. A good idea is to decorate the boot with large bright buttons.
From cardboard
If you are faced with the task of helping a preschooler or primary school child make a beautiful New Year's card, then you can draw a large felt boot on thick paper or cardboard (folding it widowed). Color it with your child, cut it out. And inside make a pocket - glue it on one of the walls. Put chocolate in your pocket. It turned out to be a great gift - uplifting, cute and tasty!
Striped stocking
Remember the fairy tale about the girl Pippi, who wore multi-colored stockings? You can create a similar long sock yourself by sewing it from multi-colored ribbons. Another option is to simply tie the stocking with a regular “elastic band”. On the resulting stocking, sew colored pompoms cut off from old children's hats. If you don’t have any of these, make pompoms from fluffy knitting threads. You will get a capacious package - you can put a big gift!
As you can see, there are a lot of ideas for making New Year's boots. Choose any and act! As soon as the packaging for the presentation is ready, the only thing left is to buy the gift itself. You can be sure that your friends and family will love any gift in such a magnificent boot. Well, the kids just jump with delight!
Each of us loves the New Year, because on this holiday it is customary to give. In order for a surprise to please, it must be adequately packaged. Place a gift, such as a handmade Santa Claus boot.

We make a felt boot with our own hands
For a felt boot, you need to prepare:
- red or blue tone felt;
- strong threads;
- needle with a pencil;
- light fabric.

From the felt, cut two equal parts of the boot. Sew with white thread on the details of the snowflake. It is necessary to cut a rectangle of white fabric along the width of the upper edge of the boot and sew it to the product. Next, connect the two blanks and sew them together. Then make a loop with threads, and put the gifts in the boot.

The technique can also be used to make a boot. For the density of the product, prepare shreds-squares of medium size and a synthetic winterizer. Let's start with the main creative process.

Put the shoe pieces in the correct order. Lay one lining face down first, then the other lining face up. Next, lay out the shreds face up, and put the fabric for the back of the boot on them, face down. It is necessary to firmly collect all the details, circle the outline and sew them with a machine. Excess fabric must be cut off and the product turned inside out between the upper and patchwork parts. Make a piping and put New Year's surprises in the boot.

To make a stocking with an applique pattern for the New Year, take:
- a durable piece of fabric, for example, a drape;
- chintz and cotton wool;
- application drawing;
- scissors with a needle;
- strong threads;
- glossy varnish.

From a durable piece of fabric, you need to cut 2 parts of the stocking. An appliqué pattern should be sewn to one of them, but not completely, in order to fill it with cotton wool for volume.

Then sew the end of the appliqué. From another fabric, you need to sew an edging to the product. Embroider snowflakes with white thread, and cut 2 parts of the stocking from the cotton fabric in the same way as from a durable fabric. Next, you need to overcast the chintz fabric and sew to the outer part of the halves of the drape.

The stocking can be turned inside out and formed into a loop. Write the name of the person to whom the gift is intended with shiny varnish on the stocking.
From the West, a tradition came to us to decorate a house for new year And Christmas decorative stitched boots.It is very easy to make them with your own hands, besides, such a boot is a great package for little gift, which is not very convenient to give just like that. And any little thing put into it (for example, a chocolate bar) will become bright and memorable. gift, verified!
I will tell you about my experience in implementing the idea Alexandra Alexandrovna Nikulina for simplified sewing of such boots.
So, to begin with, we define pattern. You can draw your own (it's very simple), you can translate from a finished pattern in a magazine or the Internet (there are enough of them). The main thing is that the gift that you are going to pack in this boot fits freely into it.
In use materials And decor give space to your fantasies, decorate the front side with decorative stitches, ribbons, sequins - after all, it's a holiday!
I do patchwork, so for the front side of my boot I prepared patchwork from squares:If you want to make your boot tighter, you can quilt the front (and back too) side of the boot with a small layer synthetic winterizer.
Now let's start with the most important part: stacking layers. We put on the table:
- layer lining face up
- on it - the second layer lining face down
- above - patchwork(front) face up
- fabric for backdrop boot face down.
We circle the contours of the boot according to the template and we sew(except for the top).
We cut excess, leaving allowances along the seam line.
In places of bends, do not forget to do notches according to the allowances, so that after turning the seam does not tighten.Now turn inside out boot between the patchwork part and the back.
In this case, the seam between the two parts of the lining will be closed, and your boot, even from the inside, will not have open frayed seams! And this one line!
Now all that's left is to wrap top cut.
Moreover, it is possible to simplify the procedure here too: leave a small “tail” from the inlay, then bend it into a loop and fasten (and decorate at the same time) with some bead or button.It's that simple! If you do without a patchwork canvas, then the work will take otsily hour!
Making boots is a fashionable pastime and a lucrative business.
In 2007, fashion houses Oscar de la Renta, Dolce & Gabbana, Stella McCartney, Badgley Mischka, Josie Natori and Anthropologie presented their own Christmas socks to the public.
Each boot had a "character".
For example, Mark Badgley and James Mischka sewed an elegant "female" sock from gray silk. It was decorated with a large bow and metal pendants, and "female" little things were placed inside.
The sock from Anthropologie turned out to be the most “saturated”. It is made of felt, cardboard, bamboo. It also included pipe cleaners, wire, buttons, schnapps, automatic guns and even silver spoons...
All of these Christmas socks, as well as socks from other famous designers, were available on eBay. By the way, the designers filled their socks with gifts. And the proceeds from their sale were used to help the elderly.

like this New Year's boot you can do it yourself.

Like these ones christmas boots I sewed for my children a few years ago.
To sew boot for gifts we will need:
- red material (I bought red fleece for 0.5 m)
- white material for "fur" (I literally bought a strip of 20 cm of some furry material)
- material of any other color if you will embroider names (I had purple fleece)
- faith
- decorations

We reshoot the pattern - you can enlarge it in any graphic program or draw it by cells. My boots turned out to be 21 cm high.
sewn boot for gifts elementary: we cut out on the fabric with allowances for the seams, sew the sides of the boots and sew "fur" and a rope on top so that there is something to hang on. We decorate to your taste. My kids put notes there with wishes for gifts for the New Year from Santa Claus.
ATTENTION: if you want, like me, to decorate boots with the names of children, then first you need to sew on the letters, and then sew the boots themselves.
I took the letters from the Word, selected the font without extra monograms and simply increased the font to the size I needed. I printed them, cut them out of fabric, under which I put interlining, so that the letters remained even. That's all, the boots are ready!
This is how it looks enlarged:

Natasha Oleinik (Saechka)
 December is just around the corner - the month of pre-holiday fuss, the month of waiting for the holiday, fairy tales and miracles.
It was the Christmas and New Year holidays that from childhood soaked into us with the aroma of pine needles, sparklers and fireworks, some kind of mystery, magic and miracle. Each time, under the chiming clock, we make another (or the same) wish, confident that this time it will come true. We prepare gifts for our relatives and friends, we come up with many different delicious dishes - almost for the whole year ... At the expense of a bowl of Olivier salad, I'm not sure that everyone still puts it on the New Year's table. But once, in "stagnant times", it was considered bad form to celebrate the New Year without this salad. Traditions…
Sorry, I, as always, deviated from the topic, because I have a needlework, not a culinary one.
Let's start making Christmas boots (socks, stockings - as you like) for gifts. Although such a boot itself can be a wonderful gift, isn't it? 
For manufacturing we need:
1. Blue wool blend fabric for sewing the base of the boot;
(Or another, to your taste) 
2. Adhesive dublerin to give a more rigid shape to the boot; 
3. Pieces of white non-woven material (bulky interlining, synthetic winterizer) for making a snowman and snow; 
4. Pieces of red or orange cloth for making a nose and
headdress for a snowman; 
5. Dark brown yarn for making a broom;
6. Fabric with blue sequins for finishing the top of the boot in the form of a starry sky; 
7. Oblique trim or braid for edging seams; 
8. Beads for making eyes and a mouth for a snowman and for depicting stars 
9. Sewing machine or just a needle and thread.
So, we draw on paper layouts - patterns of boots, choose one of them in order to give a start in life. 
We cut out from blue fabric and from dublerin two parts of the boot, placing them in a mirror.
Mirror is like this. 
On the wrong side of the main pattern, we put the doubler with the adhesive side to the fabric and iron it with an iron through gauze or a cotton napkin.
We begin to decorate one of the sides of the boot.
To do this, fluff the edge of the non-woven material on one side, on the other, trim it with the bottom of the boot.
We lay a few decorative stitches on the non-woven material, sewing it on. We lay the top line at a distance of about 0.8 cm from the fluffy edge, maintaining the illusion of fluffy snow. 
We cut out circles of different diameters from non-woven material for making a snowman.
We sweep the details together, put a bucket of cloth on the head of the snowman and sew on a nose-carrot. With black beads we draw coals-eyes and a mouth for a snowman. 
We fasten them to the front side of the boot and attach a zigzag seam along the edge.
Subsequently, the snowman seemed to me somehow defenselessly lonely, so I decided to “sculpt” his hands and reward him with a broom.
A bucket on the head is “powdered” with snow from a fluffy non-woven material.
I made a broom out of dark brown yarn: I crocheted the shaft (a regular chain), and a pompom-tassel served as the “sweeping” part. When sewing a broom to a boot, do not forget to pass it through the "arm" of the snowman.
Depicting the starry sky, we tack the appropriate fabric to the top of the boot, 
unfold it and trim the edges. 
We scatter several "stars" of beads between "heaven and earth" - below the "starry sky".
We decorate the second (back) part of the boot with “snow” and “starry sky.” Our snowman lives on one side.
We fold the two parts of the boot face outward, sweep. We trim the sections with braid, do not forget to sew a loop on top. 
Advice: if you are edging the edges not with an oblique trim using a special foot for a sewing machine, but with a braid, then do not be too lazy to baste the braid in order to avoid later unattached sections.
Textile hearts, snowflakes or stars can be sewn to the boot from the remnants of the fabric. A wonderful handmade gift for Christmas and New Year is ready. It will not only create a festive mood for your gift, but also convey a piece of your warmth to relatives and friends.
HERE IS SUCH IDEAS I HAVE DISCOVERED AND LIGHTED TO DO IT ITSELF.
A do-it-yourself Christmas boot made of paper can be a bright decoration for the walls. You can also put in it, a cash gift, or another small souvenir. Such a decoration can be made very easily, even if you do not have special creative skills. And you can also involve your children in this activity, let everyone make their own paper boot for gifts with their own hands.
New Year's boot made of paper with your own hands. Master Class
For work you will need:
- white paper - one sheet,
- PVA glue,
- themed wrapping paper,
- a piece of wallpaper, or special paper for creativity,
- simple pencil,
- ribbons,
- thin cord,
- two beads
- curly scissors,
- scissors.
Manufacturing process:
To make a boot for the New Year with your own hands out of paper, draw the shape of a boot or felt boot on a white sheet. Fold the sheet in half and cut out the figure along the drawn contours. The result is two identical parts.

Cut out exactly the same felt boots from wrapping paper with a New Year's pattern.

Spread glue on the white parts and glue the boots from the wrapping paper to them.

Spread the edges of one of the boots from the inside with glue, while capturing only about 1 centimeter from the edges. At the same time, leave the upper part without glue, where you can put something in the future. Glue two boots together.

Cut out a rectangle from a piece of wallpaper or other paper with a beautiful pattern (you can just use white paper). Its width is about 4 cm, and the length should be equal to the length of the entire circumference of the upper part of the boots. Finish the bottom and top edges with curly scissors.

Cut a satin ribbon for a loop on which the product will hang. Glue it under the strip of wallpaper. The strip itself (lapel) is also completely attached to the base.

Take the silver ribbon. Collect it with an accordion. Put a beautiful lace (thin) in a thick needle. Pull the needle through the ribbon accordion.

Tie a tight knot on one side. Cut off the string from the needle. Put on a bead on the two formed cords. Tie the ends with knots, otherwise the beads will fly off.

A small New Year's boot can be filled with sweets and hidden under the baby's pillow - let him be happy when he wakes up. The boot can be sewn from bright red felt and decorated with an appliqué in the form of a Christmas tree and a bunny. Making a boot does not take much time.
To make a boot we need:
- - bright red felt;
- - green felt;
- - white felt;
- - blue felt;
- - silver sequins;
- - white, red and black beads;
- - scissors;
- - an ordinary sewing needle;
- - a thin needle for beads;
- - threads of red, green, white and blue colors.

How to make a boot
1. At the beginning of work on the New Year's boot, you need to make a paper pattern. To do this, redraw the boot pattern and appliqué details on paper and cut it out.

2. Redraw the outlines of the paper boot onto bright red felt and cut out two identical parts.

3. Now you need to cut out the details of the appliqué from felt. One part of the Christmas tree is cut out of green felt. From white felt we cut out a bunny and snow under the Christmas tree. From the blue felt we cut out a snowdrift on which the bunny will stand.

4. Additionally, you need to make a lapel for the boot from white felt. To do this, cut out a strip about 11 cm long and about 2.5 cm wide. Smoothly cut one edge of the strip with scissors to make a wavy edge.

5. Take one bright red part of the boot and sew a green Christmas tree to it. It is better to sew the herringbone with the usual stitches of the basting seam, taking green threads for sewing.

6. Now take the white piece of snow and sew it under the Christmas tree with white thread. Next, to the left of this detail, with blue threads we sew a snowdrift cut out of blue felt.
7. Take the part of the bunny and sew it so that it stands on a snowdrift.

8. Sew on a nose from a red bead and eyes from black beads to a bunny. For their sewing, it is more convenient to use a special thin needle for beads.

9. Put the details of the boot together and sew them with an overcast seam. To stitch the boot, you need to take red threads and try to make medium-sized stitches of the same size.
From above with white threads we sew a white lapel to the boot. This piece can be sewn on with a simple basting stitch.

10. Decorate the lapel of the boot. To do this, take silver sequins and white beads and sew them along the upper edge of the lapel with white threads with a bead needle.

11. The boot itself can also be additionally decorated with white beads. We sew white beads scattered around the boot, as if it were falling snow.

12. If you plan to hang a boot on a Christmas tree or near a fireplace, then you need to sew a loop to it. A satin green ribbon of small width is well suited for making an eyelet. It is enough to take a segment 18 cm long. It must be folded in half and sewn to the inner surface of the boot, trying to sew the tape so that the stitches are not visible from the outside.

13. It looks like a boot with a loop sewn on the back.

A bright boot is ready. It remains to put a few delicious sweets in it and hide the child's boot under the pillow. The boot turned out to be small, but it’s even good, because it’s harmful for children to eat a lot of sweets. If you wish, you can enlarge the pattern and make a larger boot - then the toy will also fit.
You can sew a few New Year's boots and hang them on a Christmas tree or give them away to children who will come to visit you during the winter holidays. Applications on boots can be different - with snowmen, snowflakes or deer.
