DIY Christmas decorations from gift paper. Snowman with a whisk. Craft ideas for creating a New Year's interior
Someone is preparing for the new year, decorating the tree with designer expensive decorations, and someone else - with cheerful multi-colored electric garlands and glass balls from the store.
Such Christmas tree decorations will undoubtedly make the New Year's beauty stylish and beautiful, but, unfortunately, they cannot be compared with handmade toys. After all, the very process of their creation not only enhances the anticipation of the holiday, but also gives invaluable minutes of communication to all family members.


There are a lot of options for how to make Christmas tree decorations with your own hands for the coming new year, but the most affordable and not requiring special skill in manufacturing are New Year's toys made of paper. You only need materials at hand that can be found in any home, a little patience and creative imagination.
The most common and versatile toys for the New Year are Christmas balls. You can make them yourself from any thick paper: colored cardboard, colorful postcards or old magazine covers. Single-colored balls will add a single style to the room, and multi-colored ones - an atmosphere of fun and fabulous magic.

So, before you start making such paper toys, you need to prepare the following:
- thick paper with a pattern you like;
- scissors;
- PVA glue;
- a compass or any object, outlining which, you can reproduce a circle (jars, lids, glasses, etc.).
How to do:
- Draw 21 identical circles on paper and cut them out with scissors.

Prepare the mugs as follows:
- bend the circle twice in half (this is necessary to determine the center);
- unfold the circle and bend one side of it so that the edge of the circle is exactly in the center;
- bend two more sides of the circle to make a triangle with equal sides;
- cut out the resulting triangle, which will play the role of a template for the rest of the details;
- overlay the triangle over the rest of the circles, trace with a pencil and bend the edges outward along the lines.
- Glue 10 circles together with two sides so that you get a strip: 5 circles on top, and 5 - below. The strip must be glued into a ring. This will be the base for the balloon.

- Divide the remaining 10 pieces by 5 pieces and glue them in a circle. We got two "caps".

- Glue the top and bottom "caps" to the base in sequence.
- The loop for hanging the ball can be made from a thread threaded through the top of the toy with a needle, or from a beautiful ribbon. A ribbon loop is fixed with a knot and passed through the top of the ball “cap” before gluing it to the base. The knot remains inside the toy, and the loop is outside.
An original paper toy with your own hands is ready for the coming year!
More paper balls for the tree


Volumetric snowflake
Another indispensable attribute of the new year is snowflakes. They can be the simplest, cut out of a sheet of paper with an arbitrary pattern, or they can be voluminous using the origami technique. We suggest making your own hands the last version of the New Year's snowflake.

To do this, you need to cut six squares of the same size, fold each one diagonally, and then in half. Parallel incisions are made along the fold. The square unfolds, the inner tongues are rolled up and fastened together.
The outer petals are connected to the same petals of the other squares. You can attach them both with glue and with a regular stapler.
How to make beautiful Christmas decorations for a New Year tree and New Year's interior with your own hands.
These Christmas decorations can be used to decorate classroom in school, kindergarten playroom.
Spiky ball
Cut 14 circles of the same diameter out of paper. Divide each circle with a pencil and a compass into 12 identical sectors (Fig. A).
Roll each of them into a small bag and secure with glue (fig. B).
Do the same with all fourteen circles. Fold them in two stacks of 7, face down. You need to fold it so that each upper petal bag lies between the two lower ones (Fig. C).
.jpg)
Fasten the stacked circles with glue or thread (Fig. D). You get two hemisphere blocks. Glue them together, passing a thick thread with a loop between them - the spiky ball is ready.
.jpg)
Spiral of stars
Put a sheet of blue paper on a plate, circle it, cut a circle in a spiral (fig. A). Make 8 holes. Circle and cut out 8 stars from yellow paper (fig. B).
.jpg)
Make a hole in each sprocket with a needle and thread. Tie the stars to the spiral (fig. C).

Volumetric Christmas tree
On colored paper, draw a pattern for a half of a Christmas tree (fig. A). Using this template, cut out more Christmas trees from four double sheets (Fig. B).
Glue them together with the wrong side. When gluing, put a loop of thread or decorative rope inside so that later the toy can be hung.
.jpg)
The herringbone is ready (Fig. C).
.jpg)
Christmas tree garland
Use colored, silver, or gold paper of the required length. Fold the strip several times. Translate the drawing, cut it out. Decorate the tree with the resulting chain.
Eight pointed star
Fold a square piece of white paper in half, then in half again, cut out a circle. Draw rays with a pencil and cut
Openwork garland
Fold a sheet of paper 4 times, alternately make cuts on both sides. Expand and stretch the garland. It is best done with foil or gold and silver paper.
Christmas boots
Fold the colored paper in half. Cut out the silhouette of a felt boot or boot so that the back line of the boot falls on the fold line.
Cut a narrow strip out of white paper. Expand the postcard and glue it to the very top of the boot. Fold the postcard, cut off any excess white paper. Decorate the boots, thread them in so you can hang them.
Cone
Prepare three strips of 3x15 cm paper. Make cuts on each strip, and small cuts on the two edges of the strips. Roll the strips into a roll, one on top of the other, fixing the ends - the bump is ready.
Christmas trees accordion
Fold a 14x20 cm piece of paper in an accordion manner along or across the sheet. On the workpiece, make a "straight cut with gaps" element. Position the cuts as far as possible to the opposite edge. Flip the strip of paper over so that the cut triangles are on top. Repeating the shape of the triangle, make a straight cut again, leaving the border of the same width. Expand and straighten the finished craft.
.jpg)
Rice. Christmas trees accordion
Metallized paper star
Fold a square sheet of metallized paper in half diagonally to form a triangle. Follow the template, attach it to the resulting triangle. Following the dotted lines, bend the right corner of the triangle inward, repeat this again until the next dotted line.
Flip the triangle over and repeat from the other corner. At the same time, make sure that the fold lines on one side pass along the edge of the other. Redraw the pattern onto the folded triangle. Cut along the edges with a cutter, and punch inside with a punch (Fig. A). Expand, smooth out the folds coming from each ray so that they are of the same type - with an inflection. All folds separating one ray from another should be facing in the opposite direction.
Make another star in the same way, using paper of the same or a different color. Cover the craft with 3D paint and sprinkle with glitter until it's dry.
.jpg)
When the paint is dry, use double-sided tape to connect the stars together with the reverse sides (fig. B). Cover the joints with paint. Pull the thread through the hole in the beam (Fig. C).
.jpg)
Rice. Metallized paper star
Pendant "Star"
Draw the outline of a five-pointed star on colored paper, inside it - three more of the same outline. At each contour, mark with a pencil the lines that do not need to be cut (Fig. A). Cut out, excluding the marked places. The contour of each star will turn out to be linked to the other (Fig. B). Attach the string.
.jpg)
Paper cascade .jpg)
You will need a cardboard cylinder from food foil, patterned wrapping paper, foil, PVA glue, thin adhesive tape.
Wrap a cardboard cylinder in foil and fold the edges inward. From brown paper, cut a 16x16 cm square and a 10x16 cm rectangle.Then cut out two 14x16 cm rectangles.
Step 2 cm away from the edge and draw a line on the sheet. Do the same for all four sheets.
Cut 1 cm wide strips from the opposite edge.Take a 10x16 cm rectangle.
Stick the paper to the cylinder with the right side inward, then glue the wider parts. Flip the cylinder over and shake it slightly so that the paper turns right-side out (fig.).
Cut out a variety of folded, shiny paper and glue them to the ends of the strips.
Hang the finished decoration where light will fall on it.
Everyone loves the New Year holiday because of the fun, delicious food, weekends, communication, dancing, songs, competitions ... And it all starts with creating a festive atmosphere that will give joyful emotions and impressions. In this article we will tell you how to decorate your home in an original, creative and enchanting way for the New Year.
The most common home decoration for the New Year is considered to be a garland. Consider several ideas and master classes for making it.

You will need: colored paper, scissors, a simple pencil.
Master Class

Garland "Santa's Socks"

You will need: bright big socks, red rope or satin ribbon, clothespins or eyelets.
Master Class
- Attach the string to the desired location.
- Hang your socks on a rope in a themed color scheme.
- Secure each sock.
Garland "Felt circles"

You will need: pieces of felt in bright colors, scissors, glue, thread.
Master Class
- Cut out felt circles. There should be about 50 circles. The more circles, the longer the garland.
- Glue the circles to the thread.
- Attach the garland.

You will need: peel from orange, tangerine, grapefruit, lemon (you can choose one option, or you can make an assorted one), scissors, a needle and thread.
Master Class
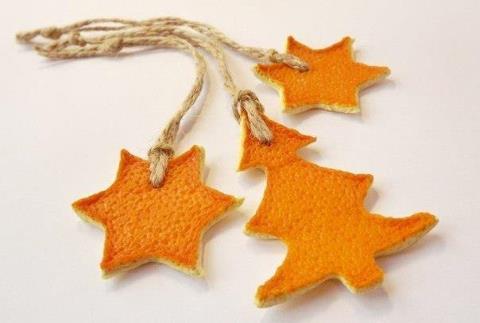
Such a creative garland will not only decorate your home and surprise guests, but also give a wonderful citrus aroma filled with vitamin C, which is so necessary in winter.
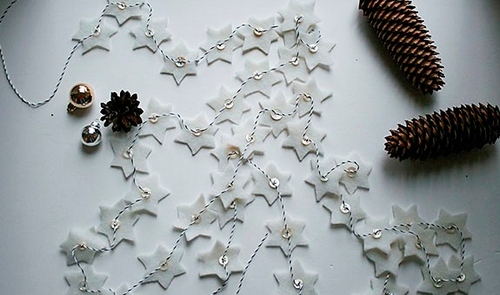
Garland "Natural composition"

You will need: cinnamon sticks, dried mandarin slices, cones, Christmas balls, thick thread and a needle.

Master Class
- Use a needle to string a cinnamon stick, a dried tangerine wedge, and a pine cone.
- Repeat the first step until the desired size of the garland.
- Decorate with Christmas balls.
- Attach the garland.

Decorating the house with a wreath for the New Year is a very original idea! It can be hung on a wall or door. A New Year's festive Christmas wreath can be made from clothespins, buttons, twigs, and even wine corks. Consider master classes and learn how to make wreaths for the New Year.

You will need: aluminum hanger or wire (for the frame), clothespins, beads and a ribbon (for decoration)
Master Class
- Unscrew the hanger and make a round frame, or create a wire frame.
- String the clothespin and bead.
- Repeat step # 2 until the wreath is full.
- Hang the wreath on the wall or door.

You will need: cardboard, scissors, glue, ribbon and bright buttons.
Master Class
- Cut the frame of the wreath out of round cardboard.
- Glue the buttons to the frame.
- At the top, make a ribbon bow.

You will need: base for the frame, lots of wine corks, beads for decoration, satin ribbon, glue gun.
Master Class

If you have a question, where to get so many traffic jams? - the answer is simple. Wine corks can be ordered from an online store at an affordable price, or purchased from a specialized store with interior supplies in your city. You can make not only a wreath from wine corks, but also a huge number of different crafts that are written about in this article: "Crafts from wine bottle corks with your own hands."

You will need: sprigs of needles or a fir broom, threads, beads and a ribbon for decoration.
Master Class

Decorating windows, glass and mirrors for the New Year

You will need: snowflake pattern, toothpaste and brush, glass half filled with water.
Master Class

You will need: pieces of felt, scissors, glue, sequins, thread.
Master Class
- Cut snowflakes or stars out of felt.
- Glue a sequin to the center of each snowflake.
- Glue all the snowflakes to the thread.
- Decorate the eaves and baseboards.
Decorating the walls of the house for the New Year

Such bright snowflakes on the walls look very creative. Making them is easy enough, only you need to have at least 24 identical wooden ice cream sticks. You can collect them or order them from the online store at a very affordable price.
You will need: ice cream sticks, red gouache, newspaper, glue and ribbon.
Master Class


You will need: dense threads, a bouncy ball or a ball, PVA glue, scissors, a needle, a candle in a tin box, a glass.
Master Class

Now we will consider enchanting ideas for decorating the ceiling. Helium balloons, which themselves fly to the ceiling, decorating it, will look very festive. The more of them, the better, brighter and more beautiful!

Snowflakes on strings attached to the ceiling fill the whole room with snow and this snow does not get cold! Get together in a big company, cut out a huge number of snowflakes and turn an ordinary room into a whole masterpiece!

Attach New Year's toys to the threads, then attach to the ceiling above the table or by the window itself, create a New Year's mood at home!

Use the best ideas for decorating your home for the New Year with your own hands. Happy New Years for you and your loved ones!
In any case, paper is the most inexpensive and easy-to-use material for holiday crafts, which is why we arm ourselves with scissors, glue, stapler and tape, as well as a bunch of colored leaves to make the most beautiful DIY Christmas decorations made of paper... And even if some ideas are not new, you can start doing this right now, without any complicated and expensive preliminary preparation.
DIY Christmas decorations made of paper
Garlands that stretch around the entire perimeter of the room, curl walls, furniture, ceilings, have been made by us since childhood. Colored chains are no longer the most popular long variety. DIY paper Christmas decorations... The hit of this winter is starfall, the end and edge of which is not visible.
To create these, you need one template or stencil, a long rope and glue. On the stencils, you need to cut out so many stars so that it is enough to shower the whole house. Since the option of such a craft is very simple, it is necessary that the stars themselves have individual artistic value, therefore, if you take bright, colored sheets for them, maybe even with sparkles or metallic overflows, then this will only get better. Another good option is wrappers, which are sold for gift wrapping departments, this material already has an interesting texture, and is not so expensive. One such leaf can become the progenitor of hundreds of stars. You need to collect the garland on a rope, using glue for this, coat it on one star, lay the rope on it so that it passes in the middle, and then cover it with a second star on top and gently press it with your fingers so that the elements are fixed. You can run the garland in several strands, you can organize a whole star curtain by placing them on the cornice of a window or doorway, or you can let them come down from the chandelier, shining beautifully under artificial lighting. To complicate the task a little, you can glue together not two, but five elements in sequence, then you will get interesting do-it-yourself voluminous Christmas decorations made of paper... To save money, because this kind of material will take several times more, it is worth taking newspaper sheets.

It is not worth dwelling only on the stars when there are still so many different elements for. For example, you can use large images of Christmas symbols - deer, Christmas trees, candy canes and gingerbread men - as such elements. They are not glued to a rope, but attached with an ordinary clothesline, making a creative garland in the style of photographic exhibitions of dryers.

Volumetric decorative accents can complement garlands with a more uniform texture, for example, paper balls, folded in any way you know, always bring bright touches. They are fragile and strong at the same time, large and neat, suitable for any interior, since the color for them is limited only by the palette of your set of colored craft cardboard. Pay attention to how beautiful the heart pendants look, the photos of which you can see above, moreover, you can later use the idea of creating such for Valentine's Day decor, but no longer depicting snowflakes on the front of the hearts.
DIY Christmas home decoration made of paper
What is good volumetric do-it-yourself christmas home decoration made of paper, so this is because it can be used not only in hanging garlands, but also in desktop compositions, which can become no less popular, especially if they are illuminated inside using LED garlands or in other ways.

In the photo example, you can see some ideas for both tabletop and pendant decor. Such cones with the image of Christmas heroes can not only be printed on a color printer, but also drawn with your own hand. You just need to first draw a layout diagram for such a decoration, for this you need to arm yourself with a compass so that the circle turns out to be correct and even, the larger its diameter, the higher the resulting cone. The resulting circle needs to be divided into four parts in the middle and only three painted, because you will need to cut off the fourth part. After cutting, the cone is twisted in just one movement and fixed with glue. It is somewhat more difficult to make such cute snow-white lanterns, for them the vytynanka technique is used, when an openwork pattern is carefully created using a sharp mock knife or scissors. To get just such an elegant effect, you first need to fold the solid candlesticks, but using a more transparent material, for example, such as tracing paper or parchment for baking, and the top layer, on which the drawing will already be cut, is made on the basis of the usual drawing format, it keeps its shape perfectly and it will be convenient to cut it. But we will come back to this beautiful technique when we study the options in more detail.

Apply all the cool techniques you only know to get a great New Year's Eve result. This is proved to us by some DIY paper Christmas decorations, photo which are above. For example, the classical origami technique can be quite complicated, but if you want three-dimensional stars, then you can easily use its schemes, which can be found quite a lot on the Web. Such stars can be hung in general not as a common garland, but separately, as they certainly deserve. Pay attention also to which is a folded book page. As a base for the tree, you will need a piece of wood or a small log in which vertical grooves are made. The pages are folded in identical right-angled triangles and inserted into these holes so that the sharp end - the top of the Christmas tree - turns out to be on top, and there are wide legs at the bottom. Above, a decorative tree is simply obliged to complement a wooden star or a volumetric origami craft.
DIY Christmas decorations made of paper
Snowflakes, thin as lace, were not so long ago used only as. Now, their grace is the best fit for decorating a modern interior in the Provence style or similar classical styles, so snow laces should definitely be considered in any material devoted to do-it-yourself paper Christmas decorations.

Of course, the inspirers of this DIY Christmas decorations made of paper - snowflakes, may not be of the most classical form. In all examples of decorative crafts, snowflakes of one kind or another are used, depending on the tasks that are set for them. So, for example, for an elegant garland that hangs in the most conspicuous place, it is best to choose multilayer snowflakes, with a dense center, for this the shape of hearts, circles, crescents, which are presented in the photo, is suitable. But if you want to combine snow elements, for example, into a common wreath to decorate a window opening or an entrance door with it, then you should make a lot of them, but the simplest possible form, because the beauty will lie in their number, and not the delicacy of each separate part. It is for wreaths that you can deviate from the classic white color and make New Year's decorations from colored paper with your own hands, let them be pink, blue, red, to match the color of your interior.

But for windows today, not just snowflakes are cut out, but whole snow landscapes, compositions that look especially impressive if they are highlighted. Above you can see suitable for similar DIY paper Christmas decorations templates.
DIY corrugated paper Christmas decorations
Tenderness also does not take do-it-yourself corrugated paper Christmas decorations... This material seems to have been created for the most festive crafts, what beautiful flowers, weightless garlands and so on are obtained with it. If you stock up on several rolls of corrugated material in basic shades, you are guaranteed to be able to make the most fashionable and elegant varieties of New Year's decor.

For example, we know that they are often used to decorate large areas, this is a fairly simple element. Strips of corrugated material are twisted into roses and fastened with glue. So that there is a place for flowers in the winter interior, use them to decorate Christmas balls or a large ball that decorates the chandelier. It's also an interesting idea to make a wall tree using this green material. The strips are cut with a fringe and glued to the wall (or flat base), starting from the bottom. Or you can use the ones you know for DIY Christmas decorations from paper scheme, which will make it possible to make garlands that differ in texture, more voluminous and bright. For example, such simple bows do not require special gluing or folding, but they look very elegant.

Make DIY Christmas decorations out of paper
Now let's look at a simple example like make DIY Christmas decorations out of paper that will meet all the fashion trends of today. These include window decor, which has several layers. On sale such cities, however, plywood, wooden, cardboard, are quite expensive, but if you use thick, high-quality paper, and even do everything yourself, you can get by with fairly modest means.

You can either develop it yourself, or download a ready-made one Christmas decoration of paper windows. With your own hands you need to transfer the sketch to the material and carefully cut it out with a breadboard knife. If you iron the format beforehand. It will be easier to work with. Fold the cut out houses, glue the roof to them and place them in the prepared box.

On both sides of the box, you need to make the outer layers of the composition. For the layer that will be on the glass, the image of tall houses, a month in the sky, and so on, is suitable, for the foreground - walking people, a standing Christmas tree.

Inside, houses are installed and fixed, inside which garland bulbs are placed. To heighten the effect, the very last distant plan is drawn on the glass with the help of artificial snow.