Crafts from cones with your own hands: a step-by-step master class for creating original products. Christmas tree from cones. Cone birds
In the world, probably, only babies do not know what cones are. This natural material serves not only to decorate trees, but also is the source for many Hand-Made crafts. Having given quite a bit of time, you can make colorful products from cones at home and transform the interior with designer crafts. And also to make collective compositions from spruce, cedar, pine cones, involving the whole family in the work. Having given quite a bit of time to creativity, you will plunge into the magical world of a fairy tale. If you have a rich imagination, then it will not be difficult for you to make any craft. In the meantime, we have selected the most popular songs.
What can be made from cones
Cones can not only be combined with interior items, but also create stand-alone decorations. You can also always make funny animals, and the process of creating products will intrigue not only a child, but also an adult.
With the use of cones, you can create:
- Decorative compositions that will not only add coziness and New Year's atmosphere, but also refresh the interior. The category of such crafts includes: a wreath on the door, ikebana, topiary, candlestick.
- New Year's products. Here the designer's fantasy can unfold in all directions, because you can start with a small composition or even make a tree from cones.
- Animal figures. Teddy bear, hedgehog, squirrel, goblin, penguins, snowy owl - a set of such heroes will not leave any child indifferent. And the manufacturing process will give a lot of pleasure and reward you with a charge of good mood for the whole day.


Cone processing
Before you start making crafts from cones, you should carefully process the cones:
- Contaminated material should be washed and dried naturally.
- Clean less contaminated material with a brush.
- Unripe and unopened cones should be placed in a slightly heated oven with the door ajar. You will notice that moisture will evaporate from wet buds, and unopened buds will gradually open in the form of spruce branches.
If, according to the idea, closed cones are needed, then in order to avoid opening the petals, you need to keep them in carpentry glue for 30 seconds. To transform, soak the cones in water, and then tie with a thread, giving the desired shape. Craft materials can be left in their natural form or covered with artificial snow, varnish, paint. Everything will depend on the intended craft.

Christmas tree made of cones
One of the most popular crafts around the holidays is the Christmas tree. Making it is easy enough. Consider 2 options.
For work we need:
- cones;
- cardboard;
- glue;
- coniferous branches or tinsel.
Step-by-step instructions for making a Christmas tree:
- Make a cone-shaped base out of cardboard.
- Glue the cones to the cone at intervals.
- Attach coniferous twigs or tinsel between the cones.
- The Christmas tree is ready. It remains to decorate the New Year's beauty.

Materials for making Christmas tree crafts from cones:
- cones;
- cardboard;
- stand;
- newspaper or paper;
- Super glue.
Step-by-step instruction:
- From cardboard, make the base for our Christmas tree in the form of a cone.
- For good stability of the structure, put newspaper or paper inside the structure.
- Cut out a circle from cardboard or use a wooden stand and attach a cone to it.
- Glue the cones to the cone from top to bottom. To avoid large gaps, turn the cones of each subsequent row in the opposite direction.
- If you have glued all the cones, then the main part of the craft is finished.

Cone decorations
Increasingly, in houses you can find decorations from cones made for the New Year or Christmas holidays with your own hands. Mostly these are pine or spruce garlands, or trees in pots.
When working with cones, it is very important to note their advantages:
- natural material without chemical impurities;
- pleasant coniferous smell;
- saving money by making decorations from cones.
If desired, you can make almost any toy out of cones, you just need to apply a little imagination and sometimes patience. Making Christmas tree ornaments is a great idea for a craft. After all, you not only make these decorations with your children, but also then dress up a New Year's beauty or decorate interior items with products. From the most elementary crafts, you can make a gnome.
Step-by-step instructions for making a gnome:
- Leave the bump unchanged, and take it as the basis of the gnome's body.
- Take a chestnut as the basis of the head. Then glue on the beard.
- Legs and arms are made of fabric and stuffed with padding polyester or cotton.
- Clothes are sewn from felt.
- For dwarf girls, a braid of thread should be braided.
The cones, elongated in shape, can serve as decorations in the house or become a wonderful decoration for the Christmas tree. To make exclusive ties for curtains, take a velvet fabric and fasten at the ends along a pine cone.


Another wonderful decoration of our decor can be a New Year's colorful garland of cones. The creation of this craft will not take you much time.
For the garland you will need:
- cones (the number depends on the length of the garland);
- glue;
- rope;
- spray paint (you can use any paint);
- sequins.
Step-by-step instruction:
- Prepare the cones for coloring by first cleaning them.
- Spray paint on the bumps.
- Sprinkle with glitter afterwards. Wait a little while the material dries.
- Take the rope and make marks on it where you will place the bumps.
- Leave 10 cm of string to tie the garland.
- Put a drop of glue on the base of the cone and glue it to the rope. Hold the bud firmly for 5 seconds for a firm grip.
- Do the same for the rest of the cones.
- The garland is ready.


Also, handmade crafts in the form of snowflakes made from cones made by hand will look very elegant as a New Year's decoration at home.
For making snowflakes, it is better to use spruce or long pine cones.
Take 6 cones and glue the bottom sides together. The center of our craft can be decorated with a small paper snowflake or lace. Within 5 minutes, our snowflake is ready.
Christmas wreath of cones
Preparing your home for the holidays begins at the doorstep. The autumn framing of the door is replaced by winter motifs and takes you to a winter fairy tale. Making a New Year's wreath is not at all difficult.
First you need to cut out the base of the wreath in the form of a circle from plastic, cardboard, flexible branches or wire. Glue small rings on the cones, pre-select a decor for the cones, or leave it in its original form. Put the cones on the wire by stringing. At the end of the work, twist the edges of the wire and decorate with a large bow.
Newspapers can also be the basis for a festive wreath. Rewind them into a ring and secure with threads in a circle. If there is organza or other material at home, wrap the resulting frame with them. To imitate spruce branches, use a green or light green rain. Glue the cones to the rain and add plastic fruits to the composition.
You can buy a ready-made base for a wreath in stores. Decorate it with acorns, nuts, cones and create your own individual design. You can decorate with any improvised materials: paint, sparkles, ribbons, beads, beads.


How to make a beautiful ball of cones
You can diversify the decor of your interior by making an unusual ball of cones and acorns. It is quite difficult to do it, but if you follow our instructions, then you will cope with the task.
For the base of the ball, make a circle of paper, crumpling it like when making a snowball. Another option for the base can be a trash bag. You can make a ball shape by stuffing the bag with cotton wool, padding polyester or newspaper. The opening of the package should be closed or sealed. The basis for the craft is ready.
We proceed to the main composition and glue the cones, evenly distributing them around the perimeter. After natural drying of the product, the composition is ready.
The final stage is the coating of the ball with varnish or snow. The finished product can be put in a pot or vase, or simply attached with a thread to the ceiling.


Topiary from cones
A good idea for creating an unusual interior is trimmed trees - topiaries. Sometimes they are called trees of happiness and good luck.
To implement the idea you will need:
- cones;
- gypsum or sponge;
- clay or plastic pot;
- tree branch;
- newspaper ball or flower sponge;
- threads;
- spray paint.
Step-by-step instruction:
- Form a ball of newspaper and wrap it with thread.
- Apply glue to the base of the cone, and glue it to the ball as tightly as possible.
- Glue the rest of the cones onto the ball. Try to choose buds that are similar in size.
- Sharpen the end of the pine branch and make a hole in the bottom of the ball.
- Fix the branch in the ball with glue.
- Paint the resulting ball with paint. The ball is decorated with dried leaves, branches, beads, colored ribbons.
- Prepare the plaster for work: dilute it in a pot, indenting 3-5 cm from the edge.
- Insert the branch with the ball into the gypsum solution and fix until dry.
- Mask the plaster with small cones or moss.

Making a candlestick from cones
A lit candle in a beautiful candlestick is responsible for giving romance and creating a New Year's composition at the festive table. The radiance of festive lights will not only add coziness, but also diversify the interior. Even a child can make this accessory with their own hands. The main decor material is cones, and other materials are selected depending on availability.
To create a festive candle you will need:
- cones, acorns, chestnuts;
- glue;
- cardboard circle;
- spray paint.
Lay out all the decoration elements on the substrate and paint. Staining should be carried out with open windows or on the street. Glue a candle and prepared decorations in the center of the cardboard circle. A branch of a coniferous tree will look original in the composition.
Another option for creating a candle can be decorating finished candlesticks with cones, twigs. Unusual candles are obtained from glass jars. To do this, pour sugar or artificial snow on the bottom of the jar. Decorate the top with lace and attach a few cones. Treat the composition with an aerosol with snow.


How to make a basket of cones
To make an unusual basket of cones, use our tips.
Materials for creating a basket of cones:
- cones;
- wire, fishing line;
- glue;
- cardboard.
The bottom should begin to be tied from the central cone, and so connect 8-16 in a circle, wrapping it with wire or fishing line.
For the second row of buds, make a smaller circle. For a high basket, make 3 circles.
Connect 2 circles of cones together with glue and wire. Make the handle of the basket out of wire and decorate with cones. Weave the handle alternately, turning the cones.


Animals from cones
Engaging in artistic creativity is equally useful for both adults and children. Each work uses the principle of combination and play of contrasts. After all, the difference in color, shape and size dictate their own rules in the craft.
Teddy bear made of cones
Materials:
- fir cone;
- 4 half-opened pine cones;
- a large open pine cone with a round top;
- acorn caps;
- alder cones;
- awl;
- glue;
- scissors.
Step-by-step instruction:
- An oblong pine cone is the body of a bear cub.
- Apply glue to the parts of the scales to be joined.
- Connect the parts of the product so that the scales of one cone fix the scales of the other.
- Make paws out of pine cones.
- Make the hind legs of the bear cub from larger bumps compared to the front ones.
- The head of the product will be an open pine cone.
- From the caps of acorns, make ears and a nose and attach tightly with glue.
- From black pepper, make eyes and the tip of the nose.
If a bag of cones has accumulated in the house, then creating a big bear is right for you. The size of the toy is selected according to the number of cones.
Make a bear frame from papier-mâché or polyurethane foam. Stuff the frame with paper, and put heavier material in the legs for stability. Make the top layer of cones and secure with glue. Ears, muzzle make from pompoms.

Hedgehog from cones
You can also make a beautiful hedgehog from cones by adding plasticine.
For the hedgehog you will need:
- cones;
- plasticine of several colors.
In order to make a hedgehog, all actions are performed in turn according to the instructions:
- Take plasticine and blind an elongated muzzle.
- Attach it to the base of the cone.
- From a different color of plasticine, make a nose, eyes, paws.
- Fix them on the craft.
- Additionally, make ears out of plasticine and attach them.
- The craft is ready.

Nature has always inspired people to be creative, because everything in it is subordinate to it. Having shown a little imagination, you can create not only toys, but also entire mini-cities from natural materials. And the process of creation will unite the family and give everyone the chance to show their design skills.
78 photos of cone craft ideas


In order to develop the imagination and fantasy of the child, it is necessary to instill in him a love of creativity from early childhood. Especially popular are natural materials that are absolutely safe for children. They are available to everyone, the main thing is to have time to prepare them. Crafts from cones are often found among the works of children, they are used to participate in competitions or exhibitions, and can also complement the interior. Below you will find master classes with a step-by-step description of creating products that will help you make a unique masterpiece using spruce fruits.
What can be made from cones with your own hands
With the use of cones, various figurines, decorative elements, and interior decorations can be created. The creative process of creating crafts will appeal not only to children, but also will not leave adults indifferent. With the use of such natural materials can be created:
- Animal figures - a mouse, a squirrel, a hedgehog (for example, using a bottle or additionally using only plasticine), a swan, a crocodile, an owl. Children can create such crafts, the creative process will give them a lot of pleasure, good mood, and the finished result will take pride of place at an exhibition at a school or kindergarten.
- Compositions for interior decor, which are able to enliven the room, create additional comfort. These crafts include: ikebana, topiary, a wreath on the door, a candlestick.
- New Year's crafts that will give a special festive mood, and due to the fact that they are handmade, the products will be much more valuable. As such decorative ornaments, toys, garlands for the Christmas tree or the festive tree itself can be created.
Step-by-step instructions for making crafts from cones
Natural materials are often used to create applications, accessories, interior decorations. In order to make an original craft using cones, you need imagination. But sometimes imagination is not enough or there are certain difficulties in composing a composition. In the absence of inspiration or knowledge about the nuances of creating a particular work, use detailed master classes and diagrams.
How to make a Christmas tree from cones for the New Year
It is difficult to imagine the New Year holidays without an elegant beauty of the Christmas tree. It is not always possible to place a natural tree indoors, this may be due to the small area of \u200b\u200bthe room or for security reasons. In this case, the ideal solution would be to make a Christmas tree yourself, using cones and decorative elements to decorate the craft.
For work you will need:
- cones;
- polystyrene foam or thick cardboard (it is acceptable to use any high-density paper);
- acrylic paint;
- glue;
- decorative elements.
Step-by-step creation of a Christmas tree:
- Using cardboard, make a cone or cut it out of foam.
- Using a silicone gun, glue the cones to the base so that they are facing outward with the open side.
- Cover the cones with gold or silver acrylic paint, if desired, a green tint can be used.
- After the coating has completely dried, decorate the Christmas tree with decorative elements: small toys, beads, sparkles.
- To learn another option for creating a Christmas tree, watch the video:
Master class on making Christmas decorations from pine cones
Decorating the Christmas tree on the eve of the holiday is a fascinating and favorite pastime that is enjoyed not only by children, but also by adults. In order for this process to be even more interesting, and the tree to become more beautiful and original, it is necessary to decorate it with hand-made toys using natural materials. You should take care of the decorations in advance, because before the New Year holidays there will be many other worries, and it is not always possible to find the gifts of nature to work under the cover of snow.
Materials required for work:
- cones (spruce, pine, cedar);
- acrylic paints;
- ribbons;
- sequins.

Step by step creation of Christmas decorations:
- Tie a thread to the base of the cone, for which the decoration will be hung on the Christmas tree.
- Using a sponge or brush, cover the toy with paint and sprinkle with sparkles.
- Hang the accessory by a thread, let it dry.
- Cover the jewelry with varnish, this will ensure the long-term preservation of the jewelry and allow it to be used in subsequent years.
- Tie bright, beautiful ribbons with a bow, glue cones to the base. Additionally, decorative elements can be used, which will give the decoration originality.
- Watch the video to learn more about the procedure for making Christmas tree decorations using natural materials.
Topiary - a tree of happiness from cones, acorns and decorative elements
Using materials of natural origin, original trees can be created, which, in addition to their decorative function, according to beliefs, can bring happiness, joy, prosperity to the house. To create a topiary, completely different things can be taken from coffee beans and artificial flowers to chestnuts, cones, acorns, leaves. The tree created using cones and additional decorative elements looks original.
For creativity you will need:
- pine or spruce fruits;
- small box;
- a sheet of paper, cloth or bamboo napkin for decorating a vase;
- tree branches;
- glue;
- gypsum;
- foam ball;
- paint in a balloon, gouache;
- decorative elements: ribbons, beads, sequins.

How to create a composition step by step:
- It is worth starting work with preparing a flowerpot for the future tree. To do this, it is necessary to glue the selected plastic box or other container with a bamboo or straw napkin. If desired, it is worth additionally decorating the accessory with ribbons or a bow.
- Make a hole in a foam ball painted brown, stick branches into it (fix everything with glue so that the structure holds well).
- Glue the ball over with cones, then sprinkle everything with white paint to give originality to the craft.
- Place the tree trunk in a pre-prepared flowerpot and fill with plaster, which is diluted in accordance with the instructions. Wait for the material to fully set and decorate a creative masterpiece using moss, beads, ribbons.
- For a detailed description of creating a topiary, see the video:
Christmas wreath of cones and fir branches
To decorate the room on New Year's Eve, you need to prepare decorative elements in advance. An ideal door decor would be a wreath created using cones and other gifts of nature that can retain their properties for a long time and not lose their original appearance. It is worth attracting a child to the creative process - this will help to have fun, exciting and useful time, creating a unique masterpiece for your home.
For work you will need:
- tree branches (vine);
- grass;
- cones;
- glue;
- rowan twigs, other decorative elements.

Instructions for creating a New Year's wreath:
- Twist branches, grass into a three-dimensional wreath. Wrap with rope or wire for strength and reinforcement.
- Use a glue gun to glue the cones onto the wreath. If desired, the product should be coated with golden or silver paint or left in its natural form.
- Add decorative elements: mountain ash, beads, spruce branches, beads and more.
- Attach the tape to the back of the product with a loop for fastening.
- Watch a video with another option for making a New Year's wreath:
Children's craft hedgehog from cones and plasticine
The process of creating a toy using natural materials for a child and his parents will be fascinating and interesting. Making such a product is very simple, and the finished result will delight. To work, you need to prepare the following tools and accessories:
- bumps.
- plasticine of several shades.

Step by step creation of a hedgehog:
- Using light-colored plasticine, mold the muzzle of the animal and attach it to the back of the cone (to the place where the cone was attached to the Christmas tree).
- In order to make a nose, eyes for a hedgehog - it is necessary to roll up several balls from a dark-colored plasticine mass, place it on the “face”. Additionally, create ears, attach them to the crown.
- Make paws using the base color plasticine, glue them to the base of the hedgehog.
- Using multi-colored plasticine, it is worth molding an apple, mushrooms or a leaf and pricking decorative elements on the “needles” of the hedgehog.
- Watch the video to see another option for creating an animal figurine:
Christmas decoration made of cones - candlestick
A lit candle in a beautiful candlestick can decorate the New Year's table. Create such an accessory with your own hands, using natural materials for this. A variety of details, accessories, decorations can be used for work, which will help make the craft unique and very beautiful. For work you will need:
- cones;
- disk or cardboard circle;
- glue gun;
- acrylic paint in a bottle;
- decorative elements (beads, Christmas decorations of small sizes, shells, artificial twigs);
- other natural materials: chestnuts, acorns, nuts.

Step-by-step creation of a New Year's candlestick:
- All natural materials that will be used in the work must be laid out on a newspaper and covered with plenty of paint. If desired, sprinkle with sparkles or mother-of-pearl. It is desirable to carry out all manipulations in an open space or in a well-ventilated area.
- Glue a candle in the center of the disk, and place the parts covered with paint around. When creating a composition, you should also use the material in its natural form, New Year's beads, toys and other decorative elements. A sprig of spruce looks beautiful in such a craft - natural or artificial.
- Watch a video describing the process of creating other simple candlestick options:
How to make a basket of cones with your own hands
It is realistic to create a beautiful basket for flowers, fruits or sweets with your own hands, using improvised and natural materials for this. Such a masterpiece will become a true decoration and add some zest to the interior. For work it is necessary to prepare the following materials and tools:
- pine cones;
- glue gun;
- cardboard;
- wire 0.2 and 0.5 cm thick.

How to make a basket step by step:
- The first step is to create a circle using the bumps and the wire that needs to be wrapped around them for a secure fit. We connect the cones to each other, attaching the first to the second and wrapping the wire around it. So connect 10-20 cones in a circle, leaving the base of the cones outside.
- Similarly, make the second ring, but slightly smaller in diameter. If there is a desire to create a high basket, it is additionally worth creating a third circle.
- Connect the rings together, fixing with glue.
- Make a basket handle using thin wire and cones, attach to the product with glue.
- Glue thick cardboard to the bottom.
- Look at the photo for examples of ready-made baskets and options for their use:
Video tutorials: how to create beautiful crafts from cones
Natural materials are unique elements that are often used in creativity, in children's needlework. This is due to their safety, accessibility (they can be collected in the country, in the forest, park) and a wide range of applications, the ability to create a wide variety of crafts using, for example, cones. Sometimes children and their parents do not know how to make this or that product with their own hands. For inspiration on new masterpieces, check out the selection of video tutorials below.
Decorative basket of fir cones
Composition on the theme of autumn from cones and natural material
Easy craft for children - forest animals hare and fox
Autumn crafts for a child in kindergarten or school - flowers in a vase
So let's see what ideas crafts from cones I have collected for you today.
craft idea
from shelled cones.
(7 new ideas)
If you disassemble the bump into scales (pull them out with ticks), then you can lay out any picture from such scales (a fluffy dog, a natural landscape, or such a formidable owl.

Can do paper cone ... and with a glue gun(sold in a hardware store for $ 5) glue the entire cone with cone scales, overlapping each other (like a tile). Get a Christmas tree. You need to start pasting the cones with scales from the bottom of the cone ... and gradually move row by row to the top of the cone.

By the same principle, one can lay out plasticine turtle shell, or a hat mushrooms.

Or a very good idea that itself asks for cone scales is Hedgehogs. We sculpt the body from plasticine. We poke the back with sharp scales. And we form a muzzle from a bunch-panicle. The question is, what to make this bundle from? Here's what I think you can try from an ordinary broom cut into thin twigs… Or take corn cake and cut it with scissors into thin straight chips- collect them in a bundle, bend the bundle in half (the place of the fold will be the tip of the nose). Next, we fluff this bent bundle ... so that it spreads out with a panicle on the sides - and with this spread we glue it into the bow of the plasticine craft.

By the way, I thought here - probably, the muzzle can be made not from the natural material of kakuruz skin ... and cut out of paper(small narrow strips) ... or take elementary threads (make a bundle, bend in half, wrap the fold line of the bundle into a navel nose). Perhaps the threads will need to be starched later so that they keep a rigid shape.

By the same principle, this children's craft is made - PROTEIN from cones and plasticine.

First, a body is molded ... then on the body with a pencil zone boundaries are delineated. We will cover one zone with cone scales, in the other zone with a small panicle made of paper (or natural materials).
When the body is ready, we separately sculpt the tail from plasticine... and we stick its upper part with cone scales. And we cover the lower part of the tail with a white thin cut of paper pile.
You can mold an EAGLE from plasticine ... or another bird - make plumage from cone scales.

You can lay out a FAIRY HOUSE with such scales. Such a house is made very simply. To do this, we need an elongated zucchini (you need to buy not a fresh zucchini with thin skin, which is easy to pierce with a knife ... but a garden one that is already yellowed or dark green, the skin of which is not only not pushed through with a fingernail, but not with a knife the first time. Such hard garden squashes sell babki in the market. Walk along the market row, poke your finger on the sly and choose. If your squash is not SUCH PEAR-LIKE in shape as in the photo of the house below - do not worry… it’s just that your roof of the house will be a slightly different shape (not so elongated, but more rounded). This will not diminish the beauty of your crafts from cones. And most importantly try to choose one that can be put on the ass - and so that it does not fall ... But if it does fall, then it's okay - you can just put plasticine under its base.

You can leave the zucchini whole (do not remove the middle) - but be prepared for the fact that the zucchini can rot from the inside over time. ... Or you can cut off the lower buttocks. Take out its contents with a spoon ... and dry it in the sun so that its crust hardens from the inside (so your house will be eternal and will not rot).
We paint the zucchini in brown (if you paint with gouache, then after painting, thoroughly spray the entire painted zucchini with HAIR SPRAY, so the paint will stop getting your hands dirty)
Details of doors, windows and rosettes above the doorway WE MAKE WITH HANDS. Sculpt the best from polymer clay (plastics) which hardens in the oven.
BUT IF you don't have plastic surgery, then suitable for salt dough(water + salt + PVA glue + flour + paper towel). I add pva glue and a small-torn paper napkin to the salt dough so that the dough does not crack when it dries, but is smooth and holds a solid shape well.
OR you can blind all the details plasticine crafts... and so that it does not float in the sun, it needs to be hardened. As a hardener, spray varnish (from a hardware store) ... or hairspray ... or nail polish is suitable. The only side effect is that the figurine will have a sheen from the varnish. But it's not scary. The main thing after the plasticine has hardened is not to try to CRUSH it (the lacquer peel may crack). Therefore, we will cover with varnish the doors and windows already glued to the zucchini.
CRAFTS FROM TOP CONES.
(take the top part of the cone)
And if you start peeling the cones from the tip - and leave the tops of the cones with scales. Then to such scaly caps you can glue round pads, or pompoms. You put a ball of cotton wool (or synthetic winterizer) in a square of canvas fabric, collect the edges of the square into a bundle and tie up a thread (you get a round knot (like a hedgehog in the fog from a cartoon). Cover this round knot from above (where the tie is) with a cone hat - on glue.
And you get an acorn craft. Such cone acorns can be hung as a decoration on a wreath of wicker.

Instead of canvas bags, you can use a half of a foam egg ... you must first paint it (for example, in gold paint).

Or such a knobby top can serve as a shell for a plasticine turtle.
And now let's move on to crafts from WHOLE cones. We'll start with the birds... then we'll take the animals... and then the little men.
Cone birds
(pine and spruce)
PENGUINS.
Here is such a beautiful idea of \u200b\u200bpenguins from fir cones requires plasticine and white paint. We sculpt the head and wings from plasticine - and cover the belly with paint. Or you can make wings from corn cob meal.

OWLS AND CHICKS.
Below in the photo you can see that auxiliary material can serve pieces of felt, cardboard, feathers, as well as acorn caps(they can be used as the bulging eyes of birds - turn the hats upside down, paint them white and draw pupils with a black marker.


If you put the cones on top of each other, then you can make such owl crafts. Wings and eyebrows are made from pieces of bark, eyes and nose are made from paper. A paper circle for an owl's eye can be cut in a circle with scissors and through these cuts make a winding with threads - this way we get expressive rays in the eyes of owls from cones.

And if a pine cone is rolled in cotton wool plucked into fibers, then it will get such a fluffy white color. From such fluffy cones you can make white owls, chicks, snowmen or try to make a fluffy dog.

PEACOCKS AND TURKEYS.
Can be from a cone make a peacock. For this craft, you need thick paper for the head, and soft crepe paper for the plumage of the tail.

And here is another option from the same breed of crafts. Here the principle is the same, but the bird is no longer a peacock, and a turkey.

Sparrows from pine cones
Here is another version of the cone bird. The sparrow's wings are made from pieces of bark, and the head is a ball sewn from terry cloth (if you have piece of terry cloth, you can donate to the creation of this bird - fur fabric is also suitable). It is better when the napkin is white ... then you can paint the frontal part of the chick's head with black paint. Plus, this is a bunch of fabric that was pulled off with a pinch, wrapped around this pulled pinch with a thread at the base (so that it would be fixed) - and painted black. Bead eyes were sewn or glued to the head.

Or the head can be made from a pom-pom. Take ordinary white thread and wind them into two holey circles ... as usual do-it-yourself pompons are made (google, you will find such a lesson).
Or you can make a head for a bird from a regular foam ball. They are sold in craft stores, or they can be ordered from online stores (they are very cheap). And if you order from China on the Ali Express website ... then it will generally be cheap.
The plasticine head will turn out to be VERY HEAVY, and the bird will fall...
But more can be done ping pong ball heads.
And also the head can be made of wool(sold wool for felting) ... also quite inexpensive. You need to put it in a bowl with warm soapy water - and roll a ball out of it right in the water ... as you roll, the ball becomes denser and denser ... (you need to roll for 2-5 minutes, a long time). And then we take it out and dry it. And we get a ball as dense as a felt boot. It is light and holds well on the bump, without outweighing or overloading the craft.

Bird legs can be crafted from wire... wire can be obtained from large CLIPS. Paper wings are attached to plasticine inside the scales.
HERONS, SWANS AND OSTRICHES from cones.
Here are examples of TALL BIRDS from long cones. The tail for the left bird in the photo below is made from a strip of paper, which is pasted over with scales pulled out of the cone.

If you have feathers (pulled out of a pillow, for example), then you can make beautiful swans out of cones. Necks can be rolled up from plasticine and wire.

Here are more examples of crafts with feathers - ostriches from cones. The neck and head are molded from plasticine. The secret of the stability of such thin and long necks is in the wire that is hidden inside these necks (rolled in plasticine) like a metal frame ... the end of the wire sticks out and it is he who sticks into the bump.

Due to the flexibility of the wire neck, it can be bent to any side and give any bend to our cone craft (as in the bottom photo). By the way, note that one of the birds is made in the form of a FLAMINGO ... and in the background we see a pink cone sheep.

Hedgehogs and MICE
FROM A PINE CONE.
Hedgehogs from cones are made in two ways. Or we sculpt a muzzle from plasticine and attach it to a bump. Or we cut out this muzzle from felt (cardboard). We glue the buttons-eyes and glue the felt to the cone.


And here are ideas for creating bears from cones. Coarse postal thread (for wax sealing of parcels) - suitable for wrapping the muzzle and belly of a bear. We pre-stick plasticine on the bumpy muzzle so that the thread sticks.


But the squirrel - the head is made from a pom-pom (sold in craft stores) hands and ears from wire brushes (also sold there).

But below we see mice whose heads are simple cones made of gray felt (or fleece).

If you buy pieces of fur, you can make these crafts from cones for the Christmas tree. I will post even more New Year's crafts from natural materials in a separate article and then a link to it will appear here.

PEOPLE as handicrafts from cones.
(several ways).
Remember, just above, I explained how to roll a hard felt ball out of a piece of felt wool - in soapy warm water. From such balls and cones you can make little men.
Or you can replace the felt balls with ping-pong balls or wooden balls.

Here is an example of a MOTHER AND BABY made from cones and felt... Mom's hair is made from orange felt wool. Handles are also made of wool rolled into a flagellum in warm soapy water.


And here is a family of gnomes made of cones. Craft from a felt head and pieces of felt or fleece fabric + bells on hats.

Another similar piece. Gnomes from cones - on the head of each gnome is a hat (a cell from a paper cassette for eggs). The legs are leaves glued onto cardboard, the beard is made from a piece of cotton pad glued to a muzzle made of cardboard.

And to the family of gnomes, you can make another company out of cones - the forest inhabitants of the magical forest - FEY. Roll the face out of plasticine - glue a bunch of chopped threads to the top of the head - acorn hat on top. And glue bright wings made of cardboard or felt on the back.


And from the cones you can make beautiful skiers in bright scarves. Hair is a bundle of threads. Scarves - a piece of Christmas garland.

Hats for such skiers can be crocheted or knitted. Cut out scarves from fleece or soft crepe paper (you can just crumple a white sheet of paper ... and cut a scarf out of it - it will be soft and easily wrap around the bump. Cardboard skis (or ice cream sticks) ... toothpicks serve as ski poles.
Good luck with your creative ideas.
Olga Klishevskaya, specially for the site
Each of you knows what forest cones are, but not everyone realizes that from these seemingly simple things, you can create incredibly beautiful and original products that will be a wonderful decoration for your home. Most often, pine or spruce cones are used as the material. To collect them, it is not necessary to go to the forest. Trees of this breed also grow in residential areas, such as parks or recreation areas. If you have children, then it is best to engage in such a developing activity, of course, together. This will help encourage kids to be creative from an early age, expand their knowledge and horizons to the world around them. After all, nothing will please your kids as much as joint creativity with you.
Necessary material and tools for work
Before starting work, you need to stock up on the necessary materials that will be required for work. To make crafts from cones, you will need:
- Cones are ordinary;
- Silicone Glue;
- glitter powder;
- Decorative tape;
- Sequins and rhinestones;
- Threads and scissors;
- Colored paints;
- Cardboard or fibrous paper (felt);
- Awl and tongs;
- Beads or sequin beads;
- artificial snow, etc.
Important! When working with sharp and piercing objects, it is important to observe safety precautions. Do not trust children with the front of work where there is an accidental risk of injury.

Decor on the theme of autumn
Autumn is not only a beautiful time of the year, but also a source of creative inspiration for many people. The step-by-step instructions for simple cone crafts given in this article will help you create a truly beautiful, designer decor from improvised materials. After all, with the advent of the Internet in our lives, the need to go to professional master classes has disappeared. Today, finding a detailed description of the process, where step-by-step steps will be presented with photographs attached to them, is a matter of five minutes.
Very often, kindergarten teachers, as homework, ask your kids to make an unusual composition of cones on an autumn theme. It can be absolutely any miniature, the main thing is that it conveys a festive, autumn mood.

Decorative wreath of cones will be a great decoration for the front door
Such a wreath is made quite simply; for this, it is enough to take an ordinary plastic or wooden blank in the form of a ring and glue pre-prepared acorns and cones to it. To make the product more attractive, it can be tied with a decorative rope.
Making funny hedgehogs from dried cones is even easier, because their shape resembles the body of animals. To the prepared workpiece, on its sharp part, a triangle made of felt material and having rounded edges is glued. He will play the role of the face of our future crafts. After that, you just need to revive the resulting workpiece. To do this, the eyes and nose are glued to it. Congratulations, the cone hedgehog is ready.


This beautiful decor is made as follows. An old pot that you might have been throwing away is filling up with green moss. After that, small cones are carefully inserted into it so that they fill almost the entire area of our craft. To fix the cones, you can use glue, so you eliminate the likelihood of them falling out during the drying of the moss.
Despite the fact that such decoration will last for a relatively short time, it is guaranteed to give you a good and cheerful mood for a couple of weeks.

Miniature trees made of cones, acorns and walnuts
Making an owl out of cones is probably one of the easiest tasks that even a five-year-old child can handle. The set of necessary material is quite simple. The body, as usual, will be the bump itself, you just need to add the missing elements to it, namely: eyes, nose, paws and wings. To do this, you can use the same fibrous fabric (felt) or ordinary acorns, which are also an excellent material for making crafts.


To make your products look more realistic and beautiful, use them to create them, which always attract increased attention.
baby decoration
There are a lot of ideas for children's crafts, and even the smallest family members can take part in their creation. Decorating with forest cones is a very exciting and entertaining process that will bring the whole family together at the same table. The result of joint creativity will be beautiful decorations for your home.
A hand-made product made from forest gifts will allow you to create a cheerful and festive atmosphere in your house, because in them you will make the dreams and desires of your kids come true.
What crafts can be made from cones:
Christmas decorations (Christmas trees, garlands, toys);
Figurines of fairy-tale characters;
Models of birds and animals;
Flower pots and vases;
Original gifts and decorations;
Home interior items;
Beautiful figurines;
Wall and other small designer decor.
This is just a small list of what can be made from spruce and pine cones. In fact, the number and variety of crafts is limited only by your imagination. However, you need to start small and only then, having gained experience, you can begin to manufacture more complex products.

Beautiful children's crafts made by hand from improvised materials


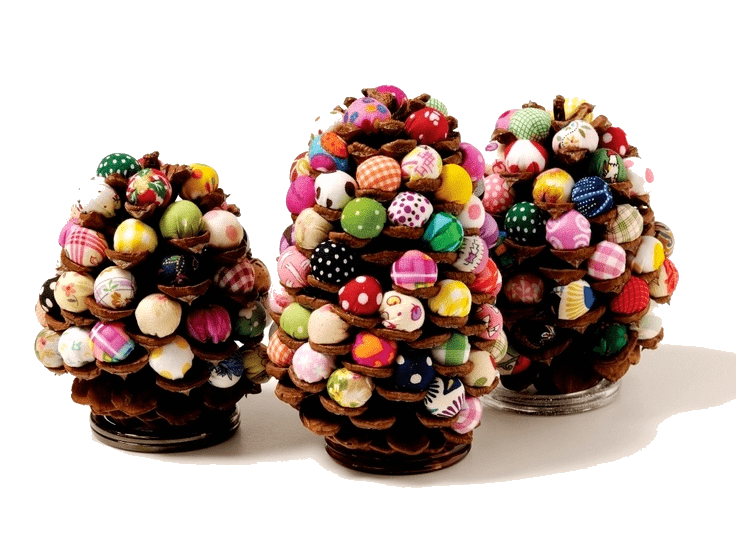
Another wonderful craft that will undoubtedly please your kids is a decorative Christmas tree made of cones. To make it yourself, you will need a pine cone with opened petals, multi-colored felt balls and silicone glue.
The process of creating a figurine is quite simple. A small drop of glue is applied to the ball, capable of holding it on the tip of the petal. After that, you should wait for it to dry completely, and then check the reliability of fixing each ball. The craft is ready!

Needlework is a great activity for developing tactile sensations and improving hand motility. That is why creating crafts for kindergarten from cones is not only a pleasant, but also a very useful hobby. Moreover, cones are an environmentally friendly product, which, in addition to their aesthetic beauty, have a pleasant smell of pine needles.
Having received a couple of practical lessons from their parents, then the children will be able to independently engage in this creativity, which will captivate them with their heads. Finished products can be a wonderful decoration for your home or a good gift for friends.


To make a turkey or turkey from a cone, you will need felt, a pine cone, tongs, glued eyes. The craft is done like this:
So that the body of the future turkey does not turn out to be too elongated, the sharp part of the cone must be carefully bitten off with tongs;
Further, according to a pre-prepared template, a tail, paws, beak, head and neck are cut out of felt paper;
All elements are fixed to the workpiece with glue;
Now it remains to revive the figurine. To do this, the eyes and beak are glued to the head. The cone turkey is ready!

Plasticine products
Plasticine is an excellent choice for making your children creative. It has been proven that when working with With this material, not only fine motor skills of the hands develop, but also children's speech, and the modeling process itself gives unlimited pleasure.
Plasticine products for kindergarten are also not a rare homework for your kids. After all, the benefits of this work are obvious and indisputable. Most often, children are asked to make a composition on the theme of autumn, and this is not easy. There are so many beautiful and beautiful things you can think of at this time of the year, especially when there are so many improvised materials (acorns, chestnuts, fallen leaves).

Red squirrel - a wonderful craft made of cones and plasticine
Squirrel - personifies a symbol of thrift and thrift. This craft will be a great toy for your children. To make it, you will need orange, black and white plasticine and 3 cones (2 large, 1 small).
First, combine 3 cones into a single composition, 2 (large) of which will be the body and tail, and the third (small) head. To do this, you can use glue or plasticine itself;
From orange plasticine we make 4 paws. We fasten them to the body of the squirrel;
Next, you need to blind the muzzle and ears. We fix them on the head;
Roll two balls of the same size from white plasticine, stick two black ones to them, only smaller. This way you will get eyes. Having flattened them a little, we fasten them in the upper part of the face;
It remains to sculpt the squirrel's nose. To do this, roll a ball from black plasticine, about twice as large as white and stick it on the tip of the muzzle. The squirrel is ready!


Funny figurines that you can make from cones with your own hands
Leaf crafts
Tree leaves are an excellent material for creating voluminous crafts. They can be used alone or with other natural materials. And one of these materials is a bump.
There are plenty of creative ideas for using this natural material, you just need to decide on the direction of the style, whether it will be a picture, a wreath, or just an ordinary exhibition. For the manufacture of products, any cones, open and unopened, large and small, are suitable.


You can create original compositions from cones and leaves on absolutely any topic. In finished form, they can decorate not only your home, but also yours. In addition, your kids can take part in their creation. You just need to organize a small step-by-step master class for them, after which they will happily do it on their own.
Crafts of miniature animals and people are especially popular. They are made quickly and simply. Auxiliary material for their manufacture can serve as pieces of fabric, shelves, tree branches, metal wire, tree bark, acorn caps, etc.


Autumn is perhaps the most beautiful time of the year. Her beauty has become an inexhaustible source of inspiration for many creative personalities: writers, artists, sculptors and others. It is in autumn that the foliage of trees acquires its bright, beautiful color and then falls off.
Experienced masters of needlework are sure that such beauty should not be wasted. With their own hands, they make incredibly beautiful crafts from fallen leaves, which sometimes look like a real work of art. Well, forest cones only complement the overall picture.

Beautiful decor of leaves and cones on the theme of autumn
Christmas toys
New Year is the main family holiday, which both adults and children are looking forward to. Well, what holiday is complete without toys and gifts? Indeed, on this day, your kids are waiting for a special atmosphere and a real miracle. To surprise your family, you can of course go to the store and buy everything there. However, such a surprise should not be ordinary, it should be interesting and original. Therefore, the best option is to make gifts and decorations with your own hands.
To create a magical and festive atmosphere, decorating one Christmas tree will not be enough. On this day, everything around should be beautiful. DIY Christmas toys made from cones will help you solve this problem. After all, there are a huge number of New Year's themes for decorating the house with crafts from cones. Let's consider each of them in more detail.


If you have old toys that your child has not played with for a long time or they are worn out, you do not have to throw them away. They can be given new life by turning them into original Christmas decorations. Making such a toy with your own hands is easy. To do this, you will need cones, glue and other auxiliary material (sticks, beads, buttons, etc.)
- The first thing to do is paint the bump in gold or silver. It is best to use special cans of paint for this;
- Next, you need to attach the head to the bump. A glue gun works great for this. Paws and tail can be made of any material, felt is ideal;
- A thread in the form of a loop is tied to the finished products, at the base of the neck. With its help, toys will be hung on the Christmas tree.


New Year is a bright and cheerful holiday, in which there is a tradition to decorate not only the Christmas tree, but the whole house. Your mood will depend on how well the decor is chosen. It is best to decorate the ceiling and walls with beautiful white snowflakes, windows with multi-colored garlands, sprinkle furniture and floors with sparkles and confetti.
The arrangement of cones will go well with the legs of a pine or spruce. Add colored ribbons and toys to it and you will get an incredibly beautiful New Year's composition that will become the center of attention at your holiday.

A pine branch decorated with cones is a very popular element of New Year's decor.

New Year has its own traditions and one of them is to light candles.

Traditionally, the main colors associated with the New Year are green, red, blue and white. Of course, the color scheme can be supplemented with several other colors, but the main thing here is not to overdo it.
For example, blue or red, on a green background of a Christmas tree, will look bright and rich, they will emphasize the beauty of the green beauty, which is characteristic of her at this time of the year. It will help to dilute bright tones. It can be artificial snow for decoration, paper snowflakes, silver-coated cones, tinsel or garlands spirally wrapped around a Christmas tree.

It is not difficult to make a New Year's composition with the use of forest cones with your own hands, you just need a little of your imagination and patience, as well as skillful hands that can work wonders.
- First you need to collect as many cones as possible in the forest, preferably pine cones. Buds should have a neat appearance with no visible damage. It is desirable that all the petals are fully opened, so the craft will look more voluminous and richer;
- Next, using ordinary gouache, cover each tip of the petal with a dense layer of paint. For more elegance, you can sprinkle glitter on top.
Ready-made cones can be used as a decoration for a Christmas tree, or you can make a luxurious garland out of them and decorate it with, for example, a portal. They can also be placed in a transparent container and used as a decorative element.


As you can see for yourself, forest cones are an extremely easy-to-use natural material from which you can make amazing decorative items on absolutely any subject with your own hands.
With the help of properly selected decorations, you can create a unique interior of a country house or apartment.

In all kindergartens and schools, every year they are asked to make products with their own hands. This is perhaps the most common puzzle for parents.
And you know, it's not even bad at all.

We have a lot of natural material, you need to add a little imagination.

And most importantly, you and your whole family will immerse yourself in the charming world of creativity.

Today, we will look at a natural resource - cones.
It is used not only in school crafts, but also for the interior, Hand-Made designers and others.

Below are photos and a detailed diagram of several cone crafts.

What crafts from cones you can do with your own hands
Almost everyone can make crafts from real pine and spruce cones, the main desire and a little imagination.

Using this amazing natural resource, you can do:
- Decor elements that will bring a wonderful smell of the forest and a cozy atmosphere into your home.
- Christmas crafts: festive wreath, candlestick, Christmas tree, garland, Christmas ball and more.
- Interesting crafts of funny animals with children.
Festive wreath
You can convey the New Year mood to guests right from the doorstep. For the design of the New Year's wreath we will use:
- Cardboard
- Spruce or pine branches
- cones
- Satin ribbon
- Not real snow
- Dye
- glue gun
- Decorations for decoration, optional.

In the manufacture of the base, many materials are used.

For example: plastic, cardboard, branches, bending wire, and even newspapers.

We settled on cardboard, it is quite simple and convenient to work with.

On the cardboard we cut out the diameter of the circle that we need. Next, we fasten the branches and cones, forming a symmetrical circle.

After the cones are glued, we continue to decorate our wreath. We take a can of artificial snow and spray the edges of the cones.
If you could not find snow, then you can paint the scales with white or silver paint.

We tie with a satin ribbon, choose the color yourself.
Note!


For a more interesting and rich wreath, you can add additional decorative elements: red beads, acorns, nuts, flowers.

Turn on your imagination and you will succeed!

Christmas garland
Quick and easy craft to make.
Material you need:
- cones
- glue gun
- rope
- dye
- sequins

Step-by-step instructions for crafts:
- We prepare the cones in advance, paint them with paint. Paint can be selected in different colors. Or make it in one color that matches the design of your interior. Glitter can also be used for the "elegance" of the product.
- We take the rope and make marks the distance between the bumps.
- From the edges we leave 10-15 cm each in order to have a place to attach a garland.
- Using a glue gun, attach the cones to the rope. Glue along the entire length.
- We are waiting for the glue to dry. And voila! Christmas garland is ready.

Note!

For kids and schoolchildren, it will be easy to make crafts from cones and plasticine of funny animals: Mishutka, Hedgehog, Squirrel, Owl, etc.

bear
We will use:
- Cones of different types (pine, spruce, open, closed)
- Scissors
- Plasticine

Step-by-step instructions for making crafts:
Body. From the collected material, we select an elongated pine cone. On the connecting parts of the scales, apply glue. We connect the parts so that the scales fix each other.

Paws. We choose 2 larger cones for the lower legs, and 2 smaller ones for the upper ones. We glue the parts with the body, follow the symmetry.

Head. We make the head from open pine cones. They perfectly convey the fluffiness of the bear's fur. Attach with glue to the base.
Note!


Ears, eyes and nose. It can be made from plasticine, and the tip of the nose, for example, from black peppercorns.

If you want to surprise everyone around, then you can make a big bear. The size of the bear is up to you, the main thing is to get the right amount of cones.

You can make the base - the frame of the Mishutka from polyurethane foam, polystyrene or papier-mâché. An excellent solution, for the stability of the product, is to attach something heavy to the bottom.

We cover the frame with cones, and we make the ears and muzzle from plasticine or pompons.

Hedgehog
The easiest children's craft made of cones. For its manufacture, you need only two materials:
- cones
- Plasticine

Step by step description:
Body. The cone itself is well suited for the base of the craft. If you look closely and turn the scales correctly, they look like hedgehog needles.

Muzzle. Here we need plasticine. From it we make an oblong muzzle. And fix on the craft.

Eyes, nose, paws, ears. We also use plasticine, only of a different color.

As you can see, there is nothing complicated, this cone craft is suitable for kindergarten.

Experiment! Decorate your home with interesting design solutions that you have prepared yourself. Do not forget about the children, they will also be interested in taking part in the creation of a small miracle.

Photo of crafts from cones


