Twin Needle: Machine setting for a good stitch. For denim. What is a tool
The twin needle can be installed in any zigzag sewing machine. The main thing you should pay attention to before buying a twin needle is the width of the hole (slit) of the needle plate and the distance between the needles. How to sew, and how to use a twin needle, how to thread two needles at the same time? The threads are threaded in the same way as with one needle, only two will be used instead of one spool. And both threads will pass through the same upper thread tensioner.
The use of a twin needle increases the capacity of your machine and makes finishing double stitches easier. In addition, when sewing knitwear, you can imitate the stitching of a cover stitch machine. But most often, a twin needle is indispensable when sewing clothes that have a double stitch finish. Decorative topstitching on jeans, patch pockets, details on men's shirts, etc. you can sew evenly and neatly with just one stitch with a twin needle. 1. How to use the twin needle How to use the twin needle? Just like with a regular needle, however, you need to correctly thread both upper threads and be sure to loosen the tension on the lower one (in the bobbin). The lower thread in the bobbin will be used simultaneously by the two upper threads, "unfolding" between them in a zigzag pattern and therefore it must be loosened. You also need to loosen the tension of the upper threads, otherwise the line will tighten and even break. Be sure to adjust the tension of all threads well, and use elastic and thin threads if possible. And do not forget that for the formation of a high-quality stitch, the lower thread must be thinner by a "number". 2. Twin needles are not suitable for all sewing machines
Twin needles can only be used on machines with a zigzag stitch. Lockstitch sewing machines such as Podolsk, as in this photo, are not designed for such needles. The needle plate of such machines has one round hole, and the use of a double needle requires a narrow and wide gap, which is also necessary for sewing a zigzag stitch. In addition, additional thread guides and a stand for the second spool are also required. If you are going to install a twin needle in a Seagull sewing machine, pay attention to how the needle enters the hole in the needle plate when it sews a straight line. The needle must pass exactly in the center of the needle hole. If there is an offset from the center, the twin needle may break. 3. Second thread needs an extra spool pin Modern Janome, Brother, Juki and many other sewing machines have two spool stands, as well as paired threaders and thread guides that thread the top threads separately. Each reel must be mounted on a separate pin (reel holder), often for this you need to install an additional rod on the body of the machine. If there is only one stand for the reel on the machine body, then an additional one is usually included in the kit. 4. Installing the twin needle and threading
A twin needle is installed in any sewing machine, just like a regular needle. The flat of the needle (saw cut) should be directed back (away from you), and the round side of the needle bulb should be towards you. The threads from the spools are passed together through all the thread guides, including the upper thread tensioner, and only the lowest thread guides (at the base of the needle) separate them. The left thread is threaded into the left needle, the right thread into the right needle. If this lower thread guide is only one (like Chaika's), then the left thread is passed through the thread guide, and the right thread is passed nearby, tucked directly into the eye of the right needle. 5. What are the needles and their purpose
As already noted, a double needle can have a different distance between the needles. Depending on this distance, the appearance of the decorative stitch will change (narrower, wider) and even triple needles are produced. The different width between the needles makes it possible to choose the width of the finishing stitch and use it for decorative design of clothes. Therefore, it is desirable to have several types of such needles in stock. With this stitch, you can quickly and beautifully complete the finishing stitch on a pocket or valve shirt. However, it should be borne in mind that the use of double needles is more intended for decorative work and seams that do not experience heavy stress. A double needle uses only one lower thread to form a seam, so such a seam will not be especially strong. But, for example, for embroidering two or three parallel contours at the same time, a double needle is simply irreplaceable. Such a pattern looks especially impressive if the threads are of different colors. Using double needles with a narrow gap between them and a different shade or color of threads, you can create an imitation of a shadow in the seam. The threads, as it were, are superimposed on each other, creating the effect of a shadow, a three-dimensional image. In addition to simple topstitching, twin needles can be used for sewing on tape, rib-gathering, pintucking, and more. 6. Wrongly matched twin needles can break
When shopping for twin needles for your sewing machine, pay attention to the maximum opening width of the needle plate. The maximum zigzag stitch width of your sewing machine can also be a good guideline for determining needle size. Incorrectly selected needles can break off by touching the edge of the hole in the needle plate. This is especially important for machines such as Chaika, in which the needle is often offset from the center of the hole. Before sewing with a twin needle, check the pattern selection switch. The stitch should not be set to a zigzag or other offset needle such as used for sewing on a zipper, etc. The twin needle should only work in straight stitch mode. In any other mode, it will simply break on the needle plate of the sewing machine. Information found on the site: Sewing master
A complete process of working on a sewing machine, regardless of experience with this device, is impossible without its correct settings, which are performed manually. So, in this material we will consider detailed diagrams of how to properly fill a sewing machine.
General instructions for refueling a sewing machine
The general instructions for refueling a sewing machine look like this:
- Wind the thread with which you will work on the bobbin and at the same stage put on the upper pin on the spool for the upper thread.
- The next step is to thread the upper thread in the sewing machine. For this process, there is usually an instruction on the instrument case. The upper thread is the one that is pulled from the spool into the eye of the needle. Before threading through the eyelet, raise the presser foot and set the needle so that it is at the very top.
- Check thread tension. Modern devices have special tension regulators.
- After threading the upper thread, you can thread the lower thread. To do this, turn off the drive (moss wheel) and insert the bobbin into place. After that, you need to turn on the wheel and turn it until there is enough thread on the bobbin.
- Insert the bobbin case into the bobbin, making sure that the bobbin pin aligns with the bobbin slot. If everything is done correctly, a characteristic click will be heard.
- The thread must be brought out through the valve plate, close it. The upper and lower threads must be connected and brought back by the shoulder blade.
To check the correctness of the work done, you should scroll the flywheel. After the needle rises and falls, a loop should form from the hole in the plate on the top thread from the bottom thread.
To understand how to thread a bobbin into a standard-type sewing machine, we recommend watching a video tutorial that tells not only about the sequence of actions, but also about where the bobbin is located and what nuances you should pay special attention to:
Correct threading order
This process will vary depending on the type of machine. Modern devices have detailed instructions on how to properly thread a sewing machine, and the devices themselves are designed in such a way that you can intuitively guess how to do everything. But with rotary-type machines, difficulties arise, so we will present two instructions in detail:
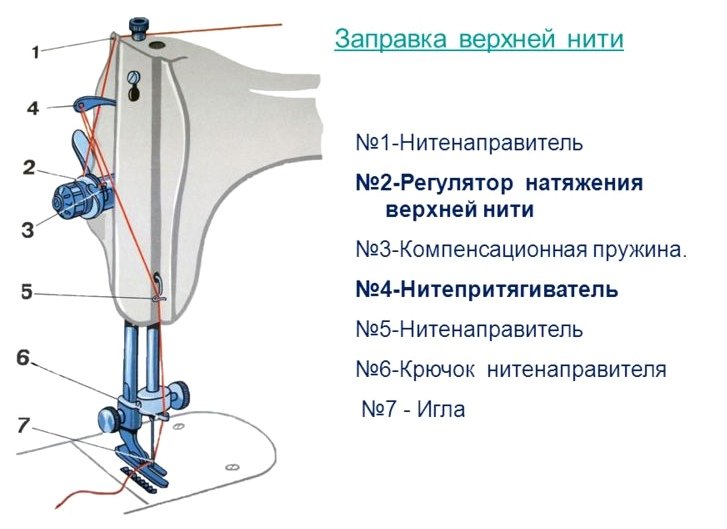
Top threading
- Pass the thread from the spool through the mount at the body of the device.
- Thread the thread into the thread tension regulator and bring it into the compensation spring, which looks like a hook.
- Pass the thread through the hole in the thread guide, bring it out through it and pass it into the existing fastening, then into the eye of the needle.
In some models of machines, instead of a thread guide, there is a fork. In this case, you just need to put the thread on this fork, and not thread it into the hole.
Threading the lower thread
- Wind the lower thread not on the spool, but on the bobbin.
- Insert the bobbin into the bobbin case, while the thread should be tucked under the spring plate.
- Check thread tension. A certain tension is set for the model of the machine.

How to thread a twin needle?
If the machine sews a zigzag stitch, then a double needle can be installed in it. In this case, the threads will be threaded into the needles in exactly the same way as if it were done with one needle, the only difference is that an additional - second - spool is required. In this case, both threads must pass through the same upper thread tensioner.
Instructions on how to thread two needles into the machine:
- A double needle is installed in the same way as a regular needle. The cut of the needle should be directed away from you, and the round side of the needle bulb itself should be directed towards you.
- The threads from both spools must be passed through all the thread guides, not forgetting the upper thread tensioner. It should turn out that the lowest thread guides will separate them.
- The left thread must be threaded into the needle on the left, the right thread, respectively, into the needle on the right. If the device has one thread guide, then the left thread must be passed through the thread guide, and the right thread next to it, tucking it under the eye of the needle.
It is not difficult to use a double needle, the main thing is to thread both upper threads correctly, as well as loosen their tension (in the bobbin itself). The lower thread will be used when sewing at the same time as the upper thread, thereby forming a zigzag, so it is imperative to loosen the tension.

The twin needle makes it easier to sew double stitches on the machine, as well as to sew decorative stitches with just one twin needle stitch.
Manual sewing machine: how to thread
When setting up a manual machine, it is important to choose the right needle and thread number for a particular type of fabric, as well as adjust the thread tension, otherwise the quality of the stitch will suffer. Otherwise, refueling a manual sewing machine should not cause difficulties, as can be seen from the instructions for refueling the Chaika machine:
- Turn the handle so that the mechanism that attracts the threads is at the top.
- Insert the needle into the holder until it stops. The flat side should be facing towards the pin that the foot is on.
- Use the screw to secure the needle.
- Install the spool of thread on the rod intended for this.
- Pass the thread through the friction washer and thread guide.
- Insert the thread into the thread guide, fix it in the needle holder.
- Pass the thread through the eye of the needle (this will be the upper thread).
Threading the lower thread:
- Wind the thread onto the bobbin.
- Insert the bobbin into the cap. The thread should be outside.
- Insert the cap back until a characteristic click sounds.
- To tighten the thread, you need to turn the handle of the machine to tension.
- Tuck both threads (top and bottom) under the foot.
How to properly adjust the thread tension:
- Use the screw that is on the bobbin case. The tighter the screw is tightened, the tighter the thread is.
- Adjust the tension using the adjuster, which is located at the lever that raises the foot.

A few useful rules for using the Seagull machine:
- Without a pre-lowered needle under the foot, the line cannot be started.
- The handle of the machine turns strictly “towards itself”, it is impossible to change the direction of rotation.
- To work on this machine, you need to choose those fabrics that are suitable for all types of stitches, otherwise you can ruin not only the fabric, but also bring your machine into complete disrepair.
Video: How to fill the Podolsk manual sewing machine?
Another old machine that grandmothers had at home is a device of the Podolsk brand. Despite the fact that such a model is old and manual, it is pleasant to work with it if you understand all its mechanisms and learn how to refuel, which will help the following video:
In order to enjoy work, as well as avoid problems during work, it is worth thoroughly studying the instructions for refueling the sewing machine, because not only the quality of the sewn product, but also the life of the device will depend on this.
In contact with
Felting needles. Information for beginners
Felting (felting) today is quite popular among needlewomen. Both adults and children make gizmos and toys from wool. Woolen crafts bring warmth and joy, and what delight is the very fact that you are holding a real work of art in your hands, which just yesterday was a shapeless mass of fibers!
Let's talk about dry felting, when special needles are used. Working with wool in this technique, it is difficult to spoil the product. There is always the opportunity to correct: add or reduce volume, attach a detail, remove excess.
Felting needles are sharp metal instruments with notches all over their surface. Types of needles are different, and each of them has its own scope, its own function.
What needles are needed for felting
In general, you can dump a small toy with one needle, any. The only question is how much time and effort you spend on it, and what quality the product will turn out to be. Any craftswoman wants her man-made miracles to be truly miracles, and their production does not turn into a grueling monotonous process. Therefore, for work, you will need several needles that differ in thickness and cross-sectional shape.
Types of felting needles
The thickness of felting needles varies from thick (coarse) to thin. This parameter defines the needle number. The thicker it is, the smaller the number. So, the coarsest needle has number 19, the thinnest - 42. Sometimes you can also find the marking "No. 43", this needle is called ultra-thin. The very beginning of work is always done with a coarse needle, the main part of it is with a medium one, and a thin needle is needed for the final work on the details and leveling the surface.
The needles may have a section in the form:
- diamond
- triangle
- cones
- cylinder
- three-beam sprocket
- four-beam sprocket
The most popular of them are star-shaped and triangular.
Also, this tool can have straight and reverse notches. Straight needles entangle the upper hairs deep into the product, dumping them more densely, while reverse needles, on the contrary, pull the lower hairs out of the depth. In this way, you can create the effect of fur, which looks especially appropriate on animal figures. And with reverse needles, you can dump the surface in a hard-to-reach place - inside the fold, for example. Where it is difficult to get, and even more so, to work with a straight needle. The reverse needle passes through the product through and finalizes the details.
How to choose felting needles
You need to choose needles based on your goals. What are you going to roll? If these are smooth products of a simple shape, then straight needles of thick, medium and thin are sufficient. If you plan to make a wool fluffy, you can’t do without a reverse needle.
Needles with an asterisk cross-section dump faster and denser than with a triangular cross-section. Therefore, for voluminous things it is better to prefer them. For small things it doesn't matter. It is convenient to finish with an “asterisk” - it will gently smooth out all the bumps and will not leave traitorous holes on the surface.
How to use a felting needle
The felting needle can also be used by itself, holding the blunt end with your fingers, but this is not very convenient. It is best to fix it in a special holder with an ergonomic handle. This will speed up the felting process and allow you to work more comfortably. Some needles are sold already in the holder.
Before work, it is necessary to prepare the surface on which the wool will be placed first, and then the product in the process of its creation. Many needlewomen use a foam rubber sponge for this purpose.
It's cheap, but the downsides of the sponge outweigh its only upside. The sponge can be pierced through and either break the needle on the table, or (if the foam is on your lap) get injured. After a short time of use, small pieces of foam rubber begin to come off and stick to the product. Working with the reverse game, they can even be accidentally attached to it.
The best option would be to use a special felting brush with a long hard pile and a dense base. And you will be safe, and needles.
Happy needlework!
Attention! This article was written exclusively for the site www.happy-kids.ru. Full or partial reprint of this article is prohibited.
Getting rid of acne and blackheads with the help of miracle devices makes the procedure quick, affordable and less traumatic. A tool for removing acne is used both at home and at a beautician's appointment. We will consider the features of the application in the article.
Basic Tools
There are several types of devices that can be used simultaneously in different directions:
- cosmetic extractor (a loop with a Vidal needle at the ends);
- combined spoon Uno;
- cosmetic spear;
- skimmer;
- curette;
- brush.
Each of the devices can have different combinations of tips. They can be selected individually as needed. All instruments are made of medical steel, do not rust, adapted to frequent processing and disinfection.
Cosmetic extractor
Visually, the tool is a metal handle, at both ends of which there is a thread. Small devices are mounted on the thread, which tend to be removed and screwed onto the handle. It can be two identical loops or a combination of a loop with a spear (Vidal's needle).
If the extractor has two loops, then their diameter differs from each other. This allows the tool to be used by people with individual characteristics of pathological rashes. The metal handle itself can also vary in size and diameter. Notches are located in the middle, which reduce the slip of the device in the hand during facial cleansing.
Combination Spoon Uno
Reversible metal instrument used to remove acne and comedones. One end of it is equipped with a small spoon, in the center of which there is a hole. The other is a small sieve. A strainer is used to fight acne, and a spoon removes the contents of single acne.
Cosmetic spear
A small tool used to remove blackheads, acne, boils. It has a handle and a sharp tip in the form of a spear, made of medical steel. The spear is resistant to corrosion, treatment with disinfectant solutions, sterilization by any possible methods.
Skimmer
The tool resembles a kitchen slotted spoon - a small spoon with a lot of holes. Used for the following purposes:
- face cleaning;
- ear care;
- removal of acne on the forehead, chin, nose;
- fight against comedones.
Curette
It performs the same functions as the cosmetic loop, but due to the presence of a wide rim, it less injures the skin during facial cleansing.

Where can I buy
You can buy all the necessary cosmetic devices in a pharmacy (if you have a medical instrument), medical equipment stores, in ordinary stores with a profile in the field of cosmetology, as well as on Internet sites.
It is advisable to purchase instruments from those suppliers who deal exclusively with medical equipment. In this case, the risk of buying devices from low-quality material will be low, and you can visually assess the condition of cosmetic utensils.
Online stores offer lower prices, which is due to the absence of the need to pay for the rent of the premises and salaries of the staff. When choosing this method of purchase, you should give preference to already verified suppliers.
Features of using tools
Each acne removal tool has certain rules and benefits of use. Let's take a look at how to use them.
Loop tools
Removes impurities from the pores and the contents of acne located at different depths. Works more effectively against elements of a dense consistency.
- Cleansing the skin with an antibacterial lotion or washing gel.
- Steaming of pathological zones, so that the maximum expansion of the pores occurs.
- Treatment of hands and devices with ethyl alcohol or special disinfectant gels.
- The loop is superimposed on top of the selected pimple so that it is located exactly in the center.
- With a small effort, press down the loop so that the contents of the pathological element come to the surface.
- Treat the area with an antiseptic solution.
Do not squeeze pimples with your hands (especially dirty ones!). This will lead to the spread of the inflammatory process and cicatricial changes on the skin.

Uno spoon
After treatment with antibacterial agents and steaming the area requiring cleansing, a spoon with one hole in the center is applied to the pimple. After a slight pressure, the device is retracted to the side, with a sliding movement. This allows you to capture the contents that have appeared outside and leave it in a spoon. Cleaned items should be treated with an antiseptic.
Instruments with a Vidal needle
An effective device that allows you to deal with small white pimples resembling millet, and deep pathological rashes.
- Pre-steam the cleaning area and treat with an antiseptic.
- Treat hands and tools with disinfectants.
- The pimple is pierced with a needle.
- With the second end of the device, which has a spoon or loop, the contents of the pimple are completely removed.
- The puncture site is treated with alcohol-containing preparations.
Brush
An excellent tool used not only to combat acne, but also to prevent their appearance, cleansing the dead upper layer of the epidermis, smoothing fine mimic wrinkles. A cosmetologist or dermatologist will help you choose a brush after determining the type and characteristics of the skin.
Actions after acne removal
A prerequisite is the treatment of the cleaning area with antiseptic solutions. This will reduce the amount of transient microflora, prevent the development of inflammation. Since such drugs have a tightening and drying effect, a few hours after the procedure, it is permissible to make a nourishing or healing mask.
Some examples of such masks:
- Add 3 drops of lavender essential oil and 6 drops of apricot oil to a teaspoon of linden honey.
- Mix a teaspoon of blue clay, beaten egg white and 3 drops of orange oil.
- You can use a decoction of chamomile in the form of lotions or for washing, and after freezing it in ice molds, wipe the skin.
It is advisable to refrain from using decorative cosmetic preparations for some time (contacting directly with the cleaning area).
Benefits of using cosmetic devices
There are a number of positive aspects that make cleaning the skin from acne and blackheads with the help of tools an order of magnitude higher than manual cleaning:
- hygiene;
- convenience;
- elimination of elements in the most uncomfortable areas (near the nose, in the auricles);
- painlessness;
- absence of cicatricial residual phenomena;
- absence of age spots in the area of the procedure;
- deep cleansing.

Rules for the care of tools
In the conditions of beauty parlors, all used instruments are disinfected in special solutions, undergo pre-sterilization cleaning and sterilization. The destruction of all kinds of microorganisms on devices takes place in dry-heat cabinets or special ultraviolet chambers.
At home, after use, the tools should be washed well under running water using soap. Preferably household or regular without fragrances and flavored additives. Next, you need to carefully treat with ethyl alcohol (not vodka!). Particular attention is paid to the places of contact of the device with the skin and purulent discharge.
Do not wipe the alcohol from the surface, but wait until it is completely dry. Store in this condition until next use.
Acne Prevention
There are a number of tips, the observance of which will allow the skin to remain beautiful and healthy:
- cleanse the skin of impurities daily with a cleansing gel or lotion;
- it is important for girls to wash off makeup from their faces before going to bed;
- after washing, apply a nourishing cream to the skin;
- 1-2 times a day treat the skin with an antibacterial cosmetic;
- once a week you can clean your face;
- monitor the foods that are included in the diet - reduce the amount of salted, smoked, pickled, coffee, a large amount of spices, alcohol;
- normalize the mode of rest and physical activity;
- timely treat diseases of the gastrointestinal tract and endocrine system;
- women regularly visit a gynecologist, periodically monitoring the hormonal balance of the body;
- reduce the impact of stress.
Everyone chooses how to take care of the health of their skin: visit beauty parlors or carry out procedures at home. Any of these activities can be effective only if the advice and instructions of specialists are followed.
Video
We use the tool to remove acne in practice.