Pattern of a rooster toy made of fabric. Soft toy Cockerel with their own hands. Master class with photo
When the New Year is knocking on the door and there is less and less time left, ideas are urgently needed that are easy to bring to life literally in one evening. It is believed that in order for the coming year to be rich and happy, its symbol must be present in the house - in 2017 it is the Red Rooster. If there is no time or not enough skills, then such a craft will come to the rescue.
These cloth roosters look so simple yet terribly cute. And most importantly, depending on the fabric and small details, they become completely different and not similar to each other.
You will need:
- dense fabric - flannel, coarse calico;
- pieces of felt for scallops, beaks and tails;
- buttons, rhinestones and other sew-on trinkets;
- sintepon.
We sew a simple cockerel in 5 minutes
For one chicken, you need a piece of fabric measuring 21 x 11 cm. A triangle is formed like this:

All seams, of course, should be on the wrong side, the last side seam is sewn up by hand after stuffing the toy with padding polyester. Do not forget to put the combs, beak and tail of the future cockerel inside the seam.

Show your imagination on decorating sewn cockerels - maybe you will give them the features of the people you are going to present them to?
By the way, these cockerels can be used as a bag for sweets if you sew a lock on the side! Your friends and their children will surely be delighted with such a present!
Already on the threshold, 2017 pleases us with a snowball. New Year's festivities will begin soon and of course we are waiting for gifts. All the craftswomen are ready to tell how to sew a rooster out of fabric with their own hands. We sew this particular bird, since the next year will be guarded by the Fire Rooster or the Red Rooster, as follows from the Chinese calendar. There will be no difficulty for a beginner needlewoman when sewing, we have amazing rooster patterns from fabric, which will make a cute symbol of 2017.
What material to choose and how to sew a rooster with your own hands at home
A rooster is a bright head in any yard, so our bird will be colorful. Therefore, the material for the toy will be appropriate. we recommend using the site for the toy “Fabric Rooster”:
- fleece,
- brocade,
- colored cotton,
- any fabric that looks saturated.
For stuffing, we take a synthetic winterizer (from an old jacket or pillow), ordinary cotton wool is also suitable. If there is a desire to make the cockerel “confidently standing on its feet”, prepare an elastic wire for the frame inserted into the paws and body.
Do-it-yourself rooster from fabric patterns
Choose your favorite patterns. We will sew on 1 provided blank, it is simple and does not take much time.
DIY fabric rooster pattern
To enhance the effect and create a more “LIFE” cockerel, resort to using colored faux fur or feathers. Stick them on the wings and tail, the effect is amazing. Here is a pattern for a rooster with fur inserts.

Do-it-yourself rooster from fabric with fur pattern
If the patterns are small, you can enlarge them in Photoshop or any other picture editor. Then print enlarged copies and create roosters in real size. According to my pattern, the rooster will be 25 cm tall, quite enough for a souvenir.
Instructions on how to sew a rooster with your own hands:
- Stick the paper pattern on thick cardboard, then trace the details on the fabric. We make allowances of 2 cm, more or less is not needed. Do not forget that the wings, paws - must be from the same fabric, for symmetry. The second steam room will be mirrored, this is normal.

- We check and cut the blanks.
- We sew the details of the toy from the inside, leaving 4 cm holes for stuffing. If you are doing with a frame, insert the wire. We turn the workpiece inside out, stuff it with padding polyester (in my case) and sew it up. Pay attention - we don’t fill the rooster’s undereyes, they look more aesthetically thin.

- If there is a desire to make the wings moving, then do not sew them on, but fasten them on large buttons (from the coat).
- We don’t stuff the paws, then the cockerel will “sit” with its legs hanging down. If the rooster is standing with the frame, form the desired position by bending the wire.

- Eyes - I made from 4 buttons of different diameters - large at the bottom, small at the top. Alternatively, the eyes are drawn with gel pens. You can use a bright piece of fabric and sew or glue the eyes onto the hot glue.

An unusual symbol of 2017 - step by step making a cockerel from fabric - fur
No less magical is the second option for making a cockerel with your own hands from fur fabric on a wire frame.
A set of materials will be needed as in the first case, only the fabric will be different. The manufacturing process is similar to a fabric cockerel, only it will be connected in a different sequence.
So, let's start making a rooster step by step:
- Having repeated the first steps from the above-described MK, we begin to connect the workpieces. First, from the inside, we sew the breast, abdomen and body, after which we turn it on the face.
- We sew both halves and wings. Do not forget to leave a gap under the synthetic winterizer.
- Insert a thick wire (I used copper 10) into the finished body, leaving the ends for the tail and wings. Focus on your size.
- We fill the future symbol of 2017 and sew it together, leave the wings empty, you can only fill them a little. We sew the body with wings.
- Sew on a two-piece beak and a beard.;
- We make the tail from strips of fabric, sew them on one side on the front.
- We pass along the tail onto the frame, forming it magnificent.
- Paws are simply created by fitting a wire blank.
- About the creation of the eyes, I wrote the options above. After that, the toy will be ready.

Mink cockerel
Patterns cockerel from felt
When you want a bright bird, sew it from pieces of felt, additionally stitching along the indicated lines. Such a present will look interesting and will be remembered for a long time.

Pattern of a rooster from felt

Ready-made felt roosters - for inspiration
Necessary materials:
Scissors
- a set of colored paper
- box
- PVA glue
Stages of work:
Prepare boxes of various sizes. From the box, cut off the part that closes the box, make cuts along the fold lines (they should be ½ the height of the box itself). Bend the parts of the box along the cuts. Two opposite parts will be the wings, and the rest will be the tail and head. Round the wings. Cut the tail to the very base. Cut the head, moving from the top to the very base, to get the shape of a triangle. Decorate the craft: make earrings and a comb.
DIY cockerel craft
You will need:Plastic bottle - 3 pcs.
- a yellow ball from a dry pool
- red and yellow plates
- red and yellow disposable cups
- black marker
- stapler
- plain tape
- double sided tape
Work process:
From 3 bottles, cut off the upper parts, fasten them with adhesive tape to each other. Cut along the edge of disposable cups. They must be attached to the neck of the rooster with tape. Colors must be alternated. From disposable plates, cut off the edge, make cuts from the inside. As a result, you have feathers. Gather the tail and feathers with a stapler. Insert the tail into the incision. Cover the joint with wrapping paper. Wings also need to be cut from disposable plates. Attach the head with double-sided tape. Scallop, beak and beard cut out from red disposable plates. Insert the cut pieces into the cuts on the head. Eyes are also created from disposable plates.
Cockerel 2017 DIY
You will need:Beads for eyes
- hot glue
- egg cartons
- primer
- acrylic paints
- balloon
- old newspapers
- scissors
- 2 beads
- PVA glue
How to do:
Cut two cones from the egg tray, cut one side of each cone. Connect the cut cones together with the cuts down. You will get one large cone with 4 petals. In order to create the neck and head, connect 5 cones together. At the top, they will expand and become larger in size. Cut out the scallop from the side of the tray. From the lid, cut out the beak, which will consist of two parts. Feathers are also created from cones. They are fixed on top of the cardboard with hot glue. The length of one wing is - 15 cm. Similarly, make blanks for the tail.
The next step is to create paws. Bend the shape of the paws from the copper wire. In order to give the desired effect, twist the corrugated tube. Insert the left tail between the corrugated and metal tube. For strength, fill the lower part with glue. Cut out the claws from the bottom. They should be long and narrow. They need to be attached with glue. Paint the legs with the body with spray paint.

Prepare a stationery knife and construction foam. All cuts should be neat and even. You can cut pieces individually. Lastly, glue them together. You can bring it to the desired shape with sandpaper. Treat additionally with acrylic putty, wait until it dries completely, plaster again and treat with PVA glue. It will allow the paint to take on better.
Start painting from the head. Glue the eyes on the head. To create a beautiful scallop, make a pattern on paper, transfer it to foam, cut it out, and glue it to a suitable place. Take care of preparing the shape for the wings. Leave the back open. Cover the top of the wings with feathers made from corrugated bottles. Fold the last row inside the wing. Paint over with paint, leave to dry, attach with perforated tape and a self-tapping screw. Make a tail. Take the mesh, bend it. Cut feathers from bottles. Paint them separately on both sides. Apply black first, and then a little blue. Attach the feathers to the mesh with wire. Once the paint is dry, cut the feathers into two more pieces to make the tail look even fuller.

You will like and.
For the back, cut feathers from a transparent bottle. The width of one feather should be approximately 2-2.5 cm. Attach them on the back at once, 3-4 pieces. Use self-tapping screws for fastening. When you fix the feathers on the neck, cut off the upper part. Glue the last row of feathers to hide the heads of the screws. Glue smaller feathers in the back of the head and on the side of the crest. Cover all parts that you have painted with construction tape and bags. First apply yellow paint, dry it. Add some orange stripes.
The finishing touch is blinders. Cut 2 strips, make an incision with a clerical knife. Insert them between the metal-plastic and corrugated pipes. Paint the craft with yacht varnish.
How to sew a cockerel with your own hands
You will need:Cardboard
- thread, scissors
- orange, blue-green, black and white fabric
- tweezers
- cotton wool
- Scotch
- glue
- colored paper

Stages of work:
Draw a sample of the toy on a piece of cardboard, cut it out. Separately draw a wing, cut it out, see how they will look. Cut the sample into separate parts so that it is convenient for you to work further. Compare each piece of the sample with a separate piece of fabric, cut out each piece in turn from the fabric. Each part should be 2. Cut out the head from white fabric, the upper part of the wing and body from blue-green fabric, and the lower part of the wing and tail from black fabric. Make a beard, paw, beak, scallop and eyes from colored paper. Sew all the details for the head. There may be some difficulties with sewing on the comb. The fact is that it is wider than the head. It is better to sew it on the outside. Glue eyes from colored paper.
Do-it-yourself cockerel costume:

For the body, make allowances of 1.5 cm. Connect the parts from the inside. Sew the tip of the foot inward. Sew the wings on the outside, put soft filler inside. If it is not at hand, ordinary cardboard will do. Sew the lower half from the outside, sew to the body, connect through the cardboard with a seam. Fit the body to the head. Sew the neck to the body. Fill the connected parts with cotton wool. You need to fill through the hole in the tail. The hole is very small, so you need to fill the craft with cotton wool in small portions. You may need to use tweezers. Sew the details of the tail with the outer seam, fill it with cotton.
Paws can be made from cardboard or a piece of fabric. Choose the fabric of the right size and color, make a few square details. Trim the ends, sew the oblong paws. Fill with cotton. Sew legs, wings, tail to the body. Cut off without touching the seams. DIY cockerel toy is ready.
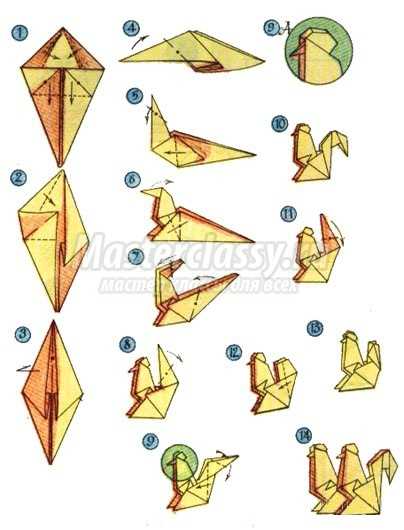

This is the easiest way to create crafts. There are several ways. You can use the technique of origami, quilling, cutting with scissors, etc. Paper crafts can be put or hung on a Christmas tree, glued to a window, decorate a festive table. An excellent solution is the decor of napkins. It will look quite restrained and at the same time - original. If you use origami, then the napkin can be immediately folded in the form of a cockerel. We will provide you with diagrams.
Cockerel do-it-yourself patterns.
According to the Eastern calendar, the symbol of the next 2017 is a red fiery rooster. Close people will be very pleased to receive a hand-made cockerel from you as a gift for the New Year. The rooster pattern below will help you please your family and friends. A simple lesson on sewing a soft toy is offered.
Sewing Instructions for Raymond's Fighting Cock
On various sites dedicated to sewing and needlework, there are many patterns of various toy roosters. Raymond's toy rooster pattern, which was invented by foreign craftsmen, is very popular. This product is characterized by the use of fabrics of different textures, such as felt, fleece, brocade, chintz, etc.
To create this cockerel, any multi-colored patches of fabric available are suitable. Various large buttons can be used to decorate the toy. Thus, to create Raymond's rooster, you must have:
- toy patterns
- thread with a needle or sewing machine
- patches of various fabrics
- for stuffing - cotton wool, synthetic winterizer or other.
The legs of the rooster can be made soft from fabric or a wire frame can be built into the details of the legs so that the toy can stand, depending on your wishes.
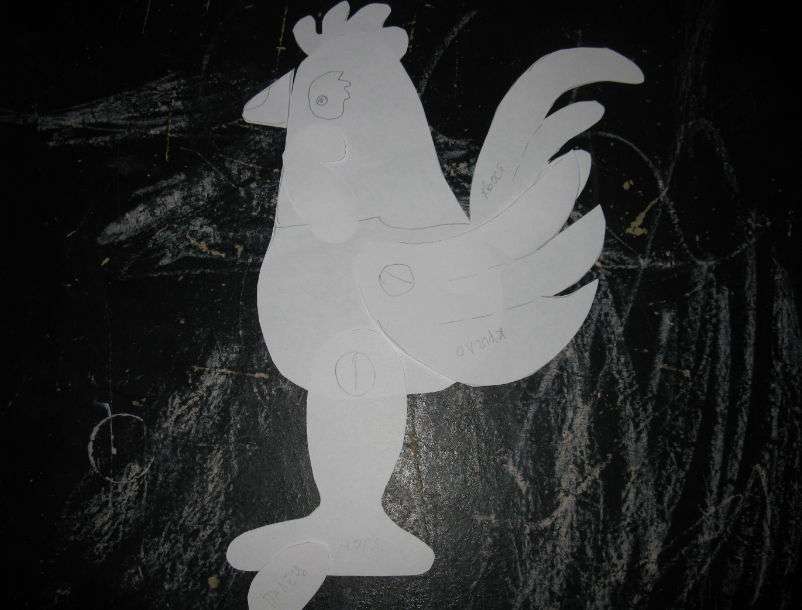
toy pattern

The main stages of sewing toys
- Print the proposed patterns, having previously reduced or enlarged them, or you can leave them as they are.
- The patterns are transferred to cardboard and cut out, the required amount is written on each.
- Patterns are placed on the fabric, circled with chalk and cut out, leaving 1.5 cm for seam allowances. Paired parts are made from the same fabric.
- The parts are sewn together, leaving a gap for stuffing.
- All parts except for the legs are filled with stuffing and gaps are sewn up.
- All elements are connected to each other.
- At the last stage, eyes and other decorative elements are sewn on.
Rooster Raymond is ready
Toy for beginner needleworkers "Petya-cockerel"
A very easy to make do-it-yourself rooster soft toy, its pattern with less details than Raymond's rooster. For its production, it is desirable to use any soft fabric: flannel, felt, fleece, etc. The pattern indicates the number of elements.
View pattern
 The workflow is the same:
- print and cut patterns;
- sew the parts together and stuff with stuffing;
- sew all the elements of a soft toy together;
- decorate the cockerel by sewing eyes, etc.
Rooster tilde
 Thanks to Norwegian sewing master Tori Finanger, tilde dolls have received worldwide recognition. For the manufacture of which pastel soft fabrics are used, in addition, they are characterized by primitivism of execution and their eyes are always made in the form of dots.
According to the Chinese calendar. It is not surprising that the housewives try to decorate the house with the image of this vociferous bird! Figurines, toys, Christmas balls and kitchen utensils in the form of roosters instantly fly off store shelves. We offer to save on purchases and make a miracle bird from improvised materials.
Knowing how to sew at a basic level, you will create a cute designer toy in just a few hours! Just be patient and follow the instructions. Ask your children or your husband for help - it's more fun to create together. A funny cockerel will complement an apartment or a workplace, and after the holidays it will “register” for a long time in a children's room or on a kitchen shelf.
Cockerel-antistress
The peculiarity of this toy is that it is pleasant to squeeze it, thereby calming the nerves. Work on the craft will take no more than 30 minutes and even a child can do it (naturally, under parental control). A funny cockerel will take root at home or in the office. The craft looks great on surfaces: shelves, window sills, cabinets. To create a toy will come in handy:
- plain or colored cotton fabric
- pieces of red and yellow felt
- filler: sintepuh, synthetic winterizer, collection of fragrant herbs or buckwheat
- matching thread, needle and scissors
- buttons for the eyes and other decor
 Step-by-step instructions for creating an anti-stress cockerel
 Make a pattern in the form of a rectangle, the length of which is twice the width (for example, 14 by 28 ss). From red and yellow felt, cut out a comb, beak and beard. Lay the cutouts on the blank, securing them with pins for convenience. Then fold the fabric in half and sew by hand or machine. Fasten the thread and turn the toy right side out.
Stuff the cockerel with the stuffing of your choice. After that, fold the edges of the fabric inward and sew a seam over the edge, connecting the two halves. Sew on button eyes and, if desired, make long legs of red thread for the cockerel. Decorate the craft with embroidery, felt appliqué or buttons. Attach a loop to the comb, for which you can hang the toy from the Christmas tree. Make birds of different sizes and colors to make a cock family.
Cockerel in the style of "tilde"

Tilda is a popular toy making technique. Cloth dolls are recognizable by their small head with beady eyes, thin and long limbs, muted skin colors and clothes. Tildas play the role of toys and decor at the same time. They are perfect for country style interiors. Most tildes are figures of girls and women. But in this technique they make different characters, including animals. To make such a cockerel, as in the photo, prepare everything you need:
- fabric in three colors: for the body, details (comb, earrings and paws) and clothes
- paper, pencil, scissors
- stuffing (synthetic winterizer, sintepuh, holofiber)
- needle and thread to match
- black acrylic paint
- wooden stick (for example, for sushi) or tweezers
- decor (buttons, ribbons).
Let's dwell on the fabrics for the tilde. Special materials for sewing dolls are sold abroad. In the absence of such matter, use not very thin fabrics of natural origin: two-thread linen, coarse calico, cotton, chintz, poplin, cotton spandex. Doll outfits are most often made from materials with a pattern, plaid or polka dots. For the body of the cockerel, beige fabric is suitable, for the comb and paws - red. However, experiments will not be superfluous.

So, to work! Transfer the pattern to the fabric and cut out the details. Instead of a jumpsuit, you can make another outfit - for example, a knitted sweater and bloomers. But back to the bird. Sew a beak to the head, smooth the seam. Attach wings without holes for eversion to the sides. Grab the beak along the edges so that when connecting the parts, the fabric does not move out.
Sew the body of the rooster, get rid of excess fabric on the beak and temporary seams. Connect all the elements of the toy: paws, feet (with a hole for eversion), comb and beard (with a hole for eversion). Turn out the details. Make holes in the wings for this purpose. Using a wooden stick or tweezers, fill the toy with padding polyester.
Stuff the paws to half, fix one edge with a stitch and attach the feet to it with a hidden seam. Fill the legs to the brim and sew to the body with the same blind seam. Sew the holes on the wings, decorate with small buttons and attach to the sides of the rooster. Do the same with the comb. Add a beard. Dip a toothpick in black acrylic paint and dot the eyes.
 Step-by-step instructions for creating a tilde cockerel
 Well, the most interesting thing is the decor. Tildas are distinguished by bright pink cheeks, which are painted with the help of rouge in balls. As already mentioned, the choice of outfit is yours. We settled on a jumpsuit, the details of which are shown in the pattern. Wrap the edges of the legs so that the fabric does not fray. Turn and iron the apron. Cut the tape in half - the harnesses will come out. Sew them to the apron, pass through the holes in it and fasten with a blind seam.
Decorate the edges of the apron with buttons and sew it to the pants at a distance of 0.7-0.8 cm from the border of the workpiece. Unscrew the apron and wrap the edges of the fabric, except for the place where the apron is attached. Pass the elastic, fix it with pins and sew. Add straps. Draw tucks at the bottom of the trousers. Can you knit? Then make a sweater or scarf for the rooster, or decorate his neck with a bow. Put clothes on the doll, add New Year's "accessories" to taste.
Patchwork rooster
 A simple and cute cockerel made from scraps of fabric
 The essence of style is to combine the incongruous. All items are created from scraps of fabric of different colors and textures. Checked, striped or patterned materials are especially popular. Such a cockerel will be excellent. We warn you right away: working on a toy requires a full hand and a lot of time. Prepare materials:
- dense fabrics (felt, fleece, cotton, chintz, brocade) of different colors
- stuffing for toys (synthetic winterizer, sintepuh, cotton wool)
- thick wire frame, if you want the rooster to stand firmly on its paws
- small buttons
- needle and thread
- a sheet of white A3 cardboard, a pencil or felt-tip pen, scissors
Transfer the pattern to cardboard, increasing the size of the details. Circle the elements along the contour, leaving an allowance for the seams - 1.5-2 cm. It is better to make paired parts (paws, wings) from the same fabric. Turn the other half over so that it comes out in a mirror image. Cut out all the elements and connect the half to each other from the back. Make a small hole for stuffing the toy.