Unusual crafts for cosmonautics day. Teaching children to cut: applications on a space theme (photo and video instruction)
Summary: Cosmonautics Day. DIY crafts for Cosmonautics Day. Children's crafts on the theme of space
In recent years, many schools and kindergartens have begun to organize exhibitions of children's crafts on the theme of space on the eve of Cosmonautics Day. In this article we will tell you about what interesting crafts you can do with your children for this holiday. The most popular material used for crafts for Cosmonautics Day is the so-called. waste material: plastic bottles, cardboard boxes, cardboard rolls from toilet paper, parts from broken toys, etc. When making space crafts, it is also good to have a glue gun on hand.
1. Crafts for the day of cosmonautics. Flying saucers
It is very easy to make a flying saucer from plastic or paper disposable saucers. Choose plates of different diameters and depths for this craft for Cosmonautics Day.
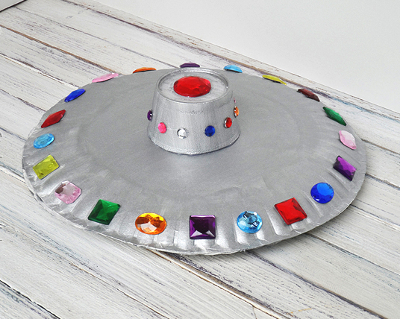
Ready flying saucer can be wrapped in foil
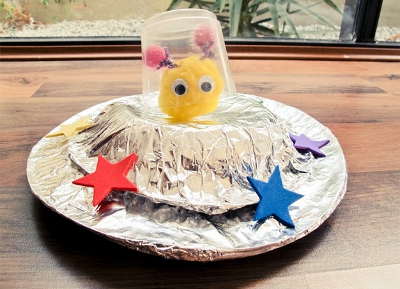
or paint with silver spray paint. Do not forget to make signal lights for the flying saucer, for example, from buttons or rhinestones.
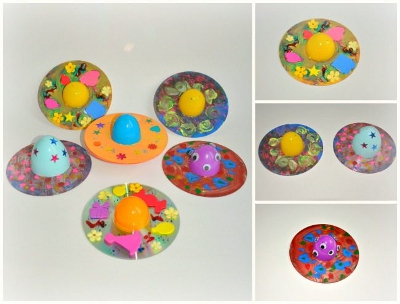
You can also make a flying saucer from an unnecessary CD and half a kinder egg.
2. Do-it-yourself Cosmonautics Day. Starships, space stations
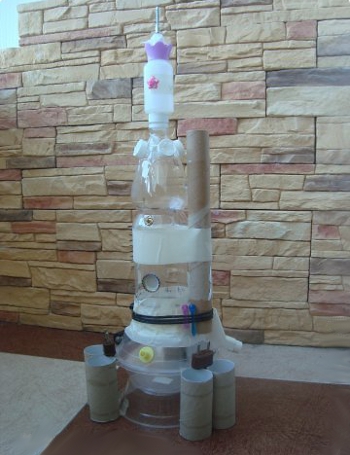
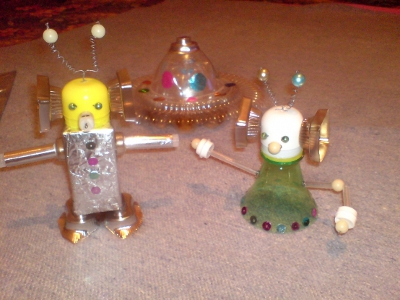
In this section, we will tell you about one interesting way to make DIY crafts for Cosmonautics Day. A beautiful starship or space station can be made from scrap material that you can easily find at home. Using a glue gun or double-sided tape, fasten all the details of the craft together. At the end, paint your Cosmonautics Day craft with silver spray paint. Additional details can be painted with acrylic paints.
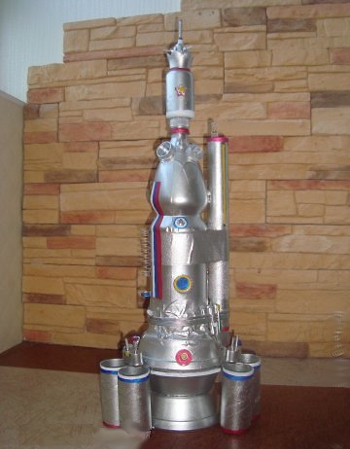
Here is another example of a similar craft for Cosmonautics Day. The body of the space station is made from an old aquarium filter, a wheel from a typewriter, a plastic bottle, leftovers from pens and all sorts of broken toys, the wings are a cut floppy disk. Everything is spray-painted. Link .

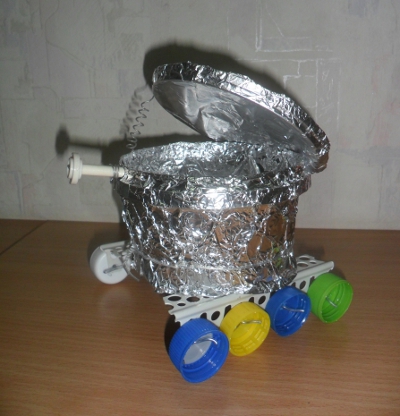
If your craft on the theme of space, made from junk material, has few small details, then at the end you can simply wrap it with foil. See what kind of lunar rover turned out from a plastic jar and bottle caps.
3. space crafts. How to make a rocket with your own hands
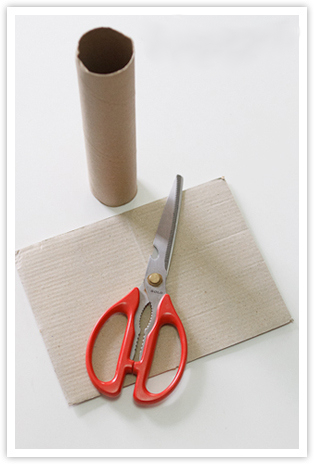
The easiest way is to make a rocket for Cosmonautics Day from a cardboard roll. In the photos below you will find a detailed master class on making this space craft with your own hands.

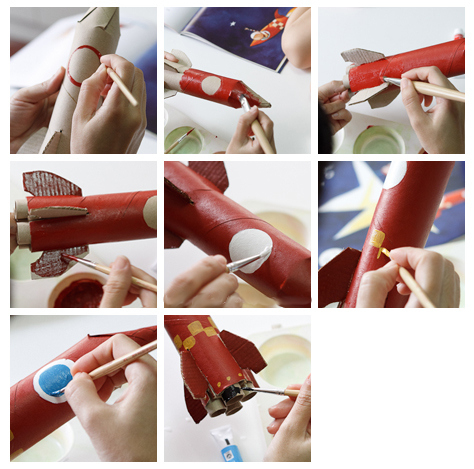
Make cuts on one side of the roll. Twist the strips in the form of a cone, glue them together.

From an additional piece of cardboard, make a stand for the rocket and engines.

Paint the rocket with paint. Space craft is ready!
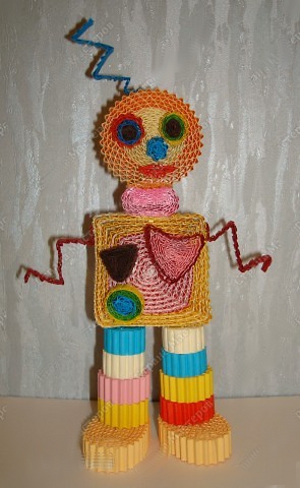
Corrugated cardboard robot. Link
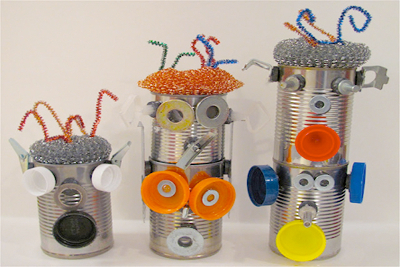
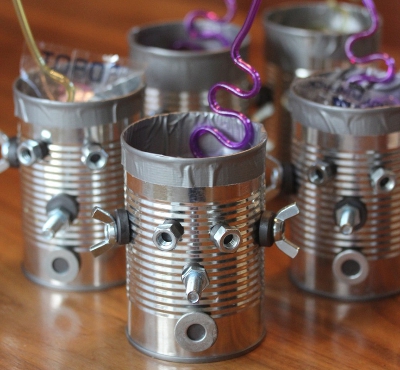
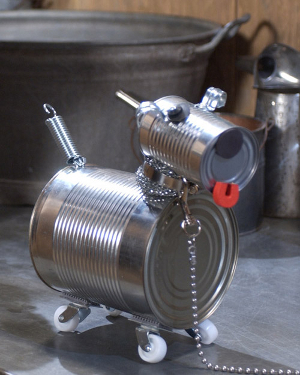
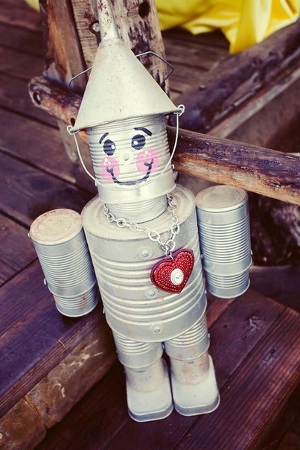
Canned robots
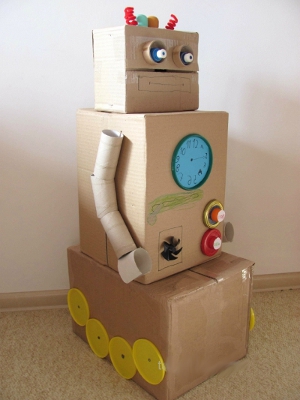
Robots made from cardboard boxes
5. Children's crafts on the theme of space. aliens
You can make a humanoid out of newspapers and napkins by wrapping them on the outside with foil.

You can mold an alien from plasticine
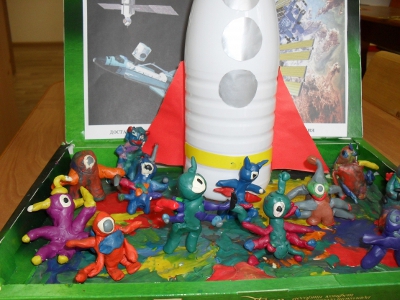
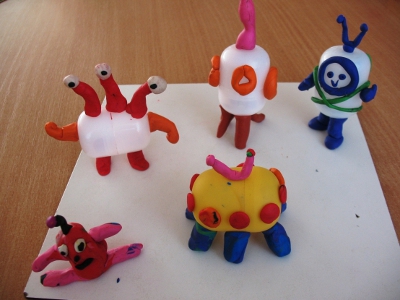
or made from waste material.
6. Crafts for the day of cosmonautics. Paper application on the theme of space
A simple craft for the day of cosmonautics for children is an application made of paper.
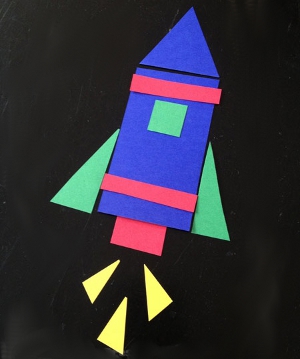
Geometric applique rocket
Origami paper rocket
Before Cosmonautics Day, various exhibitions of crafts are organized in preschool and school institutions. Today, a space rocket, a UFO or a solar system is easy to make even from improvised materials. Have fun with your kids and turn disposable tableware, cardboard boxes or toilet paper rolls into creative crafts on the theme "Space". You can make many unique products on your own.
Flying saucer made of paper utensils
Interest in UFOs arose a long time ago, so any child will be interested in making a flying saucer, which he often saw in films and cartoons. The easiest way to make such a craft is from plastic or paper of different sizes.

A UFO made of two plates will look original, one of which acts as a control cabin. In order to glue them, you need to make incisions on a small plate at the bottom, and then bend in a circle and stick it on a large plate. If you are working with paper materials, then it is easy to do this with ordinary PVA, it is better to glue plastic with hot glue. Do not forget to paint your craft with acrylic paints and decorate by gluing ordinary buttons along the contour.

A flying saucer made of and halves of a large egg from Kinder Surprise will look original. You can even use part of a plastic egg, it will be much more convenient to glue it than a large half. Don't forget to decorate your craft.

DIY space station
From rolls of toilet paper and towels, you can either ship, but the whole space station. To do this, you will need plastic bottles, double-sided tape, spray paint, plastic plates or vessels, acrylic paints. First, consider the design and dimensions of the future station. After that, prepare all the necessary materials and tools. The parts can be glued together with adhesive tape or hot glue. Make the base of the station from a 1.5 or 2 liter bottle. A beautiful stand is obtained from disposable plates or vessels, which will need to be turned over and placed on top of each other.

Attach one long towel roll to the bottle and 6 small ones at the bottom. Small parts from old toys can be useful to you in making a space station with your own hands. After you have completely assembled the craft, you can start painting. First, use spray paint, and then apply a pattern or some kind of pattern with acrylics. Such a craft will definitely win at the exhibition of space works.
If your craft consists of a small number of small elements, then instead of paint, you can use ordinary foil, which completely covers the craft.
Master class: How to make a rocket
From an ordinary cardboard roll, which most often ends up in the trash after use, it is easy to make a real space rocket. To do this, take a roll and a piece of corrugated cardboard. After that, make 4 cuts on the roll up to 5 cm deep and twist them so that you get a cone. This will be the top of the rocket. Glue it tightly with PVA.


Rocket from cardboard boxes for kids

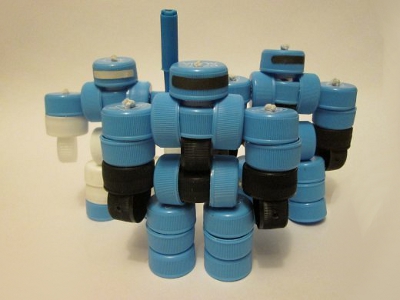
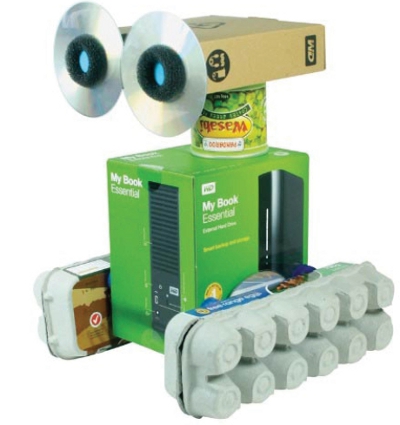
Space robots from improvised materials
If your child is excited about robots, it is not necessary to buy a ready-made toy in the store. Try to make a beautiful robot with your own hands. This does not require any specific knowledge and skills. You can use ordinary cardboard boxes of different sizes and toilet paper rolls. Give a metallic effect to a fake using foil.
Children imagine the Cosmos as an endless mysterious world inhabited by unusual creatures endowed with superpowers. You should not convince the baby of the opposite, it is better to use these fantasies to develop imaginative thinking. The ko craft can be made by a group or by an individual kid.
Invite your child to make crafts with materials that are always at home, and you will get fun space crafts. In this article, several master classes will be presented to your attention, where you will learn how to make crafts on the theme of Space.
Painting from cereals "Cosmos"
Craft ko (in kindergarten) may look different. For example, cereals will be an excellent material for creativity.
Source materials:
- gouache paints;
- cereals: rice, beans, buckwheat, peas;
- multi-colored plasticine;
- cardboard, foil;
- glue, brush, scissors;
- saucers;
- clear varnish (can be used for coloring nails).
So, how is cereal made in kindergarten? See below:
- In advance, in order to have time to dry, we paint the cereals in different colors: rice - in yellow, buckwheat - in blue, peas and beans - in different colors. To do this, dilute gouache paints of various colors with water and apply to cereals. Dry.
- Draw the contours of any space objects (rocket, moon, planets, stars) on a sheet of cardboard. then you should knead the plasticine well and fashion the image of the moon and the rocket.
- Press the painted beans and peas into the plasticine as tightly as possible so that the plasticine is not visible in the gaps.
- Paste over the rocket window with foil, as well as frame the picture.
- Carefully apply glue to the contour of the stars, sprinkle with yellow rice cereal. When the glue dries, shake off the excess.
- Lubricate the unoccupied gaps thickly with glue and cover with blue buckwheat groats. Shake off excess. Repeat so many times that as a result all the voids are filled.
- Lacquer some of the details of the picture.
Craft "Space" from unleavened dough
Craft for Cosmonautics Day in kindergarten from this raw material is easy to do. You just have to be patient and some materials:
- food colorings;
- unleavened dough;
- wire;
- sticks, beads, buttons, balls, eyes for toys;
- stack
- cardboard rolls (from under foil, cling film, parchment paper);
- straws for cocktails.

Craft for Cosmonautics Day in kindergarten is easy:
- First you need to prepare a multi-colored dough. To do this, knead different food colors into pieces of dough.
- Next, you should give the child the opportunity to choose the objects and characters that he wants to fashion. For example, a funny alien with several eyes.
- You can offer to blind the planet Earth. To do this, stock up on a sufficient amount of blue and green dough.
- A very interesting idea is to mold figures of the planets of the solar system. Attach the resulting planets and the Sun on threads. The sun is in the middle, the planets around, you get a beautiful pendant "Solar System".
- Another type of pendant: cut out stars using a cookie cutter, decorate with beads, balls, sparkles and hang on strings.
- Making a space base will be a real flight of fancy. To do this, place sand in the pan. Make rockets, spaceships from cardboard rolls. Arrange them on a pallet.
Craft for Cosmonautics Day in kindergarten is ready! You can safely participate in the exhibition.
Souvenir "Rocket"
Materials and tools needed for work:
- small plastic bottle;
- paints;
- brushes, scissors;
- corrugated colored paper, cardboard, aluminum foil;
- large beads;
- glue, tape.

Rocket manufacturing steps:
- Cut off the bottom of a plastic bottle. Slightly above the middle of the bottle body, cut out the porthole.
- Roll a cone from a piece of non-solid cardboard, fix it with a stapler or glue, align the edge with scissors and glue the cone on top of the bottle.
- Cut out two circles from thick cardboard. Cut one circle into four parts (these are rocket stabilizers). Leave the other circle intact for the design of the porthole.
- Form two small cylinders from soft cardboard - these are rocket nozzles.
- Paint the hull orange, stabilizers blue, nozzles black. Wrap a cardboard ring for the porthole in foil.
- Wrap the top of the rocket with foil, glue the parts in place. Decorate with beads and pieces of foil.
- From yellow, orange and red paper (corrugated), cut a lot of thin stripes and attach inside the nozzles - it will look like a bursting fire.
Plasticine panel "Mysterious space": materials
Crafts for Cosmonautics Day in kindergarten from natural material are easy to do, and above we have considered options using cereals. For a plasticine composition, you will need to purchase:
- multi-colored plasticine for children's creativity;
- thick cardboard in black, blue or purple;
- plasticine board;
- stack.

Technique for making crafts
It is not difficult to make a panel, you just have to show your imagination.
- One of the details of the panel, the Sun, is molded from yellow, orange, red plasticine. A piece of plasticine must be rolled into a ball, stuck to a sheet of cardboard, which serves as the basis of the panel, and crushed into a cake. Stretch another piece of plasticine with a thin stick of such length as to completely wrap the sun. Fasten around the Sun and rub on the cardboard with your finger. Here it is ready.
- The moon is molded from pieces of brown, white and yellow plasticine. To do this, plasticine of different colors is slightly mixed, forming a marble pattern. You can depict both the month and the full moon by giving a piece the appropriate shape and attaching it to the base in a flattened form.
- It is very easy to make stars: for this you need to roll up small plasticine balls and, attaching them to the base, stick them from the center to the periphery.
- The planets of the solar system are molded in the same way as the full moon, only for each planet you need to choose your own mixture of colors (for Earth - blue, green, white, Mars - red, brown, etc.). For Saturn, it is necessary to make a belt depicting rings.
- The next detail of the panel - a rocket - consists of a plasticine rectangle. Above it you need to attach a triangle, under the rocket smear a piece of orange-red plasticine, which will depict the fire from the rocket. In the end, you need to decorate the rocket with details to your own taste. Craft for Cosmonautics Day in kindergarten is ready!
After these master classes, you will be able to conduct very interesting and informative activities with the children with the manufacture of crafts with your own hands and stories about the Cosmos.
Practically in all educational institutions, various exhibitions of student handicrafts are held on Cosmonautics Day. Naturally, on the eve of this peak, many people have a question in their heads about what crafts to make for Cosmonautics Day from waste material. And especially for you, we have prepared the best ideas.
Ideas for crafts from handy material for Cosmonautics Day
Flying saucer made of plastic saucers.
Plastic plates are an excellent material for creativity. It is worth noting that people make a wide variety of crafts from it. If you decide to make a flying saucer, then prepare:

Progress:
- Take a couple of plates. Plastic bottle caps are glued to the back of one plate. Glue a jar to another plate. Pre-paint plastic plates with gouache paints.
- Lubricate the edges of the plates with glue, and then connect them together. You can also fasten the craft with a stapler for reliability.
- Now the plate can be decorated. In this case, use your imagination.
And here are a few more options for space saucers.


Craft from a CD.
In order to surprise everyone, without exception, at some event, try to make crafts for Cosmonautics Day from disks. A space dish made from such material looks quite interesting. To create it, prepare:
- Styrofoam disk and hemispheres,
- Self-adhesive colored paper and decorative carnations,
- Flat stars made of plastic, bamboo skewers and toothpicks,
- Sequins and large beads,
- Chenille wire, glue and acrylic paint.

Progress:
- Take self-adhesive colored paper, attach a disk to it and circle it around. Cut out a circle and glue it to the non-shiny side of the disc.
- Paint one hemisphere with acrylic paint. Let dry.
- We decorate the second polystyrene hemisphere with decorative carnations and sequins. In this case, the sequin is placed on the year and attached to the ball.
- In the hemisphere, which is decorated with sequins, stick a couple of pieces of chenille wire. They will be the antenna.
- Now it's time to assemble the body of the dish. We glue the hemispheres between the disk. Glue the hemisphere with sequins to the shiny side of the disk. The painted part is glued to the part of the disk that is sealed with paper.
- Then make "legs" for the flying saucer. In this case, put beads on the blunt edge of the toothpick. In this case, the opposite edge of the stick should be inside the beads.
- Now insert the support legs into the painted part of the ship, which should be located from the bottom. In this case, the legs should be located at the same distance from each other. They should allow the craft to stand flat on the table surface.
- Plastic stars are glued to the shiny side of the disk.
Space world.
Disks can be used for more than just flying saucers. Do not fantasize a lot, then something interesting can turn out. To create you need to prepare:
- The discs themselves, glue, the tips of the sticks,
- Plasticine, paints.
Progress:
- Colorful sticks are attached to one disk with the help of plasticine.
- Make a rocket out of plasticine. Attach it to the disk. Then you can paint the disk with paints.
- With the help of one large piece of plasticine, one disk is attached to another.
- Now it remains to close up the hole in the disk with a piece of blue plasticine.
Space helmet.
Crafts for Cosmonautics Day look very bewitching. And making them is a pleasure. In order to make a helmet, you will need not only the help of parents, but also the following materials:
- 5 liter plastic bottles
- colored paper,
- Paint and tape.
Progress:

Balloon.
A bright ball is a great craft for everyone. For its manufacture you will need: glue, colored paper, and cardboard.

Progress:
- Take sheets of paper in two colors and cut out about 6 blanks according to the template.
- Then fold each piece in half.
- Coat the left halves with glue and glue them together, alternating colors.
- After that, the resulting ball is glued to the cardboard base.
- Then clouds were cut out of the paper, which were folded in half.
- A structure is assembled from them and glued to cardboard.
- Next, take a couple of pieces of woolen thread. They are glued to the ball on both sides. Cut out a basket from brown paper. It is glued over wool threads.
- At the end of the work, the craft itself can be decorated as you wish.
Cup rockets.
Ordinary disposable cups are also suitable for making crafts with the smallest. And if you decide to make crafts for Cosmonautics Day with your own hands in kindergarten, then you need to pay attention to the following products. For manufacturing you will need:
- Several plastic cups
- Colored paper, white gouache and glue.
Progress:
- A circle is drawn on each cup with white paint.
- A cone is made from colored paper. It sticks to the bottom of the glass.
- It is also worth making small cones for the wings. They are glued along the cups.

Cereal painting.
In order to make a craft, you should prepare:
- Gouache paints,
- Grains at your discretion. It can be: peas, buckwheat, beans or rice.
- Plasticine of various colors,
- Cardboard,
- Glue with a brush and scissors,
- Clear varnish and saucer.
Progress:
- First of all, it is necessary to pre-paint the cereals with paints. Paints are diluted with water and they are used to color cereals. Dry the grains.
- On a sheet of cardboard, apply the contours of any suitable pattern. It can be: any planet or rocket. Then take the plasticine and knead it. Sculpt the moon and space stars out of it.
- Fill the space of the rocket with the groats that you painted in advance. Let the craft dry, and then shake off the excess.

Plasticine panel.
In order to make the next craft, you will need plasticine. You will also need: cardboard and a plasticine modeling board.
Progress:
- The sun comes first. To do this, roll a large circle of: orange, red or yellow plasticine. Attach this ball to the cardboard, which is the base. At the moment of attaching the sun, it is slightly added to the cardboard.
- At the next stage, several colors of plasticine are mixed together and a long sausage rolls out of them, which needs to be wrapped around the sun.
- Now it remains to stick all the planets of the solar system from different colors and attach them to the orbit, which was formed from plasticine.

Summing up
If you decide to paddle your time, then creating space-themed crafts in this case will be a great pastime for you. Be inspired by our ideas and get only a good mood from the creations of these products.