Stand for pens from self-adhesive film with their own hands. Master class with step-by-step photo. Stand for pencils with your own hands from girlfriend
How to make a stand for handles with your own hands step by step with a photo
Afonin Denis, student of grade 6 MKOU "Batkovskaya Main School"Leader: Mamaev Oleg Vladimirovich, teacher of history and social studies MKOU "Batkovskaya Main School", Ryazan region, Sasovsky district, P. Batki
Purpose and Description:
The master class is intended for teachers and students, as well as for all those who like to needle how to create original and useful crafts from affordable material. The exercise is an origami-model of a stand for written accessories, made using self-adhesive film and stickers.
Degree of originality:
Paper origami-model "Stand for the handles" is not an invention of the author, the description of its assembly is easy to find on the Internet. However, the creative innovation of Denis, associated with the use of stickers and self-adhesive film for a special paper coverage, seemed so interesting to us that we decided to publish a master class of radically updated crafts, having significant advantages compared to your paper analogue: except the number of aesthetic properties, the stand has Large technical strength and external solidity - it can decorate not only the student table, but also will be appropriate on the desktop of the teacher or other adult.
Purpose:
Making a stand for pens from self-adhesive film.
Materials:
Seven A4 Paper Sheets, One Dense Sheet of Paper A4 (or Cardboard List), Super Challenges, Scissors, Fountain, Rule, Stapler ...

... Decorative self-adhesive film, divided by six squares with side size 25 centimeters ...

... album with stickers.

Master class
1. From the six rectangular sheets of paper we need to make six square sheets. For this purpose, we take one sheet of paper and reject the angle to the side. Cut off the triangle on the dotted line.

2. Reveal the triangle and get a ready square. In the same way, we make the remaining five squares.

3. We take one self-kept and separate the paper layer.

4. Gently glue self-keys per square sheet.

5. The line is smoothing the folds.

6. We turn over the workpiece to the other side and cut off the side strips of the film, protruding beyond the borders of the square.

7. Square is ready: one of his side is covered with a film, the other remains open. In the same way, we glue the remaining five squares.

8. We take one square and twice bend it in half.

9. We make four smooth bends on blue dashed lines.

10. Result: A large square is divided into 16 small (4 squares on each side).

11. Bend the corners of the four extreme small squares allocated in the top shot.

12. In red dotted lines, we value the upper and lower parts of the workpiece to the center (to the blue dotted line).

13. Result.

14. We turn the workpiece on the other side and sweep its side parts to the center (to the red dotted line).

15. Result.

16. Insert one "pocket" of the workpiece into another.

17. Result. One element for the stand is ready. In the same way, we make five more items.

18. Now we need to make six empty liners for each element. To this end, we take the seventh sheet of paper and cut six rectangles from it with the size of the sides - 5 and 9 centimeters. As can be seen in the picture, from an ordinary sheet you can make ten right liners (eleventh and twelfth liners isolated by cross, several smaller sizes are obtained).

19. Cut six liners.

20. Insert the liners into all six elements.

21. Open album with stickers (in this case, we use stickers with dinosaurs) and choose your favorite and fairly compact image.

22. Remove the sticker from the album and stick it into the "window" of one of the elements.

23. Result. In the same way, decorate all other elements.

24. We connect two elements together and sew them with a stapler.

25. Sticking brackets should not regret. In the image, the elements are joined ten brackets: the four on the right, four on the left, one above in the middle and one below in the middle.

26. After stitching the elements, a small hopper remains between them from the outside. To remove it, lubricate the superlock the surface side of one of the elements.

27. Cress items tightly for 15-20 seconds. This turns out to be enough to firmly link the elements with each other.

28. Add the remaining four elements to the workpiece, in turn, stitching them with a stapler and gluing superclaim. Result.

29. To make a durable bottom for the stand, take a dense sheet of paper and cut half from it. Then turn the stand below to itself and lubricate all the ribs of the base.

30. Click the stand to trim the thick paper and apply some cargo on top (for example, a book). We are waiting a few minutes until the glue gets up.

31. When the glue gets dry, we take the scissors and cut off the excess paper along the edges of the stand.

32. Stand is ready! Fill it with stationery.

33. Another stand with softer design and crab stickers.
3D origami is an exciting occupation. From individual modules, which, by the way, is very easy to do, various products are collected: from toys to interior items. If you are a novice in this matter, then start from the most simple models. Try one product to assemble several times to understand the essence, practice your hands, fasten the skills. For the first works, the pages of old magazines will be suitable. More prepare a ruler, pencil, scissors, cardboard, glue. It will take patience and accuracy and the result you will be satisfied.
I suggest today to make a glass for pencils in 3D Origami technique. You will learn to make modules for voluminous origami, connect them into a circle, use different sides of the module, arrange modules in the product.
All 3D Origami products consist of separate modules. First, I propose to use large modules. Cut the sheets of paper on rectangles 10 x 6 cm. Fold the module in the order, as shown in the photo. Such modules will need 176 pieces.

Works are starting from the assembly of modules into the first round: two modules connect the third.


So add 16 modules and connect them by the same 16 modules until we get a circle.


To make a circle, connect the first and last modules. Having made the first circle, we got two rows. The first round without experience is difficult to collect. Therefore, many masters use glue, smearing the ends of the first row.

We continue to ride the modules. In each subsequent row, we dress the module to neighboring ends. My product assembly process is represented by modules of different colors for greater clarity.

In this order, collect six rows.

Turn over the opposite side.

Squeeze the top of your hands.

We get a product resembling a glass.

We continue to accurately collect modules. Watch that they "watched" one way. Make 10 rows.

For the eleventh, the last, row is the modules with the other side.

As a result, you will get a neat narrowed edge of the product. In this model we get through hole. To close it, attach a cardboard circle to the bottom.

Create masterpieces with your own hands for family and friends with the site.
Universal selection of gift ideas for any case and occasion. Surprise your friends and loved ones! ;)
How to make a pencil with your own hands: master class
I will show you how to make a pencil with cute characters from the cartoon "My neighbor Totoro". In fact, the specified technology can be used for any kind of pencilies.
To create a pencil, you will need:
- Bank Tin (from any canned food)
- Any fabric to choose from for wrapping banks (I took Fleece and Miki Flis)
- Felt for finishing
- Threads in the color of the fabric
- Scissors
- Glue with a thin nose or glue-gun
- Plastic eyes
- Piece of synthetone
First of all, you will need to measure:
- the length of the circle can
- height of banks,
- diameter of the bottom.

In accordance with the measurements obtained, clean the 2 parts of the rectangles with the parameters from the tissue of 2 parts: (height of the jar + allowances on the seam 0.5 cm) x (circle length + allowance).
Both rectangles see first rear sovik (seam "back needle" either on a sewing machine) so that it turns out a closed surface. Surret Dysheko to the rectangle on the contour. You will remove one part, and leave the second.

Set aside the resulting cylinders. Now cut from the fabric 18 pair parts of the little animals - in my case the little takes. Patterns do not bring, as the contour is easy to draw yourself - an ovalchik with ears))
Sustrate pair parts with each other, it will turn out 9 animals (do not forget about the holes for turning).

On the site of future eyes, draw points and make cutters crosswise, as in the photo.

Remove animals and score syntheps.

And now in the resulting holes, add some glue along the contour. Be careful - then you will be inserted into the openings of the eyes. Insert until the side of the eye is completely drowned in the fur.

Hole at the bottom of the squeeze.

Uu, Baby


Cut the bank with details from Singrytegone Schw "Through the Edge." This is necessary in order for the pencil not to knock on the table. This stage can be skipped if desired.
First, cover the edge of the sintecon wrapped around the jar. Rodyshko also a trick.

Tension one of the cylinder parts on the outer side of the jar. In my case, it does not reach the top edge - a special effect.

At the bottom of the pencils also put a synthetone (stuck it, so as not to drive).

Insert the second (not turned out) the cylinder inside the stand. If you wish, you can also drop on the bottom of the glue, so that the inner part is fixed.

Singing a secret seam one cylinder to another.

Here is such a pencil with me)) If you wish, you can stay at this stage or decorate the product as described further.

All the animals are made or sung over the entire surface.

Cut out a few leaflets from felt and hang on them "Back Neck" characteristic lines. Stick leafles to the resulting pencil. It is possible to embroider patterns on the bunnies themselves.
We admire the result


From cans
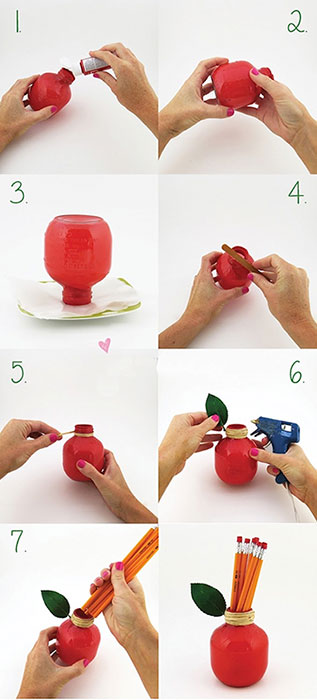
Apple
A very interesting way to make a stand for pencils - take the bank, liquid acrylic paints, paper, plate, cord and artificial petal with a glue gun.
Pour paint and shake into the bank. Drain the residues of the paint and let dry. Squeeze the edges if necessary. Take a thread with a cord and decorate the leaf - voila
Lego Guy
The method is identical to the previous one, only at the end will need to put the face with a black permanent marker.

Minion
Loves of all kids, meet!) Here you will need a tinny bank and a non-fermented EVA polymer (foamed rubber, which can be purchased as plastics in stores for creativity). By the way, the polymer can be replaced with a soft felt.
Cut all the details on the template and wrap the jar with a yellow rectangle. From the inside also glue a rectangle to hide the metal part. Stick the face, pants. Do not forget about the mouth.

From plastic bottles
Techula
For the manufacture of such cute pencilians you will need only a few oblong bottles, scissors, tape, acrylic paints and a photo frame for fastening (optional).
Cut the thread from the bottle and cut down the top of the top, as in the photo. Clay the central part of the tape from two sides, leaving in the middle empty space. Paint empty space and decorate the remaining lids, also painted. You can stick to the frame, and you can leave as it is.

Monstrics
Here you will already come in handy a jar from under shampoo. Cut her top with a lid, choosing on your own. From the remaining part cut the handles. Get ridiculous fabrics from felt or paper.

From cardboard and paper
Cylinders
The easiest way to make a cardboard pencil is to take cylinders from under rollers for clothes, rolls with paper towels or toilet paper. Wrap them with newspaper paper, boost together. Everything

Book flower
Very unusual and bright idea. Take an old fat log or directory. Divide all its pages on 5 equal parts. Get the pencil to the side part. Wrap a pencil book to turn out to be in the center, glue.
Top with a white acrylic paint. Cut from dense cardboard bottom, circling a pencil. Stick bottom.

From wood
Rather, not even a tree, but from wooden pencils. To do this, you just need to glue a few pencils together, forming the wall. Such walls will be required 4. Downstairs glue the bottom of the dense cardboard.

But I described the 10th pencil in the article about New Year's decorations. I am very advised to look, there are many interesting ideas.
By the way, Minky Fleas, from which the outdoor green background of the first pencils and white totor, acquired here. I advise you, as it is very difficult to find it in our gables.
Subscribe to updates and share your impressions! See you soon!
Sincerely, Anastasia Speeva
Order on the desktop Excellent indicator of the organization and orderliness of the thought of man, who works behind it. Now on the Internet you can find many options for organizer for desktops. But much more pleasant to surround yourself with unique suitable things that are suitable for you. Everyone can make a cup for pencils with their own hands and decorate them your desk.
It will take only a little patience and a drop of fantasy. Material for creativity can be very diverse, sometimes it can be found just at hand.
For example, make a cup for pencil pencils. But for such a craft, it is also suitable:
- flower pots;
- glass or tin cans;
- plastic bottles;
- knitting yarn;
- cardboard tubes;
- pencils or markers;
- modular origami.
Glass for pencils from modular origami: step-by-step instructions
Modular origami - the creation of bulk items from paper elements - modules. With this technique, you can collect a toy for a child, decoration for your desktop, or a cup for pencils. The beginners should not immediately take on complex work and buy special paper. For training, newspaper sheets or log pages are quite suitable.
Materials for craft
- sheets of paper of two colors (here red and yellow);
- line;
- scissors;
- cardboard;
- glue;
- sticky pencil.
Using the example of the cup, you will learn the basics of creating paper modules for bulk origami, connect them into a cylinder, experiment with paper shades. The work is painstaking, you need to be patient, but the result is worth it.
First you need to prepare paper from which we will make modules.
We turn ordinary paper into the module
Cut 176 pieces of paper rectangles. We fold them as shown in the figure.

We collect the base of the cup
When all modules are collected, you can start collecting the first circle. For this, two modules are inhabited by sharp ends in the third. The first 8 rows will collect from the modules of one, the main color.
Create a circle of 24 modules. For beginners, it is properly made and combined the first circle is not an easy task. Details can be punctured. Then they will not fall apart.

In 9 row, we begin to introduce the modules of the second color, according to the scheme: 1 yellow module, 5 red and so in a circle.
Gradually reduce the number of red modules between yellow. Similarly, we make all the sides of the stand.

We draw up the bottom of the crafts
For registration, the cup of a cup must be carefully flipped over its bottom to seal another number of modules.

Optionally, you can cut a circle of cardboard, suitable in diameter, and glue a cup on it.
Paper Pencil Cup: Step-by-step instructions
Modular origami is very beautiful and painstaking art. But there are cases when the resource of time or paper is limited, but there is a desire to decorate the desktop with a cute and original stand for stationery. A master class to create a cup for pencils from paper will come to the rescue.
To create a cup, you need only one sheet of paper, but cost to be extremely neat, paper is very easy. So that your handicraft does not lose appearance during operation, collect the cup you need easy movements.
Step 1
From the standard A4 sheet, make a square. To do this, take it over the corner of the short edge and bend it diagonally. Remains cut.
Step 2.
List bend on diagonals and horizontal. In further assembly, we will focus on the resulting lines. We put paper on the horizontal fold line so that it turns out a triangle.

Step 3.
The top corner of the triangle needs to be bandaged for about two centimeters, spend the fibe on the fold line and reappear to return to its original position.
Step 4.
The lower right angle of the triangle is bending to the left to the line planned on top.
Step 5.
The leftmost corner of the crafts is put to the right to the same mark. Next, the left fold diagonally bend left again. Lower corner hide down, between the layers of the product.
Step 6.
Similar manipulations spend on the other side of the crafts. We carefully smooth the finished handicraft. We turn over and reveal the cup from below. Fingers from the inside smoothed the bottom of the cup.
Our stand is ready.
Video selection on the subject of the article
All the details and even more options for creating a cup for pencils with your own hands, you can watching the video master classes.