We make a folding chicken for eggs for Easter. Master Class. Easter craft “Chicken with chickens in a basket. simple flower garland
There is also such a beautiful idea how to sew Easter chicken from scraps of fabric.
We need such a pattern

now, you need to prepare a patchwork fabric (stitch together, steam, iron)

now, we cut our canvas

some details, sew together

we sew the wings by hand, here is a view from the inside

for the body of the chicken and the bottom, we make a layer with batting

that's it, a more detailed description can be seen here.

I think there is nothing easier: just take old, unnecessary things or some pieces of fabric, patches, prepare patterns to put it all together. The chicken can be made multi-colored using different fabrics or you can give preference to a single color scheme.
Easter chicken is a wonderful Easter symbol that you can sew with your own hands.
I really liked the idea of a scented toy, for lovers of Attic dollsquot ;.

In order to sew such a chicken, we need the following materials:
fold the fabric in half and transfer the pattern onto it.

We sew on a typewriter along the contour, leave a small hole at the bottom and turn it inside out:


tint with coffee solution and dry

We make a scallop out of lace and glue it

We paint the chicken with acrylic paints, as fantasy allows us

Our Easter chicken is ready :)
How to make other Easter gifts, you can see here
Hen with a pocket for eggs, or the so-called Easter chicken.
the chicken is sewn from cotton fabric, you will also need a rope or cord, ribbon (for tying), yarn or floss threads for the scallop and tail.
According to the template, we cut out the details, one large one (we will fold it in half later) and two wings. we sew the wings to the body, the threads - in place of the scallop and tail, bend the bottom of the chicken and sew it, insert the cord. The beak is made of a triangle of fabric, sewn in half.


P.S. I don’t know what the chicken has to do with Easter, because in the Old Testament a lamb was slaughtered on Easter, and according to the New Testament, Easter lost its power (since the holiday symbolized the sacrifice of Christ, which had already happened when He came into our world and died for us) and Christ's substitution for the Supper.
In order to sew an Easter chicken, you must first prepare a pattern. By the way, you can make it according to your own sketch. Draw the outline of the chicken and then make two patterns on it on the fabric that you will prepare for this craft (this can be either a simple colorful chintz fabric or shreds of more expensive and elegant fabric - choose according to your desire).
Wings, or rather paper patterns, for the chicken need to be drawn separately. The pattern for them is also separate.
The wings and scallop of the chicken are best made from a fabric of a different color than the whole chicken.
For a more visual process of patterning and sewing an Easter chicken-basket, you can see a photo with a step-by-step implementation of this craft (see photo below):


In order to sides the hens of the basket were denser and kept their shape, you should put a denser fabric between the two parts of each side of the hen.
Easter hen with a pocket for eggs. The color of the fabric is taken in light tones with a pattern.


The chicken is sewn according to the pattern. The fabric must be glued to the interlining. For more information on how to sew a patchwork chicken, see here.
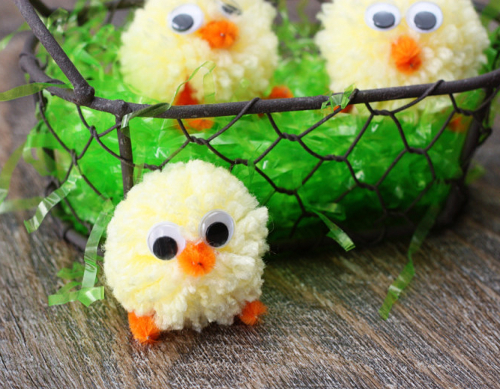
A little chick will be the main decoration of the Easter table, an excellent keychain and a wonderful reminder of the pleasant moments of the holiday. And if you make a whole family of chickens, they will surely outshine at the school exhibition.
Today I will show you how to make two chickens:newborn(and therefore very surprised) and older, on short thin legs.
To make a newborn Easter chick, you will need:
- yellow threads (acrylic, cotton, wool),
- round artificial eyes (or two black beads),
- red cardboard (for scallop, paws and beak),
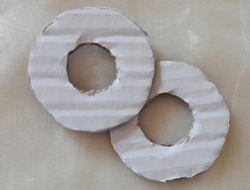
- two circles cut out of cardboard.
Let's start making chicken!
1. Take two circles with cut out centers. The outer diameter is the size of your future chick, and the inner diameter determines the density of the pompom. The larger the cut out part, the more threads can be wound, and therefore, the pompom will come out denser.
So it's time to decide whether you will have a tiny chicken or a rather impressive broiler =)

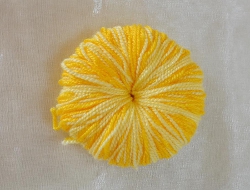
2. Put two circles together and wrap them with thread.


But if you have a large pompom, unwind 15 meters of thread, fold them in eight, and only then get to work. That will be much faster.


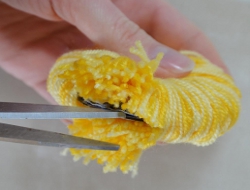
3. Cut the threads as shown in the photo. The scissors should go between two cardboard circles.

4. Having cut the threads to the end, take a new thread 20 cm long, wrap it between two cardboard boxes and tie it tight so that the pompom keeps its shape well.

5. Now cut the cardboard circles out of the pompom with scissors - they are no longer needed there.

6. Done? Well done! It's time to visit the beauty salon and give your chicken a chic hairstyle.
Align the pom-pom, straighten the threads, cut in the right places, and you're good to go.

7. Cut out comb and paws from red cardboard.

Glue them to the chicken. Like this:


8. Now glue the eyes and the beak, consisting of two red droplets. Beauty!

We take on the second chicken, which can already walk.
For work, additionally prepare:
- glue Moment Crystal,
- wire,
- red threads,
- two black beads
- red cone bead.
1. Make 2 pompoms (You already know how): one is small and the other is bigger. Do not cut the threads with which you will tie the pompoms - they will come in handy when tying the parts of the chicken's body.

2. Now cut the threads. From a thin wire, make legs for the chicken: three fingers will be in front and one behind.


3. Lightly smearing the paws with glue, wrap them with red thread.

4. Glue the red cone bead. This is a chicken beak. Glue two black beads in place of the eyes.

Here are our two beauties. Sit them in and soon to a friend - Happy Easter and!
Easter pendant "Chicken with chickens" with your own hands. Master class with step by step photos.
author: Travneva Olga Yurievna, primary school teacher, KSU "Secondary School No. 21 with. Saryozek Osakarovskiy district Karaganda region KazakhstanDescription: this master class can be used in their work by teachers of preparatory groups in kindergarten, primary school teachers and parents.
Purpose: gift, to decorate the interior of the apartment, work for the exhibition.
Target: making an Easter pendant for the holiday.
Tasks:
- to form practical skills in working with cardboard, scissors, glue;
- develop aesthetic taste, creativity, fantasy, imagination, fine motor skills of hands;
- to cultivate independence, patience, perseverance, respect for traditions.
Materials and tools needed to make an Easter pendant:
- colored cardboard;
- scissors, glue, pencil;
- templates, sample work.


Guys, tomorrow is a big holiday; Feast of the Resurrection of Christ, Feast of Easter. In the old days there was a belief that on Easter "the sun plays." Many tried to watch for this moment, turned to him with a song.
On this bright day, people become kinder, happier. All insults are forgiven, all quarrels are forgotten. Let us also say the words: “Christ is risen - Truly risen”, embrace and forget about disputes and strife forever.
Everywhere the blessing is buzzing
Of all the churches, the people bring down,
The dawn is already looking from heaven,
The cover of snow has already been removed from the fields,
And the rivers are torn from the shackles,
And the nearby forest turns green,
Christ is risen! Christ is risen!
The earth is waking up
And the fields are dressed.
Spring is coming full of wonders
Christ is risen! Christ is risen!
On Easter, the doors of the houses are open to all guests. Guests are greeted cheerfully and cordially, generously treated with Easter cakes. And on the table are plates with colored eggs. In ancient times, people dyed eggs, and washed themselves with water from a red egg in the hope of getting rich quickly. And on street festivities with eggs, interesting games were held. For example, the best prize was given to the one who rolled the egg the farthest without damaging it. It was considered enviable to collect as many Easter eggs as possible, deserving them with dexterity and "sharpness" of the eye.
It is believed that any wish made for Easter is fulfilled. The girls made wishes.
Sunday of Christ!
Send me a single groom!
God bless the groom
Not on a cow, but on a horse!
And the old people combed their hair on Easter with such a wish: “May I have as many grandchildren as there are hairs on my head!”
On the eve of Easter, the fair was especially lively and cheerful. People from all volosts came here to buy festive dresses and gifts.
The sun rises bright
People rush to the fair
And at the fair goods -
Selling samovars, cups, sleds,
And sweets, and bagels,
Millet, eggs, cheesecakes,
Tape in braids and toys.
Guys, and I want to invite you to make a gift for the holiday of Holy Easter with your own hands - the Easter pendant “Chicken with chickens”.
We will be working with scissors, so we need to remember how to handle scissors while working.
When working with scissors, observe the following rules:
1. Keep order in your workplace.
2. Before work, check the serviceability of the tools.
3. Do not work with loose scissors. Use scissors with rounded ends.
4. Work only with serviceable tools: well-adjusted and sharpened scissors.
5. Use scissors only at your workplace.
6. Watch the movement of the blades as you work.
7. Put the scissors with the rings towards you.
8. Feed the scissors with the rings forward.
9. Don't leave scissors open.
10. Store your scissors in their sheath with the blades down.
11. Do not play with scissors, do not bring scissors to your face.
12. Use scissors for their intended purpose.
Making the Easter pendant "Chicken and Hen".
Let's prepare the templates. You have templates on your tables, with the help of them we will cut out all the details of our future pendant. For the egg, chicken, bow, we need to cut out two parts. Do not forget that the second part is traced in a mirror image to the first part. This is necessary so that the parts match when gluing. If we use double-sided cardboard, then we will prepare one part of an egg, a bow, a chicken.
If there are two chickens on your pendant, we prepare the details for two chickens accordingly.
Now let's decide on the color. For the egg, you can choose any color, since eggs are dyed for Easter. For chicken, you can choose white, gray or brown. For chickens - yellow cardboard is more suitable, but white cardboard can also be used. For the bow, choose the color to your taste, the main thing is that it differs from the color of the testicle.

1. Cut out the details for the egg and carefully glue them together.

2. Prepare the chicken for hanging:
- cut out the details of the body of the chicken and glue;

- cut out the part of the scallop from red cardboard and stick it on;

- cut out a beak from yellow cardboard and stick it on;

- cut out the eyes (it is easier to cut out the eyes from colored paper) and glue them.

3. Now glue the chicken on the egg.

4. Prepare the details for the chickens and stick them on the chicken.
Let's start with the chicken girl:

- cut and paste the wings (in one piece);

- cut and paste the head;

- cut and paste the beak;

- cut and paste the eyes;

- Cut out and stick on a bow.

5.Now prepare the details for the chicken boy and stick it on the chicken:
- cut and paste the body;

- cut and paste the head;

- cut and paste the beak;

- cut and paste the eyes;

- cut and glue the wings.


6. Glue the details of the bow and stick it on the pendant.

This is how our Easter pendant looks like.
Front view.

Back view.

Glue or insert the thread into the pendant.

Now our Easter pendant "Chicken and Hen" is ready.
Summary: Children's crafts for Easter. Easter chickens. Easter chickens. Easter chicken. Easter souvenirs with their own hands. Children's crafts for Easter. Easter chicken.
Easter is a family holiday, when many friends and relatives gather at the same table, children run around. On Easter, it is customary to make and give each other small gifts (do-it-yourself Easter gifts): Easter baskets with painted or decorative eggs, Easter cakes, Easter souvenirs - Easter chickens, chickens, bunnies. It is especially interesting to participate in the preparation for the holiday and the manufacture of crafts for Easter with their own hands for children.
In our previous articles, we talked about how to paint eggs for Easter, how to decorate Easter eggs, how to make Easter baskets with your own hands. Read our articles:
In this section you will find instructions for making children's crafts for Easter. Make DIY Easter souvenirs with your child for relatives and friends.
1. Easter master class. Easter chickens. Easter chickens

2. With your own hands for Easter. Easter chickens
Option 1.
It's very easy to make an adorable Easter chick out of pom poms. You can make an Easter chicken from two or one pom-pom.

How to make a pom-pom out of yarn? To do this, cut out two identical rings from cardboard. Put them together and wrap them in a circle with yarn in several layers (see photo below). Here is what you should get as a result.

Now cut the pom-pom blank in a circle with scissors and tie it in the center with a thread. You just have to trim the pom-pom with scissors so that all the threads become the same length, so that the pom-pom is even and pretty.

If you are going to make an Easter chicken out of two pom poms, then you will need to make another pom pom a little smaller for the head. But you can do with one pom-pom. Easter chickens from one pom-pom also look very cute. Judge for yourself!
For beauty, plant the Easter chicken in a thoroughly washed and dried eggshell.

An interesting idea is to glue bamboo skewers to the eggshell, put purchased or homemade Easter chickens in the shell. With this craft, you can decorate pots with house flowers or sprouted wheat for Easter.

Option 2.
You can also make an Easter chicken out of an egg carton. For a detailed Easter master class, see the photo below.


Option 3.
Papercraft for Easter - 3-D paper model of a chicken in an Easter egg from Epson's Singapore site. You can download the template here >>>>


3. Children's crafts for Easter. Children's crafts for Easter
We continue to tell you about interesting children's crafts for Easter. These funny Easter chickens are handmade using papier-mâché technique. For those who are not familiar with this technique, we will tell you in more detail how to make them.

For this Easter craft you will need:
Balloon
- plain paper or newspaper
- yellow and white corrugated paper
- PVA glue
- any greasy cream or petroleum jelly
- felt, satin ribbons
How to make an Easter chicken with your own hands:
1. Inflate a small balloon. For ease of use, hang it on a string.
2. Lubricate the ball with fat cream or petroleum jelly.
3. Cut or tear into small pieces plain paper or newspaper.
4. Dilute the PVA glue with water in a ratio of 2:1. Lubricating each piece of paper with glue, glue the ball on all sides in several layers. Pieces should overlap each other.
5. In the same way, glue the balloon with several layers of yellow corrugated paper. Decorate at the end with circles cut out of white crepe paper.
6. Leave the chicken blank to dry for at least a day.
7. Deflate and remove the balloon from the craft.
8. From felt, make eyes, beak, scallop, paws, wings for the Easter chicken. Decorate it with satin ribbons.
The Easter chicken in the photo below is also made using the papier-mâché technique. Her head is made separately from paper and felt and glued to the body at the end of the work.

4. DIY Easter chicken. DIY Easter chicken
To make such an original Easter chicken, you will need: cardboard toilet paper roll, yellow cardboard, yellow double-sided paper, felt-tip pens, scissors, glue, M&M's sweets.

Cut the cardboard roll lengthwise and cut off a small segment from it so that it becomes like an arch (or tunnel). Paste it on all sides with yellow paper or paint it with yellow paint. This will be the body of the Easter hen.


On yellow cardboard, print additional details for the Easter craft. You can download them
The video content titled "" was posted by the author of "David's Adventure" for 4 years. ago, it was already viewed 44,607 times. The video was liked by 266 and disliked by 39 users.
Description:
Making crafts for Easter. Funny paper chickens can be a great Easter gift for your friends and loved ones. To make Easter chickens, we need:
Materials: sheet A4 bright yellow, sheet A4 orange, sheet A; pale yellow, a piece of white paper 3x1.5, a piece of colored paper 5x5, a ruler, scissors, a pencil, a glue stick, a black felt-tip pen or eyes for toys.
Our video shows in detail how to make a craft for Easter in the form of a chicken. By the way, the paper does not have to be yellow, if you take some kind of colorful paper, then the chicken will turn out to be even more fun. Don't be afraid to fantasize.
And it’s still not clear why only chickens and bunnies are made for Easter. We recommend not limiting your imagination and making, for example, beautiful paper rainbow giraffes.
See here -
By the way, why not make crafts in the form of heart snails for Easter. After all, a do-it-yourself craft as a gift to loved ones is, first of all, a small declaration of love. And on Easter day it will be more than appropriate.
Look -
Well, we helped you with ideas of what crafts to make for Easter?
If not, then subscribe to our channel so as not to miss new videos.
Timeline for video crafts for Easter:
00:23 - Cut out a square from a yellow A4 sheet
00:25 - from the resulting square we twist the cone
00:27 - we outline the place of gluing
00:29 - glue
00:34 - cut off excess paper
00:35 - the basis for crafts for Easter is ready
00:37 - Cut off three strips 2 cm wide from the short side of the sheet
00:39 - twist the strips into rolls with a pencil
00:44 - glue the strips together. This is the tail.
00:53 - glue the tail of the paper chicken for Easter
00:59 - cut a strip 6 cm wide
01:01 - fold in half
01:02 - cut out the wings
01:08 - glue the wings to the body
01:16- cut off two strips 2.5 cm wide
01:18 - fold the strips with an accordion. These are paws.
01:24- Glue the legs to the body
01:29- cut out a 4x8 cm rectangle
01:31 - fold in half and cut out two circles
01:35 - glue the circles to the paws
01:39 - cut out another rectangle 4x8 cm
01:41 - fold in half and cut out two pieces for the scallop
01:46 - glue together only the edges of the parts
01:54 - put a comb on your head
01:56 - cut off a strip of 1.5x13 cm
01:59 - divide into two parts
02:01 - from the longer part we make a beard
02:05 - glue the beard
02:10 - from the second part we make a beak
02:15 - glue to the beard
02:20 - cut out the base for the eyes
02:23 - glue to the head
02:26 - glue eyes or draw with a felt-tip pen
02:31 - cut out decorations
02:34 - glue on the chicken
02:35 - Easter paper craft is ready Video source youtube.com/watch?v=Ay35b9-Z4ck
This video material about modeling can be watched online, as well as downloaded absolutely free of charge and without registration in almost any video format: mp4, x-flv, 3gpp and so on. You just need to click on the "Download" button at the top of the site and move the slider to the right. In addition, you can see other educational video about molding from plasticine, salt dough, clay and so on from the author of David's Adventure, which are also posted on our website, as well as other similar educational videos about modeling, crafts, materials, art and the like. If you need a mobile version of this video, then our site has a modern responsive design and is suitable for any mobile device: tablets, smartphones, phones, and so on.
Don't forget to bookmark educational and educational videos for kids and adults! To get back to watching.