Print the layout of the paper cone. How to make a cardboard cone: a detailed description of the work and tips for using
To create a festive atmosphere at home, you can use small Christmas trees made of cardboard cones, made using various techniques and materials. Whatever way you choose to decorate the forest beauty, you will need a base. You can read about how to make a cardboard cone for a Christmas tree in this article, everything is written step by step.
Such different Christmas trees
Beautiful handmade Christmas trees are a great solution for decorating your home for the holiday, as well as for a small gift for a loved one. It is so important to share the festive mood with other people. There are a lot of options for such trees. A Christmas tree from a cardboard cone can be offered to children. This activity will be to their liking and will help them realize their creative potential.
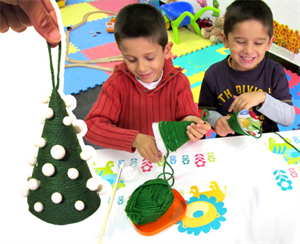

Adult craftswomen make magnificent crafts from various paper, decorative elements, threads, tinsel, sweets and even feathers.


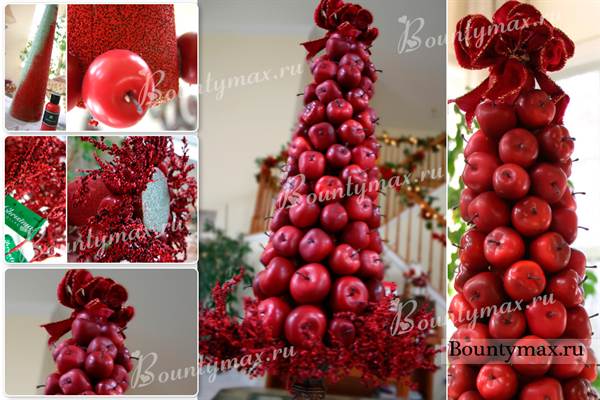

Inspired? Now take a close look at the photos of all these beautiful crafts. What do they have in common? Of course, this is the base in the form of a cone. And each tree has its own. If the Christmas tree is intended as a floor or table composition, then the bottom can be omitted. But there are also crafts in which the bottom of the cone must be closed. Read below to learn how to make cardboard cones for the base of such Christmas trees.
Cones without a bottom
The best material for making Christmas tree bases is cardboard.
Since the decor sometimes weighs quite a lot, it is better not to take paper for the base. It is only suitable for making children's crafts or Christmas trees decorated with paper decor.
To make a conical base, you will need:
- Cardboard;
- Scissors;
- Glue or tape;
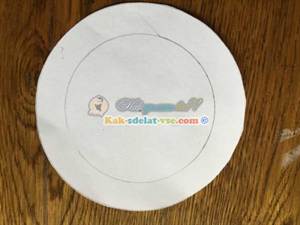
- A compass or a round object that can be circled along the contour (plate, bowl);
- Pencil;
- Ruler.
The thickness of the cardboard should be chosen depending on the weight of the selected decor. If the decor is heavy enough, and the cardboard is thin, the base may not withstand, and the tree will turn out to be unstable, it will fall to one side.
There are several ways to make a paper cone. To implement the first, you need to fold the cardboard in the form of a bag, as in the figure:


Next, the excess cardboard on the bottom side is cut off with scissors. This must be done exactly as in the diagram, otherwise the product will collapse. Glue the side edge of the cone with tape or glue. This method is convenient in that you can independently and without calculations adjust the height and width of the cone.
Bottom manufacturing
For items such as topiary or stemmed Christmas trees, as well as Christmas trees in the sweet design technique, conical bases with a closed bottom are required. A small master class will clearly show you how to make a paper cone with a bottom.
To do the job, you will need the same set of tools as for creating the cone itself.
And now we will gradually consider the manufacture of the bottom. Take the finished cone and measure the diameter of its base with a ruler.

As you know, if you divide the diameter in half, you get the radius. Make the necessary calculations and use a compass to draw a circle corresponding to the size of the base of your cone.

Make a sample. The edges of the drawn circle and the edges of the cone must match in size.

To fix the bottom to the base of the cone, you need to make an increase of 1-2 cm. Draw a second circle and cut it out.
Cut the distance from the edge of the outer circle to the edge of the inner circle with scissors (the pitch is 5 mm).
And again I will show you how to create origami things from one sheet of A4. Today you will learn how to make a paper cone with your own hands according to the correct and convenient scheme. The craft is a shortened version of the master class. The cone is strong and neat, it can be used in a masquerade, in the form of a nose if you are. We do not need any glue or other tools with materials. The craft is very easy, you can start teaching needlework to your children with it.
How to make a paper cone
As always, we put an A4 sheet, this time I took a raspberry color.

According to the already known scheme, we make a square. We bend one corner so that the two edges lie parallel exactly relative to each other.

We tear off an unnecessary rectangle, we get two parts, one of them is the square we need.

According to the already existing fold, we make a triangle from the square. Or rather, we add one corner to the opposite.

Then fold the triangle in half again, along the central corner.

We unfold the last action and bend the lower half of the triangle along the central fold.

Then, just twist the bent half up. First, twist up one step.

Then twist in the second step. And there should be no extra protrusions at the workpiece. It turns out here is such a triangle.

For clarity, I will turn the workpiece. We make a turn of a single extreme corner. This is for convenience.

We put the part that was not tucked inside the workpiece.

View from above. We stick to the end.

This is how it should be.

And at the very end, the initially tucked part, as well as the opposite one in the previous step, is thrust inside the cone.

View from above. Of course, we stick it to the end.

And it turns out a beautiful and very simple do-it-yourself paper cone made according to an origami style pattern.


Sometimes you need to urgently make a New Year's clown costume or elegant gift wrapping, an original Christmas tree or a funny little animal, unlike any other. And then the question of how to make a cone out of cardboard or paper may come up. If someone does not understand what we are talking about, let us explain: this is such a voluminous geometric figure, at the base of which lies a circle. All rays from the circle rise upwards at an equal angle and intersect at one point.
How to fold a cone from a rectangle?
It is unlikely that anyone over 40 years old has not had to roll up a bag, because plastic and cellophane bags for packaging have appeared relatively recently. And under the Soviet regime, such packages of loose goods were practiced in stores. Yes, and in everyday life, many used this method of folding cone-shaped bags to pack a sweet gift, buy seeds from an old woman on the corner, pour granulated sugar for tea at work ... But you never know what else?
But today, not everyone knows how to make a cone out of paper. A step-by-step algorithm of actions will show how to cope with this task.
- The left hand grabs the sheet from above.
- This side of the rectangle wraps down at an angle. The sharper the bag is needed, the smaller the overlap angle. The top of the cone can be in the right corner of the sheet or on the perpendicular side. The thumb is located on the outside, and all other fingers should be inside.
- Wrapping the sheet around the fingers, form a bag. It is important to ensure that the top of the cone is "respected". On how clear and accurate the tip of the bag will be, its strength depends.
- The material from which the cone is rolled must not be crushed. The sheet must “keep its shape”, only then you get a bag made in accordance with all the rules.
- The top of such a cone is tightly folded or twisted. To create a gift bag, you can use a stapler, glue, a beautiful ribbon that you need to wrap or bandage the package.
How to make a cardboard or paper cone from a whole circle?
If the parameters of the future "bag" (namely, this is what the people call this figure) are not clearly regulated, then arbitrary sizes can be taken.
- Since it is quite simple to make a cone out of cardboard or paper, you just need to draw a circle on the prepared material using a compass.
- Then draw a radius in this figure. It needs to be cut.
- Next, the edges of the cut are superimposed on each other so that the initially flat figure acquires volume. The center of the circle becomes the tip of the cone. It is sharper, the larger the area of application.
- By fastening the cone along this line with a paper clip, stapler or glue, you can get a cone made of paper or cardboard.

But you can simply cut out a sector bounded by two radii from a circle. The edges of the resulting figure are fastened in the usual way. The larger the angle of the cut sector, the sharper the paper or cardboard cone will turn out.
How to construct a cone from a semicircle?
Sometimes you need to make, for example, a cap for a carnival costume or a Christmas tree toy. For such crafts, pointed cones are needed. And in these cases, it is no longer necessary to use a circle with a cut out sector. A semicircle will serve as a pattern for the cone.

In the middle of the diameter, which serves as the edge of the cut out, mark a point. This will be the top of the cone. The radii are superimposed on each other and fastened with glue, a stapler. If a cap or other craft is made of fabric, then the fabric is sewn in this place.
Why do you need to know how to make cones?
Very often, parents have to make New Year's costumes for their kids. Knowing how to make a cardboard cone, you can easily make a clown or wizard outfit. Yes, and the top of a witch's hat with a brim is easy to make with such skills.

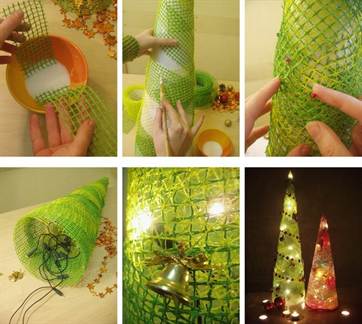
If you make a cardboard cone, wrap it with threads, cords or rope, coat the top of the structure with paste or glue, then after removing the cardboard frame, the manufacturer will have an openwork original “Christmas tree”. It can be decorated with small toys, chains, flashlights or light bulbs.
On the basis of cardboard cones, many cool figures of animals are made. Such crafts act as Christmas toys for the Christmas tree, creative crafts for gifts or designer decorations for rooms.
As a packaging for sweet gifts, a cardboard cone looks very presentable. Yes, and fed up with all the factory boxes and packages! And when at least the packaging for the same sweets is made by hand, then this is already a manifestation of special attention to the gifted person.
Paper cones can be used in a variety of home projects. Need a sharp nose for a paper rocket or a snowman? Want to make a party hat? Paper cones have a lot of potential in terms of looks, and they're fairly easy to make. With the cone ready in hand, you can go ahead and decorate it in all sorts of ways.
Steps
Making a cone from a paper circle
- The wrong shape will greatly affect the result of your cone. Put in extra effort by cutting out a circle of the correct shape.
- To achieve a round shape, you can use a compass or trace around a round object, such as a lid or a round container.
-
Draw a triangular wedge. Use the template to cut the circle on both sides and get a wedge. To draw your own wedge, make a mark in the center of the circle. To make a wedge, take a ruler and draw two straight lines from the center point. The closer these lines are, the smaller the wedge will be and the wider the bottom of your cone will be.
- Use a compass or protractor to determine the center of your circle if you're not sure where to put the dot. If you originally used a protractor to draw a circle, then in order to save yourself time, first mark the center, and only then proceed to draw a circle around it.
- You can also draw a triangular wedge with a ruler and pencil.
-
Cut out a triangular wedge in the circle. To make a cone with a small bottom, cut out a larger wedge. Use scissors or a craft knife to cut the wedge as straight as possible. If you make a mistake, you will most likely have to start over.
Bring the cut sides of the circle together. Bring one cut of your circle to another to get a cone. Hold the sides tight and make sure the bottom edge of both sides overlap evenly. Now your circle should take the shape of the cone you want.
- Unfold the paper and try again if the sides didn't fold correctly the first time.
- Do not make hard bends in the paper. The cone must be rounded.
-
Cover the inside of the cone with tape. To begin, glue the two cut sides of the paper together to form a cone. Then glue the inside of the cone by overlapping one side and gluing them together. After that, the cone will be ready.
- One straight piece of tape will give your cone the most strength. If you try to secure the inside of the cone with a few pieces of tape, your cone will look messy. Hold the cone together with one hand and apply the tape with the other.
Making a cone by folding paper
Cut out a large triangle. If you don't like the circle method, you can make a cone out of a paper triangle. To roll it into a regular cone, one side of the triangle must be long, and the other two must be short and of the same length. The larger the triangle, the larger the cone will be. Try to keep your measurements and cuts as accurate as possible.
Fold the far corners of the paper towards the center. Take one of the far corners and wrap it towards the center so that the edge of the paper is in the center of your triangle. With your other hand, fold the second corner and wrap it around the first. As a result, your triangle should take the shape of a cone.
Align your cone. If you don't manage to wrap the paper perfectly, then you will have to move it a bit to align the cone. Tighten the wrapped corners if necessary. If you feel like you've turned corners unevenly, you might want to try again.
- If excess paper is peeking out from the bottom of the cone, then your original sheet was uneven. In this case, to continue working, cut off the excess with a craft knife. If the base of your cone turns out to be even, it is unlikely that anyone will notice the blunders that you made in the process of making it.
- The whole process of work does not take very much time, so it is better to repeat it several times until you get the perfect cone.
-
Wrap the free edges of the cone inward. Excess paper must be wrapped inside the cone. This will allow you to hide all the bumps, and the folds to keep their shape. If you have folded the paper correctly, then all that remains is to take care of the triangular tip that needs to be folded inward.
- If for some reason you can't fold it due to lack of paper, you can solve this problem by taping the base of the cone with tape, from the outside and in.
- Try squeezing or loosening the cone slightly if you're having a hard time finding the crease.
-
Cover the cone with tape. Although rolling the free edges helps to keep the cone in shape, by taping the seam lines from the inside of the cone, you will definitely keep it intact. Cut off a strip of tape and place it along the seam line. If you're still unsure about the cone's strength, cut off additional strips and stick them across the top and center of the seam. Once the tape is in place, your cone is ready to use.
- Dangling edges can also be glued.
Creating a unique cone design
-
Choose the right paper. You will be able to think in advance what material to use if you have a clear idea of what you need a cone for. Some types of paper are better for some projects than others.
Make a paper circle. The height of your cone will depend on the radius of that circle. The larger the radius, the higher the cone will be. Print out the pattern and transfer the figure to the appropriate paper. If you decide to draw a circle by hand, try to make it as round as possible.
In order to create a New Year's mood, it is not necessary to install a large live or artificial Christmas tree at home, you can make a small New Year's beauty from cardboard or paper with your own hands. To do this, you can use various methods and options for making such a Christmas tree. In order to make a Christmas tree, you need to make the basis of the entire Christmas tree.
How to make a Christmas tree cone
A beautiful Christmas tree made of cardboard and paper can not only give a New Year's mood to your home, but is also ideal as a gift for family and friends who will not remain indifferent to such a festive gift. There are a lot of options for making a festive tree. You can also involve your children in the manufacture of such a cardboard tree, who will be passionate about this activity. This skill not only captivates them, but also helps to reveal their creative abilities.
Reference! All Christmas trees made of cardboard have the same base in the form of a cone. If you decide to install the New Year's beauty on a wall or table, then the bottom of the cone can be omitted. But, if you make a hanging Christmas tree, then the bottom must be made.

What you need to make a Christmas tree cone
To make a miniature Christmas tree, you will need the following materials and tools:
thick paper or cardboard;
- scotch;
- scissors;
- glue;
- simple pencil;
- ruler;
- compass;
- materials for tree cone decoration.
Reference! As such a material for decoration, you can use beads, tinsel, beads, cones and much more that you have at hand.
The design can be either from colored cardboard or paper, or white. It all depends on your taste preferences.
The thickness of cardboard or paper must be wiped off, starting from the weight of the future decoration of the Christmas tree. If you intend to use a lot of decor, then choose a dense material as the basis for the design. Since when choosing a thin base, the tree will not hold steady, and fall on any side, or it may even fall.

Do-it-yourself Christmas tree cone: step by step
You can make a cone for a Christmas tree in several variations. You can fold the cardboard into a bag. Then you need to cut off the excess paper or whatman paper at the base so that the cone can stand straight. This must be done evenly so that the tree stands firmly and does not fall. The sides of the cone must be glued to each other. To do this, you can use both adhesive tape and PVA glue. This method is easy, since you do not need to take certain measurements, but you can do everything by eye.
If it was decided to make a bottom on the spruce structure, then the following rules must be followed. It is necessary to replace the diameter of the base of this design. To do this, you can use an ordinary ruler. In order to calculate the radius of a circle, it is necessary to divide the diameter into equal parts. 
Take a compass and draw a circle with it the same as the base of the cone of your future New Year tree. The circles must be identical, their edges must match. In order to attach the drawn circle to the base of the cone, it must be two centimeters larger than the base of the cone. It is necessary on paper, where a circle is drawn with a compass, to retreat the necessary centimeters and draw another circle.
Next, you need to cut the resulting circle, which is two centimeters larger than the primary one. Cut with scissors from the base of the large circle to the base of the other. The distance between such grooves should be five millimeters. Next, you need to lift up the cut paper. It is necessary to grease the cut edge with glue and glue it to the base of the cone. Now your cone with the bottom is completely finished, and you can decorate your New Year's beauty with decor. 
Such a Christmas tree will please both you and others, as it is in no way inferior to the usual one. Making such a design for a Christmas tree will not take much time, but you will get a lot of positive emotions. Since it is possible to translate your ideas into reality, using your imagination to the maximum.
Do not forget to involve your children in the manufacture of the New Year's tree. This event will not only unite you, but the children will also be glad that they had a hand in creating such a Christmas tree. Let them choose the decor for the tree themselves. And you will see what abilities kids have.
Creating a cone for a Christmas tree is a very creative process, using all the rules described, and in this article, any person, whether an adult or a child, will cope with this function.