Do-it-yourself jacket clothes for a textile doll. How to sew a jacket for a doll with your own hands. Open the doll's coat
Dolls will forever remain girls' favorite toys. They are for babies - and faithful girlfriends, and daughters in the game, and fashionistas, who also need to be taken care of and dressed in style.
To make your princess doll look like a lady-in-waiting from her retinue, you can try sewing some trendy modern outfits.
Basic Rules
To understand how to sew clothes for your daughter's doll, you need to remember a few simple rules:
- Dolls are created in the likeness of the human body, so all the outfits are sewn according to the example of the human, only in a format reduced several times.
- Like a person, to determine the right size of clothes, the doll takes measurements on the most protruding parts of her body. For example, for a T-shirt, you need to take measurements of the width of the shoulders, chest and hips, the length of the desired product, the width of the armholes of the head and arms. Sometimes the widest part of baby dolls is the waist - in this case, you need to measure its girth.
For tailoring trousers and skirts, the circumference of the waist and hips, legs at their widest point, the length of the desired product are measured. And for socks - the length and width of the doll's foot.
For sewing doll clothes, you should not buy a new fabric. Rummage through the bins: you probably still have large patches of bright fabric from past sewing, old unnecessary things. Use them to make doll clothes with your own hands. 
football mood
T-shirt is the most difficult piece of clothing to sew. But if you master a T-shirt for a doll, you can easily overcome all other items of clothing.
For sewing, the necessary materials are:
- The right size fabric
- Threads to match
- Scissors
- pins
Be sure to take the necessary measurements from the doll before starting the process.
- Take 2 identical pieces of fabric of the required size for the front and back of the T-shirt. For each measurement add up to 5 millimeters of overlap for the seam.
- If you have a figured doll, trace curved lines on the scraps of fabric along the curves of her torso and cut it out taking into account the overlap - the T-shirt will turn out to be tight-fitting. If you want a straight cut T-shirt, skip this step.
- Using scissors, form a cutout of the required shape and armholes for a C-shaped sleeve, taking into account the overlap. Armholes need to be cut on both parts, cutout - depending on the shape.


- Process with additional small oblong patches the cutout so that the "raw" fabric is not visible.
- Sew the 2 pieces together near the neckline.
- Measure 2 semi-circular patches for the sleeves, process their edge according to the example of the cutout and sew to the armholes.
- It must be remembered that the last two steps must be performed only from the wrong side of the product, so that there are no seams and darts on its outer side.
- Sew the remaining parts - the sleeves and sides of the T-shirt.
Now you can safely try on an outfit for your doll.
Complete wardrobe
In addition to a T-shirt, every self-respecting doll should have a whole bunch of fashionable clothes!
- Pants
If you want classic or light trousers, choose knitted fabrics of the desired color, if jeans, a dense dark blue fabric will suit you. If the trousers are conceived from light fabric, you can sew the same top for them - you get a summer outfit.
It is better to sew trousers according to the pattern using the necessary measurements for the doll and laps. With the help of a pattern, measurements are taken from the fabric and flaps of the required size are cut out, which are swept to each other and sewn together. The seams of the armholes must be processed. 
These pants have an elasticated waistband to keep them from falling off the doll's waist - don't forget to thread them through the holes in the pants waistband.
For a skirt, you can take a light flying or cotton fabric - they will keep a beautiful bell shape well.
Take the necessary measurements - waist circumference and length of the product. Cut a piece of fabric with a difference to the waist of about 1: 2 in length. The width of the flap is the length of the product. 
The top of the skirt at a distance of about a centimeter from the edge is sewn with the widest hand stitch, after which the thread is tightened, forming beautiful folds.
To process the upper edge, a rectangle about 1 centimeter wide and approximately 2 centimeters long is taken, tucked to the edge and sewn.
Next, the place where the edges of the skirt are sewn is marked. Leave about 2-3 centimeters free to the top edge, and sew on a button and a kind of loop for fastening on the top edge. 
The skirt can be decorated by stitching the bottom edge with lace or by adding a second layer. So the skirt will turn out even more magnificent and elegant.
- Socks
What outfit can you wear without socks? For socks, take a light, stretchy fabric that does not unravel. Trace the doll's leg on thick paper to about the ankle or slightly higher. Cut out the template. 
Fold the fabric in half and attach the template with the instep of the foot to the fold of the fabric. Circle, cut and sew. Repeat operations to get 2 socks.


Good day to all who visit!
I invite everyone who wants to warm their crumbs to get acquainted with the process of sewing such a jacket.
The sewing process is not complicated, but rather lengthy and consists of a number of simple operations. Even novice tailors should not be afraid and underestimate their strength. Step by step, paying attention to each operation, you can easily handle this product. For sewing a jacket, no additional equipment is required, except for a straight stitch sewing machine.
For the jacket you will need:
1. A piece of raincoat fabric measuring 40x150 cm.
2. A piece of insulation measuring 40x150 cm. I use a synthetic winterizer. If the synthetic winterizer is thick, it should be divided into thinner layers.
3. A piece of contrasting fabric for lining the hood and pocket ruffles.
4. A piece of lining fabric.
5. Spool of elastic thread.
6. Buttons for fastening.
7. A piece of elastic for sleeves.
Tailoring process:
Cut off a piece of raincoat fabric 15 cm wide to a length sufficient to lay out all the patterns.
Cut off the same piece of insulation.
Chip off the raincoat fabric and insulation.
Draw lines along which we will make lines with a thread with an elastic band to create a puffy effect.
We draw the first line at a distance of 4 cm from the edge
We draw the second and third lines in increments of 2.5 cm.
We lay along the three drawn lines of the line with a thread of the shade corresponding to the raincoat fabric. This stitch will hold the lining and insulation together, allowing you to use both layers as one piece when sewing. Also on this line will pass a line with a thread with an elastic band in the shuttle, to create assemblies of the effect of puffiness.

On a piece of raincoat fabric stitched with insulation on the side with raincoat fabric, we prick patterns,
combining the lines of stitching on the fabric and the lines of stitching on the patterns, attach the sleeve and hood at your discretion. Outline with a disappearing marker or washable marker.
Attention: the patterns are already given with allowances, there is no need to draw lines of stitches, you need to accurately align the parts and sew at the same distance from the edge of the parts (5 mm).
Cut out the details of the cut.
1. Stitch the shoulder seams on the main pieces and separately on the lining pieces. Sew off the shoulder seams from the front.

2. Stitch sleeve ribbing, sleeve and sleeve lining.
Turn the elastic band allowances inside, i.e. the elastic band is smaller than the bottom of the sleeve by the size of the allowances on both sides. Fold the plank in half. Place placket between folded right sides together, lining sleeve and main fabric sleeve pieces.


Lay a line along the cut. Sew off the sleeve detail from raincoat fabric, along the seam of attaching the strap, without grabbing the lining detail.


3. Stitch the sleeve on the main parts and lining. This is the most time-consuming operation, do not rush and try to make the seam neatly without wrinkles on the front and sleeve. Cut off the sleeve and armholes of the shelves, start chipping from the middle, aligning the middle of the armhole and the shoulder seam. Lay the line along the side of the shelves, straightening the resulting folds as you sew. Sew off the shelves on the front side.


4. Sew a pocket according to the markup to the front shelf. This point can be done first while the shoulder seams are not completed yet.
Attach a pocket pattern without allowances to a piece of raincoat fabric, cut it out, making allowances for hem along the contour. Turn the top of the pocket over and topstitch.
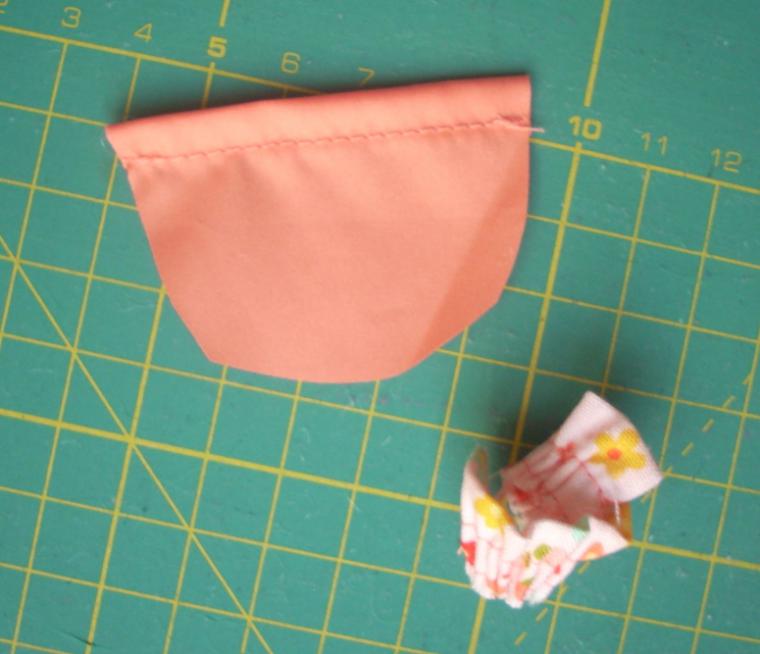
Align the pocket openings on the pattern and the raincoat fabric part, sew a line along the contour of the pattern, increasing the stitch length to make it easier to remove the thread after attaching to the front shelf.

The pocket is ready, you can apply it to the right place and attach it, placing the prepared ruffle of the pocket from one edge. At the ruffle, first make a side seam from the wrong side, turn the ruffle, lay two parallel lines at the open edge of the ruffle, pull the threads together to form gathers.

5. Sew the lining to the front bar under the fastener. In my second photo from point 3, this operation has already been completed.
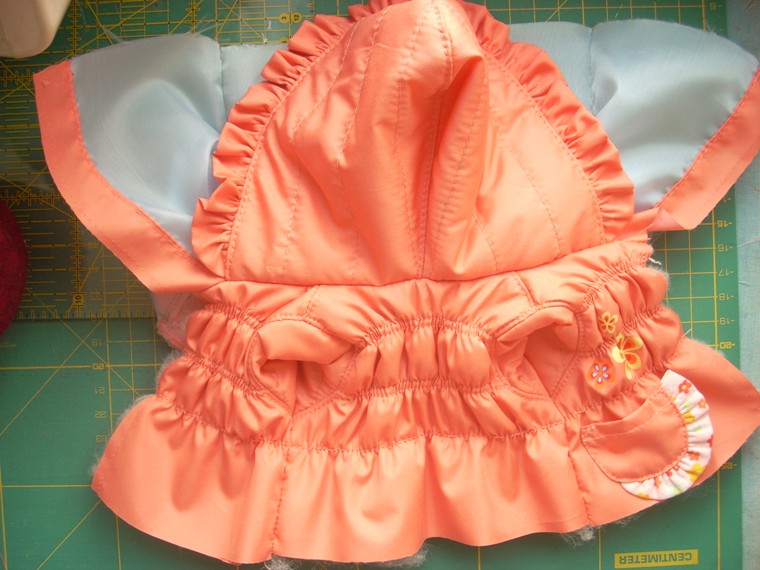
6. Run the hood.
Stitch the middle seam of the hood on the details of the raincoat fabric with insulation and lining. Lay them together right side up.

Along the cut of the hood, put the prepared quilling of the hood, chop, stitch, turn and stitch the hood from the front side.


7. Stitch the hood into the neck of the jacket.
Fold the necks of the jackets from the main fabric and from the lining right side inward. Insert a hood between them.
On the necks, mark the middle and combine the middle of the neck from the lining, the middle of the neck of the hood and the middle of the neck from the main fabric. Then chip off and combine the parts on both sides of the middle.

Lay a line along the cut and turn the jacket right side out.


8. With a single line, sew the side seam of the lining, the seam of the sleeve of the lining, the seam of the sleeve, the side seam, without grabbing the bar under the elastic band.


9. Replace the bobbin thread with an elastic thread, adjust the tension of the bobbin thread and the main thread,
so that the line is without loops. To do this, loosen the tension of the shuttle thread by tightening the screw on the shuttle, and set the maximum value on the upper thread regulator.

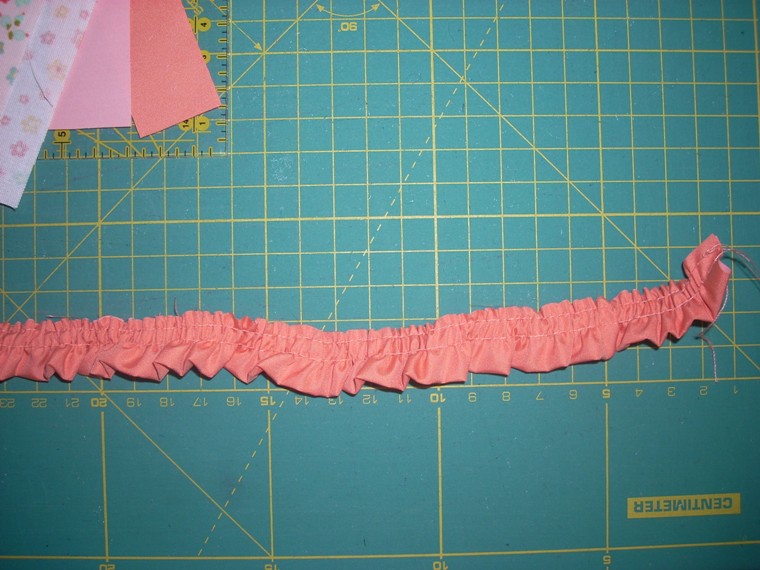
On the lines on the shelves, lay two rows of lines with a thread with an elastic band.
At the same time, unscrew the lining, the lines do not pass through it. Auxiliary lines are unpacked.


On the sleeves, do not make stitches with an elastic band, otherwise it is very difficult to put on the sleeve of the jacket on the doll (but if you want to make them, then you need to do it before the seam of the sleeve is made).
note, on the belt we make one row with a thread with an elastic band, we will lay the second seam at the very end in order to combine both layers of the lining and top.
10. Turn the jacket inside out and align the front cuts of the lining and the top of the jacket on the pattern marks 1 and 2

11. Prepare the bottom shuttle. Cut a piece of 55x5.5 cm from the insulation and put it in the middle of the bottom flounce.
Process the side sections of both shuttlecocks. Put two frills together, aligning the top lines, lay the lines for assembly, assemble the frill to the size of the bottom of the jacket - up to about 32 cm.


12. Turn the jacket inside out. Insert the shuttlecock between the lining and the main parts, matching the cuts. The front side of the shuttlecock (with two shuttlecocks) lies on the front side. Start chipping from the middle, marking in advance the middle of the backs on the lining, on the raincoat fabric, on the shuttlecock. Next, chop off the side seams, and then chop off the space between them. Stitch.
16. In order for the skirt not to bulge in different directions, lay a line with a thread with an elastic band in the shuttle, along the frill close to the seam for sewing in the frill. And along the neck.

And sew the second row with a thread elastic band on the belt. The elastic thread is always on the wrong side of the product.
And in total we have three rows of lines stitched with a thread with an elastic band in the shuttle.

17. Install buttons for the clasp.

Hope everything works out for you!
If some points are not clearly written, ask, I will explain. Over time, I will supplement these moments with photographs.
The pattern for this jacket can be purchased here.
The shops offer a wide range of clothes for dolls. However, a jacket for a doll that you can sew with your own hands will certainly be exclusive. This master class is designed for beginners, so the jacket pattern here is very simple. It is designed for a doll with a height of 30-40 cm.


Jacket for a doll with a hood and lined, a straight silhouette with a one-piece sleeve, a patch pocket is sewn on the right shelf. The edges of the jacket are processed with oblique trim, fastener with buttons.
Master class for beginners: how to sew a jacket for a doll with your own hands
For work you will need:
- raincoat fabric - 20 cm with a flap width of 1.5 m;
- lining fabric;
- a piece of fur (for a hood);
- accessories (oblique trim, threads, sew-on buttons, decorative button).
We make a pattern of a jacket for a doll (see photo), then we cut out the details from the raincoat fabric. For the back we use the front pattern, while the fabric should be folded in half.

The result should be the following details:
- before with a one-piece sleeve - 2 parts;
- back with a one-piece sleeve - 1 piece;
- hood - 2 parts;
- pocket - 1 detail.

First of all, we sew the pocket. To do this, we bend the edges of the part along the contour and grind it manually.


We sew both parts of the hood together, connecting them with the front sides inward.

Sew along the shoulder and side cuts in front and back of the jacket.

Sew the hood to the neck of the product.
You can not overcast the seams, since this master class has a lining. We make it in the same way as the top of the jacket, using the same patterns: we sew the shoulder and side sections of the jacket, the middle sections of the hood, we sew the hood into the neck of the lining.


We turn the upper workpiece of the product on the front side. We insert the lining of the jacket into it with the seams down.

We connect both parts together, grinding them along all the edges, first by hand and then on a typewriter. We try to make the seam as close to the edges as possible.

Then we process them with the help of an oblique inlay. Tape can be used instead. At the neck we form a loop. How beautifully to process the edges with an oblique trim, read.


We fix a strip of fur to the hood with a glue gun, or sew it on.

It remains only to fasten buttons and a decorative button (near the eyelet) on the jacket. Instead, you can sew on a zipper, Velcro or hooks.

Here is such a beautiful jacket for the doll should be the result:

From the canvas (150x20cm), which was used to make the jacket for the doll, a small flap should remain. It can be used for sewing trousers. In this case, the doll will get a warm set, which can be supplemented with a fleece hat and scarf.
Hello dear guest and doll lover. In front of you is a puppet quilted coat on a synthetic winterizer, with a lining. If your doll needs a warm spring outfit, you can sew a coat for a doll with your own hands.
Sew a coat for a doll can be made from any material, but I found a piece of 22 cm wide quilted fabric in a flap box in a store for only 15 rubles.

The coat can be sewn for any doll, I chose Milena, 43 cm tall. The length of the coat is up to the doll's knee, it has a collar, fastens with three buttons in front, it has a lining, like a real coat. made from the same material, so it perfectly complements the outfit. And red boots, a hat complete it well.
For beginners, this work may seem difficult. But you can sew a coat for a doll without lining, then it will be much easier to sew it.
The outfit is sewn from 7 parts of material with a synthetic winterizer: 1 back, 2 shelves with a side and a pick, 2 sleeves, 2 collars and 5 parts from lining fabric: 1 back, 2 shelves without a pick, 2 sleeves. In total, you need to sew together 12 parts together!
The clasp is made of 3 buttons. But it could be buttons. It is possible to sew a coat for a doll using a detachable zipper, then the sewing sequence will be slightly different.
This coat needs patterns for a Baby Born doll, who is also 43 cm tall. But without a hood pattern. The link will open in a new window, so you can easily make drawings.
OPEN THE COAT FOR THE DOLL

HOW TO SEW A COAT FOR A DOLL
- Stitch the shoulder seams of the main material and lining fabric. Do not overcast the cuts, as we decided to sew the coat with a lining. Seam allowances should lie on opposite sides of the seam. I did not iron the main fabric, but I ironed the seam allowances at the lining.

- Sweep up the sleeves, matching the shoulder seams - the marks of the middle of the sleeve hem.

- Sweep, then stitch with one seam of the side and sleeve. Please note that the top of the coat has the front side, and the lining has the wrong side.

- Put the coat inside the lining, sweep, then stitch along the pick line:

- Measure the length of the neck from one midline to the other. I have 17 cm.
- Draw a collar, cut out the drawing to get a pattern.
- Fold the main material right side inward, chop off the collar pattern and fabric:

- Cut collar, seam allowance everywhere 0.7 cm
- Cut out the second piece.
- Sweep, then stitch both parts of the collar along the upper part:

- Turn it inside out, sweep it out, it is advisable to sweep the cuts along the bottom of the collar.

- Insert the collar along the neck between the main part of the coat and the lining. The edges of the collar only reach the middle of the front. I hope you noted this point of the neck.
- Pin the collar with the lining and the main part of the coat with pins: the shoulder seams should match, the lines of the middle of the back too. The pick-up, in this case it is visible as a synthetic winterizer, turns out to be from the side of the lining.

- Sweep, stitch a collar.
- At the bottom, bend the bead, stitch it where I have a pin in the photo - 1.5 cm from the bottom (the seam in the padding polyester is almost invisible in the photo).

- Turn coat inside out:

- Sweep at the bottom, then hem the material from the padding polyester to a height of 1.5 cm. In the corners, the excess fabric must be cut off:

- I planned cuffs on the sleeves, but the material is thick, so I refused cuffs. To hem the sleeves, I had to shorten the lining of the sleeves by 1 cm:

- Bend the material with padding polyester to a width of 1 cm and hem the bottom of the sleeves.
- Put 3 buttons.

- From the remnants of the fabric on the synthetic winterizer, I sewed a very simple bag, but it perfectly complements the doll outfit.
There are a huge number of master classes on the topic of what can be done from old jeans. It can be toys and bags, even sheathed with denim patches. And I suggest sewing clothes for the doll from old jeans.
For example, you can make a vest for a doll in a hurry. Cut out the fly from the jeans. Then, take two pieces of denim and sew a zipper to them. Then, according to the doll, we draw the back on the fabric and sew it with the front, but not completely. Now we try on the vest on the doll, sew it in the shoulder area. To make the vest more fashionable and at the same time hide all the errors, you can sew fur. I borrowed this fur from an old toy. We sew fur to the collar and the vest is ready.


In just a couple of minutes, you can make a handbag for a doll. To do this, fold a piece of denim in half and draw the contours of the bag on it. Then we bend the edges and lay a line, sew along the contour. We turn the bag inside out and sew a handle to it, I have a thin ribbon. To decorate the bag a little, you can sew a piece of white fur (taken from the same toy) to the front side.
To make denim shorts, you need to wrap the doll's hips with fabric, leave about half a centimeter for a seam on the side, and cut off the rest. On the resulting piece we draw future shorts. At the top we bend and lay a line so that an elastic band fits in the resulting hole. We sew along the lines. We put the elastic in the belt, measure, sew the ends. You can make a fringe at the bottom of the shorts.


You can make a sundress very quickly and simply. Sew together two pieces of fabric. We bend the top edge and lay a line. Then we sew on a ribbon that will serve as a strap. We try on the doll and sew on the side.
Since the sundress is sewn without darts, it turns out to be wide at the waist, if you don’t like it, you can tie a ribbon on the belt. You can make a fringe along the bottom edge.


It is also easy to sew a dress for a doll. We take a strip of denim, lay it on a piece of tulle, bend the edges of the tulle and lay two lines. I will make a skirt for the dress from lace. You need to stretch the thread along the upper edge of the lace and pull it off so that it turns into an assembly. Sew the top with the skirt.


The back of the dress will be Velcro. Therefore, we sew Velcro to the edges and the dress is ready. The waist can also be emphasized with a ribbon.
You can sew a denim jacket for the doll. For this you need a pattern. We transfer the pattern to the fabric. In order not to process the bottom edge in the future, cut out the details from the ear of jeans, where the edges have already been processed. We cut out all the details of the pattern and do not forget to leave allowances for the seams.


Fold the front pieces and back piece right sides down. Sew along the shoulder line and sides. Then we sew the sleeves.
We insert the turned-out sleeves into the holes and sew the sleeves to the jacket.
The edge in the neck area turned out to be not very neat, and I sewed strips of white fur on top.