With my own hands and theirs. Wine cork craft. DIY crafts at home from polymer clay
Today we will learn how to interesting and original paper crafts with or for children.
And first, let's see what we need for this:
To create crafts, we will use different types of paper and cardboard:
napkins for decoupage on boxes;
newspaper for creating papier-mâché balloons;
old magazines for crafts with beads;
crepe and wrapping paper;
colored double-sided paper;
corrugated and plain cardboard;
paper plates, cardboard tubes, various boxes and much more.
For creativity, the child will need such basic materials and tools as scissors, glue, paints and felt-tip pens.
Does it happen to you that you collect a lot of small necessary items, but there is nowhere to put them? Let's make a fun pocket in which everything will fit and which can be hung in a conspicuous place.
Paper crafts for kids: USEFUL POCKET
What will be required:
colored paper
pencil
lace scissors glue
Work sequence:
Draw the outline of the muzzle of an animal, such as a bear.
Cut out two such shapes along the contour. Make details for the ears and nose, as shown in the photo.

Apply glue along the edge, connect the parts to make a pocket inside. Punch two holes.

Glue on the ears and nose. Draw a ribbon for hanging.

This pocket is perfect for storing small items: hairpins, combs or stationery.

Paper Craft for Kids: RACE RACE
Did you know that you can make unusual racing cars with your own hands? Let's create them and have a real race. I wonder what car number will win?
What will be required:
cardboard tubes of paint, felt-tip pens
colored paper, cardboard
glue scissors
Work sequence:
Color the tubes in bright colors.

Cut out parts for cars from colored and white paper (for wheels, it’s better to take black cardboard - then your “car” will stand firmly). Use a felt-tip pen to draw what you need.
Make a hole in the straw as shown in the picture (you can ask an adult to help).

Now glue all the details. Wait until it dries - and go ahead, play!

Paper crafts for kids: PAPIER-MACHE BALLOONS
Who doesn't dream of flying in a hot air balloon? Someday you will definitely do it. Now let's try to make an unusual balloon from an ordinary newspaper.
What will be required:
glue bead
needle spoke
cream paint
Work sequence:
Inflate the balloon, lubricate it with any cream. Prepare a newspaper for crafts - for this you need to tear it into small pieces. Wetting them in water, glue the ball so that there is no gap.

Now apply a layer of glue on the ball and glue it again with pieces of newspaper soaked in water - so you need to make 2-3 layers. You may need the help of an adult.

When the ball is completely dry (for this you will need to wait 1-2 days), pierce it with a needle - we don’t need it now - and cut the ball, as shown in the photo.

Now color the ball with paints.

Now let's make a basket. To do this, the newspaper sheet was divided into 4 parts to make rectangular blanks. Then, starting from the bottom corner, roll the newspaper into a tube with a knitting needle, and glue the tip.

Take 5 tubes and put them side by side, and stretch the sixth tube across under the first, over the second, under the third, etc., alternating. The next tube must be weaved in reverse: what was below will be on top.

To secure our base, take one tube and weave it around, also passing it between the other tubes through one.

Now you can make the basket itself: to do this, bend all the ends up and start weaving them around in the same way as you did before. Weave 4 rows.

Unnecessary ends weave on top and glue, some you can just cut off. Color the basket with gouache.

Make holes at the bottom of the ball and secure the basket with a thread. The balloon is ready!

FUNNY ANIMALS
It turns out that you can quickly and easily make yourself a striped friend. And in order to be able to play with friends, let's find out how to make not only a tiger, but also other animals.
What will be required:
colored paper
glue scissors
Work sequence:
Take a sheet of colored paper and fold it as shown in the picture. Glue the ends to make a strip.

Bend the strip "accordion" in three places to get the letter "M".

Cut out blanks for the animal from colored paper.

Glue the blanks to the base. Ready! You have a tiger.

HOME THEATER
But what if you arrange a real theater in your home? It will be possible to invite adults to the performance and show them some kind of fairy tale, for example, "Gingerbread Man". I think they will definitely appreciate your skill!
What will be required:
colored paper compasses scissors glue
markers stick
Work sequence:
Draw a blank on a sheet of colored paper, as shown in the photo.

Cut out the blank and glue.

Cut out the base for the animal from colored paper
Glue the pieces to the base. Look who we got

Take your favorite animal fairy tale as a base and make all the characters out of paper. If sticks are glued to the blanks, it will be possible to show a performance from behind a screen, as in a puppet theater.
Paper crafts for kids: FUNNY CATERRORS AND SPIDERS
Have you ever seen a real spider? And the caterpillar? Let's make funny animals with furry legs out of a cardboard egg box. They will look like the real thing!
What will be required:
egg carton
glue scissors
colored paper
wire
Work sequence:
Cut out blanks from a cardboard box: three cells for caterpillars, one for bugs and spiders.

Color the blanks with gouache.

Prepare details for animals: cut out eyes from colored paper, make legs from fluffy wire.
Make holes in the blanks and stick the legs. Then glue on the eyes.

Try to make them exactly the same.

AMAZING MASQUERADE
You can celebrate your birthday in an unusual way by throwing a masquerade. Invite your friends and have everyone make an animal mask for themselves. It will be fun!
What will be required:
cardboard plates
colored cardboard and paper
scissors
Work sequence:
Color the plate blue.

Cut out the ears and color them too.

Prepare parts for a bunny from colored paper.
Cut out holes for the eyes and glue the pieces as shown.


PAPER BEADS
What girl doesn't love jewelry? Let's try to make beads from old magazines. You will get bright ones that you can wear with your favorite dress or give to your mother.
Work sequence:
Cut out the details from the magazine sheet: strips about 1 cm wide and elongated triangles.

Wind the blanks on the knitting needle - these will be paper beads. Glue the tip well.

Make as many beads as you need for the entire decoration. Take a needle and thread and carefully thread all the beads onto the thread.

This is how easy it is to make unusual ones: original multi-colored beads, bright bracelets. You can even give them to someone: what girl would refuse such beauty?!
Paper Crafts for Kids: PRINCESS DECORATIONS
All girls dream of becoming real princesses. What is a princess without a crown? Let's make it from a regular cardboard roll.
What will be required:
cardboard tubes of paint
colored paper
scissors
Work sequence:
Cut out the crown from the roll. You can do a few things.

Color the blanks in different colors.

Decorate crowns. To do this, you can use beads, ribbons and laces.
Make holes on the sides and thread the elastic so that the crown can be put on.

You can make a decoration for a real princess from an ordinary hoop: use colored paper to turn it into a beautiful diadem.
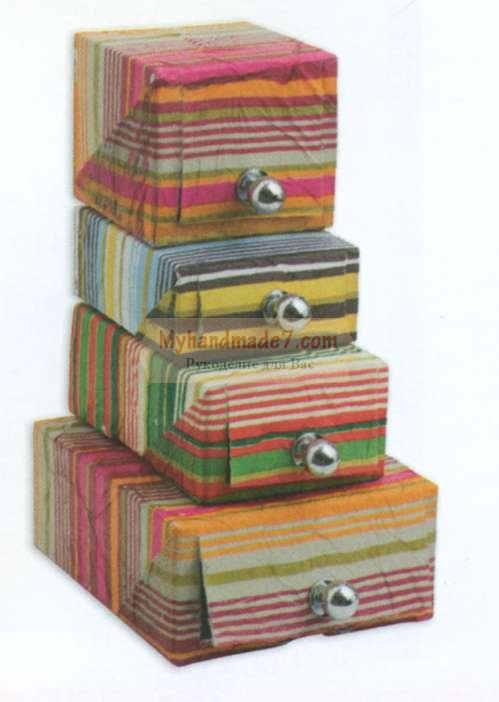
Paper craft for kids: TOY LOCKER
Probably, like all children, you have a lot. Sometimes there are so many of them that it becomes difficult to neatly fold. Let's make a beautiful storage cabinet for small toys.
What will be required:
boxes of different sizes
white gouache
patterned napkins
stationery knife
tassel pen
Work sequence:
Paint the boxes white so that the pictures and text on them do not show through.

Glue the box on all sides with a napkin. To do this, put it on the box, pressing along the edges, and with a brush, apply a thick layer of glue on top so that it sticks.

Cut out the doors with a clerical knife - here you will need the help of an adult. Glue the handles with superglue and fasten the boxes together to make a cabinet.
Everything! Our dresser is ready. Now you can put your toys there. Mom will be delighted when she sees what order you have!
CREATIVE BOX
Do you like to draw? Or maybe you like to carve or craft something? It's great! Let's make a creative bag-box where you can put everything you need for creativity.
What will be required:
shoe box
wrapping
colored paper
adhesive lanyard
Work sequence:
Tape the box and lid on all sides. If it's hard for you, ask one of the adults about it.

Make blanks inside the box. At the bottom of a sheet of colored paper folded in half, make an incision to the middle, as shown in the photo. Cut two pieces of the same length as the width of the box from top to middle.

Insert the blanks into each other and place them in the box - these will be the compartments of our bag.
Make holes on the sides of the box: they should be at such a level that the box can be closed with a lid. Make the handles of the same length from the cord so that the box is comfortable to take in your hand.

HANDMADE PHOTO ALBUMS
Where did you last go on holiday? Maybe it was a trip with your parents to the sea or a vacation in the village with your grandmother? You must have some memorable photos. Let's make a suitcase-shaped photo album for them.
What will be required:
colored paper and cardboard
hole punch scissors lace
Work sequence:
For the cover of the photo album, take a sheet of colored cardboard and fold it in half.

For pages, take sheets of double-sided paper of different colors and also fold in half.

Now connect the cover and pages together: for this, fold everything together and make holes on the side with a hole punch. Tie the sheets with a rope or cord.

Cut out the details for the suitcase from colored cardboard and glue them to the photo album.


Paper Crafts for Kids: FUNNY BOOKMARKS
What is your favorite book? Or maybe several? It's great that you love to read. Let's make an interesting bookmark for the book.
What will be required:
colored paper
Work sequence:
Use a ruler to draw three squares on a sheet of colored paper, as shown in the photo. The triangles that are filled in are not needed.

Cut out the piece.

And it, as shown in the photo: first bend it to the inner corner, then another on top of it. Glue them together. Cut out the details from colored paper.

It turned out great, right? Now it will be easy to find the place in the book where you finished reading. You can also make a bookmark in the form of another animal, such as a dinosaur with sharp teeth.

CARDBOARD BAG
Do you know how you can make a bright bag out of an ordinary box? Very simple! Let's dream up and make a handbag that you can take with you outside in sunny weather.
What will be required:
cereal box
colored paper
glue scissors
Work sequence:
Color the box with gouache.

Cut out a bag with handles from the box. This may require the help of an adult.

Cut out a strip and a circle from colored paper - this will be the core of the flower. Fold the strip with an accordion and glue the ends. To keep the flower, stick it on a small square. Glue the core on top.

For butterflies, cut out blanks from 1 colored paper. To make the figure voluminous, you need to make 5-6 identical parts. Glue them together in the middle. Glue all the pieces to the box.

DIY Paper Crafts: Pencil Stand
Do you want to give a gift to a friend, but don't know what to choose? Don't be upset, I have an idea! Make an original stationery stand out of an ordinary cardboard box. Your friend will definitely love this gift!
What will be required:
boxes
the same width
white and colored paper, cardboard
adhesive tape
Work sequence:
Build a ship out of boxes: cut off the lids and cut them to height. Make the bow of the ship and pipes out of cardboard.

Tape each piece with colored paper inside and out.

Cut out and glue the windows, lifebuoy, steering wheel, anchor.

Glue the boxes together and glue them to the base, cut along the contour.

PUZZLE APPLICATION
Do you have unnecessary puzzles in which a lot of details are already lost? I have an idea how they can be applied. Let's make an amazingly colorful application with autumn leaves.
What will be required:
unnecessary puzzles crepe paper
paint glue
Work sequence:
Color the puzzles in the colors of bright autumn leaves: yellow, orange, red.

Cut out a brown rectangle from crepe paper - this will be a tree trunk - and make green grass.

Glue the brown blank in the form of a trunk: for this, somewhere you need to compress the paper in layers, and straighten it somewhere.
Make a crown of a tree from the prepared puzzle pieces. Also glue several layers of grass to make it voluminous.


Paper crafts for kids: 3D PICTURE
Do you want to make a large application? It's quite easy! You will get a real picture that you can give to your grandparents.
What will be required:
candy box
corrugated cardboard
double tape adhesive
Work sequence:
Cut out the necessary details for the picture from corrugated cardboard.

Glue the first layer of applique on the bottom of the box - what will be in the background.
Paste other details on top.

What's the beautiful! It turned out to be a real big picture. In this way, you can make a city where there are cottages and high-rise buildings, or an underwater world with shells, algae and fish.

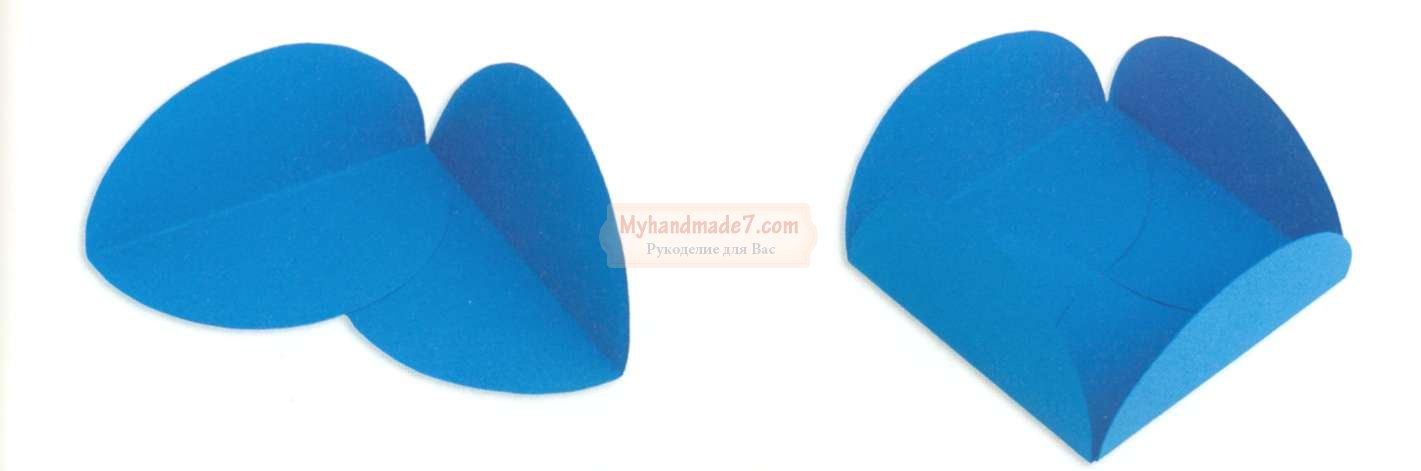
BOUQUET IN A POSTCARD
Do you want to give your mom unusual flowers? Let's make a card-bouquet of colored paper. Trust me, she'll love it.
What will be required:
double-sided colored paper
scissors ribbon
Work sequence:
Draw a blank on a sheet of colored paper, as shown in the figure.

Cut out the blank and separately a triangle.
Glue a small triangle on the bottom, and fold the large part as shown in the picture.

Draw, and then cut out flowers of different sizes and colors. Make leaves for the bouquet.

Glue flowers inside our postcard in the form of a bouquet, tie a ribbon at the bottom.


3D POSTCARD
Surely you watched the cartoon in 3D and noticed how the characters come to life with a three-dimensional image. It turns out that making objects three-dimensional is quite simple. Let's try to make a postcard with a 3D effect.
What will be required:
colored cardboard, double-sided colored paper
scissors ribbon
Work sequence:
Take two sheets folded in half: one is cardboard, the other is colored paper.

On a sheet of colored paper, make cuts on the fold side, as shown in the photo. You should get 3 even squares of different sizes.

Now what you cut, push forward and inward. You should get a ladder, as if from boxes.
Glue the blank onto a sheet of colored cardboard. Decorate the boxes: glue colored paper and ribbons.

By this principle, you can make a card with balloons

CARD WITH PALM
Do you want to make another unusual postcard? You don’t need anything special for this: just a sheet of colored paper and cardboard, scissors, glue and your wonderful pens.
What will be required:
colored cardboard and paper
Work sequence:
Circle your palm on a piece of cardboard.

Cut out the piece with scissors. You will need two of these items.
Cut out a strip of colored paper and fold it like an accordion.

Glue one end of the accordion to one "hand" and the other to the other. Cut out from colored paper or write a congratulation with felt-tip pens.

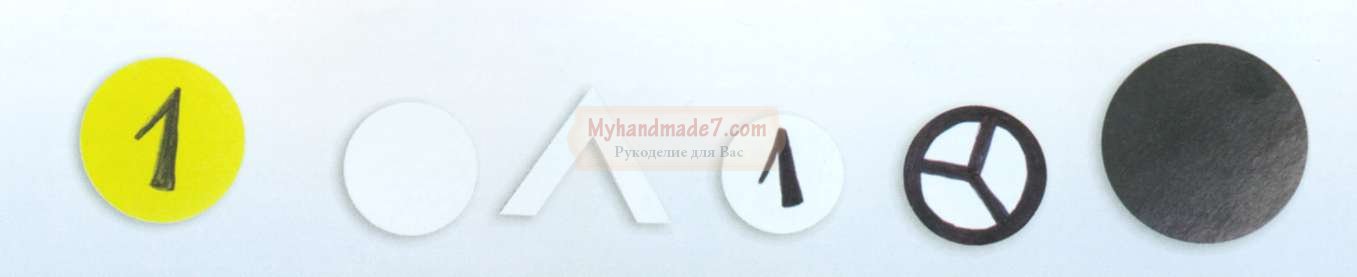
ENVELOPE
Do you know how to decorate a small gift? You don't have to be an adult to do this, and you don't need any special equipment. Repeat after me and you will definitely succeed!
What will be required:
colored paper glue
ribbon
Work sequence:
Draw 4 identical circles on a sheet of colored paper. This is easy to do if you take a mug, put it upside down and circle it.

Cut out the circles and fold them in half.

Glue the circles together as shown in the picture.
Bend the free halves of the circles so that one turns out on top of the other. Then pull the bottom from one side up.

SWEET GIFT
Have you ever seen a gift shaped like a candy? Maybe they gave you something similar? Let's make such a surprise, and you can "treat" someone to them.
What will be required:
cardboard tube
wrapping paper glue
scissors ribbon
Work sequence:
Cut out a square from the wrapping paper. In size, it should be larger than a cardboard tube.

Cover the tube with paper. Tie one end of the candy with a ribbon.

Put candy in a gift and tie the other end.
3D FIGURINES
Have you ever wanted to decorate your room in an unusual way? Let's make voluminous figurines-decorations from colored paper. They can be placed on a bedside table or hung on a string from a chandelier.
What will be required:
colored paper glue
scissors ribbon
Work sequence:
Draw half an apple on a piece of colored paper folded in half, as shown in the photo.

Cut out the blank and, using it as a template, make 5 such copies. Additionally, cut out the details for the apple.

Glue the blanks together, as shown in the photo.

Glue the rest of the details.

Fruits and vegetables can be anything!
Crafts from cardboard and paper: bright flowers
Do you want to grow bright flowers in your window? Let's make them out of cardboard tubes, but in such a way that no one guesses what material they are from.
What will be required:
cardboard tubes of paint
colored paper glue
scissors skewers
Work sequence:
Make cuts on both sides of the tube so that they do not reach the middle.

Color the tubes in different colors.

When the blanks are dry, straighten the petals, as shown in the photo.
Glue the centers cut out of colored paper.

Paste the skewer with colored paper, cut out the leaves.
Connect all the details. Poke a hole in the center of the flower with a skewer.
Such a flower can be put in a vase and presented to someone.

FRAME OF UNUSUAL FLOWERS
Do you have a boring monochrome frame at home? Let's make it a real masterpiece!
What will be required:
egg carton
glue scissors
Work sequence:
Cut out petal blanks from the cells of a cardboard box, as in the picture.

Color them the same color. You should have 15-18 such sets of different colors (depending on the size of the frame).

Glue the petals together in the middle, carefully press and let them dry.
Glue the flowers to the frame. You won’t be able to attach everything at once, so do it in stages and wait until everything dries.

The frame is ready. Now you can insert your favorite photo into it.
CUTE CACTUS
How do you like such a cute cactus? It is completely safe for children because the thorns are painted on it. Let's make such a cactus and put it on the windowsill.
What will be required:
markers
Work sequence:
Draw a cactus in a pot on cardboard.

Color the picture on both sides and make another one exactly the same.

Make cuts: on one cactus from the bottom to the middle, and on the second - from the top to the middle.

Insert the blanks into each other. The cactus is ready.
In the same way, you can make a rocket or a teddy bear.
COLORED LANTERNS
Your birthday is coming up and you want to decorate your room to make it festive and beautiful? Then let's make unusual colored lanterns.
What will be required:
toilet paper tubes
crepe paper
ribbons
glue scissors
Work sequence:
Cut out a square of crepe paper and glue one side of the tube.

Make blanks from crepe paper: cut out strips and make cuts on one side along the entire length.

Start taping the tube from the bottom. You should get a skirt, as in the photo.
Thus, glue the entire flashlight. Make holes on the top sides and thread a ribbon through them so that the craft can be hung.

Such lanterns can be not only decoration, but also a useful thing. For example, at a holiday you can arrange a game with prizes: hang lanterns on a rope and put something valuable in them by gluing the bottom. Each blindfolded guest must cut off a gift with scissors.

ROOM DECORATION
Would you like to have a bird? Of course, nothing compares to the real one, but still an unusual and beautiful bird can be made from ordinary colored paper. See how it's done.
What will be required:
double-sided colored paper
crepe paper scissors
ribbons
wire
Work sequence:
Draw bird silhouettes on a piece of paper.

Cut them out. Make a few of these. They must be different colors.

Make wings out of crepe paper: to do this, cut out rectangles of different colors and fold them like an accordion.
Make cuts in the blanks of the birds and insert the wings there. Tie ribbons to the figures and hang them on a circle made of wire.
It's nice to decorate your house, garden plot or even clothes in an original way.
It has also become fashionable to give unusual crafts made by hand.
The expanses of the Internet are full of new ideas, the implementation of which does not require large financial investments and time.
All crafts are simple in execution and, quite, can become a gift item.
Easy DIY crafts. interior decoration
Once a season, you want to update your home interior. For this purpose, people change the wallpaper on the walls, buy curtains and curtains, blankets on the bed and sofas. The easiest way to achieve what you want is to add zest to the atmosphere. Change the viewing angle and add some new accents.
For example, make a gray nondescript wall brighter - hang colorful colorful pendants.

Pendants are made in Indian style. Elephant figurines are cut out of thick cardboard. Textured drawings are pasted on it. Do-it-yourself homemade products at home are extremely simple - ready-made elephants are glued to a jute thread and hung on the wall. Textured drawings on the figurines of elephants can be changed to any other, suitable in color for the selected interior.
To update the interior, it is enough to hang new paintings. This is another of the easiest ways to improve your mood. Moreover, you can create a panel with your own hands.

To make a picture, you will need the following materials: two frames covered with fabric, paints, a brush, a handful of buttons of different colors and sizes, glue.
Stages of work:
1. The frames are painted with white paint;
2. After the layer of white paint has dried, a tree is drawn on the panel. It is advisable for beginner artists to draw the outlines of a tree with a pencil, and then circle them with a brush with black pigment;

3. At the third stage, imaginary leaves and button flowers are glued to the tree. It is recommended not to skimp on glue, since a button that is loosely planted on an adhesive mass will certainly fall off over time;
4. At the last stage, you can give full freedom of action to your imagination and make 4 easy DIY crafts at once for all seasons of the year and for any mood.

Well, how can you do without a stylish pillow on the sofa or in the car. Such a textile miracle can be proudly presented to a relative or close friend for a holiday. This gift is sure to be appreciated.

To make a beautiful sofa craft with your own hands, you will need: synthetic filler, 2 companion fabrics (it is recommended to choose American cotton), felt of different colors, coins, a black felt-tip pen, a heart-shaped wooden button, matching threads, needles, scissors, a sewing machine with embroidery function (or with the darning function, when it is possible to turn off the upper feed dog).
Stages of work:
1. Pieces of fabric for the pillow are cut out, but not sewn together, since you first need to make a patchwork pattern on the front side of the future product;
2. The shape of a tree, leaves, owls and swallows are cut out of felt;
3. The resulting tree is glued to the fabric. In extreme cases, you can sew it to the fabric, but the line will, of course, be visible to the naked eye;
4. The leaves are also glued to the fabric base and to enhance the artistic effect - a line is laid in the center with a thread that does not match;
5. Twisted branches are made with a sewing machine. The embroidery functions of the machine are used in which the top feed is turned off and the fabric is not fed. It is recommended to embroider twigs at this stage, since later the sewn coins and the figure of an owl will interfere with the free rotation of the fabric under the foot of the sewing machine;
6. An owl and a swallow are sewn on. Bird paws are recommended to be embroidered by hand;
7. The text of the inscription on the tree can be done with a simple black felt-tip pen. After washing in the washing machine, the inscription will not disappear;
8. The inscription on the pillow with the text of the wish is made on a sewing machine. The inscription is first applied to the fabric with a bold strip of pencil. In case of self-doubt, the desired inscription can be applied with a dark blue felt-tip pen;
9. The trace from the ladybug insect is stitched by hand. A finished insect can be sewn on, if one is found in the store among the buttons;
10. At the last stage, coins are sewn into the pattern and the pillow can be sewn on and filled with synthetic filler.
Easy DIY craft is ready. This is a very simple pillow sewing pattern that can be done by an amateur. Complexity is possible only at the stage of constructing embroidery, but for beginners, the task is solved by replacing the machine seam with a felt-tip pen.
Beautiful crafts with your own hands. New life for old clothes
The habit of throwing away old worn clothes can be easily replaced. Some things can be given a second life. An old T-shirt will make a scarf or dress for a little girl. From an old tablecloth - napkins or handkerchiefs.

This is how short trendy gloves can be sewn from worn socks. The heel and toe, as shown in the figure, are cut off. Edges with one hem on the wrong side are processed. It can be sewn by hand, but always with a knitted stitch (meaning obliquely) so that the fabric does not lose its stretch properties.

Further, the accessory is decorated with a textile heart. For a heart, it is recommended to choose a fabric that frays slightly at the edges on the cuts. Especially when the cut is diagonal. At best, thin felt or even satin, but with melted edges with a candle. The resulting gloves are easy to wash in the washing machine on the set delicate mode. The main thing is that it will never occur to anyone - what they were in a past life.

A boring boring T-shirt can be turned into a feminine seductive T-shirt. Actual in the summer season or on a beach holiday abroad. To make such a beautiful thing with your own hands is nowhere easier. First, deep cuts are made on the sides. The edges are processed on a sewing machine. And on the back, preferably with a pencil or a washable felt-tip pen, a heart shape with almost horizontal stripes is drawn. Strips, as in the picture, are cut out. The edges are finished, but without hemming, with any overlock stitch for thin fabrics. If the edges of the fabric on the T-shirt do not fray, the edges can be left unfinished.

DIY homemade products at home. Ways to store jewelry
There is no woman in the world who does not have jewelry. Making yourself beautiful and attractive is almost a tradition. And, of course, from the moment the first ring appears in the house, the question arises about the place of its storage. The larger the decoration, the more often this question pops up on the surface of everyday worries.

It is not difficult to make such a homemade box with your own hands at home. Minimum time. Minimum financial costs.
As a box, you can use absolutely any packaging from some previously purchased item. It would be better if a magnet is built into the box for tight closure. If there is no such magnet, it is recommended to stick it manually. As an internal filling, a cotton fabric of a pleasant shade is used.

The fabric is ironed in advance and lined inside the box like an accordion. It is required to achieve a snug fit of all textile layers so that the decorations inserted into them under the pressure of their own weight do not fall into the fabric. If desired, the jewelry box is decorated with colored paper. You can paste over it with textured fabric or paper with a pattern of oriental motif.

Even a jewelry organizer can decorate the interior of the house. The highlight of the room is a vintage wardrobe for precious stones. It was made from an old tray, many of which are still preserved in the dachas and gardens of grandparents. The spirit of antiquity on the wooden walls can be left by covering the structure with “colorless wood varnish for interior work”. Or - update. The wooden coating will need to be carefully sanded, painted with paint, and a protective coating applied. Still need to finish the inner wall. For these purposes, you can use everything that is at hand. There are many options: simply paint with paint, glue cardboard with an exotic pattern, textile design. In the figure, a double bottom made of cardboard is inserted into the tray, on which a cotton fabric is stretched and glued on the reverse side.

Using a screwdriver or pliers, hooks are screwed into the wall. They have old used thread bobbins in them. Bobbins are also recommended to be varnished.

Homemade cardboard boxes are made by hand at home. Labels on them too. In the figure, the boxes are shown open, but it is better to make them with lids, since in practice it will be difficult to wipe the dust from each decoration every time. It is much more practical to clean only the lid on the box from dust.
Many people think that gifts must be purchased exclusively in stores and pay a lot of money for them. In fact, everything is not so. Surely you have noticed how mother's eyes shine with joy when a child gives her a gift that he made himself, with his own hands. Of course, she will show this craft to her friends with great pride and keep it all her life.
Surely many people have a question, how to make a gift with your own hands, so that there are no special costs. You should only look around and understand that you can create from everything that surrounds us, and this is a truly exciting experience. Everyone in the house has a piece of unnecessary fabric, thread, paper of different colors. Even an eggshell can make a delicious little thing!
In summer and autumn, you can find unusual material for DIY crafts right under your feet - these are various beautiful stones, leaves, cones, pieces of bark, straw, flowers and twigs.
Your observation and imagination is the main thing that can be useful to you. Thanks to your work, you can make an unusual stand, panel, toy, bouquet, and even various decorations. And you will be proud to realize that there is nothing else like it in the whole world.
Holding a piece of clay in his hand, the master is able to make anything out of it, from souvenirs to jewelry. These days, you can easily make amazing things at home with polymer clay.
Your polymer clay crafts will last much longer than using plasticine. In addition, polymer clay is currently quite common, and modeling is its main technique.
With the help of clay, more and more new possibilities open up before you. Now, you can make not only decorative elements, but also various hairpins, brooches, jewelry. Clay has plasticity and softness, which helps you to make both light and complex elements out of it. For example, you can easily make rose petals, patterns, flowers, unusual figures without much effort.
I present to you a master class on how to make such an original craft from polymer clay with your own hands - a pendant in the form of a hanging cat. Made according to the instructions of Elena Burmina.
We take black polymer clay from any manufacturer.


We give this form.

Using a sharp knife, cut into three parts on both sides, not reaching the center.


Gently draw out the legs, tail, shape the head.


We lay the paws and tail beautifully, set to bake. Then we glue rhinestones on the eyes and one more on the paws.


If desired, the cat can be varnished.


Perhaps paper can be called the most affordable material for crafts, since it surrounds us almost everywhere, and getting it is not difficult. Paper is actually suitable for various crafts. Most often it is used for cutting various stars, snowflakes, etc.
It is also incomparable to any other craft material, as the ease of working with paper appeals to everyone. The only tools you may need to work with paper are glue and scissors.
If you are bored with the usual paper cuts, and you want to discover something new, something unusual, then you should get acquainted with such a technique as quilling.
Strips of colored paper will help you create truly extraordinary compositions. It is worth starting from the simplest flower, and moving on to something more, refined. Why not make unusual objects, paintings and caskets using quilling?
You can also make a holiday card, or decorate a gift box, this will be a truly original gift for your loved ones.
Filigree is a paper processing technique that was invented in the old days, it was spread in European countries oh, and a little later came to us. In the United States, filigree was given a new name - quilling.
DIY paper craft master class
In this master class, I will show you how to make such a paper pendant using the quilling technique.

We buy special paper for quilling.

And twist the spirals.


Two spirals of different sizes and one very small.

We give this form.


We glue all three parts together.


Our paper decoration is ready!


How to make others, see here.
DIY crafts from wire
If you are already bored with paper and clay, then you can safely move on to wire. Just imagine that a bird can be made from an ordinary clothespin and wire, and a little man can be made from a ballpoint pen.
Also, with the help of wire, you can easily make Christmas tree decorations, funny pictures and necklaces for girls, moreover, you can do it all yourself!
Decorative colored wire can be purchased at any craft store. You will also need a set of beads and balls of any size. If right now you have a great desire to make something out of wire, but you think that you do not have the material, then in no case should you be upset.
Walk around the rooms, it is quite possible that you have beads or beads lying around in your locker, and it is also not difficult to find the wire, for sure you have it in your house.
It is not necessary to use the wire color that is provided on our website, you can choose another color, or just the one that you have on hand.
The mood of your craft will depend on the color, therefore, it is advisable to use bright, colorful and rich colors. If you have a desire to make a keychain for your bag, then you should choose the color that will be combined with your bag.
Master class - do-it-yourself wire craft
I present a master class - how to make such a Christmas tree toy out of wire with your own hands.

We take the wire and give it this shape.


And wrapped with plastic tape.


From green oval beads we make eyes, skipping one pink one between them.

Well, that's all, do-it-yourself Christmas tree toy made of wire is ready!

Plasticine crafts
Each child is an individual personality, and that is why the child is able to perceive the world around him in his own way, and express his thoughts and emotions. A child, being at a very young age, does not yet know how to express his feelings and feelings in words, and therefore, he does this with the help of his crafts and drawings. Therefore, in the room of your child should always be paints, plasticine and pencils.
Plasticine promotes the development of imagination, fantasy, thinking, fine motor skills, sensations of volume and knowledge of colors, shapes and sizes.

In addition, plasticine is good because the child can independently choose the color that he likes and supplement his craft with new elements. For example, he can mold a kitten from one color, and with the help of another color he can make a collar for a kitten. Also, he can mold one character, and make furniture for him around. Thanks to this, your child will learn to make unexpected creative decisions.
Of course, a great responsibility also lies on the shoulders of the parents, who must be present near the child during his work, and prompt him if he has any difficulties.
Who invented plasticine and for what purpose?
It is impossible to say exactly who is the inventor of plasticine. There is a legend that one person somehow decided to invent a substance that would clean the wallpaper. After he invented it, he sent it to his sister, who worked in a kindergarten, for testing. It is still unknown how plasticine coped with cleaning the wallpaper, but the children really liked to sculpt from it.
A few secrets of plasticine:
- As everyone knows, plasticine comes in a variety of colors in a box, but sometimes a child needs new colors, which, alas, are not in the box. But, fortunately, you can invent a new color yourself! You only have to combine two or more colors with yourself, and you will get a new, completely different color.
- If you want the color of your plasticine to be lighter, then you just need to add white to it. If, on the contrary, you want to make a dark color, then add a piece of black plasticine. Just add pieces of black and white should be extremely careful, otherwise the color of your plasticine will become either too bright, or vice versa, too dark.
- It is best to connect pieces of plasticine together in portions and gently mix it together so that it has an even color.
Wonderful DIY crafts made from natural materials
Our nature is truly rich! Have you ever thought about how many unusual things you can make with an ordinary shell? You just have to touch the fabulous world of magic, and you will no longer have an ordinary shell in your hands - but an unknown animal that came to this world from your country called Fantasy.
With the help of a walnut shell, you can easily invent cute little animals, and you will get your own zoo. If you also use colored paper, fabric and plasticine, then you will be able to invent many bright and memorable crafts.

Also, acorns are an excellent material for crafts. If you add a huge imagination to your skillful hands, then crafts in your hands can come to life. It is not difficult to get acorns, because most often they are found in the forest, even in the city. If you went to the forest for acorns, then try to collect them fresh so that it is easy for you to work with them.
To work with acorns, you will need glue, an awl, twigs and plasticine. Bark and plywood are great for the base of your work. With the help of acorns, you can make a huge number of different crafts that will not even be repeated. What is required of you is to consider a small miracle in the stomach, from which cool crafts will turn out.

DIY crafts from cones
If you want to make a voluminous craft, then a bump is in a hurry to help you, because it is from it that voluminous works are perfectly obtained. With the help of a cone, you can make a man or an animal. In addition, they are very convenient and easy to work with.
Cones are also attractive in that they have completely different shapes, and they can be easily glued together. It is most convenient to use with those cones that have not yet had time to open. Choose buds that are in moist soil. They are good because they retain their shape for a long time.
If you have collected a lot of cones, now you should sort them. It will be better if you sort them by size and shape. In no case do not take a green cone, as over time it will become dark in color and begin to dry out. Other cones, dry and clean, will delight you for many years with their beautiful appearance.
DIY Christmas crafts from cones
Crafts from chestnuts
If you want to do the simplest crafts, then a chestnut tree will help you. Chestnut is attractive because it has a shiny, bright brown surface. With the help of an awl, you can easily pierce the shell of a fresh chestnut without much effort.
It will be better if you store your chestnut in a cool place. Then he will retain his appearance for a long time and will not lose his qualities.
How to make chestnut mushrooms video
DIY decorative pumpkins
A decorative pumpkin has a wide variety of shapes and shades. If you want to invent an unusual craft, then such a pumpkin will easily cope with this task.
In addition, it is easy to process and dries well without losing its properties. With the help of a decorative pumpkin, you can easily make a lamp, a jug, a candlestick and much more. Turn on your fantasy and imagination - after all, you have such interesting material for creativity!
The simplest DIY pumpkin crafts
DIY shell crafts
Seashells are also an excellent material for creativity. They have a variety of shapes, thanks to which you can make a wide variety of crafts from them. If shells are combined with other material, then you can get beautiful, fancy flowers.
Most often, shells make out a frame for a photo, a box, a stand, and so on. It will look quite unusual if you make an unusual seascape with shells. The shell is easy to attach to any surface with glue.
Shells can be found near the sea, in water bodies, and it is best to do this in the summer. Be sure to wash them with a brush and lay them out to dry. Once your shells are dry, you can start sorting them. You can store shells anywhere, regardless of temperature.
Children should definitely be introduced to the beautiful, and it is advisable to do this as early as possible. Try to draw children's attention to the beauty of the world around them, to flowers, trees, shells, leaves and much more.
Your child should see that each object has its own shape and size. Of course, you can buy a toy in a store, but what your child makes himself will be the one and only. After all, the gifts that a child makes with his own hands for friends and parents are truly priceless.
This article will be a pleasant find for everyone who seeks create a cozy interior in my house. You don't need to spend a lot of money to bring a little magic to your home! Improvised materials, imagination, a couple of bright ideas - and the apartment is unrecognizable ...
The handicrafts collected here are created in no time, and they will please the eye for a long time. Each of them I fell in love with, the idea with the Easter basket seems especially cute. I'll be glad if you like it too!
DIY crafts for home
- Hanger for scarves and scarves. I need this! Very easy to do with wooden clothespins.

- wooden coasters for hot and cold dishes will never be redundant in the kitchen!


- glasses case from a tie. I think it's great...

- Pillowcases from shirts. I have one in mind, I need to do it!

- The second life of old furniture! A wonderful mini-bar.

- Replacing the watch strap with a bright scarf is a stylish idea.

- Amazing holiday table decor!

- lamp shade. It looks original during the day, casts cozy shadows in the evening! And it's so easy to make...

- A vase of paintbrushes!

- Another idea for using wooden clothespins is how you can keep your jewelry in order.

- Fork candlestick. I am delighted!

- How to make a decorative clock: such crafts will fit into any interior.

- It looks amazing, but how practical! I miss this hanger in my kitchen...

- A meeting place for lonely lost socks.

- Easter basket will be ready in 15 minutes! I will save these ideas for myself and will definitely make one for Easter this year. All materials are inexpensive and easy to make. Miracle!

- Here's what you can replace the handles of kitchen cabinets with!

- Decoration-clip for a kitchen curtain from a fork. Charm!

Interesting crafts create a special atmosphere in the house,
Each person in his life was probably engaged in the creation of some cool crafts, not only in childhood, but also in adulthood. After all, as you know, needlework brings everyone great pleasure and a lot of positive, relieves accumulated stress and negativity, makes us rejoice and look at the world with completely different eyes. Its fruits transform our homes, replenish school and kindergarten exhibitions, flaunt in the hands of our relatives and friends as an expensive gift for the New Year, March 8, February 23, Birthday, Easter, May 9, Mother's Day and even astronautics or just like that, for the sake of deep respect. This activity is especially interesting for our children. They, like no one else, love to make something from paper, cardboard, plasticine and other materials at work lessons or at home at their leisure, thereby developing their inner world, making it richer and more beautiful. If you and your family decide at home to start making some original gizmos from accumulated unnecessary items, then we recommend that you look at our article. She will provide you with 74 photo ideas of beautiful do-it-yourself crafts from improvised means created for the beauty of the room interior and benefit. Informative videos with an accessible and step-by-step description of creative work will come in handy. They will solve all the questions and problems that have suddenly arisen.
The best cardboard crafts
You can do the same cardboard crafts DIY with instructions and diagrams for all family members. This is a fascinating and interesting process, and will not leave anyone idle.
From white decorative stones of small size, you can make a very original cup holder with your own hands, as in the photo. To do this, the stones need to be glued together. This is a very painstaking and lengthy work, but the result will exceed all expectations. Such a stand, made from an affordable improvised tool, can even be used under hot dishes at home.
Jewelry box from a metal can

We have provided you with a lot of interesting photo ideas for creating DIY crafts from various improvised means. All of them are equally beautiful and original. However, I would also like to offer you one no less cool idea, which is carried out at home from a simple tin can and colorful fabric. If you are interested in our offer, then let's start our step-by-step master class with a description of all the actions.
To work you need:
- metal can;
- the cloth;
- hot glue;
- scissors;
- cardboard;
- pencil or compass.
Manufacturing process:
- We take an empty metal can and cloth. We need to arrange a festive container. To do this, we take measurements from the side of the can and transfer them to the material. Then we cut out the decor of the desired size and glue it to the side surface of the container with hot glue.
- The protruding part of the fabric on the top of the jar should also be folded inward and sealed. It turned out something like neat sides.
- From cardboard, measuring the diameter of a metal container, we cut out circles of the appropriate size in the amount of two pieces and an additional third slightly smaller size.
- Our cardboard blanks should also be decorated on both sides with a cloth, using hot glue to secure.
- One round piece will become the bottom of our decorated box, where we insert it, and the second two will become a lid, consisting of two circles that differ in size (the large one is the top of the lid, and the small one is the bottom).
- Upon completion of the creative work, you can transform the box with satin bows, rhinestones, beads, or something else, no less bright. It’s not a sin to give such a craft to your mother, sister, girlfriend or your young girlfriend. This is how at home with your own hands you can create many original things from empty jars of cream, hair balms, tea and more. All these improvised means are quite affordable and diverse.
Video: master class on making a box of matches