DIY sequin symbol of the year. Craft a cock from felt. Do-it-yourself magnificent Rooster in the form of a sofa pillow
New 2017 is the year of the Red (Fiery) Rooster, and its figurine or image will be the most demanded present. The needlewomen of "Cross" have a good tradition: to prepare thoroughly for the New Year's holiday. And this year will be no exception. Many of us will make or are already making a rooster with our own hands, or even not one, but several at once! After all, you must definitely please your family and friends with a needlework symbol of the year, and yourself with the fascinating process of creating this very symbol in various hand-made techniques.
The creation of a kind of MASTER CLASS GUIDE from the Internet is also a tradition of our handmade site, which was born a year ago. For you, dear craftswomen, we have selected on the network a lot of only the best master classes. Admire, look closely, discuss and choose the most colorful rooster! And then sew / knit / draw / blind / weave it. So, in what technique can you work on the eve of the New Year's holiday?
If you don’t have time to work, it’s not a problem. The article contains links to craftswomen who sell finished works.
Cockerels made of paper and on paper
We make postcards with the kids
If you are not a professional cardmaker, then before you start creating cards, be sure to read our article "Learning to make DIY New Year cards using the Scrapbooking technique." In it you will find not only a lot of ideas, but also get acquainted with the basic rules for creating postcards.
Any cockerel your child draws can be placed on a postcard. If the kid himself finds it difficult to figure out how to draw a rooster with his own hands, then show him this step-by-step instruction:

And then, it's a matter of technology. Cut out the cock and make it the centerpiece of the composition. For example, your postcard can be so simple but cute. In your work, use New Year's paper and bright red ribbon, add snowflakes, twigs and other festive paraphernalia. Once you have a basic idea, the postcard creation process becomes much easier!

Photo from the site http://itsapatchworklife.blogspot.ru
If your child likes to color in black and white pictures, give him this opportunity. Print a card template with a cockerel on heavy cardboard and let your little one get to work. Further, by cutting out a blank ball, you can add voluminous snowflakes, glue half-beads, imitating Christmas balls, etc.,

YOU WILL FIND OUT
You will find 8 more templates for coloring, as well as 2 step-by-step instructions for drawing more realistic roosters in the archive, which you can download quickly and for free!
Take note of the idea with a cockerel on a stick, like on Elena Yurchenko's postcard. Her cockerels are cut out of felt, or you can cut them out of paper.

Roosters from colored paper
Colored paper applique can also be placed on a greeting card. But such an application itself can act as a postcard. To draw and carefully cut out all the details, children will need the help of their parents, but they can glue them themselves.

Olga-15 offers to make funny paper cockerels in her master class.

A Rooster blank is a rectangular sheet of flexible paper or thin cardboard folded in half lengthwise. Its size is 13.5 × 10 cm. We make 7-10 inclined slots along the fold line (approximately every 1 cm). Their angle of inclination is 50-70 degrees, and their depth is ¾ of the height of the folded sheet.
Ekaterina Ivanova in her video tutorial shows how to make a red rooster using the Origami technique:
Roosters using the Quilling technique
A very interesting idea is to lay out only a luxurious rooster tail out of quilling paper. It's not as confusing as spreading a whole cockerel, and it can turn out very effectively! Here is a rooster without a tail as a base (how it looked in the original, see the photo below).

Print it on a color printer, and then fantasize over the tail. As an example - one such work (although the tail is modest here, but you will try, right?))

And if you are not afraid to make a whole rooster using the Quilling technique, then you can take this ready-made postcard as a basis:

Or this pattern:

A cheat sheet on the main elements of Quilling to help you:

Button applique
And here are absolutely stunning handsome roosters, laid out of multi-colored buttons, half-beads, strasses and beads! As a basis, you can take the contours of the cockerels from our archive (link just above).


Crochet cockerels
Many needlewomen with a crochet hook on "you" and will be happy to knit a cockerel from multi-colored threads. And "Cross" will help you to decide on the model and will offer several master classes on this type of needlework.

You can also buy knitted cockerels from Svetlana.


Felt roosters
The fastest and easiest options for creating a symbol of 2017 are felt roosters. The material is easy to process, keeps the shape of the toy well, does not require processing of seams. On the contrary, hand seams on the face of the product give it a special flavor and charm.


Photo from the site https://madeheart.com


Photo from the site http://ktototam.ru/
The figurine of a rooster, carefully cut out of thick felt, will be both a Christmas tree toy and a pendant.

Photo from the site http://ktototam.ru
And if you decorate the felt cockerels with embroidery, flowers and other decorative elements, it will turn out incredibly beautiful in general!

Photo from the site http://mmmcrafts.blogspot.ru

Roosters in Tilda style
Well, how can we do now in our life without the tilde-Rooster? On the ToySew website there is a master class on sewing this popular toy.

The Vetic master posted on her blog the patterns of the Rooster and the Chicken of the Goroshkins based on the tilde pattern. An interesting couple will turn out if you put in the effort and patience!

And for inspiration:

Cockerel Yurik from Orange Toys

A funny video about her tilde-roosters was shot by Maria Fedorova (the link to the patterns is in the description of the video!):
Coffee toys-cockerels
Aromatic, or coffee, toys compete with tildes in popularity. There are roosters in this technique.

The coffee cock can be like this:

Photo from the site http://zabavochka.com
You can easily sew it yourself using one of the patterns suggested above. "Cross" talked about all the intricacies of creating coffee toys in this master class.
If you think that you cannot cope with such work yourself, contact the master. Yulia Charikova has made enough branded toys with the scent of coffee and put them up for sale at this address.

Interior toys made of fur
Oksana Svyatkovskaya will show her vision of a rooster and show how to sew it correctly according to ready-made patterns. Her Rooster is made of faux fur, but who can say that this does not happen or is he not good?)


In the workshop Everything for creativity (dljatvorchestva) there are a lot of blanks for both painting and decoupage. Choose and be creative!

This is the kind of beauty you can get:


If you don't want to make a souvenir in the shape of a rooster, you can decorate any wooden surface with a picture of a rooster. Here the scope for creativity is simply endless !!! Here are just a few examples for inspiration:


Felted wool roosters
Other craftswomen make wool toys like real ones! We admire and get inspired! And if you really want to buy one of these beauties, then look for them at the Fair of Masters (there is a link on each photo).


Elenia gathered in one place many different felted wool Roosters and proposed to MK to create one of them. It turns out very cute!
Roosters embroidered with a cross, beads and ribbons
Perhaps you love embroidery more than other types of needlework. Then you can put the symbol of the year on a pillowcase, decorate it in the form of a panel, a picture in a frame or a brooch. The main thing is that the image of the Rooster warms your soul. And if you donate your work, find out the preferences of the gifted.
You will find more than 50 different patterns for embroidery of roosters and cockerels in a special album
2017 - Rooster, therefore, today you can prepare a festive decor for this holiday, where the Cockerel will flaunt with his luxurious tail. If you pay due attention to the owner of the year, then he will not deprive you of the next year, he will give you wealth and prosperity. The owner of the year requires special attention, his image must be present in your house on New Year's Eve: toys with the image of a cockerel can be hung on a Christmas tree, use the symbol in decorating a festive table and, of course, give each other themed gifts. In the East, where the horoscope is given special importance, fairs are opened on the eve of the holiday, filled with souvenirs with the symbol of the next year.
2017 - the year of the Fire Rooster
You can give your friends a symbolic coffee magnet on 2017 year of the Fire Rooster... Of course, this magnet will be made in the shape of a Rooster, and on top we will decorate it with coffee beans. Such a fragrant souvenir will remind your friend of you and your concern for many years to come. In addition, you can start a new tradition of giving each other homemade magnets for the holidays, and then you will constantly compete in your creativity.

In the center of the festive table, a voluminous symbol of 2017 Rooster, made in the exclusive modular origami technique, which has gained extraordinary popularity in recent years.
Find out how easy it is to craft a rooster from bottles, coffee beans, fabric. See how to make a rooster out of salted dough from egg trays.
Craft a rooster from egg trays

This is what a rooster can be made of. This is completely junk material, but it makes great crafts. For work you will need:
- egg trays;
- acrylic paints;
- thin white paper;
- cardboard;
- newspapers;
- scissors;
- glue gun;
- brushes;
- pencil.
Using a glue gun, cut out the bird's wings from cardboard, glue them with blanks from egg trays that look like leaves.

Most of your time will be spent waiting for the papier-mâché rooster's body to dry. Therefore, it is better to start working with its formation. Cut the newspapers into strips, dilute the glue with water in a 1: 2 ratio in a container. Dip the paper in here, stick it on the inflated balloon. It will take more than one hour to dry this part. When this happens, pierce the ball with a sharp object and remove it through the small hole left.
This rounded workpiece must be cut into two unequal parts, insert the smaller one into the larger one to increase the strength of the part. Glue these elements together with a glue gun.
While the papier-mâché was drying, you had enough time to form the head and neck of the rooster. To the part, which looks like a flower with elongated petals, made using petals from an egg tray, glue two triangular beak blanks, a comb cut out of cardboard.
Insert the second one into this flower blank, then the third, fourth and fifth. The head and neck of the bird are ready. Glue this piece to the side of the half papier-mâché ball. To do this, use a glue gun to attach a strip of cardboard inside the neck so that it looks out from below. We glue this label to the half of the papier-mâché body.

To make a tail, draw semicircular lines on the lid from under the eggs, cut along them.

Glue the tail to the back of the body. Everything, you can paint the cockerel with acrylic paints, when it dries up, hand the craft to the addressee or put it in the most prominent place in your house, as a bright attribute of the holiday.
You can make a rooster with your own hands not only for the New Year, but also for Easter. Then you put painted eggs in his semicircular body, thus decorate the festive table.
Symbol of 2017 made from plastic bottles
If you decide to celebrate the New Year at the dacha, then make a rooster - a symbol of 2017, which is not afraid of either snow or water. Plastic bottles are perfect for this.

To make a rooster with your own hands for the Year of the Rooster, prepare all the necessary materials, in particular
- a five-liter canister;
- a plastic bottle with a volume of 5 liters;
- metal-plastic tube;
- 2 plastic bottles with a volume of 1.5 liters;
- corrugated pipe;
- thick copper wire;
- plastic bottles for feathers;
- perforated tape;
- acrylic putty;
- fine mesh;
- sandpaper;
- awl;
- construction foam;
- stationery knife;
- glue gun;
- self-tapping screws;
- scissors;
- screwdriver.

Bend the reinforced plastic pipe to make two rooster legs out of it. Attach them to the five-liter canister using self-tapping screws. To make an animal's neck, cut off a large piece of cloth from a 5-liter bottle, roll it up in the form of an envelope, and secure with self-tapping screws. From 1.5 liter bottles, cut off their tops below the shoulders, obliquely. Put them on the top of the bird's legs, and also attach these parts with self-tapping screws or a glue gun.
To make bird feathers, cut off the neck of the bottle. Using scissors, cut out 5 longitudinal feathers.

Put corrugated tubes on the rooster's legs, begin to decorate the thickened parts with feathers. To fix them, make two holes in each with an awl, insert a piece of wire here that needs to be tied to the base.
Cover the body of the bird with feathers, starting from the point where the tail grows. We are not making the backrest yet.

Roll the wire so that you get two paws, each with three fingers, put on these blanks pieces of corrugated pipes.

Cut out long and narrow nails from the bottom of the bottle. Attach them to the glue gun or to the "Moment of Installation".

Cover the resulting blank with spray paint, using one color for the torso and a different color for the legs.

Cut the head of the cock out of the building foam using a utility knife.

Take sandpaper, sand this part with it, then apply acrylic putty.

When this coating is dry, smooth the surface again with sandpaper, then coat with PVA.
To paint well on the head of the cockerel, use a trick, having previously covered it with PVA. In this case, the paint adheres well, and its layer will be more durable.

From a fine-mesh mesh, cut out a part that will become the wings of the back and tail of a rooster, glue long blanks from a plastic bottle to it to decorate this part with feathers. At the top, the wings are made from corrugated bottles.

Paint the wings, when the solution is dry, attach this torso piece with perforated tape and self-tapping screws. Cut from 2.5 and 2 liter bottles of elongated feathers, cutting each container into 5 pieces. Paint them on both sides, after drying, attach with wire to a metal mesh.

To make it easier to paint plastic bottles in a light color, take transparent ones, cut feathers from them for the back. Attach them with wire, 4 pieces at once for self-tapping screws.

Attach the bird's head to its place using long self-tapping screws, cover the already painted parts with plastic, paint the rest. Make spurs for the rooster out of the wire, after which you can put it in its intended place in the country or at home.

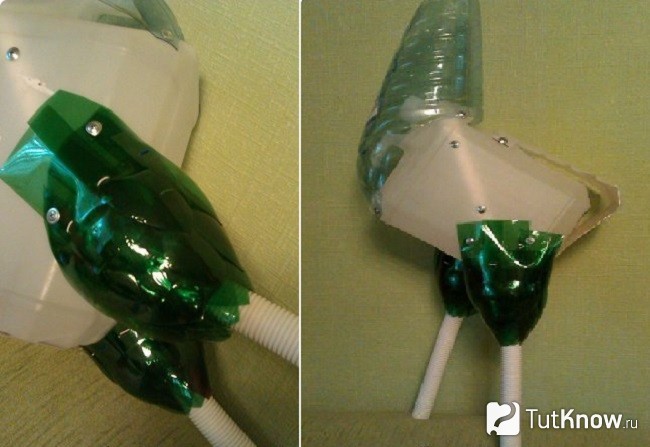
It's even easier to make the next bird out of plastic bottles.

To do this, you will need:
- two plastic bottles with a volume of 2–2.5 liters with small necks, and one of the same volume, but with a large one;
- disposable plastic cups in two colors;
- disposable plates;
- wrapping paper or trash bag;
- plastic ball;
- eyes for dolls;
- Scotch;
- stationery knife;
- glue;
- scissors.

For plastic cups, cut the top into strips 8-10 mm wide. In length, they will occupy a third of the height of the glass. Put these blanks on the high neck of the bottle, alternating in color. Cut the bottom of the last glass. Shred this container not only from one side, but also from the other side into thin strips. At the same time, the middle will remain solid.
Just below the rim of the plates, cut the semicircular feathers out of the plastic plates and cut them on one side with scissors to create thin feathers. In the bottle, which is located on the opposite side of the neck, make an incision, insert the tail feathers here, secure with tape.

Attach the ball to the top cup, secure it with tape. Cover the tail cut with wrapping paper or a fan-cut piece from a colored trash bag. Cut the wings out of plastic plates, glue them to the sides of the bird with tape.

Cut the comb, beard, beak of the cock out of plastic plates. Make three cuts in the foam ball, insert these blanks here, glue them for greater strength of the connection. Take ready-made eyes for toys, or make them yourself from a white foam plate, cut out the pupils from a black garbage bag. Glue the eyes.

If you want to learn how to make a rooster out of bottles even faster, then watch the third master class in this section.

- Cut the bottom of a large plastic bottle, put it on a fence peg or a stick specially dug into the ground for this occasion.
- If the bird will stand in the house, then glue its lower part with strips of colored paper, make the wings and comb out of cardboard of the appropriate shades. If the rooster is on the street, then these parts must be waterproof.
- Create stripes from colorful trash bags (by tying or gluing those), wings, nose, comb, colored plastic goatee.
- Take two white bottle caps, paint the pupils here with black acrylic paint, glue them to the head.
- The tail is made from bottles of different sizes and colors. Cut off their bottoms, chop them almost to the shoulders into thin strips with scissors. Insert one bottle into another, fix them with wire, tape or glue.
Salted dough rooster
Such a three-dimensional picture looks great, but it is performed in an unusual way.

To make such a panel, take:
- 120 ml of water;
- 180 g fine salt;
- 370 g flour;
- 1.5 tbsp. l. vegetable oil;
- acrylic paints;
- rooster pattern.

- You will make a cardboard image of this bird when you transfer the presented drawing to paper.
- Mix flour and salt, pour vegetable oil and water here. Knead the dough well, cover it with a cloth to stand for 20 minutes.
- Now you can roll it into a layer, put a template on top, cut a rooster out of salted dough along it. Using the same knife, apply streaks of feathers on the tail, wings, neck to the workpiece.
- If you want the bird to be voluminous, then separately sculpt the wings, buttons, the upper part of the comb.
- Leave this creative result to dry the dough. To do this, you need to place the product in a well-ventilated area to give the workpiece greater strength. Dry it for a day in this way, then heat the oven to 50 degrees.
- Using two cooking spatulas, transfer it to a baking sheet lined with paper and sprinkled with flour. Reduce heat to low, dry at this temperature for 2 hours. Take out the product, cool it down.
- Now we need to paint our fiery rooster with acrylics of different colors, and then varnish.
If you have a colorless nail polish, it works great for coloring a rooster with salt dough.
You can also sculpt a voluminous rooster from salted dough. Then the figurine needs to dry well for two days.

Crafts roosters from coffee beans do it yourself

This is not a simple rooster, but a magnet. To do it, you need to stock up on:
- a piece of burlap;
- a piece of red felt;
- coffee beans;
- a sheet of cardboard;
- rhinestones and sequins;
- crochet;
- threads;
- glue gun.
Use a brown pencil to paint the cardboard body of the cockerel. At the bottom, using a needle, into which the thread is set to match, form two legs of the cock out of it, make the paws out of brown colored cardboard, like the blank of the tail, which needs to be glued into place.
Make a beautiful fluffy tail out of threads, glue it onto a cardboard blank. Also glue coffee beans on the body, bypassing the wing, and attach them to the ends of the legs. Glue a magnet on the back of your torso. Decorate the wing with sequins and rhinestones.

We sew, we knit, we embroider crafts of roosters
These needlework techniques will also help you create crafts for the year of the rooster 2017. If you know how to embroider, then the following diagram will help you. Thus, you can arrange a small decorative pillow, an apron pocket made of plain fabric, or make a panel.

If you decide to knit a sweater for a child as a gift, calculate the loops so that this poultry flaunts in the center in front.
The diagram shows which colors to use. To make them all look good, knit a white yarn sweater.
If the listed types of needlework are still beyond your power, then make a cockerel on a stick from the remains of ribbons, threads, and fabric.

Here's what to prepare:
- a square of linen fabric with sides of 15 cm;
- red canvas measuring 5 × 20 cm;
- multi-colored ribbons;
- soft filler;
- threads;
- jute;
- twig;
- red yarn;
- a needle;
- wooden stick.

- Fold the linen cloth diagonally, trim one corner slightly. Stitch one and the other side with a basting seam, but leave free space between these sides, which is marked with a pencil in the photo. Through it, you will subsequently fill the figure with filler, and insert a wooden stick here.
- Insert a twig into the cut hole on the corner, fix it with turns of red yarn. This is the head and beak of the cock.
- Fill the workpiece with padding polyester. Insert a stick there, secure this part by tying it tightly with red threads.
- Take a strip of red felt, fold it in half, and place it on one and the other side of the cockerel's head. Wrap the top and bottom with thread to separate the comb and goatee. Cut the beard at the bottom with scissors.
- Fold satin ribbons of different colors in half, attach them to the tail, tie with red thread. Also form the wings of the rooster, just sew them on the sides.
- Embroider the bird's eyes with black thread or make them from beads. After which the wonderful rooster symbol of 2017 is ready.

Check out another idea by watching the video. It tells how to make a rooster craft from nylon.
If the children want to learn how to make it out of paper, then show them the second video.
Holidays, especially New Year, become an inspiration for people who love to make home decorations with their own hands. And children, and even more so, are always glad to creative ideas. The most relevant will be crafts in the form of a rooster - the feathered symbol of 2017. This time it is paired with the fire element and red. Several options for products, diverse in technology and materials, will allow both experienced craftsmen and beginners in hande made creations to choose their own.
Pom-pom cockerels
A figurine made of pompons is made quite easily, even beginners can handle it. And it looks very presentable. This is a wonderful compact decoration for the Christmas tree and for the table, a present to loved ones.
The base of the bird will be two pompons, one smaller for the head and more for the body. You can make a very young bright yellow chicken or a variegated young cockerel. Show your imagination in the choice of yarn and other materials so that you get your own, unique symbol of 2017. Decent and sleek, perky and disheveled or cute and fluffy cockerel. Use natural colors or your favorite colors.

In order not to manually combine colors for a variegated bird from many threads, choose a melange or multi-color yarn. Play not only with color, but also with texture. Use thin or thick threads, smooth or fluffy. Fine and varied decorative effects are obtained from fancy yarns: grass, boucle, pile yarn (imitating fur, it is similar to feathers) and other types.
Here are what balls can be made from various threads:

To make pom-poms, you can use a special template or cut two washers from thick cardboard. The larger the hole in the center, the fuller the ball will be. Making pompons:
- We wind the thread on the base until the hole is filled.
- We cut all the loops along the outer circumference, between the washers.
- We tie it tightly with a thread in the center.
- We cut through the cardboard or open the template and remove it from the pompom. If necessary, align the threads over the area of the ball.

We connect two pom-poms, forming the body of the cock. Next, you need to make the wings and tail. Real dyed feathers work best. You can also cut them out along with the beak using templates from:
- felt,
- thin felt
- thick colored paper.
The eyes can be bought ready-made for soft toys or replaced with knots, beads, buttons.
The legs are easy to make:
- from the same fabrics,
- from thick colored wire,
- thin wire intertwined with threads.
We fold the wire and threads in a bundle and twist or wrap the already formed wire. We attach all the details to the body. Sew or glue (super glue or hot glue from a gun) to the centers of the pom-poms, between the threads.

Mosaic
Many do not raise a hand to throw away their favorite vase with a crack, a chipped mug. Give these things a second life by using them as a material for making the rooster, the symbol of 2017. The shard mosaic looks very impressive. You can also use tiles, ceramic tiles. If you want to create a finer, more subtle work, use a dyed eggshell. To make such a picture, patience and a long time are needed, but such needlework does not require special skills.
Use sturdy cardboard or thin plywood for the base of the mosaic. You can use this technique to finish:
- decorative cutting boards,
- dishes,
- flower pots.
To break the ceramic into small pieces, wrap it in a thick cloth and beat it with a wooden or rubber mallet. Or metal, wrapped in a thick layer of soft material (padding polyester, wool, felt or the like). For smaller pieces, hit with the narrow side of the hammer, attach a chisel and hit or break it. Use tile glue, liquid nails, plaster of paris, hot gun glue.
Use any illustrations you like as a template. Lay pattern-side up, stretch well and secure to the base of the mosaic. Draw all the outlines using moderate pencil pressure. Lay out the pieces on the base, and when you are happy with the formed picture, start gluing.

Combine colors and patterns on the fragments as you like. Create a cock, worthy to symbolize your coming year!
Panel and applique
Using the applique technique, you can get three very different options for the texture of the paintings, due to the use of different materials:
- buttons,
- lids,
- herbarium.
The printed template is superimposed on the base of the painting and the silhouette is outlined. If internal lines are needed, they are easily transferred to the base. Shade the reverse side of the image sheet with a B-2B soft pencil. Attach it to the base for the mosaic, secure. With a pencil lead, lightly pressing, go through all the contours.
Further, according to the resulting markup, the selected fragments of the panel or applique are attached. The elements should be selected in advance. You need to calculate the number, taking into account the area of the final drawing and the size of each element.
Lids
Bottle stoppers or plastic caps work well for large scale art. The picture from them turns out to be quite schematic, such a symbol of the next year will look good in the design of the facade of a house, a summer cottage or a suburban area.
 For the base, use a sheet of OSB, hardboard, plywood or pressed cork 3-5 mm thick. The same panel can be laid out immediately on a wooden fence or a wall made of boards.
Draw or translate the outlines of the future image. It is better to fasten the covers to wooden surfaces with nails. Or press into the plastic base a thick layer, gradually applied to the surface, liquid nails, polymer cold or hot glue.
Caps can be of different diameters and thicknesses for a more structured image. Use more prominent, but smaller circle details for the rooster itself, smaller ones for the background.
Herbarium
It is necessary to collect and carefully dry the leaves of various trees under the press in advance. Also use petals of different flowers. The more varied the material, the more colorful the applique will turn out.

It is better to use thick paper or cardboard for the base. It is optimal to glue the elements with PVA or office glue. Choose a bottle with two applicators, narrow and wide, or fabric, or apply the composition with a brush to the pieces of the mosaic rather than the base. A glue stick is not very convenient because the leaves are brittle and crumble as they stick to the stem.
A baby can also make an applique in this way, using a simple silhouette of a rooster and a small amount of leaves. The creators are older, if you apply diligence and come up with imagination, the picture will turn out to be stylish and non-trivial. Bright and eco-friendly applications will delight the eye all year round!
Buttons
Buttons are selected in various sizes and shapes, with a contrasting structure, complemented by beads and beads. Or, on the contrary, buttons of similar colors of the same shape are used. The result is a variety of panels: graceful, bright, voluminous.

For the background, when gluing with cold or hot polymer glue, cardboard, plywood, OSB are suitable. You can sew the elements onto the fabric stretched over the embroidery hoop, then framed or stretched onto a hard base. Another convenient way is to glue buttons onto push pins and press them into a base (such as paint-coated or fabric-covered drywall).
It is easy and happy to create such homemade and cozy appliqués from buttons for your interior and as a gift to your loved ones.
Embody ideas for the symbol of 2017 with your own hands in the technique you like and do not forget about the omen: the year will correspond to its personification. It's up to you whether it will be a proud and obstinate, but luxurious rooster, a cozy domestic hen or a charming little chick.
Secrets of large garlic Garlic has narrow-linear leaves, a complex bulb, consisting of 11 - 25 cloves. Does not form seeds, reproduces vegetatively. Teeth serve as planting material. Garlic is a cold-resistant plant, begins to germinate at a temperature of 3-5 ° C, easily tolerates frosts, in the conditions of the Non-Chernozem zone it can winter on the vine. Garlic is a herb of the onion family. Central Asia is considered the birthplace of garlic. Cultural garlic is subdivided into two subspecies: shooter (winter) and non-shot (spring). The non-firing one forms only bulbs consisting of cloves, and the firing one, in addition to the bulb, forms an arrow bearing an inflorescence, in which air bulbs (bulbs) are formed instead of seeds. Vegetable gardens usually grow their own local forms of garlic, found in almost every region. Garlic agrotechnics. An area with fertile soil that has a neutral reaction is allocated for garlic. The best predecessors are early cabbage, cucumbers, zucchini, under which organic fertilizers were applied. Garlic should not be placed after onions and garlic earlier than 4-5 years later due to common pests and diseases. It is not recommended to grow after potatoes, as the plants are affected by fusarium. In autumn, after harvesting the previous crop, organic and mineral fertilizers are applied under the garlic (5-6 kg of humus or compost, 30 g of superphosphate and 20 g of potassium chloride per 1 m2). Then the site is carefully dug onto a full bayonet of a shovel, evenly mixing the fertilizer with the soil. Growing winter garlic. Winter garlic is planted in the second half of September - early October in the garden bed in an ordinary way at a distance of 20-25 cm row from row. The cloves, depending on the size, are planted in a row at a distance of 5 to 8 cm from each other, the planting depth is 3-4 cm, counting from the top of the clove to the soil surface. The planted garlic is mulched with peat or humus with a layer of 1.5-2 cm (1.5-2 buckets per 1 m2). In spring and summer, caring for garlic consists in feeding with nitrogen fertilizers, watering as the soil dries up, in weeding and loosening the soil in the aisles. The arrows must be regularly removed at the beginning of their formation so that the bulbs are large. Leave them only on seed plants. Winter garlic ripens in late July - early August. It is impossible to be late with the harvesting of garlic, since when overripe, the heads crumble. Therefore, when the leaves of the garlic begin to turn yellow, the plants are pulled out of the soil and dried for 4-5 days - in sunny weather on the ridge, and in rainy weather under a canopy or in a well-ventilated dry room. After drying, cut off the roots and tops, leaving a 4-5 cm long “neck” of the bulbs. Growing spring garlic. Spring garlic is inferior to winter garlic in terms of yield, but it has the ability to be stored for a long time. It is grown in areas with highly fertile soil, which has a neutral reaction, with the introduction of organic and mineral fertilizers of the same composition and in the same doses as for winter garlic. Garlic is planted in the spring after thawing the soil, as early as possible (in April-May). The planting rate is 50-70 g per 1 m2, the distance between rows is 20-25 cm, in a row - 5-6 cm.The depth of planting from the soil surface to the top of the clove is 2-3 cm. The emerging seedlings are fed with urea (10-15 g per 1 m2) and watered as the soil dries up. During the formation of the bulbs, 50 g of superphosphate and 15 g of potassium chloride per 1 m2 are added as top dressing. Spring garlic is harvested when the lower leaves dry out, yellowing and lodging of the upper leaves in late August - early September. You need to prepare a garden bed for spring garlic about a month before sowing it. It is better to choose a place for the garden where carrots, tomatoes, peppers or cauliflower used to be. For one square meter of land for garlic, you need to add one bucket of rotted humus and sawdust (you can take them fresh), one liter can of grass or wood ash, fluff lime and bird droppings. After adding humus, the earth must be dug up and leveled. After the rest of the components, a simple harrowing is sufficient. After that, the garden bed must be watered heavily from a watering can and covered with an old film or cardboard. When growing garlic, you should take into account: - shoveling off the earth in the second half of June from the head of the garlic contributes to the formation of a smoother and larger head; - if you tie the leaves of garlic in a knot two to three days before harvesting, it will accelerate its ripening and improve keeping quality; - to obtain a high yield of garlic, you need to feed it at least twice with mullein (1 kg per 8 l of water) or chicken dung (1 kg per 10 l of water) per 5 square meters. The first feeding should be done in the phase of plant germination, and the second - in the phase of head formation. To grow large garlic, you must first of all pay attention to the seed. Slices of well-ripe garlic should easily separate from each other, the skin of the cloves is dense, often pinkish-brown, not milky white, the bottom is dry. Never plant garlic damaged by mold and rot! He will spoil the whole harvest for you. Before planting, soak the planting material for several hours in a sufficiently strong manganese solution (the color is almost purple, not pink). If there is a spore or other of some fungus attached there, manganese will disinfect everything. Plant the garlic at a distance of at least 20-30 cm from each other, make the beds so that you can walk along them when the garlic grows up, take only the largest specimens for planting. This is the key to your success. When the garlic grows up, it will bloom. Don't give him this opportunity! All arrows must be removed regularly. Otherwise there will be no harvest. You can leave one or two arrows for reproduction, but that is a completely different story. Harvesting is necessary only when the aboveground part of the garlic begins to turn yellow. Dig up entirely, shake off the ground and lay your crop in the shade, without cutting off either the roots or the stem. They should dry out. Turn periodically, stir up the harvested plants so that they dry out evenly: the lower layers (this is when the harvest is large and you have to fold it in a thick layer) have an unpleasant property of undercutting. When all the tops have become almost dry, carefully cut it off by 10-15 cm, and at the same time the dried tips of the roots. This will allow you to keep your harvest without loss!