Packaging boxes do it yourself. Felt box. What can be stored in cardboard boxes
The article will tell you about how can be done with your own hands and use a cardboard box. Here you will find templates and master classes on the manufacture of boxes of different shapes.
Box - the easiest way to pack something or hide. The box can serve as an excellent storage tool: jewelry, postcards, trifles and cosmetics. Of course, modern stores will provide you with a lot of options for boxes: large, small, curly, square, with covers, decorated and simple cardboard.
Much more pleasant to create something with your own hands and decorate it as I would like it and so how the product itself will correspond to the style of the holiday, premises, the case. You can make a crawler from absolutely any cardboard. The material can be purchased in the store for creativity (that you will find a large selection of color solutions and cardboard textures), and you can use the one in which the household technique often pack (refrigerators, for example, or washing machines).
To work, you will come in handy:
- Cardboard (as much as required for the product preferred).
- Hot glue (can, of course, use any other, but hot preferably to the measure of it quickly drying and strong fastening of the material).
- The template (using it you can understand how exactly you should cut, bend and glue material).
- Scissors and pencils - for the backbone, cutting. It is necessary so that your product looks carefully and aesthetic.
Pattern box with folding lidImportant: There are two main types of cardboard box with a lid. One assumes the presence of a cap, which is covered by the box from above, the other - the cover that is leaning back, but is part of the box.

 Cover Cover Box Template
 How to make a box with a lid styardly:
- Prepare all accessories, print a template for the box on the printer or draw it in an accurate ratio on the cardboard.
- Cut two elements from cardboard
- Start the bending of dotted lines and carefully gluing them.
- Tightly press the edges so that the material begins
- Give a product a bit
- After drying, you can decorate the box to your liking.
Video: "Box: Master class"
How to make a round cardboard box: Scheme, template
A round cardboard box is a very beautiful and practical product that will always find its application. Decorating it to your liking, you can store inside decoration and jewelry, sets for sewing and embroidery, cosmetics, cutting and more.
Make a round cardboard box a little more complicated than, for example, square. However, it is quite realistic to "figure out" by its own hands, not spending a lot of money for materials. Use a thick cardboard and accurately follow the template presented, you can only change the size, but not the form of details.
How to make a round cardboard box, templates:
 Template round cardboard box number 1
 From which parts consists of a round cardboard box: Template number 2
 In what order should be glued to the part of the round box: Template number 3
  Round cardboard box with handle: finished product
 Video: "Gift box or cardboard box: detailed master class"
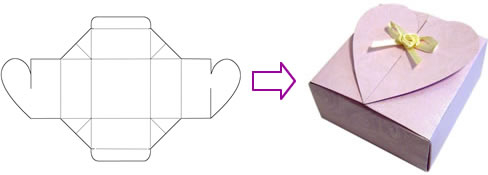
How to make a box heart from cardboard?
A heart shape is much more complicated in manufacturing than a round or square box. However, if you enjoy tips and templates, you can easily create this beautiful product.
A heart shape is not only a storage box, perfect packaging for presenting a gift to your beloved person. Such a box can be filled with a variety of surprises: sweets, souvenirs, baubles, gifts, key rings, petals of flowers, even butterflies can fit in it.
Important: In a lot of a heart-heart, a round box is similar, but it all depends on the bottom: if it is proportional, then all the product can look neat and smooth. The box has two donkeys: internal and external, the walls of the box are attached on the principle of a round box.
Different templates for the manufacture of a cardboard box in the form of a heart:

 Template boxes in the form of a heart from one detail: Template number 1
 Template boxes in the form of a heart from one piece: Template number 2
 Step-by-step work in the photo:

 Prepare the same hearts: Two Punches and Cover
 Purley the bottom of the side of the box
 Lock and wait for complete drying, make the lid
 Video: "Box in the shape of a heart: master class"
How to make pieces of paper and cardboard?
Give gifts in packages, cellophane packages and paper wraps is no longer beautiful and is considered a sign of "bad taste." What is more likely to look at your gift in paper or cardboard packaging, which you glue and decorate yourself.
Important: The size and shape of your box depends only on what exactly you will give. More "heavy" gifts require dense cardboard, and for small and lungs, you can even glue the paper box.
Cardboard and paper boxes, different templates:

 Simple rectangular box: template
 Box with folding lid: template
 Triangular Box: Template
  Simple Square Box: Template
 Box Pouch: Template
 How to make a box of color cardboard?
In a modern shop for creativity you will find a huge selection of cardboard:
- Kraft cardboard (Sand color monotonic material)
- Cardboard color
- Cardboard velvet
- Cardboard holographic
- Cardboard with sparkles
- Cardboard with prints, drawings and inscriptions
- Fact cardboard and much more
Important: All this variety of choice allows you to create boxes from cardboard of incredible beauty and use them in any destination.

 Cardboard for creativity
 Video: "How to make a box of cardboard?"
How to make a box of cardboard without a lid?
If you need to make a cardboard box without a lid, you should also use the template. Such a product is perfect for storing personal belongings: pencils, cosmetic brushes, hair accessories and much more.

 Cover Box Template
 Video: "Box without a cover with your own hands in the Origami technique"
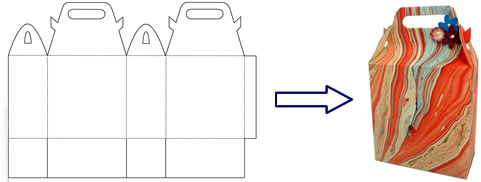
How to make a box of cardboard for candy?
Candy boxes do not have to buy in the store, you never know exactly what will be inside. It is always more pleasant to make a box with your own hands, fill with sweets to your liking and give a close person. It will not only be a "delicious" gift, but also very original, as well as special.

 Box with handles: template
 Box with butterfly: template
 Triangle box: template
 How to make a box for decorations from cardboard?
Store jewelry, jewelry and clock is very comfortable in a cardboard box. It can be bought or done independently, decorating to your taste. If you wish, inside the box you can do as one and several departments.
Several tips and templates for the manufacture of a flat cardboard box will help you make your own hand packaging of any size.

 Template for flat box
 Video: "Flat storage box with your own hands"
How to make a square box of cardboard?
A small square box can be used as a bomberrian or packaging for small surprises with your loved ones.

 Square box template
 How to make a triangular cardboard box?
The triangular box can exist, as a separate unusual packaging, and maybe part of the packaging in the form of a cake.
 Triangular box template
 Decorate boxes from cardboard with your own hands?
The decoration of the homemade box depends only on how original your fantasy is original. It should be decorating the box as well, focusing in the case (holiday, for example, or room decor).
How and how can you decorate any cardboard box:
- Lace and cloth
- Satin ribbons
- Bachek and burlap
- Stickers and stickers
- Buttons and other fittings
- Sparkles and pebbles
- Colored paper
- Kraft paper
- Drawings and inscriptions
Video: "5 ideas of jewelry boxes"
If you soon go to a solemn event, and the packaging service of the presents is far away, try to make a beautiful box for gifts with your hands from cardboard and paper, with a lid or without it. It is not so difficult, you just need to find ideas, master classes to create such crafts, stocking of the necessary materials, tools and clearly follow the step-by-step instructions. Gifts and premium packaging, collected by their own hands, are always unique and priceless, the addressee will certainly appreciate them.
How to make a gift box with your own hands
Make a present truly original and unforgettable can help a self-made box for gifts with their own hands. It is not difficult to make it hard, you just need to find a master class to create a suitable packaging or print a ready-made pattern. Next, it will remain to transfer the drawing to the color cardboard, paper for creativity, cut, fold, glue. At the request of the already collected in your own hands, the box for gifts can be decorated with ribbons, rhinestones, bows, buttons or braid.
Materials for manufacture
In order to make a box for gifts with your own hands, you will need good high-quality materials that will not be bored, they will not work on the road and during the donation. An ordinary cardboard here is unlikely to suit, it is not so dense, and his color is not festive. It is better to use a special, and you can decorate the packaging for gifts using beautiful paper designed for needlework. There are shops where many materials for creativity are sold. There you can purchase a whole set of necessary accessories or buy something specific.
Schemes boxes
How to make a box for a gift from the finished
Even a regular box for a gift created by your own hands, you can surprise the recipient of the present and all others. If fantasy allows you, it is quite realistic to create an original masterpiece that you will not find in stores. One of the easiest ways is to make gift boxes for gifts with your own hands from those who are ready. For this, the usual container is suitable in which you, for example, bought shoes, find suitable in size. Next you need to decide on the holiday themes to select the desired color, drawing of the design and decor.
The prepared box must be placed with dense paper (tissue) with glue, tape. It is best to do it and inside too, use the material of different color, so the packaging will look more beautiful, more effectively. The lid on the box decorate in the same way, they must complement each other. Decorate the finished packaging at your request, according to the holiday. To do this, use bows, hearts, fruits, funny figures, fabrics of various textures, paint, stencils, etc. Creative people can make figures independently, for example, from polymer clay.
How to attach a gift box
To do this, you will need a box, paper (color, gift, self-adhesive, wallpaper, napkins) and tools (glue, scissors, ruler, brush, pencil). Next, act in such a sequence:
- Expand the selected material, put the box in the center.
- Source the required amount of paper, it should be enough for the bottom of the base, side parts and a little bit. You can do this using a ruler.
- Cut the excess part, cut four strips from it for corner areas.
- Stick these strips, then wake the glue external parts of the box and enclose paper. Do the same on the inside.
- In the same way, plunder the lid. Let dry and decorate further at your discretion.
Gift box with your own hands - master class
It is not difficult to make ordinary gift boxes for gifts, you only need a bit of patience, time, tools, materials. If all of these you already got stuck, proceed by such instructions:
- In the middle of the cardboard or tight paper, mark the square - this is the bottom of the future product.
- From him on four sides perpendicularly draw two lines. These will be the side parts of the box, determine the length of the lines, based on the desired depth of the gift packaging.
- On each side of the side parts, try the protrusions of 1.5-2 cm and cut their edges in an angle of 45 degrees.
- Carefully cut the resulting drawing, bend along the drawn lines, glue with glue or bilateral tape.
- It remains only to decorate the box and inside to lay a gift.

Box with a surprise with your own hands
To give money for a birthday or jewelry, not necessarily put them in a paper envelope or a ready-made casket. Show a little fantasy, and the present will not look like a banal. Much more spectacular, for example, to present a small box glued down with your own hands. When the addressee still finds inside such a work of art a gift - there will be many impressions.
You will need: dense paper, scrap paper, scissors, glue, line, pencil, materials for decor. You can make such a package like this:
- From a monophonic piece of paper cut out the basis with a length of part of 30 cm.
- Straighten the workpiece on 9 identical squares, corner cut.
- Using a ruler and acute subject (toothpick, knitting hooks), scratch the lines drawn by a pencil. So the seats of folds will be smooth.
- Bend the side parts, glue with a pencil from the inside to them sliced \u200b\u200bearlier squares, retreating 2 mm from the base. Treat edges with nail file.
- Cut from scrap-paper 8 squares of 8.6 mm, stick them from two sides of the base.
- Next, it remains to decorate the box at your discretion: flowers, ribbons and rhinestones, inscriptions with wishes, etc. Very original and unusually watched the photo of the perpetrator of the celebration at the top of the box.
- Inside, put a surprise itself - money, a postcard with congratulations, a small souvenir.
Box for candy
Original packaging for candies with your own hands is easy to do with the help of a ready template. It must be printed or sught on thick paper, collect on dotted lines of bend, glue and put sweets there. If you do not have such an opportunity, then:
- Take a color disposable glass of large cardboard, remove the cut.
- Top 7-8 cuts for 3 cm long, maintain them inside, place in the candy box, connect the edges with each other, glue.
- Decorate on top of multi-colored pompons, beads or stick an interesting inscription: it will be an exquisite present in women by March 8.
New Year's boxes do it yourself
On Christmas topics, too, there are ready-made patterns in the form of a Christmas tree, balls that help create boxes for gifts with their own hands, etc. Cry one of them, cut, glue. If your gift is big and will not enter such a package, choose any suitable container and simply decorate it for New Year's theme. For this:
- Purley from all sides or just wrap bright red paper of any texture.
- In the middle across the entire box, glue a wide bar of black.
- Next, make a square from gold paper, cut the middle in it, attach the gift from the front side of the gift over the black strip. See what happened, what is not Santa Claus costume?

Box for rings
Ordinary velvet boxes for rings - this is the last century, but if you give your favorite person in the package made by your own hands, it will be a present impression. It is made similarly to a simple box with a surprise, only inside you need to additionally build a substrate for a jewelry. To do this, follow this scheme:
- Cut from the foam rubber, cut the rectangle or square suitable in the width and height of the box itself. Make a slot in the center, the ring will then be inserted into it.
- Take two satin or openwork cutting of the fabric, insert one piece in the incision first, then the second.
- Free edges. Select beautifully folds and secure glue from the reverse side. Insert the substrate into the box, and in it - the ring.
- At the lid, glue the hearts, flowers, rhinestones, place the design with ribbons.
How beautiful to pack a gift - circuits and box templates
For those who do not know how to do anything with their own hands, there are many different finished circuits, boxes templates for gifts. You need to choose a photo of a suitable packaging, print (draw), cut, bend over dotted lines, glue, decorate. Choose the size and shape, based on the gift parameters - round, rectangular, in the form of a heart, cake, christmas tree, children's boot, etc. Believe me, such simple, but cute boxes will make a greeting original, unforgettable.
Rectangular box with a lid of double-sided cardboard
Make a packaging for a rectangular gift is the easiest way. To do this, pour cardboard, scissors, glue and act according to the instructions:
- It is better to use bilateral cardboard, so the product will be inside and outside the one-color, with the same pattern. In the center of the rectangle, it will depend on the size of the present.
- From above, from the bottom, on the right and on the left of the shapes, draw even rectangles - these are lateral parts, their height should be equal to the desired depth of the future box.
- From all sides of the side parts, mark the allowances of 2 cm, cut their upper faces at an angle of 45 degrees.
- Bend the workpiece over the lines, glue using the allowance.
- The lid is made similarly, only its width and length should be more than 2-3 mm. So it will be free to close, open.
- If you need a big box, and the double-sided cardboard caught a small format - cut out each part separately, glue with the help of spaces.
Round
For the manufacture of a round box for gifts, you will not need a lot of time, but patience and preferably will be useful to you. So, follow the following sequence of actions:
- Cut four circles from porous cardboard, two of them must be slightly smaller in diameter.
- From the beer cardboard, cut two strips in size of circles, one wide, second narrow. Leave stocks for the allen on them, cut them into the cloth. So strips will stick evenly.
- Next, glue 2 large and separately 2 small circles - this is the bases for the box and cover.
- Enclosure to them: wide on a narrow circle, narrow on a wide one.
- Decorate the lid of the packaging bow from the tapes, the original inscription, postcard.

Felt and paper cake
Such packaging is often used not for gifts, but for wishes and consists of 12 "sweet" pieces. To create it, you need:
- Print the presented template in the form of a piece of cake, cut on it from paper 12 identical blanks (can be multi-colored), glue each.
- Plug the billets with felt, brown or color, creating the illusion of chocolate cakes or a delicious cream.
- Put in each kosovo a wish or small souvenir, decorated the cake in connection with the theme of the holiday.
In Origami technique
To create boxes for gifts in this technique, you will need: paper of any texture, scissors, glue, pencil and ruler. Next, you need to do such manipulations:
- Cut two squares, one more than another 2-3 mm.
- We take one of them, blacks are diagonally diagonally from one corner to another.
- The lower angle is bended to the center of crossing the lines, and then the same part we sweep once again to the middle. Deploy. Similarly, we do with all angles.
- Scissors on the left and right of the upper angle we make 2 outbreaks, length before the first fold line from the center of the workpiece. The same is done with the bottom angle.
- Left and right corners are waiting for the center, bend once again along the lines of cuts, lifting them. You must have two sidewalls.
- Bend them, glue the letters in the form of triangles.
- Top to put the top and bottom, stick. The box itself is ready.
- Similarly, collect the lid.
Heartbeat
Such packaging is made similarly round, only the base is cut as a heart. Use the finished pattern or draw the box shape yourself. Choose a dense cardboard as a material. Make a box according to such a scheme:
- Cut 2 hearts (one less than 2 mm) and 2 strips equal to the length of our figures. The height of one strip is the depth of the packaging, the second must be less.
- On each strip, leave 2 cm allowances for gluing, bend them, cut into the cloves. Stick strips to bases.
- Next, select the material for the decoration, plundate them the outer, inner, side part of the box and cover. Make a decor in the form of a bow.

Packaging for the Gift "Brilliant"
Draw a template for such an unusual box with your own hands, so it is better to find and print ready. Next, you need to take the cardboard of the desired color, scissors, glue and act according to the scheme:
- Cut the template, attach to the cardboard, circle.
- Next you need to cut the stationery knife, sharp object (knitting, crochet for knitting) to sell the folding space (using a ruler).
- Bend blank over the lines, glue the product (it is better to take the "moment" glue). Before gluing the last part, put a gift inside.
Bonbonniere
These little unusual boxes are taken to give guests at the wedding, often there are candies, nuts, coffee, lollipops, and cookies, and still thanks or wishes. When to distribute such gifts created by your own hands, the newlyweds decide themselves, but the present will like everyone, both women and men. If you want to make a bonbonniere of paper or cardboard, then:
- You need to print (draw) and cut ready-made product template for the desired form.
- Make bends on dotted lines.
- To glue, not forgetting to put inside sweets, notes with warm words.
You can make such packaging not only from paper, but still from the fabric. For example, a fatin, chiffon, silk suitable for this. Make a pattern, take the material of the desired color, thin ribbons in color and act according to the scheme:
- Cut from the material circles with a diameter of 23 cm. For one bonbonniere you need 3 circles.
- Put them on each other, put a postcard with wishes, candy into the center.
- Collect the fabric in the form of a bag, tie a ribbon. Spread the ends of the fabric. The original gift is ready for your own hands!
Video
Summary: Boxes for gifts do it yourself. How to make a box of paper. Schemes boxes. Box of cardboard. Origami box. How beautiful to pack a gift. Gift packaging with your own hands.
Now in stores there is no shortage in choosing a gift packaging. Held sellers will offer you gift boxes, decorative packages, gift paper for every taste. But you agree that much more interesting to make the packaging with your own hands. And the recipient of the gift will be doubly pleasant, because by dedicating the time of choice and gift packaging, you thus have shown attention to it. In this article, we want to offer you different options for making boxes of paper and cardboard with your own hands. All crafts are accompanied by ready-made schemes of boxes. You only need to choose your favorite gift box, print the diagram and glue the box with your own hands according to the instructions.
1. do-it-yourself box
Let's start our article from the original boxes in the form of pyramids. Download the boxes of the boxes, print it on thick paper or cardboard, do hole punch holes as shown in the instructions for the manufacture of the box with your own hands. Collect a box, tie it up with a beautiful ribbon. Packaging for a gift is ready! Note: Beautifully look at the boxes made from corrugated cardboard.
2. How to make a box of paper
Do not know how to make a box with your own hands? Then use our ready-made paper boxes.
Box for a gift with a heart. A special relevant will be such a packaging for a gift on February 14th or March 8.
Here is another option box from cardboard with hearts \u003e\u003e\u003e\u003e

3. Boxes for gifts. Gift boxes
Pink and blue gift boxes in white polka dots. You can put cookies or candy in such a gift box. It will be great if you bake the cookie yourself.

Pink color circuit \u003e\u003e\u003e\u003e
Blue color box diagram \u003e\u003e\u003e\u003e
Instruction \u003e\u003e\u003e\u003e
4. How to make a box of paper. Schemes boxes
For the manufacture of boxes from paper with their own hands, decorative paper for scrapbooking is perfect. Make it from it festive packaging according to the scheme. Use the instruction
5. Cardboard box for gift with your own hands
We suggest you make a bonbonniere with your own hands. Bonbonniere is a beautifully decorated box for candies. Bonbonniere accepted to give guests at a wedding as a sign of gratitude for visiting the celebration. Also such boxes of cardboard filled with candy and nuts, you can give the kids who came to your child for your child. In the photo below you can see the classic version of this gift packaging made by your own hands.

6. Packaging with your own hands. How to make a box
The largest selection of boxes with your own hands is presented at Creative Park from Canon.


8. Box do it yourself. How to make a box
Original boxes for small gifts or sweets you will find in the section
After analyzing several MK by packing, I found an option that it is completely satisfied with me. So you can make the box of any size and color under the box, plate, etc. In the same diagram, there is nothing new in the box. The main thing is that I "invented" for myself is the manufacture of your "designer" paper. In a small town, find beautiful paper is difficult, and that's what I suggest to do.
1. Materials:
- Watman or Cardboard,
- Napkin or corrugated paper
- sheet of tracing
- PVA glue
- scissors
- ruler
- Pencil
2. Determine the size of the box to then draw the scheme.
The size of the bottom of the lower part: add 1 cm to the size of the product itself.
The size of the side parts is equal to the height of the product or slightly above.
The size of bending for the bottom: 1 cm smaller smoking part.
Cover size: 0.5 or 1 cm. More Punches.
The size of the side parts of the lid I do 3 cm.
The size of the bends for the cover 2, 5 cm. (For a simple box, it is possible without them)
For example: Casket size 5x5x4. Box sizes: bottom 6x6 cm; Sidewinks 5cm.; Figing 4 cm. Cover 7x7cm, sidewalls 3 cm, bend 2.5 cm.
Now we determine the size of the square, which will be the basis of our scheme. We fold 4 + 5 + 6 + 5 + 4 \u003d 24cm. This is the length of the square, which we will draw on Watman.
In fact, it is not so difficult to produce all the calculations, as it seems))) If you do and understand the principle, you will easily produce them in goal without any pieces and records.
3. Blacks in the watman square, in our case, with long sides \u003d 24 cm. Cut.
4. Now we place the square on each side according to the scheme: 4cm - 5cm - 6cm - 5 cm - 4cm. All dots connect, get such a scheme.
Here are shaded those parts that then cut off.
5. Now, in fact, proceed to the manufacture of paper. To do this, you can use the conventional napkin of a suitable pattern and size. Or corrugated paper, then the box will be monophonic. Square, which we cut out of Watman. Lubricate PVA. It is important here it is important to miss the entire surface, especially the edges, but the adhesive should not be too much so that the napkin does not twice.
While glue slightly dries, stroke the napkin with a hot iron, so that there are no folds. Corrugated paper can not stroke. Then we put the napkin on Watman, cover with a sheet of tracing and carefully stroke the iron. I carefully managed not from the first time, here you need some skill))) That's what it turns out.
6. Now cut the extra parts of our square. We get such a figure.
7. We make cuts on red lines.
8. Gently bend everything with a ruler
9. Watch the valves and bends inside and get a cute box. More precisely, its lower part.
10. For the box cover, repeat all operations, only the sizes of the square will be others. In our example 2.5 cm + 3cm + 7cm + 3 cm. + 2.5cm \u003d 13 cm
As a result of all the described manipulations, such a box appears.
Everything is done fast enough, about an hour I have done such pieces 6
But this may look like a finished product in a beautiful package.
- What is a holiday? - Ask you once.
And you come with a smile and answer:
- It's when everyone is happy, nice wishes say, give gifts ...
And in response to you:
- So, if today to give someone a gift and wish something wonderful, then there will be a holiday?
And this is true ... And you can even give a candy handful. The main thing is how to do it. Perhaps it is worth starting with unusual packaging. Paper box with their own hands is a wonderful idea for the original gift or surprise.
Even a purely symbolic gift will be worthy of admiration if you presented it in your own packaging.
Materials and tools
So, what may be needed in the manufacture of all sorts of boxes.
- Paper.
It is best to take paper for scrapbooking - it is good what can be bilateral, and with different patterns on each of the sides. A dense designer paper, colored pastel paper, cardboard (200-300 g / m2 density), a simple sheet of watman or watercolor paper, which you can paint or tinted can be painted.
You can also use the "yellow" postage paper (or envelope from it), packaging paper ... and every other you can apply for decorating. - Corrugated cardboard
- Napkins (preferably relevant)
- Ribbons, ribbons, cord
- Beads, buttons
- Ready labels
- Scissors, stationery knife
- Bilateral Scotch, Glue Pencil
- Superclauses or glue "Moments" Universal (transparent gel) for fixing beads and other
- Rule, pencil
- Compass
- Hole puncher
- Nail file (to make bigovka)
Useful advice. Before you take directly for the paper from which your box will be, try to assemble it from ordinary paper. You will understand that where to cut off, how it is more convenient to make bends, how to collect a box. Plus, you can evaluate what size the box you need. After all, after all, the first pancake comormed - so let this whom will be from simple cheap paper.
Decor. As for the elements for the decoration, they can not limit themselves here: make flowers from fabric and paper, combine ribbons and raffia, lace, which is just thinking. The main rule is not to overdo it.
And now about the boxes themselves. Variants, models and schemes for their manufacture are a huge set. We offer you the most popular - from classic round and squares at the base of boxes to unusual bonbonniells. But first things first.
Square box
It can be given in it anything. From candies and cookies to handmade soap and jewelry. Naturally, for each gift should the corresponding decor box.
In this case, the packaging is stylized under the postal parcel. It gives it special romanticism, after all, the services of traditional mail to send letters and gifts today are becoming more and less.
If you use the color paper with a pattern - the box will already with a very different mood. Choose your!
This is such an excellent box of paper can be created in just a few minutes.
This is one of the possible options for making a square box. It will be made of solid sheet, without a separate lid. Let's start.

Redraw the circuit box on paper. We think in advance the desired size. Cut.

Carefully bend the workpiece on dotted lines, which are drawn in the diagram.
If the paper is quite thick, in order to bend it easier, you can first make a bitter. To do this, attach a ruler to the folds of the fold and spend on them the nail file (with the circular edge, the tip of the scissors). Must get a groove - deepening over the line. Now all the bends will be clear.

We glue the bilateral scotch strips as shown in the figure. Instead of scotch, you can use adhesive pencil, but the tape is still more reliable, and more convenient.

Decorate the walls of the box outside, while she is still dismantled. And then glue it. It remains to put a gift and tidy the packaging!
With a round base
The box of this model is more suitable for gifts for women. Although everything again depends on the gift and decor. It can be presented in it as beads and tie (if you twist it snail), and another aromatic candle, New Year's ball or even a cupcake!
Such a paper box with your own hands can continue to serve as an excellent box for smallest things (buttons, beads, etc.). 
So, proceed.

Choose the desired radius of the circle at the base. We draw with a circulation 4 of such a circle on thick paper and 2 on corrugated cardboard.
Measure 3 strips on paper. Their length will be equal to the length of the circumference of our circles (yes, you will have to remember the favorite formula 2πr). The wider strip will be in the height of the box, one more will be 1 cm already, and the third strip is the narrowest - for the height of the future cover.
It is difficult - only while you read it, it is worth starting to do - and everything becomes simple and understandable! 

Put the circles from corrugated cardboard paper. We have turned out the bottom and base of the lid.

We glue the first and second strips, as shown in the figure (vertical shift about the thickness of the bottom of the box, the shift horizontally is 1 cm). The front side of the paper should be out. Decorating the future wall of the box.

Purchase the bottom of the box with a double paper strip. Then we glue in a circle the base of the cover remaining narrow strip.
The box is ready! We put the gift inside and close the lid decorated.
Separately, the lid can not be decorating, but to bandage the entire box with a ribbon. For example, like this: 
Elegant boxes and a drop of glue!
Is it possible to make a box of paper with your own hands quickly and without any glue? Voila! There are more examples of such packages than you can imagine.
Everything is made from one sheet of paper. The main thing is to carefully cut the workpiece and bend correctly. This is at first view of the scheme for some boxes wisdom, and in fact everything is much easier. Each next box will collect everything easier. We advise first to practice on ordinary paper!
When working with tight paper, a lot will help you again. We try!
1. Strict box - male option.
Although if you make it bigger, out of paper with a gentle print and decorate with a flower, will be just right for the gift of female linen. 

Ideal for sweets and something lush and air.
In order to turn a ribbon or lace, do in advance in the blank hole hole. 
Suitable, for example, for loose fragrant tea. Or for any vials, candlesticks. 
It looks very concise, perfectly suitable for a male gift. 

And with a brighter decor, it will be a good option for a gift to a woman.


Here is the same case, but a little bit of another configuration. This option can be opened and closed, thanks to a kind of clasp.
Cute bonbonnieres
Bonbonnieres are a special kind of boxes. Bonbon in French - sweetie, and the name of the boxes from the word "candy man." It is a bonbonniere with sweets or sweet dragee give newlyweds at the wedding guests - in response to congratulations.
Order Production of bonbonniere for each guest - the cheapest pleasure. But the bride and her girlfriends will not be difficult to make bonbonnies in the style and tone of the wedding.
1. One of the easiest options

2. Elegant.
Remind a casket or a small chest.
Very slightly harder than the first. Draps in them make a stationery knife, holes, if we want to draw a ribbon or lace, - hole pack. 

3. Unusual and tasty.
As a rule, bonbonnieres are located on a special separate table and often on a dish or tray. You can beautifully play with this situation and make bonbonnieres in the form of pieces of cake. And it is necessary to place them together, as if it is a paper cake. 
To begin with, the big circle (the plane of the cake) and divide it on the sectors to know the parameters of our pieces.
Then, according to the dimensions, draw a scan pattern piece. We make the desired amount of sweep, cut them out and glue. You can decorate until gluing, or after - everything depends on the idea of \u200b\u200byour decor. 