How to make a voluminous star out of paper with your own hands. New Year's star: how to make a beautiful paper star with your own hands
There is very little time left before the New Year and everyone around is busy preparing for this wonderful holiday. The main attributes of the New Year holidays appear everywhere - bright Christmas trees, decorated with bright shiny toys and colorful garlands. And at the top of each Christmas tree shines a New Year's star. Of course, you can buy such a star for the Christmas tree in the store. But it is much more interesting to make the decoration yourself, with your own hands. It will look no worse than the store, and besides, it will save your money. And you can buy something else with them. Let's figure it out together how and from what you can make a New Year's star for our green beauty.
Christmas star made of paper
Both children and adults love to make paper out of paper. Try decorating the Christmas tree one of those long winter evenings with your child. So many variations of paper stars for the Christmas tree have been invented that it’s impossible to list them all. You think that paper toys will look too simple - not at all. Just look at what beautiful crafts are made from this material.
Paper toys are simple and inexpensive
To make a star, use double-sided paper of your favorite color. Fold it like an accordion. To make the parts even, we recommend that you first fold the sheet in half, then unfold and fold each half in half again. Expand again and repeat the steps with a quarter sheet, i.e. a quarter of the sheet must be folded in half again. You will get fold lines along which it is easy to fold an even accordion.

Fold the accordion in half, this is done to mark the middle line. Expand this fold. Cut a piece of paper diagonally from the outer bottom corner to the middle, but not reaching it.

Tie the workpiece in the middle with what you will subsequently attach it to the Christmas tree.

Expand the star. There will be extra gaps between the rays of the star on both sides, glue these sections with tape.

Straighten the star and fasten it to the top of the Christmas tree.
If you like five-pointed stars in the style of the Soviet era, then they are easily made from thick paper or cardboard - ordinary, for children's art, or decorative, which is used in scrapbooking.
Proceed according to the following instructions.

Here is another variation on this theme made of perforated cardboard.

Volumetric star for crown or branches
If the previous options are best fixed on the top of the Christmas tree, then the star, made according to the next master class, will decorate the branches. It looks more like a fluffy needle ball, and you can’t immediately say that it is made of paper on its own, it looks so professional.

Cut out 10 round pieces. For outlining, you can use any object of a round shape or a compass.

Fold the circle in half. Then again in half and again. Expand the figure.

In the center, draw a small circle about 2 cm in diameter and make cuts along the folds to the inner circle.

Lubricate the tip of each petal with glue and, using a sharpened pencil as a form, roll each petal into a cone.

Lubricate the petals with glue, you can sprinkle them with sparkles, additionally decorating.

Now let's collect the star. Make a hole in the center of each blank with an awl.

Put a small sequin on the cord. Insert two threads at once into a thick needle.

String the first part so that the wrong side looks up. The rest are strung on the contrary. We fix the last detail with sequins. Pulling the two threads in different directions, form a star.
Modular origami star

They also make origami stars out of paper. It may seem difficult at first glance. But if you follow the instructions carefully, it turns out that the process is not so much complicated as painstaking. The easiest way is to make a star from separate modules, which are then nested one inside the other.
Modular star is easy and quick to assemble

To make, you will need 6 squares of paper of different colors 9 by 9 cm.

All modules stack the same way. Fold the paper diagonally. Rotate 90 degrees clockwise and fold again diagonally.

Unfold 90 degrees clockwise, flip and fold in half like a booklet.

Unfold, push the paper from the sides and it will lay in the folds. You get a double triangle.

This is how it looks from the back.

And so - from above. Make 6 of these parts.

Let's start assembling. Each module has two corners on each side. Take the red module and the yellow one.

Insert the two corners of the yellow module into the two pockets of the red module.

Insert all the way.

Fold in half. Turn back. Get a fold.

Now in this place the paper is revealed.

Fold it in the same way as in the photo.

Take a new red module and insert it into the pockets of the yellow module. Push all the way in again.

Lay the pleat. Open and bend.


Close the shape at the end. Don't forget to fold. Straighten. It remains only to thread the thread. Make a loop and slip it into a pocket. Glue so that the thread does not fly out.
Small multi-colored paper stars

Here is another instruction for making small stars, they can decorate a miniature forest beauty.

We make notes on a sheet of paper two centimeters long.

We draw lines along the marks to get even stripes. And cut off the strips.

Take one paper tape. Fold the edges into a loop: the left edge under the right. There should be little left edge.

Insert the left edge into the loop and align.

Tuck the little tail up.

Lower the top ribbon down and to the left. We lay out exactly on the edge.

Turn the shape over and rotate so that the long piece of tape is on top. Fold down and to the right. Turn over again, bend down and to the left, turn over - down and to the right, then turn over again - down and to the left.

We hide the remaining piece in the resulting pocket.

Use your fingernail to push the star from the sides and it will become voluminous.
For a more complex master class on making origami, see the video format.
Video: origami star of Bethlehem
A star on the top of the Christmas tree and pendants made from scraps of fabric

Fabric toys look a little unusual for us. But how great they will look on the Christmas tree. For example, this eight-pointed star can be tied to the crown. It is not done in 5 minutes, but for the sake of such beauty, you can spend some time.

To sew a lace star of Bethlehem on a Christmas tree, you need a pattern. You can build it yourself, but we recommend using a ready-made one, just enlarge the image to the desired size. In the original, the size of the finished asterisk was 24 cm.

Source materials:
- two types of fabric close in tone, but different in texture, however, this is to your taste;
- fabric for the back of the toy. This can be a piece of the same material that is already used for the front side, if you suddenly have an extra one.
- ribbons with which the star will be attached to the top of the spruce;
- for decoration, use whatever you want: sequins, buttons, rhinestones, beads, beads. The lace looks especially good.

Cut out eight "petals" of the star for the front side and the back side, of course, from two halves.

Fold the pieces and sew where you see the red lines.

Smooth out the seams well.

Fold the resulting parts two together and sew again.

Now you have two facial parts that need to be smoothed out.

Just sew them with one center seam.

Finish off the piece.

On the reverse side, sew a ribbon 50-60 cm long and a loop 10 cm long.

Sew both halves, and use scissors to make cuts where marked in green.

Stuff the toy and sew.

Decorate as you like or as pictured. The central bead is sewn through, while at the same time a button is attached to the back.
Now see what result you can get. Such needlework can also be given as a gift.

And if you make several small toys, you can make pendants out of them.

Six-pointed fabric star

A six-pointed star is sewn in a similar way (Soft pendant stars in traditional Christmas colors).
Speaking of pendants. Original variations on the theme of the Christmas eight-pointed star are obtained from patches. These stars are unusual, but they are also hung on the Christmas tree.

By themselves, they are round, but the pattern created from patches of different colors forms a star. This decoration looks very elegant on the Christmas tree. Moreover, the color of the toy is predominantly red, New Year's.

First of all, prepare the material. You can buy it specifically at craft stores, but it's much more practical to use old shirts, blouses, bedding, whatever, as long as the colors go well together. In total, 40 parts with sides of 5 by 4.5 cm are required. From this number of elements of the indicated size, an ornament with a diameter of about 10 cm will be obtained.

Bend the long side of each part inward by about 1 cm and smooth it with an iron.

Now lay out a few parts face up and draw a line in the center. Do it with all the details.

We cut out a square-substrate and draw it as in the photo: two diagonals and a cross passing through the middle of the sides.

Lay the first part so that the top edge and the line in the center coincide with the lines on the substrate.

Move the second part down a little.

Place three more pieces in the same way.

Sew all the details with a "back needle" seam. Be sure to make sure that the edges of the parts are sewn, the stitch must exactly fall on the beginning of the part.

Sew seven more rows in the same way. The center lines on the parts match the lines on the backing.

Bend the right piece first.

Then drop it.

Bend again, but up.

Do the same with the left part.


Then lay down. We do not bend anything up. This is done only with the first part in the row.

We repeat similar actions with all shreds in all rows.

As a result, such an ornament is obtained. Pin the front piece to the backing with pins and cut out.

Sweep and, stepping back from the edge about 1 cm, draw a line in a circle.

Cut out the front side of the back and a circle of synthetic winterizer for the inner layer. On the back, we also draw a line, retreating 1 cm from the edge.

We take an oblique inlay from a store or from the material from which the toy was sewn, cut out a strip along the oblique.

Carefully we sew the decoration in a circle. We process the edges.

Don't forget to sew on the ribbon.
Openwork and original thread decorations

Maybe you have a small skein of knitting thread left and you don’t know what to make of it for the good of the cause? Try to make airy, graceful charming stars on a wire frame. Try to make a star-pendant from fluffy threads and wire

To make such a cute fluffy star pendant, you will need very few materials.

Prepare the wire.

Bend the wire so that 5 rays are formed.

Cut the wire, leaving a small margin.

Take fluffy yarn.

Lubricate the frame with glue in the place where you will start wrapping the sprocket.

Gently wrap the thread around the entire frame.

Then, in a chaotic manner, fill in the gaps, as shown in the photo.
That's all. It will take only a few minutes to make the pendant, and you can decorate the entire Christmas tree with such toys, you don’t even need anything else.
Cardboard and twine star
And how do you like the next master class, which shows the manufacture of a star from cardboard and twine? The original decorations are painted with acrylic paint.

Make a template out of cardboard. Outline the outline. You will need two identical parts.

Cut out the frame of the future star from cardboard.

Lubricate one half of the frame with PVA glue.

A small star, which turned out from the middle of a large star, can also be wrapped with threads.

Glue two layers of the frame for the small and large stars.

Coating cardboard with PVA glue from the outside, start wrapping it with twine. Fasten the edge of the twine with glue.

The star can be painted with acrylic paints and a sponge.

It remains only to tie the thread.
openwork star

An openwork star, similar to a real work of art, will turn out if you make a frame for stretching threads from matches. Soak the thread itself in PVA glue, and then start wrapping the frame: first along the contour, then in the middle, creating a fantasy pattern. Let the star dry and remove from the matches. The toy, thanks to PVA glue, will keep its shape.
See the video for making a star according to this scheme, it will be simpler, but the technology is similar.
Video: thread star
Products from beads and beads

To make stars on the Christmas tree, they also use beads and beads. They are incredibly beautiful and graceful. You will need wire, beads, beads, wire cutters and a lot of patience if you want to make something more difficult than in the photo above. One of the simplest bead stars looks like this. Beads are typed on the wire frame - without weaving.
Video: yellow bead star
The option of several rows looks more interesting, but not everyone can make such a star.
Video: how to make a snowflake
Small pendants made of glass beads can also serve as Christmas decorations. We offer one of the manufacturing schemes.

Do you want a simpler, but very decorative option? Make a frame of thick wire, and collect a lot of multi-colored beads on a long piece of thin wire for weaving. Then wrap the frame with beaded wire. Here's what you should get.

Crafts from newspaper tubes
An interesting direction of needlework is weaving from newspaper tubes. Preparations are very easy to make. It is necessary to cut the newspaper sheet lengthwise into strips about 7-8 cm wide, then twist them diagonally, using a knitting needle, a wooden skewer or something similar at the beginning. Decorative crafts, souvenirs, doll furniture, flower pots and, of course, stars on the Christmas tree are made from such tubes. It is quite difficult to present clear instructions in a photo, so we suggest that you familiarize yourself with the master class in video format.
Each child tries to decorate their room in their own way. Someone draws pictures, and some make paper crafts and hang them all over the room. Most often, children want to make stars. They can decorate not only the walls, but also depict the starry sky.
Asterisks can be made large, small, colored, voluminous, pentagonal and octagonal. Such crafts serve not only as decoration, they bring a lot of pleasure and happiness. And also the manufacturing process perfectly develops fine motor skills of hands and imagination.
Volumetric paper stars
There are many options for making volumetric stars. Let's consider some of them.
Octagonal asterisk. To make this craft you will need:
- Paper;
- Scissors;
- Pencil;
- Glue or double sided tape.
Scheme of a three-dimensional star made of paper:

Beginner Option
For her you will need:
- Cardboard;
- Simple pencil;
- Scissors;
- Glue.
A step-by-step diagram of how to make an asterisk out of paper with your own hands:

Craft in the style of origami
To make it, you only need colored paper and scissors..
Manufacturing steps:
- Cut the strips. Their width should be 1 centimeter, and the length 30 centimeters.
- Make a loop out of the flat and stick the tail into it. Get a knot in the form of a pentagon.
- Now this pentagon needs to be wrapped with the same strip. Wrap each side twice and hide the tip under a strip of paper.
- It remains to give the craft volume. To do this, take it in your hands and press on each face in the middle.
- The origami star is ready.
Unusual paper stars
Christmas star from a roll from paper towels. To make this craft you need:
- Roll of paper towel;
- Scissors;
- Tassel.
- Transparent color film from candies or flowers.
Manufacturing master class:

Christmas garland
To make such a garland, you need colored paper, a hole punch, a ruler, a thread, a sharp stick.
Manufacturing steps:

paper star ball
To make this craft, you need:

Step by step master class:
- Cut each sheet in half.
- Spread the edges of each part with glue and twist the tight tubes.
- Fasten three beams with a stapler in the form of a fan.
- The resulting fans must be strung on a thread. You should get a prickly star in the form of a ball.
These unusual and interesting stars can be made from paper. Choose any option and get creative. Good luck!
Attention, only TODAY!
In the modern world, things made by one's own hands, including various crafts, have begun to enjoy special value. One of these crafts is a star.
Using various materials and familiarizing yourself with master classes that explain how to make a star, you can create universal decorations for your home. They can be used for any holiday.

volumetric star
When thinking about what materials a star can be made of, most people opt for paper. This material is quite affordable and has a low cost.
Making a volumetric star with your own hands is especially popular, since it can be used not only as a decoration for the holidays, but also as one of the main attributes of the interior.


To create this kind of star, you will need the following materials:
- multi-colored cardboard;
- regular pencil;
- scissors;
- glue;
- ribbon of any color.

Having prepared all these elements, you can start creating a star:
Initially, two sheets of cardboard are taken, which are bent first vertically and then horizontally. Then the sheet is folded in half diagonally twice.

With the help of scissors, small incisions are made in the area of \u200b\u200bfolds placed perpendicularly. The incision should reach half the fold or be slightly smaller. In total, 4 incisions are made.

The edges of the sheet are bent, where the incisions were made (you can see in more detail in the photo of the crafts of the star).

Using glue, one of the sides of each ray of the star is smeared. The sides are glued.

The second half of the star is created, following the previously presented plan. The two halves of the star are glued together, the decoration is considered ready.


convex star
Such a craft is characterized by the presence of small sizes and can be used both as a decorative element in the interior, and as an addition to holiday cards.


The following materials are used to create crafts:
- multi-colored paper (if it is not available, you can use pages from an unnecessary glossy magazine);
- scissors (can be replaced with a clerical knife).

Strips are cut from paper. This moment needs to be given special attention, since the quality of the star directly depends on it. The strips must be even and reach a width of 9 millimeters and a length of 22.1 centimeters.

One strip is taken and a small loop is made from it.

The remaining tail of the strip is wrapped, and then a knot is tied. Actions must be extremely careful, as you can tear the paper. The knot is carefully tightened, pressed, and the existing tail is hidden inside. The result is a pentagon.


Each side of the pentagon is wrapped around with a long strip. It is necessary to carry out from twelve to fifteen wraps. This indicates that all faces must be wrapped at least twice. The unaffected tip is hidden inside the star.


The pentagon is held with one hand. At this point, with the finger of the other hand, you need to press a little on the middle of the face. These actions are repeated with each face, resulting in a small star.

Craft from book pages
This version of the star will be a great addition to decorations made for the New Year or Christmas.

To create this star, you will need the following elements:
- plastic volumetric star;
- unnecessary book;
- scissors;
- glue.

Having prepared the material, you need to perform quite simple steps:
- ¼ of the book page is cut off, and bags are created;
- the bags are glued to a plastic star (more details can be seen in the photo);
- a small amount of glue is applied to the edges of the bags, after which they are sprinkled with sparkles.

Decoration for the New Year
Such a star will be an excellent decoration for every Christmas tree, both natural and artificial.


For its manufacture, the following materials will be required:
- double-sided colored cardboard;
- scissors;
- adhesive.


After preparing the materials, you can start creating a star:
- Eight squares are created, 4 different sizes. The ideal option would be the following sizes: 70, 110, 130 and 180 millimeters.
- Each of the squares folds into a triangle with a tail (you can see it in the photo).
- Next, the squares are glued together in size. Initially largest and then descending.

Such a star has more than once been chosen as the best craft at competitions on the theme “Handmade Star”.

decorative star
Another version of a star that can take a place on the Christmas tree.

For its manufacture, the following materials will be required:
- ready-made star template;
- white cardboard;
- green and red felt;
- pencil;
- glue gun;
- cutter;
- brown thread.

Having prepared these materials, you need to follow this plan:
- A cardboard is taken and a star from the template is redrawn on it. Then it is cut out.
- Then another star is drawn inside the resulting star, but smaller.
- The inner star is cut out.
- A brown thread is attached to the remaining star with a glue gun, the entire workpiece is covered with it.
- Two small circles are cut out of red felt, and 2 sheets are cut out of green felt. Circles and leaves are glued to the top of the star.

Each of these crafts will be a wonderful home decoration.

Photos of stars


It is hard to imagine the New Year without a dressed up, bright evergreen beauty, who gathers the whole family near her, helps to create a festive atmosphere, fills the house with a fabulous exciting aroma. To decorate the Christmas tree, it is not necessary to run to the store for toys, you can make them yourself, using improvised materials that can be found in everyone's house. Today we will tell you how to make a star on the Christmas tree with your own hands in order to decorate the top of the tree.
A very beautiful decoration for the Christmas tree will turn out from completely ordinary materials that can always be found at hand. Such an asterisk top will look very original on an evergreen beauty, create a festive New Year's mood. And the process of its manufacture is quite simple and does not take too much time.
Materials required for manufacturing:
- cardboard from the box;
- wire;
- special tool pliers;
- comfortable scissors;
- scotch;
- dry glitter;
- bright tinsel;
- hair spray.
Let's get to work
It is necessary to cut out two identical five-pointed stars from cardboard. Bend them in such a way that they turn out to be voluminous. Glue together with adhesive tape, after putting pieces of fabric, crumpled paper, cotton wool inside to give more volume. In order to subsequently put the finished product on the top of the Christmas tree, a wire spiral must be placed inside the asterisk. To prepare such a spiral, you need to take the wire and wind it tightly on a stick. The excess piece of wire must be cut off. The product is best created when the Christmas tree is already installed, and you can more accurately compare the actual dimensions of the spiral and the star itself.
Lubricate the voluminous star with plenty of glue and carefully sprinkle with sparkles so that the cardboard is not visible under them. Let the product dry thoroughly. Later, use hairspray to coat the glitter on top so that they do not crumble. The edges of the star can be decorated with elegant tinsel. The asterisk-top is ready, it remains to put it on the Christmas tree.
Beautiful, easy-to-make star

Such a star for the New Year 2019 is very simple. therefore, small children can also be involved in the manufacture of these stars.
For this decoration you will need:
- thick double-sided colored paper or cardboard;
- scissors.
Make such a template in any scale, what size you want.

Copy the template onto colored paper in 2 different colors and cut out 2 blanks. Then bend each of the 2 blanks 3 times at each of the 3 corners, as if 3 ribs are formed.

You will get 2 halves like this:

Now we connect the 2 halves together:

If you stick a stick or pencil inside one of the halves, you get the top on the Christmas tree. From such stars you can make garlands for the Christmas tree, or decorate a room with them.

A five-pointed three-dimensional star made of paper will be a wonderful decoration for the Christmas tree. A large product can decorate the top of a tree, small ones will look beautiful on Christmas tree branches.
For such decoration you will need:
- paper;
- Printer;
- scissors;
- glue.
To make a three-dimensional five-pointed star, you can use any thick type of paper. It can be cardboard, old magazines, books, or other similar material. For large tops, you need to use dense materials, for small stars, you can limit yourself to plain paper. For a large five-pointed top, you need to take five sheets of cardboard. Choose your favorite decoration size. Using the printer, print 5 blanks for the rays of the future star. The resulting templates must be carefully cut. First, glue each blank separately. Then all 5 rays must be glued together. Such decoration can be made more festive. For example, decorate the rays with sparkles, sequins or beads. You can make each beam of decoration from different colors of paper. Then you get a beautiful, multi-colored top.
Volumetric eight-pointed top
Making an eight-pointed star on top of paper is easy enough. This decoration can decorate not only the Christmas tree. You can decorate a room, a window, a lampshade and a New Year's gift with similar products. The size of such a decoration for the New Year 2019 depends on the size of the paper.

We will need:
- thick paper;
- pencil;
- glue;
- scissors;
- decorative thread.
Let's get to work
You need to take two sheets of colored cardboard, or another type of thick paper, and give them a square shape. After that, each sheet must be bent in half. Once - horizontally, another time - vertically. After that, you need to bend twice in half diagonally. Next, with scissors, you need to make small cuts along perpendicular folds. Such cuts should be half a line long. In total they need to be done 4. One opposite the other. After this, the edges of the cuts need to be bent one to the other. You should get four triangles. The next step is to glue one side of each ray with glue, and glue the second to it. The result is one half of the future star. In the same way, you need to make a second blank. After that, they must be glued to each other. When the Christmas decoration is ready, you need to make a hole in one of the rays and thread a decorative thread into it. If you do not have colored cardboard, you can safely use plain multi-colored paper. It is very impressive if you decorate the product with shiny details, beads or other New Year's tinsel.
Star 3D
These tops are easy to make. They are made of thick paper and are a very original New Year's decoration.

We will need:
- colored cardboard,
- ruler,
- pencil,
- scissors.
![]()
Let's get to work
On thick paper, you need to draw two five-pointed stars. To do this, you can use cardboard as one color, and several. The next step needs special attention. We make cuts. On one of them it is necessary to cut from the top of the corner to the center, on the other workpiece - from the inner corner also to the middle. After that, the blanks must be inserted one into the other. Such a decoration can be decorated with sparkles, artificial snow or other New Year's tinsel.

Small paper stars will perfectly decorate a Christmas tree, a house or a holiday gift for the New Year 2019.
We will need:
- colored paper;
- scissors.
Let's get to work:
For such small stars, any kind of paper will do. It can be both ordinary colored sheets and pages of glossy magazines, packaging or any shiny paper. The main feature when working with it is to cut the strips correctly. Their length should be 221 millimeters, and their width should be 9. The paper must be cut into pieces of a similar size. After that, you need to take one such strip and fold it in the form of a loop. In this case, one tail should be much shorter than the other. A small tail must be wrapped in such a way that a knot is obtained. This is very neat work. It will require a lot of patience and delicacy. After that, the resulting knot must be very slowly tightened (so as not to tear the paper) and pressed. The result is a flat pentagon. The tail must be tucked into the middle. After that, the strip with the resulting pentagon must be turned over, and the tail must be tucked inside this figure. If the strip turned out to be very long, it can be folded in half and only then hidden in the middle. Next, the long end must be wrapped around each side of the existing pentagon. It is necessary that there be about 15 turns, but not less than 10. Each face must be wrapped at least twice. The end of the ribbon is hidden inside. Everything is ready 🙂 .
Master class with video instruction:
It remains only to gently press on the middle of each face. Get a voluminous New Year's craft. It can be decorated with shiny New Year's tinsel.
origami star
A beautiful star - paper origami will perfectly decorate not only a festive Christmas tree, but also a room for the New Year 2019.
 step 1
 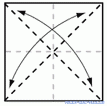 step 2
  step 3
 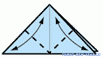 step 4
  step 5
 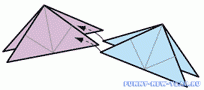 step 6
step 7 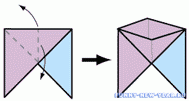 step 8
 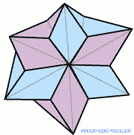 step 9
For such crafts you will need:
- sheets of plain paper.
The main thing is that the material is not too dense and bends perfectly. And you can use both children's colored paper and regular newspaper.
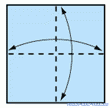
Let's get to work
First you need to make a square with even sides. After that, such a sheet must be bent twice. Once vertically, once horizontally. On a paper sheet, you will get 4 marked squares. The corner of each of them must be bent to the center. Two corners that are located opposite each other need to be opened. After that, the paper must be bent along the horizontal fold. This turned out to be one of the blanks for the future top. Similar figures need to be made 5. The blanks must be inserted into each other. Those corners that you unbent will hold the finished structure. When folding the Christmas decorations, pay special attention to ensuring that the corner of one block is inside the second, and the corner of the second is inside the first. When you attach the last part, you need to glue a loop to one of the corners.
For interior decoration or themed holidays, such a decorative element as a star is often used. There are a lot of variations on the theme of making a star: large and small, voluminous and flat, double or single. Materials for making crafts also vary significantly. It can be paper, cloth, foil, wire and other improvised means. In this article, we will consider the most popular formats for making paper stars. Well, a selection of thematic photos, detailed diagrams and video material of a master class on making a star with your own hands will make the task easier.
How to make a small paper star
Such stars are small (1.5 cm), but in large numbers they look very impressive and original.
To work, you will need colored or glossy paper (you can also use old glossy magazines) and scissors.
- First, blanks are made: paper strips are cut, 29x1.1 cm in size. The width and length of the strips can be changed according to the desired size of the future star.
- Make a small loop from the strip (at the edge), then bend the protruding short end. It turns out a pentagonal figure, press it slightly.
- Turn the product over (pentagon) and continue working with the long end of the strip.
- With a strip, we begin to tightly, gradually wrap the pentagonal figure, without pinching it too much. At least 10 such wraps are obtained, that is, each face of the star is wrapped twice.
- Hide the remaining edge of the strip under the bottom.
- The next stage: the transformation of the pentagon into a full-fledged star. Holding the workpiece with one hand, with the nail of the other hand, press on the middle of the face of the pentagon, forming the rays of an asterisk. Five pressures - and the star is ready!


- Such stars look very stylish in the interior: they can fill a glass vase or a jar. And if you do this business with the children, the motor skills of the fingers are perfectly trained.

How to make a paper star
To make such three-dimensional stars, you will need thick decorative paper, scissors and glue.
- Draw blanks for the rays of the star, print and transfer to the desired paper.
- Bend along the lines and glue along the edge (gluing allowances are given).
- Then, glue the five prepared templates together, getting a three-dimensional star.


- The size of the stars can be adjusted independently by increasing or decreasing the size of the template.


How to make an origami paper star
Such stars look great and stylish from newsprint or music paper.
- Fold a square-shaped sheet in half, then bend the triangle of one of the vertices.
- Do the same maneuver with the other vertex of the rectangle.
- Attach the opposite corner of the rectangle to the intersection point of the previous folds.


- Next, bend the rays of the future star along the drawn lines. The remaining shapeless tail of the workpiece is cut off.
- With the correct execution of all the folds, on the spread you can see the pentagon pattern.

- The final stage is the most difficult. To get a star, you need to carefully bend and wrap the resulting template along the lines.


So, in this article, the most popular ways of making a paper star were considered. Completely different in appearance and manufacturing method, the presented options will ideally fit into the festive interior and become a spectacular decoration.