Unusual New Year's gifts that you can make with your own hands. From cotton pads. A wreath of balls and an old hanger
Useful Tips
To decorate on New Year tree, table or house, it is not necessary to purchase various toys and decorations - many different original New Year's crafts can be made with your own hands.
You just have to purchase a few simple things (paper, cardboard, skewers, ribbons) and tools. You may already have a lot of this at home.
Read also:How to make a beautiful SNOWFLAKE
Here you will find interesting ideas and instructions for creating beautiful crafts for the New Year:
Easy crafts for the New Year: lollipops

Despite the fact that the instruction is large, it is very simple to do such a craft.
You will need:
Felt of different colors
Hot glue, super glue or PVA glue
Ribbon or thread (to hang the decoration)
Toothpicks, skewers, or other parts that will act as lollipop sticks.
1. Cut one strip from each felt. You can choose its size yourself, but in this example, the length of the strips varies from 17.5 to 30 cm, and the width is 1 cm.

* You will need 6 strips for one lollipop. In this example, 2 stripes are used for each of the 3 selected colors.
2. Place all 6 strips on top of one another. Remember that when you roll the strip into a tube, some will start to bulge and you will need to trim them. The strip that will be the shortest inside the tube and the longest on the outside.

* You can trim the strips with scissors as you twist, or you can cut the necessary strips in advance (the approximate length of each strip: 17.5, 20, 22.5, 25, 27.5, 30 cm).
3. Start curling the strips, adding a little glue between them. Finally, make sure the outer strip is longer than the others. Glue the ends of the strips together.


4. Hot glue the stick to the resulting candy. You can paint a toothpick or skewer with white acrylic paint if you like.

5. Glue or sew the tape to the back of the candy so you can hang it on the tree.

Crafts on the theme of New Year: a tree made of wine corks
You don't have to buy wine to get the right amount of wine corks, you just need to order corks online or in a store.

You will need:
Wine corks (26 corks were used in this example)
* Instead of plugs, you can use cardboard or wooden spools of thread.
* If you replace the corks with toilet paper sleeves, then by painting them, you will also get the necessary material for the Christmas tree. In this case, the Christmas tree will turn out to be larger than the Christmas tree made of corks.
PVA glue
Hot glue or super glue
Paints or glitters (to paint the plugs or bushings)
Twine and toilet paper cardboard sleeve (for the hemp on which the tree will stick).

1. Paint the corks with acrylic paint or, best of all, apply PVA glue, on top of which sprinkle glitter.

2. Having painted the plugs (coils), glue them together with a pyramid (see image) using hot glue or superglue.

* It is advisable to glue first one row of plugs, then another, and so on, until you have the required number of rows. After that, just glue all the rows.
3. Cut a part of the cardboard sleeve from the toilet paper, start wrapping it with twine, adding PVA glue, so that the string holds better. You have a stump.

4.Use hot glue to glue the stump to the tree.
On the top of the head, you can glue a button, ribbon, toy or paper star or a small suitable object in an arc.

Crafts for the New Year (step-by-step photo instructions): snowflakes from clothespins

You will need:
Plain wooden clothespins
Small decorative clothespins (optional)
Medium clothespins (optional)
White acrylic paint
Sponge brush
Sequins, fake snow or salt
PVA glue
Thin wire.
* In this example, 6 clothespins of each size are used to make one snowflake. Therefore, buy the right amount and better with a margin.
1. First, get rid of the spring mechanisms on the clothespins.

2. Paint all the clothespins.

3.Use hot glue or super glue to glue the large clothespins together to form a snowflake (see image).

4. On top of large clothespins, glue the middle ones, and on top of the middle ones, glue the small ones.

5. Cover the resulting decoration with PVA glue and sprinkle with glitter, artificial snow or salt on top. You can also use decorative snow (spray).

6. Thread a piece of wire or ribbon through the hole in the clothespins to make a loop to help hang the clothespin.
Crafts for the New Year on the Christmas tree: patterns from puzzle pieces

You will need:
Small details from old puzzles
Acrylic paint (in this example red, green and white)
Brushes
PVA glue or hot glue
Twine or thin ribbon
Small bell (optional)
Various decorations (optional).
You can create several variations of wreaths and other Christmas tree decorations from puzzle pieces, and here are some of them:
Puzzle candy
1. First, paint a few parts that you are going to use for the craft. In this example, 6 parts were painted red and 6 parts white.

2. When the paint is dry, use PVA glue to join the parts together.
3. It remains to add a ribbon. If you have a hole between two pieces of puzzles, slip the tape through it, and if there is none, just glue, attach with a stapler or make a hole with scissors.
Puzzle wreath

1. First, glue all the details together to make a circle (wreath).

2. Paint the parts in the desired color.
* If desired, after the paint has dried, you can paint some details in a different color.

3. You can attach a bell to the wreath. Pass the ribbon through the bell and then through the wreath and you can decorate your Christmas tree.
The best crafts for the New Year: Christmas candles

You will need:
Cardboard rolls for paper towels and toilet paper
* In this example, we used: 3 bushings of 30 cm, 2 bushings of 20 cm, 3 bushings of 15 cm, 2 bushings of 10 cm, 1 bushing of 5 cm. But you can use other sizes by cutting some of the bushings.
Electrical tape or tape
Hot glue
Spray paint or acrylic paint
Electric candles on batteries
Sequins
PVA glue.
1. Glue the sleeves together to form one large candlestick.
2. Using electrical tape, duct tape or tape (preferably double-sided), attach the electric candles to the grommets.

3. Use hot glue on the sleeve to simulate candle wax. Squeeze out the glue to create large and small beads of wax that run out.

You can make several layers of "wax" - first apply one, wait until it dries, and then apply the second on top.
* You will need a lot of glue.

* Hot glue can create unwanted "strands". They can be cut with scissors or melted with a hair dryer.
4. Prepare the acrylic paint and start painting the entire cardboard sleeve candlestick. Choose the color yourself.
5. When the paint is dry, cover the candlestick with PVA glue and sprinkle glitter over it.

6. On the lower part of the candlestick (the lower parts of the sleeves), apply PVA glue and glue it to a paper plate to keep the structure better.
7.Use hot glue to glue tinsel or garland to the candlestick and plate. You can add other decorations, such as a toy bird, artificial berries and flowers, ribbons, stars and beads.

Crafts for the New Year with children: New Year's lights from cardboard sleeves

You will need:
Toilet paper rolls (their number depends on the number of lights)
Twine
Colored paper or colored cardboard
Hot glue or PVA glue
Scissors.
1. First, all the bushings must be pressed down.
2. Cut each sleeve into pieces (rings) 5-7 mm wide.

3. Glue the rings to the colored cardboard.
4. Cut off the glued rings.

5. Now all received flashlights need to be connected with twine.
To do this, the twine can be glued directly to the lanterns (on the back of the colored cardboard).

* Or you can cut small rectangles out of cardboard or paper, bend them in half and glue them to the lanterns. Next, glue the strings to these rectangles, bend them and glue the ends.


Lanterns can be hung on a Christmas tree, used to decorate a house or other objects.

DIY creative crafts for the New Year: burlap herringbone

You will need:
Burlap jute white (decorative, for needlework)
* You can use a different fabric such as linen.
Scissors
Double-sided tape
Cone (you can buy a foam one or do it yourself out of paper)
To find out how to make a cone, check out our article:Paper cone .
1. Cut the fabric into wide strips - about 5 cm.

2. Using double-sided tape, start glueing the strips around the cone, from bottom to top (see image). Each subsequent strip should slightly overlap the bottom strip.

* Use scissors to shorten the length of the strips if necessary.
* Tweak the fabric to fit the way you like it.

3. The Christmas tree can be placed on a small pot, which can be filled with artificial snow, pebbles or sand.
* You can decorate the Christmas tree by gluing to it (using PVA glue or hot glue) various decorations - pom-poms, stars, buttons, etc.


You will need:
Small spruce branches (preferably artificial)
Artificial berries
Small tray.
1. Place the tray on a flat surface first. Add spruce twigs on the sides.


2. Now add the buds. They can be placed on top of the twigs.

3. Continue adding buds to the tray, distributing them as you like.

4. Add a few more spruce twigs between the cones.

5. Now you can add some sprigs with artificial berries.

* If desired, some parts can be bonded with hot glue.
* You can also sprinkle this Christmas decoration with artificial snow, salt or sparkles, and so that this "snow" holds well, you can slightly anoint the cones on top with PVA glue.


Homemade crafts for the New Year: an elegant spruce wreath

You will need:
Wreath (you can buy ready-made or do it yourself)
To find out how you can make a wreath with your own hands, visit our articles with detailed instructions: DIY New Year wreath and DIY Christmas wreath
Decorative snow (spray and in the usual form)
* As an alternative to decorative snow, salt and PVA glue can be used. Place the wreath on the table and glue the top, then sprinkle generously with salt.
Candles (you can use decorative candles on batteries) of different sizes
Decorative branches (preferably white)
Round tray (can be a board).
1. Lay the wreath on a flat surface and spray the top branches with decorative snow. Then wait for the "snow" to dry and harden.

2. Place the snow wreath on a round tray, board, or even cardboard.
3. Place candles in the center of the composition. To make the candles look beautiful, try to put an odd number - 3 or 5, for example.


4. Now add white decorative twigs.

5. Add decorative snow or a few piles of salt to the base of the candles.

Cool crafts for the New Year: table decorations

You will need:
Christmas balls
Superglue or hot glue
Decorative twigs and berries.

1. Remove the fasteners from the ball.
2. Apply glue to the twigs in the places that will touch the neck of the New Year's ball.

* You can fill the balloon with water so that you can insert a real flower or a couple of real spruce twigs for smell.
DIY New Year craft ideas: a simple ribbon star

You will need:
Small board (plywood)
Small nails or screws
Chalk, marker or pencil
Bright ribbon
Scissors.
1. Draw a regular 5-pointed star on the board.

2. Drive nails or screws to the ends of the star you have drawn.

3. Starting at the top, start wrapping tape around the nails (screws) along the lines of the star you have drawn. You can tie a bow on top. Use scissors to cut off the excess tape.

Crafts for kindergarten for the New Year: ice cream for the Christmas tree

You will need:
Corrugated paper or thin wrapping paper
Brown colored paper or cardboard or paper bag
Scissors
PVA glue
Thread and needle (if necessary)
String or ribbon (to hang the toy on the tree).
1. Make small cones out of paper or cardboard. To do this, cut out a circle (in this example, the diameter of the circle is 12 cm). Cut the circle in half and fold each of the resulting semicircles into a cone, glue the ends.

For more detailed instructions on how to create a cone, see our article: Paper Cone.
2. Crumple up a few pieces of corrugated paper or thin colored paper so that you get small balls - these will be balls of paper ice cream.

3. If you want to hang your decoration, thread a needle through the center of the paper ball. Fix the ends of the thread in place with glue and cut off the excess.

* If you want to use tape, just glue it to the cone and you can hang it on the tree.
4. Apply glue to the bottom of the paper ball and stick it to the cone. You can also apply glue to the edge of the cone.

The ice cream is ready and you can use it to decorate the Christmas tree.
How to make a craft for the New Year (video): a snowman from a sock
Today, handmade gifts are popular. The souvenirs look luxurious, they are of high quality, the crafts are unique, and their creation is incredibly fun. You can create gifts using different materials. The main thing is imagination, a little patience and sincerity with which souvenirs will be created.
It is especially pleasant to receive and make crafts for the New Year. This holiday is loved by adults and children. We offer you to familiarize yourself with the gifts that you can make with your own hands. For each craft, the required list of materials is indicated. It is very easy to create an exclusive and original gift. Crafts can be used as decorations for the Christmas tree, apartment, present souvenirs to friends and relatives.
Christmas paper crafts
It is not difficult to make a craft out of paper. Lanterns, garlands and snowflakes, as well as other products are created from it. Paper is a simple and affordable material, therefore it is widely used to create New Year's crafts. When asked "What to make of paper for the New Year", the first thing that comes to mind is a snowflake that will decorate a Christmas tree, a window, and become a nice souvenir. Well, let's do it. But we will not make a simple snowflake, but a voluminous one! You will need materials for this: paper, scissors, a stapler or glue.
Look for more paper crafts in the article:
Christmas crafts from cones
The best material for creating New Year's crafts is cones. There is practically nothing to do with the buds. They are already an excellent decorative material in themselves. Pine cones can be used to decorate a Christmas tree or folded into a vase and placed on the table to create a festive atmosphere. We propose to make a garland of cones. For this we need: cones, glue, sparkles, tape.

We have other cones crafts for the New Year:
New Year's dough crafts
With cones, everything is clear! But what to do for those who do not have the opportunity to look for bumps. We'll have to improvise. Don't worry, we know you still have a ton of craft supplies at home that you might not even know existed. For example, many gifts for the New Year can be made from salted dough. To prepare it, you will need only three ingredients: flour - 1 glass; salt - 0.5 cups; water - 0.5 cups. You can also add sunflower oil (2 tablespoons) and color (a few drops). We suggest making a "knitted" heart from the dough.

You can find more dough crafts in a separate article:
New Year felt crafts
In search of improvised materials for New Year's crafts, you may well stumble upon felt shreds. In fact, felt is a kind of felt, so if there is no felt, you can use a similar material. We propose to make a penguin out of felt. We will need: felt, threads, a needle, cotton wool or synthetic winterizer, buttons.
Christmas crafts are created with pleasure using felt. The souvenirs are colorful, touching and delightful.
See also other ideas for felt crafts:
Christmas crafts from disks
Surely everyone has unnecessary discs, they can be used to create original New Year's crafts. The easiest craft option is a snowman. For this we need materials: CD, felt, scissors, glue, felt-tip pens, buttons or beads, ribbons.

A child can make such a snowman, he will be carried away by this activity. The craft can be hung on a Christmas tree or presented as a gift.
For more ideas for New Year's crafts from old disks, see the article:
New Year's crafts from bottles
Ordinary plastic bottles can be used as an improvised material for crafts for the New Year. We offer to make an original craft - feathers that will look great on a Christmas tree, window or as a keychain. We will need: a plastic bottle, scissors, felt-tip pens or markers. Plastic feathers will be a wonderful New Year's decoration.

Christmas crafts from tubes
For creativity with children, cocktail tubes are suitable as material for New Year's crafts. Surely, on the eve of the New Year holidays, you have already bought several sets. Fine! Then let's get started!

Christmas crafts from cotton pads
So, what else can you find at home as material for New Year's crafts? Of course, cotton pads. By the way, if there are no disks, ordinary cotton wool will do. It makes an excellent imitation of snow. There are a lot of options for crafts from cotton pads or cotton wool, but we suggest making a New Year's ball. You will need: cotton pads (many), a stapler, a needle, thread and a small tape. The process of creating a New Year's ball will take no more than 15 minutes, but such a Christmas tree toy looks like a truly winter one!

New Year's crafts made of cardboard
You can use cardboard as an improvised material for New Year's crafts. Not sure where to find cardboard? But what about old postcards, which are probably gathering dust idle. Of course, you should not use commemorative cards, for example, from dear and close people. But postcards that mean nothing can be used for a good cause. As a trial craft, we suggest trying out a pine cone!

New Year's crafts from threads
What else can be used as an improvised material for crafts for the New Year? Threads. It can be thin threads or thick yarns, depending on what you want to make. We propose to build a New Year's star. We need: threads, PVA glue, matches or safety pins, a disposable container.

New Year's crafts from fabric
A very cool New Year's craft can be made from fabric. If you are familiar with a needle and thread, then you should start with something simple, for example, sew a pretty Christmas tree using the following materials: fabric (you can take coarse calico, cotton, chintz, silk, linen, satin); strong threads; needle; safety pins; scissors; filler (synthetic winterizer, holofiber, cotton wool); wooden stick; decorative elements (optional).


You can decorate the Christmas tree made of fabric with different objects, snowflakes. Crafts, ribbons.
In addition to the Christmas tree, other New Year's toys can be made from fabric:
Christmas candy crafts
On New Year's holidays, every house is full of all kinds of sweets, mostly sweets. Well, do not waste the good, we will make an excellent New Year's craft, which will be an excellent gift for friends and acquaintances. We suggest starting with a Christmas tree. For this we need: thick paper, candy, double-sided tape, ribbons and tinsel.

By the way, if you need to attach other sweets, we have some ideas for that:
Christmas crafts from cups
Plastic cups will also be used. If there are a lot of plastic containers, you can make a big snowman. By the way, if there is no snow on the street, and the baby is terrified how he wants to blind a snow woman, plastic cups will come to the rescue. By the way, you can also attract neighbors. In any case, tinkering with a large company is more fun! We will need: plastic cups, a stapler, glue, decorative items.

Christmas crafts from disposable tableware
You can create real New Year's masterpieces from disposable plastic dishes. Plates, spoons, forks, knives are suitable as materials. There may be a lot of ideas, but we suggest making a Christmas wreath from plastic spoons. To do this, you will need: 201 spoons, glue, blank for a wreath ∅45 cm, red paint (preferably spray), white ribbon. Break off the handle of each spoon. Then, in four circular layers, glue the round portions of the spoon to the wreath blank. It is better if the workpiece is made of MDF, but if not, then thick cardboard will do. After that, paint the wreath and let dry completely. Now it remains to thread the tape and you can hang it!

Christmas crafts from sticks
Have a children's New Year's party with a lot of ice cream eaten? Fine! We are urgently collecting sticks and preparing to create a New Year's craft. Let's make a snowflake. For this it will come in handy: sticks, paints, glue, buttons. The craft can decorate the refrigerator or become a Christmas tree toy, and it can also be presented as a gift.

By the way, snowflakes can be made from other materials:
Christmas crafts from cotton swabs
When all the obvious options have been considered, it's time to use the magic cotton swabs! We will make a magical winter applique of them! For this we use: cotton swabs, glue, cardboard, paper!

Christmas pasta crafts
So, what else from what is at home can be used for New Year's crafts. Pasta is a great option. Yes, ordinary pasta for cooking. True, you do not need to cook them for this. By the way, macaroons of any shape are suitable: horns, spirals, shells, bows. We suggest using pasta to create New Year's cards. For this we need: pasta, paints, glue, glitter.

For more ideas for New Year's pasta crafts, see the article:
New Year's crafts from buttons
For crafts for the New Year, absolutely any materials that you can find at home are suitable. Surely everyone has such a box in which spare buttons from clothes are kept. The shirt has long been thrown away, but the buttons are still in stock. Fine! You can usefully get rid of this good by making cute New Year's cards. In addition to buttons for crafts, you will need thick paper, glue and various decorative elements. You can decorate the card with buttons in the form of a snowman, New Year's garland, wreath.

Need more postcards? We have!
Christmas crafts from toilet paper rolls
Move on. In search of improvised materials, it is worth going around the whole apartment, literally. Especially don't go around the place where everyone loves to think! Yes, you can also find materials for New Year's crafts in the toilet. Don't be alarmed. These are just toilet paper rolls. Let's make owls! To do this, we need: toilet paper rolls, paint, paintbrush, colored paper, scissors, glue.

Don't rush to throw away the bushings! We've got over 100 more DIY ideas!
New Year's crafts from napkins
I think there are napkins in every home. Moreover, before the New Year for the festive feast, they are bought without fail. You can make incredibly cool crafts from ordinary napkins. We propose to stop the choice on the tree. For this we need: thick paper, napkins, a stapler, glue or double-sided tape, beads, rhinestones.

Another cute Christmas tree made from napkins will be a wonderful decoration for the holiday.
Christmas crafts from boxes
What else can be used as an improvised material for New Year's crafts? Boxes, friends, boxes! And absolutely any: from under shoes, milk, oatmeal, cereals, etc. The first thing that comes to mind when looking at a cardboard box is a house. You can decorate a window sill with cardboard houses or hang them on a Christmas tree. And if you put an electric candle inside the house, you get a magic flashlight!

By the way, we have other ideas for houses:
New Year's crafts from satin ribbons
If you have satin ribbons lying around, get them out urgently! You have no idea what valuable material you have in your hands. Real professionals of kanzashi (this is the name of the technique for making handicrafts from ribbons) work wonders. Well, beginners should try something easier, for example, make a Christmas tree. For crafts we need: thick paper, satin ribbons, scissors, glue, beads.

Are there any more tapes left? Try other crafts too!
Christmas crafts from old light bulbs
Well, do you think all ideas are over? Nope! We are urgently looking for old light bulbs. Of course, incandescent and energy-saving lamps will do. But we propose to use the good old Ilyich light bulb. Let's make a "winter in the bank"! You will need: an old light bulb, sparkles, mini herringbone, glue, ribbon.

Looking for more Christmas decoration ideas from old light bulbs? We have!
New Year's crafts from corks
Well, for those who like to drink a glass of another wine after a hard day, a craft made from wine corks will be an excellent option. If there are not enough traffic jams, you can make a small craft, for example, a deer or a gnome. But if more than one dozen of traffic jams have accumulated in a year, you can make an excellent New Year's wreath.

By the way, if you need more ideas for wreaths, we have one!
Help us become better: if you notice an error, highlight the fragment and click Ctrl + Enter.
Today in stores there is a huge selection of a variety of fashionable and stylish jewelry for every taste and wallet. Some even change the New Year's style of the tree and the apartment in general every year.
However, despite all the variety and miracles of design, nothing can replace handmade toys and jewelry. They not only add variety to the "cold" decor from the store. The process itself will surely give a lot of positive emotions and vivid impressions, and a fabulous atmosphere will reign in your home long before New Year's Eve. It will be especially pleasant for children to look at the fruits of their labor. Adults will surely appreciate your attempts to create a cozy festive atmosphere.
In order to do this, not much is needed - desire and imagination. As materials, you can use improvised means that are in any home: colored and wrapping paper, ribbons, beads, cones, buttons and even old newspapers. And even if ideas do not visit you at all, you can "call for help" the Internet.
New Year's crafts from discs: we make decorations for the New Year from old CDs
Surely in every home there are old unnecessary discs that are a pity to throw away. They can be used on the eve of the New Year holidays, to create stylish and unusual toys that will look great on the tree.
Not much is needed for this - an old disc, cut into pieces, and the most common toy, you can take an old and already boring one. Having carefully coated it with glue, attach the "fragments" of the disc to the surface in random order. That, in general, is all. A stylish decoration that will perfectly "play" with light is ready.
However, you can make not only a Christmas ball from old CDs, but also much more.
New Year felt crafts: we make felt decorations with our own hands for the New Year
Decorations and toys made of felt material look very impressive and unusual. You can buy such fabric in any store for purely symbolic money, especially since more than a dozen interesting figures can be made from a couple of meters. The multi-colored material will give you a lot of possibilities, and the flight of imagination will be almost unlimited.

After a variety of figures are sewn, they can be hung around the apartment "one by one", you can decorate the Christmas tree instead of toys, or you can put them together in a festive garland. In any case, it will look great.
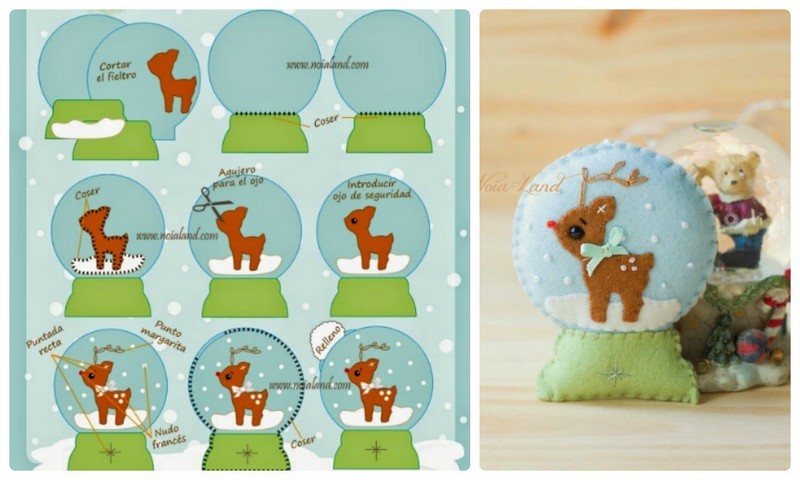
By the way, a small and neat Christmas tree, a star or an angel can become not only an ornament, but also an excellent “warm” souvenir for friends and family. They will surely appreciate your efforts and care.
See more:
Christmas crafts made of cardboard or postcards
In order to decorate the Christmas tree with unusual toys, you do not need to run around the shops looking for something that others do not have. It is enough to find thick cardboard at home (colorful magazine covers, old postcards or, as a last resort, ordinary colored sheets from the set - the main thing is that they are double-sided), glue and scissors.
The first thing to do is to cut 8 circles of the same size (about the size of the neck of a regular glass, you can have a little more or less), and 2 more a little smaller. After that, the large circles fold in half twice (to end up with a quarter). The blanks are ready. Four of them need to be glued to one small circle, four more to the other.

After that, the pockets are gently melted, and the two halves of the toy are glued together. It remains to attach a beautiful ribbon and you can hang the original cardboard ball on the Christmas tree. And if you cover it with varnish or glitter, hardly anyone will guess where such a stylish toy came from.

Cardboard balls are especially fun to make with kids. The technique is not too complicated, so they will gladly take part in making Christmas tree decorations, and then all the holidays will be proud of their masterpieces that adorn the fluffy beauty.
See more ideas:
Christmas balls made of threads
Balls made of thread are one of the most fashionable hand-made techniques today. Moreover, it is used not only to create New Year's, but also everyday decor. In any case, such compositions and toys will not only enliven your festive interior, but also make it unique.

To create a masterpiece, you will need threads (you can use the leftover yarn, or you can buy multi-colored skeins in the store), PVA glue and balloons. The mechanism is simple. The ball is inflated to the desired size, after which it is wrapped in threads soaked in glue in advance. This should be done quite tightly, leaving only small gaps.

After the first stage is completed, the toy must be properly dried. As a rule, a day is enough for this. If during this time the thread ball has become hard, you can proceed to the final - piercing and removing the remains of the balloon.

To decorate a thread ball, you can use any elements - beads, braid, rain, tinsel ... In general, a full flight of imagination. The same goes for “collecting” the finished composition. Thread balls suspended at different heights from the ceiling look very impressive.
See more Christmas ball ideas:
Festive wreaths
A Christmas wreath is a fashionable decoration that can be purchased at almost any store. However, it is much more pleasant to make a composition with your own hands, putting the warmth of your soul into it. The material can be anything. For example, bumps.
Making a wreath of cones begins with a base, which can be a wire, willow rods or something else that easily "forms" into a circle. Cones are attached to the base using liquid nails. They need to be placed as close to each other as possible so that the wreath looks "lush".

After the main part of the work is done, you can start decorating. For example, cover the cones with colored varnish and "dilute" them with small toys, rain or tinsel. That, in general, is all. It remains to find a suitable place to place the New Year's masterpiece. He must not go unnoticed.
See more:
Japanese crafts kanzashi
The novelty of the season in the field of decoration is jewelry made in the Japanese kanzashi technique. They can be of any shape - herringbone, flower, snowflakes ... individually or in a group. By the way, this is a great option not only for Christmas tree decorations, but also for a gift, as well as elements of a festive costume.

In their homeland, Japan, they symbolize closeness to nature. In our country, they are more like a nice souvenir than something meaningful ideologically. In order to do something in the kanzashi style, you need not so much - silk ribbons and desire!
Festive headband with snowflakes in Japanese technique
Thanks to the Japanese, anyone can bring joy to little and big princesses by making a wonderful headband that resembles a snowflake. It will not only complement the appropriate costume, but will certainly become that very missing highlight for any New Year's hairstyle.
So, in order to make such a wonderful accessory you will need:
- blanks made of silver, blue and white ribbons (silver ones should be cut into squares measuring 2 * 2 centimeters, white - 5 * 5 centimeters, blue - 2.5 * 2.5 centimeters, in total there should be at least 42 squares of each color);
- glue gun;
- white rim (if there is a rim of a different color, then it can be easily turned into white by braiding with a ribbon);
- scissors;
- preparation of a snowflake measuring 3 * 3 centimeters.
So, after all the materials and blanks are ready, you can start working.
The first thing to do is 6 round petals made of white squares. They should be the largest, as they will form the "middle" of the future flower. Then - 12 triangular petals are also white, but they will turn out to be slightly smaller in size. Next, from 12 triangular blanks (white and blue), fold six petals consisting of two colors. And finally, the final touch of the preparatory stage - 42 small, silvery petals. The edges of each workpiece must be scorched with a lighter so that they do not disintegrate in the future. Otherwise, it can be an unpleasant surprise for the person to whom the bezel is intended.

After you have finished with the petals, you can wrap the snowflake with a white ribbon, attach it to the rim and, finally, collect the first petals in the “heart of the flower”. Its base will consist of 6 large white petals that need to be glued together. In no case should they disintegrate! After that, you can attach a blue-white composition of three more to each petal (two white petals at the edges and a two-color one in the center). And finally, each piece should be complemented by a silvery small petal that is inserted directly into the center of the glossy ones. As a result, you should get a kind of "fluffy" flower.
The finished composition can be decorated with sparkles, beads or anything else - at your discretion. The only thing that is not recommended is to varnish it, this can ruin the appearance.

Using this technique and from the same ribbons, you can make not only a rim, but also beautiful snowflakes. They will become an excellent alternative to traditional Christmas tree decorations and even a souvenir for family and friends who will surely appreciate your originality and warmth invested in such a gift.
We have more master classes for crafts using the kanzashi technique:
Help us become better: if you notice an error, highlight the fragment and click Ctrl + Enter.
With the onset of winter cold weather, the need to contemplate something beautiful is felt much more sharply, especially what is built with your own hands. You have not noticed that all possible exhibitions of handicrafts are immediately started in kindergartens and schools. For which the guys, together with their parents, do sometimes just not probable things.
And if you also decorate the decoration of a house, apartment, yard or office. Because, in my opinion, the use of New Year's attributes in the interior greatly enhances the expectation of the holiday itself and some kind of magical miracle. And who if not we ourselves will create this magical mood for ourselves.
So read the article just below, take your favorite examples for a note and be sure to involve your children, this will significantly raise your New Year's mood. And it will make the atmosphere of the holiday incredibly wonderful, with elements of magic and anticipation of a miracle.
When I first saw these cute toys, I could not believe that they were made of sock. And of course, we combed our hands to make them together with the children, it turns out it's very simple. To celebrate, we put on a lot of snowmen and decorated almost the whole house with them.
What is required to prepare them:
- Two socks (white and colored) - 4 pieces;
- Buttons - 10 pieces;
- Black marker - 1 piece;
- Rubber bands - 10 pieces;
- Glue gun - 1 piece;
- Filler (any cereal) - 300 grams.
What do we do:
We cut each toe into three pieces, thus getting rid of the heel. Tie the edge where the elastic was with an elastic.
We fill every detail with any prepared cereal.
After that, we divide them into two or three balls. As you like best.
Now we make clothes from a colored sock. Cut off half and put it on the craft. Sew buttons on the top, use different ones, it will look more interesting. Use the glue gun to decorate the craft to your liking.
It remains to sew on the eyes and the nose and the snowman is ready.
I construct my hands from toothpicks, having previously divided them in half.
This is how beautiful it was with minimal effort.
Christmas tree made of pasta
An original product from available tools. The main thing is to get used to sticking each pasta with a glue gun and you will definitely succeed.
What you need:
- Pasta - 1 kilogram;
- Plastic cup - 1 piece;
- Glue gun - 1 piece;
- Paint - 1 can;
- Beads are optional.
Let's start cooking:
If you do not have a glue gun, then you can simply spread the plastic blank with plasticine and glue pasta on top of it. But such a design, unfortunately, will not please you for a long time.
You should start gluing the blanks from the very bottom edge in a circle. Then comes the second layer and, applying drops of glue, gradually move over the top of the structure.
Then we make a leg, for this, fasten the two bases of plastic glasses together, and attach it to the pasta tree.
You can paint each pasta separately with a brush, but I love using spray paint. Fast and convenient.
Then, after drying the paint, we decorate our beauty to our taste.
Souvenir snow fairy tale
It's just magic, and nothing more. It is so unlikely that a souvenir turns out to be beautiful that one cannot believe in the simplicity of its manufacture. But believe me, preparing it yourself is as easy as shelling pears, which I will show you. My children and I prepared them for school for exhibitions more than once, and there were never indifferent people, only admiration.
What is required for cooking:
- Jar with lid - 1 piece;
- Rubber glove - 1 piece;
- Scissors - 1 piece;
- Water - as needed;
- Glycerin - 150 grams;
- The decor is at your discretion.
We start manufacturing:
First, decide what will be in your craft besides the main composition. Since the more interesting the details are selected, the more colorful the craft will be.
We wash the required container together with the lid and dry it.
Glue the prepared decor onto the lid.
Be sure to make sure it doesn't dissolve in water.
We cut plastic snow into a jar. I made it from candy plastic.
Pour glycerin into the container and then water. For a tighter closure, I cut off part of the medical glove and put it on the jar.
You can add a little glitter if you wish.
Coat the lid with glue and screw tight. We decorate it with a beautiful ribbon and "veils" - the craft is ready !!!
Do-it-yourself star on the Christmas tree
A classic in making a star on top of a tree is, of course, red. But today it is very fashionable to dress up a green beauty in jewelry of the same color, so you can easily build yourself a star of absolutely any color.
What is required to prepare it:
- Paper of the desired color - 2 sheets;
- Glue - pencil - 1 piece;
- Stencil - 1 piece;
- Scissors - 1 piece.
Let's get started:
I present to your attention the wonderful stencils that have helped me more than once to decorate not only the beautiful Christmas tree, but also the decoration of the rooms and the decoration of various holidays.
This is one side of the star.
All that remains is to download the templates of the size you need and collect lovely stars together with the children.
And now for more details on this:
It is necessary to cut two blanks from paper of the desired color according to the template. Fold them in the center of each side and around the edges.
Lubricate the ends with glue and connect both parts. Allow the product to dry. The star for the New Year's beauty is ready!
A step-by-step video tutorial on making a snowflake with your own hands
Nobody would say that such beauty can be built from an ordinary plastic bottle. But this is possible. Be sure to involve children and grandchildren in the joint work.
And it turns out quite economically for your wallet.
You can decorate trees in the yard with such snowflakes, give them as a souvenir to friends and neighbors. Their main advantage in strength and durability, they are not afraid of rain and snow, and any frost.
Funny plasticine octopus
A great option for joint creativity with a child of elementary grades or kindergarten age. Children growing up in abundance of attention and communication with their parents become more independent, decisive and achieve more in life. So do not waste precious time and devote it to your children.
What you need:
- Plasticine of different colors - 1 pack;
- Stick - 1 piece;
- Plastic knife - 1 piece.
Let's get started:
First, roll up two balls of the same color, but different sizes. This will be a torso with legs and a head.
We form a small droplet from a small one, and squeeze the second into a layer.
Using a plastic knife, cut the strips.
It turns out something like a flower, we make long tubes from each petal.
As a result, you should get such a star.
From a brighter color we form small balls and attach them to the legs.
Use a tube of balls to make them look like suction cups.
Now we bend the legs with suction cups in any shape.
We make the head like this: stick the plastic case from the chocolate egg completely with plasticine and attach the eyes. We attach the head to the body.
Pour liquid into a glass container and put an octopus in it, tighten the lid. Turn the jar over and decorate it with algae and colorful fish on top.
Snowman made of disposable glasses
Every year millions of people try to decorate their homes with New Year's symbols. Someone buys them, and someone makes them on their own. Recently there has been a fashion for making crafts from plastic dishes, so I decided to tell you about making a snowman from glasses. It is simple and quick, the main thing is to select the necessary materials earlier.
Required tools:
- Plastic dishes - 300 pieces;
- Stapler - 1 piece;
- Decoration is at your discretion.
Let's start making a snowman:
For the first row, you will need exactly twenty-five cups, we lay them on the floor in an even circle and fasten them with a stapler.
The second row will go a little bit shifted, like colors on a chessboard.
Fasten each glass in several places, so the structure will be more stable and durable to the touch.
Move each row a little deeper to get a spherical shape. We do not finish it, seven rows will be enough.
We form the head from eighteen pieces in each row and close it completely.
Cut out eyes and a sharp nose from paper, decorate the head.
We connect both parts and fasten them as tightly as possible with a stapler.
Add decorative elements as you wish. At home, we put a light bulb inside and it turns out just fabulous in appearance.
Original Christmas tree made of threads
I make such beauty every year for the kitchen and for other rooms where no living beauty will stand. It also looks great in offices, or you can give it to your friends.
What you need:
- Thread - 1 pack;
- Glue - 1 tube;
- Decor - at the discretion;
- Scotch tape - 1 piece;
- Scissors - 1 piece;
- Brush - 1 piece.
Let's start cooking:
To begin with, draw a circle out of paper and collect a cone from it. Better to glue it over with tape, so the threads will not stick. Then we start winding the thread on the cone. The tighter you wind, the less airy the tree will be.
Grease the threads with a thick layer of glue, after you have wound the whole thread. And set aside to dry completely. After the product dries, it remains only to remove the blank from the cone and decorate with decorative elements.
Christmas tree toy "Gentle angel"
The simplest decoration that even a child can make.
What you need:
- Tape with a hard edge - 55 centimeters;
- Bead - 1 piece;
- Glue gun - 1 piece;
- Stapler - 1 piece.
What do we do:
We cut off the tape 30 centimeters long and making an indent of two centimeters, fold it like accordion fur. Cut off one hard side and secure with a stapler. From the rest of the tape we make the same accordion, only we fasten it in the middle.
We fasten both blanks together, attach a bead with a thread on top and gently straighten the edges. A wonderful craft is ready.
Master class - a Christmas tree made of cones
Of course, you can build a small Christmas tree from cones and a paper cone, but I decided to go further and tell you how to make a big beauty that will look great even on the street.
What you need:
- Wooden sticks and wire - for the frame;
- Sheet - cardboard;
- Glue gun - 1 piece;
- Spray paint - optional;
- Decor - to choose from;
- There are a lot of cones.
Let's get started:
First of all, we build a frame from sticks and wire. Make it as strong as possible. Make a base out of cardboard and glue it to the bottom of the frame.
That's all my friends, I hope this article has become at least not much useful to you, and you have found interesting ways of making crafts for yourself. Write your opinion in the comments, it is very important to me. And now I say goodbye and write only until we meet again.
On the threshold of the long-awaited New Year's holidays, which are eagerly awaited not only by children, but also by adults. After all, New Year is a new hope, new plans, new life. To create a magical atmosphere in the house, we always prepare decorations in advance. Someone buys them in stores, but in this article we will show you how to make interesting DIY crafts for the New Year.
The fiery Rooster will be the patron saint of the upcoming 2017. It is his image that should be present in every home so that the whole year is successful and happy.
You can make a cockerel in different ways. In this case, the main thing is to show imagination. We will present several master classes on making DIY crafts of the symbol of the New Year 2017:
Rooster toy
The product will look like a soft toy. To create it, you need a pattern, cotton wool, two identical buttons and any thick fabric. You don't have to buy one, you can use an old sheet or shirt.

The only items available are two small pieces of red and orange felt to make a beak and scallop. You can also use any decorative elements for the cock. In the photo below, the craftsman used a straw to make a bow.

The uniqueness of this toy is that it is easy and quick to make. In a short period of time, you can sew dozens of such cockerels to present them as gifts to all your friends for the New Year 2017.
If you make small soft cockerels, then they can become decorations for the New Year's tree. It will only be necessary to sew ropes to them, for which they will cling to the Christmas tree branches.

You don't have to make the cockerels bulky. Just cut them out of felt, decorate with rhinestones, beads, feathers, ribbons and other decorative elements, attach ropes to them to hang the products on the tree.

Rooster made of buttons and old beads
- Draw the outline of the rooster on decorative paper.
- Using quick-drying glue, attach buttons and beads to the image, alternating them in colors and sizes
- The resulting product can be framed and hung on the wall in the hallway or in the kitchen

Painting "Rooster" in quilling technique
The quilling technique is very popular among needlewomen, because it can be used to make exquisite products using only special paper, a toothpick and glue. To make a picture with a cockerel, you will need the same material and whatman paper, which will become the basis for future crafts.
The work will be very painstaking, so you need to be patient:
- First you need to cut the quilling paper into strips 5 mm wide and 25 mm long.
- Then screw each strip onto a toothpick. Glue the ends to the finished paper spirals. All spirals need to be slightly lowered and squeezed in the shape you need.

- Glue all the curls on the previously prepared contour of the rooster on a Whatman paper.
- In addition to the rooster, other elements of the picture can be made in the same way - snowflakes, Christmas trees, snowmen, and so on.
As a result, you should have such a beautiful product:

The techniques we have listed are the most practical options for making a New Year's symbol that will last for a long time. You can use many other methods of making cockerels, for example, from disposable dishes or plastic bags, but they are unlikely to retain their original beauty for a long time due to their impracticality.
DIY Christmas tree craft
Despite the fact that a live or artificial Christmas tree is in any case decorated for the holiday in every home, we still make small original crafts for the New Year do it yourself in the form of a forest green beauty, so that the festive mood can be felt everywhere.
Of the many ways to create Christmas trees, we have selected some of the most interesting:
Christmas tree made of bright pictures

- To make such a beauty, you will need old magazines, newspapers or a children's book.
- Of them, using a shaped hole punch, you need to make as many round elements as possible - these can be flowers, ordinary circles.
- Each of the resulting circles must be twisted a little, wrapping them around a regular pencil.
- They will need to be glued in neat rows to a pre-prepared paper cone, starting from the bottom.
Christmas tree made of felt

From the minimum amount of material, you can make such a Christmas tree. You will need:
- felt fabric in two colors
- thick cardboard
- quick dry glue
- thin Christmas tree rain
- First, we make a cone from cardboard, which will be the basis of the future Christmas tree.
- Then we cut out circles of different diameters from felt, cut a hole in the center of each through which these circles will be threaded onto the cone.
- When all the felt details are threaded, you can proceed to decorate the product - glue the Christmas tree rain and other New Year's tinsel that you do not mind in a spiral to the product.
Christmas tree made of floral mesh and garlands

- To make such a tree, you first need to make a paper cone and wrap it with a plastic bag.
- Then it is necessary to cut flaps of the same size from the floristic mesh, moisten them in PVA and alternately glue them onto the cone in several layers.
- When all the layers are glued, the top of the mesh must be greased with PVA again and left to dry.
- After the mesh is dry, it must be removed from the cone. We won't need it anymore. Instead, a garland must be attached to the inside of the tree with a decorative wire.
- If you wish, you can also attach any decorations on the outside of the resulting Christmas tree.
DIY paper crafts for the New Year
Paper is a versatile material for needlework, but you can make short-lived products from it, although they are quite original. In this article, we decided to tell you how to make paper from paper easy DIY crafts for the New Year... We are talking about two designs of Christmas tree decorations.
Crafts from paper tubes

To make such a decoration for a Christmas tree, you will need scrapbooking paper and a ring from an old chain through which a decorative thread will be threaded.
What will be the algorithm of our actions:
- Cut out a circle of any diameter from any cardboard and mark a center on it (the size depends on your desire, to make the same toy as in the photo above, you need to cut out a circle with a diameter of 5 cm);
- From one sheet for scrapbooking we cut out squares with a side of 3 cm, and from the second squares with a side of 2.5 cm;
- Expand all the squares so that they look like diamonds, then begin to bend the left and right ends of the square towards the middle as if you were swaddling a child;
- Glue the resulting elements with quick-drying glue;
- To the center in a clockwise direction, begin to glue the twisted elements to the pre-prepared cardboard so that each tube fits snugly against each other;
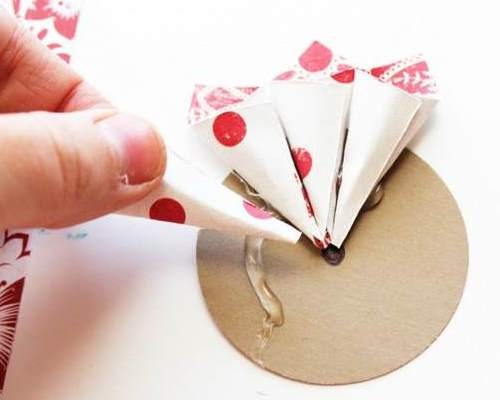
- You will need to make several layers of these tubes so that in appearance the future product begins to remind you of a flower;
- Attach an old brooch or pendant with stones to the middle of the toy, and glue rhinestones along the edges of the tubes.
Craft from paper squares and foam

The basic material for making such a beautiful paper cone is decorative paper and a foam ball. What you need to do with them:
- Cut the paper into strips 2.5 cm wide;
- Each strip must again be cut into squares with a side of 2.5 cm;
- From each resulting square, you need to make such an arrow, as shown in the photo;

- When all the elements are prepared, you can start gluing them to the foam ball in layers from bottom to top;
- You can attach paper sheets and braid to the top of the cone, for which the resulting cone can be attached to the tree.
From above, each of the proposed toys can be covered with sparkles, sprinkled with New Year's tinsel, so that they look festive and elegant.
Crafts from cones for the New Year
Crafts from cones with your own hands for the new year look very original and natural on the New Year tree. From this beautiful natural material, you can come up with a huge number of different toys and table decorations. After all, the cones lend themselves to staining and gluing. As examples, we will present you several options for cone products for the New Year:
- Having painted the cone green and sprinkled with white or silver sparkles, you can make a mini Christmas tree that will look beautiful as a New Year's toy, as a figurine on the fireplace.

- The pine cone can be used as a torso for a toy bird or deer. You just need to figure out what to make them heads and limbs. It can be a sponge, cotton wool, wool - any material and decorative elements.

- Pine cones can be used to make beautiful Christmas wreaths on the door. Moreover, they do not even need to be subjected to any processing. Through them you only need to thread a wire, with which the cone will firmly hold on to the wreath.

Crafts from the dough for the New Year
To create crafts from salt dough for the New Year children can also be involved. As a rule, children really like to sculpt different figures out of it, especially if they are timed to celebrate the most awaited winter holiday.
The most important thing here is to knead the dough correctly. It's very simple: you need salt, flour, starch and water. All these components are mixed with each other in equal amounts. If you already know in advance what color your products should be, then you can immediately add dyes to the dough. If not, then leave it colorless.

- To give contours to future crafts, you can use special confectionery molds - Christmas trees, snowflakes, gnomes or snowmen.
- Cut out the characters, then lay them out on a baking sheet and dry in the oven.
- When the products are dry, take them out and decorate - paint, glue all kinds of decorative elements to them.
Here are some examples of designs for New Year's products made from dough:


Crafts from candies for the New Year
Candy is the most festive stuff. As a child, each of us tied a string to them in order to decorate the New Year's beautiful Christmas tree with sweets. Today, sweets are used in a more original way. With their help, you can create not only interesting crafts for the New Year but also make sweet gifts for your loved ones.
For example, if you are going to visit godfathers or neighbors, you can make a beautiful Christmas tree from a bottle of champagne and loose sweets.

How to do it:
- Lubricate a bottle with a holiday drink with glue, and attach New Year's tinsel to it.
- Then, in a circle, glue the candies in the same way. You can use both the same sweets and different ones.
- Decorate the resulting Christmas tree with bows, beads and that's it - this chic New Year's gift is ready.
If you go to a house where there will be children, then you can also make New Year's sweet gifts for them. Buy assorted chocolates and cane-shaped lollipops. From these sweets, you can make a sleigh:

- Glue the chocolates to the candy canes with a glue gun
- Put the rest of the sweets on the chocolates in the shape of a pyramid and wrap them with a beautiful ribbon
- To complement the sweet gift, you can tie a toy deer to the sleigh
You can also make New Year's clock from sweets. To make them you will need:
- metal cookie box
- candies
- Christmas tinsel

- First you need to decorate the cookie box with corrugated paper
- On one side, make a dial from old beads
- Glue all decorations and parts of the product to the glue gun
- Then glue the candies around the circumference of the box so that they fit tightly to each other.
- From above they can be wrapped with decorative tape.
When the main part is ready, you just have to complete the dial decoration. This is where your imagination comes in handy.
Crafts from disks for the New Year
Everyone in the house probably has old CDs that just take up space on the shelf in the closet. So that they do not gather dust simply, use them to create beautiful DIY crafts for the New Year.
We offer you to make New Year's toys and pendants-panels from CDs. They can be used to decorate the Christmas tree and walls in the rooms of your home.
You don't need to show any special talents to create Christmas tree decorations. Even children can handle this work. You will only need to draw a beautiful winter pattern for them on the disk and give out decorative elements - paints, beads, beads, buttons. Children will already show their imagination and complete the decoration of CDs.
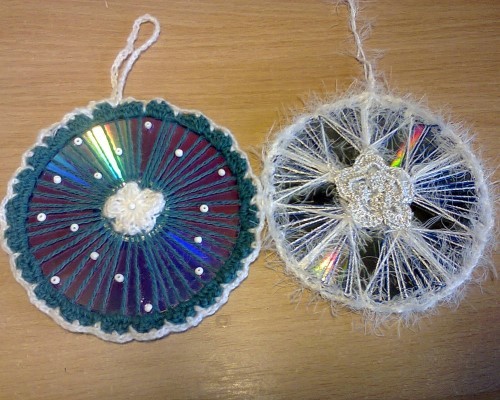
The panel pendants are a little more complicated by the manufacturing technique:
- The discs will first need to be coated with acrylic paint.
- Then pass the braid through the hole and fasten it tightly.
- The next step is to glue a pattern to the disk using decoupage technique, which we will need to paint and add volume to it with the help of salt, semolina and other improvised means, for example, toothpaste, from which we can make snowy mountains.

Crafts from beads for the New Year
Beading is a real art, and not everyone can master at least the basics. But what to do if you really want to make of this material beautiful crafts for the New Year? There is an exit. We have selected several ideas for creating New Year's beaded decorations that even a child can make.
Christmas ball made of beads
- Take a long, thin wire and string the beads on it in a random fashion.
- Having coped with this task, inflate a small regular balloon.
- Now this ball needs to be carefully wrapped with prepared wire.
- When the whole ball is decorated, pierce it so that you have such an original Christmas tree decoration in your hands, as shown in the photo below.

Christmas tree made of beads
- Make a tight cardboard cone and set it aside.
- After that, string green beads very tightly on the wire, alternating with red.
- You just have to wrap the resulting garland around the paper cone in a spiral, and then remove it so that only the original Christmas tree remains, which can be used as a toy.

Beaded snowflake
- First, fasten three wires of the same length together so that you get an asterisk.
- Then, on each ray of the star, simply string the beads so that you get a beautiful snowflake, which is shown in the photo.

Knitted crafts for the New Year
Knitted ideas original crafts for the New Year great amount. Of course, in order to create at least one of them, you need to undergo special training or train yourself for a long time, relying on video tutorials from the Internet. For those who know how to talentedly knit Christmas decorations, we have selected several patterns that can be useful to needlewomen while preparing home decor before the New Year holidays.
Knitted snowflakes

Knitted Christmas balls


Bulk crafts for the New Year
In this section, we will show you how to make volumetric unusual crafts for the New Year from scrap materials.
The first option for New Year's decorations - Christmas tree toys made of walnuts. To do them, you need:
- First, peel the insides of the nuts so that only the shell remains.
- Cut off a 25 cm long satin ribbon, fold it in half and string a bead on it. Place the ends of the ribbon between the two parts of the shell, and only then glue them.
- Dye the nuts the color you want, decorate and varnish.

The second option is Christmas tree decorations from wine corks... To make them you need:
- Paint the corks in different colors
- Come up with the shape of the future toy
- Fasten the plugs together in the desired shape using a wire
- On top of the resulting decoration, attach a ribbon in the form of a bow with an ordinary decorative pin.

The third option for Christmas tree decorations is the simplest - from burnt out light bulbs... They just need to be painted beautifully - to make them look like penguins, snowmen or Santa Clauses:

Crafts for kindergarten for the New Year
All of the above homemade Christmas decorations can belong to this category. However, we want to highlight here exactly DIY children's crafts for the New Year. As an example, we will give original options for needlework that you can offer your children to make on the eve of New Year's parties in kindergartens.
Magic snow globe
- On regular round cardboard, glue cotton wool that will simulate snow.
- A plasticine snowman and a Christmas tree are attached to it. On top of this craft, you will need to install a small glass jar, the inner surfaces of which must be greased with glue and sprinkled with sparkles to give the impression of falling snowflakes.
- We attach the glass jar to the base of the craft using a glue gun. It turns out such an original product:

Modular Paper Crafts
- In the same way, we first prepare the base. In this case, it will be a cardboard box of chocolates.
- We glue it so that both parts touch each other at right angles.
- We lubricate their inner surfaces with glue and glue cotton wool to them, which will again simulate snow blockages.
- We make different animals out of paper - bunnies, bears, and then we attach them to a horizontally located base.
You can also place a plasticine tree and other homemade products here. For clarity, we will give the following example:

Video: DIY crafts for the New Year 2017
In this video, the needlewoman clearly demonstrates how you can decorate Christmas balls with your own hands in an original way or make unusual elements of New Year's decor.