Wreath on the head with your own hands. How to make an autumn wreath of leaves, rowan, flowers with your own hands? Autumn wreath with your own hands. Master class with photo
A wreath of leaves is an indispensable attribute of autumn photo shoots. The two most popular options are rowan and maple. We have prepared step-by-step master classes for you, from which you will learn how to weave such wreaths on your head with your own hands. This process requires perseverance, but is not as complicated as it might seem at first glance.
Instead of maple leaves, you can use any other, and it is easy to replace rowan with viburnum or even artificial bright berries. The base for the wreath can be prepared in advance or you can use a regular hairband. However, you can do without everything at all. Someone uses this autumn craft several times - it will not wither, but it will dry out a little. And if you plan to make a wreath for photo shoots for a long enough period, the base must be solid.

Wreath base
The first step is to decide on the base material. In this collection you will find several options: choose the most convenient.

Option number 1: from rods
To make the basis for the autumn wreath on the head, we select young branches. Suitable willow, birch, pine and other trees and shrubs, which are easy to cut thin strong rods.

We clean the branches from the bark and make them smooth. To make a leaf wreath beautiful, you need to make the base correctly - it should not be too big or too small. Measure the girth of the head, but constantly estimate the size of the workpiece as you work.
Tighten the twig ring with twine. Then start winding the rods on this frame. Build them up gradually and constantly reinforce with jute.
Make a tight winding when you finish braiding the branches and achieve the desired thickness of the rim for the wreath. Put the workpiece under the press overnight.
Option number 2: from paper and nylon
This base for an autumn head wreath will be made of lightweight materials, but you can be sure of the strength and reliability of the design.

We have already told you before. Here the principle is the same. Cut magazines and newspapers into strips, roll them into tight tubes. Twist them together or just glue them together. You can also make a base for a wreath using tape or even sew these strips.
To finally fasten the structure together, take nylon tights and tightly wrap the rim around them.
On such a blank, you can stick or apply leaves, berries or other accessories from which you want to make your autumn wreath.
Option number 3: from wire
The wire rim is good because it turns out thin. This means that you can make an autumn wreath on your head more elegant and light. This is ideal for assembling small leaves in one or two layers.

The wire must be folded in one, two or three layers and twisted together, twisting it into a bundle. Select the degree of winding depending on the thickness of the material.
Twist the ends of the wire together and hide. From above, make a winding with twine or ribbon. This is necessary so that the craft turns out smoother and does not tangle the hair.
Such a wreath can be braided with leaves on top or glued material directly onto it.
To make the wreath on the head more convenient, peculiar loops can be formed at the ends of the wire. Then we will tie ribbons there and we will tie it into a bow. You can make it a kind of decorative element: for example, add a wide red ribbon and leave its ends free.
Weaving pattern
As a rule, all wreaths on the head are woven according to the same pattern. It looks like this.

As a basis, you can take flowers, autumn leaves, grass, dried flowers, rowan branches or any decorative material.
Additionally, the gaps between two adjacent leaves can be fixed with fishing line, thread or twine. You can also use satin ribbon to make the wreath brighter.
Maple leaf wreath
The most popular fall option is the maple leaf wreath. You can make it yourself quickly enough. Choose a base from those described above, or weave without it.
The first step is to collect as many maple leaves of different sizes as possible. Let them dry a bit if it's humid outside.
The thickening near the stem must be cut off from each leaflet.

We take the first sheet and bend the bottom edge so that we get a parallel line with the "stem".
With a sprig of the second sheet, carefully pierce the first one as if we were making a stitch with a needle and thread.

We bend the second sheet in the same way as we folded the first sheet before. We take the third maple leaf and repeat the procedure.
So we go through the whole circle. To finish the wreath, you must first try it on your head, and then pierce the first and second leaf with the stalk of the latter.

If desired, you can make one or two more rows.
rowan wreath
Weaving an autumn wreath of mountain ash with your own hands is also quite simple. To make it perfect, we suggest you watch a visual step-by-step video instruction. With its help, you can easily repeat the process of making this beautiful autumn accessory.

Such a wreath can be additionally decorated with any autumn leaves to make it even more elegant. You can also make it from only one mountain ash - large clusters look very beautiful.
We hope that now you will be able to weave a wreath on your head yourself, and your autumn photo shoots or contests will be even more beautiful. By the way, leaves made of colored paper or foamiran are often used for school crafts. If you need to make something similar, use the suggested instructions and ours.
Views: 12 394
I really love autumn for its bright colors, abundance of vegetables and fruits, warm scarves and berets, and, of course, for the comfort and special atmosphere. And I also really like to create interesting and beautiful home decor from natural materials.
In autumn, nature is generous with colors, and the whole world around us is a riot of color. I constantly want to collect something, make bouquets, and also weave autumn wreaths of leaves, cones and other gifts of autumn. And then leave all this beauty in your memory for a long time, because ahead is the winter time, buying up paints.
DIY autumn wreath
The word "wreath" comes from an old Slavic word meaning "gift". This wicker decoration made of natural materials in the form of a ring is designed not only to decorate, but also to protect warmth and peace in the house.
Editorial "So simple!" prepared for you 21 delicious autumn wreath idea which are so easy to create with your own hands. Here it is - a symbol of the harvest, creating comfort.
- This wreath used a large number of different herbs and fruits of reddish hues. Such decor will become a fashionable and bright addition to your interior or house facade.
- The natural colors of autumn leaf wreaths are familiar to the human eye, they soothe, relax and harmonize.
Fresh and dry leaves are very beautiful and only once again confirm that the best artist is nature. So why not fill the space at home with her wonderful works, creating a special atmosphere of comfort.


- And this decoration is for lovers of everything unusual. If you think round wreaths are too boring, try weaving a wreath in the shape of a heart. It looks very stylish and original.


- This season, according to the Pantone Color Institute, red is in special favor. And this is a good reason to create a monochrome solution for your interior in red tones.


- All lavender lovers will appreciate this fragrant decor. Weave a lavender wreath and decorate the door with it, and happiness will definitely not pass by!


- You can also make very pretty wreaths from old newspapers, which are great to hang on the wall or use as table decorations.


- To create such a decor, you will need cones, hot glue, a pruner for cutting cones, a wreath hoop (can be twisted from branches or newspapers), burlap or linen.
Using a pruner, you need to trim the bumps, cutting off the tops. Work on such a wreath is laborious and with an abundance of garbage, but the result is worth it.


- In the simplest, but at the same time effective way decorate a wreath on the door decoration will be collected on the street or in the park with autumn leaves. A wreath looks beautiful both from leaves of the same type, and combined. For a decorative wreath, oak, maple and other leaves are suitable, the color is your choice.
Dry artichoke, pine cones, chestnuts, acorns and rowan can be added to the leaves.


- And this is a wonderful autumn wreath using physalis fruits. How do you like this stylish front door decoration?


- This wreath can be used as table decor. Stylish and beautiful, isn't it?


- Maple leaf wreaths are especially popular, which can be woven in the usual way or come up with something more interesting.
For example, you can take birch, maple or other tree branches and intertwine them together. And then decorate the branches with leaves, ribbons, acorns or cones.


In autumn, you can also see a lot of orange physalis fruits, which stand out brightly from other plants. Due to its natural ability to survive for a long time without water, physalis is an excellent basis for decoration. So I suggest you get inspired by another couple of physalis.
Autumn wreaths made from natural materials can be hung on a wall or a door, put around a candlestick, a vase and other decor items, and they will create an atmosphere of comfort, warmth and harmony in the house.
Let your imagination fly! And may your autumn wreath be bright and sunny. To create it, you can use both natural and artificial materials. So on the way home, do not forget to collect a bunch of maple leaves, cones, mountain ash and get to work soon.

In addition, to create such decorative wreaths children can be involved. They will be able to select leaves, cones and acorns that match in color, as well as weave them into a wreath on their own.
Nastya practices yoga and loves traveling. Fashion, architecture and everything beautiful - that's what a girl's heart aspires to! Anastasia is engaged in interior design, and also makes unique decorations with a floral theme. Dreams of living in France, learning the language and keenly interested in the culture of this country. He believes that a person needs to learn something new all his life. Anastasia's favorite book is Eat Pray Love by Elizabeth Gilbert.
Women have been decorating themselves with wreaths since ancient times. All kinds of artificial flowers, fresh flowers, stones, ribbons, leaves, accessories are woven into them.
Today's master class is dedicated to decorating the head with artificial flowers and fresh, as well as autumn colorful maple leaves.
All of the above examples are easy to manufacture and assemble at home.
Do-it-yourself wreath on the head in the Ukrainian style
The technique is suitable for beginners. The wreath is made from artificial flowers bought in advance in the store. It is recommended to use a special soft wire for weaving wreaths. It has no sharp metal ends and is pleasant to the touch.

Materials and tools: soft wire with a large diameter brass, copper or decorative wire with paper wrapping, artificial flowers, dark-colored fabric (felt can be used), scissors, thread, decorative tape, instant dry glue, pliers (if metal wire is used).
Stage 1
A wire is taken and applied to the head around the circumference. The excess part is cut off. Both ends are twisted into each other in a spiral, as in the photo.

Stage 2
Do-it-yourself flowers for a wreath are laid out in the order they are attached. Circles are cut out of a suitable dark-colored fabric. All - different diameters, corresponding to each flower.
Stage 3
One by one, the flowers are glued onto the wire of the wreath with their own hands, starting with the largest one. On the reverse side of each, a circle of fabric is glued. It is important to apply a thick layer of adhesive on the wire, on the circles and on the back of the flower for a quality connection.
The wreath in the Ukrainian style is ready. It is decorated with bows and sprigs of fresh flowers to top it off. Such crafts can be safely put on in bad weather: the leaves will not deteriorate and the colors will delight with the constancy of colors.
Wreath on the head with your own hands from colored paper
This decoration is made of corrugated colored paper. It can be purchased at any office supply store. The wreath is easy to assemble and original idea.

Materials and tools: corrugated paper in 7 different colors, soft decorative wire, glue, scissors, pencil, ruler, beeswax, brush.
Stage 1
Decorative wire is taken and cut into sticks 12.5 cm long.

Stage 2
Strips 2 cm wide are cut from green corrugated paper. It is important to cut them across the lines on the paper, and not along.
Stage 3
Glue is applied to the strips. It is better to do it in the form of droplets, and not a continuous strip.
Stage 4
Each wire is wrapped in a spiral with a strip of corrugated paper coated with glue. It is recommended that during the folding process, constantly hold a strip of paper, kneading and pressing it. When one paper strip is over, a new one is taken with pre-applied glue.
Stage 5
For future chamomile, orange paper is taken. According to the already iconic scheme, a stamen is made from it, as in the photo.

Stage 6
A 5/10 cm rectangle is cut out of white paper. The short side should correspond to the longitudinal lines on the paper.
Stage 7
The rectangle folds into an accordion. You should get five layers, five additions. The bottom side is trimmed at its corners, rounded off. And the top one is sharpened, as in the photo.
Stage 8
A strip of glue is applied to the lower left corner, on which a do-it-yourself blank with an orange stamen for a wreath is placed.
Stage 9
Clockwise, a white piece of paper is wrapped in a flower bundle.

Stage 10
The base of the flower is fixed with a strip of green paper, which is wrapped in a spiral by 4 cm.
Stage 11
Each petal is bent to the side. With the help of a pencil, they are given a rounded shape.
Stage 12
Making a poppy flower. A rectangle 2.5 / 7.5 cm in size is cut out of red or pink corrugated paper. Oblong strips are cut out on it parallel to the lines on the paper, as in the photo.
Stage 13
The resulting skirt is wound around the tip of the wire according to a familiar pattern.

Stage 14
A 7.5 / 14 cm rectangle is made from orange paper. It is folded into five folds into an accordion. An unusual shape is cut out, exactly as in the photo.
Stage 15
The pink poppy stamen is wrapped in orange paper that has been pre-applied with a bead of glue. The base of the flower is also wrapped in green corrugated paper, like the previous chamomile.

Stage 16
Each poppy petal is straightened by hand for a wreath on the head with their own hands. The edges of the paper need to stretch a little.
Stage 17
The beeswax melts. It is applied with a brush to flowers, petals and leaves. Wax will give the wreath a realistic look, the feeling of fresh flowers on the head. The flowers take some time to dry. Wax hardens slowly. It is better not to use varnish instead of wax. It has no elasticity after hardening - by negligence, any petal will simply break and the product will be damaged.
Stage 18
Oblong leaves are cut out of green paper. They are also waxed.
Stage 19
The resulting flowers are collected in small bouquets, wrapped in paper. Each bouquet leans against the main wire and is again fixed with paper.
The paper wreath is ready!
DIY autumn wreath
The theme of such a wreath on the head is inspired by autumn motifs. Walking through the park or forest, dry fallen leaves are visible under your feet. Their colors are so varied and attractive. Fantasy plays with ideas and pictures.

Materials and tools: maple leaves, thread, scissors.
Stage 1
For an autumn wreath, do-it-yourself leaves are taken only with a length and a strong stem. They should also bend well.
Stage 2
The first two sheets are taken and placed on top of each other with branches crosswise. The top branch is wrapped around the bottom and placed along it. This position is fixed with a thread.

The weaving technique is similar to weaving the well-known dandelion wreath.
Stage 3
Thus, each new leaf is placed on top, and its branch wraps around the previous one and is placed along all the others.
Stage 4
When the desired length of the autumn wreath is woven with your own hands, the tip is tied with a thread and inserted into the beginning of the first sheet.
Autumn crown of leaves is ready!
A beautiful fall wreath can be made in just a couple of hours. What is not a good way to entertain yourself on a gloomy autumn evening? Moreover, as a result of this lesson, you will get a stylish decoration for the front door, mantel, console in the hallway or dining table. See below how to make an autumn wreath with your own hands from natural materials, paper, felt, knitting threads and other improvised means!
How to make an autumn wreath with your own hands
After looking at some of the beautiful fall wreath photos in this article, you might think that they require a lot of time to create, or at least good weaving skills. However, it is not. Decorative wreaths from leaves and other natural materials are quite simple to make today:
- Weave into the base of the vine or willow branches;
- Stick on a circle of polystyrene foam, cardboard or other improvised material.
Below we offer you a look at 30+ DIY fall door wreath options with step-by-step instructions on how to make them.
DIY wreath of autumn leaves
First of all, you should decide on the design of the future wreath. Do you want it to be lush and colorful in the spirit of a rustic decor, or more sophisticated and elegant to match the style of your modern apartment? Depending on the leaves you choose, the autumn wreath can look completely different, as the following photos confirm:


As you can see, in most cases, to make a wreath of autumn leaves with their own hands, craftsmen use a circle of vines tied in several places with a strong thread.
The photo below shows you a simplified instruction on how to make a wreath of autumn leaves with your own hands step by step:

Beautiful autumn wreaths made of natural material
Branches, cones, feathers, spikelets, even vegetables and fruits - almost any natural material can be used to make an autumn wreath for home decoration. How about a stunning feather wreath?

Like an autumn wreath of leaves, it is created using a special base and glue.

A few more interesting options:


An autumn wreath of branches can look especially impressive, in particular in compositions with large flowers or fruits, even if they are artificial or handmade from fabric or paper.


How to make an autumn paper wreath
If you don’t feel like going out to collect leaves and other natural gifts, then why not try making an autumn wreath out of paper? We offer some interesting ideas for this in the photo!


An interesting craft - an autumn wreath made of felt
Soft felt is one of the best materials for fall crafts. It is available in various colors, is easy to work with and has a pleasant pile, thanks to which it seems to radiate comfort and warmth into the interior. The best photos with examples of how to make an autumn felt wreath:


If felt does not suit you, then pay attention to the last photos in this article with autumn wreaths made of simple fabric and threads. Share with us in the comments: which option did you like the most? Also read:


30 ideas how to make an autumn wreath with your own hands - from leaves, cones and other materials updated: October 17, 2016 by: Margarita Glushko
In autumn, you really want to bring a bunch of fallen leaves home, but what to do with them later? We offer you an article with master classes on how to make a wreath of autumn leaves with your own hands.
Easy option
We will need:
- twigs;
- autumn leaves;
- wire;
- ribbon.
We form a circle from twigs, fasten with wire. Then we begin to wind the leaves in a circle, they should overlap.
To hang a wreath, make a loop of ribbon.

royal flower
Let's make a rose from the leaves. To do this, they must be slightly damp.
When a certain number of flowers are ready, we prepare the base from a thick wire, folding it into a ring.

Now we can connect the roses in threes and start attaching these blanks to the base with a thread or thinner wire.

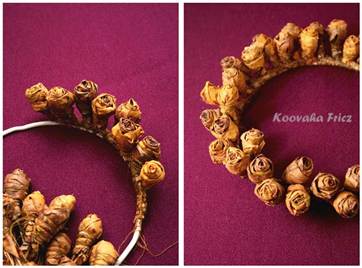
This is the wreath we end up with. Also use ribbons for hanging.

craft with children
Most often, we go with children to the forest or park to admire the fall of the leaves. We offer you a master class on how easy it is to make a beautiful wreath by introducing a child to the creative process.
It all starts with the collection. Choose colorful leaves: red, yellow, green. Different types: maple, mountain ash, birch, etc.
From a disposable plate, cut out the base, how to do it, shown below in the photo.
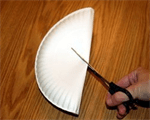

Now it's the turn of the child's hands and his imagination. Let the kid apply glue and place the leaves on the base in the order that his imagination tells him.


If the branches stick out, they must be cut.

If you and your child have collected not only leaves, but also various cones, then make the next wreath.

For it, you can also use the base of a disposable plate, or you can cut it out of cardboard. The leaves must be glued in several rows and in a checkerboard pattern. For convenience, you can draw several circles.

When you get to the inner circle, start gluing the rest of the decor. To begin with, let it be large acorns, and between them small cones (for example, alder).

On top, let the small acorns into the space between the large ones.

When all additional materials are glued or you are satisfied with the existing result, we will begin to make the loop. To do this, cut out two rectangles from cardboard, and a loop from woolen thread, string or ribbon. We place it between the cardboard boxes and glue it.

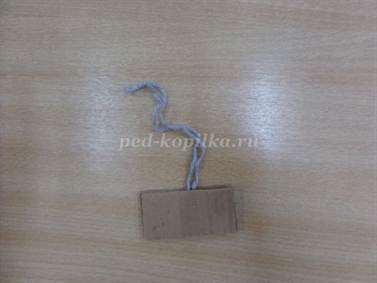
We glue the loop on the back of the wreath and that's it, it's ready.

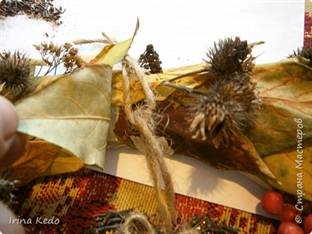
From the leaves and berries of rowan

To create it you will need:
- leaves, it is better to take birch or similar;
- rowan berries;
- dried flowers to choose from;
- thin branches;
- cardboard;
- newspapers;
- twine or ribbon;
- masking tape;
- glue.
Cut out a circle from cardboard and cover it with several layers of newspaper using masking tape. We impose so much paper until we get the desired thickness.

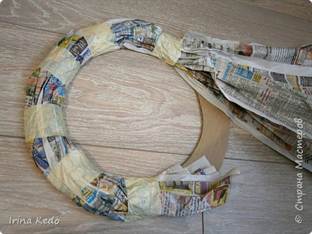
With the help of the same adhesive tape, we begin to cover the surface of the base with overlapping leaves. You can also use glue.


In principle, such a wreath looks beautiful on its own, but let's continue decorating it. To do this, we distribute branches with berries, branches of dried flowers throughout the wreath.


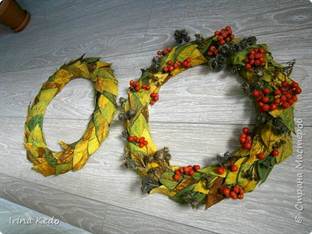
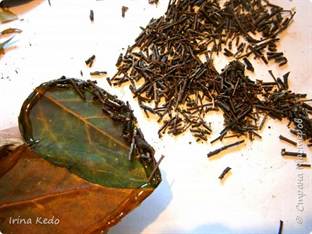
Now put the wreath aside and cut out four hearts from cardboard.
You can make them the same size, or you can make one of the pairs a little smaller than the others, as you decide.

We glue in pairs, not forgetting to put a loop of twine (or ribbon) between them.

Now we close each side of the hearts with leaves. We cut off the excess.


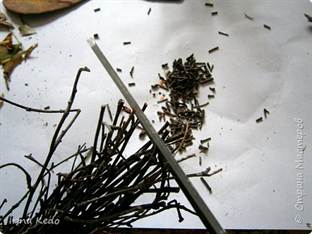
We apply glue to the edges of the hearts and sprinkle these places with crumbs from twigs.
We decorate the central part with rowan berries.
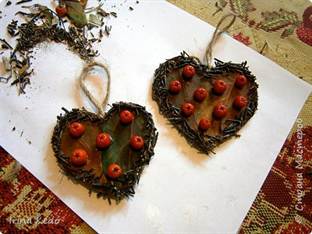
We attach the hearts to the wreath, hiding the loops under the leaves.

This wreath can decorate your home. And since it is made with your own hands and labor and warmth have been invested in it, it will become a kind of amulet for your family.
paper decoration
But what if, for example, the weather does not allow you to collect live leaves or you live far from the park? What now, to abandon the idea of \u200b\u200bcreating an autumn wreath? Do not despair, colored paper will come to your aid. Here you can also involve children, this will certainly develop not only fantasy, but also fine motor skills. After all, we will make leaves using the origami technique.

Prepare:
- colored paper;
- scissors and stationery knife;
- glue;
- cardboard, preferably thick;
- stapler.
From paper cut out squares with sides of 10 centimeters. We will have 10 pieces for each sheet. The number of leaves will depend on the size of the base.

Take six squares and fold them diagonally. Next, fold both corners to the fold line. We have formed corners at the bottom, we also bend them to the center. For the other three squares, we perform only the first stage of adding the right and left corners. But the tenth will serve as a cutting for the leaves.


When we prepare all the details, we begin to glue them in threes, as shown below.

Then we connect all the triplets together. We place them side by side.
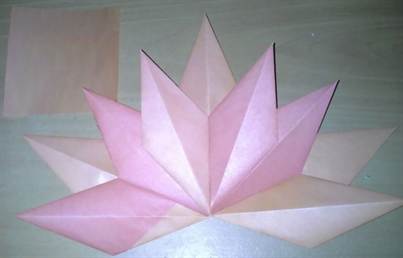

We paste the tenth square on the reverse side, cut it along the edge of the sheet, but not the end. We fold this protruding part into a stalk.


Now we cut out the base from the cardboard and begin to place our leaves. We impose one on the other with an overlap with cuttings inside.
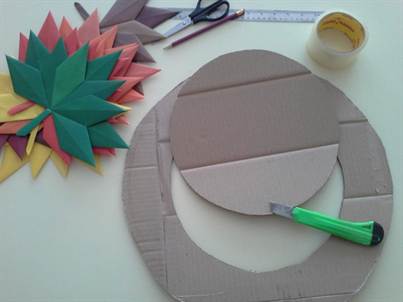

Our autumn wreath is ready. Here are a variety of wreaths that can decorate your home in the fall.
Video on the topic of the article