We study the letters of the spelling. Guidelines for explaining the writing of letters and elements. Useful video: lowercase Russian letters
Letter dots.
We will write the points at the same distance from each other, not very close and not very far. On the top line of the working line and on the bottom.
The letter is a short straight slanted line.
We start writing from the top line of the working line and draw down a straight inclined line to the bottom line of the working line.
The letter is a long straight slanted line.
1 option. We start writing from the middle of the interline space. We lead down a straight inclined line to the bottom line of the working line.
Option 2. We start writing from the top line of the working line, we draw down a straight inclined line to the middle of the interline space.
The letter is a short straight slanted line with a rounding down (to the right).
We begin to write in the same way as a short straight slanted line. From the top line of the working line we draw down a straight inclined line. Slightly not reaching the bottom line of the working line, we round to the right, bring it to the bottom line of the working line and lead up to the right to the middle of the working line.
The letter is a short straight slanted line with a rounding up (to the left).
We begin to write just below the top line of the working line, lead up to the right, rounding, bring it to the top line of the working line, draw down a short straight oblique line to the bottom line of the working line.
The letter is a long straight slanted line with a rounding down (to the right).
We start writing from the middle of the interline space. We lead down a straight inclined line. Slightly not reaching the bottom line of the working line, we round to the right, bring it to the bottom line of the working line and lead up to the right to the middle of the working line.
The letter is a long straight slanted line with a rounding down (to the left).
We start writing from the middle of the interline space. We lead down a straight inclined line. Slightly not reaching the bottom line of the working line, we round to the left, bring it to the bottom line of the working line, again round to the left just above the bottom line of the working line.
The letter is a long straight slanted line with a loop.
We start writing from the top line of the working line, draw a straight inclined line to the middle of the interline space, round it to the left and, having made a loop, lead up and to the right, crossing the written line on the bottom line of the working line, we finish writing in the middle of the working line.
The letter is a long slanted line with a rounding up and down.
We start writing just below the line space, leading up to the right,
Rounding, we bring to the interline space, we draw down a straight inclined line. Slightly not reaching the bottom line of the working line, we round to the right, bring it to the bottom line of the working line and lead up to the right to the middle of the working line.
Capital letter "A".
We begin to write a little above the bottom line of the working line, round it down to the right and, touching the bottom line of the working line, draw a long sloping line smoothly up; not leading to the next line, we stop and draw down a long straight inclined line to the bottom working line. Without taking your hands off, we begin to write a loop: we lead a little up what is written, round to the left and cross the first element of the letter, not reaching the upper working line, we bend the loop to the right, crossing what is written, we finish a little below the top line of the working line.
Lowercase "a" letter.
The letter "a" consists of two elements: an oval and a short straight slanted line with a rounding at the bottom. We begin to write below the top line of the working line, Lead up, rounding slightly to the left, bring it to the top line of the working line. Then we draw a rounded line down to the bottom line of the working line, lift it up to the right to the beginning of the letter. Then we write the second element - a straight inclined line with a rounding down, which is in contact with the oval.
Capital letter "B".
We start writing a little above the middle of the line space. From top to bottom we lead a long straight inclined line to the bottom line of the working line and round to the left, smoothly moving into a loop, we lead to the top line of the working line, round to the right, write a semi-oval. We write the next element from left to right: in the form of a smooth rounding on the left and turning into a straight, straight horizontal line.
Lowercase "a" letter.
We begin to write in the same way as the letters "o" and "a". Having reached the beginning of the letter, we begin to write the second element: we write a straight inclined line upwards, not reaching the middle of the line space, we make a smooth turn to the right.
Capital letter "B".
We start writing a little above the middle of the line space. We draw a long straight inclined line from top to bottom to the bottom line of the working line and write a loop to the top line of the working line, continue the line up and at the level of the first element we round it to the right down and write a semi-oval to the top line of the working line. Without taking your hands off, we write the second semi-oval from the top line of the working line to the bottom line of the working line.
Lowercase letter "v".
We start writing from the middle of the working line, draw a line with an upward slope, make a loop, up to the middle of the interline space, draw a straight inclined line down, slightly not reaching the bottom line of the working line, round it down to the right and, touching the bottom working line, write an oval. (On (1-4) almost bringing to the upper working line, and on (1-3) touching the upper working line.)
Capital letter "G".
We start writing from the middle of the interline space. We lead down a straight inclined line. Slightly not reaching the bottom line of the working line, we round to the left, bring it to the bottom line of the working line, again round to the left to the middle of the working line. We write the next element from left to right: in the form of a smooth rounding on the left and turning into a straight, straight horizontal line.
Lowercase "g" letter.
We begin to write just below the top line of the working line. We lead up to the right, rounding, we bring it to the working line, we lead down a straight inclined line. Slightly not reaching the bottom line of the working line, we round to the right, bring it to the bottom line of the working line and lead up to the right to the middle of the working line.
Capital letter "D".
We start writing from the middle of the interline space, a smooth rounding to the right, turning into a large semi-oval. Touching the bottom line of the working line, we write a loop to the left and draw up a large straight inclined line without touching the semi-oval.
Lowercase "d" letter.
We begin to write the first element in the same way as the letter “a”. The second element is a straight slanted line. We start writing from the top line of the working line, lead down, bring it to the middle of the line space and make a loop, rounding the line up to the left.
Capital letter "E".
By (1-3). We start writing from the middle of the interline space, draw a rounded line to the left a little up, rounding down and to the right, not reaching the top line of the working line (according to (1-4) leading to the top line of the working line), we begin to write the second element: we draw a rounded line a little to the left , then down, not reaching the bottom line of the working line, round to the right, touching the bottom line of the working line, round up to the right to the middle of the working line.
The letter is a lowercase letter "e".
We start writing just below the middle of the working line. We lead the line up with an inclination to the right, almost bringing it to the top line of the working line, round it up to the left, touching the top line of the working line, write a semi-oval to the middle of the working line.
Capital letter "J".
The letters "Ж" and "Ж" are the same in writing, differ only in size. They consist of three elements: two semi-ovals and an inclined line. We start writing below the middle of the interline space, lead up to the right, round down to the left, write a semi-oval. Then we write the connecting element from the middle of the semi-oval to the right up to the middle of the line space, then we write the oblique line and start writing the second connecting element from the bottom point of the oblique line upwards to the right to the middle of the line space. The third element - the right semi-oval - we start writing just below the middle of the interline space, lead up to the left, reach the middle of the interline space, lead down, round to the right, write a semi-oval.
Capital letter "Z".
We start writing just below the middle of the line space. We lead a rounded line to the right down to the top line of the working line, rounding to the left. Then we begin to write the second semi-oval. From the point where we finished writing the first element, we draw a rounded line to the right down, not reaching the bottom line of the working line, round it to the left, bring it to the bottom line of the working line, round it up, slightly rise above the bottom line of the working line.
Lowercase "z" letter.
We begin to write just below the top line of the working line, round up to the right, bring it to the top line of the working line, continue to round, lead down to the left, not reaching the bottom line of the working line. The second element is a loop. We start writing just above the bottom line of the working line, round to the right, lead down to the middle of the line space, make a loop (the loop intersects on the bottom line of the working line). We finish the letter a little above the bottom line of the working line.
Capital letter "I".
We start writing from the middle of the interline space, move up to the right, round off and write a long straight sloping line with a rounding down to the right, bring it to the height of the first element without taking our hands off, write a long straight sloping line with a rounding at the bottom. The height of both elements is at the same level. (and-one-and-two).
Letter lowercase "i".
We start writing from the top line of the working line, write a short straight oblique line with a rounding at the bottom, bring it to the top line of the working line and, without taking our hands off, write a second straight oblique line with a rounding at the bottom. (one-and-two-and).
Capital letter "K".
By (1-3). We start writing from the middle of the interline space, draw a small straight oblique line up to the right, then write down a long straight oblique line, slightly not reaching the bottom line of the working line, round it down to the left, touching the bottom line of the working line, write a loop, crossing it with a little written above the upper working line. Then we lead upwards to the right, ending with a slight rounding at the level of the height of the first element. We tear off our hand and begin to write the next element a little above the top line of the working line; we lead a little as written, round up to the right, lead down a straight inclined line with a rounding at the bottom. (You can not explain the beginning in detail, but say that we write the first element, just like the letter “H”).
By (1-4). We explain in the same way, only the loop crosses what is written on the top line of the working line, and the third element _ is a short straight inclined line with a rounding of the top and bottom.
The letter is a lowercase letter "k".
We start writing a short straight inclined line from the top line of the working line, return it up to the middle, then we lead it up to the right and slightly round off on the top line of the working line. There is a small corner between the first and second element. Next, we start writing from the same place where we started the inclined line with a rounding up and down, only a smaller size.
Capital letter "L".
The letter "L" is written in the same way as the capital letter "A", only without the last element.
The letter is a lowercase letter "L".
We begin to write just above the bottom line of the working line, round off, bring it to the bottom line of the working line, then lead up, deflecting the straight line to the right and bring it to the top line of the working line. From the point where we finished the first element, we begin to write the second - a line with a rounding at the bottom. First, we lead down the written, and then we make sure that a corner is formed between the first and second elements.
Capital letter "M".
We start writing just above the bottom line of the working line, round off, bring it to the bottom line of the working line, lead up and deflecting the straight line to the right, bring it to the middle of the line space, then write a line with a rounding at the bottom and make sure that a corner is formed. Without taking your hands off, we lead up and reject to the right, bring it to the middle of the line space, write a line with a rounding at the bottom to the right.
The letter is a lowercase "m".
Similarly with writing the capital letter "M", only the sizes are smaller.
Capital letter "H".
(1-4) We start writing from the middle of the interline space, draw up to the right a small straight oblique line; then we write down a long straight inclined line, slightly not reaching the bottom line of the working line, round it down to the left, touching the bottom line of the working line, write a loop, crossing what is written on the top line of the working line; we draw a line to the right up, above the working line we make a loop, rounding to the left, the intersection on the top line of the working line and we draw down a straight inclined line with a rounding at the bottom.
The letter of the lowercase letter "n".
We write a short spicy sloping line, return along the written up to the middle, make a small loop (tie a knot), draw a smoothly sagging line to the right to the top line of the working line and write a short straight sloping line with a rounding at the bottom. (one-and-two-and)
Capital letter "O".
We start writing from the middle of the working line, draw a rounded line down to the right to the bottom line of the working line; rounding up to the right, we draw a rounded line, not reaching the next line, smoothly rounding up to the left, then we draw a rounded line down to the left and bring it to the beginning of the letter.
Lowercase "o" letter.
With a lower connection with the next letter, we begin to write from below, with an upper connection - from above.
According to (1-4) only the lower connection.
Bottom connection. We begin to write a little above the bottom line of the working line, round down to the right, touching the bottom line of the working line, make a rounding to the right up; not reaching the top line of the working line, we make a rounding to the left up;
Touching the top line of the working line, round it down to the left and bring it to the beginning of the letter.
Top connection. We begin to write the letter a little below the top line of the working line, lead up, rounding to the left; touching the top line of the working line, we make a rounding to the left down; we draw a rounded line to the bottom line of the working line, rounding up to the right, we bring it to the beginning of the letter.
Capital letter "P".
We start writing from the middle of the interline space, draw a straight inclined line down, not reaching the bottom line of the working line, round it down to the left, bring it to the middle of the working line. We tear off our hand, we begin to write the second element - a straight inclined line with a rounding at the bottom to the right. We draw a straight inclined line from the middle of the interline space, almost bringing it to the bottom line of the working line, round it to the right, bring it to the middle of the working line. When writing the first two elements, you need to pay attention to the same height, slope and distance between them. The top element is written from left to right. We start with a small rounding, then draw a straight line to the right.
The letter is a lowercase "p".
We begin to write from the top line of the working line, we lead down to the bottom line of the working line. Without taking your hands off, we lead up as written to the middle of the working line, then up to the right, rounding, bring it to the top line of the working line, round off and draw down a straight inclined line with a rounding at the bottom to the right.
Capital letter "R".
We start writing a little above the middle of the line space. We draw a long straight sloping line from top to bottom to the bottom line of the working line and round to the left. The second element is written from left to right in the form of a rounded line.
Lowercase "r" letter.
We start writing from the top line of the working line, lead down to the middle of the interline space, without taking our hands off, lead up on what is written, bring it to the middle of the working line and write the second element - lead up to the right, rounding, bring it to the top line of the working line, round and lead down slanted line with a rounding at the bottom to the right.
Capital letter "C".
We start writing just below the middle of the line space. We lead a rounded line to the left, then down, cross the top line of the working line, go down, slightly round to the left, bring it to the bottom line of the working line, go up to the right and finish the letter in the middle of the working line.
The letter is a lowercase letter "s".
We begin to write just below the top line of the working line. Lead up, round to the left, bring to the top line of the working line, lead down the rounded line to the bottom line of the working line. We rise up to the right to the middle of the working line.
Capital letter "T".
We start writing from the middle of the interline space. We lead down a straight inclined line. Slightly not reaching the bottom line of the working line, we round to the left, bring it to the bottom line of the working line, again round to the left just above the bottom line of the working line. We tear off the hand, write the second element - a straight inclined line. We start writing from the middle of the interline space, we draw down a straight inclined line to the bottom line of the working line. We start writing the third element from the middle of the interline space. We lead down a straight inclined line. Slightly not reaching the bottom line of the working line, we round to the right, bring it to the bottom line of the working line and round up to the right to the middle of the working line. Pay attention to the same height, slope and distance between the three elements. The top element is written from left to right. We start writing with a slight rounding, then draw a straight line to the right.
Letter lowercase "t".
We start writing from the top line of the working line, draw a straight inclined line down to the bottom line of the working line, without taking our hands off, lead up to the middle of the working line and begin to write the second element. We lead up to the right, rounding, bring it to the top line of the working line, round off and lead down a straight inclined line to the bottom line of the working line, without taking our hands off, we lead up the written to the middle of the working line and begin to write the third element. We lead up to the right, rounding, we bring it to the top line of the working line, we round it and we lead down a straight inclined line with a rounding at the bottom to the right.
Capital letter "U".
We start writing from the middle of the interline space. We lead up to the right, round off, lead down a straight inclined line, slightly not bringing it to the top line of the working line, round to the right; touching the top line of the working line, we draw to the right up to the height of the first element and, without taking our hands off, write a long straight sloping line with a rounding to the bottom left.
The letter is a lowercase "y".
We start writing from the top line of the working line, write a short straight oblique line with a rounding at the bottom to the top line of the work line and, without taking our hands off, write a long straight oblique line with a loop at the bottom.
Capital letter "F".
We begin to write just below the middle of the line space, the first oval, which touches the top line of the working line. Then we write a straight inclined line with a rounding at the bottom to the left, which starts from the middle of the interline space and ends on the bottom line of the working line, and touches the first oval. We begin to write the second oval from a straight inclined line just below the line of the working line.
Lowercase "f" letter.
The letter consists of two ovals and a straight oblique line. We begin to write the first oval as we wrote the letter “o”, then we write a straight inclined line to the middle of the interline space, which touches the oval. We start writing the second oval from an inclined line just below the top line of the working line, lead up to the right, bring it to the top line of the working line, draw a rounded line down, bring it to the bottom line of the working line, round it up to the left and bring it to an inclined line.
Capital letter "X".
We start writing just below the middle of the interline space, lead up to the right, bring it to the middle of the interline space, round down to the left, lead down, slightly not reaching the bottom line of the working line, round off, bring it to the bottom line of the working line and round up to the left without taking your hands off , we lead up the written to the middle of the semi-oval and begin to write the second element. We lead up, round to the right, then we return along the written to the middle of the semi-oval, touch it, lead down, slightly not bringing it to the bottom line of the working line, round it off, bring it to the bottom line of the working line, round it up to the right.
Lowercase "x" letter.
The spelling is similar to writing the capital letter "X", they differ only in size.
Capital letter "C".
We start writing from the middle of the interline space, lead upwards to the right, round off and write a long straight sloping line with a rounding at the bottom to the right, bring it to the height of the first element and without taking our hands off, write a long straight sloping line with a rounding at the bottom, we finish the rounding just above the bottom line of the working line and start writing a loop: draw a straight line down, round to the left, cross the loop on the bottom line of the working line.
The letter of the lowercase letter "c".
We start writing from the top line of the working line, write a short straight oblique line with a rounding at the bottom, bring it to the top line of the working line and, without taking our hands off, write the second short straight line with a rounding at the bottom, we finish the rounding just above the bottom line of the working line and start writing a loop .
Capital letter "H".
We start writing from the middle of the interline space, lead up to the right, round off, lead down a straight inclined line, slightly not reaching the top line of the working line, round to the right; touching the top line of the working line, we draw to the right up to the height of the first element and, without taking our hands off, write a long straight sloping line with a rounding at the bottom to the right.
The letter is a lowercase "h".
We start writing below the top line of the working line, we lead up to the top line of the working line, then we draw a smooth sagging line from left to right again to the top line of the working line, then we write a short straight oblique line with a rounding to the bottom right.
Capital letter "SH".
We start writing from the middle of the line space, move up to the right, round off and write a long straight sloping line with a rounding at the bottom right, bring it to the height of the first element and, without taking our hands off, write a long straight sloping line with a rounding at the bottom right, bring it to the height of the first element and we write a long straight sloping line with a rounding at the bottom to the right.
The letter is a lowercase "sh".
The spelling of the lowercase letter "sh" is similar to the spelling of the capital letter "SH".
Capital letter "Sh".
We begin to write the first three elements in the same way with the letter "Ш". The fourth element - we finish the rounding just above the bottom line of the working line and begin to write a loop (see the letter "C").
The letter is a lowercase letter "u".
The spelling is similar to writing with a capital letter "Sh".
Letter letter "b".
We start writing below the top line of the working line, we lead up to the top line of the working line, then we draw a smooth sagging line from left to right to the top line of the working line, then we write a short straight oblique line with a rounding at the bottom to the right; without bringing to the middle of the working line, we round to the left to the middle of the inclined line.
The letter "y".
By (1-4). We start writing from the top line of the working line, write down a short straight oblique line with a rounding at the bottom to the right; without bringing it to the middle of the working line, we round it to the middle of a straight inclined line; and without taking your hands off, we lead down and to the right along the written oval to its middle, then we draw a line to the right up to the top line of the working line and, without taking our hands off, write a short straight sloping line with a rounding at the bottom to the right.
By (1-3). We start writing from the top line of the working line, write down a short straight oblique line with a rounding at the bottom to the right; without reaching the middle of the working line, we round to the left and, without touching the written straight line, make a small loop, draw the line to the right up to the top line of the working line and, without taking our hands off, write a short straight oblique line with a rounding at the bottom to the right.
Letter letter "z".
We start writing from the top line of the working line, draw down a short straight inclined line with a rounding at the bottom to the right, not reaching the middle of the working line, round it to the left to the middle of the inclined line, write a small oval.
Capital letter "E".
We start writing just below the middle of the interline space, lead up to the right, bring it to the middle of the interline space, write a rounded line, bring it to the bottom line of the working line, round it up to the left. In the middle of the working line, we write the second element - a straight line.
Lowercase "e" letter.
The lowercase letter "e" is similar in spelling with the capital letter "E".
Capital letter "U".
We start writing from the middle of the interline space, draw a small straight line up to the right, then write down a long straight oblique line, slightly not reaching the bottom line of the working line, round it down to the left, touching the bottom line of the working line, write a loop, crossing what is written on the top line of the working line lines, then write an oval.
The letter is a lowercase letter "u".
We start writing from the top line of the working line, we draw down a straight inclined line to the bottom line of the working line; Without taking your hands off, we rise up the written to the middle, make a smoothly sagging line and lead down, write an oval.
Capital letter "I".
We begin to write a little above the line of the working line, round it down to the right, touching the bottom line of the working line, draw a long straight sloping line smoothly upwards; not reaching the middle of the interline space, we round to the left and write an oval that touches the top line of the working line, without taking our hands off, we draw down a straight inclined line with a rounding at the bottom to the right.
Lowercase "i" letter.
The lowercase letter "I" is similar in spelling with the capital letter "I".
The ability to write is one of the most important skills, along with reading, that any person should master (see also:). Many parents unreasonably believe that it is necessary to start teaching a child as early as possible, that it is this skill that is the highest indicator of the level of development. Is it so? Many experts agree that you should not start teaching a child to write until he is 5-6 years old. Teaching beautiful writing to a preschooler is not an easy task, it requires composure, perseverance and attentiveness.
All parents want to be proud of their child and try to teach him to write at an early age. But such an approach can only harm if you do not know how to properly deal with a child.Children at the age of 3-4 years, in their main number, are fidgets. They want to run, jump, play, but not write any letters and numbers in boring copybooks. If you still decide to teach your child to write, then remember: now you will need to deal with the baby with calligraphy regularly, otherwise after a while he may forget everything you taught him!
Not everyone may like these activities, so he can start writing letters and numbers quickly and sloppily, wanting to finish them as soon as possible and move on to some more interesting things in the end. All this can lead to the development of ugly handwriting, which will not be so easy to fix later. Let's figure out what the experts are talking about: is it worth it to start teaching children to write at preschool age, how effective will such classes be and their consequences?
Should parents teach their children to write before the age of 5?
Teaching crumbs to write at 3-4 years old is not worth it for a number of reasons:
- Children lose the sense of novelty that comes with being in school. When a student understands that everything they begin to go through in the classroom, namely the writing of numbers and letters, he loses all interest in learning. The child becomes bored and lazy to complete the task. We are no longer talking about any incentive and joy to learn new things every day.
- Writing skills are wrong. Two experts in the field of child development (physiologist Maryana Bezrukikh and early development specialist Lena Danilova) are convinced that the development of writing skills, including penmanship and speed writing, does not occur in one year, but gradually. It takes years. You should not throw all your strength into teaching your baby to write beautifully. All this may negatively affect his entire style of writing in the future.

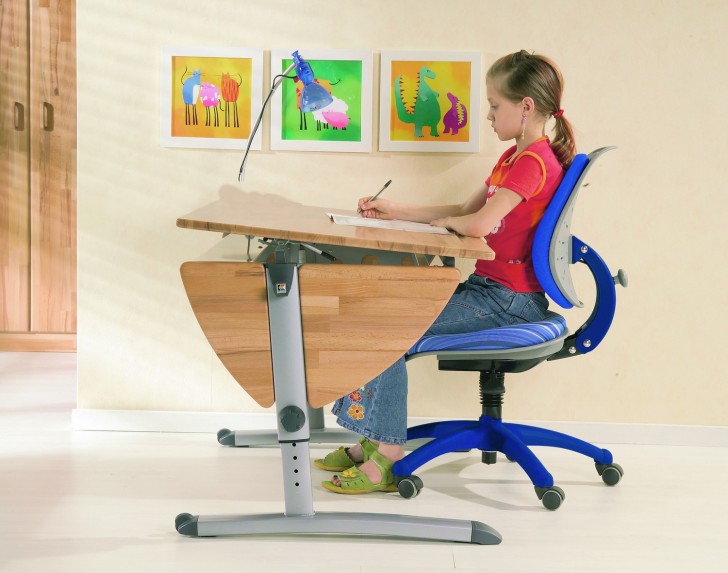 Correct posture must be formed from a very early age, as soon as the baby takes his first pencil and sits down to draw at the table. In the future, this will help to avoid many problems with the spine.
 At first, a preparatory base will be enough for training. Teach the baby to sit at the table in the correct position, and also teach how to grab a pencil or pen. Over time, you can begin the learning process, but remember that it is important to be consistent in your teaching techniques. Each number and each letter should be explained separately, explaining and comparing. A child is able to fully appreciate the method of writing a particular letter only closer to 5-6 years.
Haste in learning always only hurts, it is especially important not to rush at first. By pushing the child, you will provoke him to make mistakes in writing individual elements.
Increasingly, there will be irregularities in height and width, inclination. It will become almost impossible for a child to combine letters into words. Then, having come to the first grade, the child will fall into the hands of a teacher who will be forced to correct many of your mistakes.
When should you start?
Usually, it is at school that we learn to write letters and numbers beautifully. Learning to write there takes place in several stages: first, children are shown how to sit at a school desk, then how to hold a pen or pencil. Teachers give the child the first ideas about letters and numbers, talk about the height and width of the lines and slopes in them, show how to connect them together correctly.
Early mastery of accurate writing of numbers and letters does not guarantee the safety of this skill in the future. It is important to put your hand in such a way that the child is minimally tired in the process of work. This skill, as well as the skill for beautiful handwriting, is made up of regular practice. A baby who loves to run and jump can hardly be forced to sit at a notebook. When the parents nevertheless succeed, then his only goal is to finish everything as soon as possible, so that everyone falls behind, and then run to play. This wrong approach risks spoiling children's handwriting for a long time.

 The child should want to learn to write on his own, and until that time, classes can be held in a playful way
 Let's conclude: it is desirable to deal with a child in a playful way. Any learning activity should be presented easily and naturally. Do not rush to put a baby 3-4 years old for prescriptions and notebooks in a line. Wait a couple of years, then your successes with him will be more tangible and not so labored. Until that time, you should only prepare small hands for future writing.
Preparing a Preschooler to Master Writing Skills
All of the above does not mean that a 5-6 year old kid does not need to be prepared for school at all, because before he starts learning to write, you need to master a variety of skills. Here, just, the help of parents will come in handy. For this, it is necessary to pay attention to the development of fine motor skills and coordination of movements. Thanks to the full development, the child will be able to write beautifully in the future, so that both his and your eyes will rejoice. Teach the baby to do everything carefully, to show diligence and attentiveness. It is these skills that should be developed in children in the preschool period. We are talking about the age of 2 to 5 years. To do this, the following activities will help you.
Exercises for the development of fine motor function

 You can develop fine motor skills in many ways, for example, modeling from plasticine
 - finger gymnastics: a great option to stretch naughty fingers is to play a game called "Twister" together, only with your fingers;
- make a shadow theater with your hands;
- make applications from all kinds of materials (colored paper, felt, autumn leaves, grains, etc.);
- learning to cut (first simple shapes, then more complex pictures);
- make drawings on semolina, sand (we recommend reading:);
- folding, paper modeling, origami;
- construction;
- weaving bracelets and figures from rubber bands;
- classes with loose and small objects (cereals, legumes, pebbles): repeating a pattern, making a mosaic, stringing pasta on a string, etc .;
- modeling from clay, dough, plasticine;
- copybook, coloring, drawing.
Remind the importance of posture. Pay close attention to your position at the table. In the future, while focusing on the process of writing, posture control will be carried out at a subconscious level.
It is very important to teach the baby to hold a pencil from an early age. Today, there are convenient triangular-shaped pencils with a thick diameter on sale. Thanks to them, it will be easier for the child to master this skill. Also on sale are special nozzles for a pencil that teach the correct grip.
Don't do the same activity for too long. Alternate classes, and also do not forget about moments of rest, when it is important to give your fingers and hands the opportunity to relax and relieve tension.
 There are many colorful and interesting recipes for younger children, where the baby will learn to trace, hatch and much more.
 The method of teaching writing developed by M.T. Strizhakova. It's called "From Drawing to Letter". All children love to color and shade drawings. The shading method can also be used in copybooks with wide or narrow rulers.
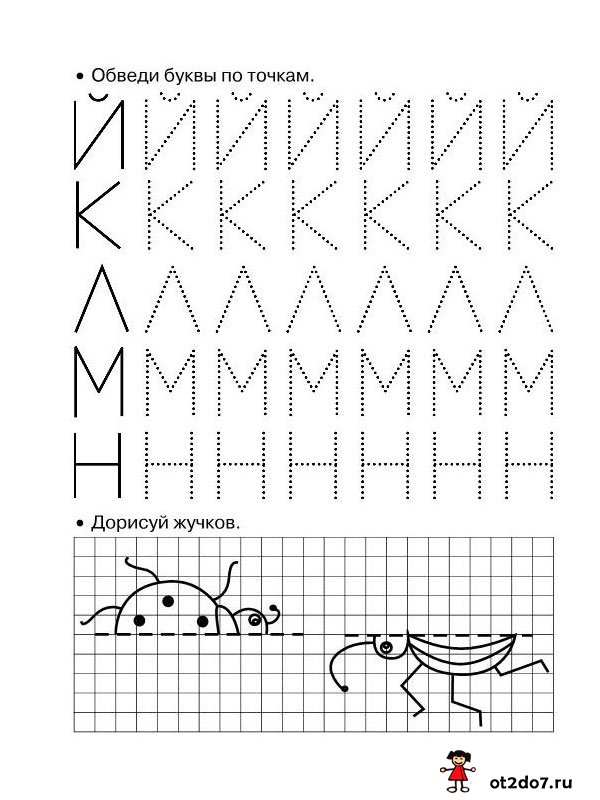
Prescriptions for kids may be interesting. In such tutorials, tasks are given to trace contours, drawings, figures, numbers by points. Remember, we are all learning, which means everything takes time and no rush.
What do you need to know when learning to write?
If a preschooler himself asks you to teach him to write, then during the training, adhere to the following rules:
- be sure to praise the baby during classes for any of his success and do not scold him if something suddenly did not work out for him;
- start teaching with simple tasks, first draw by dots, then by dotted lines;
- only after the baby understands how to print printed letters and numbers, you can already move on to writing capital letters.
There is no need to spend a lot of time on classes, 20 minutes a day is enough. They will be enough so that the child can learn something, but at the same time he does not get bored and is always interested.
Writing numbers should be meaningful, so you should, first of all, learn to count up to 10. You can start memorizing numbers by the age of 4-5, and when you already write them with your child, be sure to pronounce the names to him so that he remembers.


So where to start:
- Teach your baby to navigate the location of the elements of the cage. He must be able to determine its sides, upper and lower boundaries, divide the cell into 4 equal parts, find its center and corners.
- An important step is teaching the child to observe the angle of inclination while writing numbers. You can determine the slope as follows: draw a line that will connect the upper right corner of your cell with a point placed in the middle of the lower edge.
- Before proceeding directly to writing numbers, the child should practice drawing dashes, ticks, circles, semi-ovals. It is from these elements that all numbers are composed.
Important! The number in height is always equal to the size of the cell in the copybook or notebook, so it occupies almost the entire part of the cell. The right edge of the number is always in contact with the right side of the cell, without going beyond its edges.
Consider the example of writing the numbers 0 and 1. By analogy, you can independently teach the child the correct spelling:


Buy or download math worksheets. First, the fidget must trace the numbers in dots, then in dotted lines. On one line, examples should be repeated 2-3 times so that you can always focus on them. You can also purchase a stencil for the baby, he will definitely like to circle various signs on it. To prevent loss of interest and boredom during classes with prescriptions, give your child the opportunity to draw circles, a sun, or hearts next to the numbers. With such entertainment, we learn and assimilate new material faster.
Learn numbers by dots
Coloring books with numbers
Letters
Before starting to draw letters, the child must master the alphabet, figure out what this or that sign looks like. In this, he will definitely be helped by copybooks with block letters. Draw your baby's attention to the boundaries of the lines, explain to him that the letters must be written so that they do not go beyond these limits. Conduct calligraphy classes with him in the form of a game, compare letters with various objects. For example, you can compare “O” with an inflatable ring, “C” with a month, “U” with a slingshot. So your classes will be more fun and exciting, and it will be easier to remember the names and appearance.
Start learning how to write capital letters only after the child has mastered capital letters well. First, show several times how to write a new sign correctly. Comment on your actions, tell how and where you draw the lines, what elements the letter consists of. Then write this letter together, help the preschooler in his first experiments with writing. For a better understanding, you can show with your fingers in the air how it should be, and then ask the baby to repeat after you. Once he succeeds, you can give him time to write on his own.
Engage with your child, develop his imagination and imagination, train fine motor skills and coordination of movements, praise his every achievement. Then you will definitely be able to teach your baby to write without spending a lot of time and nerves!
Learning with a child to write block letters in dots. The letters are already written with a dotted line, you need to carefully circle them
Before learning to write in real cursive capital letters, they need to learn how to "print", that is, write in block letters. There are practically no such "copybooks" anywhere, and it is very necessary to teach a child to write block letters.
Print these cards, you can have several copies at once, let the kid train to trace the letters until he gets neat, even lines.
All letters are written with dots, the kid just needs to circle them with a pencil, thanks to such exercises the kid will memorize the letters, as well as learn how to write them correctly


Download file: (downloads: 678)
Dear readers!
All materials from the site can be downloaded absolutely free of charge. All files are checked by antivirus and do not contain hidden scripts.
Pictures in the archives are not watermarked.
The site is replenished with materials based on the free work of the authors. If you want to thank them for their work and support our project, you can transfer any amount that is not burdensome for you to the site's account.
Thank you in advance!!!
Recipe- a wonderful notion of adults to develop writing skills in children. You can use prescriptions from a very early age, starting from 3 years.
Now you can find a huge number of prescriptions. The main thing is to choose prescriptions for the child, corresponding to his age. On this page you can download and print copybooks for children 3-4 years old, 5-6 years old (preschoolers) and first graders for free.
You should not start classes immediately with numbers, letters and words - it is very difficult. Toddlers aged 3-4 years old will be interested in prescriptions with exciting tasks for attentiveness, accuracy and coordination of movements.
These are recipes with fairly simple shapes, lines, various curls. Let the kid first practice his hand, circling the fragments of pictures, funny hooks and sticks.
The kid must learn to draw various curly and continuous lines evenly and beautifully, try not to tear the pencil from the paper. It is not so easy.
Download recipes for kids
I. Popov's recipes are perfect for kids for the very first lessons. Sticks and hooks are built into the copybook drawings. First, you can color the drawing, and then move on to "lowercase writing."
Download recipes for boys

Funny recipes for children 5-6 years old
For children 5-6 years old, take prescriptions with more difficult tasks. Using such recipes, your child will learn to carefully draw dotted lines, master the first skills of writing and drawing, and gain dexterity when working with a pen and pencil.
Download recipes for children 5-6 years old

Download fun recipes for preschoolers
Recipes for a preschooler will prepare the child for writing, introduce him to the configuration of the letters of the Russian alphabet, and teach him to write letters in cursive. Use the spelling data, and your child will quickly remember the name and spelling of letters.
Download copybook - alphabet for preschoolers

Mathematics recipes with numbers and tasks will help the child learn how to write numbers correctly and get acquainted with the score in advance. By clicking on the link, you can download several types of math worksheets quickly and for free
Download copybooks with numbers

Recipes for schoolchildren
To develop a beautiful handwriting, the child will need a lot of time. But now at school very little attention is paid to the correct and calligraphic writing of letters and numbers. Therefore, you can print out the alphabet for schoolchildren and study additionally. These recipes - without pictures, are aimed at more serious work on teaching writing. In addition to the letters themselves, there are also individual elements of letters in the writing.
Download copybooks for schoolchildren "Alphabet in words"


Every parent strives for a child to have a beautiful and understandable handwriting. The prescriptions come to the rescue. Calligraphic samples of letters, syllables, numbers are presented in notebooks for written work. They help children learn how to write correctly by outlining the principles and foundations of calligraphy. Adults also resort to the help of prescriptions. With regular training, they correct sloppy handwriting.
Recipe

Adults rarely write by hand, often when absolutely necessary. The letter was replaced by computer text. This is convenient, but at the same time, the handwriting of adults deteriorates due to lack of training. Children in schools and kindergartens are taught to write correctly and beautifully, to regularly reinforce the skill, train their hand and learn to write using special aids at home.
The simplest prescriptions are made independently, they are suitable for children 2 years old, 3 years old. It is necessary to take a notebook in a box and draw simple figures with a dotted line: lines, squares, triangles. And the kids with the help of their parents or on their own will circle the figures. Examples for beginners are shown below. The network contains templates for pdf, word and other formats.
For preschoolers


Children 3 - 4 years old


45 years


5 – 6 years


For the preparatory group


By points


Patterns: sticks - hooks


For 1st class


For 2nd grade


Mathematics


Classic


For adults


The printed alphabet is simpler than the written alphabet because the letters do not connect with each other. Such study notebooks are suitable for kindergarten, when kids are just introduced to the alphabet. Coloring books in a playful way will introduce the child to the alphabet when he paints a picture that begins with a certain letter. For example: a watermelon when it comes to the letter "A" or a hippopotamus when it gets acquainted with the letter "B".
While learning the printed alphabet, the child should explain what vowels and consonants are, how hissing sounds differ from voiced, hard from soft.


calligraphic letters

The uppercase alphabet is taught before school. These are complex characters where the spelling of uppercase letters differs from lowercase ones. In this case, it is important to connect the symbols correctly with each other. Parents and teachers use modern types of exercise books or copybooks from Soviet times.
Adults and children of senior school age can use prescriptions in a wide range; for kids, notebooks are used in a narrow one. You can print the copybook, where all the letters are on one sheet - this will help you quickly remember the sequence of letters in the alphabet.


How numbers are written

Mathematical symbols are easier to write because they are much smaller: only 10 digits versus 33 letters of the alphabet, and the numbers do not connect to each other. For prescriptions, they use notebooks in a box, where each number is clearly limited and does not go beyond.
School copybooks with numbers are equipped with shading, arrows and other signs that help you understand where the character starts from, the writing algorithm. Printouts with examples of numbers are used for teaching both preschoolers and school-age children.


Calligraphy workbooks

Teachers and educators recommend purchasing special notebooks designed to prepare the hand for writing. The best prescriptions were developed and created by domestic teachers, which include the Nekin simulator, the working prescriptions of Bortnikova, Zhukova, Kolesnikova. Benefits are designed for children of different ages.
Bortnikova

Zhukova

Kolesnikova

Nekina

How to prepare your hand for writing

To prepare the hands of future first-graders, teachers have compiled a list of special tasks.
Regular exercises train fine motor skills in children of any age:
- Finger games will help prepare the hand, but you should not give priority to only one hand, regardless of whether the child is right-handed or left-handed. Limbs should be equally involved.
- Coloring pages - a fun pastime develops creative imagination and prepares fingers for writing.
- Special outline notebooks for future schoolchildren. The authors propose to circle pictures or large letters by dots, draw lines without lifting the pencil from the paper (maze).
- Recipes - the first teaching aids are developed for children 4-5 years old, 6-7 years old, for grades 1-2, for grades 3, 4. Recipes introduce kids to printed and capital letters, syllables. There are also mathematical aids with figures and numbers, notebooks in Russian, English, German, French and other languages.
A child of senior preschool age learns according to prescriptions. They can be bought at stationery, bookstores or downloaded for free online.
How to fix handwriting

Many people believe that beautiful handwriting is formed at school age, and adults will no longer be able to correct it. In fact, it can be improved regardless of age: both a first grader and an adult are able to put their hands up. However, this is the result of long and regular training.
It is important to follow the rules and take into account the nuances:
- A comfortable place to write - you need good lighting, choose a table with a hard surface, a chair with a back. These conditions are especially important for toddlers, children 3-6 years old, younger students, but are also recommended for adults.
- When working, you can not rush, you need maximum focus on the process.
- Suitable stationery. Previously, experts argued that for success in calligraphy, good handwriting, you need to use a fountain pen. Today, ball is also allowed, but with a thin rod.
- Educational material - children use prescriptions for the appropriate age. They learn to write in dots, hatching or dotted lines. Adults can get a notebook in a narrow line and train in it. If you wish, you can download ready-made online copybooks, learn how to correctly write compounds of letters, their elements, syllables and sentences.
- Initially, straight and parallel lines, circles and other simple shapes should be written. Then move on to letters and syllables.
- If necessary, they turn to calligraphy masters, they will tell you how to write letters and compounds that have errors. They will advise exercises that improve fine motor skills of hands and handwriting.
Don't expect quick results. Calligraphy will improve after hard and regular practice.
How to learn to write correctly and beautifully

It is easier to teach a student to write beautiful handwriting right away than to retrain and correct mistakes later.
Parents of preschoolers and first-graders will be helped by the advice of experienced teachers:
- Calligraphic handwriting is impossible without developed finger motor skills. To do this, you need to draw more often with pencils, sculpt from plasticine, engage in origami, beadwork. For the little ones, games with cereals will be interesting and useful. To do this, an adult needs to mix a little buckwheat and rice, and the child will sort them out.
- Beautiful handwriting is directly related to a straight posture. The kid should not be hunched over while he writes in the recipe. The back should be straight, for this he is seated on a chair with a hard back. At the same time, computer swivel chairs are not suitable.
- High quality writing pen. It is necessary to select stationery with a thin rod. When choosing between a gel pen and a ballpoint pen, the latter is preferred because it does not scratch the paper. The place for gripping fingers should be made of rubber. Such a pen will not slip in children's hands, unlike a plastic or metal counterpart.
- Handle grip. The correct position in the hand: the pen lies on the middle finger, the thumb and forefinger hold it, and the ring and little fingers are pressed to the palm. With an incorrect grip, beautiful handwriting cannot be achieved.
Compliance with the rules of calligraphy will help the child learn how to write beautiful letters from A to Z, words, numbers and numbers.