How to make large foliage flowers from corrugated paper. How to make large flowers from corrugated paper
A bright beautiful bouquet will be a wonderful gift. Flower arrangements are used to decorate festive tables. They are used in the design of various events. Such products can be made by hand. They will not fade over time, for a long time they will delight others with their impeccable appearance.
To create an interesting composition, consider a photo of corrugated paper flowers. Experienced craftswomen offer various options for the manufacture and layout of plant elements.

The structure of corrugated paper allows you to create voluminous compositions. The material holds its shape well and is suitable for decorating bouquets. It will take very little time to create your own unique flower.

Materials and tools
To start the creative process, they purchase corrugated paper. It is inexpensive, it is easy to get it in the store. Corrugated material is produced in a wide range of colors.


You can buy solid color options or rolls with a soft shade transition. They open up almost unlimited possibilities for translating interesting ideas into reality.

To make flowers, you need the following materials:
- corrugated paper;
- cardboard;
- wire;
- glue;
- cotton wool;
- paper clips;
- threads.

If you plan to make bouquets with sweets, then they purchase sweets in advance, which will become an important component of the product.

To work, you need the following tools:
- scissors;
- simple pencil;
- pliers;
- silicone gun.

To make beautiful flowers, live plants are closely watched. Each has its own structural features, which is taken into account in the manufacture. To get large flowers from corrugated paper, enlarge the standard pattern to the desired size.

The technology for performing the work is no different from the usual procedure for making flowers. But for a bouquet of large plants, you will need more materials. They will be a great decoration for the interior at the celebration.

Corrugated paper rose
The queen of flowers always looks great in a single copy and in bouquets. This delicate flower is easy to make yourself.

Step-by-step instruction:
- Petals and leaves are drawn on cardboard. To do this, you can use ready-made patterns or remove them from a real rose.
- Small indentations are made in the blanks of the petals with your fingers to give the elements the desired shape.
- The length of the leg is chosen at the request of the craftswoman; for this, the wire is carefully cut with pliers.
- Prepare small pieces of wire of a smaller diameter, on which the green leaves will be attached.
- The end of the wire is folded back with pliers to form a bud. For this, cotton wool is used, or the middle of the flower is simply wrapped in paper.
- One by one, they begin to glue the petals to the core, starting with the smallest part. To securely fasten the elements, a strong tone-on-tone thread is used.
- The flower is ready. Now you need to take a small strip of corrugated paper. It is wound around the stem, on which pre-prepared leaves are attached. This is the final stage of the assembly.
- The petals and leaves are gently straightened.


If you make several flowers, then they are collected in a bouquet. There is an easier way to make a rose. It takes only 15 minutes for one flower.

A strip 10 cm wide is cut out of long paper. The edge of the workpiece is made uneven by pinching it with your fingers along the entire length. After this operation, the strip is folded into a bud, it is attached to the wire with a thread. You can create an amazing composition in just 1 hour.

Novice craftswomen are worried about how to make flowers from corrugated paper. To do this, you need to prepare materials and tools, be patient and get to work. If you follow the instructions exactly, you can get excellent results.

Corrugated paper peony
For a luxurious peony, you need paper in different shades. A strip is cut from each roll. The size of the element depends on its distance from the core. The dark color is located closer to the center, after which there is a transition to lighter shades. The resulting elements are folded in an accordion, they must all have the same width.


The edge of each component is shaped into a petal. The middle parts of the obtained blanks are connected and stacked in size. All components are rewound with a thread, a flower is formed.

Corrugated paper tulips
Take a template and cut out the petals. Each of them twist the tip, give the shape of a cup at the base. Then they begin to form a bud, when performing this operation, glue is used.


Elements are alternately tied to the core. After this operation, a strip of green paper is wrapped around the stem. The cut sheets are attached to the stem.

Corrugated paper flowers with sweets
A rectangle is cut out of paper, folded in half, and the edges are cut off on one side with scissors. Candy is placed in such a blank. The material in the center is stretched slightly by hand. On one side, the edge is fixed with an elastic band. A wire is used as a stem, it is attached to the base of the flower. To do this, you can use a silicone gun.


Cut out the petals. They need to be shaped by stretching the middle and twisting the edges of the workpiece. For a lush flower, cut out more petals. They are attached to the bud with threads and glue. This fixation ensures a secure connection of all components. You can also use rubber bands for this.

Leaves are cut out of green paper and fixed at the base. The stem is wrapped in green paper. A bouquet of flowers will be a great holiday gift. Small bows will give the composition a festive look, they are attached with skewers. Such a surprise will definitely be appreciated.


Finding ready-made stencils is easy, you can make them yourself. Don't worry if the elements end up different. In nature, there are no two absolutely identical leaves. Fold the paper several times to speed up the cutting process.

To achieve a natural color of the petal, you can apply a darker paint to the base with a brush. Using a variety of shades in one flower will give it a natural look.

The patterns are sorted and folded into separate envelopes, which are signed. Whenever a specific element is needed again, there is no need to start the process by developing a template.

Conclusion
Amazing compositions for the holiday, unusual gifts are made of corrugated paper. Simple flowers will help to decorate the table and complement the interior.

An unusual option will turn out if you use various plants. Bright poppies, delicate cornflowers and daisies are combined into a field bouquet. Multi-colored asters are complemented with greenery to give the composition a finished look.


Bouquets made of corrugated paper and sweets are especially popular. Those with a sweet tooth will love them. Any flower can be collected. It is only important to choose the right shape, size and number of petals.

To create flowers, you do not need to attend expensive courses, purchase a set of tools. The manufacturing technology is simple and understandable even for novice craftswomen. Working with such material will delight both adults and children.

Photo of flowers from corrugated paper


On the eve of the holiday, everyone tries to decorate the room in which the solemn event will be held. An unusual and, at the same time, beautiful decoration are large growth flowers made of corrugated paper, which are easy to make with your own hands. From a distance, such crafts look like living things. The technology for making large flowers from corrugated paper with your own hands is quite simple, and the process itself does not take much time. The main thing is to stock up on the necessary material.
Advantages of corrugated paper for flower making
Why are they trying to make most of the paper flowers that they make with their own hands from corrugated paper? The fact is that many advantages of such a material are known, so it is perfect for counterfeiting. Corrugated paper is pleasant to the touch, it is a pleasure to work with it.
In addition, the benefits are:
- availability - it is not difficult to buy corrugated paper for flowers, it is sold in a stationery store at an affordable price;
- does not require special storage conditions - the material is packed in rolls, it can be stored in a closet or other dry place;
- ease of use - to make a bouquet of flowers from corrugated paper with your own hands, you will need scissors and glue, sometimes additional materials and tools are used, depending on the type of fake;
- the ability to quickly eliminate errors - corrugated paper is easy to use, if it was not possible to correctly complete any part, you can make new blanks;
- a wide range of textures and colors - thanks to a wide range of colors, you can create bright and memorable color models.
With the use of corrugated paper, craftsmen understand how much this seemingly fragile material is capable of giving. It stimulates the imagination, which is great for counterfeits. You can make huge growth flowers in a floor vase from corrugated paper with your own hands, and small beautiful flowers for decorating a gift. From corrugated paper, you can make not only voluminous, but also flat flowers for making beautiful postcards.
Corrugated paper roses - step by step instructions with a photo
There are several ways how to make large voluminous or small graceful flowers from corrugated paper with your own hands. Depending on the idea, completely different compositions are obtained, which are easy to use for fake or for decorating a voluminous bouquet.
To make a beautiful rose from corrugated paper - a huge or very small flower - you will need the following materials and tools:
- pink and green corrugated paper;
- wire;
- PVA glue;
- scissors;
- cardboard;
- simple pencil.
The process of creating a rose from corrugated paper is quite complicated, it takes time and perseverance. The master class consists of the following:
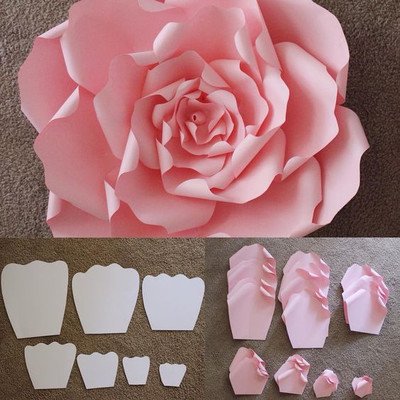
- Draw flower petals of different sizes on cardboard. It is advisable to use at least 3 templates. The more options for the petals, the more voluminous and more beautiful the rose will turn out.
- Cut the blanks with scissors.
- Fold pink corrugated paper in several layers, attach each blank of different sizes to it, circle the contours and cut out the petals. The result should be several groups of figures of different sizes.
- It is necessary to pre-prepare each rose petal for the upcoming assembly. To do this, the corrugated paper figures must be slightly stretched from the rounded corners. In the center, you need to make a small notch with your fingers.
- Using a similar scheme, make leaves for the future flower from green corrugated paper with your own hands. However, there is no need to stretch them as they are not involved in making the bud. You also need to prepare a wire that will be used instead of the stem.
- Cut the wire into several lengths. Wrap them in pairs with green tape or special tape used for making flower bouquets, as tightly as possible. Bend one end with pliers. A rose bud will be attached from this edge.
- Take the smallest petal and wrap it around the folded end of the wire. In advance, you need to fix the lower part of the flower petal made of corrugated paper, made by hand, using glue, as in the photo.
- Gradually form a rosebud, attaching the petals in accordance with the dimensions. In the center of the bud, there should be small petals, along the edges - the largest.
- Cut the herringbone out of green corrugated paper as shown in the photo. Wrap this detail around the bud at the base of the flower.
- Secure the sepal with floral tape. Wrap the stem with green corrugated paper, tightly, cut at the bottom and secure with glue. Glue the leaves in certain places on the stem.
- At the end, it is enough to spread the petals to give the rose an attractive appearance.
You can make several of these beautiful roses out of paper and put them in a vase. The result is an interesting bouquet that looks like a living one at first glance. Also, if you make a lot of roses, you can put them in a basket. If only the buds are needed, the stems are easily cut off, leaving a small margin (about 2 cm).
On a note! Using the above master class, you can make huge outdoor flowers from corrugated paper with your own hands. To do this, you will have to make many larger petals and fix the bud on a long wire. To keep the tall stem stable on the floor, you can roll it up from the bottom into a ring.
Master class: simple do-it-yourself paper rose
This master class is much simpler than the previous one, but it also helps to gradually make easy-to-perform, but rather beautiful flowers from corrugated paper with your own hands. In this case, we make one bud, without a stem. To do this, you will have to use a long strip of red corrugated paper. The length of the material is selected depending on how much the rose is planned to be made.
Step-by-step instructions for making a simple flower from corrugated paper with your own hands:

When the bud is ready, all that remains is to fix the edge of the paper with glue so that the rose does not disintegrate. In addition, you can make a green sepal, as in the previous master class, which will also serve as a retainer. Such large and small flowers, made by hand from corrugated paper, are in demand when decorating rooms with numbers or creating other compositions.
Making large peonies from corrugated paper
Peonies are beautiful flowers that are loved by many. Not surprisingly, these paper flower making workshops are a success. Beautiful bouquets of paper peonies will delight loved ones and will be a pleasant gift for a celebration.
To make flowers from thin corrugated paper with your own hands, you will need the following materials and tools:
- corrugated paper of different colors;
- wire;
- scissors;
- stationery clip;
- thin thread.
Workshop on making large peonies from corrugated paper:
- Cut a piece of the same size from each roll of corrugated paper.
- Fold each piece of corrugated paper into an accordion fold. Secure with a clerical clip so that it does not fall apart.
- Label each accordion from smallest to largest. Cut off as in the photo. The difference between the length of one piece and the next strip should be approximately 3 cm.
- Fasten each piece exactly in the center with a clerical clip. Cut corners from everyone.

Home decor is a constant and never-ending work. In the process, new techniques and types of work are being mastered. In this article, we will talk about how to make flowers from corrugated paper. This paper can be found in flower shops. But in a larger assortment, it is in specialized establishments that sell everything for needlework. For work, you will also need wire or thin sticks (bamboo skewers are also suitable), glue and scissors.
General principles and rules
Despite the fact that corrugated paper flowers are made different, the principles of work are the same. Here are briefly general rules that will help you make paper flowers very similar to real ones with your own hands.
These are, in fact, all the rules. And one more thing: the stem is prepared first. For it, wire or sticks of different thicknesses are used, which is wrapped in a long thin strip of green corrugated paper. The tape can be coated with glue, and then wound onto the base. You can roll it dry, and fix the edge with a drop of glue. Another point: if you are going to collect a composition from flowers, leave the lower 1/3 of the stem without finishing - it will be easier to make a bouquet.
Poppies
Corrugated paper poppies are very easy to make. It is important to find the right shade of scarlet. You will also need a small piece of black for the core. But, if it is not there, you can use any dark one, then paint it black.
We do corrugated paper poppy like this:
- We fold a small square from paper napkins of any color. We wrap it with black corrugated paper. If there is no black, take any dark one, then paint it.

- We cut out two or three petals of different sizes from scarlet paper: small, medium and large.
- We collect the petals all together (do not put them in a neat pile) and crush them into a ball.
- We disassemble the ball into petals.

- We take the core, wrap the first small petal around it from left to right.
- The second small petal partially overlaps the first, followed by the middle one, too.

- The second middle and two large petals form the second row. They are located so that their central part overlaps the junction of the previous row.

- Gathering everything together, we insert the wire into the base, wrap the base with thread, glue it. We wrap it in green paper.

Poppy is one of the easiest flowers to DIY from corrugated paper. It looks, at the same time, very good. You can use them in a campaign with other flowers, or make a bouquet with only poppies.
Even such a simple flower can be made in different ways. First of all, you can change the middle. In the master class described above, the core of the flower is very simple. It can be made more like natural. Using the same technology, we make the middle, but from white paper. And from black (can be painted) we cut out a strip about 1 cm wide and 4-5 cm long. On one side we cut it into thin stripes (a couple of millimeters wide). We twist the resulting "noodles", getting thin stamens. We wrap the stamens around the core, and then we act according to the same algorithm.
How to make paper and candy crocuses
An unusual gift can be made by using candies as the core of flowers. It turns out an original sweet gift. Such a core can be made in flowers with a large hollow bud inside - a tulip or crocus, for example. Moreover, corrugated paper crocuses are very easy to make. Everything will take 5-10 minutes. Not more.

A bouquet of corrugated paper with sweets is a nice surprise
- Cut out a square with a side of 15 cm from paper.
- We divide it into three parts, making a cut to a depth of 7.5 cm.Three petals are obtained.

- Each petal, measuring 5 cm from the top, scroll around its axis and bend the upper part down.
- Use your fingers to give them a concave shape.

- We take the formed petals, wrap them around the stem so that each petal takes its place - about 1/3 of the entire diameter. To do this, the bottom edge will have to be crushed well.

- We make leaves from green paper. Cut out a rectangle with sides 5 * 8 cm.
- We divide it into three parts, making incisions to a depth of 8 cm.
- Having stepped back from the edge of 3 cm, we twist the strip of paper around its axis, bend the upper part down, straighten it and give it a rounded shape.

- We wrap the leaves around the bud. They should fall at the junction of the petals.

- We take a narrow strip of green paper, twisting it around the wire, form the stem.
That's all, the crocus made of corrugated paper and sweets is ready. Having made 7-9 pieces of these colors, you can put them in the basket. For more variety, you can make some small flowers.
Chrysanthemum
Chrysanthemums can be made using the technology described above. The difference is that there will be many petals and they will be narrow. And the principle is the same: we twist the upper part of the petal, lower it down. Only in the case of chrysanthemums, it is necessary to give the entire petal a curved shape.

For these paper chrysanthemums, candies are also used as a core. These corrugated paper flowers are best made from a material that is not too bright. The tones are softer, softer. For foliage, muted greens are also chosen. For more believability, take paper of two close shades and make petals in two shades.
So, do it yourself chrysanthemum from corrugated paper:

This chrysanthemum variant looks pretty good. But for greater believability, petals of different sizes can be made. You need at least three grades: small, medium and large. They will differ more in length than in width. Such a flower will look more magnificent, it will look richer in a bouquet. Try it.
Asters - simple and original
For simple yet eye-catching corrugated paper flowers, try making asters. They are made from corrugation in bright and pastel shades. They look best in a bouquet, and the colors can be different.

Corrugated paper asters can also be made from petals of different sizes - shorter ones closer to the center of the flower (there should be fewer of them), and longer ones at the periphery (there are more of them). You can bend them in one direction, or in the opposite direction. As you like best.
Corrugated paper roses: a step-by-step manufacturing algorithm (2 ways)
The good thing about corrugated paper flowers is that they can be made in different ways. The material is very plastic, it easily changes shape, because there are several ways. Someone wants to achieve more "naturalness", and someone is important about speed.
1 way (natural look)
For roses made of corrugated paper, it is better to choose paper of two or three very similar shades. This will make the flower look more natural. For example, white and crepe paper was used for the flower in the photo. The number of petals of different shades is arbitrary, as is their placement in the bud.

The manufacturing procedure is as follows:

As a result, we get a beautiful corrugated paper rose. In this version, it looks like a real flower. There is an easier and faster way (pictured below).
Method 2 (simple and fast)
Cut out a strip of paper 7-8 cm wide. You can make it uneven - narrower on one side, wider on the other. We fold it starting from the narrow edge with an "accordion". The width of the "accordion" is 3.5 -4.5 cm. From the resulting stack, cut out the petals by 2/3 of the height.
We wind the petals onto the wire (you can not wrap it with a green ribbon for now), starting from the narrow edge. As we twist it, we shape it with our fingers - stretch it on one side, crush it against the stem. Having installed all the petals, we fix them with a thread (just by winding a few turns). We correct the petals, forming a bud.

From green paper, folding it like an accordion, cut out long and narrow petals. Please note that their ends will need to be twisted, so they should not be so narrow (noticeably 1 cm). We wrap the cut petals from below, under the petals, twist the leaves with our fingers, and then draw up the stem.
Corrugated paper peonies (with patterns)
Peonies need yellow corrugated paper - for the core, green - for the foliage, pink, cream, crimson - for the flower itself. A wire or thin stick is suitable for the stem. You will also need PVA glue.

Corrugated paper peony is a rather complicated flower to make. It has many different petal shapes. You can't do without a pattern. But there are many varieties of peonies, so there are several patterns. Here are two options. The first one can be printed, cut out and used as a template - it is given in full size image. The second option can be drawn with your own hands in the cells.
Step-by-step manufacturing process with a photo:
- Cut out a strip of yellow paper 4-5 cm wide and 10-12 cm long. Fold it several times, cut into thin "noodles", leaving about 1 cm of uncut edge.
- We roll the resulting tape into a tight roll, using the whole edge for this. We grease it with glue and twist it. It turns out a shaggy yellow core around which the petals will be attached. We fix this center on a stick / wire, which will be the stem.

- Cut out the petals from paper. The minimum quantity is 20 pieces (all types), but the more, the more fluffy the flower will be. On the second pattern, the number of petals is indicated on each; on the first, explanations are needed. There are also numbers there. This is the required number of petals.
- Stretch each petal in the middle, without touching the edges, giving them a convex shape. Don't try to make them the same. This is not required. In the process, you can still stretch or squeeze a little.
- We begin to fold the petals from the smallest ones. We place them around the existing center. Place the first small petals just slightly overlapping their edges. We coat the base with glue.

- Next, take the middle petals. We lay them with a slight approach to one another.
- Then we put the large and the last - very large leaves. We coat each layer with a small amount of glue at the base.
- Leaves are also required. We cut them out of green paper. On the one hand, we squeeze them, forming a petiole, on the other, we straighten them in the middle, giving them a curved shape (similar to a boat).

- We attach the leaves under the bud, bend them down.
- You can also make leaves, like those of a peony, but this will also require a thin wire and several carved curly leaves. Streaks cannot be made on corrugated paper, but they can be marked with paint.

- We glue each leaf to the wire, wrap the petiole with a thin strip, then attach it to the stem.

The assembly process is a creative activity
- We take a long narrow strip of green corrugated paper (about 1 cm wide, 20-30 cm long - depending on the length of the stem). We wrap the base of the flower, then smoothly move to the stem. At the end, we fix the edge of the paper with a drop of glue.
The corrugated paper peony is ready. Usually they make up a bouquet. When you do the following, do not try to make them exactly the same. All flowers in nature are unique. Yours should be different too.

You can play with the size and number of petals, mixing petals of different shades, close in color. You can try to darken the petals at the base with paint. In general, there are a lot of options.
Corrugated paper flowers: photo ideas, patterns
Using the techniques described above, you can make any flower. The main snag is in the shape, number and size of the petals. The most important thing is still the form. It is characteristic of each petal. Sizes are arbitrary. Not only do flowers come in different sizes in nature, recently it has become fashionable to decorate the interior with giant growth flowers. The decoration is original, but specific. It is necessary to increase the basic patterns many times, it is difficult to work with large scales. It is best to practice on normal sized flowers first and then move on to larger ones.

A little about patterns. They can be found not only. If it happens in the summer, take the desired flower, disassemble it into petals. From the whole heap, select the most characteristic ones, attach them to a sheet of paper, circle them. Then the shape must be corrected taking into account the fact that these are still paper flowers. The pattern will finally take shape after a few trial and error. We will post several patterns and master classes in photos in this section.
Cornflowers
The simpler the flower, the more ways to make it. Cornflower from corrugated paper can be made using different techniques. Examples are in the photo.


If you want to make it very similar to the real one (A - a pattern for a blossoming flower, B - for a bud)
Iris
Making iris out of paper takes some imagination. A very unusual flower. The photo shows several techniques that can achieve different effects. Some flowers just resemble the original, some are very similar to it.


Anything different


Lilies ... Beautiful, but several techniques are applied


Pansies - a pattern for making from corrugated paper


0 216 060
The easiest way to feel the approach of any holiday is to start making home decor for the celebration. This time I decided to figure out how to make flowers from corrugated paper - realistic and stylized. Let's figure out together how to make flowers from corrugated paper and what is needed for this.
There are many handicraft techniques in the world that allow you to make beautiful flowers with your own hands - today flowers are made from beads and fabric, plain paper (quilling, origami, applique, and so on), they are knitted and felted, but still one of the most popular manufacturing methods remains assembly of flowers from corrugation. Why are these flowers good:
- they can be both photorealistic and fantasy;
- they are easy to make in a few minutes (as opposed to felting or beading);
- easy to dispose of (important for those who want to decorate a large hall with flowers for the holiday);
- very affordable materials - corrugated paper costs a penny, especially if you buy in rolls, not sheets;
- no special training required;
- there is no need to use any complex tool;
- it is easy to get an acceptable result without experience (for example, it can be done with sweets - even small bouquets look very presentable);
- the products are bright and expressive (which is very important for children).
Getting ready for work
What is required in order to make flowers from corrugated paper with your own hands:- several rolls of paper (it is better to choose matching colors and green for leaves and stems);
- wire, floral sleeve, or any other stalk attachment;
- cardboard for blanks;
- glue;
- sharp scissors;
- breadboard knife;
- threads and fishing line.
Making flowers
The easiest option:So, making flowers from corrugated paper of more complex options almost always follows the same scenario. I will describe it so as not to rewrite one by one:
- first you need to make a petal template;
- cut out 15-20 petals for each flower (if you want to make a realistic flower, then make petals of different sizes - for example, five small, five medium, five large);
- cut out the petals (when cutting, observe the direction of the corrugation);
- collect the central part of the bud (5-7 petals are twisted together, tying at the bottom and gluing);
- further, the petals need to be slightly stretched and bent so that they take the most natural form for the plant;
- glue the prepared petals to the bud;
- fix the flower head on the prepared stem.

How to make a stem:
- we take a piece of wire, a floral sleeve, an ordinary twig - at our discretion, we measure the required length;
- cut off;
- we decorate with green corrugation, or fabric, or paper;
- imitate leaves, shoots and thorns;
- cut on both sides again.

Making realistic roses

To make roses, prepare high-quality paper in the most natural shades. Do not take burgundy or fuchsia, use gentle tones - cold shades of pink, tea tones. These roses will look very, very natural.

And this is the easiest way to create a rose:
A similar version of twisting a rose flower, but already with explanations from the author:
Realistic peonies
A peony is a large flower in itself, so it is better not to try to make small flowers, but to collect some really large and beautiful peonies. To make a large flower from corrugated paper, you will need about twenty minutes.By the way, if you want to achieve a more natural color, then you can take white paper and tint it with food coloring - delicate pink and orange flowers will really look like real ones.


Or a more complicated option:
Decorative and stylized flowers
How to make simple flowers from corrugated paper? Step-by-step instructions for making different colors and different methods.Realistic lilies. Photo of creation step by step:

We make large flowers from corrugated paper - roses.

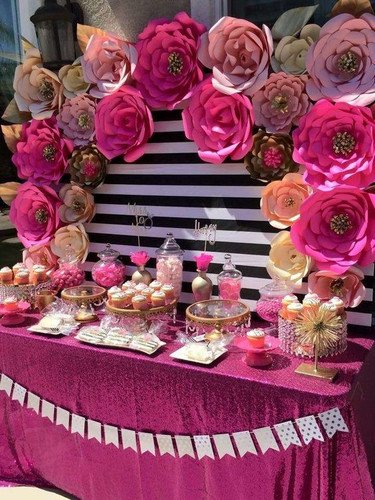
Such graceful and simple flowers made of corrugated paper can be useful for photo shoots or interior decoration, and they can also be used to create various decorative compositions on the street (you just need to take into account that the flowers are quite light and can be carried away by a gust of wind). In general, growth flowers are often used for decoration, but making them according to the same principle as small flowers is not too laborious.
Huge poppies / anemones:
Photo step by step: stylized poppies, but already in miniature.
In order to make lush artificial poppies, you need paper of three colors (black, red, green), wire, thread, glue or a stapler, and of course scissors.
- Cut a cylinder about ten centimeters long from a roll of black paper.
- Tie tightly with a thread and cut into a fringe along one edge - this will be the middle of our flower.
- You can also make a box in the middle - for this you need to take the scraps and wrap them in black paper to make a ball. The ball is fixed with a thread or staple staple, and attached to the center of the fringe.
- A roll of red paper must be unfolded and cut into six parts, each part folded like an accordion.
- Lay all the accordions one on top of the other and secure them well with thread.
- The corners of the accordions need to be rounded off with scissors.
- All the petals need to be well expanded (we straighten each accordion, and we get a petal).
- Use dense wire or wooden slats as stems - they need to be wrapped in green corrugation, large leaves should be cut out and attached to the stems.
- Fix the poppy heads on the stems and spread the petals.
Now you know how to make more flowers from corrugated paper. If you want to make giant flowers, then for beginners it will not be very difficult, however, it is worth considering some points:
- use high-quality paper - of course, even from junk paper, the master can make something beautiful, but for beginners it is better to rely on good materials;
- huge flowers must have weights, otherwise they will simply fall (or fix them with fishing line on the wall);
- do not smooth out the petals completely, leave a slight ripple;
- many petals are better than few (large roses of four petals look very pitiful);
- for a field composition, use several shades of green paper - then ordinary herbs and plants will look natural;
- if a child is engaged in making voluminous flowers with you, make sure that he does not cut himself with paper, scissors, fishing line or thread;
- for decoration, use made flowers of two or three shades - a larger number of flowers may look awkward.
More ideas and inspiration
Already wanted to make beautiful flowers from corrugated paper with your own hands? Great, so you liked the ideas I proposed and mk. I'll tell you a little more about what you can do with your own hands from corrugated paper.Check out how to make crepe paper crafts - cute daisies that look better than real ones!
And according to this master class, you can learn how to do sweet flowers from corrugated paper do it yourself. And so, flowers made of corrugated paper with sweets, decorated in the form of a heart:
For these flowers, you can create petals in any size! Just keep each layer smaller than the last. I used three layers in creating these colors, however, if you wish, you can always add a few more. Alternatively, you can also experiment with different types of centers and leaves.
To create flowers, we need:
- Paper (thick)
- Pieces of cardboard to use as a base
- Scissors

First, let's create patterns for the petals. Then take the paper and fold it in half. I made the template in such a way that the large petal fits into half of the leaf, and the smallest petal fits into a quarter of the leaf. You will need 6 halves for the large petal, 6 halves for the middle petal, 3 quarters for the small petal, and 3 quarters for the flower center.
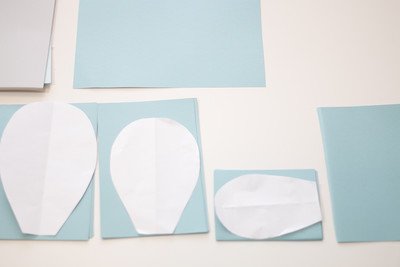
Cut out large petals according to the pattern.

At the base of the petal, cut out the base for bending, as shown in the photo:

Flip the petal over so that the widest part is at the bottom. Roll the petal away from you to create curls.

Now flip the petal back so that the base with the two flaps is at the bottom. Glue the sash so that it overlaps the other. When making the outer petals, do not make too large an angle, do not overlap the petals too much. As you progress, the petals should lie more evenly.


Remember: for the largest petals, you need to make a large overlap, otherwise the flower will be too straight. Do this for all large petals.
Now we will attach more and more petals to each other to form a ball shape. Add glue to the edge of each petal and glue.


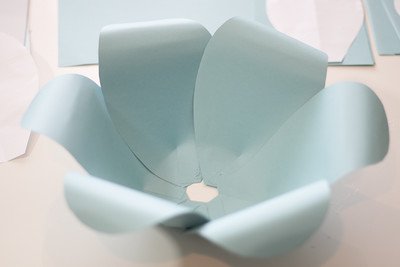
Continue adding petals to form a flower. Repeat all the above steps for the medium and small petals.


Glue thick cardboard to the "bottom" of the flower to give firmness and base to the flower. In this example, I just used this pink cardboard because it happened to have some kind of holdover.

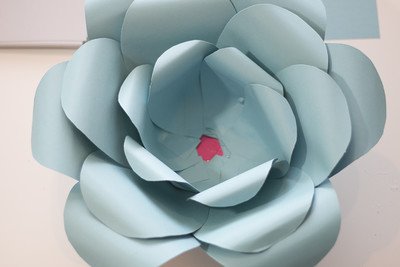
To make the center of the flower, take the last quarter of the leaf and fold it in half. Now we cut off the "brush". Make sure you cut from the folded side.


After cutting through 3 sheets, peel and unfold them.

After you finish rolling the first sheet, attach it to the next sheet and continue rolling. Do this until you have folded all 3 sheets together.

This is how the center of the flower should ultimately look. Now all you have to do is add glue to the bottom of the center and add it to your flower!


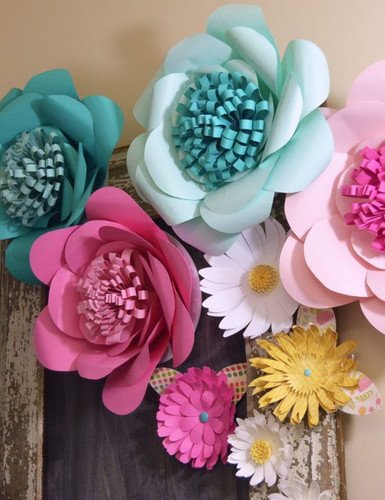
You can make many more different colors, just change the petal shape, size, color, and center.


I hope you enjoyed this master class. If you decide to try to make such flowers, be sure to share the photo with us!


- Rate - Excellent Good Not bad Bad Awful