Spaceship with your own hands from the girlfriend. What cosmic crafts make it yourself. Interesting crafts from plastic bottles and cardboard for the Day of Cosmonautics
Almost all educational institutions for the Day of Cosmonautics are held a variety of exhibitions of students. Naturally, on the eve of this peak, many in their heads the question arises, what to make crafts for the Day of Cosmonautics from the cast material. And especially for you, we have prepared the best ideas.
Ideas of Cosmonautics Cosmonautics
Flying plate of plastic plates.
Plastic plates are excellent material for creativity. It is worth noting that people are mastered from him a variety of crafts. If you decide to make a flying plate, then prepare:

Progress:
- Take a pair of plates. The covers from plastic bottles are glued to the back side of one plate. To another plate, glue a jar. Plastic plates are pre-painted with gouache paints.
- Lubricate the edges of plates with glue, and then connect them together. Even for reliability, the craft can be made in a stapler.
- Now the plate can be decorated. In this case, use your imagination.
And here are some more options for space plates.


Craft Disk.
Whatever to surprise everyone without exception at a kind of event, try to make crafts for Cosmonautics from disks. A space plate created from such a material looks quite interesting. For its creation, prepare:
- Disk and hemispheres of foamflast,
- Self-adhesive colored paper and decorative carnations,
- Plastic plastic stars, bamboo skewers and toothpicks,
- Sequins and major beads,
- Silent wire, glue and acrylic paint.

Progress:
- Take a self-adhesive colored paper, attach a disk to it and circle it around the circumference. Cut the circle, and glue it to a non-shiny side of the disk.
- One half factor color acrylic paint. Let me succeed.
- The second floor sphere from the foam decorate decorative cloves and sequins. In this case, the site is satisfied with the year and attached to the ball.
- In the hemisphere, which is decorated with sequins, stick a couple of pieces of cigal wire. They will be an antenna.
- Now the time has come to collect the case of the plate. Hemispheres glue between the disk. Glue the seafront with sequins to the brilliant side of the disk. The painted portion is glued to a piece of the disk that is packed with paper.
- Then make the "legs" for a flying saucer. In this case, on the stupid edge of the toothpicks put on beads. In this case, the opposite edge of the sticks should be inside the beads.
- Feet-supports Now insert into the painted part of the ship, which should be located at the bottom. The legs should be located at the same distance from each other. They should allow the craft smoothly on the surface of the table.
- Stars of plastic stars are glued to the brilliant side of the disk.
Space world.
Discs can be used not only to create flying plates. Not a lot to dream, it may turn out something interesting. To create you need to prepare:
- The wheels themselves, glue, the tips of the sticks,
- Plasticine, paint.
Progress:
- Colorful wands are joined to one disk with plasticine.
- From plasticine, blind rocket. Attach it to the disk. Then you can paint the disk with paints.
- With the help of one large piece of plasticine, one disk is attached to another.
- Now it remains to shut a hole in the disk of a piece of blue plasticine.
Space helmet.
Crafts for the Day of Cosmonautics look very fascinating. And to make their pleasure. In order to make a helmet, not only the help of parents will need, but also the following materials:
- Plastic bottles on 5 liters,
- Colored paper
- Paint and scotch.
Progress:

Balloon.
A bright ball is an excellent handicraft for everyone. For its manufacture, you will need: glue, colored paper, as well as cardboard.

Progress:
- Take the sheets of paper of two colors and cut about 6 billets by template.
- Then, fold each workpiece in half.
- Left halves Mix glue and glue with each other, alternating colors.
- After that, the formed ball is glued to the cardboard basis.
- Then the clouds are cut out of the paper, which are folded in half.
- Of these, the design is collected and glued to the cardboard.
- Next, take a couple of segments of a woolen thread. They are glued to the ball on both sides. From paper brown cut the basket. It glues over the threads of wool.
- At the end of the work, the cracker itself can be decorated at its discretion.
Rockets from cups.
Ordinary disposable cups are also suitable for making crafts with the smallest. And if you decide to make crafts for Cosmonautics, do it yourself in kindergarten, then pay attention to the following products. For manufacture, you will need:
- Several plastic cups,
- Colored paper, white gouache and glue.
Progress:
- On each cup draws a white paint circle.
- Cone is made from colored paper. It is glued to the bottom of the cup.
- It is also worth making small cones for wings. They are glued along cups.

Picture of cereals.
In order to make the craft you should prepare:
- Gulation paints,
- Cereals at their discretion. It can be: peas, buckwheat, beans or rice.
- Plasticine of various colors
- Cardboard,
- Glue with tassel and scissors,
- Transparent varnish and saucer.
Progress:
- First of all, it is necessary to paint the cereals in advance with paints. Paints are bred by water and pars are painted. Dry cereals.
- On the cardboard sheet, apply the contours of any suitable pattern. This may be: any planet or a rocket. After that, take plasticine and disarm it. Crash the moon and space stars from it.
- Fill the space of the Rocket Rocket, which you painted in advance. Give the craft to dry, and after shook too much.

Panel from plasticine.
In order to make the next handicuit, plasticine will need. Also need: cardboard and plasticine modeling board.
Progress:
- Initially, the sun is made. For this, a large circle is rolled out: orange, red or yellow plasticine. This ball attach to the cardboard, which is the basis. At the time of attachment, the sun is slightly alleged to the cardboard.
- At the next stage, several colors of plasticine are mixed with each other and the long sausage rolls out of them, which you need to wrap the sun.
- Now it remains to stick up all the planets of the solar system from different colors and attach them to an orbit, which was formed from plasticine.

Summarize
If you decide to spend your time, then creating crafts for space themes in this case will be a great time for you. Inspire our ideas and get from the creatures of these products only a good mood.
Laurena Kormitelleva
Produce crafts we will be in the technique« Paper tunnel» .
Here we will produce such a beauty.
Let's be proceeding!
To work we will need:

1. Scissors
2. Cardboard 5 sheets (black color)
2 sheets for harmonic
3 sheets for background
3. Printed blanks of planets and space background

4. Glue PVA
5. A box of candy served me a framework (can do from paper)
6. LINE, Pencil
7. Paints (gouache)
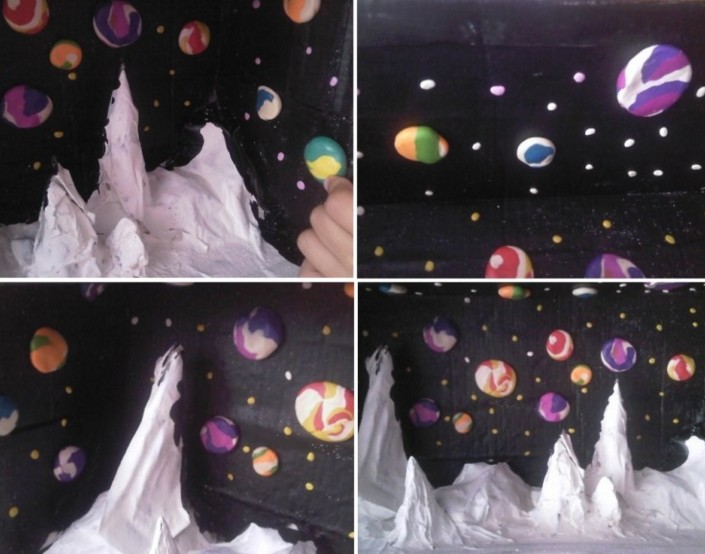
Our tunnel Consists of 3 elements. In the sheets of cardboard cut circles, clearly in the middle. Decorated with paints by the "spray" method

Now you need to make the side parts of our tunnel.
We measure the height and width of the box.
Then make two accordions that correspond to the height of your product. Harmonic divided by 1., 5 cm.

We sink the bends.

Insert the background in the box. Insert the harmonica-glit.

View from above.


Close-up.

Since my box is white, I pasted it black paper.
Paper tunnel"Space"Ready!
Publications on the topic:
Good afternoon, dear colleagues! I bring to your attention the cradle on the theme of fire safety performed in the paper "Paper Tunnel".
We take the hoop of medium size and wind the insulating ribbon we are tightening with the fabric of the corresponding colors make balls from paper.
Lapbuck "Cosmos" is designed to work as an educator with children of 5-6 years in the group. I made it from an ordinary cardboard box, sackled self-adhesive.
Materials are needed for the manufacture of layout: - Watercolor sheet (A3 format) - 1 pc. ; -The colors (colors: gray, white, black); -plain.
1. To work, we will need: - Colored paper - Black cardboard - glue - Scissors - Pencil 2. Cut the stencil of rockets from cardboard.
The holiday of Cosmonautics Day is approaching. This year we celebrate the 55-year anniversary of the first flight to Sosmos Yu. A. Gagarin. Due.
On April 2, our entire country is celebrated by the Day of Cosmonautics. In 1961, it was on this day that our planet shocked unexpected news: "Man.
In our material you will find the most interesting ideas of crafts on the topic "Cosmos", which a child will be able to make their own hands for projects at school or for self-studying universe.
Mysterious space and all that is connected with it, always fascinated and adults and children. Is there any life on Mars, why stars glow, how to fly to the moon -. If your child likes this topic, attract it to a more detailed study of space. Wonderful starts will serve. And in order to study the favorite topic, not to turn into a scarcot, offer the child to make interesting crafts about space to school.
Such children's crafts about space do with their own hands have not only the training effect, but also fit for the schoolboy for and concentrating. With their help, you will be well able to play the stories from, the child will be more recognized about the solar system and will be able to work perfectly for thematic lessons at school. Just imagine the joy of the child when his exercise about space in the school will gather a lot of humbags!
How the solar system is arranged: a crib for children's crafts to school on the subject of space
Tell the child how the solar system is arranged: what planets in it are included at what distance is the earth from the sun. Let the child gradually remember the names of all the planets. Do not customize - it will take time.
Crafts for children on the topic "Cosmos" do it yourself


If nothing happened with foam plastic, you can draw planets on cardboard and place them similarly to foam, as shown in the pictures above.
.jpg)
Planets is an unconditional element of any craft about space. Make such planets from the thread will not be difficult. Step-by-step instructions and what you will need to craft you will find in our master class on how to do, because the principle is the same.


Saturn from foam ball and old CD disc - Great idea for small crafts about space with your own hands. the main thing- Find at home at least one old disk.

Interesting mobile felt planets, stars and spacecraft will be for a child an engaged deal about the cosmos with their own hands, because it will take time and patience. And such a mobile will be a wonderful decoration in the room. If it is hard to manage with the child, let him build a similar mobile paper.

And what about the soft solar system? Such planets from Pomponov are very nice to keep in their hands and just to go to school for lessons - Do not impenet and easily fit in the backpack. Read the link.
.jpg)
Imitating the surface of the Earth - Very beautiful and simple snience. The child can make it like a craft on the subject of space, because the earth- This is one of the planets of the solar system, or as a craftto school on the day of the earth. See the master class, how to do, by reference.


Each lover of space dreams once to fly there. But while your child is still developing the basics in the study of space, invite it to make it a rocket. And an excellent toy, and incentive to the future profession!
.jpg)
.jpg)
Studying space, without stars and constellations just can not do. Making a similar craft from the bushings from the toilet paper, rubber bands and carved paper schemes with the child, to study astronomy will be more interesting. Plot with a needle black dots on the diagrams, cover over black paper on the sleeve and secure the rubber band. A child can look at the sleeve as in a telescope, or highlight holes from the inside with a flashlight. Download Schemes Constellations can be referenced.

Make a crawler on the topic of space and planets with your own hands, which can also be worn on yourself, very simple. This will especially like girls. We will need beads of different sizes and colors. If there is no beads of the desired colors, let the child is not upset, because they can always be repainted.
Now that the child needs to be done to the school to make a craft on the subject of space with their own hands, you do not have to break your head all evening what and how to build. And here, for some reason, they are confident that these crafts will get involved in their hands not only children, but also adults. Master with your chance interesting crafts, see the developing cartoons, read and together open the secrets of our universe!
Hello dear subscribers and blogs blog!
I imagine completely forgot that in April there is another world holiday, which is always celebrated on the same day on April 12 - this is the day of cosmonautics. How about this can be forgotten (((.
I decided to correct right now and present to your attention a collection of original and unique crafts that you can perform at home with your children and bring to the contest or exhibition. Ideas will be different from easy-to-challenging, so that you can choose. After all, someone has children already adults and go to school, and someone else is still at all kids - in the kindergarten.
I think that here everything is clear, the most important symbol of this holiday will be a rocket, because it was on it that was the first in the world to emissions into space Yuri Gagarin, if you did not forget.
Yes, by the way, do not forget that there is ahead of Easter, and I have already given any kind of remember? Well, do not forget that in May. Wow, cool, right a whole petition.
Perhaps, perhaps from the most common and you already guessed the popular option, it is a rocket. It can be done independently from what you always have at hand.
To do this, you can first take a dressing roller, if you do not have it, you can twist the cardboard and glue the sleeve.

Stages of work will be such as not difficult, but on the contrary, on these pictures you can easily create this unique thing.

So that the rocket fell not falling, it is necessary to make a support, that is, a stand and consolidate it on it.


You can create a huge charm. Exactly in the flight children will go))).

Well, or many such.

From ordinary plastic bottles here, what happened.


Here's another charm, the child did himself, pasted with newspapers.

You can also build a flying plate.


What will you do to it? Choose from what I found on the Internet on the Internet, or write at the bottom under the article, from which you can still create.
From the CD discs, as well as can be decorated with beads and rhinestones, cinema wire.

The legs can be made of rustic chopsticks or skeins, and glue beads.

Ha, hands from the filth are made.

Healthy models, directly to the exhibition can be sent.


Plastic cups also went here, it turned out a cabin.

Space base has been released from plasticine and matches.

Cool it looks, the main thing is that you can perform quickly and easily, while not spending a lot of finance and investments.

And if you are tired of all primitive, then you will detect anything creative and your own.

But this is not all, you can make any planet of the solar system, as you have such an idea, see how such a papier-mache.


Or perhaps all the planets are depiction using the dough for modeling or take ordinary color plasticine. Twist in flagella, and then, like straw and in the ball.


Marsian lacks them. Wow, what wanders came out from the authors, take a look. And the material is an ordinary egg from Kinder Surprise, or rather her box.

What a pitfall, and the legs are made of wire and plugs from bottles.

Ideas of cosmic crafts in kindergarten
It came to the next stage, I will show you what can be performed with your favorite kids. Put them in a circle and start with them to perform the following actions, you will need paper, or rather square sheets.

The result will be like that you will definitely have to do, but for children for sure.

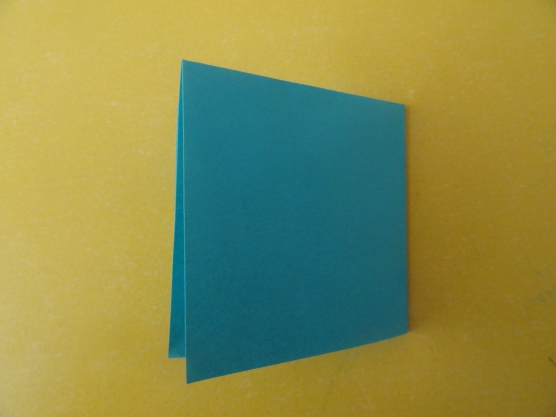
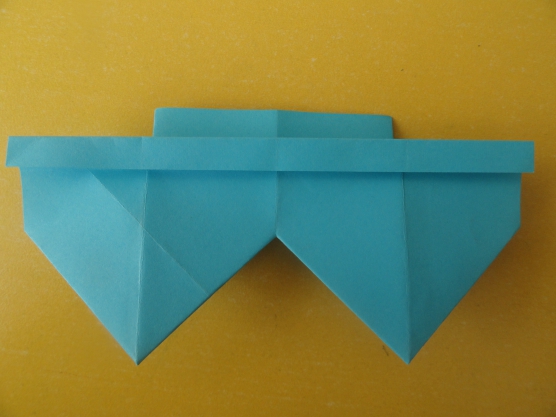
After all, Origami like everyone. What could be easier? So, fold the square sheet in half along.

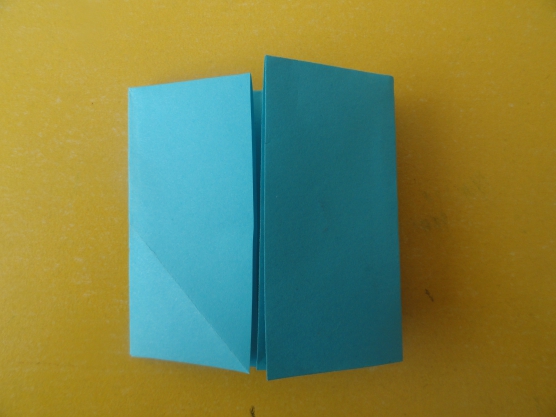
To this fold line again begin to make bends on both sides.

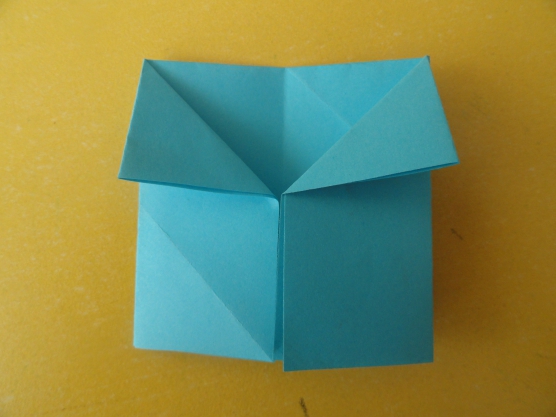
Now beaten like the way it is shown.
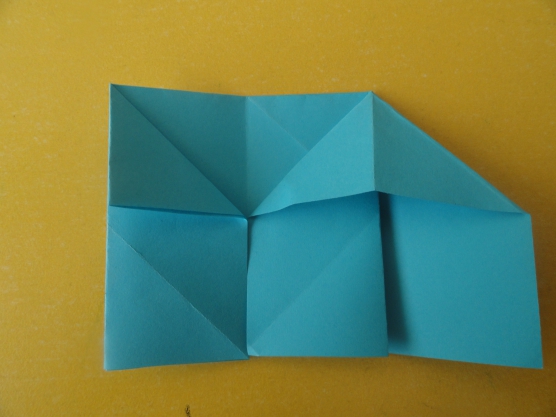

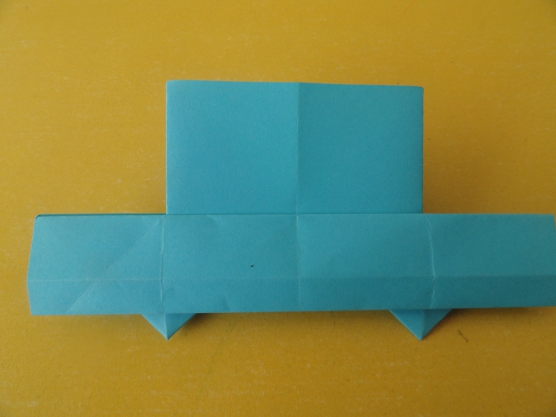
The next step is to trim everything too much.
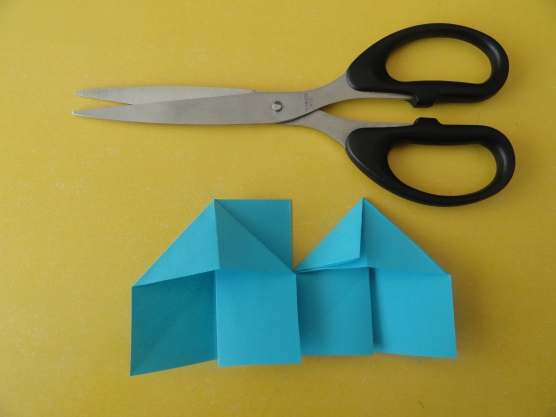
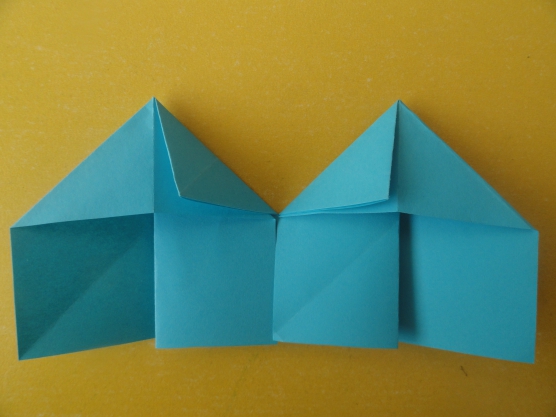
Start bending like an envelope.

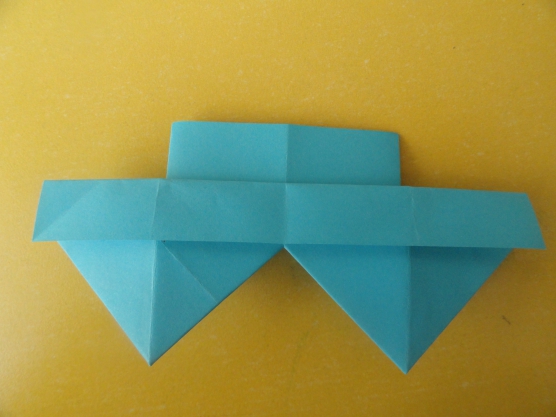
Then subsequently two triangular parts will be seen. Follow the further instructions.


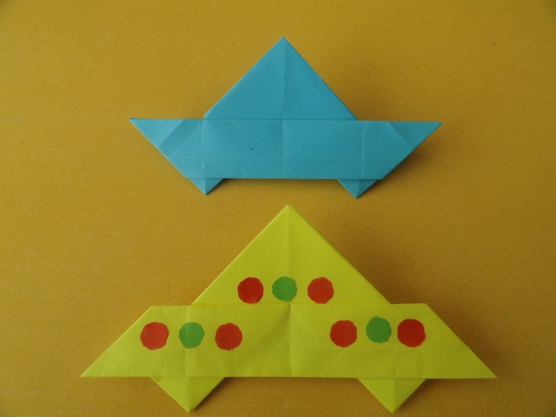
Also, do not forget about the fact that you can use plasticine here, roll out small balls out of it and cut out.

Draw or print an astronaut and rocket for example.

And start writing a picture. It develops not only perfection, but also attentiveness.

It is possible to roll greamp. Or still pumpkin seeds to paint and stick here, but it is already under the control of adults and at home with their parents.

Or completely large lumps in the form of planets of the entire solar system. The foam rubber was used here.

This is such a simple model and a flying object scheme. You can use it further by appointment, for example for applications, etc.

See how great it can look at the usual sheet of paper.

These are the types of transport with the stars.

Also from colored paper you can make an unusual craft for skyscraper.

You can add to this version of people to add, inhabitants.

Or your child to make a pilot, he will be accurately delighted. Here again, children's palms have adapted.

Or a teamwork of a group or class with children's photo of the children.

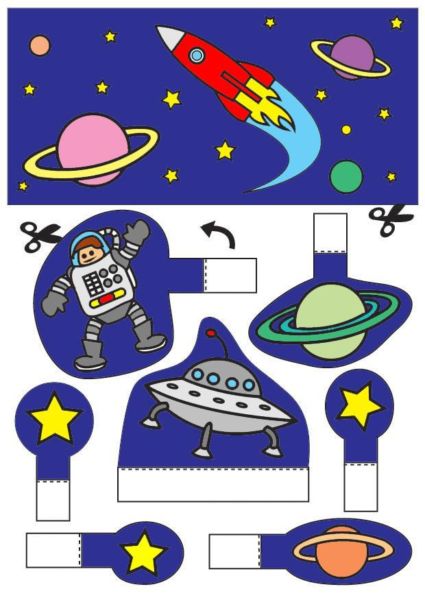
You can also take a ready-made pattern and cut, and reoxoile will issue these parts on the A4 sheet.

It all depends on you and your imagination.

Why not, all make such a distribution material.

Also, a super idea was to create an astronaut from Kinder Surprise.

Video news, you will help you, if you want, something new to make something with your wards.
The most simple work on space from paper and cardboard
Do not forget that you can take any coloring and paint it with markers or watercolor paints, gouache.


Perhaps such samples, someone will be useful for their work.


Or use colored paper and cardboard.

Work I found masters in the country.

Here, even Gagarin depicted.

Here is a sketch you can print and cut, after gluing.

Do not forget to sign the product. It may be a beagase.

Beautiful crafts about space to school
You will probably laugh, but I decided to find something unusual this time, and I found. Of course, you can take as a basis any idea and something to it from yourself. Or do the humanoid of foil and napkins).
The master class will be from Konstantin Cobzik.


You can make an earth satellite. In order to create it, I suggest you to see this video.
Well, or then lay out a whole composition of the cast material. For example, take the box and paint it into the appropriate background.

Get stars from self-adhesive paper.


This will be an outer object. All other parts attach to it from plasticine.

Come up with something else, such as a plane.

Position at your discretion.

You can do this picture, without your favorite heroes, the cartoon can not do here. A product is made of dough for modeling.

You can also use corrugated cardboard and tin cans.

That is what base turned out.

Or such men, as if robots that live on the moon, Lunatic).

Here is such an idea from round pasta.

Choose, here again plasticine.

The whole picture of it is flattered.

It looks bright and stylish, your peers will accurately appreciate.
Do not forget that you can also use the sun too much, because it is also a planet.

There are many options in general, so choose and create!
Cool work from the country of masters
Here I suggest you see pictures taken from this site, maybe it will open you on a new thought.
I first came across the work performed in the style of modular origami. How do you?

Fast flight, Uuu!

From the cereal, too, won, that they launched the children, take a look.

Someone even managed to associate such a product.

Perform quilling in the technique.

Here are some more adorable ideas.


Space plate and aliens from the cast material and assembly foam
Here everything goes everything, what you have at hand. Let's think together together what you can create space masterpieces. That's right, from anything. Take a look, from an ordinary shampoo, or rather packing a bottle made a racing.

And on the side of the aliens, whose aliens. In the course and plates went paper, it is possible to take plastic.

These are such cradle. Straight some alien station turned out, here as you can see and disks and even pasta instead of hands, and the hair made of straw are made.

Here are also the ideas of the bottles and even the bow adapted.


Wow, from egg shell.

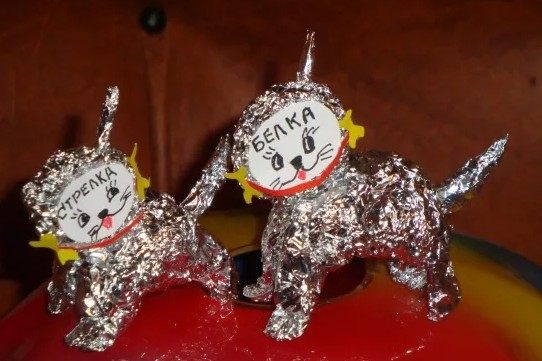
It also looks originally work from foil, squirrel and arrow, ha))).
Or, see the composition of the box and the bump instead of the device started.

This, I also liked me, made of fabric and buttons.

And I saw such oats, a super option.

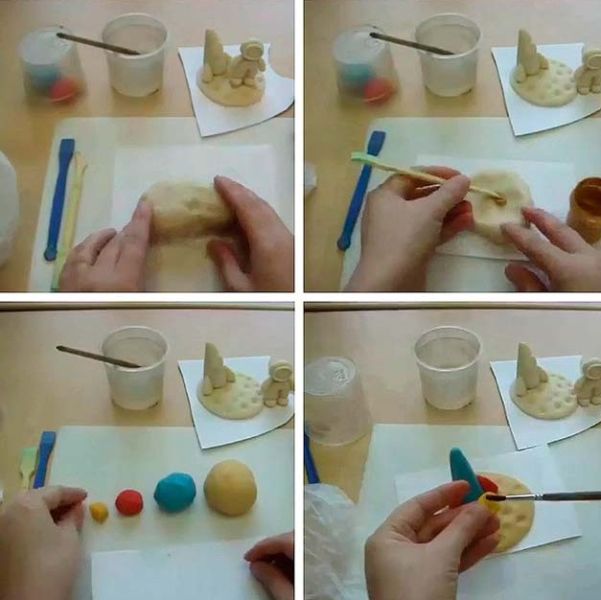
Have you ever tried to make products from a salt dough?

If not, then it is just this moment, see this video from the Yutuba channel and you also have such a charm.
You can certainly use more fabric, such as felt.

Cool crafts look awesomely attractive.


But the masterpiece from the mounting foam, it looks cool, a cosmonaut made of salted dough.

From the test at all, it is fashionable to create a bunch of crafts.
Souvenir right to order came out.

Just like paper, reminds the tunnel.

Baby Cards on Space
First of all, I want to immediately offer to make a postcard, so it is not easy, and the bulk. You need to choose the plot if you like this, like on this sample, then write to send you it. So, you print it and then paint with pencils or markers.


But so that it looks civilantly, you need to make a cover, fold it in half, and then draw to it.

Perhaps you will have this soul.

Either use the trace method, it is also ideal for this purpose.

Take a clean plastic cover from sour cream or other dairy products. Print on the printer Beautiful space background. Note the circle equal to the inner diameter of the cover.
Cut the circle from cosmic printing and glue to a plastic cover.
Take plasticine brown, gray and golden color. Somob plasticine into the layer and impose three colors to each other.

Connect the colors so that it turned out an interesting combination with divorces.

Apply the reservoir of the received plasticine at the bottom background. Using stacks distribute plasticine and make an uneven edge.

Take the plasticine of brown, pink-purple and yellow, impose on each other, as in the picture.

From the resulting combination make a thin plasticine layer.
Brush the layer into small angular pieces. Mount the mountain range on one side of the planet.

Using toothpicks add relief to the mountains. Take gray, silver and pink plasticine.
Somob gray plasticine into the reservoir and cut the rocket with manicure scissors as in the picture.

Make turbines, portholes and vertex for rockets from silver plasticine. Take the details to the rocket. Make stripes from blue, white and pink plasticine and make a semblance of a flag on a rocket.

Toothpicks Make a pattern on the rocket.

Mix yellow, red and golden plasticine.
Fire flames emanating from rocket turbines.

Connect several colors of plasticine to make a beautiful combination. Purify the form of the planet with the plastic reservoir.
Take the planet to the top edge of the magnet.

Mix silver and golden plasticine and place the ring around the planet.
Select rings with toothpicks.

Connect brown and orange plasticine and make a comet. Of orange and purple plasticine, the flaming mark.

Make a thin black roller for the flagpole. Make the Russian flag and connect with the flagpole.

Take a round flat magnet.
Enclose the magnet on the back of the plastic cover.

Space magnet ready!
Fiction! What a wonderful magnet from ordinary available materials and plasticine from us turned out! Such a souvenir made by your own hands will decorate the collection of magnets for the refrigerator.
