How to make a ball out of small rubber bands. How to weave a rubber band bouncing ball
How to make a bouncing ball out of rubber bands without a machine at home.
Bouncing ball
The bouncing ball (or ball) is a well-known and very popular toy for children. The bouncy bouncer bounces off hard surfaces well. If you throw such a ball with force, it will bounce up high enough or jump for a long time.
How to play with bouncing balls
You can make these balls with your children, and then:
- arrange a competition for the largest, brightest, reddest or most blue ball. Or a ball that jumps the highest. But so that every ball is sure to be the best in something.
- to hang a target on the wall and arrange a competition: whose ball, bouncing off the floor, more accurately hits the target - it's not as easy as it seems: you need to be able to calculate the force of the blow.
- throw the ball against the wall and catch it when it bounces off.
- This toy will please pets: cats, dogs, hamsters. You can play the ball with them.
How to make a bouncy bouncer at home
It is not difficult to make rubber band jumpers at home, but it will take a lot of patience. In addition to developing perseverance, this is a good workout for the muscles of children's fingers.
Another big plus of this craft is that if the child is tired of weaving bracelets so that the rubber bands do not lie idle, you can make a new toy out of them. For its manufacture, rubber bands of different colors, remaining in small quantities from weaving of other crafts, and rubber bands from sets with not very desired colors, are suitable.
Instructions with photos for making this toy were sent by Olesya (7 years old) and her mother to the "Rainbow rubber bands" competition.
What you need to make a bouncing ball
- half or a quarter of a notebook sheet
- rubber bands, from 200 pieces and more
How to make a rubber band bouncy. Master Class
___
And the largest ball made of rubber bands was made by the American Joel Wal, it took him 6 years. The height of the ball is 2 meters, the circumference is 7 meters, the weight is 4 tons - this is recorded in the Guinness Book of Records. The idea to the author of the record was prompted by a television show in which a huge rubber ball was thrown from an airplane. Video: ria.ru/services/blog_player/191368728.html
I suggest looking at other articles on what else can be done from:
- math tablet - educational tool for children
- crafts
- figurines
- bracelets, etc.
Enjoy your creativity! For site readers only "MORE creative ideas for children"(https: // site). Yulia Sherstyuk
All the best! If the article was useful to you, please help the development of the site, share the link to it in social networks.
Placing materials from the site (images and text) on other resources without the written permission of the author is prohibited and punishable by law.
- Weaving from elastic bands - 3: a simple bracelet ...
- Weaving from elastic bands - 2: a simple bracelet without ...
- Weaving from elastic bands - 4: bracelet "Fish ...
The most important holiday of the year is New Year! Preparation for this magical night begins several months before. We make a menu, choose outfits, look for decorations for the main beauty - the Christmas tree. However, there is nothing better than handmade jewelry! I will show you how to weave a ball of rubber bands for a Christmas tree. Latex rubber bands allow you to create wonderful Christmas balls without spending a lot of time and effort. This workshop will show you how to weave a beautiful colored rubber ball using only a crochet hook!
As a reminder, last time we showed you how to weave.
To create a New Year's ball, we need:
- elastic bands of 2 colors;
- clip;
- a hook;
- filler for soft toys.
We need to start our weaving from the top of the ball. That is, from the place where the rope is usually attached, for which the ball is hung on the tree.
To make this detail, we will wind 1 yellow elastic band around the hook 3 times.
Here, through this rubber band (cutter), we will pass another 1 yellow cutter. The hook has 2 loops.
We will pass 1 more cut through these loops.

Then again we will put the hook into the very 1st cut, which was wound. And so we pass 1 cutter through it.

Here on our hook 4 loops are formed. We must, as it were, connect them, so we pass 1 cutter through them.

So we repeat 2 more times.
As a result, you should get 6 loops. The 6th will be on the hook.
We mark the loop on the hook with a clip.
Then we need to weave in this row in the lumigurumi way.
That is, they brought the hook into the 1st loop, pulled the cut through it. Here, the very 1st cut must be pulled through all the others.
So we weave to the end.
As a result, we should have 6 loops left.
Next, we need to weave, alternating cuts in color. We will alternate lilac with yellow.
In the new row, we will add, that is, we will increase the number of our loops to 12.
We weave 2 cuts in each of the loops.
But here weaving differs from the previous row. We will continue to weave in knots.
That is, we put the hook in the 1st loop and pull the lilac cut through it, but we also immediately pull it through the loop on the hook.

We hang part of the cut from the finger on the hook and pull the 1st loop through the 2nd. We get a knot.

Here we skip the hook into the same 1st loop and weave the yellow cut in the same way.
Here we need to start our hook in all subsequent loops 2 times. At the end, our weave will have 12 loops.

Do not forget to hang the clip on the loop on the hook after each row.
In the next row we will increase the number of loops to 16. Here the colors of the elastic bands also alternate. We add after 2 loops.
In this row, it is a little difficult to find the necessary loops, since the knots consist, as it were, of 2 parts. We always need to skip the hook only to the left side.


Next, you need to weave the New Year's ball of rubber bands like this: 1 row, 1 cut through the loop. We also alternate the color.
And then there are 9 rows without any changes.

We will subtract from the next rows.
We will weave 2 loops with 1 cut. In the 3rd we drag the cutter. We have 3 loops on the hook, pull the 1st through the 2nd, 2 loops remain.
We pass the hook into the 4th loop, pull the cut through it. Here on our hook there will be 4 loops, pull the 1st through the 2nd. We get 3 loops. Here we pull the 1st through all the loops.
Then again we knit 2 loops at 1 cut, and in the 3rd we subtract in the same way.
In the new row, we do the same, but only through the loop. That is, weave 1 loop with a knot, and in the second there is a decrease.

We attach the cutter to the top of the ball so that it can be hung on the Christmas tree for it.
Here is such a wonderful New Year's ball made of rubber bands!
The bouncing ball has long won the hearts of children and even adults. With his disobedience and jumping ability, he can distract you from your daily affairs for a long time, and playing with him with a child is generally a pleasure.
This toy is adored by many types of pets, and not only cats or dogs. The ball can attract the attention of guinea pigs, hamsters and even parrots.
Today we will tell you how to weave a bouncing ball out of rubber bands in different ways - on a machine, forks, a slingshot and on your fingers.
How to weave a rubber ball without a machine?
To do this, you will need from two hundred to two hundred and fifty rubber bands of any color and a cotton pad.
You can replace the cotton pad with a piece of cotton wool.

13 signs you're wasting your life but don't want to admit it


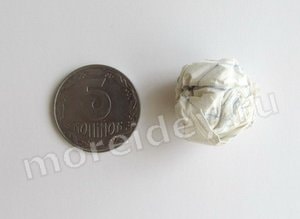
First, fold the disc by one third, then fold the second lower part.

Now fold the two side pieces.

Carefully crush the resulting figure, trying to give it the shape of a ball.

To begin with, take one elastic band and put it on once, then wrap it in the form of an eight and put it on again, turn it over, twist it and put it on again. There will be three rows.

15 shocking plastic surgeries that ended in failure
What happens if you look a person in the eye for a long time

Is a man in love with you: 10 signs

Throw the next iris across the first, also make three turns.

Try to put the next layers of elastic bands on those places of the base that are still empty.
Continue to weave, using all the new irises made of elastic bands of any color.

Remember that the more times you can wrap each rubber band, the more bouncy the ball will end up with. So try to weave, tightening as tightly as possible.
This is how, by constantly adding new layers, you increase the volume of the craft.
Remember that this process is not very fast, so please be patient and diligent.
When you reach a certain size, put on the irises without twisting them.

For more details, see the video at the beginning of this method.
As you can see, you did not need to use the machine, since a cotton pad serves as the basis, although it is very convenient to weave various complex types of figures on the machine. For the same reason, you cannot make a ball with forks or a slingshot.
Please note that this craft requires a lot of physical effort and patience, so get ready for a long and painstaking work.
Other weaving methods