Plasticine pictures that captivate even adults. Rolling plasticine sausages. III year of study
Master class for preschoolers. DIY tulips. Master class with step by step photos.
Modeling with plasticine followed by painting the product for children 5-6 years old "Tulips".
Author: Natalya Aleksandrovna Ermakova, teacher, Municipal budgetary educational institution of additional education for children "Children's Art School named after A. A. Bolshakov", Velikiye Luki, Pskov region.
There are so many flowers on Earth ...
But tulips are dear to my heart ...
Absorbed all the beauty in ourselves ...
They cannot be comprehended with the mind, with the eyes ...
They are like Angels from heaven ...
Descended to us on our Earth ...
So that our mortal light does not disappear ...
And life won over death ...
To win, only good ...
Tulips were sent by the Almighty ...
That miracle came down to us from heaven ...
In them, every stroke is not at all superfluous ...
There are no unnecessary little things in them ...
Everything is graceful and bold in them ...
And the smell is just a magician ...
Everything in them is thought out skillfully.
Hello! Today we invite your attention to a master class on creating a voluminous stucco composition of tulips. The work is offered in two versions, with varying degrees of difficulty. The first option is more difficult for the older age group, the second option is simplified and kids can easily cope with it.
Tulips are unique flowers for creativity, their genus includes up to 150 species and thousands of varieties. The most common spring flower, currently the register includes about 2500 varieties (about 10 thousand varieties are widespread in the culture), species and varieties of tulips. In each group of children, there will definitely be a child who is afraid of failure, always very worried about what kind of work will turn out - draw tulips and the fear will go away. It is impossible to make a mistake here, make the wrong shape, choose the wrong color - be breeders and create beauty!
Description: work can be done with children of different ages, simplifying or complicating the task. The material can be useful for parents, preschool educators and teachers of additional education.
Purpose: such a picture will be a wonderful gift for the holiday on March 8, decorate the interior and create a wonderful spring mood.
Purpose: creation of a three-dimensional painting "Tulips"
Tasks:
- to teach techniques of embossed tulip sculpting
- improve the skills of working with gouache
- develop creative imagination
- bring up accuracy when working
- to instill the ability to see the beauty of nature.
Materials:
- thick paper (A4 size)
-plasticine (you can old)
-Toothpaste
-stack, brush
-gouache, watercolor
- hairspray (you can not use it)

Main rules of work:
-plasticine parts must adhere very firmly to the surface of the paper
- The layer of toothpaste should be thin.
Master class progress:
We start by sculpting the petals, everything is simple here. We need thin plasticine cakes of various sizes and any approximately oval shape.

We start modeling from the inside of the flower, stick small petals to the surface of the paper.

Create a tulip bud, put the petals together.


The last petal should, as it were, close the bud. We use the stack to align the shape of the flower.

The second flower will be of three petals, we sculpt the details separately and place them in the picture, attaching them well.

It's time to create a composition, we place the first petals of raging tulips in our work.

And gradually we build up flower buds, add petals. The shape and size of the petals depends on your imagination, it is impossible to make a mistake.

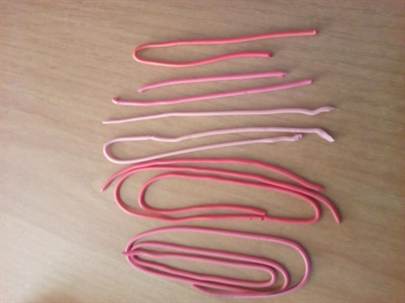
There are enough tulips, we proceed to sculpting the leaves and stems. For the leaves, we make blanks-sausages, which we sharpen on one side. You can leave the leaves semicircular, these also exist. We make the stalks from thin sausages, we flatten them, fix them and level everything with a stack.

Since after sculpting we will paint our tulips, it is not necessary to sculpt all the details, we will just draw them.

It's time to degrease the plasticine, cover all the stucco elements of the work with toothpaste (we work with a brush). And while it dries, create the mood of the picture using the background. There is a secret here: watercolor + toothpaste are wonderful and unique colors, I promise the children will be delighted. What will be the background, how many colors to use is your desire, your freedom of creativity, children must learn to think, plan their work, create.

While working with the background, the toothpaste has dried, we begin to revive the flowers, now we will work with gouache.

The technique of painting plasticine is very similar to painting with oil paints, due to the plasticine surface, the paint does not dry quickly, so you can play with color, remove excess, repaint.

We paint the leaves, well, the general tone of the work has been created, the details remain.

The work needs to dry out a little, and only after that we draw small details, add shades.

The tulip painting is ready! It remains only to preserve our beauty to the descendants, varnish the picture, you can use ordinary varnish.


And, here is the second simplified version of the work. In such classes, I very rarely give a sample of work, I prefer to work with children, draw and sculpt together, all by my own example.

For three tulips, we sculpt nine petals, any oval shape.

Then you need to prepare the side petals. I suggest that the children wrap their finger in a petal, it seems to hug the finger.

We make the first flower in the center of the leaf, closer to its upper part.

Now we fold the petals into a bud, attach them to the first one.

And we connect with each other.


We sculpt the leaves from sausages. If there are children in the group who are lagging behind, slowly doing the work, then you can limit yourself to one leaf, and draw the rest later.

We squeeze small droplets of toothpaste onto plasticine flowers, and smear them on the surface, we also do the same with leaves.

Then we work on the background, you can mix toothpaste with watercolors right at work, and you can use the palette. The main task of this stage of work is a beautiful, in one direction, with smooth transitions of color to color in tones of the background (color streaks).

We paint tulips and leaves, here, too, I give children complete freedom of choice.

We revive tulips with the help of white, children get acquainted with its expressiveness, play of tones.

It's time to play with green colors and shades, let's try to create them ourselves. Only the greatest discoveries of the world have been made by trial and error!

The work is ready, my children and I have done a good job! We invite you to our tulip garden!
The mists have dispersed
The winter has melted.
And tulips bloomed -
Spring has come to our house!
Their petals flutter
Like the wings of moths.
What if they are all together
Fly up to the clouds?
And they will fly like a flock
Happy moths
To the farthest to the edge
Dutch shores ?!
This is why so often
I run out into the garden -
I have to part with them
I don’t want friends!
Plasticine sculpting is one of the first types of creativity for kids. Plasticine can be given to a child as early as a year. You can punch to form flagella, circles and just smear it on cardboard and, of course, make an application from plasticine. This will definitely captivate the child for a long time. Of course, the older you are, the more complex the figurines and appliqués can be made. When sculpting from plasticine, the fingertips will always be involved, which well stimulates the child's speech development. True, this is another way of developing fine motor skills, as well as imagination, fantasy, contributes to the development of coordination of actions and improves perseverance.
Technique types
There are such main types of plasticine applications:
1. Technique of smearing. With such an application, you can use a ready-made template or drawing, or you can give a howl to fantasy. To fill in the picture, knead the plasticine well and stretch it along the sheet, filling in individual sections of the picture. The work should be done carefully, without going beyond the contours.
2. Quilling technique or flagella technique. Plasticine applications made by this method will have a very unusual and original look. The drawing can be arbitrary, or you can fill in a ready-made template. To complete it, we roll out thin plasticine filaments and twist it into the desired shape. To attach, slightly press down on the cardboard.

3. Plasticine mosaic. Perhaps the most common and fascinating type of plasticine applique for kids. This variation involves the use of a template. You just need to tear off small pieces of plasticine and fill the drawing with them.

4. Technique of volumetric application from plasticine. Suitable for older children. Here you only need three things: a sheet of cardboard, plasticine and limitless imagination. The child himself comes up with a drawing and creates all its details from plasticine.
5. Combined application. Here you can use all the techniques listed above, using or not using a template.

I would like to draw your attention to another very exciting technique - plasticine applications for the little ones. For the holidays, any picture made in this technique will make a splash. You can choose any thematic picture.
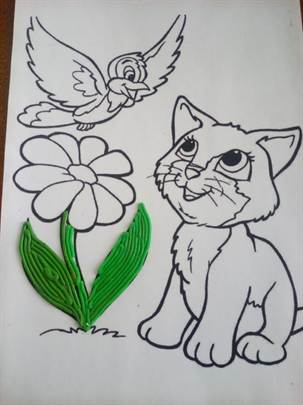
Plasticine "Cat"
Let's show by example the application of plasticine flagella on a template.
Required materials: a prepared template picture (preferably on cardboard), a syringe of at least 5 ml, soft plasticine of different colors, a glass of hot water.
1. Let's prepare the first color to work with. We crumple a piece of plasticine so that it fits into the syringe.

2. Place the syringe with the plasticine in hot water for about half a minute (depending on the temperature of the water and the quality of the plasticine), so the plasticine will become softer. Slowly squeeze the plasticine onto a smooth surface.

3. Repeat steps 1 and 2 for other colors. With the help of this method, neat flagella of the same thickness are obtained.
4. Let's start filling in the application. You need to perform each detail one by one, filling evenly. You should not be afraid of breaks - we take the next piece and continue.


5. The main part of the work is done. The background can also be made of plasticine using the smear technique. In this version, we will simply suggest using watercolors or gouache.

"Autumn in the forest"
Let's show one more example of volumetric plasticine applique, rich in details - "Autumn in the forest". This is a vivid example of how a plasticine application can also be trainable: show the season, forest dwellers, tree species, bird migration, and mushroom varieties.
We need: a sheet of orange or yellow cardboard, soft plasticine, a board and a plasticine knife.
Consider the implementation of the application for children in stages:
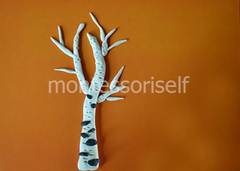
1. We make a trunk from white plasticine and fix it approximately in the middle of the sheet. Next, we form the branches.

2. With the tip of the knife we depict the relief of the bark.
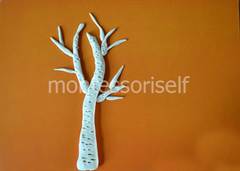
3. Finish the barrel with black plasticine by simply attaching pieces of black plasticine.
4. Now the yellow plasticine comes in handy. We tear off the pieces from it, slightly pressing them, attach them to the branches of the tree.

5. Add the fallen leaves to the ground in the same way.

6. From white, brown and red plasticine we form mushrooms - boletus and fly agarics.

7. Making a Christmas tree. It should be formed from the bottom by the overhead method. We make "needles" with the tip of a plasticine knife. We attach the trunk to the Christmas tree.
One of the favorite arts and crafts techniques among preschoolers is plasticineography. Most kids generally love to draw, and drawing with plasticine attracts them doubly. After all, it is very simple, and besides, such images are easy to correct. Kindergarten teachers also value plasticineography: such classes do not require special preliminary training and have a beneficial effect on the nervous system of children.
The essence of plasticineography as a type of children's creativity. Goals, methods, techniques
Plasticine painting refers to an unconventional sculpting technique, it is drawing with plasticine on some kind of dense basis. Objects and objects are thus embossed to a greater or lesser extent. In addition, plasticinography allows the inclusion of auxiliary parts in the composition - beads, beads, natural, as well as waste material.
Development and learning opportunities for preschoolers
- In the process of work, such mental processes as attention and memory, logical thinking and imagination develop.
- Plasticinography reveals the creative potential of children, and from a very young age.
- Doing such crafts develops spatial orientation, sensorimotor coordination - these are precisely the functions that ensure successful schooling.
- Plasticinography is a rather painstaking process that stimulates perseverance, patience, the desire to bring the work started to the end.
- This type of sculpting improves fine motor skills - the child's hand is prepared for writing.
- Classes with plasticine are able to relieve muscle and nervous tension in children.
- With this type of creativity, there is an integration of educational areas (knowledge of the surrounding world, development of speech, music).
- With the successful mastering of this technique, children can make exclusive gifts to their relatives and friends, create paintings that will decorate the home interior.
Let's highlight the main goals of plasticineography as a type of productive activity of preschoolers:
- Improving the skills of working with plasticine, stimulating interest in visual activities.
- Mastering new sculpting techniques (pressing, smearing, rolling).
- Development of the ability to navigate a piece of paper.
- Improvement of fine motor skills, eyes, coordination of hand movements.
- Education of such qualities as accuracy, perseverance, independence.
- Development of fantasy and aesthetic feelings.
Mastering the technique of plasticinography involves the use of various techniques in the process of work. The children have already met some of them in the traditional modeling classes.
it rolling out a piece of plasticine between the palms, during which it lengthens and takes the shape of a cylinder.
When rolling off with circular movements of the palms, a ball is formed.
Pull back- obtaining a pointed tip of an object using fingertip movements.
Flattening- squeezing the ball into the shape of a cake. With the help of a stack or by pressing with your fingers, such a part can be given bends, recesses.
The following techniques are characteristic precisely for plasticineography. it smoothing, pressing and smearing which are necessary to create a flat and smooth surface. They are performed with the efforts of the fingertips. Smearing can be done from top to bottom or left to right.
In addition, when creating paintings using the plasticine technique, children learn to mix different colors of plasticine to obtain unusual shades. Such a laborious but interesting process is carried out in different ways. The pieces of plasticine can be kneaded and then mixed in one piece. Another option - plasticine is mixed directly on the base, the strokes are applied alternately and smeared on the surface.
Types of plasticine used in kindergarten
In the classroom in kindergarten, various types of plasticineography are used. The most common is direct plasticinography, in which a stucco image is formed on a horizontal surface. Toddlers are able to master this technique already with early age- for this, the teacher offers them a simple drawing without small details. At the senior level, children create more complex compositions. A similar pattern is filled with plasticine (preferably wax) on a thick sheet of cardboard (it is better to pre-paste it with adhesive tape - it is so convenient to correct the image). Smeared plasticine produces the effect of oil paint strokes.
Direct plasticinography
In reverse plasticineography, drawing is performed on the back of the glass or other transparent surface. In a preschool institution, plastic or plexiglass is usually used for these purposes (since the use of ordinary glass for preschoolers is unsafe). The drawing is outlined on the surface with a marker, and then filled with plasticine (smeared with a thin layer). Along the contour, the finished composition can be marked with stripes - it will look like a frame.

Reverse plasticinography (on glass)
Modular plasticinography - a picture of plasticine rollers, balls, discs and other elements. This is a more complex technique that requires children to master all modeling techniques.

Modular plasticinography
Mosaic plasticinography - an image composed exclusively of plasticine balls. This is the simplest technique, the main thing here is to choose colors beautifully and carefully fill the space without going beyond the outline.

Mosaic plasticinography
When contour plasticinography thin plasticine flagella, which denote the silhouette of the object, are necessarily used.

Contour plasticinography
Multilayer plasticinography implies sequential application of non-surface of several layers. This technique is most suitable for landscape compositions - images of the sky, forest, mountains, when layers are superimposed on each other. The elements are sometimes attached to the base using thin rollers - a kind of 3-D effect is obtained. Note that such work is rather difficult for preschoolers and is appropriate only in the preparatory group.

Multilayer plasticinography
Textured plasticinography It is distinguished by a convex image and, in turn, is subdivided into a bas-relief (the drawing protrudes above the background by less than half), a high-relief (more than half) and a counter-relief (in-depth drawing).

Textured plasticinography (bas-relief)
Plasticinography in children of different ages. Difficulty level of crafts
Junior group
It is possible to acquaint children with plasticineography at a very early age - starting with the nursery group. Kids 2-3 years old are quite capable of mastering the simplest techniques - rolling balls, rolling flagella, flattening them into cakes. Of course, children's fingers are still quite clumsy, so the teacher should offer a picture with a small amount of large details. Topics such as "The Sun", "Flower", "Rainbow" are great for initial classes. The teacher draws a silhouette of the object with a pencil, and the child complements it with plasticine dots. For example, it can be a tree that the kid will add red or yellow apples. Another option is a vase in which the child will depict a bouquet of flowers.
The second junior group the second junior group plasticineography in the nursery group (the teacher draws up the trunk)
Middle group
By the middle group, the handles of children are already becoming more dexterous, and the teacher can move on to a more complex technique of plasticineography. Preschoolers 4–5 years old can already create a picture of thin flagella twisted in the form of a snail. The teacher can draw a magic bird, and the child will paint its feathers with plasticine of different colors. At this age, children learn not to go beyond the contour of the image, as well as to use additional materials (cereals, beads) in their work, which will make the picture more

Middle group

Middle group
,
At the senior preschool level, children are already able to create complex compositions (images of landscapes of different seasons, animals, humans, etc.), fantasy works. The teacher can offer children 5–7 years old softened plasticine, which is applied on the base with a syringe in thin strips. Such a reception, no doubt, will delight the guys. A great solution for senior and preparatory groups is collective compositions.

preparatory group

preparatory group
Classes of plasticine in kindergarten can touch on a wide variety of topics. It is best to time them to familiarize yourself with the world around you. So, in the fall it will be advisable to propose such topics as "Leaf fall", "Basket with mushrooms", "Autumn gifts" (fruits and vegetables), "Asters". After getting acquainted with the theme "Birds", the children will be happy to depict an owl, swan or peacock, and after the theme "Sea inhabitants" - a goldfish, a dolphin, an octopus. Crafts using the plasticine technique will consolidate the knowledge of wild and domestic animals ("Hedgehog", "Cat", etc.)
In winter, the following themes will be appropriate: "Snowman", "Christmas balls", "Decorated Christmas tree", "Snowflake", "Bullfinch", "Penguin on an ice floe". At the senior preschool level, these can be landscape winter compositions, including collective ones (such works, in principle, can affect all seasons).
In the spring, it will be relevant to depict the first flowers ("Snowdrops", "Dandelions"), insects ("Butterfly", "Ladybug").
In the technique of plasticinography, wonderful gifts are obtained. For example, by March 8 it can be “A bouquet for mom” or a composition for dad (“Tank”, “Flying planes”, “Ship”, etc.). To make this work more effective, it is recommended to cover the surface of the finished composition with a colorless varnish.
 Khokhloma patterns Mosaic technique Modular technique with the effect of volume Plasticine technique with the use of additional materials (foil) Collaboration Bas-relief Gift for mom (modular technique) Bas-relief Bas-relief Bas-relief Landscape composition Still life Portrait Plasticine technique with the use of natural materials Modular technique Modular technique Mosaic technique Gift for dad plasticinography Gift for dad plasticine Gift
Templates for plasticine in kindergarten
Before starting to work with plasticine, the child needs a base picture, or template. Older preschoolers usually draw them on their own. For children of an earlier age, the teacher offers ready-made silhouettes. Templates can be simple (subject image) or are complex subject compositions with many small details. The latter option is acceptable, of course, for senior and preparatory groups.
Template Template Template Template Template
Videos on the topic "Plasticinography"
Video tutorial for preschoolers - plasticineography "Bullfinch"
Master class in kindergarten on plasticineography "Fish in an aquarium"
Workshop on making a panel with lilies using the technique of plasticinography
Lesson notes
| Name of the author | Abstract title |
| Bekhtereva L.N., Surovikova A.G. |
"Yablonka" (middle group) Educational tasks: learn how to create an image of a tree using plasticineography, include additional natural material (peas) in the composition, Developmental tasks: consolidate knowledge about the structure of a tree, develop fine motor skills, hone skills in working with plasticine. Educational tasks: foster interest and respect for plants. Integration of educational areas: "Artistic Creativity", "Cognition", "Communication", "Socialization", "Health". Handout: sheets of colored cardboard, plasticine, peas, napkins, sculpting boards. Preliminary work: examining trees during a walk, reading fairy tales in which an apple tree or apples appear ("Goose-swans", "Kroshechka-Khavroshechka", "Apple"), an application lesson on the theme "Apple tree", didactic games on a similar theme. Course of the lesson The riddle about the apple. A surprise moment - the appearance of the crow Karkusha, which sits on a painted apple tree. She talks with children about the structure of a tree. The teacher offers a didactic game "Find the same" (sort paper apples by size). Motivation is to show Karkusha that an apple tree can be drawn with plasticine. The teacher demonstrates the stages of the craft. The trunk is formed from a brown plasticine flagellum. The crown is a flattened green ball that needs to be smudged on the cardboard with your fingers in different directions. The grass at the bottom of the composition is small pieces of green plasticine. Peas are used as apples, which are pressed into the crown of the tree. Before productive activities, children independently massage their hands with a bump. At the end of the lesson, the guys show their work to Karkusha, and she treats them with real apples. |
| Drynkova A. | (younger group) On a walk on the eve of the lesson, the teacher examines the sun with the children. The lesson begins with reading V. Suteev's fairy tale "Under the Mushroom", the kids share their impressions. Motivation - the poor animals from the fairy tale do not have enough sun, you need to draw it for them. An interesting point: the teacher informs the children that they have run out of paints, and only plasticine remains. Demonstration of image techniques: the contour of the sun is filled with small circles (mosaic method), the sun's rays are formed from sausages. Before the productive activities of children, an outdoor game "The sun came out from behind the clouds ..." |
| Thriller R.N. |
"Gifts to flower fairies" (drawing with plasticine on glass, preparatory group) At the beginning of the lesson, a mini-conversation is held about what children used to make from plasticine. The teacher consolidates the knowledge of colors, asks what will happen if you mix certain colors of plasticine. Unusual motivation: the teacher tells the preschoolers a fairy tale. In a magical forest in a clearing, the most beautiful flowers in the world grew, they were looked after by flower fairies. But one day an evil sorceress appeared, who bewitched the fairies - the flowers began to die, as they needed care. The task of the children is to make magic flowers for the fairies to disenchant. The work is done on glass, children mix plasticine of different colors to get interesting shades. |
Plasticinography project: goals, objectives, planning, reporting. "Gifts of Autumn" as an example of a project - subjects and photos of works
Plasticineography, one of the favorite childhood activities, provides great opportunities for project activities.
The project must have a detailed theoretical basis. First of all, the educator must come up with a memorable name for him, for example, "We create magic!" or "Plasticine Tale".
The educator should summarize the main idea of the work, for example "Let's create magic with the child together - plasticine will help us with this!"
Sirotkina Tatiana Vladimirovna
http://tutmama.ru/obshhee-razvitie/plastilinografiya-v-detskom-sadu.html
The relevance of the project is substantiated in detail (the use of plasticineography for the comprehensive development of children). The main goal of the activity and its constituent tasks are outlined. The teacher clearly identifies the age category of the children involved in the project, as well as its duration (short or long term). In the documentation, the teacher clearly describes the ways and stages of project implementation (preparatory, main and final), as well as the expected results of the activity.
At the end of the project, the teacher compulsorily draws up a report: indicates whether the tasks have been achieved. A photo exhibition on the subject of the project is being organized.
If we consider specific examples, then a very interesting topic for the project is “Gifts of Autumn” (it can be carried out in any age group, only the complexity of the tasks changes). Within the framework of this topic, the teacher can offer preschoolers the following works: "Autumn birches", "Basket with mushrooms", "Maple leaves", "Miracle fruits" (vegetables and fruits), "Asters".
Project "Gifts of Autumn" Project "Gifts of Autumn" Project "Gifts of Autumn" Project "Gifts of Autumn" Project "Gifts of Autumn"
Plasticinography circle
resources for educator self-education
Plasticineography may well become an area for a separate circle work. This activity is usually carried out with children from the middle group.
Of course, the teacher himself must be passionate about this technique of artistic creation, study the necessary methodological literature, the topic of his self-education must correspond to this direction. It is advisable to attend seminars on plasticinography.
To create a mug, you need to take care of the necessary materials and tools (in this case, it will not require special costs). The teacher thinks in advance what toys and visual aids will be needed for classes.
In the course of the work of the circle, the teacher shares his knowledge with parents, offers them consultations, conducts conversations, and gives recommendations on homework with children.
Before the start of the activity of the circle on plasticineography, it will be appropriate to conduct a survey among parents to study the interests and needs of children.
Circle program. Fragment of the program for the senior group
Before the beginning of the work of the circle, the teacher draws up a program in which he substantiates the theoretical aspects of the topic: its relevance, novelty, main goals and objectives. The teacher outlines the forms and methods of work. The age of the children who will attend the circle and the implementation period are clearly indicated (as a rule, the program is drawn up for one year). A list of children is also attached to the program.
The main part of the program is thematic planning with a description of the purpose of each session. As an example, we will give a fragment of the program of a circle on plasticineography for the older group (author Babakekhyan A.G.):
| Month | Subject | Objectives |
| October | Acquaintance of children with plasticineography. Autumn leaves. | Conversation about plasticineography. The teacher's display of finished works using this technique, with the reflection of convex volumetric images on a horizontal surface. To acquaint children with the concept of a stencil, show and teach methods of working with it. Develop fine motor skills of the hand, develop color perception, the ability to correctly choose the tone of plasticine, graphic skills (the ability to work with a stack like a pencil, using the scratching technique); to educate aesthetic feelings through the perception of paintings by great artists about autumn, to lay the prerequisites for love for nature and a respectful attitude towards it. |
| Mushroom mushrooms have grown in the woods | To improve the skills of working with plasticine in the technique of "plasticine drawing" - cutting with scissors, rubbing in shape. To form in children a generalized concept of mushrooms, their varieties, qualities. Learn to find correspondences between the forms of real and depicted mushrooms, to convey their natural features, color. Develop creative imagination and thinking; muscle activity of the hands. To cultivate accuracy in work, the desire to complete the work started with quality and to the end; feelings of collectivism. | |
| My garden and vegetable garden | Continue mastering the techniques of plasticine - to consolidate the technique of "rubbing" plasticine over the surface. To consolidate the skills to accurately use plasticine in their work. Learn to use outline drawing as the basis of the image. Strengthen the ability to classify fruits and vegetables. Develop hand motor skills, develop creative activity and independence; arouse a desire to do a useful thing - a didactic game, to foster feelings of unity from the process of joint work. | |
| The owl is an owl. Big head | Learn to mix plasticine, preventing the colors from completely absorbing each other. To teach how to use a "rolling pin" - a tube from a glue-stick for rolling plasticine over the surface. Develop creativity, independence and activity. Develop fine motor skills of hands when performing techniques for working with plasticine. Develop color perception. To cultivate diligence and perseverance in work, the desire to do the job correctly and to the end. To foster honesty and criticality when evaluating "drawings", to teach how to prepare the background of the work (branch, moon, balls). | |
| November | gold fish | Improve technical skills in working with plasticine. Develop imaginative perception, logical and creative thinking. Develop children's creativity through familiarity with different ways and materials. Foster purposefulness, passion for creative work. Find out the desires and aspirations of children (with the help of the Goldfish). |
| Worm in apple | Performing work by a teacher using different sculpting techniques. To consolidate the skills to accurately use plasticine in their work. Learn to use contour drawing as the basis of the image. | |
| Sperm whale - sperm whale | Continue mastering the techniques of plasticine - to consolidate the technique of "rubbing" plasticine over the surface. To consolidate the skills to accurately use plasticine in their work. | |
| Octopus | To continue mastering the techniques of plasticine - to consolidate the technique of "rubbing" the clay on the surface. To consolidate the skills to accurately use plasticine in their work. Learn to use contour drawing as the basis of the image. Develop hand motor skills, develop creative activity and independence; arouse a desire to do a useful thing, foster feelings of unity from the process of your labor |
Plasticineography monitoring, features
The monitoring system for plasticinography does not include any special forms and types of organization of children's activities. Diagnostics is carried out through observation, which occurs in the process of individual and collective studies.
This issue is especially relevant for circle activities - it helps to organize classes more effectively.
The teacher evaluates the following parameters.
1.Creative activity
a) Increased interest, creative activity - high level
b) The child is active, there is an interest in this type of activity, but does the work as instructed by the teacher - intermediate level
c) The child is not active, does work without much desire - low level
2. Sensory abilities
a) The form is accurately conveyed. A variety of colors, real color is conveyed, image expressiveness is a high level
b) There are minor distortions. Paint Deviation - Medium
C) The form failed. Indifference to color, monochromaticity - low
3. Composition
a) Along the entire plane of the sheet, proportionality between objects is observed - a high level
b) On a strip of sheet with minor elements - medium level
c) Not thoughtfully random - low level
4. General hand skill
a) Well developed hand motor skills, accuracy - a high level
b) Manual skill developed - intermediate level
c) Poorly developed hand motor skills, help is required - low level
5. Self-reliance
a) Performs tasks independently, without help. The child independently chooses a topic, concept, knows how to plan his actions, chooses expressive means, brings the work started to the end - a high level
b) Requires little help - average
c) Performs the task with the help of a teacher, support and stimulation is needed - low level
6. Indicators of technical skills
- rolling out
flattening
a) Performs independently - high level
b) A little help needed - intermediate
c) Performs actions with the help of a teacher - low level
- smearing
a) Performs independently - high level
b) A little help needed - intermediate
c) Performs actions with the help of a teacher - low level
Plasticinography contains a lot of opportunities for unleashing the creative potential of preschoolers, as well as for the educator's self-education. This technique is an excellent base for project activities and circle work. Kids love to work with plasticine, and when they find original use for this material, they get real pleasure and are able to create real masterpieces.
Municipal budgetary preschool educational institution of general development
species with priority implementation of cognitive and speech development
Kindergarten number 28 "Kolosok"
WORKING PROGRAMM
Educator:
Klimenko T.M.
Essentuki
Relevance of the program
Purpose, objectives and principles of the Program
Planned results of the development of the Program
Work Program Passport
Target section of the program
Organizational section of the Program
3.1Amount of classes per week
3.2 The amount of workload
3.3 Class Schedule
4.2 Methods and means
4.3 Calendar and thematic planning
5. Application
plasticineography
5.3 Regional component
A long-term plan of work to familiarize yourself with your hometown
1.PASSPORT OF THE WORKING PROGRAM
"Plasticinography - children's design"
| Year of development | |
| Working group |
|
| purpose | |
| Tasks | Tasks. I year of study (2-3 years) Educational: To form methods of visual and tactile examination of well-known objects to clarify ideas about the appearance of objects. To form the ability to see an integral artistic image in the unity of pictorial and expressive means. Developing: Develop interest in co-creation with the teacher and other children when creating collective compositions. Develop an interest in independent artistic activities. Educational: Tasks. II year of study (3-4 years) Educational: To form the ability to find connections between objects and phenomena of the surrounding world. To form the ability to navigate in concepts such as shape, color, size, quantity. Developing: To develop in children the ability to see an integral artistic image in the unity of pictorial and expressive means of coloristic, compositional and semantic interpretation. Develop perception, gross and fine motor skills. Educational: To cultivate diligence, accuracy, Tasks. III year of study (4-5 years) Educational: Improve visual skills. To form the ability to convey simple movements, changing the static position of the body or its parts. Developing: Develop perception, gross and fine motor skills. Develop an interest in artistic endeavors. Educational: Tasks. IV year of study (5-6 years) Educational: To form the ability to correctly select content for plasticineography. Improve visual skills. Teach children to analyze the shape of an object, explain the relationship between the plastic form and the way it is transmitted on a plane using the plastic materials used. To form the ability to reflect in their works generalized ideas about the cyclical nature of changes in nature. To form the ability to create multi-figured compositions. Developing: To develop the ability of children to embody in an artistic form their ideas, experiences, feelings, thoughts; develop creativity. Develop an interest in artistic endeavors. Educational: To cultivate diligence, accuracy. Foster a desire to achieve success through your own work. Tasks. V year of study (6-7 years) Educational: To acquaint with artistic means of conveying the mood of people and the state of nature. Expand, systematize and detail the content of children's visual activities. To form the ability to independently determine the plan to keep it throughout the entire work. Developing: To develop the ability of children to embody in an artistic form their ideas, experiences, feelings, thoughts; develop creativity. Develop coordination hand movements in accordance with the nature of the image being created. Develop a desire to experiment, showing vivid cognitive feelings: surprise, doubt, joy of learning new things. Develop imagination, form an aesthetic attitude to the world. Educational: To cultivate diligence, accuracy. Foster a desire to achieve success through your own work. To cultivate an aesthetic attitude towards the world around us. |
| Educational areas | Artistic and aesthetic development, cognitive development, speech development, social and communicative |
| View | Additional education Modified, compiled on the basis of methodological literature on visual activity for preschoolers |
| Implementation period | |
| Age | |
| number learners | 6-10 children in a group |
| Form of organization and duration final activities | subgroup, duration joint activities depends on age |
| Form of organization final activities | Opening of exhibitions, art galleries Personal exhibitions of works Participation in regional, city, district, All-Russian competitions of artistic orientation |
| Methodical security | Lykova I.A. The program of artistic education, training and development of children 2-7 years old "Colored palms". - M .: "KARAPUZ - DIDAKTIKA", 2007. Davydova G.N. Plasticinography - 2. - M .: "Scriptorium Publishing House 2003", 2006 |
2. Target section of the program
2.1 RELEVANCE OF THE WORKING PROGRAM
"PLASTILINOGRAPHY - CHILDREN'S DESIGN".
Currently, teachers, specialists in the field early development, insist that the development of intellectual and mental processes must begin with the development of hand movements, and in particular with the development of movements in the fingers of the hand. This is due to the fact that the development of the hand plays an important role in the formation of the brain, its cognitive abilities, and the formation of speech. This means that in order for the child and his brain to develop, it is necessary to train his hands. This is what in the future will give the child the opportunity to easily learn new things, be it a foreign language, writing or mathematics. The development of fine motor skills is also important because the entire future life of a child will require the use of precise, coordinated movements of the hand and fingers, which are necessary to dress, draw and write, as well as perform a variety of household and educational activities.
Plasticinography is one of the new types of visual activity. The concept of "plasticine" has two semantic roots: "graphil" - to create, draw, and the first half of the word "plasticine" means the material with which the execution of the plan is carried out.
Classes with plasticine contribute to the intellectual development of children. The results obtained and the process of work itself reveal the creative abilities of the child, make the children's world more colorful and spiritually richer.
Classes with plasticine contribute to the development of such mental processes like attention, memory, thinking. Plasticinography contributes to the development of perception, spatial orientation, sensorimotor coordination of children, that is, those significant functions that are necessary for successful schooling. Children learn to plan their work and get it done. In the process of practicing plasticinography, the child develops skill and strength of the hands, the movements of both hands become more coordinated, and the movements of the fingers are differentiated, tweezers develop in children, that is, the capture of a small object with two fingers or a pinch. Thus, the child prepares his hand for mastering such a complex skill as writing.
In an interesting game form the children's vocabulary is enriched. In the process of playing up the plot and performing practical actions with plasticine, an uninterrupted conversation is conducted with the children. Such a playful organization of children's activities stimulates their speech activity, causes speech imitation, the formation and activation of the dictionary, the child's understanding of the speech of others.
Sensory development is one of the central places in working with children in plasticineography, the development of general sensory qualities: color, shape, size.
The work program "Platilinography - Children's Design" is an innovative educational program document and is aimed at the implementation of the above stated provisions.
The Program is based on the conceptual ideas of L.V. Vygotsky, G.V. Plekhanov, theory of activities of P.Ya. Galperin, V.V. Davydova, A.N. Leontieva, S.L. Rubenstein and the theory of artistic education of children by A.V. Bakushinsky, N.A. Vetlugina, I.A. Lykova.
The program allows you to meet the needs of parents and the interests of children attending kindergartens MBDOU "Childhood" in artistic and aesthetic development, to achieve complete harmony with oneself and the world around, for the possibility of realizing freedom of choice of actions, involving children in art.
The provision of additional paid educational services and the implementation of the work program is carried out only at the request of the parents (their legal representatives) on a contractual basis with them.
2.2 PURPOSE, OBJECTIVES AND PRINCIPLES OF IMPLEMENTATION OF THE WORK PROGRAM "PLASTILINOGRAPHY - CHILDREN'S DESIGN"
Purpose:
Formation of an aesthetic attitude to the surrounding world through the development of the ability to understand and create artistic images that are distinguished by originality, variability, flexibility, mobility; development of the ability to perceive a work of art.
LEARNING TASKS.
| Types of visual activities | children's age |
|||||
| I year of study (2-3 years) | II year of study (3-4 years) | III year of study (4-5 years old) | IV year of study (5-6 years) | V year learning (6-7 years old) |
||
| Plasticine graphics. | Show children a variety of plastic materials (clay, plasticine, salt and butter dough, wet sand, snow, semolina), introduce them to their properties. | Learn to create the simplest forms and modify them - transform them into other forms, while creating expressive images. | Learn to create original images from 2-3 parts, betraying proportions and mutual placement of parts. | Teach children to analyze the shape of an object, explain the connection between the plastic form and the method of sculpting; show a method of sculpting on a form or frame, suggest a choice of techniques for decorating a stucco image. | To form the ability to create dynamic expressive images and collective plot compositions, independently choosing a topic. |
|
DEVELOPMENTAL OBJECTIVES:
| children's age |
||||
| I year of study (2-3 years) | II year of study (3-4 years) | III year of study (4-5 years old) | IV year of study (5-6 years old) | V year of study (6-7 years old) |
| Develop perception, gross and fine motor skills. | Develop perception, gross and fine motor skills. | To develop the ability of children to embody in an artistic form their ideas, experiences, feelings, thoughts; develop creativity. Develop an interest in artistic endeavors. | Develop coordination hand movements in accordance with the nature of the image being created. Develop a desire to experiment, showing vivid cognitive feelings: surprise, doubt, joy of learning new things. Develop imagination, form an aesthetic attitude to the world. | To develop compositional skills: to place objects in accordance with the peculiarities of their shape, size, length. Develop coordination hand movements in accordance with the nature of the image being created. Develop a desire to experiment, showing vivid cognitive feelings: surprise, doubt, joy of learning new things. Develop imagination, form an aesthetic attitude to the world. |
EDUCATIONAL TASKS:
| children's age |
||||
| 1st year of study (2-3 years) | II year of study (3-4 years) | III year learning (4-5 years old) | IV year learning (5-6 years old) | V year learning (6-7 years old) |
| To cultivate diligence, accuracy | To cultivate diligence, accuracy. Foster a desire to achieve success through your own work. | To cultivate diligence, accuracy. Foster a desire to achieve success through your own work. | To cultivate diligence, accuracy. Foster a desire to achieve success through your own work. To cultivate an aesthetic attitude towards the world around us. | To cultivate diligence, accuracy. Foster a desire to achieve success through your own work. To cultivate an aesthetic attitude towards the world around us. Cultivate interest in works of art. |
The program ensures the development of the personality of preschool children, taking into account their age, individual psychological and physiological characteristics.
2.3 PLANNED PROGRAM DEVELOPMENT RESULTS
The results of the development of the Program are presented in the form of the following targets:
The child actively and willingly participates in various types of creative artistic activity;
The child uses different ways of expressing his attitude to the world around him in productive activity;
When creating an image, a child shows imagination, fantasy;
The child has developed sensory standards;
The child has developed hand skills, tweezers;
The child is able to accept the task;
- the child is able to convey images of objects, phenomena through plasticineography.
3. Organizational section of the program
3.1 SCOPE (WEEK / MONTH)
The duration of classes depends on the age of the children, it is established in accordance with SanPiN 2.4.1.3049-13.
| Age | The maximum allowable volume of classes per week / month |
|
| 2-3 years early age | ||
| 3-4 years younger group | ||
| 4-5 years old middle group | ||
| 5-6 years old senior group | ||
| 6-7 years old Preparatory group | ||
3.2 SCOPE OF THE LESSON LOAD
| Parts of the lesson | purpose | Forms of work | Duration |
|
| Motivating children | Goal setting individually or to a group of children; Involvement in joint activities; Use of visual, informational means. Developing children's interest in upcoming activities and focusing on upcoming activities. | Fairy tale narration, Game situations, Elements of pantomime, Travel games, Didactic games, Immersion of the child in the listening situation, Immersion of the child in the situation of the actor. The fabulous and playful form of presenting the material dominates. | Early age group - 2-3 minutes; Younger group - 3-4 minutes; Middle group - 4-5 minutes; Senior preparatory group - 5-6 minutes. |
|
| Finger gymnastics | The development of fine motor skills. Warm up the joints of the hand. Preparing the child's hand for the movements necessary in artistic creation. | Conducting special finger gymnastics before starting the creative process using artistic texts | Early age group - 1 minute; Junior group - 2 minutes; Middle group - 2 minutes; Senior - preparatory group - 2 minutes. |
|
| Using the synthesis of arts and artistic activities. Formation in children of the ability to compare, contrast the various emotional-figurative content of works of fine art, the mood of wildlife. Development of the ability to convey emotions, feelings in practical activities. | Tasks related to the use of expressive capabilities of materials, performance techniques; Literary works; Musical accompaniment; Plastic sketches, improvisations; Non-traditional drawing techniques; Design creativity | Early age group - 4 minutes; Junior group - 8 minutes; Middle group - 10 minutes; Senior group - 15 minutes Preparatory group - 20 minutes. |
||
| Solving creative problems. Positive analysis of the results from the standpoint of originality, expressiveness, depth of concept. | Combining collective and individual forms of work; Exhibitions of children's fine arts; Individual opening days; Joint discussion of works. | Early age group - 2 minutes; Junior group - 2 minutes; Middle group - 3 minutes; Senior group - 2 minutes. preparatory group - 3 minutes. |
3.2 SCHEDULE OF LESSONS
| AGE | DURATION (MIN.) | TIME SPENDING | DAY OF THE WEEK |
| 2-3 years (early age group) | Monday |
||
| 3-4 years old (younger group) | Tuesday |
||
| 4-5 years old (middle group) | Wednesday |
||
| 5-6 years old (senior group) | Thursday |
||
| 6-7 years old (preparatory group) | Friday |
The program cannot be implemented instead of or as part of the main educational activity at the expense of the time allotted for the implementation of the main educational programs of preschool education (walks, daytime sleep, main activities, games). The number and duration of classes held in the framework of the provision of additional educational services are regulated by SanPiN 2.4.1.3049-13.
Organization of joint activities is carried out in the afternoon 1 time a week, 4 times a month with a subgroup of 6-8 children
| SECTIONS | STAGES | ||
| Introductory pedagogical diagnostics | Revealing the level of development of artistic abilities for visual activity. Revealing the level of possession of plastic and applicative skills, the ability to integrate visual techniques. |
||
| Artistic and pictorial activity | 1-3 years of development of the Program. Reproductive stage | Active work with children on the development of ideas about the artistic and aesthetic image, encouraging the child to create beauty in his daily life through the inclusion of types of fine arts in the process of education and training, ensuring the creative self-realization of his “I” in various types of productive activities. |
|
| 4-5 years of the Program development. Constructive stage | Active work on joint activities of children with each other, co-creation of the teacher and children in the use of plasticineography, in the ability to convey an expressive image. By the end of the fifth year of study, children independently use plasticineography to form an expressive image in productive activity. |
||
| Exhibitions-presentations of children's works | Presentation stage | Exhibitions of children's creativity, individual exhibitions, joint discussion of works is a good incentive for further activities. |
|
| Final diagnostics | Final stage | The success of the pupils in the tasks of the thematic plan, individual tasks, assistance in self-realization, determination of the level of creative development and independence. |
|
| Vernissage | To form the foundations of artistic culture; to consolidate knowledge about art as a form of creative activity of people. Continue to develop children's interest and understanding of the art exhibition. Learn to highlight beautiful, eye-catching components in an art exhibition. To foster a respect for the created works. |
4.2 METHODS AND MEANS
| Stage | STAGE NAME | METHODS | FUNDS |
| Stage I | Preliminary work | The method of sensory saturation (without a sensory basis, it is unthinkable to introduce children to artistic culture). | Conversations, work with visual material, observation, experimentation. |
| II stage | Entering the topic | A method of awakening vivid aesthetic emotions and experiences in order to master the gift of empathy. The method of non-trivial creative situations that arouse interest in artistic activity. | Games, experimenting with different materials , conversations. |
| Stage III | Artistic and pictorial activity | A method of varied artistic practice. Method of co-creation with a teacher, folk master, artist, peers The method of heuristic and search situations. | Working with materials, co-creation, activities. |
| Stage IV | Exhibition-presentation of children's works | The method of aesthetic persuasion. The method of aesthetic choice (beauty persuasion) aimed at the formation of aesthetic taste. The method of encouraging empathy, emotional responsiveness to the beautiful in the world around. | Exhibitions, vernissages, joint discussion of works . |
4.3 Calendar-thematic planning 2-3 years
| № p / p | Subject | Technics | Tasks | Materials (edit) |
|
| September |
|||||
| "Ruddy apples in our garden" | Plasticineography | 1. To teach the development of the technique of drawing with plasticine, to work out the “rolling” technique. Develop imaginative perception, teach how to compose an apple tree in co-creation with the teacher. 2. Develop imaginative perception, fine motor skills. | Green cardboard; red plasticine; modeling board. |
||
| "On a mushroom meadow" | Plasticineography | 1. Master drawing vertical and horizontal lines; add additional images to the picture: grass, sun or clouds with rain at the request of children. 2. Develop creativity, imagination, fine motor skills. | Green cardboard; brown plasticine; green, yellow pencils; modeling board. |
||
| October |
|||||
| "Fluffy Cloud" | Plasticineography | 1. Learn to create an image of a cloud: pinching and smearing plasticine with your fingers. | Blue cardboard; white plasticine; modeling board. |
||
| "Leaves are spinning, falling into puddles" | Plasticineography | 1. To teach the development of the technique of drawing with plasticine: rolling a ball, smearing, applying a smear. 2. Involve children in co-creation with the teacher through the creation of a collective composition. 3. To cultivate a love of nature, to develop fine motor skills, orientation in space. | Yellow cardboard; plasticine red, orange; modeling board. |
||
| November |
|||||
| "Rain-prankster" | Plasticineography | 1. Learn to draw raindrops by pinching and smearing small lumps of plasticine; work out the "rolling" technique. 2. Develop a sense of rhythm, color. 3. To foster a creative perception of the surrounding world. | Steel colored cardboard; blue plasticine; modeling board. |
||
| December |
|||||
| "The Christmas tree is a beauty, all the kids like it!" | Plasticineography | 1. Learn to create an image of a Christmas tree, a rhythmic pattern of branches directed downward in a cone; teach how to apply a rhythmic stroke from top to bottom 2. Develop fine motor skills. | Blue cardboard with a Christmas tree template; green plasticine, stack; modeling board. |
||
| January |
|||||
| "Ponytail with patterns, boots with spurs" | Plasticineography | 1. Teach the drawing of long, curved lines using plasticine. 2. Develop creativity. | Yellow cardboard with the figure of a cockerel, plasticine in red, blue, green, orange; modeling board. |
||
| February |
|||||
| "Coat for a hedgehog" | Plasticineography | 1. To teach how to model the image of a hedgehog by depicting needles on the back with rhythmic short strokes, using the techniques of rolling and anchoring. 2. To generate interest in creating a collective composition. 3. To cultivate a love for animals. | Yellow cardboard with a hedgehog figure, brown plasticine; modeling board. |
||
| March |
|||||
| "Visiting the sun" | Plasticineography | 1. Learn to create an image of the sun by smearing small balls with a direct movement in the forward direction towards yourself. 2. Develop spatial thinking, perception, interest in drawing with plasticine, fine motor skills. | Blue cardboard with a picture of the sun, yellow plasticine; modeling board. |
||
| April |
|||||
| "The boat is sailing, sailing" | Plasticineography | 1. Teach mastering the way of drawing wavy lines placed horizontally. 2. Develop a sense of form and composition. 3. Foster curiosity. | Green cardboard with a picture of a boat, blue plasticine; modeling board |
||
| "The first greens of spring" | Plasticineography | Fostering interest in observations in nature, reflecting impressions in accessible visual activities. Development of a sense of beauty (a beautiful tree with delicate spring greenery). 1. To consolidate the ability to draw with plasticine, using the technique of attaching small balls to the base, transforming them into an oval shape. 2. Develop fine motor skills 3. To cultivate an interest in observations in nature, a desire to reflect existing impressions in accessible visual activities. | Yellow cardboard with a picture of a tree, green plasticine; modeling board |
||
Calendar-thematic planning 3-4 years
| № p / p | Subject | Technics | Tasks | Materials (edit) |
|
| September |
|||||
| "On a visit to the sun" | Plasticineography | 1. Consolidate knowledge about the sun (what is it for? What is it?). 2. To teach to convey the image of the sun, improving the ability of children to roll a piece of plasticine between the palms, giving it a spherical shape; teach the technique of flattening a ball on a horizontal surface to obtain a flat image of the original shape. 3. Exercise in rolling the lumps of plasticine between the palms with straight movements of both hands. 4. Support in children the desire to bring the work started to the end. | Thick blue cardboard, size ½ A4; plasticine of yellow and red colors; modeling board. |
||
| "Rainbow" | Plasticineography | 1. Arouse interest in natural phenomena. 2. Teach children to convey the characteristic structure of the rainbow (arched arrangement of color stripes). 3. To consolidate the ability to sculpt "sausages" of the same thickness. 4. To develop fine motor skills of hands, color perception, eye. | Thick blue cardboard; plasticine of different colors; modeling board. |
||
| October |
|||||
| Plasticineography | 1. Expand children's understanding of vegetables (shape, color, size). 2. Learn to sculpt planar images of vegetables, apply a stack of relief patterns (dots, stripes). 3. Develop correct color perception, fine motor skills. | Thick yellow cardboard; green and red plasticine; stack; modeling board. |
|||
| "Fly agaric" | Plasticineography | 1. Expand children's understanding of mushrooms (shape, color, size, edible-inedible). 2. To learn to sculpt a flat image of a fly agaric, highlighting its distinctive features. 3. To develop fine motor skills of hands, coordination of movements, eye, color perception. | Thick yellow cardboard; plasticine red and white; modeling board |
||
| November |
|||||
| "Herringbone green" | Plasticineography | 1. To teach children through plasticineography to convey the structure of the tree, the direction of the branches, decorate with colorful balls. 2. Learn to use a stack, transferring the needle-like fluffiness of the tree. | Thick yellow cardboard; plasticine of different colors; stack; osk for modeling. |
||
| December |
|||||
| "Snowflake" | Plasticineography | 1. Expand children's ideas about winter. 2. To learn to sculpt a flat image of a snowflake from separately stuck together "sausages". 3. To develop fine motor skills, constructive abilities. | Thick blue cardboard; white plasticine; modeling board. |
||
| January |
|||||
| "Snowman" | Plasticineography | 1. Show the ways of mixing plasticine of different colors to obtain the required shades. 2. To form color perception, accuracy, develop fine motor skills of hands. | Snowman stencils, plasticine, blue cardboard, modeling board .. |
||
| February |
|||||
| "Birthday of the bear" | Plasticineography | 1. To consolidate the ability to roll out lumps of plasticine in a circular motion; teach the transformation of a spherical shape into an oval shape by pressing and moving the finger vertically downward. 3. Foster a sense of empathy and shared joy with the playable character. 4. Develop aesthetic perception. | Thick yellow cardboard; brown plasticine; modeling board. |
||
| March |
|||||
| "Colorful fish" | Plasticineography | 1. To teach the reception of "rolling" in a circular motion. To consolidate the ability to roll out lumps of plasticine in a circular motion; teach the transformation of a spherical shape into an oval shape by pressing and moving the finger horizontally, creating an image of a fish in motion; learn to convey characteristic features (forked tail). 2. To develop spatial perception, fine motor skills of hands. | Thick blue cardboard; plasticine of red, green, yellow; green pencils; stack; modeling board. |
||
| April |
|||||
| "Multi-colored insects" | Plasticineography | 1. Expand children's understanding of insects. Learn to roll a piece of plasticine between the palms, giving it a spherical shape; to consolidate the ability to flatten the ball on a horizontal surface to obtain a flat image of the original shape. 2. Develop creativity, independence. 3. Cultivate interest in working with plasticine | Thick yellow cardboard; green plasticine; modeling board. |
||
| "Salutes over the city" | Plasticineography | 1. Learn to draw salutes with plasticine: rolling small lumps into balls, smearing them to the base in chaotic directions. Learn to apply effort when working with materials at hand: stacks, tubes, caps. 2. Maintain interest in creating a collective composition "evening city". | Thick blue cardboard; plasticine of red, green, yellow; stack; tubules; caps; modeling board. |
||
Calendar-thematic planning 4-5 years
| № p / p | Subject | Technics | Tasks | Materials (edit) |
|
| September |
|||||
| "Ripe apples in the garden" | Plasticineography | 1. To learn to transfer the image of a fruit tree by means of plasticinography: pinch off small pieces of plasticine and roll small balls in circular movements of the fingers, flatten the balls on the entire surface of the silhouette (crown of the tree). 2. Develop an aesthetic perception of nature. | Thick yellow cardboard with a silhouette of a tree, A4 size; plasticine of crane, yellow or green colors; stack. |
||
| "Autumn leaves" | Plasticineography | 1. Fastening the techniques of pressing and smearing, learning to mix different colors. 2. Maintain the desire to bring the work started to the end, develop fine motor skills. 3. To cultivate the skills of accuracy. | Thick blue cardboard with a silhouette of a tree, A4 size; plasticine of red, yellow, orange colors; stack. |
||
| October |
|||||
| "Rainbow Mood" | Plasticineography | Choose the right colors and shades. 1. Learn to roll plasticine in your palms, giving the desired shape, gently smear the clay with your finger on the base, drawing the details; choose the right colors and shades. 2. Develop the ability to plot and composition. 3. To cultivate artistic taste, independence, creative initiative | Thick yellow cardboard, A4 size; plasticine of different colors; stack; colour pencils. |
||
| "A cheerful hedgehog in the forest" | Plasticineography | 1. To teach to convey in the work the characteristic features of the color of autumn leaves; choose the right background for future work; be able to look at different shades of color. 2. To develop aesthetic perception; fine motor skills. | Autumn leaves, a toy Hedgehog, A4 cardboard of various colors with a drawn outline of a maple leaf, plasticine; stack; pictures depicting autumn trees. |
||
| November |
|||||
| "Gift for Piggy" | Plasticineography | 1. To consolidate children's ideas about pets, the peculiarities of their appearance. Continue to acquaint children with the properties of plasticine (soft, pliable, able to take any shape). Teach children to achieve expressive transfer of shape, color, images of small details of the object. 2. Develop fine motor skills. 3. To cultivate accuracy in working with plasticine. Arouse in children a desire to do something pleasant, to give gifts. | Plasticine pink; stack; bright cardboard 1 \ 2; beads; bows. |
||
| December |
|||||
| « Where did the Christmas tree come from " | Plasticineography | 1. Expand children's ideas about the history of the New Year holiday. Strengthen children's skills to use in their work non-traditional visual art techniques - plasticineography. Achieve the implementation of an expressive, vivid image, complementing the work with elements of waste material. 2. Develop imaginative thinking, the ability to create a familiar image, based on the life experience of children (New Year's holiday, art word, illustrations) | Thick blue cardboard with a silhouette of a Christmas tree, a stack; A4 size; green plasticine .. |
||
| January |
|||||
| "Snowman" | Plasticineography | 1. Fix the method of creating a familiar image by means of plasticine on a horizontal plane by rolling, flattening. 2. Develop an interest in experimentation through the inclusion of "waste" material in the design of the work to create unusual surfaces in the depicted object. | Light blue (blue) cardboard with a silhouette of a snowman; A4 size, a set of plasticine; white eggshell; stack; toy snowman. |
||
| February |
|||||
| Plasticineography | 1. Teach children to sculpt a plane image of a tank, using previously learned sculpting techniques (rolling, flattening, smoothing the boundaries of joints). Learn to convey the shape, characteristic details of the tank. 2. Develop fine motor skills. 3. To cultivate love for their homeland. | Blue cardboard with a silhouette of a tank; A4 size, green plasticine; stack; toy tank. |
|||
| March |
|||||
| "Balloons for the holiday" | Plasticineography | 1. Teach children to roll balls of different sizes and colors with their palms; then flatten with pressing movements, placing it on a horizontal surface. 2. To develop fine motor skills of hands, color perception. | Yellow cardboard with a ball silhouette; A4 size; a set of plasticine; stack; toy balloon. |
||
| April |
|||||
| "Fragrant snow" | Plasticineography | 1. Teach children to depict a branch of a blossoming tree using plasticine. Learn to create a composition from individual parts, using the existing skills and skills in working with plasticine - rolling, flattening, smoothing. 2. To develop fine motor skills of hands, aesthetic perception. 3. To cultivate love for nature, the desire to convey its beauty in your work. | Pink cardboard with a silhouette of a tree; A4 size; white plasticine; stack; illustrations of flowering trees. |
||
| "Ladybug on a camomile" | Plasticineography | 1. To learn to use knowledge and ideas about the peculiarities of the appearance of insects in their work; to consolidate the use of a technical technique in the creative activity of children - plasticineography, to form generalized ways of working through plasticine. 2. Arouse interest in the surrounding world, form realistic ideas about nature. | Green cardboard with chamomile silhouette; A4 size; plasticine white and yellow; stack; sticker "ladybug". |
||
Calendar-thematic planning 5-6 years
| № p / p | Subject | Technics | Tasks | Materials (edit) |
| September |
||||
| "Live apples on twigs" | Plasticineography | 1. To expand children's ideas about wintering birds, their habitat conditions. 2. To teach to depict bullfinches, to convey the features of the external appearance. 3. Fasten the techniques of rolling, flattening, dividing into parts using a stack. 4. Develop color perception | Dense cardboard templates with a silhouette of bullfinches; plasticine; stack. |
|
| "Snake" | Plasticineography | 1. Expand children's ideas about the diversity of living things, their habitats. 2. To form the ability to decorate an object with a decorative pattern, using rolling, flattening. To develop aesthetic taste, color perception. | Thick pink cardboard with a snake silhouette, A4 size; stack. |
|
| October |
||||
| "Cockerel with family" | Plasticineography | 1. Consolidate knowledge about poultry, their appearance, habits. 2. Learn to sculpt an object from individual parts. 3. Develop hand coordination, fine motor skills. 4. To develop form perception. | Thick yellow cardboard with silhouettes of a rooster, hen and chicken, A4 size; stack. |
|
| "Swans" | Plasticineography | 1. Arouse interest in the natural world, form a realistic idea of it. 2. To consolidate children's skills to work with plasticine on a horizontal surface, to use its properties when rolling, flattening in the objects being created. 3. Develop fine motor skills. | Thick blue cardboard with a silhouette of a swan, A4 size; stack. |
|
| November |
||||
| "Owl, owl - big head" | Plasticineography | 1. Expand children's ideas about the forest bird - the owl. 2. To learn to create a composition from separate parts, using the existing skills and abilities of working with plasticine - rolling, flattening. 3. To develop fine motor skills of hands when creating a composition from plasticine. | Thick purple cardboard with a silhouette of an owl, A4 size; stack. |
|
| December |
||||
| "Penguins on an ice floe" | Plasticineography | 1. To acquaint children with representatives of the animal world - penguins. 2. Learn to convey the characteristic structure of the bird. 3. Develop creative imagination, color perception. | Thick blue cardboard with silhouettes of an ice floe and a penguin, size A 4; stack. |
|
| January |
||||
| "Clubfoot bear" | Plasticineography | 1. To give children an idea of the lifestyle of brown bears. 2. To teach how to use a stack to give the wool the necessary structure (furry). 3. Develop color perception. | Thick white cardboard with a silhouette of a bear, A4 size; stack. |
|
| February |
||||
| "Three pigs" | Plasticineography | 1. To consolidate and expand children's ideas about pets, about the features of their appearance. 2. Continue to acquaint with the properties of plasticine: soft, pliable, able to take a given shape. 3. To learn to achieve expressiveness through a more accurate transfer of form, color. 4. Develop the motor skills of the fingers. | Thick pink cardboard with a silhouette of a pig, A4 size; stack. |
|
| March |
||||
| "Different cats" | Plasticineography | 1. To instill love and respect for the "smaller brothers". 2. To learn to convey the structure of the figure of the cat, the different position of the body of the animal. 3. Develop fine motor skills of hands. | Thick lilac cardboard with a silhouette of a cat, A4 size; stack. |
|
| April |
||||
| "Octopus" | Plasticineography | 1. To acquaint children with representatives of the seabed, to tell about their characteristics, adaptability to life in the aquatic environment. 2. Develop imagination, figurative memory, the ability to think over the compositional construction of the image. 3. To promote the development of shaping hand movements in working with plasticine. | Thick blue cardboard with a silhouette of an octopus, A4 size; stack. |
|
| Plasticineography | 1. Raise interest in animals, awaken the desire to portray an animal. 2. Encourage independent children's creativity, initiative, add additions to the composition, corresponding to the given theme. 3. Develop fine motor skills of hands. | Thick orange cardboard with a silhouette of a giraffe, A4 size; stack. |
||
Calendar-thematic planning 6-7 years
| № p / p | Subject | Technics | Tasks | Materials (edit) |
|||
| September |
|||||||
| "Autumn bouquet" | Plasticineography | 1. Continue to acquaint children with one of the types of visual techniques - direct multilayer textured plasticinography. 2. To develop in children a vision of an artistic image and design through natural forms, to develop a sense of color perception; 3. To foster interest in autumn natural phenomena, emotional responsiveness to the beauty of autumn. | Dense cardboard templates in the form of leaves of various tree species and autumn fruits; plasticine; stack; autumn leaves; reproduction of the painting by I. Levitan "Golden Autumn". |
||||
| "Matryoshka - girlfriends" | Plasticineography | 1. To acquaint children with the history of the creation of the Russian nesting dolls, to consolidate the understanding of the relationship between arts and crafts and Russian folklore. 2. To develop the ability to reflect the characteristic features of the matryoshka design in an unconventional technique - reverse plasticinography. 3. Cultivate interest in folk toys. | Plastic blanks with a contour image of Matryoshka; plasticine; stack; big matryoshka. |
||||
| October |
|||||||
| "Autumn birch" | Plasticineography | 1. Expand children's knowledge about trees (structure, size, type). 2. To learn to sculpt flat images of birch, evenly placing autumn leaves on birch branches. To consolidate the ability to roll very thin "sausages" to apply the characteristic structure of the trunk. 3. To develop fine motor skills of hands, coordination of movements, color perception, eyes. | Thick blue cardboard with a silhouette, A4 size; stack. |
||||
| Plasticineography | 1. To learn to sculpt plane images of a clown from separate parts and verbal instructions of the teacher. Strengthen the skill in rolling the ball between the palms and flattening it. 2. To develop fine motor skills of hands, coordination of movements, color perception, eyes. | Thick blue cardboard with a silhouette, A4 man; stack. |
|||||
| November |
|||||||
| "Pets rabbits" | Plasticineography | 1. To acquaint children with rabbits. 2. To consolidate the ability to create a stucco painting with a convex image. 3. To develop in children a keen interest in nature. | Thick yellow cardboard, A4 size; stack. |
||||
| December |
|||||||
| "Snow Maiden" | Plasticineography | 1. To achieve the realization of an expressive, vivid image, based on the life experience of children. 2. To develop imaginative thinking, the ability to use non-traditional image technique in work - direct contour modular plasticinography. 3. Develop a sense of form, proportion and color; evoke vivid emotions in anticipation of the holiday. | Thick cardboard of pink (lilac or lilac) color with a silhouette of the Snow Maiden, A4 size; sequins and beads for decoration; Snow Maiden doll for viewing; stack. |
||||
| January |
|||||||
| "Wintering Birds" | Plasticineography | 1. Expand children's ideas about wintering birds, develop the ability to convey their observations of wildlife in artistic and visual activities. 2. To form the skills to depict birds, to convey the features of the external appearance. 3. To consolidate the techniques of rolling, flattening, applying, connecting straight and multilayer plasticineography. | Thick cardboard of light purple (blue) color, size "/ 2 A4; a set of plasticine; stack; photo illustrations with wintering birds |
||||
| February |
|||||||
| "Spruce branch with cones" | Plasticineography | 1. To teach to convey an expressive image of a snow-covered spruce branch using the technique of plasticineography. 2. To develop fine motor skills of hands, accuracy. | Plasticine, cardboard, stacks |
||||
| March |
|||||||
| "Snowdrops" | Plasticineography | 1. To teach children to embody in an artistic form their idea of primroses. 2. To develop the ability to depict flowers with the help of plasticine, to consolidate the ability to mix plasticine of different colors to obtain the expressiveness of the image by means of multilayer plasticine. 3. Develop a sense of shape and color. 4. To cultivate a respect for nature. | Light blue rectangular cardboard (under the frame); plasticine of different colors; stacks; photo illustrations with primroses. |
||||
| April |
|||||||
| "Sail" | Plasticineography | 1. To consolidate one of the techniques of multilayer plasticinography - color stretching, showing its possibilities for the coloristic solution of the topic and enhancing its emotional expressiveness. 2. Develop compositional skills. 3. To cultivate an aesthetic attitude to nature. | Cardboard of different shapes (rectangular, square, round, oval, etc.) and different sizes; plasticine of different colors; stacks; reproductions of paintings by marine painters |
||||
| "City street" | Plasticineography | 1. To give children an idea of the architecture of the city. 2. To develop the ability to stretch plasticine over the surface, creating relief objects by means of direct and reverse plasticinography in combination with contour and mosaic elements. 3. Develop fine motor skills of hands. 4. Foster collective, friendly relationships. | Cardboard templates for urban architecture houses and living spaces (trees, flower beds and flowers); plastic blanks with a contour image of machines; plasticine; stacks; unfinished composition "City Street" with a roadway on colored cardboard A1; illustrations, art photographs, a set of postcards with views of the city's architecture. |
||||
5. Application
5.1 Working with parents
- the family's request for upbringing and educational services is directly individually studied, their wishes are taken into account;
Consultations, conversations, questionnaires of parents are carried out;
Exhibitions of children's works are organized.
As part of the implementation of the additional education program "Plasticinography - Children's Design", a system of work with parents (legal representatives) of pupils has been determined.
The variety of forms and methods of work helps to find common ground with different categories of parents. Interaction with parents is aimed at sharing experience, increasing the pedagogical competence of parents, developing their pedagogical skills, etc.
Various forms of work with parents are organized, the topic of parent meetings, consultations on the development of manual skills in young children, a master class, and conversations have been developed.
To avoid deformation of the picture, thick cardboard should be used as a base;
An adhesive film applied to it will help prevent the appearance of greasy stains;
It is possible to eliminate the mistake made in the process of image of the object if you apply its contour under the film or with a special marker;
Covering the plasticine picture with colorless varnish will prolong its "life".
When creating plasticine paintings, you should adhere to the following technique .
In work, it is best to use a bright, moderately soft material that can take a given shape. This will allow the still not strong hands of the preschooler to create their first drawings.
In order for children to better learn and consolidate skills, the training should be carried out in stages: first it is important to teach how to press on the clay, then to smear it from the center to the edges of the contour and in the future to combine both techniques. It is necessary to teach plasticineography in order of increasing difficulty level: it is better to start with simple pictures at a young age and gradually move on to creating more complex ones.
When sculpting pictures, you should take into account the peculiarities of working with plasticine. So, to obtain the desired shade, you can combine plasticine of various colors and varieties. Mixing more than two colors at the same time is not recommended.
To obtain a variety of shades, children master the technique of pouring one color into another. You can use two methods. The first is to mix plasticine directly on the base, applying strokes alternately. The second is to take several pieces of multi-colored plasticine, knead, mix in one ball and draw.
A variety of methods for applying plasticine strokes, their texture, color coloring contributes to the development of the imagination of preschoolers. Depending on the intention, the texture of the strokes can resemble silk, glass or ceramics, look rough or embossed. In order to give the surface a shine, before smoothing the plasticine, the fingers are slightly moistened in water, but so that the cardboard base does not get wet. To make the surface of the painting look rough, various methods of drawing relief dots, strokes, stripes, convolutions or curly lines are used. You can work not only with your fingers, but also with stacks - special auxiliary tools. For the image of thin plasticine threads, you can use plastic syringes without needles.
A plasticine picture can consist of spherical, spherical or cylindrical pieces or strokes, and visually looks like a mosaic.
In the process of teaching children plasticineography, it is important to reinforce their self-confidence and encourage them even for small successes in mastering a new technique. Creativity should give preschoolers the joy of communication, learning, work, play, and rest. The experience of working together helps to establish relationships with peers, forms a sense of responsibility towards each other.
Materials for creating a plasticine painting:
Cardboard with a contour drawing;
Plasticine set;
Hand napkin;
Waste and natural materials.
5.3 Regional component
A long-term plan of work to familiarize yourself with your hometown
| DATE | SUBJECT | AREAS | |
| September | Our Motherland in Russia Purpose: To clarify the knowledge of children that our city has a name; how it appeared; instill a sense of pride in him | Social com. | Conversation "The name of the city", Reading poetry about Essentuki, Examination of the map of the Stavropol Territory Production of the panel "My city" |
| October | History of the city Purpose: to acquaint children with the history of the city, its name; arouse interest in your city, instill a sense of pride in it. | Reading S.K.r. Hood. | Conversation "History of the city", Reading legends about the origin of the city, Examination of Essentuki postcards - Work on the painting "Cossack village" (early 19th century) |
| November | City sights 1 (Mud baths, Drinking gallery, Kurortny park) | Reading S.K.r. Hood. | Participation in the exhibition of works "Symbols of the city" |
| December | City Sightseeing 2 (San Victoria, Mechanotherapy, Upper Baths) Purpose: Arouse children's interest in the history of the emergence of historical monuments of the city, foster feelings of pride for the city | Reading S.K.r. | City tour "Attractions of the city", Acquaintance with the symbols of the city of Essentuki " Exhibition of works: "My favorite city" |
| January | Symbols of the city Purpose: to acquaint with the symbols of Essentuki and the Stavropol Territory | Hood. Act. | Acquaintance with the coat of arms of the city Acquaintance with the symbolism of Essentuki D / I "Fold down the coat of arms and flag of Essentuki" Making a teamwork "Symbols of the city" |
| February | Famous people of the city Purpose: to arouse children's interest in the life of the city of Essentuki, a sense of respect and pride for famous fellow countrymen. | Hood. Act. | Conversation "Famous compatriots" (artists, writers). Examination of artists' reproductions :N. A. Yaroshenko, V. G. Klenova |
| March | Hometown businesses Purpose: to acquaint with the sanatoriums of Essentuki, to bring up in children a sense of respect for working people. Interest in professions | Hood. Act. | D / I "Whose logo" D / I "Sanatoriums of Essentuki" - Acquaintance with the work of A. Ekimtsev, I. V. Kashpurov |
| April | Here is my street Purpose: to continue to form in children an interest in their small homeland, street, residential buildings; To consolidate the knowledge of the home address, to give children an idea of the origin of some of the streets of the city. | Hood. Act. | Walking in the microdistrict Hometown Connoisseurs Quiz - "A trip to the museum" (Demonstration of slides with exhibits of the local history museum) |
| Battle glory of the city Purpose: To acquaint with the memorable places of the war in Essentuki; foster a sense of gratitude to the veterans of the Great Patriotic War | HOOD DO | Excursion to Victory Park to the Eternal Flame Making crafts for WWII veterans |
Literature:
1. Lykova I.A. The program of artistic education, training and development of children 2-7 years old "Colored palms". - M .: "KARAPUZ-DIDAKTIKA", 2007
2. Lykova I.A. Visual activity in kindergarten. Early age. Planning, notes, methodological recommendations. - M .: KARAPUZ-DIDAKTIKA, 2009
3. Lykova I.A. Visual activity in kindergarten. Younger group. Planning, notes, methodological recommendations. - M .: KARAPUZ-DIDAKTIKA, 2009.
4. Lykova I.A. Visual activity in kindergarten. Middle group. Planning, notes, methodological recommendations. - M .: KARAPUZ-DIDAKTIKA, 2009
5. Lykova I.A. Visual activity in kindergarten. Senior group. Planning, notes, methodological recommendations. - M .: KARAPUZ-DIDAKTIKA, 2009
6. Lykova I.A. Visual activity in kindergarten. Preparatory group. Planning, notes, methodological recommendations. - M .: KARAPUZ-DIDAKTIKA, 2009
7. Goricheva V.S., Nagibina M.I. We will make a fairy tale from clay, dough, snow, plasticine. A popular guide for parents and teachers / Artists M. V. Dushin, V. N. Kurov. - Yaroslavl: "Academy of Development", "Academy and Co.", 1998.
8. Davydova G.N. Plasticinography - 2. - M .: "Scriptorium Publishing House 2003", 2006
9. Davydova G.N. Non-traditional drawing techniques in kindergarten. Part 1. - M .: "Scriptorium Publishing House 2003", 2008.
10. Davydova G.N. Non-traditional drawing techniques in kindergarten. Part 2. - M .: "Scriptorium Publishing House 2003", 2008.
11. Kozhokhina S.K. A Journey into the Art World: An Activity-Based Development Program for Preschool and Primary School Children. - M .: TC Sphere, 2002.
12. IA Lykova "Artistic work in kindergarten" (middle, senior group). - Colored world, 2011
13. I. A. Lykova "Fine art in kindergarten" classes in the art studio - shopping center
SPHERE-M.2009 "
14. Shorygina T.A. Beautiful Tales: Aesthetics for Toddlers. - M .: Knigolyub, 2006.
15.R.M. Litvinova, A.T. Pashchenko Regional culture: artists, writers, composers (collection 2) Stavropol 2010.
Zinaida Yusupova
Dear colleagues! Currently, teachers insist that the development of intellectual and mental processes must begin with the development of hand movements, and in particular with the development of movements in the fingers of the hand. This means that in order for the child and his brain to develop, it is necessary to train his hands. Plasticineography is a new genre(view) in fine arts activities. The concept “ plasticineography”Has 2 semantic root: "Graph" - to create, draw, and the word " plasticine”Means the material with the help of which the fulfillment of the conceived is carried out. Main material - plasticine, and the main tool in plasticine are hands therefore, the level of skill depends on the mastery of one's own hands. This technique is good in that it is available to children of younger preschool age, allows you to quickly achieve the desired result and brings a certain novelty to creativity. children, makes it more fun and interesting, which is very important for working with kids.
I bring to your attention our bullfinch.
Related publications:
Holiday in kindergarten for children 3-4 years old "Autumn Meetings" Autumn Festival in kindergarten for children 3-4 years old "Autumn meetings" Characters: - Bear - Rain - Mushroom - Autumn The course of the autumn holiday.
 One of the favorite arts and crafts techniques for preschoolers is plasticineography. Children are very fond of drawing while drawing.
 Good evening, dear colleagues! Applique classes with children in kindergarten have a positive effect on the development of fantasy.
 Articulation gymnastics is an effective means of studying, clarifying and improving the foundations of the mutual arrangement and movement of organs.
Situational games in kindergarten for children 3-4 years old Game-situation "Grass-ant" Program content. Introduce children to a playful situation; give a positive emotional charge; develop.
Consultation for parents "Adaptation of children 2–3 years old in kindergarten" Kindergarten is a new period in a child's life. For a kid, this is, first of all, the first experience of collective communication. New surroundings, unfamiliar.
Consultation for parents "Plasticine in kindergarten" CONSULTATION FOR PARENTS Plasticinography in kindergarten Prepared by the teacher Ibragimova Olga Vladimirovna Plasticinography - relatively.
 The "Plasticinography" circle is held with children once a week. Preschoolers are happy to study, develop fine motor skills and general.