Corrugated paper volumetric. Many ideas for appliques from corrugated paper. Trampling paper templates. Toolkit for work
With the applique, we are introduced in kindergarten. Such a type of creativity lures a small child and undoubtedly contributes to the development of a huge creative potential. Not only develops small motility of hands, imagination, but also raises the aesthetic perception of the world, teaches the artistic taste. In this article, we will introduce you to a new type of applique using a corrugated paper master class.
And this type of application, such as a carriage, will definitely interest even needlewomen, as its technique can be used in the creation of fakes adorning the interior. Torching is a bulk design of twisted pieces of light paper glued to the surface with a thin stick. The use of different colors allows you to create amazing mosaics, looking like fluffy carpets, bulk figures, postcard-pictures.
Toolkit for work
For the manufacture of such fakes, a very small set of materials is needed: paper, glue, scissors and "fine" tool in the form of a thin stick.
Usually, this technique uses corrugated paper or, as it is also called, strong. Such paper can be purchased in stationery stores. From corrugated paper, "ending" - elements of volumetric applications are cut. The glue will be needed for cutting and gluing these ending to the base of the crafts. You can use any surface to "lower" a corrugated paper to which this paper is glued. It may be a watman sheet, cardboard, light ceiling tiles. For bulk crafts made blanks made of foam, newspapers, papier-mache, plasticine.
Well, the main tool of the carriage is a long thin wand with a blunt end. A pencil, rod or body from a ballpoint handle may well come to the role of such a tool, a chinese wand for food, toothpick.
Light lesson
Traffic equipment on a flat picture begins with the selection of the picture. It is drawn or take ready made from any coloring, pre-sticking it on dense paper. We select the right colors of the paper and make billets from them. For this paper rolls, without turning, cutting strips, and from these strips, the square mode is about 1-2 cm.


When the squares are quite a lot, we apply glue PVA glue on the part of the pattern, we retard tightly squares to the end of the sticks and put the strip on a lubricated glue. We take a stick and so work on the subsequent ending. We have one by one tightly on the glue line. You can also fill out the background of the picture so that whole landscapes are. Flat painting is suitable for classes with children from 5 years.


Volumeful way
Another interesting way of applications, creating velvet figures, is the so-called "volumetric combustion method". It is done on plasticine. The same billet squares are cut, only glue is no longer needed. It is enough to make the desired figure of plasticine and start stalling in turns of the ending with a stick to the surface.
As a result, we get surround crafts:


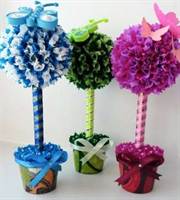
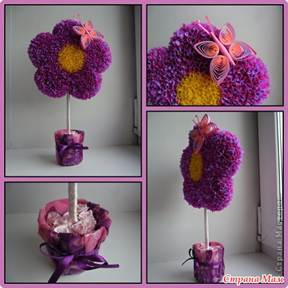
These all crafts can be made by a group of people, creating more, such as large fabric landscapes, photo frames, ornaments toys. Needlewomen makes interior decor objects in this way. If, up to this point, such an applique looked like a children's fun, the creation in such a way of floral balls and Topiariyev fascinates with its magic light view.

Topiaria's transportation is also made using paper or napkins.
For the manufacture of Topiaria We will need: Corrugated paper or napkins Multicolored, scissors, bamboo skewer, ball for ping-pong, dry glue, PVA glue, brush, awl, cardboard, sticking stick, cup of yogurt, paper napkin, acrylic paint , plasticine, segment of a narrow decorative tape.

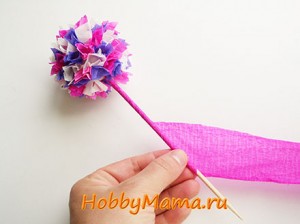
The ball, as a last resort, can be twisted from old newspapers and wrapped with threads, cut out of foam. The ball first need to be sealed with a layer of napkins so that our tubes from paper are pasted on it, then decorated in the technique of trimming with corrugated paper from top to bottom. Factors are cut into more sorts, so your product will be lush and air.


The trunk is a spanch, which is winding with decorative ribbons or a strip of paper. Glass glue with a napkin, deliberately creating crumpled irregularities for decor. When the glue dries, cover acrylic paint. Insert a cut-out cardboard in the barrel, which serves as a cover for a cup. Now our pot is laying plasticine and stick the finished crown there. On the glue we screw the lid and decorating with paper ending. Decorating a satin ribbon.

Some of us, for the first time hearing the name of this type of creativity, are wondering: What is the crossing? Nothing difficult for this title is hidden. This is such a work technique with paper that combines both the appliqué and quilling. This method is so easily mastered that even the kids in kindergarten are easily trained in this kind of creativity from the first time.
Before starting work in the technique of alert, you need to decide on the drawing, according to which the work from ending will be created. For those who are just starting, these schemes are perfect:


Such pictures can be used for classes with the baby.
In general, almost any drawing will suit how the coaling scheme. The main point you need to know is the simpler drawing, the more the dimensions of the billets for trimming can be. Conversely, the more complicated the scheme and the more small details in it, the smaller the size of the paper or napkins should be in size. Another important point is that when working with napkins, the thickness of one square should be 2-3 layers, since the paper will break into one layer and nothing will come out.
Thanks to such a technique as a carriage, very unusual things are obtained: Topiaria, voluminous crafts, and, of course, paintings.


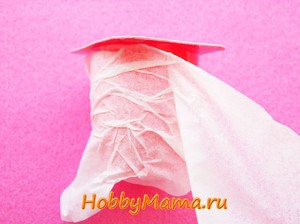
Torching from napkins: Make Valentine
This original gift cannot but please yourself who will receive it. A simple technique of work will provide an opportunity to create such valentine to anyone.
Materials for work
- Already ready postcard in valentine.
- Tree-layer napkins, with the help of which moves will be obtained.
- Cardboard for template.
- Scissors.
- Rod from handle.
- Plasticine
To begin with, proceed to drawing the template. To do this, take the ready postcard, attach to the cardboard and circle.

Now cut the resulting figure, and bend.

In the middle write your wish or recognition.

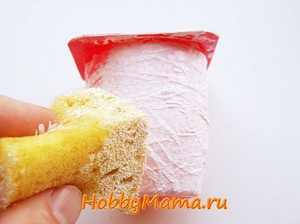
Take white plasticine and apply on the front of the postcard with a thin layer.

Now proceed directly to the move. Take the napkin and divide it into three layers.

Since Valentine's small, then the size of the sliced \u200b\u200bsquares should be 1x1.

If you do not want to make a one-picture card, then the heart can be divided into color zones using a handle.

We begin to make tracing, as shown in the photo.


Without removing a piece of napkins from the rod, press it in the place where the color is scheduled on the plasticine.

Fantasy should stand very tightly to each other, so that there is no clearance, then the work will look much better.


Well, Valentine is ready, and now you know how to make such things are easy and simple. The technique of treading from paper napkins is practically no different from the technology of working with corrugated paper, so the source material can be easily changed to your taste. Good luck and new accomplishments!
Video lessons for beginners
About the types of needlework techniques using paper can be said infinitely, because the fantasy is infinite. What we do not do with these grateful material - and cut, and glue, and the meters, and eat, and we are swearing, and we turn, and twist and smear. And all this in order to turn a flat paper sheet in a miracle, the omnuzzy, which can be glad and apply to the eye. Well, if not in the case, he is like pleasure - for sure!
Torching is one of the types of paper needlework. This technique can be attributed to the method of appliqué, and the type of queening (paper). With the help of transportation, you can create amazing volumetric patterns, mosaics, panels, decorative elements of the interior, postcards. In this way it is possible to decorate almost any items, for example, photo frames. A little known, this technique very quickly acquires new fans and wins the popularity in the world of needlework. Such a rapid growth of its popularity is explained, firstly, the unusual effect of "fluffyness", which gives a carriage, and secondly, a very easy way of execution. What is this technique for treading from paper? Let's get to know her closer.
Torlet principle
At the heart of this technique - the creation of images and objects with the help of volumetric elements from paper. The volumetric element of the transportation is called "ending" or "sticking". It is a compressed as a funnel or cone a piece of soft paper. It is from such elements and a conceived product is created. Each such "tracker" as one brush smear in creating a picture, as one loop in knitting or one beading beading.
Torching - the work is not complicated, but painstaking. It requires not only perfection, but also accuracy, attention and a certain dexterity.
Tools
To perform crafts in this technique, you need a minimal set of materials and tools: paper, glue, scissors and, so-called, "tracing" tool.
Turning paper is not suitable. Usually, this technique uses corrugated paper or a solid one. Such paper is sold in almost all stores of goods for creativity and in cultivars. In addition to corrugated paper, ordinary paper napkins are also suitable. From corrugated paper, they are made directly "ending" - elements of volumetric appliqué. Scissors and glue will be needed for cutting and gluing these ending cells to the base.
The basis uses very diverse materials. Actually, you can "lower" the corrugated paper with any surface to which this paper is glued. Therefore, for panels, paintings and mosaics, a flat base is taken - a sheet of watman, cardboard, light ceiling tiles. For bulk crafts made blanks made of foam, newspapers, papier-mache, plasticine.
Well, the main tool of the carriage is a long thin wand with a blunt end. A pencil, strip or body from a ballpoint pen, a Chinese chopstick and any other suitable wand can be used to the role of such a tool.

Technique as such
How to work with all these tools and materials? After you have decided on the type of product, it is necessary to prepare paper for "ending". It should be sliced \u200b\u200bfrom corrugated paper squares. Size - from one to three centimeters, quantity - depending on the area or volume of the product. The workpiece on which "ending" will be mounted, can be smeared in advance with glue. But you can also apply glue to each individual item - it's like you like more.
How to make one such "fluffy"? The technology of manufacturing "ending" requires accuracy. So, in your right hand you have a sticking wand, in the left - the square of the paper. Attach the paper sheet to the center of the wand, and holding it, carefully doubt the paper, turning it with her wand. By crimping paper, do not press too much so as not to break it. As a result, you will get a small fluffy cone. Fluffiness will give him a square of the square. After that, without removing the cone from the rod, stick it to the workpiece so that the peak of the cone turned out to be glued to the surface of the workpiece, and the folds of the "carnation" would look at you. By gluing actover remember that the more tight to each other you post them on the surface of the product, the fluffy and careful it will look like.
If the whole process of transporting is painted in stages, it will look like this:
- Cut the squares (one per one cm) from corrugated paper.
- We make a blank for a bulk product or draw a pattern on a flat surface.
- Dumb end (end) rod put on paper square.
- Fliminate paper and roll the rod between your fingers.
- We glue the tube-ending to the workpiece.
- Take out the rod.
Everything is so simple and concisely that forces even children. By the way, in kindergartens and schools in handicraft lessons, children are mastering the technique. And if a real master will be taken for this, then the result of its work can be a real masterpiece technique for the trade.
Options and opportunities
First of all, it is all sorts of toys and decorations. Some needlewomen use this technique in scrapbooking and designing photo frames, decorate with its help greeting cards. If this technique make a picture or panel, then a real terry rug with a solid pattern or fluffy contour pattern will be obtained.
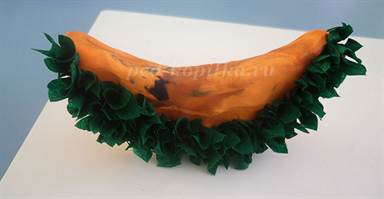
For the manufacture of volumetric products used techniques of paper on paper on plasticine. For this, the billet is made from plasticine, which is already filled with "ending". Souvenir floral balls and "happiness trees", made in this technique look very impressive.
The easy-to-carry gunner has an unexpectedly spectacular result that will not leave indifferent neither masters or those who will admire this result.
Traveling technique allows you to create wonderful fluffy carpets paintings of different shapes and sizes, causing interest and feeling of admiration. It seems unlikely that such at first glance complex applications can be performed by children. Everything turns out to be possible if you correctly organize the work of the team, and even first-graders can cope with the most complex pattern. Technique does not imply the use of any special equipment. It will require only a drawing with contours, scissors, pencil or rod from ballpoint pen, multi-colored corrugated paper or paper napkins and PVA glue.
Trucking technique: Preparation for work
First you need to cut pieces of approximately 1.5 centimeters from corrugated paper. Their quantity and colors depend on the complexity and size of the work. Stencil for the future masterpiece can be drawn independently or print any simple drawing. It is advisable to use dense paper or cardboard. For convenience, you can pour glue to the plate, and you can also use adhesive pencil. The equipment technique is a simple, but at the same time a time-consuming process that requires adhesion and patience, as it contains a lot of identical repetitive actions.

Step by step description of technology
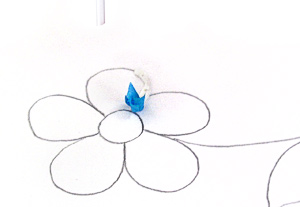
1) A thin strip of glue along the contour is applied to a small segment of the pattern.
2) The end of the rod or pencil needs to be covered with a square of corrugated paper and with the help of fingers to give paper the necessary shape, resembling a flower head.
3) Then the bottom of the resulting figures need to be dipped into the glue and glue the picture to a certain section.
4) After neat pressure, the rod is carefully removed.
An important point is that every next corrugated piece should stand next to the previous one, so they need to be put very close to each other so that there are no clearance.
Features of technology
What can be made of crepe paper? In fact, this material gives almost unlimited space for fantasy. Original and unusual postcards from corrugated paper, various crafts, flowers, as well as bulk fluffy patterns. Proceeding technique from corrugated paper is a very popular job reception. Products are very interesting, and the execution of such crafts does not require special skills. Using this method, you can create beautiful and original volumetric images from corrugated paper. And it can be both miniature compositions and large panels. All elements should be very tightly adjacent to each other, creating the effect of a thick fluffy rug, consisting of a large number of pieces of paper. Traveling technique is very easy to learn, so such activities are ideal for recreation and lessons with young children.

Advantage of working with corrugated paper
The main attraction of the picture created with the help of equipment techniques is that images are obtained light and air, which is achieved by the use of corrugated paper, fine and transparent material, which easily takes the specified form. Unlike other methods of working with paper, the accuracy of the size of the cut parts does not have much importance, on the contrary, the more uneven edges will be, the prettier will be the view from the finished product. However, some rules still need to be observed that work does not seem careless or committed unfair.

To embody the conversion technique with the help of equipment, you need to purchase corrugated paper or napkins of different colors that need to be turned into a plurality of small pieces, the size of which is about 1.5-2 centimeters. The shape of the elements can be square, triangular or round. At the same time, the edges should not necessarily be perfectly smooth, they can be zigzag, wavy and so on. The main thing is not to increase the size of the parts. If the picture is large, you can make a square 3 * 3 cm, but nothing more. What they are less, the more clearly it will look like a picture in a holistic completed form. During securing paper on glue, a thin object is used: it may be a pencil or match. To start mastering the technique of a torch, it is recommended to start with simpler images, for example, such as rainbow, flower, butterfly or various geometric shapes.

Basic principles
The technique of coaling from napkins or corrugated paper does not always imply a full filling of the desired space. For example, there is a cladding only the contour in the form of a fluffy twisted frame around the entire perimeter of the selected figure, the picture center can remain empty. Several colors can also be used in the work, also can be performed in the monochrome range using just one color, for example, to highlight the background. The main principle of technology is to use it in those areas where the volume needs to be given, while due to the small size of the paper elements, all outlines and the boundaries of the pattern remain unchanged, and the picture does not lose the clarity and the main idea.

Technique of bulk trade
The teaching technique from paper can be used not only for flat images, but also for firmly glued paper figures. It can be a casket, a figurine, paper tree. You can give a new life to old things using cardboard, gypsum, clay and other materials, "revive" which can not be brushes and paints, but decoration of paper. In addition, items can not be fixed using glue, it is quite possible to use the basis of plasticine, which will help save the mass of time. Sticking pieces of paper that differ in size and density allows you to make very soft color transitions and real volumes on a flat surface. All these effects affect the overall perception of the picture: the same green grass will look brighter and natural, if it is in some places it is dark green, and where the sun's rays fall - light-salad.

Live painting
Traffic equipment from napkins or corrugated paper is able to transform even the easiest drawing with primitive elements in a more interesting picture. Even if it's just the sun, clouds, a house and an apple tree next to a wooden fence, then after filling the image becomes bulk and alive. Crafts made according to this technology are highlighted by special tactile softness and visual elegance.

The history of the emergence of equipment
What is tormenting? The history of the occurrence of applied paper creativity is not one century. However, there are directions that appeared relatively recently, they include appliqué, quilling, origami and terethery. When using equipment techniques are created from paper, contributing to the development of creative principles, shallow motility, abstract thinking. In addition, this occupation teaches patience, perfection and hard work, which is so often lacking modern children. This young technology is becoming increasingly popular thanks to the simple method of execution and the unusual effect of the "fluffy carpet", pleasant to the touch and visually. What is remarkable to the technique of a carriage? The master class on the creation of bulk paintings can be carried out without leaving the house, during operation does not require special equipment and expensive materials. It is only necessary to reserve napkins or fastened paper, plasticine, glue, tassel, cardboard, multi-colored markers and other devices, which are so in the arsenal of any schoolboy or the pupil of kindergarten.
It requires corrugated, simple color or tissue paper (sewing), pencil, scissors, glue and the base to be attached to the parts.
1. Cut the box from paper (circle, part with uneven edges, etc.).
2. Press his center with a pencil.

3. Screw the paper around the pencil.

4. The resulting twist, without removing from the pencil, glue the base (cardboard, paper, etc.).

5. The following trackers are glued next to the first. Paper should close to each other and cover the base with a solid carpet.

Types of torch
1. Contour torch- Paper twists framed the contour of the pattern. Used to create kants, frames, borders and when combining with other technicians, such as scrapbooking.


2. Torching on the plane.In this case, the crossings are located vertically and very tight to each other over the entire surface.

3. Volumetric Turning.This type of work suggests a different density of flushing of ending and attaching to a bulk surface at different angles of inclination, which allows you to create very beautiful complex compositions.

To create a cactus used plasticine base
4. Torching layers Expansion of the details in each other. The combination of actover of different shades and colors makes it possible to achieve unusual effects and "revive" paper crafts.

All types of torches are successfully combined with each other.
Application
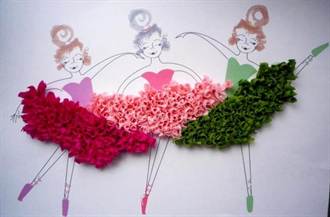
The technique of which we speak is often used to create flower compositions. Depending on the size and type of flower, the size and shape of the source parts are selected.
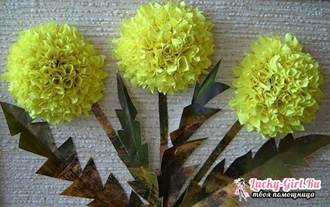
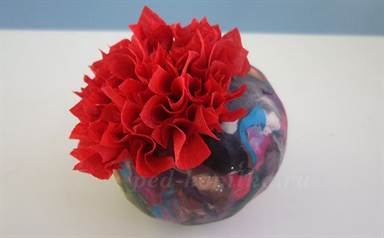
For violets, cut circles with a diameter of 3-4 cm. Spin it loosely on 1/3 of the ending. Proper ending under the big inclination.

Macs are made in the same way as violets, but the size of the circles increases to 6-7 cm, and their edges are cut by waves.

For the creation of dahlias, small strongly twisted squares are used.They are starting tightly glued from the center of the flower with a slight inclination. If, as you move to the edges, the size of the squares and their tilt increase, and the twist density is reduced, then a large blossomed flower will turn out. For bud, parts are pasted almost vertically.
Any other flowers made in the same technique will look lush and bulk.

Trucking technique can also be applied to decorating volumetric figures made from cardboard, paper, plasticine, plastic, clay, oasis floral sponge.
Turning can create pictures of any sizes. In this case, the image contours are applied to the basis of the pencil, and each segment is tightly filled with twists of the corresponding colors.


| Yet |