Do-it-yourself autumn crafts in the kindergarten are easy. Autumn DIY crafts for kindergarten. Frame of acorns
Autumn crafts- these are works made most often from natural material. Acorns and chestnuts, cones and nuts, seeds and berries, and even colorful leaves - all these are universal ornamental materials that autumn is so generous with. The section presents master classes and photographs from exhibitions from kindergartens and schools. If you were asked to do crafts with a child in kindergarten on the topics: "Gifts of Autumn", "Pantry of Autumn", "What Autumn Brought Us", "Golden Autumn", etc. - be sure to look at the materials from this section.
The change of seasons brings variety to our lives and serves as a source of creative inspiration. Autumn is a special time. The energy accumulated over the summer is looking for a positive outlet, and nature pleases with an abundance of bright colors. Clear days alternate with monotonous rains, and cheerful walks with quiet homework. This is the best time to make crafts from natural materials with your children.
Autumn inspires
Contained in sections:Includes sections:
- Autumn bouquet. DIY compositions from leaves, natural material
Showing posts 1-10 out of 4833 .
All sections | DIY autumn crafts for the garden and school
Sculpting lesson "Gifts of Autumn" Target: the formation of the ability to sculpt from plasticine based on different geometric shapes (cone, ball, oval. Tasks: 1. Educational: Consolidation of knowledge about signs autumn; Formation of primary ideas about preparations for the winter; Formation of skills to sculpt vegetables, mushrooms, ...
Master Class "Hedgehogs in autumn forest» non-traditional drawing technique - print with seals from waste materials Prepared: Abdryakhimova Rumiya Ilyasovna teacher of the second junior group I offer a master class on non-traditional drawing techniques using prints from ...
Do-it-yourself autumn crafts for the garden and school - Synopsis of the integrated application and modeling lesson "Autumn Birch"
Publication "Summary of the integrated lesson on appliqué and modeling "Autumn ..." Synopsis of direct educational activities. Integrated lesson on the development of creative skills application, modeling on the topic; "Autumn birch" Educational building No. 4 "Fairy tale" Educator: Loginov Vladimir Alexandrovich Preparatory group "Golden Key" Moscow 2018 ...
 MAAM Pictures Library
Lesson on the application "Autumn leaf fall" Purpose: To arouse interest in the creation of a collective composition "Autumn leaf fall". Teach how to lay out ready-made forms (leaves) of different colors and sizes on a blue background, move them in search of a good placement and carefully stick them. Continue to acquaint with the breaking technique ...
Master class for educators on creative activity in non-traditional technique "Autumn Trees" Tasks: 1. Involve educators in the creative process; introduce an interesting technique for making an autumn tree from colored threads, colored cardboard, using rice .; 2. Demonstrate the importance of productive activities in educating children's sense of beauty and ...
 The handicraft made from natural material was made together with a pupil of the senior group for the competition "What autumn gave us." Every year nature gives us a lot of materials for creativity completely free of charge. Our task is to see it. Working with natural material develops...
Do-it-yourself autumn crafts for the garden and school - GCD for applications from geometric shapes "Autumn beautiful flowers"
Types of activity: communicative, cognitive, visual. Educational areas: social and communicative development, cognitive development, artistic and aesthetic development. Purpose: To consolidate children's knowledge about seasonal changes in nature with the advent of autumn ....
Abstract of the combined lesson on familiarization with the outside world and modeling "Journey to the autumn forest" for the middle group Program content. Continue to form elementary ideas about autumn changes in nature, about the preparation of wild animals (squirrels) for winter; to consolidate children's knowledge about the fruits of mountain ash, spruce, pine, oak; the ability to sculpt familiar objects using learned techniques ...
 Abstract "Artistic and aesthetic development" modeling in the senior group "Autumn tree" Date: September 2018 Priority educational area: "Artistic and aesthetic development" (sculpting. Integration of educational areas: "Speech development", "Cognitive ...
 Project author: Kalugina Ksenia Nikolaevna - educator, MADOU "Kindergarten No. 131, Yekaterinburg, Sverdlovsk region Duration of the project: short-term (September - October) Project participants: children, parents, educators, senior educator. Age of children: 5-6 years ...
Collecting the gifts of autumn with children is an exciting activity. How much joy and benefit brings joint creativity at this time of the year. The search and selection of materials, their sorting and preparation, thinking over the idea you like, and the very embodiment of the author's intention - all these are opportunities not only for interesting communication, but also for expanding the horizons of the child, his acquaintance with the world around him and teaching elementary labor skills. And the development of imagination and fine motor skills of the hands, the development of patience and the ability to bring what has been started to the end are the accompanying useful aspects of this creative activity. In addition, crafts made from natural materials are a great gift option for moms and dads, grandparents, which children can make with their own hands.
*In order for your material to be included in this section, add a couple of lines separated by commas and without quotes to your blog post in the "Categories" field: "children's crafts, autumn crafts"
Parents of kids attending a preschool are aware that every holiday is necessarily accompanied by children's crafts for the kindergarten. Some may find this task to be a waste of time. But for the majority, this is still an entertaining and creative process, as well as an opportunity to spend time with a child with interest.
It is important to keep natural materials in stock in accordance with the season, and then any task for the manufacture of works will not be taken by surprise.

Reserves of natural material
When traveling to the sea, you can pick up small stones and shells. In walks in nature, stock up on beautiful leaves, cones and twigs. At the summer cottage, you can plant decorative pumpkins - this is a good raw material for products that is subject to long-term storage.

Leaves can be stored in a book. It is better to hold the cones in the oven and pour boiling water over them, destroying all the bugs. It’s also best not to throw away toilet paper or paper towel cartons, and save plastic bottles with caps. Designate a place for these items by placing everything neatly in the box.
Crafts for kindergarten - this is what the child must cook with his own hands. The degree of difficulty is determined based on the age category.

With skillful direction, the child will be able to create an application, drawing, and mold a plasticine product on his own. Taking into work natural materials in the form of leaves and cones.

DIY craft ideas for kindergarten below will tell you how best to use non-standard tools, such as pasta or plastic dishes.

Plastic bottles can already be classified as standard materials, the possibilities for working with them are endless. Use matches, napkins, and sushi sticks, they are all great tools.

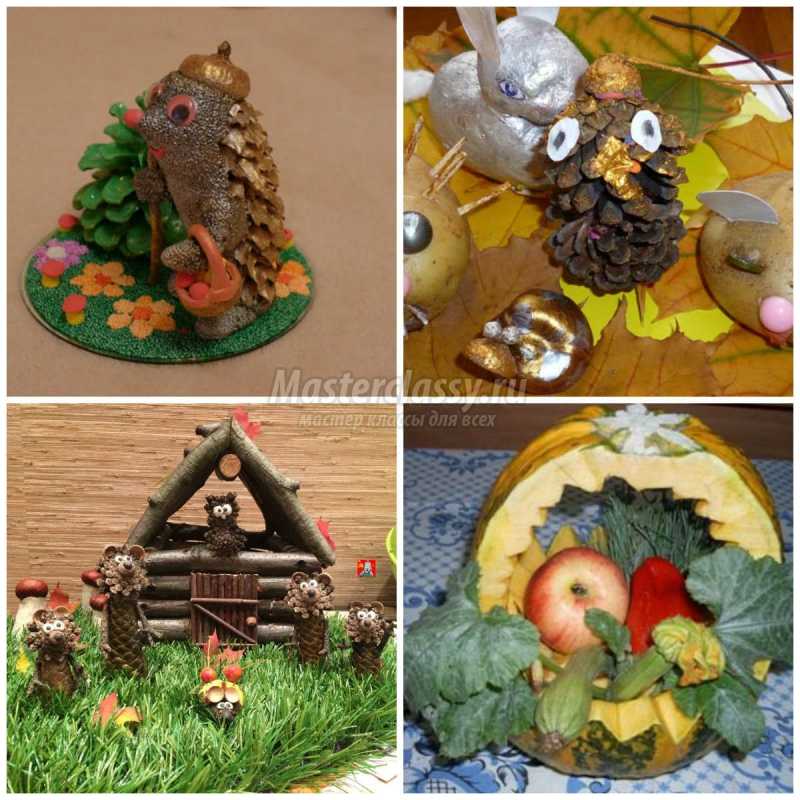
Products in the autumn version can be performed as compositions or as independent works. Perky hedgehogs, old foresters or alien creatures in a flying saucer - all this can really be done by children's hands using raw materials given by nature.
Winter style products
In winter, we have associations for New Year's holidays, and we also do not forget about the day of the defenders of the fatherland.

On February 23, military items will be relevant. You can make greeting cards. Excellent products are made from fabric, but parents should take part in the creation, since it is necessary to cut.

The body is created from fabric, while the corners at the bottom should be stitched, this is necessary for stability. Next, fill the bag with padding polyester and tighten the thread.

It remains to create a face. The nose can be made from a beige bead. Eyes can be used ready-made or create an application. Embroider eyelashes, and build antennae from threads tied into a bundle. Give a tone with blush or lipstick.

Hands are made of fleece or cloth and glued. Alternatively, attach one handle to the cap. Ideas are endless, you can supplement the work with shoulder straps.

Works in the style of autumn
Products in the autumn style are distinguished by the fact that materials given by nature are used for manufacturing. Leaves, cones and acorns of this raw material are in abundance in autumn, which is perfect for crafts on a site in a kindergarten.
As a rule, competitions of works are arranged in the autumn period. The kid is able to create an application on his own with a little help from his parents.

For products from vegetables and fruits, a knife is used, so the work must be carried out strictly under supervision. Paints are often used in gardens. But you can also replace them with material, for example, autumn leaves will serve as stamps for creating a forest.
Note!


You can tell the kids how the birds need their help and make a feeder together.

This contributes not only to the development in creativity, but also brings up a sense of caring for animals.

In winter, the death of birds is very high, because because of the frost it is difficult for them to survive, so care will be taken when creating a feeder.

For the feeder you need: a tree, a box and plastic bottles. Wooden feeders are known for their durability. But not everyone can handle this material. Cardboard is easy to use, but it won't hold up in wet weather.

In this case, the cardboard feeder can be updated periodically, and the baby will like its decoration. Plastic is the most unpretentious material. Easy to work with and will hold up after rain. The work uses a mock knife, so the process is carried out under the guidance of adults.
Note!


Street layouts
You can build situations that convey the meaning of reality, such a game will help you learn the movement on the road, study the signs. Street markings can be drawn with paints on cardboard, houses can be built from boxes. Decorate the urban landscape with greenery and, most importantly, make road signs and traffic lights.
Road signs can be printed from the Internet. A sign stand can be made from a plastic bottle cap and a sushi stick, and fastened with plasticine.

It is easy to create houses from cardboard boxes or glue them from cardboard and paint the facade. Trees are created from cardboard or natural materials.

If you finely chop the green threads and sprinkle them on cardboard, pre-lubricated with glue, you get grass. The soil is easy to create with grits glued to the surface.


Note!

One side has a background color and the other side has three traffic light colors. Glue a thread between the halves and the circle is easily glued so that you can turn it to the hole of one side or another.

bottle craft
Wall panels, plot compositions and toys can be performed in various techniques. It is very easy to make crafts from plastic bottles for kindergarten.
You can make a penguin. This will require two plastic bottles, with the bottom cut to the required size. And the part is placed one inside the other. For convenience, several cuts can be made in the inside.

Using acrylic paints, paint the toy. We make a pom-pom from threads - to decorate the hat.

The scarf is made of braid or fleece, it will successfully hide the junction of the bottles. For the stability of the scarf, you can put it on glue or double-sided tape. Colored paper is used for wings and paws.

Photo crafts in kindergarten


Good afternoon. Today I prepared new idea pack for autumn children's crafts, which are suitable for home fun with children, for classes in kindergarten or school. I will show the brightest autumn crafts, made by children's hands. Here you will find suitable ideas for the smallest children(2-3 years old) and crafts for older children(7 - 10 years). We will make broken applications on the theme of autumn, children's mosaics made of paper, buttons and beads. Draw with paints on autumn leaves, and also make colorful prints of these leaves on paper. I'll show you how to make an entire picture book out of natural material and teach you an easy way to make leaf appliqués. In short, there will be a lot of interesting lessons and master classes. So you will not leave this article with an empty head.
Moreover, the site also has thematic articles - where autumn crafts are laid out on specific topics. Popular themes for autumn are mushrooms, hedgehogs, owls, apples. Such piggy bank articles are convenient for selecting ideas for classes in kindergarten or at school.
So, let's see what children's autumn ideas I have collected. in this article.
Children's autumn crafts
IN THE MOSAIC TECHNIQUE.
Here is a pumpkin craft using the mosaic technique, which is made without glue. We will need a white sheet of paper, a black sheet of cardboard, double-sided tape and filling.
In this example, the mosaic filler is buttons, beads and nail glitter sprinkles. But buttons in our country are expensive. Therefore, it will be great if you just prepare multi-colored (yellow, orange, brown and reddish) pieces of cardboard, finely cut with scissors + beads and sequins. That will be cheaper.

On black cardboard, draw the outlines of a pumpkin. Cut out with scissors. We cut a white sheet of paper to the size of our pumpkin hole on cardboard. And we cover the entire surface of the white sheet with double-sided tape. Gently attach the sticky white sheet to the back of the black cardboard so that it completely covers the pumpkin-shaped hole. And we get a sticky inside for our mosaic. In bowls or on a tray, lay out the mosaic filler - pieces of paper, cardboard, shards of a broken cup, an orange plastic folder cut into pieces, cut pieces of cardboard and other things that come to your mind.

Your child will be happy to spread small things on the sticky surface of the pumpkin.
If you want to hold such a lesson in a kindergarten, then of course you won’t get enough adhesive tape and mosaic filler for all children. Therefore, I propose to make pumpkins collectively - one for 4 children. Just at the table, 4 children are sitting - they are given one pumpkin for all, and each has a bowl of mosaic filler. Children lay out the mosaic on the pumpkin together - and at the end of the work, when all the large parts are laid, sprinkle the craft with powder.

Glitter powder costs money. Therefore, you can make your own powder coating with a cheaper product. powder can make semolina, dyed orange. Semolina is painted with ordinary gouache, rubbed with hands into a dry homogeneous mass. Another powder can be made from grated dry autumn leaves.
Craft mosaic of colored napkins AUTUMN LEAF .
If square pieces of colored (yellow and red) table napkins are glued randomly on top of each other, you can get an excellent material for cutting autumn leaves.

Below, the master class demonstrates the general principle of creating such a children's autumn craft.
A colored napkin is placed on PVA glue - on top of an office file or film. Pieces of napkin can be torn (as in the photo below) or neatly cut into squares, as in the photo above.

Here maple leaf pattern for this children's autumn craft. By the way, This autumn leaf template can also be used as a template for a sticky mosaic craft with double-sided tape (same principle as we just made a pumpkin with our own hands).

You can also cut out cardboard in advance autumn leaf frame template. Put a cardboard frame on a plastic file- colored side down. And with children's hands fill this frame with pieces of napkin. We pour glue-pva directly onto the file and lay napkins. Napkin ukaldka should touch the edges of the cardboard frame. Further, when the craft dries, we separate it from the office file - the entire napkin mosaic will cling to the edges of the frame. And we hang this craft-frame with a mosaic on the window. The sun shines through the bright layers of napkins. A beautiful stained glass autumn children's craft - which is easy to make in kindergarten or in the classroom at school.

Children's autumn crafts
Trees on bushes.
In the same mosaic technique, you can make just such a children's craft in the form of autumn trees. Glue round cardboard circles with colored napkins and insert them into the slot made in toilet paper rolls.

You can cut ovals in the form of leaflets from colored paper. Children will love to collect their autumn tree. For the convenience of work, we first put the tree crown round on the table, stick the leaves on it, and only after that we put it in the slot on the toilet paper sleeve.

You can do it differently. Do not make a slot in the roll, but make a tree crown in the form of a POCKET, which can be easily put on the roll. Just cut out 2 silhouettes of the crown and glue them along the edges - the unglued middle will open like a hat - and we put it on the roll-sleeve.

Children's autumn crafts
from leaves
for the little ones.
The easiest children's crafts from autumn leaves are crafts for kids. When we offer a child a ready-made coloring book and show that some elements on it can be made from natural material.
Offer the child a lot of leaves and blades of grass of various shapes - and let him choose the part to be replaced - the head, or the tail, or he wants to make ears, paws from natural material.
In the same way, you can use not one autumn leaf, but several at once. Or pave the craft with a whole pack of autumn herbarium (as in the photo with the hedgehog craft).

I have collected a lot of interesting ideas for working with autumn leaves in a separate tutorial article. I invite you to go into it a little later and learn new foliage craft techniques for this fall.
Drawing on autumn leaves.
children's autumn crafts.
The easiest autumn children's craft- this is to paint a large round sheet with red paint and when it dries, draw red dots on it with your finger (not with a brush). And then we glue such a leaf an already prepared blank of a bug drawn on a sheet with black gouache.
If you do not have a round leaf, it's easy to fix. An ordinary maple leaf can be cut in a circle - and you get the desired shape.

We can stick an autumn leaf on paper. And cover it with any pattern, and draw the missing elements next to the leaf.


Before you start drawing we trace the contours of an autumn leaf on another sheet of paper and on this pencil copy draw a sketch of the future crafts. Thus, we check in advance whether all the details of the intended pattern coexist well with each other, as they fit on the autumn leaf.
And then, on a clean sheet of paper, carefully transfer all the elements of the draft sketch with bright, rich colors with a brush.
Some work can be done not with paints - but with bright thick office markers or felt-tip pens (as was done on the frog craft from the photo below).

You can also add colored paper elements to the leaf craft with drawing. Below we see a beet family in the garden. The land for the garden can be drawn, or cut out and colored paper, or made from sprinkling with a grated dry autumn leaf (grind dry brown leaves into fine dust, pour pva glue on a sheet of paper and pour leaf powder on it). Or you can use regular tea leaves.

And children just like to paint large autumn leaves in bright colors of gouache.

Or fit stained glass paint- It is thick and lays down with a beautiful glossy layer.

Children's crafts
with prints of autumn leaves.
We give the child a ready-made printable coloring book. A branch and contours of a bird should be drawn on it. The bird should be small - so that there is a lot of free space on the sheet. And the branch should go through the entire sheet of paper - diagonally. This way we can place leaf prints on either side of the branch. We cover the sheet with paint: with a brush, and preferably with a sponge - we dilute gouache with water in lids from cans and give children small pieces of a sponge. They wet the sheet with a sponge and put an imprint on our picture.

If you do not find a suitable finished coloring book on the Internet. You can draw it yourself on a sheet of paper with a black felt-tip pen - and then print it out according to the required number of children (this is if you work as a kindergarten teacher and you decide to take this idea for group classes and 20 or more children).
And also you can translate this picture from the monitor screen - directly from this site- put a sheet of paper on the screen and circle the translucent picture with a pencil. To resize the image to fit your sheet. Press the ctrl key with one hand and turn the computer mouse wheel with the other hand - the image will change size to larger or smaller, depending on where you turn the wheel: towards you or away from you.

Another autumn bird is the peacock. She is often depicted in the form of autumn crafts. We will also make it out of paper and paint. We will need paint to make leaf prints. First, we collect several autumn leaves from different trees - we need long leaves (for the central part of the tail) and small leaves (for the lower part of the tail). From paper, cut out a circle-abdomen and a pear-shaped shape for the head. Beak and eyes.
On a piece of paper we glue our belly of the future bird - and with a pencil around the belly we outline the size of the future tail. - You can immediately place the leaves in a circle - outline their location.
Then we cover each sheet with autumn-colored paint (red, yellow, orange) with a brush - and leave prints on a sheet of paper. We dry the prints and glue the paper parts of the bird. Ready.

Children's autumn crafts
In STAMP technique.
Children really like to make prints with paints using stamps made from a cardboard roll. Ordinary toilet paper is cut in half lengthwise (to reduce the bell, the whole pipe will give too large a petal) - flattened into a petal shape and connected with tape. We get convenient small stamps-leaves. In small bowls (lids from jars are suitable, or plates for flower pots) pour PVA glue and into it add gouache. Glue helps save gouache consumption - the color is just as bright and juicy.
cheap pva glue sold in hardware stores - called UNIVERSAL PVA GLUE or CONSTRUCTION PVA GLUE. It is exactly the same as stationery children's pva - but its price is 4-5 times lower than that of stationery and it is sold immediately in buckets of 500 - 1000 grams. One bucket is enough for 2 months of crafts for the entire kindergarten group. Convenient and cheap.

You can also bend the cardboard roll from above and below into a hollow - and fix it with electrical tape so that it does not unbend. And then you get a stamp in the shape of an apple. With it, you can make autumn children's crafts on the theme of fruits - with homemade preparations - compote or apple jam.
As stamps, you can take real apples cut in half.

The stamp can be cut out of any shape and with an internal pattern - from ordinary potatoes. For example, on an oval cut of a potato, cut out REMOVES in the form of veins of an autumn leaf.

Also, the inflorescence of CAULIFLOWER is a ready-made convenient stamp for drawing an autumn tree. This children's craft is suitable for the youngest children 2-3 years old.

Plain round wine stopper can also be a good stamp for children's autumn crafts in the form of an apple tree.

Children's autumn craft-landscape
in engineering
MIRROR PRINT.
And the print technique can also create such an autumn landscape reflected in the water. We need to divide the sheet into 2 halves horizontally. Bend this sheet along the line (so that there is a ready-made convenient fold line). Then paint the lower part of the sheet under the fold in blue (the color of the water in the lake). And on the upper half, apply a light shade of blue sky. Dry it all.
And then VERY QUICKLY, without letting the paints dry, we APPLY BRIGHT SPOTs of trees on the upper half of the sheet - a blunder at speed. And quickly, before they dry, we bend the sheet along our fold line - so that the spots of the trees are PRINTED ON THE BACKGROUND OF THE LAKE. If necessary, repeat this procedure again - apply the same paints to the same places and bend the sheet again. Then we add strokes in the form of tree branches. And if necessary - after drying - once again we go through the blue paint on the lake half of the sheet.

crafts-paintings
from cut leaves
Leaves do not have to participate in the application as a whole - in their natural natural form. From autumn leaves, you can cut any shape - squares, rhombuses, circles. Here on the craft below we see that the sheet is cut into rhombuses and each rhombus is a flying kite. Long blades of grass like the strings of kites, and bright stems like their long tails.

Large details can be cut from a wide maple leaf. This cute pig is made entirely of one sheet, which was cut with scissors.

Leaves are paper given to us by nature. And you can work with leaves like paper. Cut out any necessary details for the application from the leaves and make children's autumn crafts out of them. Simple and fast.


France has a whole children's book, which is illustrated with just such cut-out applications from living leaves. Why don't you come up with illustrations for your favorite stories. You can work with the whole class - and do a lot of teamwork. All illustration crafts must be photographed in good quality and ordered (at a printing house or photo studio) - an album with a story illustrated by children's work. Then this test model can be taken to a publisher - such an idea may be of interest to publishers and your class can produce a real book with a large circulation - and earn themselves an interesting class trip or excursion. Why not.


Children's autumn crafts
OWLS and Hedgehogs.
I don’t know why, but of all the birds, owls are best associated with autumn. It is their silhouettes that artists most often draw when they take on autumn forest landscapes. Well, we will not lag behind the trends of great art and create our own autumn crafts-sketches with wise owls.
Let's start with a simple - but very beloved topic by all children. An owl inside a volumetric hollow. That is, we will make a real 3D tree. It is done very simply - a sheet of paper is folded in half lengthwise - and then again in half. Now we unfold it and see that there are three fold lines on a piece of paper (that is, the sheet is divided into 4 equal long parts - now put the extreme halves of the sheet on top of each other- and we get triangular tube(that is, a pyramid tube - as in the photo below a tree trunk). On this tube (along the middle fold line), we cut an oval hole-hollow with scissors. Now, so that the tube does not turn around, we will fix these extreme halves of the sheet (which we folded on top of each other) with glue - that is, we will close the back of our trunk.

On a sheet of paper (blue background - like the sky), we stick stick-branches. In the middle, we attach our triangular tree trunk to the glue.
Now on a separate yellow sheet of paper draw a round owl(nearly the size of a hollow). We decorate the owl with wings from paper of a different color, cut out a triangular forehead also from paper of a different color and eyes from white paper.
To keep our owl in the hollow- we glue a strip of paper crumpled into a ring on the back of the owl (that is, we cut off a strip of paper and closed the ends into a donut ring). We glue this paper ring with one side on the back of an owl - and with the other side we glue it to the bottom of the hollow. It turns out that the owl sticks to the hollow, and does not fall out of it.
Left over from leftover yellow and red paper cut the leaves- stick them on the branches and draw veins on them. Here is such a cute and simple autumn craft - suitable for the senior group of kindergarten.
And here is another interesting craft on the theme of OWLS. In the photo, the crafts are made from paper plates, but we can just cut out circles from cardboard. Two rounds per child.
Children cut one round in half (these are wings). We cover all the details with glue paint. If you mix paint with PVA glue - in the proportions of glue 4 times more than gouache - then you can immediately stick eyes and a beak on such glue paint - put paper parts right into the liquid paint, and they will stick. Where to get cheap PVA glue immediately in liter buckets (and not in jars of a teaspoon) I have already said a little higher in this article.

Even more crafts on the theme of an owl - I posted in separate article
And also hedgehogs are also a good theme for autumn children's crafts. You can add a background of autumn leaves to them.

The craft above is suitable for the older group of kindergarten. We give the children a white paper cone (that is, you need to prepare cones in advance according to the number of children). With scissors, children cut the cone into a fringe. Coat the fringe with glue and attach it to a background sheet of paper. We paint the cone brown (you can immediately make cones from brown paper so as not to waste time painting). And it remains to glue autumn leaves on the children's craft.

You will find a lot of ideas for crafts with hedgehogs on our website in a special article.
Autumn crafts
Children's applications.
Autumn is the season of rain and fog. You can make a craft that tells about this side of autumn. Every weather has its beauty. And it can be reflected in the craft.
Even such an elusive phenomenon of nature as fog. Here, with the help of paper napkins (which we stratify into thin transparent layers), you can make shreds of fog (craft in the photo below).

And the rain craft can be served brightly and cheerfully if you add a bright rainbow to your picture, and make the cloud smile.


Children's craft-application
AUTUMN TREE.
The smallest children can do simple crafts - stick alternately colored ovals of tree crowns. And then circle the lines drawn with a pencil by the educator's hand with a felt-tip pen.
The kid himself will not yet draw so symmetrically and branchedly - but he will be able to draw around ready-made pencil lines. You can work with a felt-tip pen only after the glue has completely dried - for example, after a quiet hour, the craft will just dry out and children can work without the felt-tip pen getting into wet glue.

And you can do without drawing with a felt-tip pen. Just cut out thin brown paper slingshots and stick them on top of colored paper tree crowns, as is done in the photo of the children's crafts below.

Apple or pear trees are also a good idea for an autumn children's craft. You can make one tree with rosy apples. Or you can turn on collective work and give other tables the task of cutting out leaves, flowers, silhouettes of birds flying south. And then put it into one common autumn picture.

I collected a lot of crafts on the theme of APPLES and an apple tree in a separate article called

You can combine the application with drawing with wax crayons. Each drawn leaflet is first traced by the child along the lines with white wax crayon (or another color different from the color of the paper itself).
Then he takes scissors and cuts out the leaf without cutting the chalk line. And he collects a tree from such leaves. You can collect a common tree - one for each children's table. Then compare which table turned out smoother, more magnificent, more fun. And give out nominations - the most magnificent tree, the tallest tree, the most iridescent tree, etc. - so that no one is offended.

Autumn wreaths made of colored paper are also a good idea for a children's collective craft for this fall. Each child is given a simple and feasible task for children's hands. Cut along the contour of 1-2 autumn leaves.

Colored paper painting
CARPET OF AUTUMN LEAVES.
Here is such a beautiful craft that can decorate any interior. It is made from ordinary colored paper - with ordinary children's hands. You can do this craft collectively with a group of children of the same class or in kindergarten with children of older preschool age.

On a piece of colored paper - draw straight thin lines of veins. Draw a circle at the end of each line. Then we take scissors and cut out along the contour of these styles.

We paste the cut veins on ordinary leaves of the same shape - but contrasting in color. Then we combine all the leaves into a single canvas. So that it was full of holes openwork. That is, the leaves stick together with each other only in EDGES.

Good luck with your crafts.
Olga Klishevskaya, specially for the site
Collage "Autumn"Prepare:
multi-colored threads
- flowers and leaves for decoration
- thin dried twigs
How to do:
1. Make a circle of dried twigs. Secure the structure with wire or thread.
2. Take a colored thread and wind the circle in such a way that you get a "cobweb". Secure the end of the thread with a strong knot.
3. Decorate the round frame with leaves. They need to be inserted between the threads of the web. For decoration, you can use any natural material.

DIY natural crafts on the theme of Autumn
"Crown of Leaves"
Necessary materials:
Scissors
- thick paper or cardboard
- colorful leaves and natural materials for decoration
- adhesive tape
Stages of work:
1. Measure the circumference of the child's head. Add a few centimeters to this length. These data will be needed to cut a strip 5 centimeters wide. If one cardboard sheet is not enough, you can cut 2-3 strips and glue them together.
2. Cut out one strip again, but now zigzag. Only one side should be cut with a zigzag.
3. Cut off a piece of adhesive tape the same length as the strips of cardboard. Lay the ribbons, adhesive side up, on a flat surface.
4. Glue 1 cardboard strip to the top half of the tape, and the notched part to the bottom. There will be an empty part of the adhesive tape in the center. This is where you need to stick natural materials for decoration.
5. PVA glue can also be used instead of adhesive tape.

Make some like that too.
"Finger Puppets"
Necessary materials:
Thin brush or thin branches
- cardboard cylinders
- leaflets
- colored paper
- PVA glue
- glue stick
- scissors
- small stones or buttons
How to do:
1. Start gluing the sheet evenly to one end of the cylinder. First you can glue the colored paper, and then the leaves.
2. Glue small branches on the sides - these will be the hands.
3. Glue pebbles or buttons along the cylinder.
4. Make eyes out of plasticine, fix on a cardboard cylinder.
Try also to do .
Craft garden autumn do it yourself
"Spider from the bump"
Prepare:
Thread
- thin branch - 4 pcs.
- cone
- plasticine or plastic eyes
- glue "Moment"
Stages of work:
1. Make paws from twigs.
2. Attach eyes to the bottom of the cone.
3. Tie a thread and hang the spider.

"Asterisks from branches"
Necessary materials:
Raffia or paper tape
- gouache or acrylic paint
- branches of the same diameter and length
- Super glue
Stages of work:
1. In the forest, collect branches, cut them to get the material of the same length. You will need 5 pieces in total.
2. Form a star from the branches. If desired, the branches can be painted with gouache or acrylic paint.
3. Using raffia, connect the branches to form an asterisk.
4. Wrap the craft with bright ribbons or raffia.
Craft theme autumn do-it-yourself photo:

Collect acorns in a forest or park, clean them of dust and dirt, rinse with water. Pierce each fruit through with a needle or awl. Pull a wire, fishing line or thread through the acorns. As a result, you should get a ring. Glue the acorn caps to the surface with superglue and varnish.
"Tree with acorns".
Separate the hats from the fruits, paint them with paint of any color so that the craft fits organically into the interior. Attach twine loops to the hats. If there are branches left on the hats, tie a rope to them. If there are no branches left, use glue. For the best effect, place the vase on a tray strewn with autumn leaves and acorns.
autumn candle
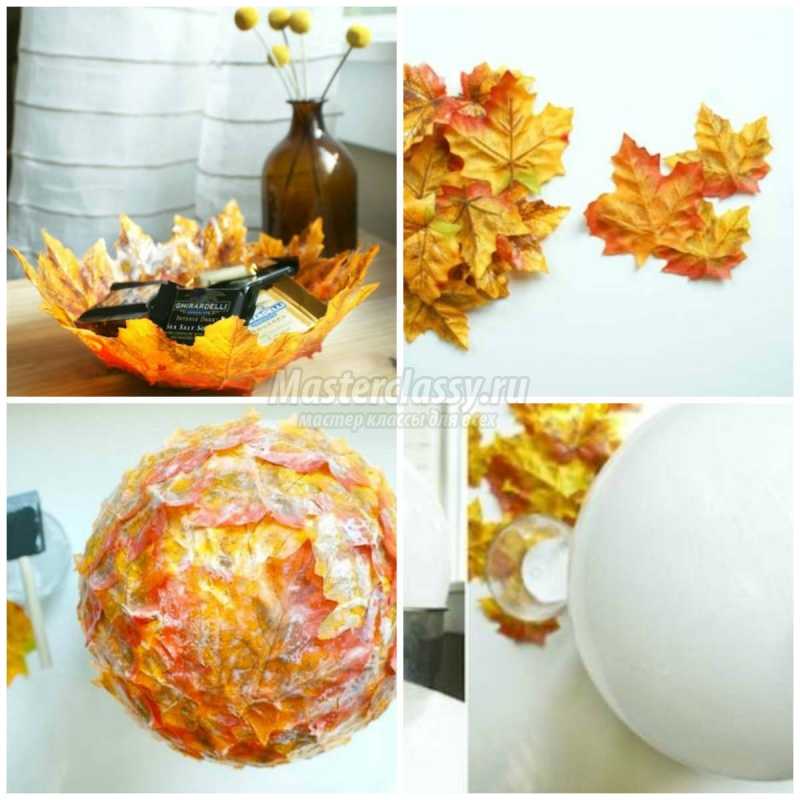
The easiest way to decorate a candle is to place it in a glass dish. Beautiful handmade candlesticks will make the atmosphere in the house festive and cozy. First of all, pick up a beautiful glass vase. If the candle is too low, pick up any object that you can put a candle on. Perfect for a bowl. Just turn it upside down and install the candle. Decorate the bowl additionally to make it invisible. For decoration, you can use willow branches. They bend well, so you can wrap a bowl around them. Fill the gaps between the walls of the bowl and vase with hay, moss, etc. Place a candle in the center and decorate it. To do this, use red and yellow leaves. Just glue them on the outer wall of the vase. Weave the twine into a pigtail, tie the leaves. The rope not only fixes the leaves, but is also an additional decor.
Branches are an excellent ecological material. To create compositions from them, you do not need to have special materials and tools available. In simple branches and snags, you can consider unusual shapes and use them to create original crafts.
Be sure to clean and dry the collected branches. Branches can be used in their pure form or coated with paints or varnish. Large sweeping branches will look great on the walls. They will become not only a decorative element. They can be used as lamps or hangers.
Do-it-yourself autumn crafts of a kindergarten
Application "Pieces of autumn".
During the walk, collect chestnuts, acorns, beautiful leaves with your child. Even from the simplest leaves you can make funny little animals, as well as beautiful patterns and ornaments. Joint creativity will develop fine motor skills, imagination, attentiveness and perseverance in the baby. Creating an app is a simple process. Prepare dry leaves, clean them of dust and dirt, smooth them with an iron, laying them between two pages of a book or paper sheets. Prepare the paper, glue the prepared leaves with PVA glue. You can use scissors and cut out beautiful details. Children often carve animal figures. In order to cut a realistic silhouette, just use the template.

Candles make the interior cozy, interesting and magical. Prepare a large candle and decorate it with small ears of corn. Give your child the opportunity to color the cobs in all the colors of the rainbow. Insert an elastic band around the candle, insert heads of corn into it, tie it with a beautiful ribbon. Coat each head with additional glue so that it is better fixed on the candle.
decorative basket
Necessary materials:
Leaves of beautiful color
- cones
- chestnuts
- acorns
- fruits vegetables
- wicker basket
- all kinds of cereals
How to do:
Line the inside of the basket with paper. If you have a floral sponge, place it on top. It is very convenient to insert autumn flowers into it. Place cereal and autumn leaves along the edges of the basket. Put the fruit in the center, insert the stems into the sponge. For better fixation, string the fruit on wooden skewers, insert them into the floral sponge.
Autumn felt leaves
Prepare 2 pieces of fabric in different colors. On one segment, mark the veins, cut them along the contour. Pin 2 leaves together with pins, sew along each vein. For this purpose, use a sewing machine or a needle and thread. Make veins in the center of the leaflet using machine or hand stitches. From these leaves you can make a beautiful garland and hang it in the house.
Good afternoon, we continue to talk about autumn crafts. And today I have prepared a new portion of ideas for crafts on the theme of autumn. There will be the most beautiful works, feasible for both children in kindergarten, as well as more serious art objects worthy of the hand of a master. You will find a variety of crafts on the autumn theme in our other articles - And I will also give you at the end of the article a list of links to other children's crafts for this fall.
Well, let's start, let's see what beautiful and simple crafts I have prepared for you today.
Origami
On the theme of autumn
In the technique of quilling.
Autumn is beautiful golden leaves. From narrow strips of paper you can transfer openwork beauty autumn leaves. Here in the photo below we see simple openwork twists using the quilling technique. For such airy leaves, you don’t need a lot of paper at all. And such work is quite simple to do for school-age children.

Younger children can fold simple leaves - where each element of the sheet is ONE single large quilling twist.

And more complex crafts-leaves on the theme of autumn are made in several stages. First, on a piece of paper, we draw the outlines of a maple leaf. Then we fill this silhouette with twist modules - starting from the center and gradually moving towards the edges of the silhouette. After the entire inside of the sheet is collected, it remains only one continuous strip of paper to glue along the entire contour edge of the craft.

And you can start doing crafts with veins(as in the left photo below). First, stretch the veins from the strips of paper - following the drawn contours of the veins on the paper - stick a pin into the end of the drawn vein, stretch a strip of paper, wrap it around the pin and glue the second half of the strip to the first half. After all the veins are collected and fixed on pins, we begin to lay paper twist modules.

There are different quilling techniques for creating patterned twist modules. By alternating different patterns and shades of color, you can make real masterpieces-crafts on the theme of autumn (like these oak leaves with acorns in the picture below).

Quilling modules can be stacked in autumn picture-panel(as in the photo below). How to make such shaggy flowers, I told in detail and showed in photographs in a special article.

Birds, rowan twigs, squirrels, hedgehogs may appear on quilling craft paintings on the theme of autumn. Everything that has to do with the autumn forest.


If you are just starting your first steps in the quilling technique, then on the theme of autumn it is better and easier to do rowan craft.

This craft has simple berries - round twists. And simple leaves - twists in the shape of an eye (that is, the same circle-twist was first loosened, untwisted, and then squeezed with fingers from both sides, giving the shape of an eye).

Children of primary school age already have sufficiently dexterous and strong fingers to twist and flatten quilling modules themselves. Therefore, for them, simple crafts on the theme of autumn using the quilling technique will also be able to do.
For example, it’s easy to make such a hedgehog and a round, relaxed apple tourniquet.

Many more ideas and ways to make an autumn hedgehog craft and in the quilling technique and from natural material and from paper you will find in our article.
And when the child gets the hang of it, you can give him craft tasks with an already LARGE number of quilling modules (as in the photo with autumn crafts below).

For the manufacture of such children's crafts, it is better to use stencils. A lot of quilling stencils on the theme of autumn can be found on the Internet. I plan to write a separate article on autumn quilling and publish full-size ready-made stencils in it. In the meantime, for a start, here is an idea for an autumn tree made of paper rolls.

Crafts on the theme of autumn
Corrugated paper.
Thin crepe paper (wrinkled or corrugated) is suitable for very beautiful autumn-themed crafts for children. You can make a tree craft from a toilet paper roll. Or an autumn flower craft on an ice cream stick.

The most important thing is to learn how to make multi-layered lush pom-pom flowers. In the article "" I give detailed explanations of how to make such lush flowers quickly and easily with children's hands in kindergarten.
And here they post such a schematic photo-instruction. And I give a step-by-step description of your actions.

Step 1- we put colored sheets of paper on top of each other (crepe or colored paper table napkins)
Step 2- we fold this stack of colored paper layers in the form of an ordinary accordion (as in the manufacture of a paper fan)
Step 3- from the two ends of the folded fan we make a rounding with scissors (this is so that the edges of the flowers are oval)
Step 4- we drag the middle of the fan with a wire or rope, tie it into a knot.
Step 5- we push the blades of our fan from both ends and in both directions - and push the colored paper layers apart, unstick them from each other. We get a magnificent rainbow cloud.
And now we either partially put this cloud into the tree trunk (toilet paper roll) or attach it to the stem of the flower (ice cream stick or a long skewer). And in the end we get a craft tree. Or an autumn flower craft.
Craft for autumn.
Newspaper wreath.
An ordinary newspaper can be a beautiful autumn gift or a craft for a school competition on the theme of autumn.

newspaper sheets we paint with gouache in different colors of autumn. Next, we fold each sheet in half several times and circle the silhouette of the blank for the future petal on it. The silhouette may be in the shape of a triangle (or a heart). Cut out such colored silhouettes. And now we twist each of them so that the tip of the triangle (or heart) looks up.
From the newspaper we turn thin tubules-bundles. From them we twist the body-base for the wreath. We fix with wire or rope.

Crafts on the theme of autumn
From ordinary cones.
Pine cones are a very versatile craft material. From them you can make animals and birds and many other crafts on the theme of autumn for children. I have a separate article Crafts from cones and there is a whole menagerie on this topic. And in this article I want to show the other side of the bump. Her beautiful inner world.
Namely world bumps in the cut.
If the cone is cut in half with a knife. Then we see a flat center with scales similar to wooden flower petals. You can use tongs to pull out the extra scales-petals. Or vice versa, glue with glue to add petals-flakes to this cut of the bumps.
And then decorate everything with gouache. Draw the colored edges of the petals, draw the middle, and even draw the fluffy stamens with thin brush strokes (as in the photo below). Beautiful flowers are obtained from cones.

Crafts for coloring cones are very popular with children. You can make whole wall panels from cones-flower beds on the theme of autumn.

But below we see blanks for a cool craft - AUTUMN FLOWER. You see orange flowers so similar to marigolds. Here, in the middle of the saw cut from a large cone, a small cone with lush open scales is inserted. Everything is beautiful in yellow. The edges of the scales are painted red. And it turns out the poured flower of marigolds. You can collect a realistic bouquet. Open the Internet, look - what shape and coloring they have, and repeat the same shades with gouache, stamens, stripes, specks - and you will get an autumn flower bed that looks like a real one.
This is a very chic craft, which is done quite simply. With such a flower bed, you will win any school autumn-themed craft competition. Rest assured. Moreover, I will now reveal to you three little secrets how to achieve perfection in this craft ...

Little secret. How beautiful to open the scales of the cone. Soak the cones in hot water. They closed off the water. Remove from water and place on a baking sheet in the oven. We fry them at a low temperature and they open beautifully - spread evenly in all directions.
And another little trick. To make your flower bed fragrant, you can use aromatic oils (sold at a pharmacy). We put the opened cones, even before painting them with gouache, in a cellophane tight bag - we drop a few drops of aromatic oil there - you can mix, drop a drop of different things (this will not spoil). And close the bag tightly, shake so that the droplets are distributed throughout the bag. And let the bump lie there for a day, soak properly.
And another little nuance. How to make your flower bed sparkle. After you have applied the main color and drawings, strokes, specks, etc. with gouache. Spray on top with hairspray. This will fix the paint, it will not stain your hands and the color itself will become two tones juicier and brighter.
The middle of each cone flower can be decorated with a round hat from an acorn - also painting it with colored gouache (as in the photo below). From such chic flower cones, you can make whole wreaths-crafts on the theme of autumn.

You can not arrange the decorated cones in the form of flowers, but simply stick them on a cardboard donut ring cut from a large pizza box.

Crafts on the theme of autumn
From natural material
Mosaic technique.
Bulk applications from cereals are loved by all children. And this is good. Because it's useful. Autumn mosaic applications of cereals and seeds are very calming to the psyche and develop fine motor skills of the hands.

Curly pasta can be added to cereals. We fix the material on plasticine or glue from a hot gun.
Small children can be given simple mosaic crafts on the theme of autumn. For example, here is such a craft in the form of an autumn tree I really like all the kids of the younger group of kindergarten.
We paint in advance watermelon pits(or pumpkin seeds) in different colors of gouache. And children lay out whole panels of these colored bones on pva glue.
And even faster to make a mosaic material on the theme of autumn from colored maple leaves. We simply cut them into cubes and pour them into bowls. Children themselves choose the elements and stick them on the crown of the painted tree.

Here are some more simple fall themed craft ideas for kids at school and kindergarten. The autumn leaf is divided into sectors and each sector can be filled with material of different texture. If there are no seeds and cereals, each sector can be filled with chopped mosaic and maple leaf, but of a different color - a sector of yellow, a sector of green, burgundy, orange, red, etc.

And hand-made hedgehogs made of natural material, beloved by all children. Hedgehog spines can be laid out from watermelon pits, their winged maple seeds. And an apple on the side of a hedgehog can be made from a walnut shell.

Crafts on the theme of autumn can be non-traditional colors - but the different texture of the bulk mosaic material will make it chic. The combination of rice, buckwheat and barley groats will give us a beautiful boletus mushroom.
Light oatmeal and maple seeds will help you make a wonderful squirrel with your own hands.

And here is my favorite combination of a mosaic of dry leaves and acorn caps.

You can make such a beautiful craft on the theme of autumn with your own hands - the silhouette of a squirrel from acorn hats. We print the silhouette on the printer. We cover it with black gouache. And on the glue from the hot gun we attach hats from acorns. Beautiful crafts as a gift to friends and relatives.


MOSAIC TECHNIQUES
for crafts for the fall.
Mosaic from lumps . Lumps can be paper (crumpled balls of their crepe or corrugated paper).

Or lumps can be from colored plasticine (as in the photo of the craft below).

Mosaic for adult art crafts on the theme of autumn may consist of more expensive material - buttons and beads. Autumn is rich in button craft ideas. It can be trees, pumpkins, and a red fox like autumn - the queen of the autumn forest.

But the child also loves to work with buttons. You can stick buttons on a glue gun or plasticine. You can lay out a long sticky path from the glue gun with your own hand, and the child quickly fills it with bright buttons and sequins (as in the photo of the autumn crafts below)

Autumn paper mosaic. This is a children's craft. When a sheet of colored paper is cut into squares. Each color is poured into a separate bowl and the child begins to lay out the picture. It looks beautiful when everything is laid out on a black background, that is, black cardboard is suitable.

The smaller the child, the easier the mosaic task should be for him. The contours of the future drawing should be drawn in advance on the background and serve as guidelines for the child's borders of the layout of the elements.

You can cut mosaic material different size. In order to fill in each sector of the picture with a different texture - small or large, cubic or triangular.

Can be cut out of thick cardboard uneven pieces of the future mosaic. First, cut the cardboard into uneven strips with winding edges. And then cut these long strips into short segments, also very obliquely and unevenly moving the scissors.

Collect crafts from such crooked cardboard elements. And then seal the cracks. Apply PVA glue to the gaps between the cardboard and fill these places with fine sifted river sand or sifted barley groats. Dry and top coat with hairspray to make everything shine. Get the effect of a real ceramic mosaic. Excellent quite simple and chic crafts on the theme of autumn. Suitable for children and parents - everyone can find their own portion of work in cutting and laying out.
Crafts from autumn leaves
in print technique.
Not in the first article on the topic of autumn, we are talking about the technique of imprinting maple leaves. Because the right print is very beautiful. Children really like such art activities where you can make stamps and prints. Against the background of such a paper sheet stamped with leaves, you can make autumn applications with a squirrel or a hedgehog.

Children's crafts from leaves
On the theme of autumn.
Children love to make elegant crafts from autumn leaves. On our website there is a large article on a variety of techniques for such children's creativity Crafts from leaves
In this article, I will show you some more ideas for kids. These cute flowers with eyes are suitable for school and kindergarten age.

We cut out a circle from cardboard - we glue white eyes on it and draw a smile and eyelashes with a marker. We turn the cardboard disk over and on the reverse side we attach the leaves to the glue or plasticine so that they look like a half of the sheet over the edge of the cardboard round. On the reverse side of the flower, we attach the tube-leg to plasticine or adhesive tape and put the flower in a vase from the toilet paper sleeve.
Here is a beautiful application of round aspen leaves. Or cut with scissors in the shape of a circle of maple leaves. We stick them on a sheet of paper, add sticks at the top, and glue the silhouette of the bowl in which they lie down. A simple craft for young children on the theme of autumn.

You can take a sheet of paper to stick autumn leaves on it in a chaotic manner. And from above this leafy canvas is covered with a sheet of cardboard with a silhouette-hole cut out in it in the form of a maple leaf.

You can also make a carpet from hardwood. Cut out an even circle. And laminate the round on a laminating machine, we get a useful craft stand for table setting.

You will find even more interesting techniques for working with autumn foliage in the article.
Crafts for autumn
from leaves and colors.
Leaves can be dyed. And they will have new craft opportunities. The painted sheet takes on a new creative life. Here's how it goes.
We took a long willow leaf and covered it with a pattern. We look at it and understand that it resembles a long feather of a wondrous bird.

Then we draw a new feather-leaf and another one, each time changing the pattern. Then we lay out the feather leaves on the table and now we see the silhouette of the future craft. Beautiful firebird.

It is not easy for children to draw neat patterns with a thin brush. And it is not necessary. Let the children's painted leaves be bright spotty, not necessarily with an even symmetrical pattern. Anyway, this work will be great.

At an older age, you can draw whole mini-pictures on large leaves. I will not talk in detail about the technique of such painting on autumn leaves, I already talked about this in the article

DIY lamps
Autumn themed.
This craft requires work with a sharp paper knife or blade, so children should not take it on their own. Let an adult cut out the inner parts of the sheet. The clear tutorial below will show you all the steps. They are simple and understandable.

We cut out a long strip from cardboard - we fold it into 4 parts-sashes, plus on one side there should be a small overlap-stock for gluing. In one of the halves of the sides we cut a hole in the form of a sheet with a knife. Glue parchment on the inside. We glue the wings to make a hollow cube. And inside we put a glass jar with a candle tablet at the bottom.

By the same principle, one can candle holders made of thick wrapping paper and rolled into a tube. On it we cut out the silhouette of a maple leaf, on the reverse side we glue parchment transparent paper, painted with watercolors in a delicate color. We turn this two-layer sheet into a roll, fasten it with a stapler. Inside we place a candle or a garland of LEDs.

And here are some more jars of candlesticks, The simplest crafts on the theme of autumn. The jars are smeared with gouache blots, or pasted over with pieces of colored napkins, and on this blotted background we paste the silhouette of a tree trunk with branches. And you're done.

You can paint the jars like this with a hole in the form of an autumn leaf. Cut out a sheet of paper. We glue it on ordinary soap on the side of the can. We cover the jar with acrylic paint. Wet the paper sticker with water - the soap soaks and the sheet peels off. It turns out a candlestick. Pour grain inside and put a candle.

And you can White Christmas LED garland decorate with autumn leaves - tie foxes to each diode with adhesive tape and get a glowing autumn garland. Beautiful crafts on the theme of autumn, to decorate your autumn holiday.

Crafts-embroideries
on the theme of autumn.
If you loved to embroider as a child, then this fall you can make an embroidered craft on an autumn theme. It can be a beautiful yellow-green-red leaf, made in different embroidery stitch techniques (as in the photo below).

It can be a picture-landscape on the theme of autumn, made in the technique of smooth surface.

You can swing at a large canvas with many elements. Or you can make a simple autumn tree.

You can decorate a useful thing with embroidery - for example, a pillow. A great gift for DIY crafts on the theme of autumn. Scheme for such embroidery you can draw yourself watercolor paints on paper in small cells- such paper is sold in the drafting department.

Crafts from beads
on the theme of autumn.
And autumn leaves look beautiful if they are made of bright beads. There are a lot of beading techniques, so there are many ways to make an autumn leaf from beads. Here I offer the simplest - accessible to children, the one that is taught in children's creativity circles. We make the outer frame of the sheet with a central vein from thick wire. And already with a thin wire we braid this frame, stringing on it, in the course of weaving, rows of beads.