Flower decorations for the new year. Ideas for New Year's compositions. Arrangements with candles lined up
New Year's holiday does not mean that you need to limit yourself to a Christmas tree, cute figurines, snowflakes on the windows, garlands and a festive table. On the eve of the 2019 meeting, you can come up with and create chic New Year's compositions with your own hands. In addition, to make them, you do not need to run to a super-fashionable decor store. You can use whatever you have at your fingertips.
We make blanks
The creation of New Year's compositions begins with the preparation of suitable materials and tools. You don't need to walk or drive anywhere on purpose. It is enough just to look around:
- Most often cones are used (both pine and spruce). It is with the help of them that you can set the desired tone. Cedar cones look gorgeous.
- Dry and live branches of viburnum and mountain ash are also popular. They allow you to give the composition bright accents. Also for this purpose, small pomegranate fruits are used.
- The main symbol of the Christmas and New Year holidays is coniferous paws. They look especially advantageous as a base for Christmas wreaths.
- To create a composition, you can take the bark of various trees, a wooden saw cut, cute roots, styrofoam, a grapevine, vases.
- Flowers, berries, fruits, moss, floral sponge and wire of various shapes of containers are used as additional material.
- Tinsel, rain, sparkles, various ribbons, scraps of fabric, nuts, and even buttons are used for decoration. In short, everything that your eye looks at.
- Silver and gold paint in spray cans, sparkles, beads, decorative snow will give charm.
All this will help you create unique and magical compositions with your own hands and meet 2019 in high spirits.
Master class for the perfect masterpiece
Imagination is limitless, so you can create many different creations for the New Year's holiday with your own hands. For example, it can be an exotic tree, a Christmas wreath, ikebana, etc. Let's take a look at the basic steps you need to go through to create a miracle.
Composition with a candle
Making a New Year's composition - allows you not only to decorate the room, but also to get a lot of memories and emotions. Compositions with a candle look spectacular on the table. In addition, making it is not at all difficult.
To create a masterpiece you will need:
- Large paraffin candle, preferably red.
- Cones.
- Gold leaf.
- Flower wire.
- Flower flasks (they are usually used for single orchids).
- Raffia (organza as an option).
- Coniferous branches.
- New Year decoration.
- Decorative satin ribbon.
- Checkered New Year's fabric.
- Tennis balls.
- Flowers (you can use both artificial and natural).
Step-by-step production:
- The tennis ball is wrapped with wire, and on top with foil and organza. Each piece is decorated with a decorative chiffon ribbon.

- An elastic band for money is put on the candle and flower flasks are stuck between them around the entire circumference. For reliability, all this can be secured with tape. Then water is poured into the flasks, and then the coniferous branches and flowers are installed and fixed. At the same time, make sure that their height is the same.

- The candle is placed in a bag made of checkered fabric, into which cardboard is preliminarily inserted for stability. If you don't have time to sew, you can simply wrap the candle with the flasks in a cloth and fix it with tape. Then the Christmas tree decorations and cones are attached to the wire.

- Put the composition together.

Arrangement in a basket
The basket is the perfect base for creating any New Year's composition for 2019. Well, let's start creating a New Year's masterpiece with our own hands?
You will need two main components: the basket itself and the floral sponge.
Additionally, you should prepare:
- fir branches;
- wire;
- Christmas decorations;
- citrus dried fruits;
- bright flowers (for example, roses);
- fresh foliage (since it's winter, you can buy it at a flower shop).
If desired, you can use a different decor at your discretion.
- The floral sponge is moistened with water and placed in the basket. If it does not fit, the edges should be trimmed to a suitable size. Do not forget to put some kind of plate or container at the bottom of the basket, into which the water will drain. Now spruce branches are beautifully positioned, sticking them into a sponge.

- Do the same with decorative branches and leaves. Queue for flowers. The composition can be done with or without them. It all depends on your wishes.

- Another decor is being prepared. For example, pre-dried dried fruits are securely attached to the wire. Christmas balls are strung on branches and fixed.

- You can make roses from citrus peels in advance. To do this, cut off a long peel from the fruit and twist it spirally into rosettes. The resulting flower is fixed with a toothpick.

- The citrus rose is dried.

- Place the decor according to the composition. The result is such beauty with buds.

- And here is a variation with Christmas balls.

Christmas tree ikebana
Such a New Year's composition can be used to decorate a room on the eve of 2019, as well as as a craft for a kindergarten or school. In addition, it will be very interesting for children to tinker with their parents. To create a craft, you will need:
- whatman;
- stapler;
- Scotch;
- plaster bandage;
- coniferous cones;
- sea salt or free flowing artificial snow;
- glue (including for a thermal gun);
- decor in the form of decorative gifts, Christmas balls, tinsel, etc.
- A circle is drawn on a piece of Whatman paper. Its radius will correspond to the height of your future tree. Cut the circle to the middle and fold it into a cone. The edges are fastened in a convenient way: with glue, stapler or tape. Now they take pieces of plaster bandage, soak in water and stick to the base. This approach will help give the tree strength and stability. Allow the base to dry well.

- Now they start gluing the cones. Sort them by size. The largest ones are glued in the base area. Stick firmly so the bumps don't come off.

- Cover the entire base with cones, reducing their size with each row. After that, the cones are smeared with a brush and sprinkled with salt or artificial snow. As a result, you should get a Christmas tree wrapped in snow.

- Now they start decorating the spruce. In principle, covered with "snow" it looks very nice and can be left in this state. But if you want more, you can glue spruce branches, Christmas decorations, bows, tinsel, fruits into the space between the cones.

Tinsel wreath
Decorating an apartment or house with Christmas wreaths is the lot of Catholics. But they are so beautiful, why not adopt the tradition for us and make the same New Year's creations for 2019? Moreover, it is done very simply.
To create a wreath you will need:
- newspaper sheets;
- tinsel with a length of at least 1.5 m (the amount is such that you can tightly wrap the wreath);
- napkins;
- transparent fabric (such as organza);
- various Christmas decorations (cones, balls, bells, snowflakes, beads);
- scissors;
- glue (PVA, for a heat gun);
- double sided tape.

Now you can create a masterpiece.
- Newspaper sheets are unrolled and rolled into a tube.

- Continuing to add sheets, make a tube of the desired thickness and desired length. The size of the wreath will depend on this. The ends of the finished tube are glued together. Can be connected with tape. Don't worry if the oval turns out to be clumsy. In the process of further work, it will level out.

- Now the newspaper base should be wrapped in napkins. You can use kitchen paper towels or good toilet paper instead. The latter option is much more successful, because it is convenient to wrap the wreath spirally continuously in several layers, and then fix the ends securely. If you are using napkins, then they should be "planted" with glue.

- As a result, you should get such a snow-white base.

- The ends of the napkins are secured with double-sided tape. This will prevent the next layer of fabric from staining.

- They start decorating with fabric. One end of it is fixed on scotch tape, and then a wreath is wrapped around the entire circumference. The color of the fabric depends on your preference. You can also use nylon tapes, which are usually woven into the hair. They will be even more convenient to use. The end is also secured with double-sided tape.

- As a result, the base looks like this.

- The next step is to attach the tinsel. One end of it is glued to tape, and the other is carefully wrapped around the base along its entire length. It is necessary to place the turns so that there are no gaps between them, through which the base looks through. The color of the tinsel depends on what kind of toys and decor you have chosen. By the way, you can use not only shiny colored tinsel. If you use matte green, you can imitate spruce branches.

- Using both garlands, their ends are securely fastened with tape. This beauty came out of a very unsightly newspaper.

- Start decorating. As planned, the wreath should be in blue and silver tones. So we used silver colored bumps. They were "put" on a wire and securely fastened to a wreath. In the course of work, some of the decorations are attached to tape, since they are lightweight.

- Also, a garland with bells was used, which was simply wrapped around a wreath in a circle. As for the toys, they were also selected in blue and silver colors. Wire was used as an attachment. The gracefulness of the wreath can be added with bows made of a silver ribbon. You can make them yourself, or buy them in a store. A large blue bell was chosen as the main toy on the wreath. Here is such a beauty.

- To fasten the wreath, the center is visually determined and a wire or a strong thread (not contrasting) is attached in that place. Such a wreath can be hung on the door or placed in the center of the table.

Christmas boot
Another tradition of European countries that has begun to take root in our country is hanging a Christmas boot. It is there that Santa puts sweets for the children and gifts. They can be different: sewn from felt, embroidered, decorated with various colorful appliques and even knitted. It doesn't matter what they're made of. The main thing is that making them fun and enjoyable.

And now a master class on making a beautiful boot.
You will need:
- any thick fabric (drape is ideal, you can use felt);
- thin fabric (used for lining);
- various colorful New Year's applications;
- scissors;
- chalk for cutting;
- threads;
- needle;
- cotton wool or synthetic winterizer;
- glitter gel;
- additional decor to taste;
- fantasy and perseverance.
All this should be sewn on a typewriter. If you don't have one, you can do it manually. The main desire.
- The first step is to make a boot pattern on paper (you can use various templates from the Internet), and then transfer it to the fabric using a special crayon or a bar of soap. By the way, if you didn't find a suitable fabric, but an old coat of nice colors was lying in the closet, which you can't wear, but it's a pity to throw it away, use it. This is exactly the "THAT" case. Note that you need two details. Don't forget to add an inch to the seam.
- Now it's up to the application. If you are having difficulty choosing a pattern, you can cut it out of a suitable handkerchief or tea towel. As a rule, New Year's options are rich in beautiful figures.
- The applique should be stitched to the cut-out details from the front side. But not completely. Leave a small "window" through which a little cotton wool or padding polyester should be placed to add volume to the figure. You should also sew the heel and toe to the boot and the lapel piping at the top of the bootleg.
- Do not forget, when working on a sewing machine, to attach a pattern, you should set not a line seam, but a special mode.
- Now embroider snowflakes on the entire boot using thick white thread. Snowflakes can be made of different sizes and arbitrary shapes.
- The same two boots are cut out of thin fabric and sewn to the inside of the thick fabric.
- Now fold both boots so that the front sides touch and sweep away. Then all the details are sewn on a sewing machine or sewn by hand. In the second case, work extremely carefully, trying to make the same and even stitches. The finished boot is turned inside out and the quality of sewing is checked.
- It remains only to put the name of the child. To do this, use a chalk to write the name on the front of the boot. Then they do it in several ways. For example, letters can be outlined with a special gel with glitters, or you can go more creatively and embroider them. It remains only to sew on a loop for which the boot will be hung.
And don't forget to put your present!
You can also use a different pattern and follow the same pattern to make a Victorian boot:

And these are options for developing your imagination. These are the masterpieces you can make yourself with the help video:
Creating compositions with your own hands with the whole family is not only an exciting experience, but also an opportunity to spend time with fun and warmth.
New Year is coming soon - the most favorite holiday for adults and children. According to the Chinese horoscope, 2019 is the year of the Yellow Earth Pig. Astrologers recommend using a lot of vegetables, mushrooms and berries for cooking. The menu must include baked goods and a large fruit basket. Gluttonous pigs love to eat very much, which means that an abundance of goodies and many, many greens are welcomed on the festive table.
The main colors for the New Year 2019 are yellow, gray, brown and gold. This range should be used in decorating the table and the room where the holiday itself will take place. It is also advisable to choose an outfit for the celebration with shiny golden embroidery.
When drawing up New Year's compositions to decorate the festive table, it is better to use fresh flowers - carnations, roses, hydrangeas and daisies. It is worth refusing to use objects of burning shades. Eliminate deep reds, blues, and toxic greens.
DIY Christmas compositions from sweets - master class
Do you want to surprise guests, relatives and children with extraordinary crafts for the New Year? For example, you can collect an unusual Christmas tree from sweets.
For work you will need:
- foam base;
- glue;
- some green brown paper;
- fluffy green rain;
- beads;
- sweets.
Cut out the base for the future Christmas tree from the foam. It should be two volumetric circles. One is larger, the other is smaller. Fasten with glue.
It is their size that will set the "growth" of the Christmas tree.

Cut a rectangle out of the wrapping paper to fit around the bottom circle. Cover the edges with glue and secure to hold the paper well.

The next step is to form the Christmas tree itself. Wrap the form in fluffy green tinsel. Secure it with small hairpins. They will easily go into the base and will not allow the tinsel to unfold.

We traditionally decorate the top of the Christmas tree with an asterisk. We will make it out of red beads. Focus on the photo and you will succeed.

We wrap the wire with paper to mask the wire. And we fix (stick into the base) on the top of the head.

Now it's the decor's turn. We take a toothpick. We put candy on one side, and stick the opposite into the foam.
You can also make a decoration out of pieces of shiny mesh.
It turned out very nice! And most importantly, an easy creative master class, which can be held with children, will bring joy and pleasure to everyone.
Another simple candy Christmas tree option. Even a first grader will do it.

For the basis of the craft, we take a paper cone, rolled up and fixed with tape. First, we wrap the wide base with Christmas tree tinsel and fix it with glue. We decorate the second row with sweets, which we attach to paper with double-sided tape. So, alternating rows, we get an elegant Christmas tree - a spectacular decoration of the festive table.

The next master class will teach you how to make beautiful New Year's wreaths. However, they are not quite ordinary. Their peculiarity is that they are "sweet" - made of sweets.

So, for manufacturing we need:
- cardboard;
- bell-shaped candies about 15 pieces, depending on the diameter of the future wreath;
- tinsel;
- scissors (or clerical knife);
- pencil;
- cones or some other decoration;
- ribbon;
- glue.
When everything you need is ready, we begin work.
Draw a circle on cardboard with a pencil. Then carefully cut it out with a clerical knife. Next, we glue the mount for the wreath. We will make it out of regular ribbon.
To make the circle even, you can use a compass

Now we take tinsel and start wrapping it around the workpiece. Try to wind the tinsel so that the cardboard is not visible from under it.

Having made a few turns of tinsel, you can already glue the sweets.
Candy can also be attached to the workpiece using a stapler, not glue.

We continue to wind the tinsel and attach the candies to the end. After that, the composition can still be decorated with cones, leaves, gifts, balls, whatever you have for decoration.

Here we have such a New Year's wreath. It can decorate your home or the home of your loved ones. Happy New Year!
We decorate the New Year's table - a composition with a candle made of flowers and fir branches
To create this trendy New Year's composition, you will need various improvised items and fresh flowers.

We will need:
- candle,
- raffia,
- decorative ribbon (satin),
- decorative ribbon (organza),
- fir cones,
- floristic flasks,
- floristic wire,
- golden foil,
- checkered fabric,
- Carnation,
- needles,
- christmas balls,
- tennis balls.
Let's start making our New Year's composition.
We start by making a wire loop and inserting it into a tennis ball. We wrap the ball in foil, decorate with raffia and organza.

Bright ribbons turned an ordinary tennis ball into a very interesting Christmas decoration.

Using an elastic band, attach floristic flasks to the candle. We will place flowers and needles in these flasks.

In the flasks we insert the branches of the needles cut by the same size. First, you need to pour water into the flasks.

Insert a candle decorated with pine needles into a tartan bag. To get a real bulky bag, the fabric needs to be filled with cotton or paper. Our New Year's bag will keep its shape, because we have tied it with raffia decorated with balls.

Insert the cut carnations into the flasks with water. Our festive bag sparkled with new colors of magical flowers.

We insert floristic wire into the Christmas balls so that they can decorate our composition. We decorate the balls with raffia.

We decorate the New Year's bag with fir cones. We also inserted floristic wire into them.

Our "New Year's Gift" is ready. We have got a bright, original, truly New Year's composition.

It turned out simply and at the same time, festively and elegantly in a New Year's way!
Compositions for the New Year from flowers
The herringbone is the main decoration of the living room, and the floral beauty of roses, daisies and spruce twigs is best placed in the center of the festive table. It's pretty easy to make such a bunch! The main thing is mood, imagination and a variety of materials for a pleasant creative process.
You can make such an exquisite decoration for the New Year's table by following the detailed author's master class by Elena Lomakina.

You will need:
Flowers and greenery:
- red ranunculus,
- pink roses,
- white spray chrysanthemums,
- fir branches.
Supporting materials:
- small wicker basket-pots,
- stationery knife,
- oasis (floristic sponge),
- anchor tape (waterproof and super-adhesive green tape),
- wooden skewers,
- artificial snow can,
- glue,
- themed decorations (in this case, a rattan star, a plastic Christmas ball, decorative apples and cones),
- candle.

Manufacturing:
Cut a piece of the oasis to the desired size and shape and place it in the basket.


Secure the oasis with anchor tape.

Sequentially, in a spiral, place the plants in the oasis.


Place a candle in the center of the composition.

Attach skewers to cones, apples and balls with glue: with their help, the decor is easier to fix in the composition.

When the composition is already assembled, in some places apply a thin layer of artificial snow on it.

Your New Year's miracle is ready!
Decoration for New Year's interior made of beads
You will have to make a lot of efforts to make such a green New Year's beauty. The work is not easy, but the result is worth the effort, material and time spent!

You will need:
- chopped green beads - 50 grams
- chopped brown beads - 5 grams
- copper or brown wire ≈ 50 meters
- a pair of pearl-like beads
- colored stones
- bugle
- alabaster
- glue "Moment"
- stand
How to make a beaded Christmas tree
Our beaded Christmas tree has 10 tiers, each of which has 4 branches.
- The top of the tree with the first tier
In the middle of a 45 cm long wire we string a golden bead, * white bugle beads, a golden bead, a silver bead, a green cabin *. We skip the second end of the wire from * to * as in needle weaving.

We collect 4 green beads on each end of the wire, twist the ends together 4 turns. Make a loop on one of the wires with a set of 4 green beads, 2 brown beads and 4 green again. We make a similar loop on the other side. We twist the ends of the wire 2 turns and make two more exactly the same loops.

- Second tier
We will need 4 pieces of wire 25 cm long to make four branches with three loops in each with the following bead set: 3 green beads, 2 brown and 3 green again. We twist the wire from eyelet to eyelet by 5 turns, and from the last eyelet by three turns.


- Third tier
From 4 pieces of wire 30 cm long, we make 4 branches with 5 loops in each. The first three loops are similar to those from the second tier. In the next two loops, instead of three green beads, we collect 4.
- Fourth tier
From 8 pieces of wire 30 cm long, we make 8 branches with 5 loops in each. The first three loops are similar to those from the second tier. In the next two loops we collect 6 green beads. After the last loop, we twist the wire down 5 turns. Now we collect one of these two branches, twisting them with a spiral by 4 turns.

- Fifth tier
From 4 pieces of wire 35 cm long, we make 4 branches with 7 loops in each. The first three loops are similar to those from the second tier. In the next two loops we collect 6 green beads.
- Sixth tier
From 8 pieces of wire 30 cm long, we make 8 branches with 5 loops in each, as for the 4th tier. Now we collect one of these two branches. We need an additional piece of wire 20 cm long. With an additional wire from the last loop, we wind 12 turns with a spiral. Then we fasten the second branch for 15 turns with a spiral.

- Seventh tier
We need 4 pieces of wire 60 cm long. In the middle of the wire we pick up the first loop. Then, on the same end of the wire, we collect 6 more loops, as in the 6th tier. The other end of the wire should remain long. Behind the last loop we twist 7 turns. At the long end of the wire, we also collect 7 loops. With the help of an additional wire, we twist the twig 8 turns downward with a spiral.

- Eighth tier
We will need 4 pieces of wire 60 cm long and 4 pieces of 30 cm each. From the long pieces of wire we twist the twigs, as for the 7th tier, and from the short ones - twigs with 5 loops. Then we collect one of the two branches, screwing them with a spiral: first, we start the spiral for 15 turns on a branch with 2 ends, and then fasten a small branch for 15 turns.

- Ninth tier
Duplicate tier 8, just increase the number of turns from 15 to 18.
- Tenth tier
We will need 4 pieces of wire 70 cm long and 4 pieces of 35 cm each. We make the branches in exactly the same way as for the 8th tier, only in a small branch we collect 7 loops, and in a large branch - 8 and 9. We also increase the number of turns of the spiral is up to 22.
- Assembling a Christmas tree from beads
With the help of additional wire, starting from the top, we wrap the ends of the wire downward. Due to the number of tiers and branches in them, the tree trunk thickens and the structure does not bend, so you can perfectly do without an additional rod. We maintain a distance between the tiers from 0.8 cm (from the top to the first tier) to 1.2 cm to the bottom.


We put the finished Christmas tree in a decorative stand: we breed alabaster and stick in the tree. In five minutes, when the alabaster is dry, we decorate the ground under the Christmas tree with beads or colored stones with the help of Moment transparent glue. How alive!
For each holiday, you want to decorate your home, make it smart and even more welcoming in accordance with each season. And meeting the New Year requires special sophistication. New Year's compositions are collected ahead of time or in a matter of minutes, from beautiful little things that are at home or from cones brought from a forest or park, painted or natural, pine and spruce branches, balls, nuts, flowers, garlands and snowflakes. And out of the shine! Iridescent, glowing, sparkling Christmas tree decorations and various candles, in general, everything that pleases the eye, warms the heart and awakens inspiration, all this will make up a beautiful composition that can be used to decorate the New Year's table and window sills and put on a table or bedside table or on a chest of drawers near mirrors.
Let's not beat around the bush for a long time and see a few ideas. I do not have a permanent annual set for creating a New Year's composition. Every year I look for something new, and every time it turns out that either this is not there, then this, the recommendations for making curiosities do not correspond to reality. Therefore, I picked up different compositions, something, yes, there will definitely be a house for the embodiment of the idea, or so that you can buy it inexpensively. And also, I want to tell you about the negative experience with pomanders and bleached cones.
1 the sparkling appeal of Christmas balls
How to assemble a composition and make sure that the balls do not scatter, look at the video in the article
2.We use luminous garlands, battery powered or mains powered
Here is the key detail, the glowing garland of snowballs.

3 bring indoor flowers
Cones and a candle radically change the look of a simple indoor plant, giving it the mood of Christmas comfort.

As well as flowers from the garden, such as rejuvenated and roses.


4. But magnificent artificial flowers have also found application.
 4. Of course, the bumps.
Amazingly beautiful, different, inspiring. It's great to collect them, this fun event already has a premonition of a home holiday.
Bumps can bleach, paint, decorate with beads and artificial snow... Whitening it's important to know that the bumps do not bleach to an absolute white, but they will still look beautiful. You need to bleach for at least 24 hours and it is better to take pine, spruce bleaches worse.
Bleached buds
To prevent them from closing, keep them on the battery or in the oven at a low temperature, that is, dry them so that they do not close. And then, you will get as in the blog plumperfectandme.blogspot.com Purple Hues and Me


Ice and cones.


Painting
Simply paint the buds by dipping them in paint cans and then hang dry. And also, such a loop screwed into the cone will make it easy to hang the cones on the Christmas tree or help hang them to dry:

A simple composition with pine cones and Christmas tree decorations is also fraught with manufacturing tricks.

Acorns, chestnuts and citrus fruits get along well with cones. The oranges are cut and dried up.
 6. About pomanders
I would very much like to compose a composition of fragrant pomanders, but the experience of last year stops me, although they look very beautiful in the pictures. And, frankly, it is believed that they have an amazing smell.


What you see is done only for one-time table decoration... In a couple of days, oranges will start mold... Even if you follow the advice to dry them, then they will look different, not so attractive, and there will be no smell from a wrinkled brown orange. True, maybe someone will succeed, but my experience was bleak and it was a pity for the money and time thrown away.
7. Fragrant compositions
But really fragrant New Year's compositions can be made if you smear the cones with glue, roll them in ground cinnamon, cloves or cardamom, and even place them near the candles, then you can hope for success.

 8.With houses
In the previous article, I talked about backlit. New Year's compositions with houses that you can do yourself look absolutely amazing.
Or bake gingerbread houses out of ginger dough. Watch the video on how to make such a wonderful composition.
9. Outdoor decor
Let's not forget about outdoor decorations, you don't even need to use artificial snow there. If you keep flowers outside the window in summer, beautiful compositions of fir branches, red ribbons or balls can sit in their place in winter. I always display some beauty on my balcony. See the article ““. 

Outside the window, you can make it beautiful and useful by arranging. Do the plants on the balcony look great in winter? Read,
Happy New Year. Always with you, .
New Year is the holiday when the soul of every person wants something special. On these holidays, everyone wants to decorate their home with a variety of decorations and lights. In the New Year 2017, it is customary to decorate housing with various compositions. And in this article we will talk about how to make a New Year's composition with your own hands. Here we will offer you the most interesting ideas for such compositions. Therefore, stock up on natural materials and other decorations in order to create something original.
What compositions to make for the New Year with your own hands
Christmas composition in the form of a star. (Master Class).

Composition in the form of a star is a great opportunity to decorate absolutely any interior. Moreover, such a composition can be a wonderful gift for a loved one or a friend. It is worth saying that you can choose absolutely any shade to create this star. In general, rely on your imagination. To create a craft, prepare:
- eustoma flowers,
- flower sponge,
- natural or artificial spruce twigs,
- pink ribbon
- aluminum and thick wire,
- plain paper with a pattern,
- christmas balls,
- flower wire,
- decorations,
- scissors, pruner and knife.
Progress:
- First, using the wire, we create the future frame for the composition. As a result, you should end up with an asterisk.
- Now we wrap the star with silver beads. You shouldn't touch the middle. This is where you put flowers.
- Then we tie the Christmas tree decorations to the rays of the star.
- Further, from the colored sponge, you need to cut off small pieces, which are wrapped in wrapping paper. Be sure to glue the ends of the paper.
- Now, you should decorate mini-gifts with a beautiful ribbon.
- In the middle of the flower, you should insert flowers and cover them with fir branches. Secure the structure with a satin ribbon.
- After that, we insert mini-gifts into the composition. To insert these gifts, you need to stick the flower wire into the composition, and its other end into the sponge.
- At the final stage, we add decorations to this composition.
New Year's arrangement of artificial flowers.

DIY New Year's compositions are a great opportunity to get a great mood and decorate your home with something special. Now we will offer another master class for creating one bright composition. To make this composition take:
- a candle made of paraffin,
- raffia,
- decorative satin ribbon,
- flower flasks and cones,
- flower wire,
- gold foil,
- check print fabric,
- live or artificial carnations,
- needles,
- new Year decoration,
- tennis balls (for table tennis).
Progress:
- First of all, a loop is made of wire and a tennis ball is inserted into it.
- Wrap the ball with foil and decorate with organza and raffia.
- In the next step, use chiffon ribbons to decorate.
- Now, with the help of an elastic band, attach the flower bulbs to the candle. You must place needles and flowers in them.
- In the next step, spread the flasks around the candle. Pour water into them. Insert coniferous branches into them, which you should definitely cut off. They must be of the same size.
- We insert the branches of the Christmas tree into the test tubes.
- Insert the candle that you decorated with needles into the bag, which must be made in advance. To make it, you need a plaid fabric. And to fill this bag, you should use cotton wool or paper.
- Now we take the trimmed carnations and insert them into the flasks that have been filled with water.
- At the next stage, we insert flower wire into the Christmas balls. We decorate the entire composition with this blank. We also decorate Christmas balls with raffia.
- Use cones to decorate your Christmas bag. Insert the wire into them.


See how beautiful and also very bright such a composition looks.
Simple New Year's composition of cones.
You can make a simple, but very original composition from a candle, which will be in the shape of a cone. Surround this candle with pine cones. In this case, choose beautiful and natural cones. You can also use golden paint to make the composition look even more impressive. 
A few more ideas for New Year's compositions
Many people use completely different materials to decorate their home on New Years. 7 But do-it-yourself New Year's crafts 2017 in a basket is perhaps the best way to decorate your home. Indeed, the New Year's compositions in the basket, which were created with their own hands, look very beautiful. They will become the original decoration of your home during the New Year holidays.


Take a closer look at other options for New Year's compositions as well. Surely you will be able to like them.


Finally
In this publication, we have listed only some of the New Year's compositions that were created with our own hands. Look at the photo and you, for sure, will be able to choose the option, the composition, which will make your home unusually beautiful.
Content
You already need to think about the New Year's decoration of the house in the same way as about buying a New Year's gift or booking a house in the mountains for New Year's Eve. Time is catastrophically short and every day it becomes less and less. So, let's start with the design of the New Year's table, if everything is clear with the design of the room. And if you don't know how to decorate your home for the New Year, then we have a lot of interesting articles. The same material will be devoted to various interesting compositions that will decorate your table.
Candles, fir branches and other decor
Now we will be with you to create beautiful compositions of fir branches with candles and different New Year's decor. For example, you can twist a wreath from the branches, leave room for a candle and decorate all this beauty with cones, bows, ribbons, Christmas decorations, beads and even fresh flowers. The composition in the photo is missing one large white candle or several thin colored candles.
And here is a more delicate option: three white candles, a minimum of decor. Everything is designed in country style with a touch of chic.

For the composition, you can use various glass vessels, earthenware, wicker baskets, and so on. It will even make it easier for you to assemble the composition itself and it will be more stable.

Choose multi-colored candles of different sizes to add variety to your composition.

Also use tablet candles that can be neatly decorated with lace, rhinestones, natural materials.

The combination of fresh flowers, spruce branches, cones and Christmas balls looks very unusual and beautiful!

Compositions on the table with glasses
New Year's compositions on the table can be created using glasses. These can be glasses of different format, there can be several of them. The decor that you want to choose for the design of the composition can also be very different: fresh flowers, dried buds, branches, acorns, chestnuts, tinsel, ribbons, lace. Use pill candles or large candles for contrast. Look at examples and use your imagination, we are sure that there are many interesting ideas lurking in your head.
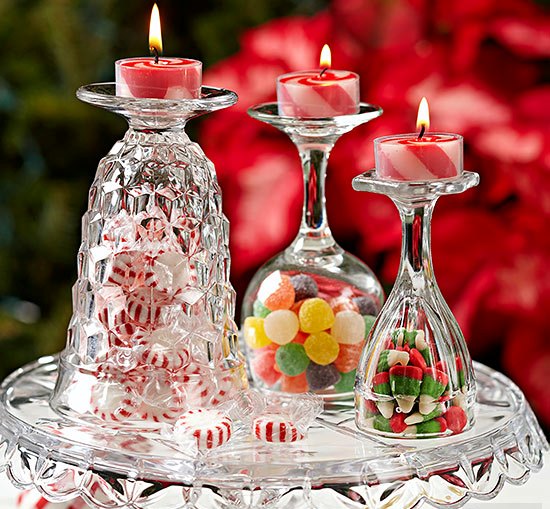
Multi-colored sweets as an option for decorating a New Year's composition for the table.

Large candles and real winter decor using ordinary glasses. It's easy to create and looks gorgeous on the table.

As an option for decorating a New Year's table. Warm, cozy, slightly reminiscent of warm days, but also does not distract from the festive theme.

Well, this is an option for lovers of everything traditional: glass, fire, gifts of nature.
New Year's compositions with fruits
Citrus fruits will look especially beautiful. Bright tangerines, oranges and lemons against the background of green spruce branches will draw attention to the table and add warmth, brightness, and soul to the room.

Note that some citrus fruits are decorated with carnation flowers. A wooden box is perfect for such a composition. Use a floral sponge as a base, it is convenient to attach branches to it, and citrus fruits can be strung on wooden skewers and also strengthened in a sponge.
If you want to serve fruit beautifully, then it can be done in this form: both beautiful and original, and decoration and appetizer.

Fruits can also be stylishly laid out in the form of a herringbone, or rather, create just such a design.

Natural materials and more natural materials
While there is still at least some opportunity, then collect twigs, moss, cones, chestnuts, driftwood, acorns and other natural materials. Indeed, a very beautiful composition can come out of a glass vessel, branches and other objects on the table. Several such compositions can be made. Let them be different, but in the same style. Then you can put one main composition on the table, and scatter the rest throughout the house.

A seashell tree can be made using a foam base, a glue gun, and many different beautiful seashells.

The same procedure for creating a composition is also in the case of nut halves, acorns, chestnuts and other natural materials.
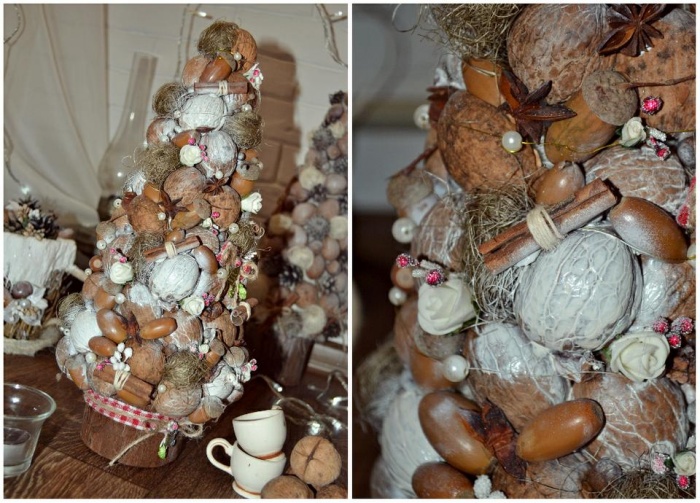
If the amount of materials allows, then you can make a floor tree. Use twigs, cones, berries, and other decor.

It's simple: nuts, candles and glass vessels:

Christmas decorations for the table
You do not have to create whole large compositions, but simply decorate the table with various beautiful New Year's decor elements that you will make yourself.
For example, from thin twigs, twine, burlap, small Christmas tree balls or beads, you can make such cute stars that you can put next to each guest.

According to a similar principle, you can make such stars, it is desirable to create a whole composition of them or give them to guests as a presentation.

With the help of twine, you can create such cute souvenirs. You will need templates on which you will wind the thread, use thick cardboard.

Initially, your work should look something like this:

Similar toys can be made with knitting threads or sewn with felt.

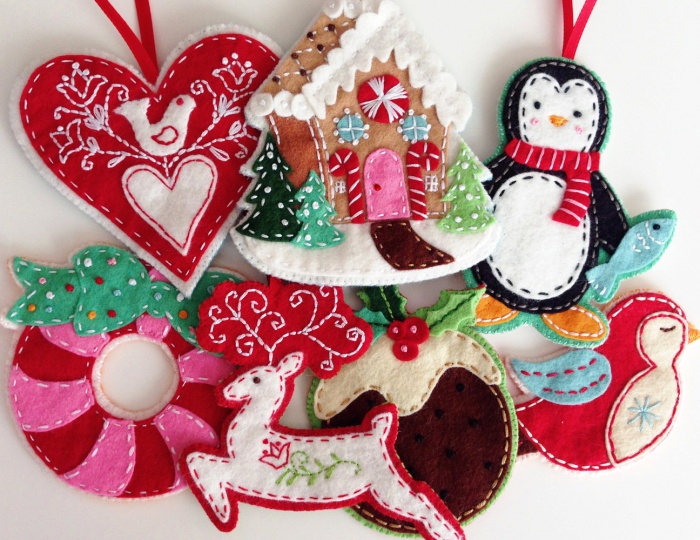
Such beautiful things can decorate not only a festive table, but also a New Year's tree.
Beauty is in the details
It is not necessary to create some kind of large composition if there is not too much space left on the table. You can create some kind of New Year's items, for example, napkin clips, beautiful cutlery decorations, and so on.

Creating these napkin holders is a snap. A little imagination and you will succeed.

You can also scatter candles, small spruce twigs, tree decorations, and other decor all over the table.

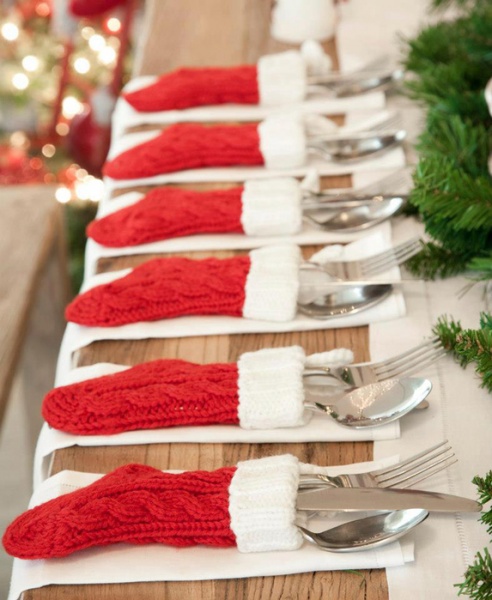
You can knit such cute boots and put cutlery in them, if you have the time, resources and skill.
New Year's decoration of glasses
Since we have gone through the details, it will not be out of place to talk about the design of glasses in the New Year's style. To do this, you will need:
- stained glass or acrylic paints;
- felt;
- scissors;
- brush;
- cotton pad;
- degreaser (alcohol can be used).
First you need to degrease your surface - wipe the glasses with alcohol. Then you need to apply a drawing on the glass using stained glass or acrylic paints.
Now you need to cut a rectangle out of felt or any other fabric, cut a fringe around the edges and decorate the stem of the glass. Something like this should come out:

You can decorate not the stem of the glass itself, but the cup. Tie it up with beautiful braid, use twine, beads, a small sprig of spruce or cypress, and so on.

A few more ideas for the original design of New Year's glasses:

Bows look very touching, do not overdo it so that the glasses do not look like wedding glasses.

We continue the theme of New Year's decor elements for the table. We offer to make cute Christmas trees from cones, which can be placed next to each guest or next to each dish, in general, as you like.
Cones can be decorated with beads, glitter, dyed green or left intact, cones can also be silver-plated or gilded.
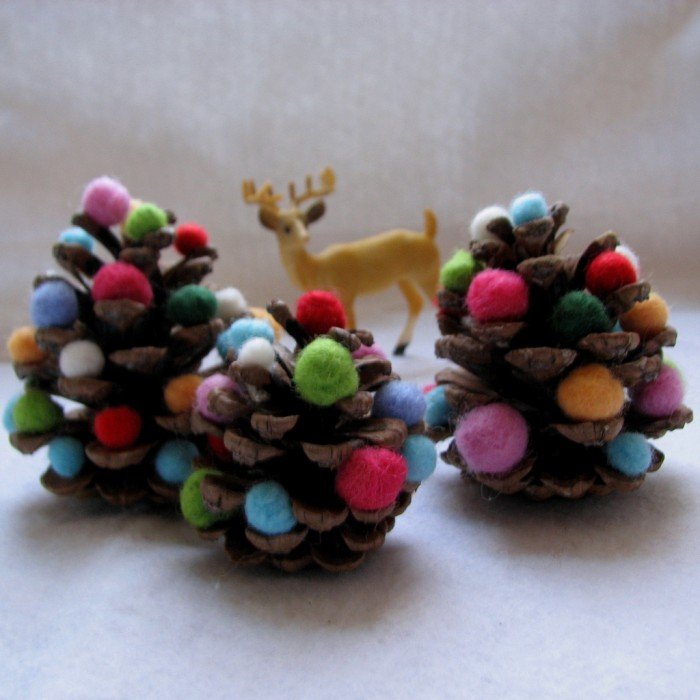
Such cute details can be placed throughout the house: in the kitchen on the shelves, in the bedroom near the mirror, in the bathroom around the perimeter of the bath itself. It will be very nice and pleasant to go into different rooms and see such trinkets. Do not forget to put all the crafts in a separate box after the end of the holidays so that they do not get dusty and are preserved until the next New Year! Although ... we will come up with something else for the next New Year holidays!

For improvised Christmas tree balls, you can use plasticine or plastic, bead details, or even real glass toys. Wool or felt parts are also suitable.

And for the next Christmas trees, you will need threads and different materials to sew Christmas tree decorations. You will also need a well-opened bump.

A small Christmas tree for the table can be made in the following way. But first, let's collect the necessary materials:
- dense threads;
- PVA glue;
- cardboard cone;
- beads.
First you need to dilute the PVA glue with water so that a homogeneous suspension is obtained so that the glue is not taken in lumps and the solution is not too sticky.
Now your threads need to be soaked in a solution and randomly wound on a cardboard cone, if there is a plastic cone, it will be even better, because it will be easier for you to separate the frame.
When the structure is dry, you can try to separate the tree from the base and you should get the following composition:

Don't forget to string beads or other jewelry. You can also make a herringbone from many cones. Using a glue gun, glue the cones on the conical base and fix the tree on a thick branch, which must first be installed in a flower pot.

It is not necessary to make a cone and the cones can be glued on top of each other in a checkerboard pattern. Just take a wooden round block as a base, glue the first row to it, and then just stack the cones on top of each other. You can decorate such a Christmas tree with different decor that is in the house. Do not buy specially materials, use what is already there or what you can make decor from. Recycling of resources is our everything! We will save the planet from pollution, and create beautiful things!

And our unchanging tradition is a video master class. We offer you to look at a beautiful composition that can be created in a short period of time, which does not require large expenses and the setting of the New Year's table will fit very cool:
Post Views: 358