Craft from glass decorative stones step by step instructions. Crafts from stones: original ideas for lovers of home creativity (25 photos)
Drawings (mosaic) from stones (pebbles) for children with their own hands. Photo.
Children's paintings, panels and drawings from stones
Few of the children have ever brought home a beautiful pebble. And so that the stones do not just lie, but be useful, you can make a game out of them - a mosaic (constructor): lay out various images, and then disassemble and create new ones.
Stones (pebbles) for this can be any: both sea, and the most common, found near the river, road, brought for repair or construction.
If you glue them with super-glue or glue-gun to cardboard, you get panels or pictures of stones. This lesson develops fine motor skills, creative thinking, perseverance. Moreover, panels and pictures made of stones are not only children's fun. Adult masters create real masterpieces using this technique.
Diy stone drawings for grade 1
To show the children the diversity of one of the types of children's creativity from natural material, in many schools, children in grade 1 in a lesson around the world are asked their homework to make drawings from stones with their own hands, and then take a picture of their work and bring a photo.
Since the drawings themselves do not need to be carried to school, the background for them can be done as follows:
- use cardboard, paper, fabric, etc. as a background for the picture.
- lay out the drawing on the street: on the ground or on the sand
If you create patterns and drawings from stones not on paper, but on the ground or sand, then you will get works in technology that, although not durable, can be admired by all casual passers-by.
The drawing itself can also be done in different ways:
- lay out the whole image with stones together with the inner parts (mosaic)
- lay out stones only the outline of the image
- lay out stones and the outline of the image, and some of its parts
- take into account or not take into account the color of stones when drawing up an image
The image can be laid out with stones without preliminary sketches or made a sketch with a contour. If a child is at a loss with the plot for such a drawing or is not satisfied with the outline drawn by him, you can find on the Internet and print the simplest coloring for kids with a minimum amount of small details, and then lay it out with stones.
Drawings from stones for children on paper
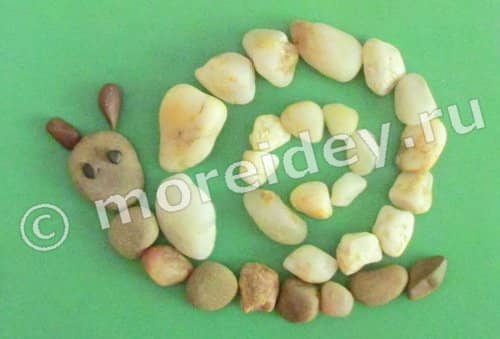
As an example, I will show several photographs of our stone drawings with my daughter.
Snail - drawing from stones
Butterfly - drawing from stones

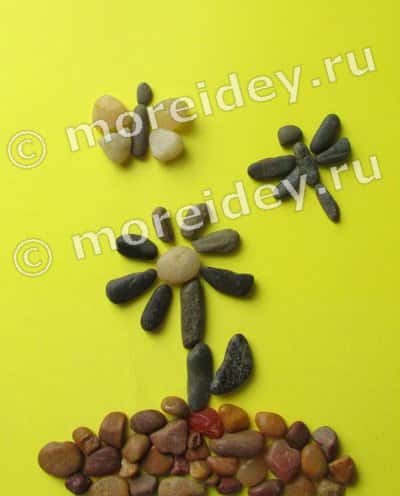
Composition of stones: flowers and a butterfly

Composition of stones: sun, clouds, herringbone, duck

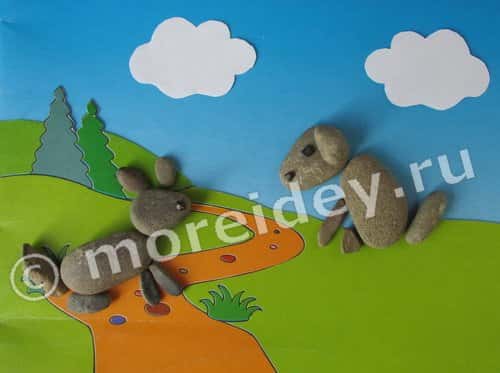
Dogs - crafts from stones
My daughter and I did the next few crafts with dogs made of stones:

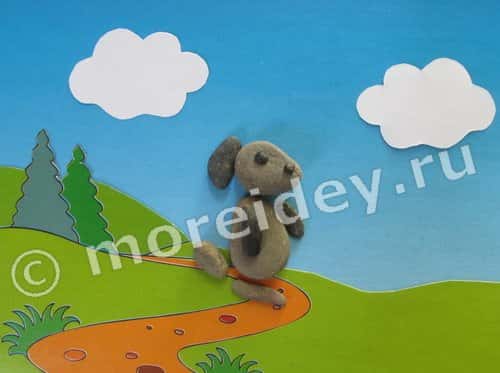
These are the compositions turned out (in one of them my daughter used a straw in addition to stones).
Man with a dog on a leash

Dog playing with a ball

Meeting on the track
Walk
Autumn pictures of stones
For a picture on an autumn theme, we found a handful of small stones of yellow, orange and brown colors to lay out the base of the clearing from them - the ground with fallen leaves, as well as several larger stones (for a butterfly, dragonfly and mushrooms).

From these stones the picture "Mushroom meadow" was made.
Mushroom clearing
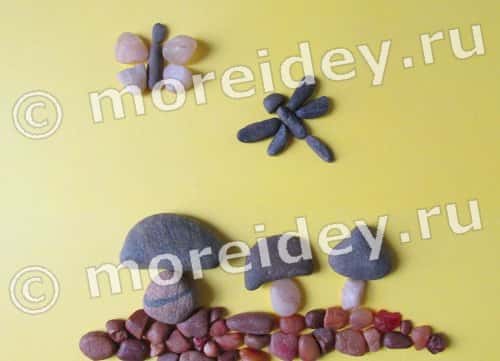
And the picture "Autumn Flower".
Autumn flower
And then, when the youngest daughter began to play with these pebbles: sorting out, pouring into toy dishes, etc., the older one made several more simple figures. On paper, especially on color, they would look better than on oilcloth, and the lighting left much to be desired, so the photo is of poor quality. But I'll show you these figures as an example.
From left to right and from top to bottom: bird, bunny, ducks, cat, giraffe.

Halloween plots
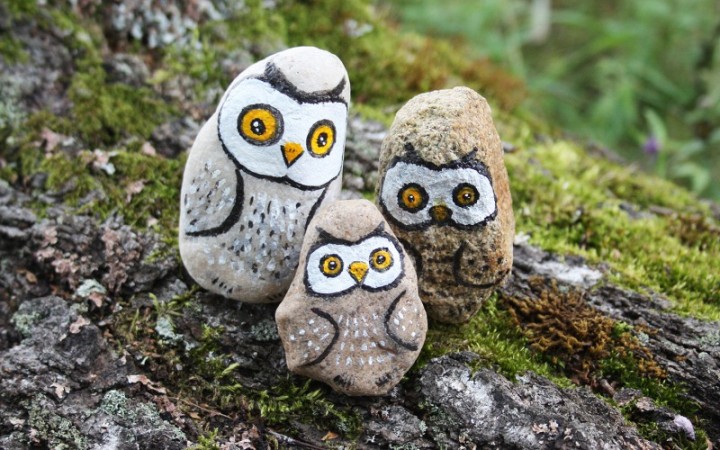
And my daughter made these figures using the finished details: a witch on a broomstick, an owl, a cat, a pumpkin and some kind of tailed robber.

The cat and the owl take a closer look. The owl's eyes and beak are made of paper.


Children's drawings with stones on the street
We received several works from stones created by children during a walk. These ideas can be used with children both to do homework about the world around them, and so that they can usefully spend time in the summer (and maybe not only in the summer) on the street.
Many thanks to the participants for these ideas and photos!
Drawing from stones and other natural materials
The work "Dragon" was completed Senkina Anastasia(5.9 years old) and Senkin Yaroslav (2.8 years old) from Moscow. When creating it, not only stones were used, but also other natural materials: twigs, leaves, flower petals.

Painting with stones
The work "Drawings with stones" with a little help from Yulia's mother was done by Kolya Kucheryavy, 4 years old, St. Petersburg.
Julia told how she and Kolya created these drawings:
"Good afternoon! I decided to show you how we learn to draw the simplest pictures with natural materials, namely stones."
Having come one fine day with a child to the lake, we thoughtlessly, but with pleasure, just threw stones into the water, and then I offered my son to build a castle of sand and stones, but my son did not want to ... Well, he didn’t want to, and okay, work for fantasy is really not easy. And then the idea came up: draw a castle! And then a boat, a fish and even a turtle.
It was here that the child with great pleasure laid out drawings with stones, which later it was not a pity to disassemble and lay out a new pattern. And the secret is that the drawing must be drawn in advance with a stick or finger on wet sand (this is done by an adult). Here is such an uncomplicated coloring! "
Having familiarized yourself in detail with what can be done from stones, you will make paintings from this natural material, a mini-hanger, and you will be able to make a beautiful painting of stones.
The good thing about this natural material is that beautiful items for crafts can be found right under your feet. A wide variety of stones will allow you to make many interesting things from them.
Diy stone paintings
They turn out to be very interesting and durable.

To do this, take:
- sea stones;
- dark marker;
- pencil;
- a sheet of cardboard;
- hot glue gun or Moment glue;
- gouache;
- acrylic paints.
Wash the stones and dry them. While this is happening, draw with a pencil on a piece of cardboard where you will have what will be located.
Then prime the surface of the cardboard with acrylic paints to create the background of the painting. It will be blue at the top and darker at the bottom. After all, this is the sea. Take small stones and glue them as a frame. And from the flatter ones, make waves. Glue them in place and paint over with blue paint.
Take dried seaweed and turn it into wood. Glue this blank to the left side of your landscape. How to fix flat stones is shown in the following photo.

In this case, the boat is tied from a plastic bag. It must first be cut into long thin ribbons, and then crocheted with a double crochet just such a figure.

The sail also needs to be tied from plastic bags, giving it a triangular shape. Take a round pebble and paint it with yellow acrylic paint. Glue to the upper right corner. Fix smaller pebbles around it, they will play the role of the sun's rays.

Draw birds with black marker, they look like semicircular check marks. Now create a land shore. You can glue real sand here or replace it with millet. To do this, apply glue here, then sprinkle the cereal. You can also use semolina, and when the glue dries, paint it yellow.
This is how stone paintings are made, which are original and durable.
See what else you can make with your own hands.

It is nice to hang towels, potholders, light things on such a hanger. For such a picture made of stone, you will need:
- wooden plank;
- drill;
- stones;
- acrylic paints;
- brush;
- rope;
- hooks.
Master Class:
- Saw off a piece of the board, sand it from all sides so that there are no chipping. Then you can paint this blank with varnish or stain.
- Make a hole at the top right and left with a drill, thread the rope here and tie knots on both sides. Attach the hooks at the bottom.
- Paint stones of almost the same size green and two larger ones white. Also paint the two larger ones and the three smaller ones black.
- On the larger ones, then draw the eyes. Glue all these blanks, when the paint dries, in place so that you get two sheep sitting peacefully on the grass.
For the next picture of stones, you will need:
- thick cardboard or other strong base;
- tree branches;
- stones;
- heating gun with silicone rods;
- White paper;
- scissors.

For a painting, the main focus of which will be light pebbles, take a dark background.
Use two stones to create the head and body of the stork. Make its beak and legs from straight branches. From other branches you need to make a semblance of trees. Use scissors to cut the pieces of paper into small pieces and glue them to create a path.
You can turn another branch into a picturesque tree.

To do this, place the branch horizontally and glue it onto a solid base. At the ends of the branches there will be a semblance of leaves. Make them out of small stones by gluing those on.
If you do not have an aquarium, but sometimes you want to admire the fish, then make it a kind of stones.

Turn some pebbles into the seabed. Glue small seashells here too. See what stones can be turned into fish, tails and fins to them. Glue on a few sprigs of greenery to complete this work. And the base will be blue cardboard.
For the next picture of stones you will need:
- stones of three types - small, medium and one large;
- hot glue gun;
- picture frame.
Arrange the stones so that they form the center of the flower and its petals. And a small twig will become a stem. In this way, make 2 stone flowers. Prepare the moss. Glue the convex stone to the bottom of the picture. Attach moss on top of it. Remove this picture in a frame, put it in a prominent place to periodically admire this original canvas.

With a child, you can make colored paintings out of stone.

To do this, pick up flat stones, then color them to turn them into houses of different sizes. Glue the resulting blanks on a strong canvas.
You can use a piece of board for the base, which must first be painted.

Also turn the stones into the moon, trees, rocks, after painting these blanks.
For the next picture of stones take:
- burlap;
- thin strong thread;
- seashells;
- stones;
- sticks.
Tie 4 sticks in the corners to form a frame. Cut a rectangle of burlap according to this size, attach it to this frame with thread. To do this, you need to insert the thread into a needle with a large eye and stitch it, capturing both the canvas and the twigs at the same time. You can glue a sheet of paper to the center of this rectangle, and then attach shells and pebbles to it to get such a masterpiece.

What can be made of stones in the interior?
The following ideas will show you how widely this material is used. If you want to make an original kitchen table, use stones too.

To attach the stones, you can use a mixture of sand, cement and water, or a special tile adhesive. It remains to put the countertop on top, and the table is ready.
If you want to make a round coffee table for the living room, then also use stones, but take a smaller size.

Transparent glue "Titan" is well suited for connecting these elements. It is invisible and leaves no trace. You can also use epoxy.
Place a table lamp next to it, for which you will also make a leg from this material.

You need to make a hole in each with a drill in the middle, then put it on the lamp rod.
If you need to make a container for storing cosmetic brushes, then take two transparent ones of different sizes. Place stones between them and connect them using transparent glue.

If you need to update old handles, take stones. Glue to the back of each mount and use these blanks as directed.

If you want to make the headboard of the bed not like everyone else's, then cut it out of solid wood, cover it with varnish, make a recess in the center into which you glue the stones.

Place a flower near the bed, and also decorate with stones. To do this, you need to choose the same ones. Use the same river pebbles and paste over the old pot, and it will turn into a new one.

In the bathroom, you can also make a lot of interesting things out of stones, for example, such a wall. It will allow you to make a bright accent on this place.

Cover the shower stall floor with smooth pebbles. This coating will be durable, safe and very beneficial for the feet, as it has a massage effect.

By the way, a country shower can also be made by filling a wooden box with pebbles. Here you will stand comfortably, your feet will not get dirty, and the water will flow naturally.

Speaking about what else can be made of stones, we can also note such an original shelf. The vertical wall for it is pasted over with beautiful pebbles.

The hot plate will surely delight you, because you can get your morning breakfast that is so beautifully decorated.

Painting stones? an exciting experience. You can transform this natural material into anything with paint.
Do-it-yourself painting of stones - master class and photo

It is best to use pebbles for such art, take one with a dense texture. If you use porous, a lot of paint will be absorbed, and if you use it with sharp edges, you can get hurt.
Here are some tips to follow:
- Having found suitable specimens, they need to be brought home, washed, dried.
- For coloring, you should use a palette, because you need very little paints to paint one stone.
- Since the surface is specific, the paint will dry quickly, the same applies to the brush. Therefore, it must be periodically moistened in a container with water.
- Make sure that the work surface is covered with newspaper or cellophane so as not to stain it. The same applies to clothing. Wear one so that you don't mind if droplets of paint get here.
- You can use acrylics, watercolors, or gouache paints. If you want to see a metallic sheen on the surface, then use metallic acrylic paint or paints intended for painting ceramics or porcelain.

To decorate the stones, use paths with which you can create non-blurring thin lines and drops. You can also decorate this natural material with waterproof markers.

For painting on stones, use different types of brushes. For the background, they take large ones, and for drawing thin strokes, small ones.
If you are a beginner artist, then you can buy 2-3 brushes, if you decide to seriously tackle this interesting business, you can buy a set of brushes.

To make the coloring on the stones more durable, cover the stones with varnish at the end of the work steps. Then they will shine beautifully and such can be placed right in the open air, since they are not afraid of precipitation.

See how to paint on rocks.
Decide if you need to prime this natural material first. Typically white acrylic paint is used as such. Then the subsequent layers will be more juicy. You can also prime it when the stone itself is dark, and the drawing should be light.

When the primer is dry, draw out the outline of the subject with a pencil. Then you need to cover the workpiece with paints of the appropriate color. Acrylic dries quickly, so you don't have to wait long to use the next one after the first color.

If you need to apply the finest details, use a contour or a thin brush for this. If a stroke is applied incorrectly, you can quickly remove it without waiting for the paint to dry by soaking a cotton swab in a solvent and acting with it.

In conclusion, it remains to cover such stone masterpieces with varnish and you can decorate a room or a summer cottage with them.

The next master class will allow you to fill your hand and consolidate what you have passed. We propose to make just such an original craft, taking stones of a similar shade and slightly different size for it. Turn them into little chicks.

You will need a base. A larger flat pebble will play its role. And small elongated pebbles, placing them vertically, glue them on it. Now take a thin brush and paint two eyes at the top of each pebble with white acrylic paint, and when it dries, apply dots with an even thinner brush.


If you find a large rounded stone of the desired shape, you can decorate the local area with it.
First, this find must be washed and dried. Now prime it on all sides, when the primer is dry, apply the main background. If it is white, then paint it with another coat of this paint. In this case, decoupage glue was used. It is necessary to cut out the selected pattern and stick it with PVA glue diluted with water or by taking decoupage glue.
After the coating is dry, apply the background with a foam brush and blot it with a dabbing motion. When it dries, cover the stone with 2 layers of waterproof varnish.

Another master class and step-by-step photo will help you get the beautiful landscape "Dawn". Take a flat pebble. Apply the selected pattern. In this case? these are graceful two-storey houses, as well as trees.

Now dilute the pink paint and cover the area above the rooftops with this compound. A little higher, make the shades diluted blue. The clouds will be white. Paint the tree leaves with green paint. It should be slightly darker just behind the rooftops.

Use different colors of paint to create bright, cheerful houses. For roofs, use different shades of brown. Use a thin brush to paint white windows.

Take a thin brush and use it to select fragments of tiles, outlines of the roofs of houses, as well as some other small strokes. Draw several birds in the sky that look like check marks from a distance.

Here is such a wonderful painting on the stone.
Speaking about what can be made of stones, it is important to note that stones are made from them, but not simple ones, but fabulous ones.
How to make stones with your own hands?

These will come in handy for some kind of performance or in order to set up doll figures, as in this case.

First take:
- flat sea stones;
- toilet paper;
- plasticine;
- PVA glue;
- acrylic paints;
- brushes.
Apply plasticine to the washed and dried stones, giving these blanks the desired shape. Help yourself with a plastic knife.

Tear the toilet paper, apply PVA glue on the stone, attach it to the base. Wait until the desired shape is reached.

Mix black and white acrylic paint for a dark gray color. Paint over the stone and let the surface dry.

Take another brush so it's almost dry and paint over the bumps with a light gray color. You can also add a little green to give these natural materials a touch of antiquity. Also design the second stone.

It remains to cover them with varnish, and you can put the selected heroines on these blanks.

Instead of acrylic paints, you can use oil paints or those that are at hand.
If you want your windows to be decorated with cacti from stones, then you can make such unusual plants. They will not need to be looked after, they do not require watering and do not prick.
How to make cacti from stones - a step-by-step master class
Take:
- smooth flat stones of an elongated shape;
- transparent matte varnish;
- gouache;
- brushes;
- flower pots;
- sand or earth;
- small stones;
- corrective stationery pencil;
- glaze or epoxy glue.
Select stones of the desired shape, soak them for half an hour in warm soapy water, then rinse and dry.
If you want to create a cactus consisting of several stones, then glue them together using epoxy glue.
Cover the stones with green paint. When this layer is dry, apply dark and light shades of green. Draw light needles with a thin brush or corrector. When the paint is dry, cover the stone cacti with matte varnish.

Pour sand or earth into flower pots, stick blanks here. Cover the top layer of this soil with small pebbles.

If you still have some green paint left over, you can paint the stone to look like a turtle. To do this, first you need to paint it in green, then with a corrector or a brush, taking black paint, apply the appropriate lines. You can also use yellow. The following step-by-step photos show in what sequence, how and where to apply this drawing.

Here's what you can do with stones with your imagination. The videos below will help you make a chess set, a beautiful transparent vase, teach you how to draw on heated stones and give you many more life hacks on this topic.
And from the second video you will learn what can be made of stones in the country.

Friends, in the middle of winter we are especially pleased to think about summer, the sea, the beach. Let's remember these wonderful days when, having bathed and jumped in the sea waves, we and our kids began to collect smooth ones, washed with salty sea spray and shining in the sun, varnished by the surf sea pebbles... Well, how could you part with them ?! 
This is how a couple of kilograms of "sea rarities" migrated to our house. What to do? After all, not everyone has an aquarium. 
How to make sure that all this "sea beauty" really comes in handy, and does not fly into the trash can in a month?
Do not despair, there is more than one way out! There are a lot of interesting options for using sea pebbles in the interior and in the landscape. Let's discuss some of them.
Sea pebbles in the interior
We all want to turn our home into a corner of rest and relaxation, hence the increased demand for natural materials in interior decoration and fashionable now eco-style. 
But what about without nautical pebbles? Thanks to its various shapes, sizes, pleasant rough or smooth texture, gloss, and natural shades, it is perfect for home decoration. 
Sea pebbles looks great in the interior. In the Mediterranean, for example, this material has long been used as floor mosaics or used in wall decoration. 
IDEA # 1 - FOR KITCHEN AND BATHROOM
Today sea pebbles also cladding walls and floors in bathrooms, in addition, it acts as a protective material for kitchen panels.  Great idea: apply sea pebbles in the decoration of the festive table! Look great in this case decorative coasters for dishes... It's not at all difficult to make them yourself.
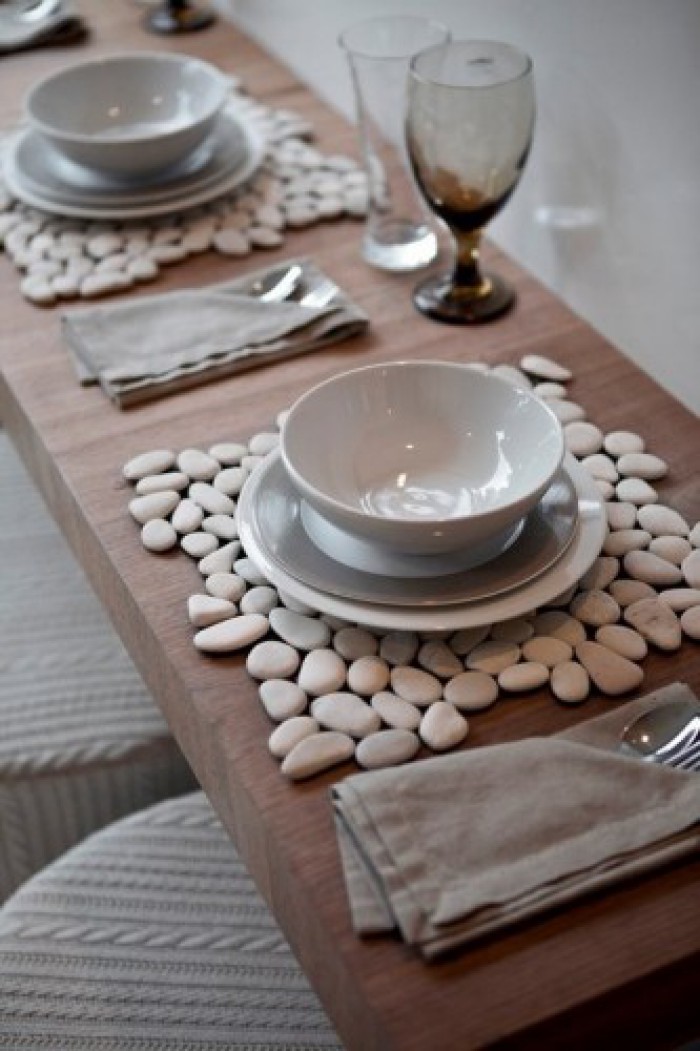

IDEA №2 - PAINTINGS AND PANNO
Because sea pebbles there are different shades and different degrees of transparency, there is no limit to experiments. Sea pebbles can be combined with other materials based on the similarity of color and texture and create amazing compositions, paintings and panels.  Small smooth pebbles go well with various materials, especially wood, glass, shells. Sea pebbles are great for creativity: the stones are flat so they can fit under glass. And they are all so different that they just ask to be part of an interesting panel. Check out examples of such works and you probably want to create something similar!

IDEA # 3 - MOSAIC CARPET
Let's try to make the interior more attractive and interesting with pebble mosaic!
Floor mats with a massaging effect look great in the interior. In addition, they are pleasant to stand on and feel like the sea, and the uneven surface of the coating will not allow slipping. You can also make such a rug with your own hands! 
IDEA No. 4 - WET SHOE TRAY
Using waterproof trays, it is very easy to create a mat for storing wet shoes. Just fill the containers sea pebbles and that's it - the functional and original thing is ready! 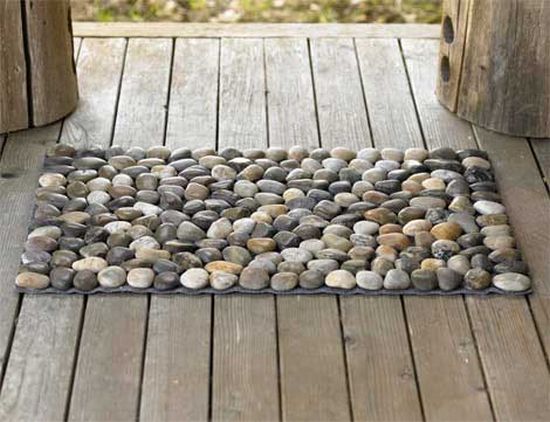
Sea pebbles in landscape
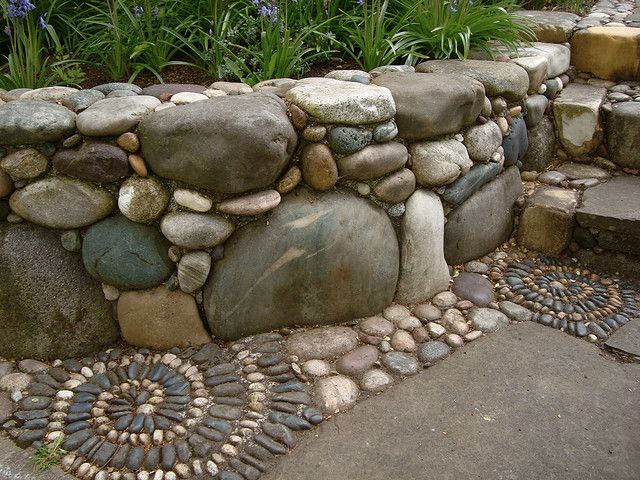
IDEA No. 5 - GARDEN PATH 
Sea and river pebbles fits perfectly into the surrounding landscape, which is why it is especially popular in landscape design. And for creative people this natural material is a real find! 

Sea pebbles make excellent and durable garden paths.
It is not that difficult to make them, but here you really need to have enough materials. I'm afraid that a suitcase with sea pebbles may not be enough, you will have to buy or collect everything that your friends have accumulated over the long years of wandering! So the idea is limited only by imagination and the size of your luggage ... 
Let's dwell on how to make such beauty and try to lay out mosaic paths from sea pebbles with our own hands. It is not difficult, and with the proper patience and imagination, incredible masterpieces can turn out. 
Necessary materials:
- pebbles of different sizes
- sand
- plywood (cut of film or tarpaulin)
- stone chips
- concrete mix
- wooden or rubber mallet
- level
- hose
- hard brush.
The process of work is consistently shown in the photo:


IDEA # 6 - "DRY CREW"
Let's continue the previous topic and show even more imagination. After all, sea pebbles can be used as a basis for "Dry streams" and gravel gardens. Laid out on the edge, it perfectly imitates the water flow in a "dry stream".  But in this case it is important not to get carried away and show the maximum artistic taste and not "overdo it" with the design!
In my landscape objects, I often use this technique: "dry streams" greatly enliven the landscape of the site and serve as drainage wells to collect excess water. How such a combination of "beautiful with useful" looks like you can see in more detail at the link .


One more interesting "dry stream" turned out on my other landscape object. For more photos, see the link .

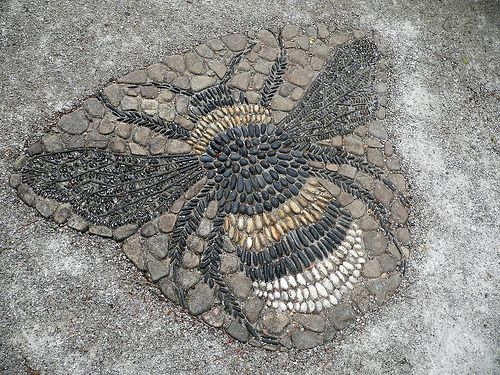
Mosaic decorative areas for a garden made of sea pebbles can also be bright and unusual.... Their manufacturing technology is similar to how garden paths are made (described in detail above). We get inspired and ... go ahead, do the wonders of garden design with our own hands!


IDEA # 8 - GARDEN COMPOSITIONS
From sea pebbles beautiful small sculptures and compositions are obtained that will decorate the landscape of the site. They, like fancy accessories, will add style and sophistication to your garden. Products made of sea pebbles can be used to decorate paths, ponds, flower beds. 


Seeing handicrafts made of stones, one immediately remembers childhood. It was at a young age that we made something, collected something. On the beach, we could look at various pebbles and shells for a long time, and then we took all this beauty home .. When traveling to warmer regions, we come across various types of souvenirs made of sea pebbles and shells. You can make such souvenirs on your own, from the simplest ones that you can craft with your children, to the most complex ones. A souvenir made with your own hands, and even more so by the hands of your children, will remind you for a long time of the happy hours spent with them on vacation.
So what can be made from pebbles and shells?
Crafts with children.
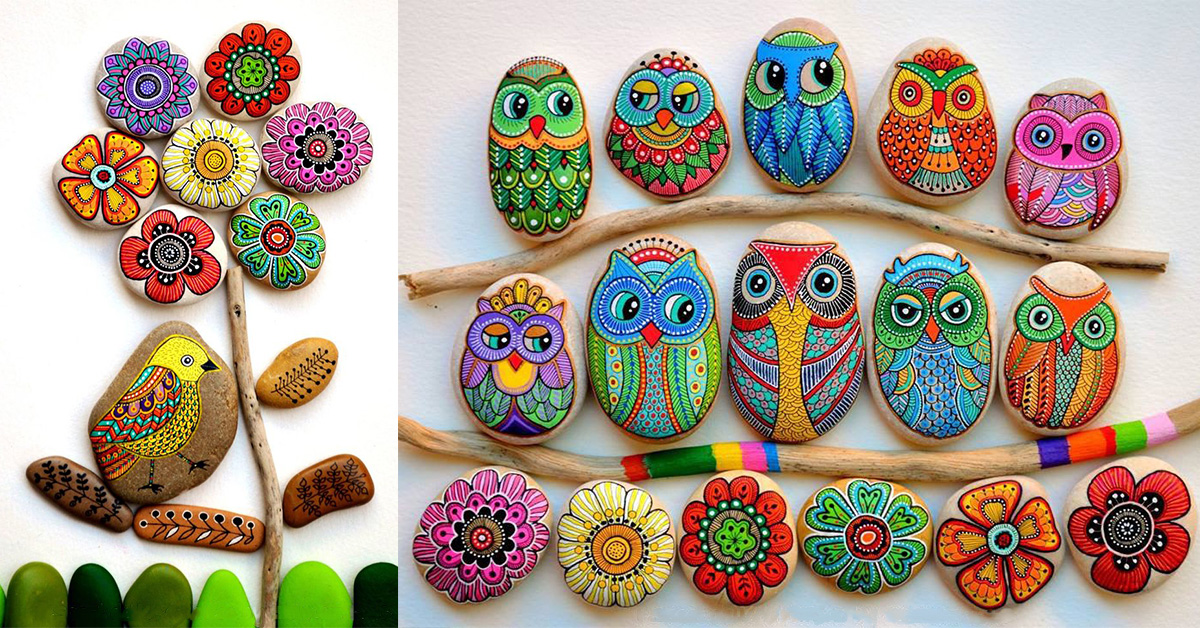
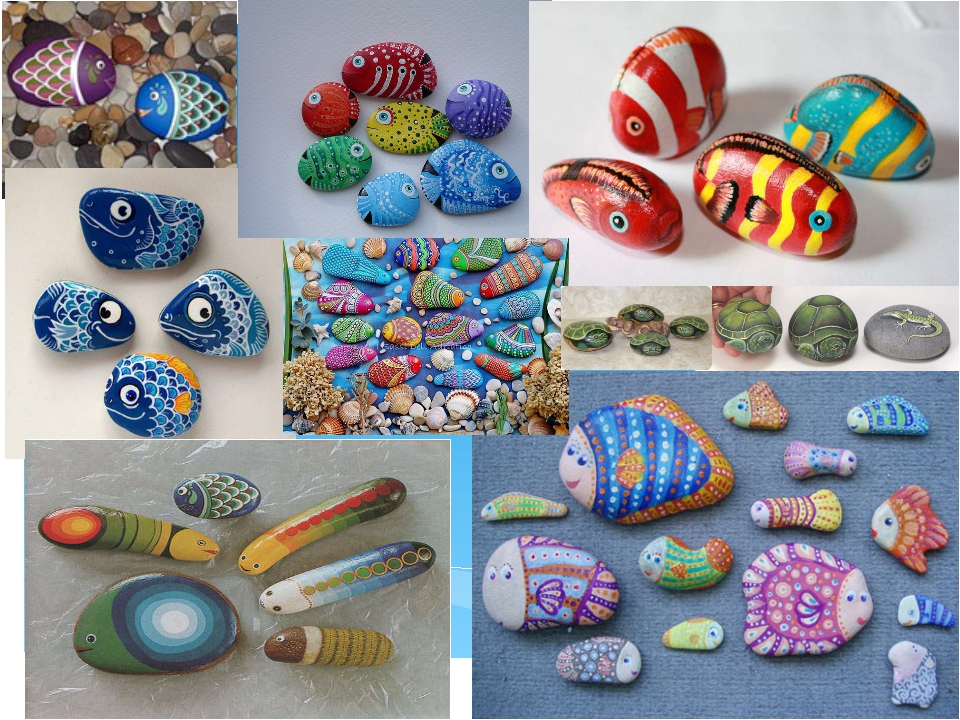
Pebbles can be painted, such an activity will be interesting not only for children, but also for adults.

For an older age

Seashell butterfly souvenir


For this craft, you will need two white donax shells ("wings"), a zebrina shell ("butterfly body") and a large black mussel shell (stand).
Glue the zebrina shell (or any other spindle-shaped one) to the stand. "Wings" - donax shells - generously grease with glue and fasten on the sides of the body. Make the head of a butterfly from yellow plasticine, antennae from thin bristles, and eyes from small seeds.
A few more ideas and tips for making crafts with children. 


Almost any thick glue, PVA or silicone can be used to glue the pebbles to each other. Better yet, use hot melt glue. The glue hardens very quickly and the work gets done well. The stones "slide" can be fixed with a paper cylinder, using it as a formwork, where we lay the stones. But with the figures you will have to tinker, fixing each pebble in the right position until the glue hardens. For the little ones, in order to accustom them to home handicrafts, you can also use plasticine as glue. Apply the plasticine to the cardboard. Sketch the drawing on the plasticine. Now you need to carefully fill your drawing with pebbles along the contour. Finally the picture is ready. Instead of small stones, you can use beads, buttons, beads, shells, you can combine both.

 Girl with a stroller

A beautiful bow, two pigtails, a wavy skirt - a little girl appeared on the shore. The girl has a toy carriage with a little doll. It seems nothing unusual ... Only all the characters are made of stones and shells.
Required materials: 2 sea flat pebbles (one is thin and oval, the second is small and round), 3 shells (scallops), yellow thread, colorful beads, 4 glass balls, pink cloth, PVA glue, red and black markers, a circle hard washcloths for the stand.

The oval pebble is the girl's torso, and the small pebble is her head. Glue a small pebble to a large one. Put multi-colored beads on the yellow thread. Tie knots around the edges of the thread. The prepared thread is pigtails, glue them on the girl's head. Cut a bow out of the pink fabric. With felt-tip pens, draw the girl's eyes, nose, mouth. Make a skirt out of the shell. Glue the two halves of the seashells - uh
Crafts made from stones are an unusual way to draw attention to your site or apartment interior. Such designs fit into the natural environment as organically as possible due to their naturalness. Crafts made of stone always look stylish and allow you to add an eco-dress to the design.
Application options
Crafts from stones that you can build with your own hands are divided into several types.
Landscape crafts that are performed directly to decorate summer cottages and suburban areas. Around them, you can form a local landscape, for example, equip a recreation area or make a pond.
Crafts made with glue and painting on a stone surface. Such products can be used to decorate both a suburban area and indoors. It can be a painted boulder of an original shape or a hot stand made of pebbles.
By the way, such crafts, in combination with shells, form a special water area in the room, especially if there is an aquarium. So you can decorate the interior of a living room or office in a nautical style.
Accessories and various gifts. Such crafts allow you to transfer all the warmth of hands and love to the donee from the master. Most often, crafts of this type are made of small stones in the form of figurines of animals or plants. Special types of stones can become a person's talisman.

Learning how to make crafts from stone is not so difficult. You can borrow some of the ideas that are presented in this material, or create something of your own.
Options for stone crafts
As mentioned earlier, stone crafts can be used for various purposes, so it is worth considering each type separately with examples.
Garden crafts
This is the most common craft option for decorating the local area. Usually, in a suburban area, there is a large amount of material for the manufacture of this kind of crafts. If it is not there, then there is nothing difficult to collect the necessary pebbles on the river bank or elsewhere.
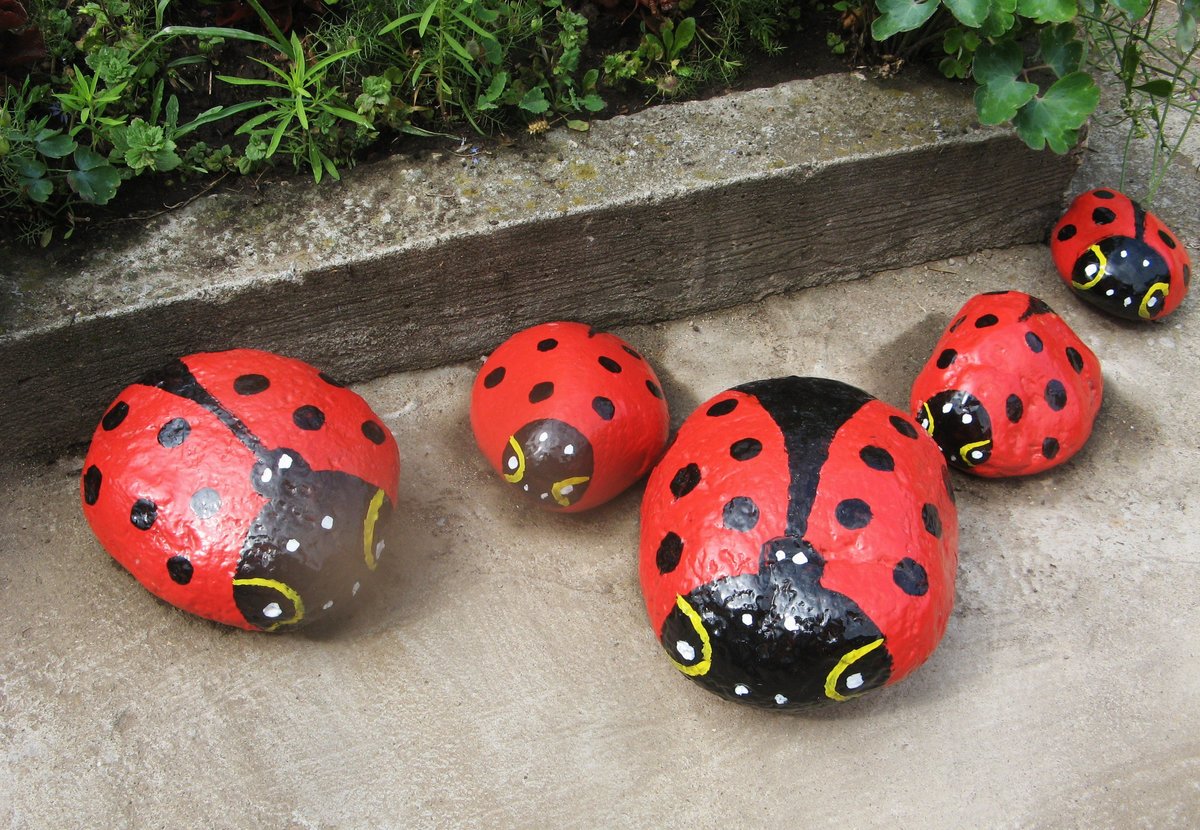
The easiest way to perform a ladybug or a caterpillar is according to this algorithm:
- Preparation of stones of the desired shape and size.
- Application of paint to the surface.
- Painting of each pebble in accordance with the idea.
- Drying the finished craft.
- Coating the product with varnish to preserve the external and quality characteristics for a long time.
Advice! Children can be involved in making such simple stone crafts, who will happily decorate the structure.
Some stone figurines can serve as a flower garden or a frame for a decorative pond on the site. For example, a star, a turtle or any other pattern can be laid out of boulders, which will become the basis for planting flowers inside it.
Pebbles painted like fairy houses are ideal for decorating a playground. In such an environment, the child's play will be more interesting, and the territory of the site will be transformed.

Perfectly complement any site with chaotically interconnected sea pebbles. They can be used to dilute the appearance of the lawn or frame the recreation area.
Less often, you can find spatial figures in suburban areas. But such options for crafts look just great and soundly. They are made necessarily with the use of a metal frame so that the stones are held more reliably. For example, stones can be used to make crafts in the shape of a dragon or any other creature. To do this, follow this technology:
- A schematic representation of a future craft on paper, specifying its size and the required amount of material.
- Selection of material suitable in size and shape.
Important! It is best to use limestone for crafts, which is much easier to process than other rocks.
- Making a concrete base for crafts, since even a small figure has a significant weight. In the process of pouring in concrete, it is necessary to place pieces of reinforcement or wire for planting stones on them in the future. In this case, the diameter of the reinforcing rods is chosen equal to 8 - 12 mm.
- During the solidification of the foundation, you can start preparing the stones and drill holes in them using a perforator.
- Formation of the frame by bending the reinforcement.
- Planting stones on a completed frame.
Advice! To prevent the stones from turning on the wire, they are fixed with concrete mortar.
- Refinement of individual fragments of the craft to indicate its constituent elements, for example, the mouth and eyes.
- Adding accents to the craft by painting its details.
Here is an example of a gabion turtle:

It is not necessary to perform such large figures, stone crafts on the site can be small. For example, animal figures are assembled from small stones that are attached to each other with pins and cement mortar. Such a family will give the garden a family atmosphere and coziness.
Stone flower - a symbol of an energy charge will appeal to all those who are interested in oriental practices. It is also easy to make this craft near your home. For the reliability of the structure, a small base is poured under it, and the acute-angled stones are fastened together, forming a half-open bud.
Decorative crafts made of stone
For the interiors of apartments and houses, stone is also often used. This addition looks very advantageous. Most of those who have a rest or live near the sea have fancy stones at home. Most often, they just lie around, like a reminder of a fun holiday. And what if you make a unique craft out of them, which will further decorate the interior of your home.

During the manufacturing process, you can ask the children for help, which will help you get more original options for crafts. Bright fish are perfect for decorating a bathroom. To make them, you just need to paint the stones at your discretion in the form of fish. Such crafts can be laid out on shelves or glued to the wall. If you collect them on some basis and supplement with other marine attributes, you get an original panel that fits perfectly into a room in a Mediterranean or other style, which reminds of a light sea breeze.
Panels made of small pebbles, which are folded in the form of a flower or a collection of plants, look no less attractive. You can even "plant" a stone of a suitable shape in a pot of gypsum and paint it like a real plant. Such a decorative craft will diversify the modest interior of a bedroom or office space, and guests will not immediately guess that the flower is not real.

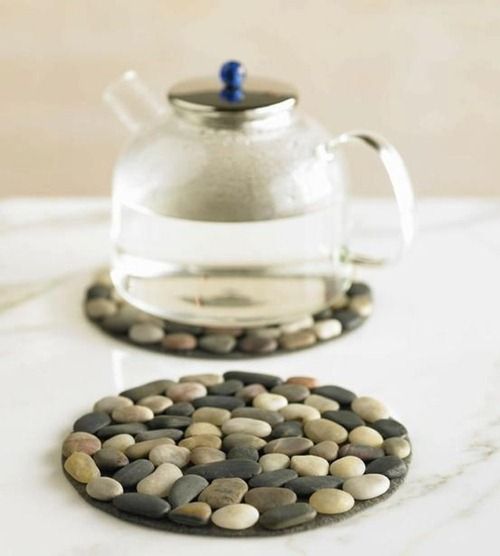
Decorating rooms with stone does not end with ordinary panels. For the kitchen, for example, heat-resistant coasters for pots made of stones glued together, located on a rigid base of plywood or cardboard, will become relevant.

An interesting and functional solution is a shoe stand made of stones. To decorate such a craft, you need to take a pallet and carry out the following steps:
- glue stones over its entire surface;
- pour soil onto the bottom;
- cover it on top with a layer of stones.
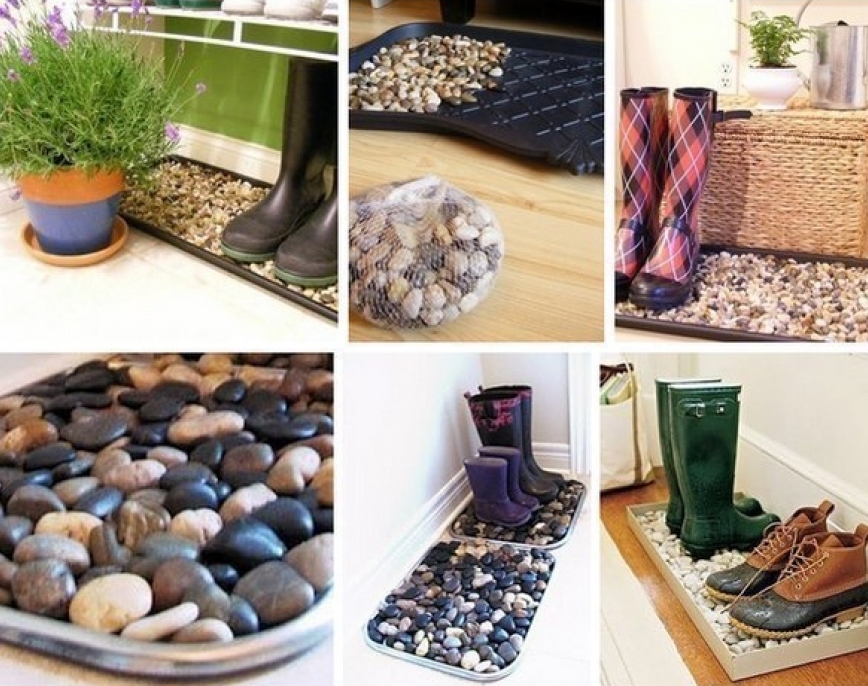
So, wet shoes put on this stand will become dry faster, due to the absorption of moisture by the earth.
The stone is ideal for the bathroom. A rug made of this material will be comfortable not only with the possibility of quick drying, but will also serve as a certain massage tool for the feet.

Important! Designers advise using stones whenever possible in any room, as this is a natural and versatile material that does not change its properties over time.
The use of stone decoration of interior items is allowed even in modern styles, for example, high-tech. If you put a couple of large tubs with flowers pasted over with stones in a room so decorated, you can get an eco-style atmosphere.

Photo frames - these are the crafts that will definitely delight the owner and guests. If the house has an area with posted photos of family members or just a few photos in regular frames, you can beat them with stones. Usually, shells are also taken in addition to make the composition of the craft look more organic. Good glue is needed to fix the elements; it is better to use hot from a gun. The decorations are taken at their own discretion and depending on the desired result.
Important ! The base of the frame should be wide enough without relief so that you can easily fix all the stones and shells on the craft.

The technology for creating a frame from stones and shells is as follows:
- Preparing the workplace - decorating the table with newspaper or paper.
- Sorting shells and stones and selecting suitable ones.
- The design of the first row of the frame with large shells and stones, the second with medium ones, and the subsequent ones with small ones.
- Complement empty spaces with decorative starfish, ribbons and other themed attributes.

There are paintings in almost every home. Ordinary ones, painted on canvas, are no longer so interesting than those that are made with your own hands from stones. This painstaking work requires perseverance and attention, but the result is worth it. The stones laid in a certain sequence on the craft allow an interesting pattern to appear on the base surface, which will successfully fit into the design of any room in the house, be it a kitchen, an entrance hall, a living room, a bathroom, a bedroom and even a nursery.

Conclusion
Crafts made of stone are not only an original decoration of a garden plot, but can also be presented as a gift. No connoisseur of beauty will remain indifferent when receiving such a presentation. And the fact that the handicraft was done by hand is only a plus for the donor.