How to make a cracker from a double notebook sheet. How to make a paper clapperboard with your own hands? DIY Christmas cracker: all the pros and cons
Good afternoon, dear children and adults - visitors to our site. Today we will show you how to make a paper clapperboard with your own hands. Surely many of today's parents remember that wonderful time when they themselves were still children and at school they made similar paper crackers. From an ordinary notebook sheet or from an album sheet with your own hands, you could make an excellent and loud cracker, come up behind a classmate at a break and clap with all your might near his head.
So, how to make a paper clapperboard (single, or single-barreled)? Double-barreled, or double crackers will be discussed on the next page.
1) To begin with, let's take a blank sheet, you can use an ordinary notebook, you can use A4 format, and bend it in half.
2) Then, on both sides, bend the corners to the middle.

3) Then we bend the workpiece in half inward, as shown in the photo.

How to make such paper snowflakes - look.
4) Then bend it in half again and unfold it back to form a fold line, as in the figure below.

5) Then we fold the edges to the fold line obtained earlier, so that we get oblique fold lines on the sides of the workpiece.

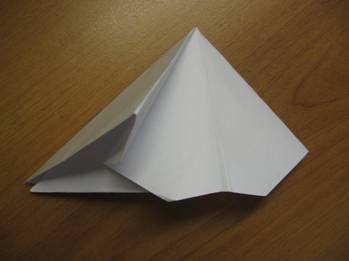
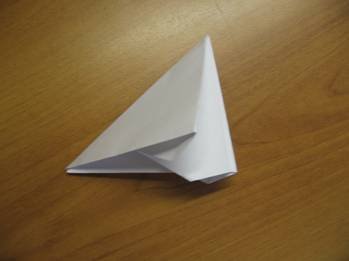
6) Then fold the workpiece along the fold lines as shown in the figure below, in order to get a cracker.

7) In order for the paper clapper to clap, you need to take it with your fingers by the triangular free ends so that its inner part looks forward and pull your hand strongly forward. Thus, the inner bent part of the cracker will fly out and make a loud popping sound.
A paper airplane, a crane and a cracker - all of them will be very popular with both children and adults. The figures, at first glance, are quite simple, but as it comes down to it, not everyone can put them together. So that you never experience difficulties with this again, we will give you step-by-step instructions with the necessary diagrams.
Earlier we told you how to fold a paper boat. From the same article, you will learn how to properly make an airplane, a cracker and a crane using the origami technique. The first figure seems quite primitive, but you will be surprised that only three out of ten people can actually make it. Our step-by-step master classes will help you practice and will be understandable even for children.
paper airplane
Let's start with the simplest - we will learn how to fold a paper airplane so that it does not fall apart and fly well. A step-by-step master class will help you figure this out, we will explain the process in the diagram.

To begin with, we need to take a standard A4 size sheet or a notebook sheet. Let's draw a simple origami diagram, you can do it mentally. If you are teaching a kindergartener or elementary school student, it is best to draw the lines with a pencil.
First, draw a vertical line - divide the sheet in half. Then we draw diagonals from the right and left corners.

Bend the triangle along this line. We should have a small tongue. We direct it up so that our paper airplane is folded more firmly and does not fall apart in flight.

We outline the fold lines of the wings on the side. Then we spread our wings.

The plane is ready! As you can see, even a child can do this simple origami technique. For greater strength, a paper airplane can be glued with a glue stick from the inside. Color the craft to make it more fun to play with.
Paper clapperboard
Flapper is one of the favorite children's entertainment. They are often piled up at children's parties: for example, they arrange speed contests.

We suggest you learn how to make a paper clapperboard with your own hands quickly and easily. Our step-by-step instructions will help you with this. It is simple and clear, so you can even teach it to a preschooler. True, he still needs help.
We take an A4 sheet or a notebook sheet. We expand it horizontally and make markings (with a pencil or mentally). The first line is a fold in half, the rest are a fold of triangles in each corner. Fold the triangles towards the center. Then we connect the side parts to each other.

We fold the resulting structure exactly in half along the horizontal axis. Then unfold the top so that you get a square. Next, fold the bottom of the resulting square up and inward. Then fold the top layer in the same way.

Fold in half to make a triangle. You need to hold a paper clapperboard by the corner.

As you might have guessed, the clapperboard is activated by a sharp downward movement.
Look carefully at the diagram so as not to confuse anything. It may seem complicated, but in fact everything is elementary. If you did everything right - take care of your ears, because the sound can be very loud. Practice, and soon you will be folding paper crackers even with your eyes closed!
origami crane
In Japan, almost any child can fold cranes. In our country, origami is not so widespread, however, elementary school students are often given such a homework assignment. We suggest you study the step-by-step instructions with which you can easily learn how to make origami cranes with your own hands.

In order to fold this origami, we need a square sheet of paper. Fold it in half. Then in half again. After that, the upper triangle needs to be pulled slightly towards you and straightened into a square.

We turn the resulting design to the other side. Then flip the triangle to the other side. After that, pull it towards you a little and straighten it into a square. In the top layer, you need to bend the two side corners to the center, and then turn them back.

Now these side triangles need to be folded inward along the lines of the intended fold. Fold the top triangle up. Then turn the design on the other side. Repeat the procedure with bending the corners: first fold them, and then unfold them. Next, fold them inward along these lines.

Expand the top layer along the fold lines. Next, fold the side corners to the center. Turn over and repeat the procedure. Fold the bottom left corner in and out.


A little practice and you will learn how to make such origami cranes without prompts. The main thing is to iron the folds well and make them as sharp as possible so that the paper crane turns out to be even.
Simple origami techniques are very useful for children. Working with paper helps to develop fine motor skills of the hands. Step-by-step instructions and origami schemes teach you to think logically - this skill is fixed in a child if he constantly trains and folds airplanes, cranes, crackers and other paper crafts with his own hands. Well, the subsequent work with decorating the figurines develops the imagination. In a word, origami for children is a really useful thing. This is why teachers often give children homework on how to fold various figures.

Use our master classes, learn and have fun!
Views: 666
A paper clapperboard is one of the most fun and popular origami crafts that will come in handy both for the new year and just in the company of friends. On this page, we have collected the world's most popular videos and diagrams that will teach you how to make a paper clapperboard with your own hands.
A simple, double or super loud cracker will be great, albeit mischievous, entertainment for children in the first place of school age. A slight wave of the hand and the person next to whom they are banging a cracker suddenly jumps. Quick reload and the gun is back in action. The effect of surprise and a lot of fun - that's what is guaranteed to everyone who decides on this paper craft.
How to make an origami clapperboard out of paper
In this video, a young young man with skill tells how to make the most popular paper clapperboard in our country - a favorite craft of all Russian schoolchildren - with his own hands. A little patience and you have a universal tool for scaring girls or classmates at school. A sharp wave of the hand and boom! Two seconds and the origami cracker is reloaded. Great toy and entertainment for the new year.
A couple of useful tips for assembling crackers. Firstly, it is best to make it from a double notebook sheet (and not from an A4 sheet or a thick landscape sheet). Secondly, the thinner the paper, the louder the cotton. By the way, this paper clapperboard model is a purely Russian invention. Foreigners use a different design.
How to make a double clapperboard out of paper
In this video, you will learn how to make a double clapperboard out of paper. It is a development, or rather a refinement of the previous craft, and, at first, the assembly goes the same way. We need the same double sheet from a notebook.
The principle of operation of a double cracker is the same: we take it by the tip and wave our hand sharply down. I won’t say that the double cracker bangs much louder, but it definitely looks cooler and more technologically advanced. The boy in the video explains everything very clearly and in detail. You won't have any assembly problems.
For assembly you will need: a double notebook sheet.
How to make a super loud cracker out of paper
Unlike Russian developments, foreigners took a different path. In this video - a really simple, but at the same time cool cracker. Her most important trait is that she is loud. It's just super loud.
Even the smallest child can assemble this model, but not everyone can use it. This subtlety is the main catch. If the origami clapperboard familiar to us (including the double one), familiar to every schoolchild, is recharged at once, then in order to put the super loud cracker on alert, you will have to practice. Moreover, bang it, too, will not work right away. It takes a little practice here. But it's worth it.
At first glance, the video may seem complicated: it is long and in English. In fact, the assembly will take you less than a minute. And even a foreign language will not hurt to cope with it. The assembly scheme is extremely elementary. The main thing is to look at the nuances: how to hold a super cracker so that it bangs, and how to recharge it correctly later. Learn - you can definitely surprise your classmates. I guarantee!
How to make a double Chinese super clapperboard out of paper
After watching the previous videos, you might think that it is simply impossible to make an even simpler cracker out of paper, but this is not so. The Chinese have done it! This is probably why this double super cracker got the name "Chinese".
Surprisingly, but the fact is that there is an even simpler assembly scheme that will take you even less time. A sheet of paper needs to be folded only three times and the clapperboard is in your hands. Like everything ingenious, the most important secret of this origami craft is in the correct exercise. We put forward a piece of the sheet from one end, take the other and bang! The sharper the stroke, the louder the sound.
The boy shows the assembly. The video is in English, but there is really nothing to explain. The whole secret is in the right charge. This double super cracker has only one minus - in the process of bang, it is almost completely revealed. Therefore, recharging takes longer than that of Russian models.
For assembly you will need: A4 sheet.
Double Chinese super cracker: option "2"
This video is not a new cracker model, but just a variation on the theme of a double super cracker from China. So to say "version 2". I bring this video only so that you understand - you have a lot of room for experimentation here. A little imagination and you will be able to assemble your own super cracker Dima or Misha out of paper with your own hands.
The video is very clear, despite the English language. Appearance of the assembled crackers for an amateur. But theoretically, the volume of this origami model can be greater than all the previous ones. There is only one question left: how strong and sharp can you wave your hand?
For assembly you will need: A4 sheet.
In this section, we have collected the best videos on how to make various origami firecrackers out of paper with your own hands: single, double, super loud. Detailed instructions and assembly diagrams in Russian and English.
New Year is impossible to imagine without bright colorful fireworks, sparklers and loud colored firecrackers. All this is now presented in stores in a wide range for different tastes and colors.
Some people on the eve of the New Year holidays are afraid to purchase various pyrotechnics. There is a way out: we remember the lessons of the past and create decorations for the holiday at home. Of course, it is not safe to “invent” fireworks, but cutting a firecracker with your own hands will not be difficult, even for those who have never done this before.
This type of activity is best done together with other family members, especially with young children. This is not only a great way to spend time together and decorate your home with original decorations, but also, at least for a while, tear your beloved child away from sitting at the computer.

What New Year's holiday and carnival without New Year's firecrackers. Even in the well-known song, "New Year's toys, candles and crackers ..." are sung. You can make some cute crackers in the form of sweets with your own hands and decorate the festive table with them.

To make these crackers, you can use empty cardboard tubes left over from cling film, foil, or kitchen towels, as well as gift paper, ribbons, and any unused cardboard. Place a small toy or candy in each cracker. In principle, it is possible to prepare a separate surprise for each guest, knowing about his hobbies and preferences. For example, if Uncle Styopa collects car models, buy him one that he does not have. And you can give beads for a doll to your niece Masha.
Without spending a lot of time making these Christmas decorations for your home, you can prepare a very beautiful surprise for your guests.
You will need (for one cracker):
- cardboard tube from cling film, foil or kitchen towels;
- gel pen;
- ruler;
- stationery knife;
- thin wrapping or crepe paper (cut into strips 20x30 cm);
- glue gun (low temperature);
- light cardboard, cut into strips 4x19 cm;
- 2 cable binders;
- scissors;
- 1 or 2 toys or Christmas decorations;
- wish on a piece of paper;
- ribbon;
- Christmas tree tinsel.
Manufacturing process:
At a distance of 9 cm from each edge, mark and draw lines around the cardboard tube. Use a utility knife to cut the tube into three pieces, drawing along the drawn lines. The middle piece should be about 10-12 cm long. This will be the body of the cracker. The remaining two parts (9 cm each) will serve to shape the clapperboard, and then they just need to be removed.


Lay a strip (20 x 30 cm) of wrapping or crepe paper face down. Lay the three pieces of cardboard tube on top in the very center in the same order as you cut them. Drop a drop of glue at the base of the strip of paper, in the center. Carefully wrap the tube in paper so that the central part (body) of the cracker runs exactly in the center of the paper and along the glue. Align the other two parts as well.

Leave some paper unfolded. Apply a strip of glue along this section of paper and wrap it all the way until the paper sticks to the tube.

Carefully remove the two pieces of cardboard tube from the cracker. Then roll a 4x19 cm strip of cardboard into a ball until it is smaller in diameter than the hole in the cracker. Insert the cracker into the hole until it unfolds and its edges are flush with the edges of the cracker. You can fix it with glue.

Gently squeeze the cracker to find the center between the body of the cracker and the end of the cracker. With your thumb and forefinger, gently squeeze the paper in this place until you get such a “neck”.

Tighten the binder cable around this neck. Make sure it is tightened exactly around the edge of the cracker's body. After tightening the binder cable as tight as possible, cut off the excess.

Now you can start filling the cracker with trinkets. Place inside a Christmas decoration, tinsel, a wish, a joke, or whatever you want.

Just as you did with one end, seal the other end of the cracker as well.
Wrap fluffy Christmas tree tinsel (approximately 7-8 cm long) or ribbon around each “neck” of the cracker, gluing the ends with glue from a glue gun. Make sure that the tinsel covers the binder cable well so that it is not visible.

Position your flapper seam side down. If you want to add a decoration, just put a dab of glue on the back of it and attach the crackers wherever you want.

Of course, a traditional cracker should make a loud popping sound when you pull the string (that's why it's a cracker). But for this, you will need to place a special wick inside the cracker before gluing it. And that's a completely different story...

DIY candy popper with confetti
Now it has become easy and simple to make a holiday at home, or prepare for any other holiday.
Confetti is a multi-colored miracle that creates the effect of a holiday, cheerful and good mood. Children can also be involved in making confetti. For them, this process will be fun and exciting. Such crackers can also be used at holidays in kindergartens.
Necessary tools and materials for making crackers:
- Corrugated paper in different colors to create packaging and confetti;
- Toilet paper core to further fill this cylindrical cavity with confetti. Or you can use any other cylindrical object, which can then be easily cut in half. You can also make a cylinder out of cardboard;
- Colored paper for creating confetti;
- Ribbon, braid for tying candy packaging along the edges;
- Scissors;
- Glue if needed. You can do without it;
- Double sided tape;
- Cardboard, or a narrow strip of cardboard.
How to make your own confetti popper:
- First you need to make the confetti itself. To do this, take corrugated or colored paper of different colors. Bend it into several layers. From the bottom, cut into strips 5 cm from the bottom edge up, vertically, see the photo below.
- Next, in the horizontal direction, cut the resulting strips into squares. You can also use a hole puncher to make circle confetti. Or use a patterned hole puncher in the form of flowers, stars, and the like. Or use everything mixed up to create more spectacular confetti.
- Next, we create our confetti shape. We take a sleeve, a core from toilet paper, or a pre-prepared cardboard cylinder. Cut it straight down the center.
- You should get two halves as in the photo below.
- Then we take such a piece of corrugated paper with which it will be possible to wrap the cardboard blank. Then, approximately closer to the center, glue a strip of cardboard and glue double-sided tape in the center of this strip in order to fix the sleeve there later. At the edges of the cardboard strip can be cut immediately.
- Next, wrap the sleeve with corrugated paper. You can glue the edges if necessary. Twist one edge of the future candy.
- Fill the cavity of the future candy with confetti. Everything you have prepared before.
- Tie ribbons along the edges, like on candy. You can add something of your own.
- Your confetti popper is ready. Now, breaking it in half, your confetti will scatter all over the room, street and anything else, creating the effect of a festive mood.
Step-by-step master class (paper clapperboard)
To understand how to make a paper cracker, we need a master class in which the process of creating a cracker is described in stages. So, let's begin. Take any sheet of paper, the main thing is that it be A4 format. Fold it in half diagonally.

Bend all the corners to the center of the sheet, namely, to the fold line.

Fold the sheet in half so that your corners are inside.

You will get a trapezoid, which you need to fold in half, and then unfold to its original state.

We have a fold line, now we need to bend the corners to it so that they touch in the center, but do not overlap each other.

Unfold the corners again, and then fold the workpiece along the line that was the main one when folding. Fold the corners along the fold lines that are already outlined, you should get a triangle. Everything, the cracker is ready. Now show your child how to make sound out of this toy. To do this, take the clapperboard by the sharp end and shake it sharply, your baby will definitely be delighted.

The second option is double
In addition to the usual paper crackers, you can make a double one. It is done almost the same as, and simple.
Take an A4 sheet and fold all the corners towards the center, as in the previous version.

Fold the sheet in half and then in half again. You should have a curve in the middle.


Now you need to put each wing of the figure inside, folding it in half.

We get a hand-made cracker. She claps in the same way as a simple one. Here is the diagram:
In addition, you can also make a triple cracker, at the end of the article you can watch a video on how to make such a toy. And also there will be information on how to make a very loud sound from its explosion.
A simple paper clapperboard (video)
Double (video)
Triple (video)
Very loud (video)
For the holidays (video)
You can make many different models for the game and the holiday, you just have to apply patience and imagination. Yes, and on the World Wide Web you can find a lot of options for creating such toys. Your child will be in the center of attention among peers thanks to the cracker, and you will not be deprived of attention from your friends and acquaintances if you bring cool things made by yourself to the holiday.
Glitter confetti poppers come in a wide variety of shapes, sizes and types. However, they all have one purpose - to burst into a rain of sparkles. These crackers are well suited for concert performances, street and pajama parties. They add to the fun, but leave behind a mess that is hard enough to clean up. Therefore, if you decide to use a glitter cracker in the walls of a building, ask permission from your parents, boss, or landlord beforehand, and never use the cracker with any malicious intent.
Steps
Tearable Glitter Clapperboard
- a cardboard tube cut in half from paper towels or a tube from a roll of toilet paper;
- shiny confetti (multi-colored);
- scissors;
- stapler and staples to it;
- cooking string or thin cord;
- scotch;
- beads;
- ribbons for serpentine;
- cardboard;
- tissue.
-
Craft a firecracker launcher door. Glitter crackers explode when someone pulls sharply on a string tied to the launcher door. Cut out a square of tissue paper that is large enough to cover the bottom of the cardboard tube (approximately 7.5cm on a side). Trace the round end of the tube onto a sheet of cardboard and cut out the resulting circle. Using hot glue, glue this circle to the center of the wrapping paper square. Wait a few seconds for the glue to dry. Take a pair of scissors or a needle and poke a hole in the center of the circle to insert a piece of string or kitchen string the length of your arm.
Attach the door to the cardboard tube. Before gluing the paper and cardboard of the door to the tube, tie a bead to the end of the cord. Make sure the bead is on the inside of the door. Using hot glue, glue the edges of the door wrapping paper to the sides of the end of the tube. At this point, your cracker will look like a tube with one end sealed, with a "tail" sticking out of it.
Decorate the tube and fill it with glittery confetti. Use your creativity to decorate the cracker. It can be wrapped with colored paper or metal foil, ribbons or serpentine can be glued on it. Before plugging the back end of the cracker, take a funnel or measuring cup and use it to fill the tube ½ or ¾ full of glitter.
Decorate the cracker with a cone-shaped tip. Use the cone tip to turn the cracker into a rocket. Draw a circle on the cardboard with a diameter of 8.3 mm. Cut out the circle with scissors and make an incision on it from the edge to the center. Pull the edges of the notch so that they overlap each other by about 1.3 cm and form a cone from the circle. Secure the cone with a stapler.
Open the cracker. Pull sharply on the cord attached to the starter door. The door will come off and glitter will rain down on the unsuspecting party guests.
Turn your hanging popper into a candy popper. Modify the design of the trap slightly so that it can be used as a souvenir for guests, and not just hung. The candy cracker explodes with sparkles not when the string is pulled, but when the ends of the cracker are sharply torn in opposite directions. Wrap the cardboard tube with thin wrapping paper. The sheet of wrapping paper should be large enough so that it extends ten centimeters beyond the edges of the tube at both ends. Next, glue the body of the cracker itself (over the wrapping paper) with cardboard, thick paper or metal foil. Then twist one protruding end of the wrapping paper at the cracker and tie it with a ribbon. Take a funnel and fill the cracker with glittery confetti. Finally, twist and tie the other end of the cracker with ribbon.
- To blow up the trap, you need to firmly grasp its ends and pull them to the sides. Instruct guests to rip open the cracker as quickly as possible so that the contents are scattered and not just spilled out.
Clapperboard
-
Gather all the necessary materials. The clapper stick is easy to make and perfect for spice up a birthday or New Year's party. You will need the following:
- paper tubes (multi-colored);
- scissors;
- scotch;
- paper;
- bowl (optional)
- glue gun and matching sticks with glue.
-
Cut paper tubes in half. First, bend the tubes in half, and then cut them along the fold. You will fill these tubes with sparkles. If you cut the tubes in half, you will get twice as many crackers. Flappers made from short straws are easier to handle and open than crackers made from whole straws.
Seal the tube on one side. You need to seal the tube at one end, and temporarily leave the opposite end open. Use a few drops of hot glue to seal the tube. Now it will be easier for you to fill the tube with sparkles. Just let the glue dry first.
Pour glitter into the tube. Take the straw vertically in your hand and hold it over the bowl with the open end up. Roll up a funnel from a sheet of paper. Insert the prepared funnel into the tube to fill it with glitter. When the straw is full, pour the spilled glitter back into the container you bought it in. Remove excess glitter from the top edge of the tube. Seal the end with hot glue and let it dry.
Explode the cracker. Pull on both ends of the tube to break it. The result should be a small explosion of sparkles. Shake both halves of the straw to shake out any remaining glitter.
- During the party, hand out these firecrackers to all the guests and set a countdown for everyone to blow them up at the same time.
Peanut shell cracker
-
Gather all the necessary materials. Empty peanut shells make great impromptu crackers. They are light, compact and well complement small packages with surprises. You will need the following:
- a pack of in-shell peanuts;
- scissors;
- small sequins (multi-colored);
- glue gun and matching sticks with glue;
- acrylic paints (optional)
- brushes (optional)
-
Open the peanut shell. Using scissors, carefully cut open the peanut shells. Place the nut lengthwise between the blades of the scissors and squeeze gently. When the shell cracks, use your fingers to separate it into two halves and remove the peanuts. Repeat the process until you have enough pieces for "peanut crackers". Make sure that all the shells are laid out in pairs.
- Dispose of any cracked shells in the trash.
-
Fill the shell with glitter. Place two paired shell halves in front of you and fill one of them with glitter. Repeat the process with all remaining shells.
Glue the shell. Apply hot glue to the edges of the half shell filled with glitter. Attach the edges of the second empty half evenly to the first half and press down. Let the glue dry.
- When the shell sticks together, it can be painted with acrylic paint. You can even pour the paint into a plastic bowl or cup and add small sparkles there. Then your ordinary-looking peanut will turn into a bright shiny cracker.
-
Explode the cracker. Give a peanut cracker to a friend. Ask him to grab both ends of the shell and break it sharply. The clapperboard will explode with a cloud of sparkles.
Homemade crackers with glittery confetti are similar to the factory-made crackers that people often buy for New Year's holidays, weddings, birthdays, and other special occasions. Flapper crackers first appeared in Britain in the 1840s as gifts given to party guests. If you're getting ready for the holiday, you can save some money and prepare homemade glitter crackers for it. For this you will need the following: