Master class: do-it-yourself Indian costume for a boy. How to create an Indian carnival costume


Hello everybody! I am writing here for the first time. I don’t want such work to sink into oblivion! Let everyone see =) Immediately I apologize for my "bourgeois", tk. I don’t know the names of some things, I can write it not very correctly. And for the drawings - I did not try very hard and so much time was spent on the MK ...
And I will immediately make a reservation that I am a slingomama and we also went together at the parade. Therefore, everything I did, I took into account, so that it would come up to the possibility of tying the child.
So. In view of the upcoming parade on Children's Day in our city, it is annually celebrated with a gorgeous carnival. This year his theme is "Children of the World", that is. you need to dress up in one of the costumes of the peoples. They chose the Indians. At first I was even somehow upset, because I don't really know what it is possible to "excel", but for some reason I really wanted ... In general, after digging around on the Internet, I came across shamans and warriors. There were no women among them, but there were beautiful hats. So beautiful that no woman will pass by: D Like this:

It was decided to make this headdress or the Varbonnet. Then I will write my throwing, suddenly someone will suit them and the MK itself will not be needed;)
I thought: what will I do, I'll go buy it. Here's what they offer:


These are from 150 to 500 rubles ... Well, somehow it didn't impress me, it doesn't look like the original at all, and as a woman I want to pass by this ... or even run: D In general - by. I went further, found this one, for example:

That's what you need! Beauty, I just want to try it on! The price is almost 3000 rubles, and it's still cheap! Epic power! Well this is to wear for one time! O_o
Taak, I think ... Then surely someone has already done this, I'll go look for this miracle MK, this is what I found:
 the video itself how to do it (I advise everyone to watch it, I guarantee a good mood! Besides, it is short) https://www.youtube.com/watch?v=0YDWj-h7FbE
Then I found this: It already looks better, but there are more problems. Well, and not very cheap in my opinion ...
 link to the video: https://www.youtube.com/watch?v=klM4ROFzfOA
then I found out how this is done in real life:

And here you can see about it in great detail: https://www.youtube.com/watch?v=GtB6UGxC_hI&list=PLbhbwVVzxrCCmoRKsEXjgIQE0QqiTwhIH&index=1
Well, in general, after this picture it dawned on me! Why, it's not that difficult! And I am also the mother of two preschool children, with whom you are not shopping, so I looked around and decided to do everything myself using available means.
So, let's begin.
The first step is to sew a hat. You can take some ready-made, but I felt sorry for the finished one, so I sewed a new one. This is not difficult. Just take a long strip with a width of 18-20 cm (it is better to take more, you can always cut off the excess) and as long as the coverage of your head. Sew it into a cylinder, and, having gathered one end, sew, like this:

Just keep in mind that the hat should not be from anything, but from the fabric that you will have in the end. It is better that it be either black (then a different color will have to be sewn on the front, if your main one is different, like mine is red) to match the hair color, or a different color to match the color of the headdress itself. I have it - red. I sewed from just about anything, so I had to sew on a different fabric on both the front and back ...
Now put the hat aside, let's get down to the fun part! We will make feathers. Feathers are needed: 30 for the front and 15 for the back and another + 2 separately for the back of the head + 4 for the temples (I made them smaller by simply cutting more. For the front, you can have fewer feathers, 25 pieces, because I got it very tight =) But I will describe what I did myself, so count on another number yourself;) So, what we need:

1. Paper with printed or painted "feathers". If we arrange, like mine, 3 pieces on a sheet, then we get 17 double-sided pages
2. Lined paper for 6 sectors - this is for the "legs" of the pens - 9 pages
3. Cocktail tubes without an accordion are for the barrel of the feather. Can be replaced with a paper roll, but the tubes are easier to attach.
4. A roll of very delicate toilet paper (yes, this hat should not be rinsed in water;)). I have a pharynx. Better two-layer.
5. Stapler and paper clips. We will use it a lot - this is the main fastening material :)
6. Glue stick (other glue is also possible, but this is easier). It is only needed for gluing the tubes for the legs of the pen.
7. The felt-tip pen of the desired color. I have it red.
8. Any cylindrical thing, I have a regular children's wax crayon. This is the basis on which we will wind the tubes. Do not take a thin pencil, it will not look very good.
9. Scissors
10. Ruler. You can have a short one, but which is not very sorry, tk. it will smear for a long time =)
Further optional materials (what I added to make it brighter):
11. 2 rolls of thread of the desired color (I have red) and an album or a book the size of a landscape sheet. This is for "hanging" on the tips of the feathers
12.2 sheets of printed "marigold" for feather end caps
13. Tiny stones for decorating these ends (I wanted more celebration and sparkle) - 32 pcs. They are still such infections, they cost 2.5 rubles each! O_o this is the most expensive thing in my roach: D
Begin.
First, cut out all the feathers:

Here are the patterns available for printing (for a black-and-white printer, otherwise I somehow crookedly translated black into blue ..., but if you have a color printer and you don’t feel sorry for it, you can make chic colored pens in general! ):
Sorry for the radical, I don't know how to insert a full-size photo anymore ...
Then we attach the tubes for the cocktail (we attach them in 2 places! In the middle, as shown here and at the bottom at the base! I didn't do that at first, as a result, some feathers "fell out" from the plumage :()

Now we are going to work on the tubes for the base. In the original, it is a piece of suede or a similar fabric that is wrapped around the barrel of a feather, and wound with thread on top. We will replace this painstaking process with a simple piece of paper with a picture))
We take a lined sheet, which can be downloaded from here (well, you can lining yourself, there is nothing complicated here, the main thing is to divide everything equally):


We take a cylindrical object (preferably of the same diameter - about a centimeter), twist it tightly around it (it’s not worth it to do it in one layer, saving, due to several turns of paper, this thing takes on a rigid shape). We coat the tip with glue, press, take out the pencil (cylindrical object)


We tear off 2 pieces from toilet paper (you can immediately divide it into all feathers, you get 51 double pieces) and cut off one side, making it shorter than the other:


Cut into noodles


And then we connect them again:


Then we bend the tip of the pen barrel and fix it with a stapler.


All this in detail on the video:
Then we sew all the feathers to the hat!
In front, the feathers should be fastened with an indent on the braid, which is 5 centimeters wide. I fastened it even higher - 15 centimeters from the edge. As a result, the upper part had to be decorated with additional beads. looked empty. But on the other hand - on the other hand, the feathers lie so well on the head and do not bristle =) I think it's worth retreating 10 centimeters. At the back, do almost along the edge (but leave about 2 cm so that you can catch on to something, so that it is convenient to wear).
Something like this (where the contour is sewn):

But the sewing process itself (though not from the beginning, but I think the principle is clear):
Now we need to connect the feathers into a single frame, we do it with a stapler. At what distance, it is better to determine by eye (keep in mind that if the feathers are fanned up, you need to fasten some of them closer to the trunk, making them denser), I did in the middle of the feather:
Further decoration is optional. If only because not all Varbonnets do it. And you can understand why - these pendants are historically scalp hair, so to speak, a trophy, huh. But I try not to think about it, I like that it makes my hat a little brighter, otherwise it looks kind of faded ... We need 47 pieces of visulek.
To create these hangers, you need to wrap the thread around the book / album 10 times. The length of the pendant will be whichever album you choose. At the end we cut one edge, the other we tie into a knot to form a bundle. All of this is attached to the tip of the pen on the stapler. At the end, we glue the cut oval in the shape of an egg from both sides right on top (you need 90 of them to glue it on both sides). I glued on the same glue stick. These are the forms (where there are gaps, you need to bend and cut 2 pieces at once), also available for printing:
And here is a rough diagram of how to do it:

And at the end, I glued a pebble-strass on this egg-shaped oval on the wide part.
Then we attach the braid with a geometric pattern purchased in the store (5 cm wide), or make it yourself - best of all from beads. But I didn't have so much of it, and in the store it costs something dear ... (100 rubles per pack, but I needed 7 flowers! Small packs are really cheaper, but still expensive), I did not find a ready-made braid , so I decided to embroider from floss (which I just lay idle). I did this: I fixed thin tubes from a cocktail (if you don’t have them, can’t they be found in stores - I didn’t find it, so it’s better to replace it with something else, for example, a wire in such a tube is not thick, 2 mm somewhere) along edges, then divided the drawing into cells and embroidered. I must say it was a very long time, I did it for almost a week ... It took me even less for the whole roach, together with the development and rejected materials ... Therefore, still try to find a ready-made braid in the store =) Its size is 25x5 cm, That circle that on the sides - 6.5 cm in diameter. It is certainly difficult to buy it. Therefore, you can leave it without a drawing at all (very often they do it - just a white circle), or draw this drawing with a felt-tip pen or something else.
Here's how it came out of the floss (I then pulled out the tubes):

We sew it with threads to the cap, we sew the Round on the ends of the braid so that the circle is slightly lower and touches the edge of the cap:

Below the braid, where we left 2 cm, we sew a crosswise strip of thick white thread (you can also have a different color, but more often it is done in white):

Well, almost everything is ready! 2 feathers are sewn to the very top of the cap (where its top is pulled together), and 2 feathers are sewn onto the temples, right in the center of the round. It is good if the feathers are of different sizes and are on some kind of wooden beads. Or you can sew a large, long piece of fur there. All this does not suit me, tk. I will have a child tied in front of me, who will tear it all off :(
Somehow like this. Here's my finished roach in all its glory:


Now, briefly about the costume itself. It's pretty straightforward. Consists of a cape-poncho in the shape of a square 120x120 cm with cut noodles at the edge and a hole in the middle. Since I also need the child to fit in there, I make an oval slightly offset to one side. Where the child is, there is a wider slit, where my neck is narrower. Cut the noodles as shown in the picture. Then it turns out to be long and beautiful in front and behind =) I took the fabric on canvas. It hardly crumbles and has a beautiful natural color.

For the "skirt" you need 2 rectangles of size 55x45 cm (final size without hem), although the sizes here are rather arbitrary, a lot depends on the height and the clothes that will be under the skirt. We cut one of the edges at 45 degrees (I just bent the corner and cut it along the fold), cut into 15 cm noodles. We bend and stitch the other side, leaving room for threading the elastic. We put in an elastic band, connecting both halves. Everything is ready =)

I also thought that my chest was very open and boring, so I added a small bib made of a diamond with a hole.
Next, you need to sew on a beautiful braid, which you can buy at the store. In the store, I did not find a beautiful suitable braid - there were only Greek ones, or in a flower. Neither one suits me, so I decided to make it myself. To do this, I just bought the cheapest red braid, 2.5 cm wide and "embroidered" a pattern on it. I already have a long experience of embroidery, so I decided to come up with a quick way. First, I sewed the braid where I needed, and then I took 2 threads - black and white, and went through the entire length with a simple zig-zag. In my opinion, it turned out very much!
So, the parade took place !! Everything was great! But due to the fact that they promised rain, I insured myself and added a tomahawk umbrella and teddy bears over rubber boots)) And here's the result !!


And here my beauty finally woke up and showed her hat made of threads and a body cap, tk. in view of her age, her hair has not yet grown back =)! 
This is the easiest costume to make. It can be made even without a sewing machine by simply sewing on or even gluing the necessary parts. This costume consists of pants or shorts, a T-shirt, a cape and a headgear.
To make DIY Indian costume will have to sacrifice one of the T-shirts and pants or shorts.
It is better to choose a T-shirt in sand, yellow or another warm color. On the sleeves and on the bottom of the T-shirt, cut off the edge seams, and cut the edges with a fringe 3-4 cm long on the side seams of the T-shirt, you can also sew a fringe.
Pants or shorts for DIY Indian costume it is better to choose also beige or brown. A long fringe and braid are sewn onto the side seams.
Sew a round or square cape of linen or other material with a similar texture around your neck, cut out a square. It is located diagonally so that two corners of the square fall on the front and back of the future Indian, and the other two cover the shoulders. A hole for the head is cut in the center of the square. The cape is trimmed with fringes and decorated with feathers, braid, beads and beads.


And of course, costume for indian do it yourself cannot be considered complete without a feather headdress! Prepare a wide elastic band (so that the bandage does not slip off your head) and sew feathers over it with an overlap of one another. On top, wash the patterned braid, brushes, beads…. It is better to fasten the hat on the head with the help of ties, because the Velcro gets tangled and pulls the baby's hair. If you don't have feathers, don't be discouraged, just cut a wide feather from tissue paper in the center, glue a piece of straw or thin wire and slice thinly to simulate fluff. The leader's feather hat can be made using the following video:
As for shoes, beige or brown moccasins should be preferred.
Complete the Indian costume with your own hands with accessories: baubles and leather bracelets, a bow with arrows or a tomahawk. And of course war paint to intimidate the pale-faced!

You May Like:
- TURN A BORING T-SHIRT INTO AN EXCLUSIVE OPTION ...
- SHE DIDN'T WANT TO PARTY WITH HER OLD FUR COAT, AND ...
- IDEA FOR KNITTING LOVERS. JACKET SPOKES IN TECHNOLOGY ...
- BOHO STYLE: PATTERNS FOR DRESSES, SKIRTS, SWEATS, ...
How to make an Indian headdress with your own hands, I'll tell you today. In addition, New Year's parties are on the way. The Indian costume is very popular with the kids. But what is an Indian without a headdress?
DIY paper Indian roach
For work, please prepare:
- colored paper,
- glue,
- scissors.
Colored paper should be heavy. It is better to take not a traditional set, but paper dyed in the mass - several sheets of the same color.

1. Fold a sheet of paper in the shape of an accordion.

2. Having assembled the accordion, cut out a workpiece that looks like a half of a feather. Leave a small straight part at the bottom - it will form a strip on which the feathers will hold.

3. From the top and somewhere to half of the feather, make cuts. They should not be too long, otherwise the feathers will not firmly adhere to the head.

4. Unfold the feathers. As you can see, they are located far from each other.

5. Move the pen slightly, smear the bends of the workpiece with glue (well, if you have a glue stick), press it tightly.

6. If the resulting workpiece does not cover the front of the head, glue the same to it, try it on.
Glue a couple more multi-colored blanks on top.
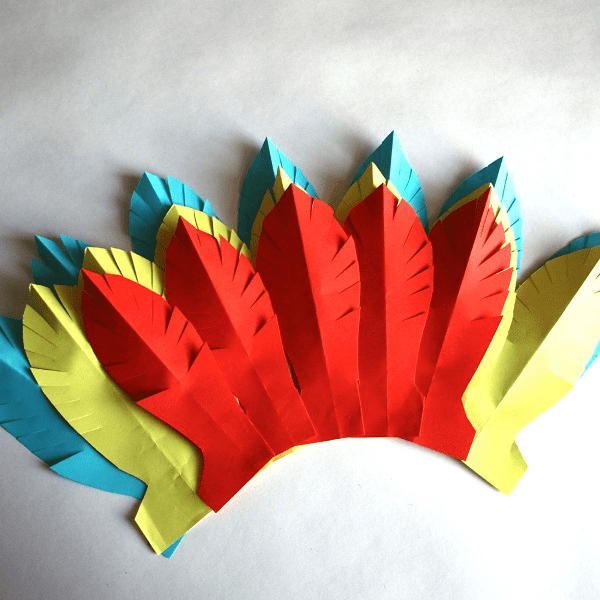
7. Now you need to hide the attachment points of the feathers. To do this, cut out a colored paper strip, glue the bottom of the feathers. Decorate with colorful circles.

8. For making strings you will need a hat elastic.

Well! The Indian roach is ready. Complementing the image with a stylish vest or poncho, you can safely go to the New Year's carnival.
And this is how it might look Indian headdress made of feathers or felt for the little ones.

We make the headdress of the leader of the Indians
The most important of the Indians is, of course, the leader. Let's make him a luxurious headdress.
You will need:
- multi-colored corrugated cardboard,
- exact collet knife,
- wood glue in a tube,
- underlay for cutting,
- scissors with curly blades,
- colored thick thread,
- glasses with a diameter of 4 and 6 cm,
- flat elastic band,
- multicolored wooden beads (8 pcs.).
1. Print the template. Cut out parts from corrugated paper using a collet knife:
One red feather A,
Two orange feathers B,
Two golden yellow feathers C,
Two lemon yellow feathers D,
One blue feather D,
Two green feathers E,
Two lemon yellow feathers F,
Two blue feathers G,
Two green feathers H.
And also cut out the blue bandage using curly scissors.
A feather for pendants is marked in red on the model.

2. We glue the first row.
Glue the largest feather in the center of the bandage, 2 cm back from the bottom edge. Laying feathers on top of each other, glue them to the bandage in descending order. Remember to leave 2 cm at the bottom of the bandage.

3. We glue the second row.
We glue the rest of the feathers by analogy with the first row. From the largest in the center to the smallest at the edges.
4. We collect the roach.
Using curly scissors, cut out the red bandage so that the stripes are vertical.
Now cut out a 6cm diameter golden yellow circle and glue it 11cm from the center of the bandage. (On the other side, glue the same circle). Using thick thread and a gypsy needle, sew the circles to the red band with a cross.

5. Sew the red bandage to the blue cross stitch, making four holes with a needle every 2 cm of the bandage for stitching. Start making crosses from the center so that the embroidery is even.

6. Attach a small flat elastic to each end of the roach to keep the headgear on your head.
7. Make pendants out of wooden beads and feathers marked in red on the model. Sew a circle to the yellow. Cut out a red circle with a diameter of 4 cm, and puncture four holes in it in the middle, sew it to the yellow cross.

Oh, what a beauty!
How to make feathers for an Indian headdress
If you are uncomfortable wearing the whole "crown" of an Indian, make a couple of bright feathers and enjoy the active game!
You will need:
- linen fabric,
- fabric paints,
- gluey spider web,
- iron,
- brushes, pencil,
- scissors.
1. Fold a strip of linen fabric in half, put a glue web inside. Iron the workpiece.
2. Now draw the contours of the feather, lightly paint over the middle of the feather with white paint.
3. Use a flat brush to make stripes: blue and black.

4. Use a thin brush with black paint to trace the outline of the pen and draw details in the middle.
5. Cut the feather along the outline. Make cuts to make it look more natural.
6. Sew the feather to the embroidered ribbon. That's it - the Indian's headdress is ready.


Some hats were intended solely for beauty, while others, such as the battle headgear, had to be made and worn only in special circumstances. If you decide to create an Indian headdress, first of all, study the culture of the people whose headdress you want to reproduce. Note that if you are in America, you should not dress up as an Indian when attending any costume parties or celebrations, as doing so could inadvertently offend the feelings of the native Indians.
Steps
Feather headband
- When you fold the strip into a circle, its ends should overlap each other by about 2.5 cm.
- If regular liquid stationery glue will not adhere well to construction paper, use a glue stick or hot glue gun.
- If you have real or fake headband feathers, you can attach them at this point. Apply a few drops of glue to the inside of the headband and glue the feathers in a stand. If you have a lot of feathers, distribute them so that they fan out.
-
Find pen making paper. If you don't have real or fake feathers, you can make your own using construction paper. To do this, you need to cut out elongated ovals and cut a fringe along their edges. You can use any color of paper and any number of pens. For example, you can make the feathers red, yellow, and orange, or use paper that is the same color as the pattern on the brown headband.
Cut ovals out of paper to make feathers. Draw a narrow, elongated oval on the first sheet of engineering paper; it should be at least 15 cm long and 2.5 cm wide. Cut out the oval. Prepare a few more feathers in the same way.
Fold the ovals lengthwise and cut a fringe around the edge. Fold one oval in half lengthwise and make a series of cuts along the curved edge. The cuts should not intersect and reach the fold. Moreover, they should cover the entire curved edge from top to bottom.
- The lobe fold on oval paper mimics the presence of a central core in it. Don't worry about keeping the fold perfectly symmetrical, as even real feathers don't always have complete symmetry.
- Expand the fold of the feather. Repeat the entire process with other colored construction paper nibs.
-
Glue paper feathers to the headband. Glue the paper nibs on the inside of the headband and let the glue dry. The feathers should be facing up and fan out from one point. One central feather can stand strictly straight, but the rest should turn out to be tilted.
Put on the headband. When putting on the headband, position the feathers so that they are slightly behind the ear. Complement this outfit with a study of the history of the Indian tribe whose patterns you used to create the headband.
Paper and Feather Combat Headgear
-
Gather the required materials. You will need scissors, a tape measure, a hole punch, a binder, stationery glue, or a hot glue gun. You will also need corrugated cardboard, crepe paper, faux feathers, or DIY feather paper.
Cut a strip of corrugated cardboard. It should be about 4 cm wide and 5 cm longer than the circumference of the head of the person for whom the Indian headdress is intended.
- Corrugated board, also called fibreboard or boxboard, has an inner corrugated layer that allows the ridges or holes of that layer to be visible in the cut. Moreover, this cardboard is slightly lighter and thicker than conventional cardboard.
- To make a hat, take corrugated cardboard that is not too thick so that it is easier to wrap the strip of it around the head.
- Here you will be given instructions on how to make a Combat Headgear with Erect Feathers.
-
Stick the feathers into the holes in the corrugated cardboard. Apply a small amount of glue to each hole in the cardboard strip where the pen will be inserted. Insert artificial feather shafts into the greased holes and let the glue dry.
- For a better adhesion of the feathers, you can insert them into a flat strip of cardboard rather than a vertical one.
- You can use stationery or hot glue to glue the feathers.
-
Place the ends of the cardboard strip on top of each other and hold together. Fold the strip into a ring so that its ends overlap each other by 5 cm. Take a hole punch, punch holes at the ends of the strip and fasten them with a binder.
- Remember to bend the ends of the binder to hold it in place.
- For extra reliability, you can pierce paired binder holes in two places (top and bottom) and fasten them with two binder holes.
-
Decorate the outside of the headdress. You can cover it with fabric, red crepe paper, or decorate with beads. When using crepe paper, you should prepare a strip 5 cm wide and 30 cm longer than the circumference of the headdress itself.
- Cover the outside of the cardboard ring with crepe paper. In this case, the paper from the top and bottom edges should protrude about 5 mm beyond the edges of the cardboard, and you should also have two equally long (15 cm each) free hanging ends of the paper strip.
-
Cut the fringe around the edges of the crepe paper. If you used crepe paper to decorate your headdress, fringe it. Take a pair of scissors and make cuts along the entire perimeter of the protruding top and bottom edges of the paper strip.
- This procedure completes the process of making a combat Indian headdress. When you put it on, all the feathers on it will be straight.
-
Craft a different type of combat headgear. Native American war hats were not the same, for more ideas on how to make them, check out the look of the various Feathered Ribbon Hats, Sioux Hats, and Upright Headdresses. About a dozen Indian tribes from the Great Plains made combat headdresses, in which each feather reflected the military merits and exploits of the Indians who wore them. Among the most famous of these tribes are the Sioux, Crow, Blackfeet, Cheyenne, and Plains Cree.
- The combat Indian headdress was a sacred symbol reflecting the great merits of its wearer. Not all representatives of the tribe had the right to wear such a headdress. Nowadays, modern American Indians can earn the right to wear such a headdress for actively advocating for the interests of the Indians, as well as for obtaining an advanced degree.
- That is why in America you can offend the Indians if you just dress up in a battle headdress.
Beaded headdress
-
Get everything you need. You will need beads, sturdy beading threads, and a beading needle of the correct size. You will also need a bead loom. If you already have a bead loom and a set of materials for working with it, choose a larger bead for yourself, as well as one large, crooked wooden bead to finish your work. If you are starting from scratch, get yourself a few bags of beads in the colors you want to use. All beads should be the same size, however you can use larger beads to complete the ends of your work.
- Make a bead loom yourself. You can make your own bead loom by attaching a pair of flat combs to a sturdy box or lid. Take two identical flat combs, or break one comb into two pieces. Glue the combs with tape or glue on two parallel sides of the box so that the teeth hang in the air.
- Purchase special thread for making beads. Slightly elastic thread allows you to create a more comfortable headgear to wear.
-
Come up with a beaded headdress design. Similar headdresses were used by many Indian tribes, including the Cheyenne, Sioux, Crow, Juice, Fox, Winnebago, Kickapu, Cree, and Arapaho. Look online or in books about Indians for traditional tribal beadwork patterns. Also you can come up with your own design. Draw the design on checkered paper, coloring the boxes in the corresponding colors of the beads you will be using.
Thread the bead loom. Tie the thread to the leftmost tooth of the machine (comb), pull it to the other side of the machine and cut it off, leaving a tail 5-8 cm long protruding. Tie this tail to the leftmost tooth of the machine of this side. Repeat this process until you have enough thread to complete your design.
-
Cast on a long string of beads. Position the design vertically to match the position of the loom and start counting the beads from the top row. Count the beads for the first five rows and string them in the order you counted them. The first row is counted from left to right, the second - from right to left, then again from left to right, and so on.
- It is in this order that you will weave a thread with strung beads with threads of the weaving base stretched on the machine (first from left to right, then from right to left, and so on).
-
Weave your headpiece with beads. Secure the needle at one end of the beaded thread and start braiding the warp threads from the front and back. Go around the first thread of the warp in front, the second in the back, then again in front and again in the back. This way weave the first row of the pattern at the top of the loom, working from left to right. This row will end on the right, so you will start to weave the second row from here, and the third will start again on the left. After completing the first five rows, pause to make sure the pattern is correct.
- If this is the case, put beads of the next five rows of the pattern on the thread and continue weaving.
- If an error occurs, release the wrong rows and re-fit the beads in the correct order.
-
Finish by tying the threads. With a tape measure, measure the head circumference of the person for whom the hat is intended. Weave the product to the desired length, or a couple of centimeters shorter if the ends of the headdress are tied on a large bead. Cut the garment off the loom and tie the loosely hanging warp threads together so that the weave does not fall apart. Then you can tie a large bead to one end of the weave, and with longer threads on the other end, sew a loop on the bead and also tie.
- Cut off the excess ends of the threads.
- If you don't want to use a large bead to tie the ends of the headgear, you can simply knot the warp threads at each end, and tie the threads of both ends together to put on the headgear.
- If you want the headgear to have the exact size over the head, then tie the ends of the headgear tightly right over the head of the wearer.
-
You will need scissors, a measuring tape, a ruler, brown engineering paper, wax crayons or paints, stationery glue or glue gun and nibs (as much as you want to use), or other colors of design paper. If you make paper pens, then for blanks of feathers from a sheet of design paper, you will have to cut transverse strips about 2.5 cm wide.You can purchase design paper of various colors and make 1-2 nibs from paper of each available color.
Cut a strip of brown engineering paper. The width of the strip should be about 4 cm. The strip should be long enough to wrap around the head with a slight overlap.
Decorate the prepared strip of paper. Take markers, crayons, crayons, crayons, paints, and paint on the paper strip with Wampanoa, Lenape, or Abenaki-style designs. Examples of patterns can be found on the Internet or in books about the life of forest Indian tribes.
Glue the ends of the strip together. Apply a drop of glue to one end of the strip from the front. Roll the strip into a circle and press the ends together so that they stick together. Let the glue dry.
From time immemorial, representatives of an amazingly strong, hardy and mysterious people lived on the territory of modern America. These people believed that all life on earth is endowed with a soul. They say they knew how to talk with animals and plants. And the souls of their ancestors always remained with them in the breeze, in the flickering of sunlight and the quiet rustle of trees. These people hunted not for profit, but for food, respectfully protecting their land and the gifts it gave them. And for communication, they used sign language and all kinds of signals more often than voice. Now this people is called the general term "Indians", but in the old days there were several hundred separate tribes. In North America alone, there were about 400 of them. They differed from each other in traditions, culture, way of life. Some of them were hunters, some were brave warriors, and some were raising livestock and farming. The clothes of the American Indians were also different.
Some Indian tribes
Indians - this is a common name And all because when Christopher Columbus discovered these places, he mistakenly considered them the lands of India. Ottawa and Ojibwe lived in the northern part. Closer to the East - the Iroquois and Mohicans. The southeast was inhabited by the Cherokee and Seminole, Central America by the Maya and Aztec peoples. The Incas hunted in South America, and the Apaches and Navajo hunted in the deserts of the Southwest.
Indian Warrior Clothes
The clothes of the Indians (photos are presented in the article) were different depending on the situation and weather conditions. On ordinary days, going on a hunt, they dressed simply and comfortably. But for rituals, in solemn moments or during the period of courting girls, the Indians dressed up richly and colorfully. consisted of either leggings and moccasins. Usually men preferred to walk with a naked torso. These people did not attach much importance to the wardrobe, as is customary among the Europeans. Going out to hunt, men pulled on leggings on their ankles, reminiscent of modern leggings. The Prairie Indians wore white shirts adorned with the scalps of their enemies. In cold weather, a buffalo-skin cloak was thrown over the shoulders, fur to the body. Gradually, the Indians began to prefer sheep wool capes. The clothing of the Northern Indians was supplemented with mittens and a shirt made of deer and antelope skin. They also wore blanket-like cloaks made of cotton. When hunting, some tribes wore wide leather belts or sleeveless jackets to protect them from injury. Only in the 19th century, imitating rich Europeans, the Indians began to use velvet, chintz, silk, satin ribbons for sewing outfits. Quechua loved to wear a poncho - a cloak made of two pieces of rectangular cloth with a hole for the head in the middle, sewn from sheep's wool. In the warm season, the cloak was folded in half and worn in the form of a scarf.

What did women wear
The clothing of the female Indians was less conspicuous and simpler. Residents of the southern regions wore only skirts, while others wore a shyness belt tied at the waist with lacing. In the center of America, women covered their private parts with pieces of fur, later replacing them with cotton fabric. In cold weather, women wore a sheep wool shawl. On the back, it could be tucked up and put into the resulting space any burden or even a child. Prairie women wore long, straight shirts made of suede. But they were all skilled weavers. On improvised machines, they made shirts, dresses, raincoats, ponchos and bedspreads. Women embroidered with beads and threads, sewed on fringe and braid, made the body and face of girls were often painted with tattoos. The noble representatives of the tribe had their faces and hands covered with elaborate patterns; women from the common class applied only a few lines to the skin. In some tribes, drawings on the face indicated a low position in society, and on the hands, on the contrary, about a high status.

Indian Child Clothes
Children under 5-6 years old went completely naked. It was believed that they were worthy of wearing adult outfits only when they learned the rules of behavior and learned the necessary skills. It was in childhood that they began to outline the body with the first patterns. Old and respected women did this with the help of fish bones or cactus spines.
Hats
The Indians did not cut their hair. Therefore, even men had gorgeous hair, intercepted from behind with a wide ribbon, headband or belt. In some tribes, to intimidate the enemy, their heads were shaved, leaving a comb or a thin pigtail. Or they smeared their hair with grease, giving it unthinkable shapes. The national dress of the Indians was rather an adornment, an opportunity to show off, than a necessity. On the head they wore feathers, variously colored and trimmed, on the body - an otter, fox or other animal. The number of feathers and the type of fur were determined by military rank or special services to the tribe. For example, the skin of a panther could only be worn by the most outstanding warrior. On weekdays, the Indians wore hats made of bark or straw, which protected them from the hot sun. Plains tribes built a crown of feathers. The southern population used hair nets, and a red thread with shells and beads strung on it was attached to the forehead.

Shoes
On their feet, the Indians wore soft moccasins. It was a piece of leather tied at the top with a cord that was pulled into holes along the edges. Such shoes allowed them to silently approach the prey or the enemy. But at the same time, she protected from numerous poisonous snakes and insects. Going on a hunt, a man took several pairs of moccasins with him in reserve. There were shoes with soft or stiffer soles, high and low. The Prairie Indians richly decorated moccasins with porcupine quills.

Decorations
The style of the Indians in clothing was distinguished by peculiar ethnic ornaments. Drawings, embroidery were applied to leather goods, fringes, beads, shells were attached. Feathers were a special attribute. Both men and women loved bracelets not only for hands, but also for legs, earrings. Necklaces were made from feathers, fruit seeds, deer hooves, shells, grizzly claws, shells, and animal teeth. Later, they began to make jewelry from copper, silver and brass. The more massive they were, the higher the position in society a person occupied. The Indians were very fond of putting tattoos on the body, especially for the peoples of the South. But men mostly used war paint, which was washed off to look intimidating in the hunt and war.
The clothes of the Indians did not at all indicate their belonging to a particular tribe. Often, after winning a battle, many of them took trophies for themselves and wore them with pride. Women adorned shirts obtained in battle by men with beaded embroidery and ocher. And it was already impossible to guess which tribe's representative the outfit belonged to. In addition, warriors could wear the hats of slain rivals to confuse the enemy.

Accessories
The clothing of the Indians was not as important as other items that complement the outfit. Men always had a tomahawk - a small hatchet, which was a symbol of the honor and valor of a warrior. Its handle was made of antler or wood, and the blade was flint or metal. The tomahawk was intended for close combat, it was decorated with a suede fringe and protected.
It is still considered a sacred subject for the few descendants of the Indians. It was originally a symbol of fertility. It was lit in a circle, in turn, to make it rain. The smoke symbolized the clouds. Later, the pipe was smoked with Europeans to seal peace agreements. Eagle feathers were the decoration of the pipe of peace.
Indians still live in America. Now the clear boundaries of the division of the people by tribes have practically disappeared. But, despite the fact that there are very few purebred Indians left, they still managed to preserve their culture and individuality, and they continue to deeply honor the memory of their ancestors.