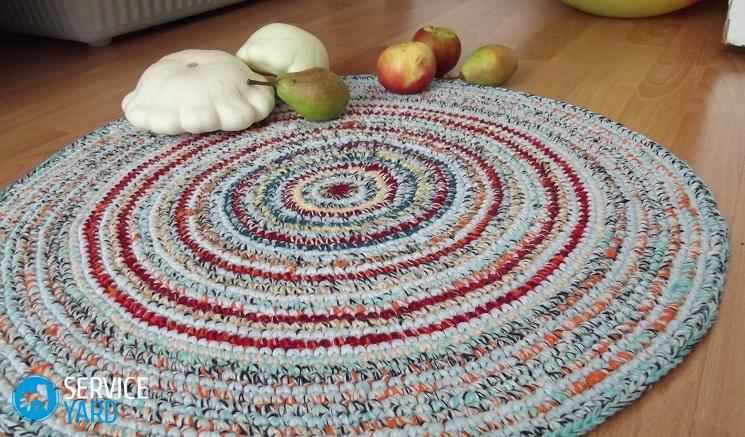
Crocheted rugs from rags. Utilitarian handicrafts from old things: crochet grandmother's rug. Fluffy rugs with a sewing machine
Previously, the houses of our grandmothers and great-grandmothers were often decorated with unusual rugs knitted from scraps. The technique of such weaving was passed down from generation to generation, while each woman tried to add something of her own to the manufactured products in order to give them individuality. They turned out to be incredibly beautiful and bright. Any craftswoman can learn this, because today many are trying to knit rugs with their own hands from rags, scraps of unnecessary fabric and even yarn. In this article we will tell you how to make such wonderful decor items for your home with your own hands.
Features of weaving patchwork rugs
Today, there are several options for weaving such rugs, you can use a hook for this or do without it. But the most important thing is to decide before starting work what size rug you need, what design and color it will have.
Braided products consisting of multi-colored braids are very simple to make:
- they are voluminous due to the partial attachment of tissue patches to the base;
- loose ends give them a lush look.
Important! A rug from rags with your own hands can be made of any shape, and round, oval, and even rectangular.
Making rugs out of patches without using a crochet hook
To weave such a rug, you will need:
- threads;
- needle;
- patchwork fabric;
- a large number of pins.
Such products are made by means of a pigtail twisted in a spiral shape, which is made from three pieces of fabric of different shades.
Important! The rigidity of the product itself directly depends on how tightly the pigtail will be woven.
Features of work:
- Before weaving, it is necessary to cut the tape to the desired width.
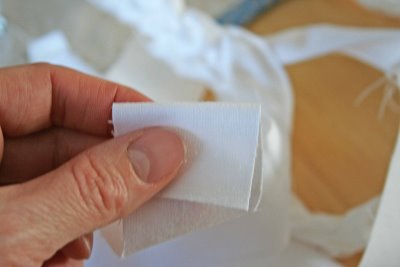
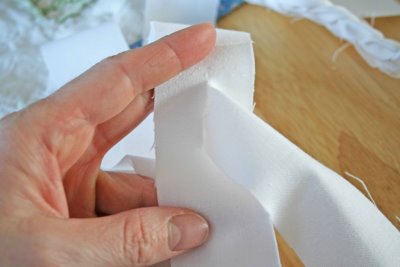
- Also, the question should be resolved, if the flap ends, and the knots will not be imposed, then how to weave. Everything is very simple here, at the ends of the ribbons it is necessary to make small cuts and cut through others to match, so that loops are formed. Due to this move, the pigtail will be of the desired length.
- In the center of the weave, you need to carefully and loosely lay the tape in a spiral, while intercepting it in two parts with a thread in order to achieve the desired diameter.

The most popular techniques for weaving rugs without a hook
Do-it-yourself rugs from rags without a hook are weaved using the two simplest techniques, namely:
- "Cobweb". To weave a rug using this technique, you need to connect about 8-12 ribbons in the form of a snowflake. Then fix them on a round cardboard base. You need to start from the center, and weave the bases of ribbons and stripes between the threads in a circle. All elements must be pressed together as tightly as possible. Then the braids should be twisted to make a rug. It can be fastened along the edge with an original decorative strip.
- "Chess". This technique involves weaving fabric stripes in a checkerboard pattern, and not like in the previous version, in a circle. For the manufacture of such a rug, a dense material is more suitable.
For the first time deciding to weave rugs from rags with or without crochet with your own hands, it is better to familiarize yourself with the recommendations and advice of experienced craftswomen so that you do not have any problems during the work:
- If you are worried that your product will shrink after the first wash, then take appropriate preventive measures. For example, if you make shreds from a new fabric, then you can wash and steam them before starting work so that they sit down immediately, and then you will not have any problems with the finished rug.
- Using pieces of fabric from different things, you need to steam and starch them before weaving.
- If you plan to actively use the products, then you must first put the flaps on a padding polyester.
- In order for the elements used to be the same, it is better to use ready-made cardboard templates for work. In this case, the product is of high quality.
- Do not rush to throw away your old clothes, because you can create an original and beautiful do-it-yourself rug out of it. It will look stylish and unusual in any home. Moreover, hand-made things are very popular today.
How to crochet a patchwork rug?
Now let's take a closer look at how to crochet a rug made of scraps of fabric.
Materials for work
You will need:
- a piece of fabric;
- special narrow ribbons;
- crochet hook No. 10.
Important! Naturally, it is not at all necessary to buy fabric, for sure there are a lot of unnecessary things in your house. You can even cut strips from an old T-shirt or T-shirt. The thinner you select the fabric, the wider the ribbons should be. And by the way, it is recommended to cut them in a spiral so that they look longer.
Master Class
So, let's get started:
- First, stretch the fabric to be cut in different directions. Be sure to pay attention to the exact direction in which the fabric is curled when stretched.
- Cut the strips, collect them into balls and distribute them according to the colors.
- Crochet as many stitches as possible to match the width of the strip. Continue knitting stitches and constantly check the number of loops so that they are the same in all rows.
- Connect the ends of the ribbons with stitches, knit the rug to the desired length.
- Align it around the perimeter for an aesthetic and neat look.
- When knitting with columns, do not make a yarn, but just add 2-3 light loops at each corner. Due to this, the strips will hold on much longer and will not curl.
The rug will turn out to be bright enough, homely cozy and warm.
Weaving a simple rug from yarn
In this section, we will learn how to weave a carpet from knitted yarn with our own hands. A pretty pretty rug can be made if you make just a few rows of the same color, and then change the shade, and return to the first one again. It all depends on the imagination of the craftswoman and the availability of material of different colors.
Step-by-step instructions for weaving a knitted rug looks like this:
- To make such a rug, you will need an unnecessary photo frame, or you can make a 30 x 45 cm frame yourself and stuff it with studs with small smooth caps on the long sides. In this case, the distance between the nails should not exceed 2.5 cm.
- The threads must be pulled in pairs over the carnations. And the base itself can be of any color. If you tighten the rows tightly, then it will completely disappear behind them.
- Take a working thread in your hand, slowly pass it first under the base thread, and then over it.
- As soon as the first row is over, the thread will need to be passed through the last thread of the warp and sent in the opposite direction. The number of rows can be whatever you want, you need to do it at your discretion.
- When changing the color of the working thread, cut it off and tie it to the end of the thread of a different shade.
- From time to time, pull the already woven rows towards the first row so that the weaving comes out tight.
- Hide all seams and knots on the seamy side and remove the finished product from the frame.
2 123 957
Making a rug from old things - Easy!
Do you think colorful, soft, original, practically free rugs are a myth? Look around! Do you have threads, cord, rope, unwanted knitwear or old T-shirts at home? Then let's make the house even more comfortable with our own hands, and at the same time protect our planet from unnecessary garbage!
This article contains original ideas for needlewomen for home comfort. Do-it-yourself carpets will be the envy and admiration of neighbors and friends.
Rectangular pom-pom rug

Do you want to have a soft rug at home on which it is pleasant to lie in front of the TV or play with your child? Then look at home for leftover threads. If the hostess is fond of knitting, then usually there are always small skeins that are a pity to throw away, and they are stored for years in some box.
In addition, you need to find scissors, cardboard and a mesh base (plastic can be purchased at a hardware store). We will now tell you how to create a shaggy bedside rug step by step at home.

The video shows the whole process in more detail:
HEALTHY! If suddenly you did not find cardboard at home, then you can wind the yarn directly on four fingers of your hand (do not take your thumb), and the central thread will be tied between the middle and ring fingers.
If you decide to decorate the rug with small pompoms, then you will definitely find a table fork for winding the material. All four cloves are wrapped around, and a long thread is tied between 2 and 3 cloves.
Oval rug of braids woven from T-shirts

A nice, homemade rug from old things for legs in the bathroom or bedroom will turn out from old T-shirts (an old T-shirt will do as well). Cotton is an environmentally friendly and soft material. Just three steps and the masterpiece is ready! You will need to select about 13 T-shirts. Take plain or colored T-shirts - it depends on your taste and interior.
First step. Making knitted threads
We have placed the production of knitted stripes with illustrations and a detailed description in the photo.Here's how to cut the T-shirt to make a single, whole ribbon:
Second step. Weaving braids
From the resulting glomeruli, take three and begin to weave a braid. When the strip ends, weave the next strip and so on until the fabric ends. If the colors are different, then try to alternate them when weaving.When working, it is convenient to braid the braid, holding it between the knees, and so that the braid is tight and does not bloom, use a clothespin when moving to the next piece of braiding.

As a result, you will end up with a long, multi-colored braid. Bend the ends and sew with strong thread.

Step three. Stitching on a typewriter
Take a sewing machine and a knit needle and zigzag over the stitch. Next, select the shape of the product: an oval or a rectangle (you get a track).In an oval rug, you need to decide on the length of the center, the longer the center is, the longer the rug. The smaller, the wider the oval will be.
We take the end, measure the length, do the right turn - clockwise. We apply further the second row of pigtails.

Start stitching where the first turn is.

We pass between two braids in a zigzag. We reach the place where the braid starts and gently bend it under the next layer and turn again.


And so on in a circle (if an oval shape) or along a snake (if a rectangular shape), until the knit braid ends.

HEALTHY! The product can slide, so you can sew or glue it to the non-slip base for safety, which can be found at the IKEA store under the name STOPP FILT.
Round rug made of twine and waste fabric

Where can the fabric scraps be used? In no case do not throw it away, because if you have a lot of free time, using this method you can make a small cup holder or a large interesting carpet on the floor with your own hands.
For this work, you will need a lot of unnecessary scraps of rags, twine (jute rope or twine), a hook, a needle and thread.
Step-by-step instructions for work: 
When the first skein of fabric ends, use a thread and a needle to sew the end from the next skein. Or we twist the end and the beginning together, then you can not use the needle.


HEALTHY! It is better to make a rug on a flat surface. If you see that it begins to bend, then you can make two columns from one loop. In some places, you can remove the fabric strips to flatten the garment.
The craft will last a long time if used nylon tights rather than fabric.
Instead of scraps of fabric, you can also use a clothesline, instead of twine, strong threads. As a result, the rug will be harder and harder. For more details, see the photo:
Rope or jute rug

To create this masterpiece from scrap materials to decorate a room in a nautical or Scandinavian style, choose a rope. You will also need a sharp knife, silicone glue, and a thick fabric for the base. Making this craft yourself is quite simple, here is the description:

Everything ingenious - simple and fast!
The second handicraft option made from these materials is a rectangular entrance rug for the hallway. Let's describe its creation in stages.
To make it, you will have to buy the cheapest rug in the store, or look in the house if there is any old one lying around in the closet. The main thing is that it fits in size.

Rug of scraps and clothesline
Sometimes thin scraps remain from needlework and the mistresses throw them away, believing that they are useless for anything. But if you add to them a clothesline and a thread with a needle, you get a nice handmade floor rug. What do I need to do:- Take a clothesline and a piece of fabric. We begin to wrap the rope tightly in a spiral.
- When the length of the wrapped rope is enough to form two rows, we fold the rope into the steering wheel and on one side (purl), we begin to sew the rows of the rug together. One stitch in the first row, the second stitch in the second row and pull them together by pulling the thread.
- We make the next circle and sew again. When one piece ends, then at the end of one piece we put the next one on top and then wrap it around the rope. If the pieces do not hold well, then you can grab them with a needle and thread.

This is how you can give a second life to thin scraps of unnecessary rags.
Old towel rug
Old terry towels are often used as rags on the farm, but needlewomen can also create a chic bathroom rug from them, without having to sew anything.
Follow these instructions for a soft and fluffy finish:
- Find the terry towels you are going to get rid of.
- Cut them into strips about 2 cm thick and 12 cm long.
- Purchase the desired size plastic net from a hardware store.
- We tie the cut rags to the mesh, fixing with a double knot.
- When the cells are large, you can tie two strips to one partition.
- By alternating colors, you can get a pattern on the rug.
The original design version of the rug made of various materials
The advantage of the next product is that you can use any materials for its manufacture: threads of different colors, ropes, pompons, braid, strips from old clothes (denim stripes look good), yarn, grass, etc.Making the base:

ATTENTION! All warp threads should be on one (front) side of the cardboard, on the back side there will be only loops between the cuts along the edges.
Weaving:
Polyethylene waterproof mat
A good summer cottage option for the street. Such crafts can be made from plastic bags accumulated at home. After all, a real hostess always has a bag with packages at home. Products made from garbage bags are softer, especially since now you can find almost all colors in stores: purple, yellow, black, red, blue, green, etc. You can make rainbow versions or with a gradient. You open the door, and there is a rainbow at your feet.A lesson on making can be seen in the video clip:
Stages of work:
- We fold the bag four to six times so that we get a thin strip: the bottom of the strip is the bottom, and the top is the bag handles. Cut off the bottom and handles, cut the remaining strip into 3-4 cm pieces.
- We straighten the resulting pieces, we get rings.
- We tie the rings together with a loop. We take two rings. We thread the first into the second ring, then straighten the ends of the first ring and pull one end into the other and a loop is obtained, we fix the loop on the second ring.
- We make a ball of the resulting several meters of tape of polyethylene rings and begin to crochet.
- To knit a circular product, start with a ring of 6 loops, then the rows are knitted in columns without a crochet, two columns in the next row are knitted from each loop (or at your discretion, the main thing is that the work does not bend).
You can crochet a rug from old things, scraps, yarn leftovers, worn wardrobe items. Such designer rugs will become not only an interior decoration, but also a very practical and cozy addition to it.
Disposal of old things with benefit - this is how you can characterize weaving or knitting stylish and practical do-it-yourself rags from rags.
Rugs for the nursery


Utilitarian handicrafts have become part of the practice of many craftswomen. This is not just a hobby, but an opportunity to give new life to old things. Spending a minimum of time and money, you can create a real design masterpiece that will become a highlight of any interior. Do not rush to throw away old T-shirts and shirts, tights with arrows, sheets and pillowcases that have become unusable. There are many interesting ideas on how to crochet old rugs. We invite beginners to learn unusual skills using the example of master classes.
Perfect seamless circle check mark pattern
We knit a bright carpet
The carpet runner is a classic floor covering for a long corridor. Our grandmothers also mastered the principle of waste-free production, making bright, practical and warm rugs knitted from rags.
Advice!
Carpet material
Here's a simple tutorial on how to create a rectangular rug:
- For work, you need a special yarn. To prepare it, you can use old sheets, shirts, any old textiles. If several things are used for the blank, it is desirable that they have the same texture.
- We cut the material into long strips 1-1.5 cm wide, tie the ribbons together and wind them into a ball.
Advice! To make the rug multi-colored, you can alternate the colors of the ribbons.
- It is more convenient to knit rugs with a thicker crochet. First we collect a chain of air loops, in the first row we knit single crochet stitches. Having reached the end of the row, we collect one air loop, turn the work over to the wrong side and continue to knit. Turning from the front side to the wrong side, and then back, we knit a track of the desired length.
Beginners will love this manufacturing method. Knitting requires basic skills, no special patterns are needed. Despite the very primitive knitting method, the result will certainly delight and surprise. Stylish, bright and practical, this carpet runner will decorate the corridor at no cost.
Carpet material
Crochet carpet
Openwork rug
The round openwork doormat will become an elegant interior addition to the living room or bedroom. The main component is yarn: we simply cut the old knitted T-shirts into strips, pull each in length, tie together and wind into a ball. You need to tie the ribbons carefully, large knots will violate the aesthetics of the openwork pattern. There is a simple way to connect the tapes: we make cuts at the ends, fold them so that they coincide. Then pull the other end of the upper strip from below through the aligned slots. The result is an inconspicuous and neat knot.
 Such a rug will perfectly fit into any interior.
 Let's start knitting:
- For knitting you need a hook number 15. We start the process with the "magic ring" - amigurumi. Around the index finger on the left hand, wrap the yarn three times, remove it. We will pass a hook into the resulting ring, pulling out the end of the working thread. Pull the yarn into the loop again, forming a sliding loop on the ring.
- The resulting loop must be tied with eleven double crochets. Then we knit the connecting element, closing the ring.
- Moving on to the second row. We knit in each lower loop two double crochets, in total there should be 24 of them.
- We knit the third row by analogy with the second, the result is already 36 double crochet. So knitting gradually expands, forming an even circle.
- In the fourth row we knit a simple openwork pattern. The scheme is as follows: at the beginning of the row, one double crochet, then two air loops, then let one lower column and knit one double crochet.
- In the fifth row, we knit all the double crochets. To make the rug expand evenly, add two double crochets to every fourth column at the bottom.
- Next, add a thread of a different color, the knitting principle is the same. At the end, we will fix the work so that the thread does not unravel. A beautiful openwork rug is ready.
Doormats for home


Having mastered the lesson of crocheting a rug from old things according to the scheme, you should not stop there. In the same technique, you can knit not only a rug, but also an elegant cover for the sofa in the living room, original seats for chairs, napkins. The products are soft, pleasant to the touch, giving the owners comfort and warmth in the house.
We knit an openwork rug
Oval rug
A do-it-yourself oval grandmother's rug will become a cozy addition to the bedroom, children's room.
How to knit an oval rug
If you make a practical base with moisture-repellent materials, you can lay the rug in the bathroom. In order to make such a product, a basic skill in the art of crocheting is enough. It is knitted according to the scheme, the main elements are simple loops.
A chain of air loops is typed. The size of the product itself depends on its length. To calculate correctly, simply subtract the width of the carpet from its length. Do not forget that the chain will stretch a little, this must be taken into account when calculating the size. For beginners, it is better to use a visual diagram to make it easier and clearer to work. The rug is knitted in a spiral, alternating columns.
For creative inspiration, use our selection of ideas and workshops. Experimenting with texture and colors, using various patterns, you can knit real masterpieces. Such original crocheted rugs will be a pleasant gift for a housewarming, bringing comfort and warmth to the house.
How to knit an oval rug
Who among us does not remember the round rugs that our grandmothers crocheted from strips of fabric cut from various old rags. But not everyone knows how to crochet, but you want to have a home soft rug.
Such a rug can be woven with your own hands without a hook, using only hands, rags, threads and a needle.In order to weave a patchwork rug, we need:
Various fabrics for shreds
Needle and thread
Safety pins
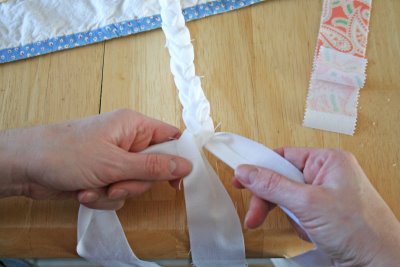
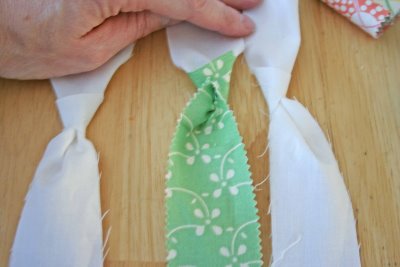
We start weaving. The rug will also consist of a spirally twisted pigtail, which is woven from three rag patches, preferably of a different color (depending on taste). The stiffness of the rug is determined by how tightly the braid is woven. The weaker, the fluffier and softer the rug will be. We cut the ribbons to the required width and proceed.
Such a rug can be woven with your own hands without using a crochet, using only your hands, rags, threads and a needle.
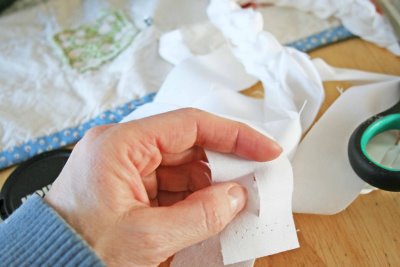
Next, we need to solve the problem - how to continue weaving if the shred is over, without imposing knots. To solve this problem is quite simple - we make an incision at the ends of both ribbons, as in the figure, and thread the ribbons one into the other, forming a loop.
After we have got a fairly long pigtail. it is necessary to assemble a rug from it directly. Everything is extremely simple here - we carefully lay it in a spiral and grab it with a thread.
We bring it to the diameter we need and that's it - the patchwork rug is ready. For fans of experiments, it is possible to advise not to sew the spiral turns with threads, but to intertwine with the help of an additional tape.


When visiting your grandmother, you probably saw her small hand-made rugs. Our ancestors did not throw away old things, they gave them a second life. Having learned how to weave a patchwork rug without a crochet, you can create it yourself. It will become not only a decoration for your home, but also a very practical thing to use.
There are large enough crochet hooks on the market, but such a rug can be made without tools.
Round rug
The simplest version of a scrapped rug is a round one. To make it you will need:
- Old fabric items;
- Scissors;
- Needle;
- Threads.
If you just want to recycle old things by creating a door mat for shoes, feel free to use any fabric. If you have ideas to fit this product into the interior, carefully select the color and texture of the fabric.

Start by cutting the fabric into long pieces.
If the fabric is loose, it is best to sew each strip and turn it inside out, leaving a seam inside. This is a rather laborious task, but a garment made of processed fabric looks neater and will last longer.
From the obtained pieces of fabric, you need to weave a braid. The tighter it is, the harder the resulting rug will be, respectively, if you want a soft rug, then do not intertwine the braid too much.
Secure the ends of the shreds with a pin.

And start weaving.
Having reached the end of the ropes, you need to lengthen them. If you tie a knot, it will turn out rough and ugly. There are two options - to carefully sew a new end or make cuts at the ends of the shreds and stretch an additional string through the working end and push its tail into the cut. Tighten gently and you have a long string with no knots or stitching. The whole process is clearly visible in the photo:


You need to braid the braid that is long enough.

Do not process its ends yet, but just grab them with a pin so that they do not bloom. If in the process of making the rug you want it to be larger, just attach new pieces of fabric and braid until you get the desired diameter of the finished rug.


You can intertwine the pigtail with a ribbon instead of thread. To do this, weave it in zigzag stitches either into the side of the carpet, or into a working pigtail thread. Pull up on the tape and it will connect the pieces together.
For more strength, it is better to completely weave or stitch the edge row of the rug with a thread, then the product will definitely not fall apart.

The round rug is ready!

Bathroom decoration
A comfortable and practical bathroom rug you can make with your own hands. To do this, you will need:
- Old towels;
- Ruler and tailor's chalk;
- Sewing machine;
- Tailor's scissors.
The manufacturing process of such a rug differs little from that described above. First, cut the towels into long strips 4-5 cm wide.

Connect the first three pieces with a sewing machine. It is also necessary to build up the "working thread" using this sewing tool.

When weaving braids, the raw edges must be folded inward.

During the assembly process, you need to flash the rows on the machine.

The bath mat is ready! It is very soft and pleasant to the touch, absorbs moisture well and can be washed.
Woven models
Patch rugs can be woven using a base. It looks like a small loom. Make a wood frame to match the size of your rug. It can be rectangular or square, it all depends on your idea. On the frame, you need to stuff carnations at a distance of 2-2.5 cm from each other.
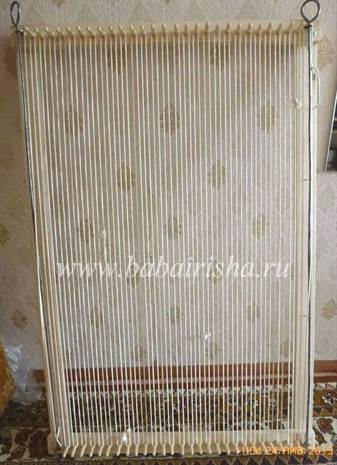
For these purposes, you can use a furniture board or an old table. It is not difficult to make a machine, but it will serve you for a long time.

On them, strengthen the warp threads made from pieces of fabric. On the leftmost warp thread, reinforce the working thread. It is best to sew it on. Weave the rug by running the string over one warp thread and under the other. You can use more complex techniques and weave with two working threads at once. In the process of weaving, the fabric must be constantly pushed upward so that it is denser.