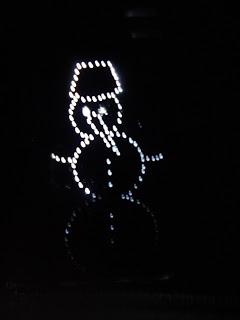
DIY paper lanterns. New Year's lanterns: diagram. Bright New Year paper lanterns - do it yourself
Paper lanterns have become a traditional attribute of New Year's decor not only in Europe and Asia, but also on the American continent.
Their history dates back to China, where they also served as decorations for Chinese New Year processions.
Lesson # 1: Tape Flashlight
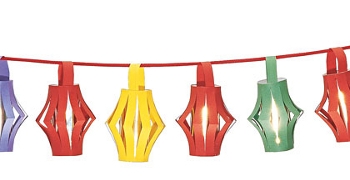
They will decorate any room. They can be hung on a Christmas tree, made into an openwork garland, or used as a cover for a miniature electric candle.

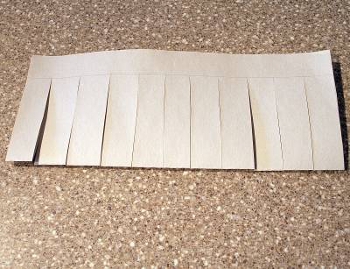
- Take a rectangular piece of colored paper and cut a strip about 1 cm wide along one of its narrow sides. Set this strip aside for use later.
- Fold the remaining paper in half lengthwise so that the front side is inside.
- Measure 2 cm from the edge of the resulting rectangle, along the long side opposite the fold line. Draw a line parallel to the edge with a pencil.
- Cut the fringe along the other edge of the rectangle, along the fold line, without going over the pencil line.
- Unfold the rectangle and fold it in half again along the fold line, only in the opposite direction (turn to the right side).
- Roll the sheet into a tube and tape the top and bottom with tape. Glue the "handle" to the upper rim from the strip of paper cut from the sheet at the beginning of the work.
Alternatively, poke small holes in the headbands and thread the lace through them. By sliding the top bezel along the lanyard, you can adjust the curve of the center section of the flashlight.
Attention! The paper can only be attached to garlands with LED - bulbs that do not heat up when burning!
Master class number 2: Diamond-shaped lanterns made of tissue paper

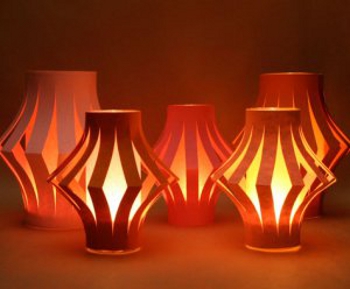
Light and graceful - that's what we can say about these flashlights. It may take a little longer to do them than others, but the result is worth it. They will look especially impressive if you put a small battery-powered candle inside.
1. Place two sheets of tissue paper on top of each other and fold them in half lengthwise. Iron the fold. 
2. Next, unfold the paper and collect it, without separating the sheets, into an accordion of folds about 1.5 cm deep 
3. To make the flashlight smaller, trim the edges of the accordion equidistant from the center. Then unfold the paper and turn it over so that the convex side of the center line faces the table.
4. Take a needle with heavy thread through it. Gather one side of the sheet back into an accordion and pull the thread through the paper. Tie the ends to form a vicious circle.
Instruction # 3: Round lanterns made of strips of paper
They look like Christmas balls and can be of any size: from very small to huge. A definite plus - they are quite easy and quick to do.

1. Cut 15 strips of 1 cm wide paper

2. Make holes at both ends of all strips along the hole, stepping back about 3 mm from the edge

3. Place the strips in a stack so that the holes match, and insert a rivet into each end (you can buy them at a craft store)

You can tie a hanging loop to the top rivet, and a tassel made of paper, beads or threads at the bottom. In addition, such flashlights make excellent garlands!

Option number 4: A flashlight made of paper or cardboard circles
This type of lantern is also perfect for interior decoration and for a Christmas tree. If you make them from thick multi-colored paper, you get a toy for children. And if you decorate them with various decorative elements or paint something on the finished product, you will get an absolutely unique thing.
1. Cut 10 identical circles out of thin cardboard

2. Fold all circles in half, right side inward

3. Glue the circles in pairs, side to side, until the circle is complete.

4. Before gluing the last two halves together, insert a straightened paper clip into the center of the sphere and secure it with a drop of hot melt glue. Bend the outer end of the paper clip with a crochet - you will hang the flashlight from it

5. Decorate the flashlight with ribbons, brushes, or other decorative items.

Lesson number 5: Flashlight "Drop"

This is another kind of flashlight, assembled from the same parts, but in this case you need a template.
As in the previous case, you need to cut, fold and glue around a number of parts. Those in the photo consist of 16 "drops".

As a component of such a decoration, you can use almost any shape, including an openwork one. Other options for this type of Christmas lantern:

 |
 |
Master class number 6: Indian flashlight

This elementary piece of jewelry looks quite unusual and pleasant. Choose beautiful colors, decorate ready-made lanterns, let your imagination run wild!
The flashlight consists of two sheets of paper in contrasting colors.
Outer layer (fringe):
- Take a 12.5x25cm sheet and fold about 5cm wide on both short sides. Smooth out the fold and unfold the paper.
- Using a ruler and a paper knife, make parallel cuts 1cm apart between the two fold lines.
Inner layer (tube):
- Take a 15x19cm sheet and glue a strip of double-sided tape along each of the 15cm edges.
- Roll the sheet into a tube and glue the two sides with an overlap, so that they overlap each other by about 5 cm.

Connection of parts:
- Attach a strip of double-sided tape to the short sides of the outer layer of paper.
- Glue one of the edges along the top edge of the tube, then, without crushing the fringes, glue the bottom edge.
- Punch holes on opposite sides of the tube at the top of the flashlight and thread the strap or string through them for hanging.
Step-by-step instruction number 7: Flashlight from strips of paper and a tube

Another project of two or more sheets of paper in contrasting colors.
1. Glue the tube from the shorter sheet.
2. Place a strip of double-sided tape along the top and bottom of the tube.

3. Cut long thin strips of paper in a contrasting color.
4. Begin gluing the strips one at a time, slightly overlapping, strictly parallel to the tube or slightly at an angle.

This is what the strips look like when glued at different angles.

5. Mask the seams with a horizontal strip of paper or hot-melt tape or double-sided tape.
6. Attach the hanging loop to the top of the flashlight. Its ends can be glued under the horizontal tape or attached to the inner walls of the tube.

Master class number 8 "Glowing flashlight"
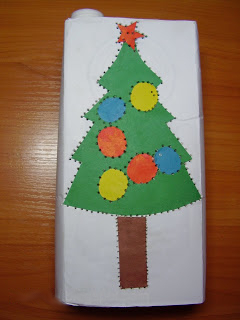
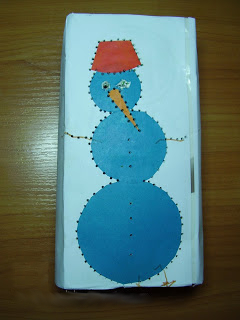
A cardboard box made of juice or milk is a wonderful material for making a New Year's lantern. The easiest way to make this DIY Christmas toy is as follows:
1. Take a box of juice or milk, cut off the bottom of it, glue it over with white paper.
2. Make a New Year's theme applique on both sides of the package.
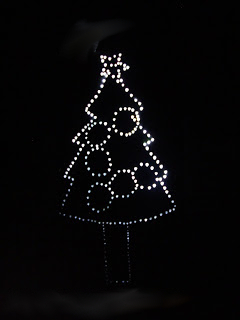
3. And now the adult must poke holes along the contour of the drawing with an awl. If you put such a box on a flashlight or LED candle, the drawing will glow in the dark. Link >>>>
Attention! If you are using a regular candle, be sure to place it in a glass for safety reasons.

Such a DIY New Year's craft can also be made from an ordinary paper bag
or a tin can.
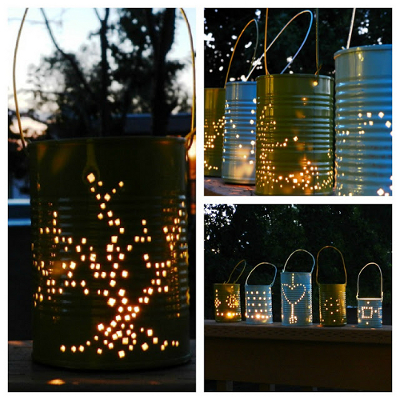
Holes in a tin can will have to be made with a sharp nail and a hammer. Helpful hint: to prevent the tin from getting distorted when making holes in it, pour water into it and freeze it in the refrigerator.

Finally, paint your Christmas lantern with spray paint and attach a wire handle to it.
The holes in the paper lantern can be made not only round, but also, for example, in the shape of hearts or stars, as in the photo below.
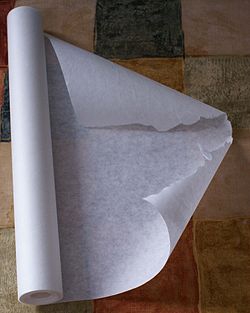
If the holes are large enough, then it is better to seal them on the back with special parchment paper. In another way, it is also called wax paper or baking paper.
Master class number 9 "Bird in a cage"

We suggest that you and your child make an original paper flashlight in the shape of a bird in a cage. To make this Christmas tree toy, you will need:
- colored paper and cardboard
- awl
- scissors
- double-sided tape or glue
- plastic cover

Work plan:
a. Cut the colored paper into strips of the same length and width (for example, 1.5 cm - width, 30 cm - length). To make one flashlight, you will need 4 strips of paper.
b. Use an awl to poke a small hole in the center of each strip.

c. Print the bird on heavy paper. Cut it out. Use an awl to make a small hole in the center of the bird's back.
d. Pass a thread through it, tie the end of the thread with a knot. Make a second knot about 4 cm from the bird.
e. Now you need to string the paper strips with string. Slide the strips along the thread to the top knot.
f. Tie another knot on top of the paper strips, which you can put on a bead for beauty.

g. Now take the plastic cover and stick double-sided tape around it.
h, i, j. Spread the strips apart and attach the ends symmetrically to the lid.

k. Cut a strip of colored paper and glue it around the lid. The New Year's flashlight is ready!

Master class number 10 "Amazing flashlight"
Cut out many of these blank shapes from paper.
 Their number should vary from ten to fifty at your discretion. The main thing is that they are all the same and neatly cut. Fold each piece cut in half.
  Let's start gluing the flashlight. To do this, all the blanks are first carefully glued together at points 1.
  Make sure to stick to the same side in case the paper has only one colored side. Then the blanks are glued on the other side at points 2.
  Then we connect the edges of the ovals to each other, stitching them with a needle or gluing them together with double-sided tape.
  At the end of the work, you need to glue the two extreme edges. Flashlight is ready!

Other manufacturing methods
By connecting imagination and imagination, you can easily figure out how else to make unique lanterns for decorating your home. For example, if you glue corrugated paper into cylinders, as is the case with classical technology, but do not make a second layer, but simply attach these forms to ribbons, and glue them along the bottom edge with light colored ribbons that will flutter and flutter at the slightest movement. These New Year's lanterns also look beautiful in a large garland.

If you want a candle to burn inside the product, then take two layers of paper for the base: ordinary paper for the top, and white parchment for the bottom, which will transmit light. Or use safe LED candles.
Another simple craft is a flashlight made of colorful stripes. To make it, you need to cut a lot of paper strips (their length and width should be the same, the longer the strip, the larger the flashlight will turn out). These strips must be folded, and holes must be punctured at both ends. Then take a beautiful lace and fasten it first on one side, and then thread it into the other hole and pull it well so that the strips are curved in a semicircle. It remains only to straighten the flashlight so that the stripes form a ball shape.
You can also make a beautiful craft in the form of an openwork lantern, which will decorate any festive table for the New Year at the Christmas tree, for birthday, and for other holidays.

- To make such a romantic decor element, you will need special cutting templates. If you are trying to make such a craft for the first time, then first it is better to take a blank drawing, in which there will be a minimum number of gaps, since cutting this part can take a long time and require some skills.
- The selected template must be printed and carefully cut along the contours.
- Pick up glasses, goblets, jars or other transparent objects that will serve as the basis for the wrapper (they should be suitable for placing candles). Measure their height and width. Cut out the templates so that the containers can be completely wrapped.
- Try on patterns again and trim if necessary.
- If you want to make colored lanterns, then you will need to attach sheets of colored parchment under the openwork patterns (you also need to cut them to the size of the vessels). They are attached with adhesive tape.
- Then you can attach the openwork patterns, also carefully attaching them with tape.
Light the candles and enjoy the romantic atmosphere of the New Year's fairy tale.

Choose any method of making lanterns you like and create small crafts that will decorate your home in an original way for any holiday.
Video lesson: How to cut a New Year's lantern out of paper?
Option 1.
The easiest way to make a New Year's paper lantern is as follows.
Cut colored paper or old postcards into strips of the same width (for example, 2 cm) but different lengths. You should have one central shortest strip, the rest of the strips should be paired, each pair a few centimeters longer than the previous one.

Fold the strips together in the correct sequence, aligning them at one end, and then secure them with a stapler or glue. After that, align the strips at the opposite end and also fasten them with a stapler or glue. Flashlight is ready!
Option 2.
One of the most popular Christmas tree decorations is Christmas lanterns. It is very easy to make them, and thanks to their spectacular shape, the lanterns will become a real decoration of the Christmas tree.
We fold a sheet of colored paper of a rectangular shape in half lengthwise. From the fold line, we make parallel cuts at an equal distance from each other (the cuts should end without reaching the edges of the sheet 2 centimeters). We unfold a sheet of paper and fold it into a tube, glue the ends of the sheet. Now, at the same time from below and from above, we squeeze this tube a little - we got a flashlight.
But that is not all. You can make a core for a flashlight. To do this, glue a tube from a thicker paper, but of a smaller diameter. We connect the two parts together (we place the core inside the flashlight) using glue or a stapler. The flashlight is ready.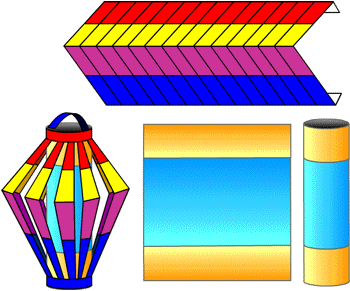
The use of a paper lantern can be found in a wide variety. And just like a Christmas tree decoration. And as a decoration for a small vase or glass (only in this case, you do not need to make a "core" for the flashlight). And several New Year's lanterns, suspended from a ribbon or serpentine, will turn into a multi-colored garland.
You can insert a candle inside the New Year's lantern. Better to use safe LED candles. If you are using a regular candle, be sure to place it in a glass for safety reasons. See link >>>>
Option 3.
A cardboard box made of juice or milk is a wonderful material for making a New Year's lantern. The easiest way to make this DIY Christmas toy is as follows:
1. Take a box of juice or milk, cut off the bottom of it, glue it over with white paper.
2. Make a New Year's theme applique on both sides of the package.
3. And now the adult must poke holes along the contour of the drawing with an awl. If you put such a box on a flashlight or LED candle, the drawing will glow in the dark. Link>>>>
Attention! If you are using a regular candle, be sure to place it in a glass for safety reasons.

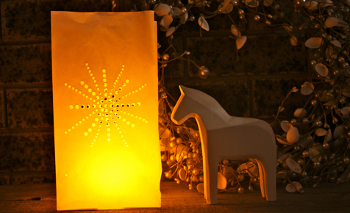
Such a DIY New Year's craft can also be made from an ordinary paper bag
or a tin can.

Holes in a tin can will have to be made with a sharp nail and a hammer. Helpful hint: to prevent the tin from getting distorted when making holes in it, pour water into it and freeze it in the refrigerator.
Finally, paint your Christmas lantern with spray paint and attach a wire handle to it. For a detailed New Year's master class, see the link>>>>
The holes in the paper lantern can be made not only round, but also, for example, in the shape of hearts or stars, as in the photo below.
If the holes are large enough, then it is better to seal them on the back with special parchment paper. In another way, it is also called wax paper or baking paper.
Since we are talking about paper lanterns with large windows, then it's time to move on to the next section of our article.
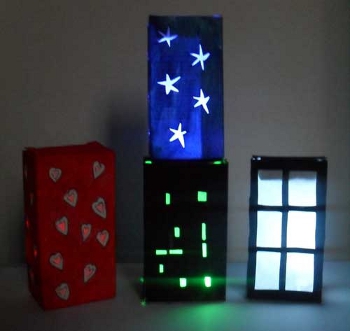
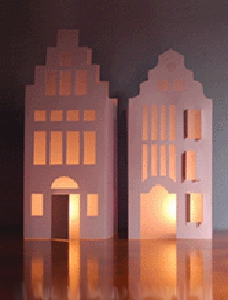
Option 4.
Home is a symphol of comfort, warmth, family hearth. That is why on frosty, winter days, a New Year's lantern in the form of a paper house will look most appropriate.
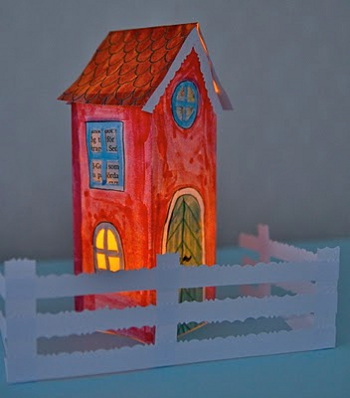
It is very easy to make a house out of juice or milk packaging. Just be sure to seal the windows with parchment (wax) paper. We already wrote about this a little higher.
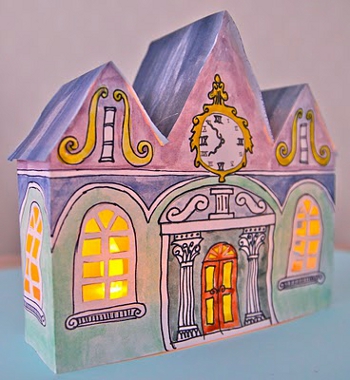
We suggest you use ready-made templates for making three gorgeous paper houses as in the photo below.
Template download links:
- pattern-1
- pattern-2
- pattern-3
To make one house, you need to print the same template twice. Each house consists of two identical halves (front and rear), connected to each other by the sides.
Cut out the templates, for this cut off everything that is marked in gray. Cut out the windows. Cover the back with parchment paper. Connect the two parts of the house together. Place the house on a light source (LED or real candle). Attention! If you are using real candles, be sure to place them in a glass container for safety. For a detailed New Year's master class, see the link>>>>
Option 5.
A New Year's lantern can be made not only in the shape of a house. You can just make holes in a homemade cardboard box and seal them with parchment. The lantern will be decorated with a New Year's applique.
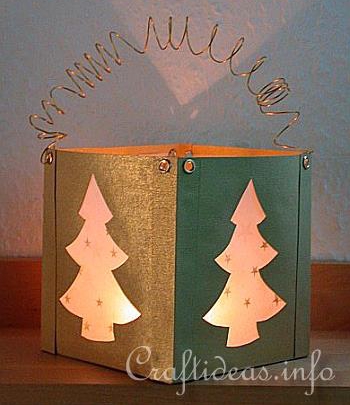
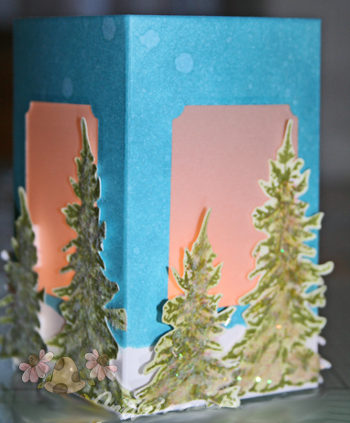
For detailed instructions on how to make New Year's lanterns with Christmas trees as in the photo above, follow the links:
- link-1
- link-2
Option 6.
You can simply draw a lock on parchment paper with a black permanent marker and wrap it around a light source: a flashlight, an LED candle, or a regular candle in a glass beaker.
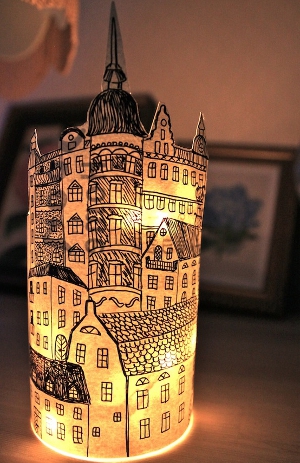
You can use a photo of the castle, cut along the contour. For detailed instructions on how to make such original flashlights, see. .
Option 7.
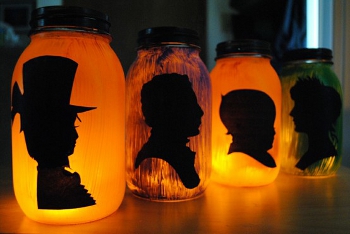
And you can also stick silhouettes of some images cut from black paper on parchment paper. See link>>>>
Option 8. 
To make these wonderful Christmas lanterns, you will need to cut colored paper into strips of equal length and width. The length and width of the stripes depends on the size of the flashlight you want to make. To make one paper lantern, you will need an average of 14-16 strips of paper.
Place the strips of paper together and poke a hole at one end with an awl. Pass the thread through one of the holes, secure the end of the thread with tape, glue or sticker.
Thread the thread through the second hole.
Pull the thread so that the strips of paper are curved. Tie the thread in a knot. The knot should be large enough so that it cannot slip through the holes in the paper strips.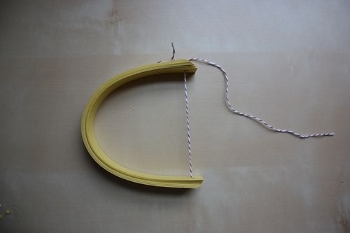
Straighten the strips to form a ball. The flashlight is ready. It remains to find a place where you could hang it.

Option 9.
We suggest that you and your child make an original paper flashlight in the shape of a bird in a cage. To make this Christmas tree toy, you will need:
- colored paper and cardboard
- awl
- scissors
- double-sided tape or glue
- plastic cover
Work plan:
a. Cut the colored paper into strips of the same length and width (for example, 1.5 cm - width, 30 cm - length). To make one flashlight, you will need 4 strips of paper.
b. Use an awl to poke a small hole in the center of each strip.
c. On heavy paper, print the bird ( download ). Cut it out. Use an awl to make a small hole in the center of the bird's back.
d. Pass a thread through it, tie the end of the thread with a knot. Make a second knot about 4 cm from the bird.
e. Now you need to string the paper strips with string. Slide the strips along the thread to the top knot.
f. Tie another knot on top of the paper strips, which you can put on a bead for beauty.

Option 10.
A very original New Year's craft - a lamp made of lace.
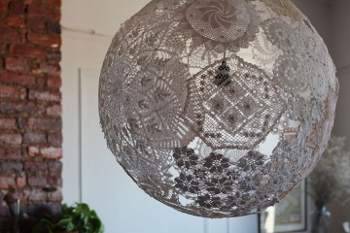
The technique of its manufacture is similar to the creation of balls from threads, only lace is used instead of yarn. How to make a ball of threads, see the link>>>>
To make a lamp from lace, you need to find a large ball, inflate it and hang it on a thread. Soak the laces well with wallpaper glue and stick them on the ball so that they intersect, overlap each other. Allow to dry thoroughly overnight, then pierce the ball, deflate and remove. We insert a small light bulb into the resulting lampshade and hang it up. That's all, an excellent DIY Christmas decoration for your home is ready! For a detailed New Year's master class, follow the link>>>>
Notes:
1. To prevent the lace from sticking to the ball, you can pre-grease the ball with fat cream or vasilin.
2. For safety reasons, it is better to use energy-saving bulbs. they don't get hot.
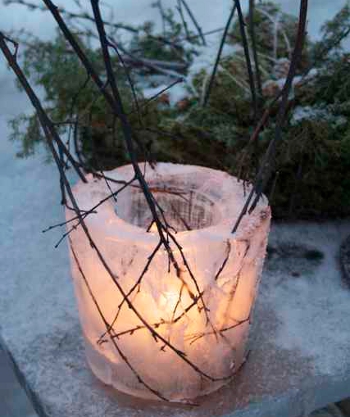
Option 11.
If you live in your own house, then New Year's ice lanterns will help you decorate the yard for the New Year. For a detailed description of how to make such Christmas decorations, see the links: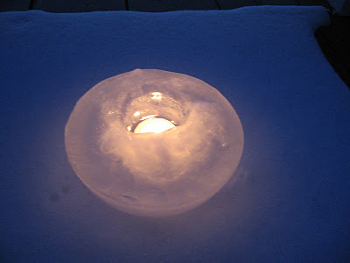
New Year's paper lanterns are a beautiful and original decoration that is easy to make with your own hands. The craft was invented in China. It was believed that lanterns not only decorate the New Year's interior, but also scare away evil spirits, and also attract good luck to the house. To create paper toys, you can involve all family members, especially children love to make them. If you put a miniature electric candle inside the craft, you get an original New Year's lamp. Keep in mind, however, that you can only use LED flashlights that do not heat up.
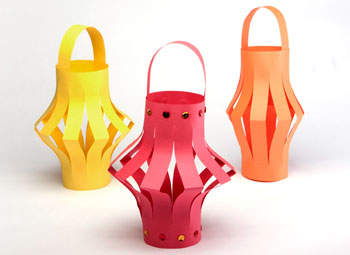
Hanging lanterns
You can decorate a Christmas tree with such lanterns, place them throughout the room, or assemble them in the form of a garland. Even a small child can make them. To make a Christmas toy, use the following instructions.

- Cut a 1 cm wide strip from the edge of a rectangular sheet of colored paper. Set it aside: it will come in handy later.
- Fold the rest of the paper in half (lengthwise) with the right side inward.
- From the edge of the paper rectangle opposite the fold, step back 2 cm and draw a longitudinal line with a pencil.
- From the fold line, parallel cuts should be made at the same distance from each other, without stepping over the drawn line.
- Expand the paper rectangle. Turning it to the right side, fold it in a tube. Glue the edges with tape, glue, or staple.
- Glue the strip you cut off at the beginning to the top of the Christmas lantern. You will get a handle for which the toy can be hung.
If you make several similar lanterns, make holes in their upper part and connect the toys with a cord, you get a wonderful DIY Christmas garland. Plus, the lanyard makes it easy to adjust the curve of the flashlight.
Tissue paper lanterns
These Christmas lanterns take more time to make, but the toys are very light and delicate. Detailed instructions will help to make them.

- Join 2 sheets of colored tissue paper and fold them in half lengthwise.
- Without separating the sheets, fan the paper. The folds should be about 1.5 cm wide.
- Expand the sheets. Turn them over with the convex side facing the table.
- Re-assemble one side of the paper into an accordion. Pull the tight thread through the needle. Tie the ends of the thread.
- Repeat this on the other side of the paper.
- Carefully smooth out the folds and tape the edges of the paper. You should get a volumetric rhombus.

New Year's lanterns made according to the same principle, but with a thread not fully tightened at the bases, look very original. Such a craft can be put, so it is convenient for her to decorate a desktop, shelves, windowsill.
These toys are very easy and quick to make. Be sure to involve children in their manufacture. Round lanterns look like Christmas balls, so they can be used to decorate a New Year's tree.

- From colored paper, cut 15 strips of arbitrary length, 1 cm wide. You can take paper of different shades.
- Step 3 mm from the edges of each strip. Make holes in this place with a thick needle.
- Align the strips of paper. Insert rivets into the holes, which can be purchased from the handicraft department.
- Pulling the strips out of the stack one by one, distribute them in a circle to make a paper ball. When doing this, start from the bottom strip.
- Tie a thread for hanging to one rivet of the finished toy. The second is a decorative brush.

Similarly, you can collect crafts and other shapes. Original Christmas toys are made from paper strips of different lengths.
Lanterns from circles
Lanterns made of round paper blanks can be interesting to decorate an interior or a New Year tree. Making such a craft will not take much time, and as a result, you will receive an original toy.

- Cut 10 circles of the same diameter from thin colored cardboard.
- Fold each circle in half with the colored side inward.
- Glue the blanks to each other in a circle with the fold, except for the last 2 halves.
- In the center of the resulting circle, insert a paper clip, straightened at one end. Secure it with superglue. The result is a hook for hanging the toy. Instead of a paper clip, you can attach a loop of thin tape or braid.
- Glue the remaining blanks.
- Attach a bow or other decorative elements to the lantern.

If you make such a flashlight from circles of thick cardboard, you get a wonderful New Year's toy for children. Having originally painted a flashlight, you can create a unique decor item with your own hands.
Such a craft, made by hand from two sheets of colored paper in contrasting colors, looks very unusual and festive. The toy consists of an inner layer (tube) and an outer layer (fringe). Start making a flashlight with a tube.

- Take a 15 x 20 cm rectangular piece of colored paper.
- Glue a strip of double-sided tape along the short edges.
- Roll the paper into a tube so that one side overlaps the other by 4 cm. The result is an inner piece.
- Next, prepare the outer layer of the craft. Take a sheet of colored paper 25 cm long and 12.5 cm wide.
- Make 5 cm folds on the short sides. Iron the fold line well and unfold the sheet.
- Use a utility knife to cross-cut from one fold line to the other. Maintain the same distance between the cuts (approx. 1 cm).
- Now you need to connect the outer and inner layers of the flashlight. Place strips of double-sided tape on the short sides of a sheet of paper with slits.
- Glue the slit paper with one side to the top of the tube and the other side to the bottom. At the same time, do not wrinkle the fringe, but gently move it to the center.
- Make holes at the top of the tube and thread a nice thread or ribbon through them so that you can hang the New Year's lantern.

A ready-made Indian lantern can be unusually decorated with your own hands by gluing multi-colored sequins on it or covering it with sparkles. Such toys look especially original if you hang them from the ceiling.
At night, you can't cope without a flashlight - the main electrical device for vision. Without this object, it is generally not possible for a person to see anything in the dark. The reason for this lies in the fact that a person in the dark is not able to distinguish between colors.
Every year, more and more photos of homemade flashlights appear on the Internet, which is quite logical, since, thanks to such an invented device, you can see absolutely everything in the dark.

There are several types of flashlights today. You can find not only the classic options, known to everyone, but also lights that provide for self-regulation, if necessary, the beam of light. In this article, we will consider in detail how to make a flashlight with your own hands, using only prepared materials and step-by-step instructions.

Lanterns made of paper
If you look at various diagrams and instructions on how to make a flashlight yourself, you will easily notice that making it out of paper is easier than out of any other material. Moreover, even a child under the supervision of an adult can make a beautiful flashlight out of colored paper.

You can see countless samples on the Internet and by looking at them you can execute them quickly enough. If you want to make a beautiful flashlight, then you can additionally decorate it with such an accessory as a paper ribbon.


A paper flashlight acts as a rather cute symbol, so even if some homemade lighting assistants do not shine at all, they are forgiven for their lack of functionality.

In addition, they are so beautiful that making them is very interesting not only for children, but also for adults. Today, simple and powerful do-it-yourself flashlights become an object that is made even with kids in kindergarten.

How to decorate a flashlight?
A classic paper lantern can be interestingly transformed, for example, with the help of various decor. Ikea company demonstrates this especially successfully. Every year, their magazines show more and more different uses for garlands of lanterns on the walls and ceiling. Thanks to such an interesting piece of furniture, you can quickly and cost-effectively transform the appearance of any room.

So what does it take to make a flashlight at home? Paper, scissors, glue and some decor. Otherwise, there is a real scope for activity, which is not limited by anything.

More holes in flashlights
Today, in various magazines, you can find many different paper lanterns that can be made with a child of any age. You can, for example, try to make a bright pot with holes, which will decorate even a classic flashlight model. Most importantly, it will definitely replace a general developmental activity with a child over three years old.

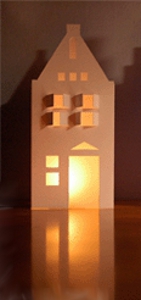
Flashlight house
If you want to try to make ultraviolet and LED flashlights popular today, then you can try to choose the shape of a house for them. Beautiful lanterns in the form of houses or even palaces are quite simple to make. On the Internet, you can find a template for almost every taste. If you want to spend more time with your child, you can even try to draw a template for your future craft yourself.

The main thing to consider when creating this type of flashlight is the obligatory creation of grooves. In this case, you will most likely not even get dirty in the glue.


In addition, the thing will become truly unique and no one else will find it anywhere else. You can make such a flashlight in just a couple of hours. The main difference during creation will be only in the material used. Otherwise, they are made in the same way as lanterns in the form of cardboard houses.

When creating such lamps, keep in mind that the accessory will never be able to become a full-fledged source of lighting. In this case, the lantern can be used as a night light in a children's room or as an additional source of lighting, for example, in the kitchen, provided that the main lighting is sufficiently bright.

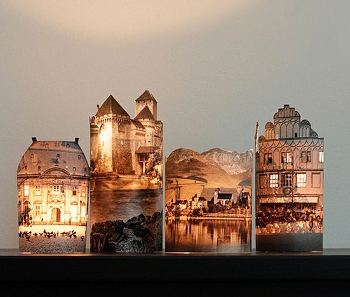
DIY photo flashlight

Note! 


Note! 


Note! 


Making a Christmas lantern out of cardboard
Author: Belyaeva Marina Valerievna, teacher of special and general education disciplines, Astrakhan College of Computing MachineryWork description: this development is intended for children of senior school age, teachers and parents.
The purpose of the master class: original decoration under the Christmas tree.
Targets and goals:
To acquaint with the simplest techniques of using the decoupage napkin technique
To help the participants of the master class in their desire to make their work practically meaningful.
Soon the new year will come to us, yesterday we are starting to put things in order at home, decorate the Christmas tree, decorate the house. And every time I want to create something unusual, how you can surprise your guests.
In my master class, I want to show how in just a week we will create a New Year's lantern under the Christmas tree, which will be the original decoration of your room.
Master class on creating a New Year's cardboard lantern
We need:
Cardboard with a thickness of at least 3mm
Ring 4cm high cut from toilet paper cardboard base
Three-layer napkins with New Year's ornament
Scissors
Decoupage glue or PVA glue
White water-based paint
Latex putty
Sandpaper (zero)
Stationery knife
Pliers
Decoupage varnish or quick-drying varnish for interior use
Glue "Titan"
Awl
Double-sided tape
Acrylic paints
Brushes for glue and varnish
Compass
Aluminum wire
Working surface
Progress:
1. Cut out blanks for a flashlight from cardboard:
Square 13 cm * 13 cm - 2 pieces
10 cm * 10 cm square - 2 pieces
Rectangles measuring 14 cm * 10 cm - 4 pieces
Rectangles 0.7mm * 10cm


2. For the upper part of the flashlight, we draw circles with a radius of 1.5 cm on two squares (large and small) using a pencil, a ruler and a compass

3. For the lower part of the flashlight, we draw circles with a radius of 2.5 cm on two squares (large and small) using a pencil, a ruler and a compass

4. Draw inner rectangles on two rectangles using a pencil and a ruler for subsequent cutting.

5. The next step - with the help of a clerical knife, cut out the inside of the blanks along the lines drawn.
6.Using PVA stationery glue, glue squares of different sizes together

7. Next, we varnish our workpieces. I use a quick dry interior varnish.

8. After drying, I cover all ends with putty and let dry for 24 hours.

9. Next, sandpaper the details and again varnish

10. The next step is to cover the blanks with white water-based paint using a sponge.


11. After the parts have dried, we begin a new stage - decoupage of the side parts of our flashlight. To do this, we need napkins with a New Year's motive, glue and brushes for decoupage.

12. For a three-layer napkin, separate the bottom two layers

13. Apply the napkin ornament to the side of the workpiece and coat the surface with glue. If irregularities and bubbles from the glue appear, gently level and press the napkin to the workpiece with your index finger.

14. Next, gently tear off the edges of the napkin with your fingers, slightly pressing the irregularities to the edge of the parts.
Note: It is not always possible to evenly glue the napkin to the part, especially when it comes to large surfaces. But I found a new way out for myself. First, cover the part with glue. Let it dry well. After that we apply a napkin ornament, parchment or cotton-paper cloth on top and iron the surface with a hot iron. The result is a 100% flat surface. It remains only to grease the edges with glue and you're done!

15. Next, we begin to paint the inner sides of the side parts and the upper and lower blanks of the flashlight. To do this, stir the blue acrylic paint with a water-based emulsion and, using a sponge, "smack" the surface. After painting, let it dry for 24 hours. After drying, we cover all the parts with varnish.


16. After drying, we begin to create windows in the side details of the flashlights.
To do this, we need a transparent film, double-sided tape and scissors.
Cut out rectangles from the film of the required size and glue them to the side parts with double-sided tape


17. The main and slightly laborious step is the assembly of all side parts using Titan glue. I alternately coat all the ends of the parts with glue and let them dry for 2-3 minutes, and then I just connect the side parts to the bottom of the workpiece. The details dry for a day.


Note: I do not glue one side part. Then I will simply insert it into the ends so that it would be possible to insert a small electronic lamp inside
18. Glue the upper part of the part in the same way. And let it dry well. For strength, I put a cast iron pan on top of the flashlight. We also glue the painted parts of the upper part of the flashlight.


19. The next step is to "smack" the poorly painted parts of the parts with red acrylic paint using a sponge and glue the upper part to the flashlight.


20. It remains with the help of an awl to make holes in the upper part of the flashlight and using pliers we fasten the aluminum wire