How to make a paper ball instruction. Colored paper ball. How to make a paper pompom with your own hands from paper, master class
There are a lot of paper crafts and one of the simplest, most interesting and informative is a ball. Making this figure is easy and exciting at the same time. It's amazing how a three-dimensional figure is obtained from ordinary flat paper. There are several ways and we will tell you about the most basic ones.
How to make a paper ball with your own hands?
"Paper ball of circles"
Instruction:
For this origami you will need colored paper, and always double-sided. Take 3 of your favorite colors.
Now cut four circles on each of the sheets.
Thus, it turns out that you have a dozen colored circles.
Fold them in half in turn and put them in each other, then just straighten them.
Fasten the middle with a stapler.
Gently straighten everything, you should get a fairly voluminous figure.
Glue the leaves in the way shown in the image, and you will get a real ball!
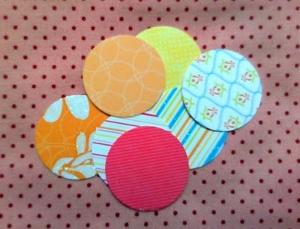
Another variation of this method is not to stack the circles into each other. Regular sequential gluing will also help create a three-dimensional ball. If you take sheets not from plain, but from patterned paper, you will get a ball of amazing beauty.

You can make a ball out of paper in another way. Prepare 8 large circles and one small one. Fold the large ones in half, and then again. The folded circles must be glued to the small one, as in the picture below, and another ball is ready.

How to make a paper ball from stripes?
Cut colored strips of the same length.
Make a ring and fasten it with glue or a paper clip.
Form a second ring perpendicular to the first.
Fasten all remaining strips in the same way.

Now the ball is ready, it remains to add decoration and you can hang it on the Christmas tree!
How to make quilling balls?
The art of quilling is not easy, but if you have mastered its basics, then making a ball will not be difficult for you. They look simply amazing and are able to decorate any interior.

How to make a papier-mâché ball?
Prepare tools and materials: non-colored newspapers, glue and a brush for it, ordinary scissors, paper and a balloon.
Fill the balloon with air enough to make it round.
Shred the newspaper.
Paste the ball with pieces of newspaper in 2-3 layers, skipping the tail. The last layer must be from sheets of plain white paper.
Leave to dry.
Carefully puncture the ball with a needle and remove its parts.
Now you can attach the thread, decorate and paint to your liking.

Balls made of corrugated paper look unusually festive.
Valentina Radushkevich
New Year's balls are one of the indispensable attributes New Year and Christmas. They can decorate not only the Christmas tree. Balls on colored ribbons will look very nice on windows, cornices, chandeliers.
They are easy and simple to make with your own hands. The manufacturing process will bring a lot of joy to adults and children. New Year decoration, made by hand, will fill the house with warmth and comfort.
Today, I present to your attention Master Class« Christmas ball from circles» . This Christmas decoration can be easily made with older children. To make a ball you need have:
Scissors, glue;
paper (colored paper, old magazines) or soft cardboard (colored cardboard, old postcards).
Making a template circle and triangle template with equal sides (equilateral triangle). Cut out 20 circles. Inside circles draw triangles.


Circles fold along the sides of the triangle. Then fold the edges circles. We get elements similar to triangles in circle. The resulting elements will be glued along the edges circles with each other.

We take two elements and glue them on the sides. Next, glue three more elements along circle like this to make a dome (see photo). For one dome, you must have five elements. We make the second dome of five elements. We will thread a thread in the form of a loop into the dome.


We have ten elements left that we will glue on the sides. Get a chain of elements (see photo).

We connect a chain of elements with glue so that we get a ring (see photo).

Then we connect the ring with two domes with glue. One dome will be the base of the ball, and the second dome with a loop will become the lid.

This is so wonderful we got a Christmas ball!


Thank you for attention!
Related publications:
 New Year - the fulfillment of the most cherished desires, all adults and children are waiting for magic! Even the smallest fake can be done together.
Good day, dear colleagues and friends! I want to bring to your attention a children's master class of volumetric application "Balloon".
MKZHOU kindergarten No. 10 "Sun" in Privolzhsk "Application from circles" Master class for teachers of preschool institutions Performed by the teacher:.
This year the weather works wonders. July took over from rainy June. It's been raining since early morning and it's time to do something.
 Dear colleagues! New Years is soon. This is my favorite holiday. The mood is excellent. And I want to quickly arrange my group for this.
 Dear colleagues! On the eve of the New Year, it has become a tradition for many to make some crafts with their own hands. And we have,.

Paper
New Year's
balloons
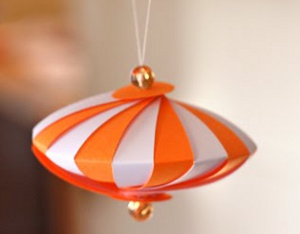
1. DIY Christmas ball (option 1)
To make this Christmas decoration, you will need colored paper, thin wire, a stapler, and glue. The balloon you see in the photo above was made from three different colors of paper (pink, blue and light blue).
Work plan:
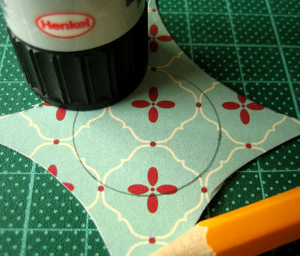
1. Take a small glass or glass (glass) and circle it on paper with a simple pencil 12 times. You should have 12 circles (4 circles of each color). Cut out the circles with scissors.
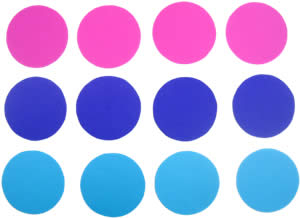
2. Fold each circle in half and stack them together as shown in the picture below. We use paper in three colors (A, B and C) to make this Christmas ball. Stack the circles in the following sequence - ABBCCAABBCCA. If, when making a New Year's ball, you used paper of two colors (A and B), then in this case the circles had to be folded in the following sequence - ABBAABBAABBA.

3. Fasten the circles of paper together with a thin wire, wrapping it around them along the fold line. Twist the ends of the wire together. If you do not have wire, then you can fasten the circles with a regular stapler.


4. Spread the circles and glue the adjacent halves of the circles to each other. Each half must be connected to one adjacent at the top, and with the other - at the bottom.

CHRISTMAS DECORATION - DECORATIVE BALL HONEYCOMB

2. DIY Christmas balls (option 2)

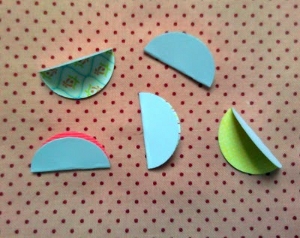
Cut out three circles of the same size but different colors from colored cardboard or thick paper. In the first of them cut a cross (fig. a), in the second circle make a horizontal cut in the middle and perpendicular to it two cuts in the direction from the circle to the center of the circle (fig. b), and in the third - four cuts in the form of a cross, also along direction from the circle to the center (Fig. c). Pass the circle "c" into the circle "b". In circle "a", bend the corners formed as a result of its incision; you get a square hole. Pass the circles "b" and "c" into it, having previously folded them. Then straighten the corners again (fig. d). Attach a thread to the resulting ball.
3. Christmas paper balls (option 3)
From old postcards or colored paper, you can make such cute Christmas toys - Christmas balls.

It is not necessary to make a large, complex ball; you can make a small Christmas ball with fewer parts.


4. Making a Christmas ball (option 4)
Very easy to make Christmas paper ball. To make it, you will need colored paper and glue.
Work plan:
1. Cut out eight identical circles from paper of different colors. Although, in fact, the number of circles can be any, but not less than three.
2. Fold each circle in half, right side inward.
3. Glue the halves of the circles together as shown in the photo below. Glue is applied to the wrong side of the halves of the circle.


4. Before finally sealing the New Year's ball, thread a thick thread or ribbon through it. You can also make a wonderful Christmas tree garland from a large number of paper balls.

Note: such a Christmas decoration can be made not only in the form of a ball, but also in any other shape.
5. DIY Christmas ball (option 5)
To make these wonderful Christmas lanterns, you will need to cut colored paper into strips of the same length and width. The length and width of the strips depends on the size of the flashlight you want to make. To make one paper lantern, you will need an average of 14-16 strips of paper.

When making Christmas balls, you can use strips of paper of different colors and beads to decorate Christmas toys with your own hands.

If the strips of paper are bent in the middle, then you get such a New Year's decoration.
6. How to make a Christmas ball (option 6)
We suggest you make such a cute and easy-to-make New Year's craft from old postcards with your child.

1. Using a small glass or wine glass, draw and cut out eight identical circles.

2. Using another object with a round base but smaller in diameter, draw and cut out two small circles.
3. Fold each large circle in half, and then in half again. See photo below.

4. Glue four folded large circles on one small circle, the remaining four on the other. As a result, you will get two halves of your future Christmas ball.
It is very IMPORTANT to correctly place the quarters of the large circles on the small circle. Try to carefully straighten the "pockets" of the folded circles and in advance, before gluing, estimate the correctness of their location. At the same time, focus on the very first photo, which shows a finished ball.

5. Now you just have to glue the two finished halves together and, when the glue dries, straighten all the pockets. Christmas ball is ready!


Making balls from thread:
1. You will need: scissors, balloons, fat cream (Vaseline), any yarn, PVA glue, bowl.
2. Dilute PVA glue with water, approximately 3:1.
3. Inflate the balloon to the desired size, give it a round shape, tie it with a thread.
4. After unwinding the required amount of yarn, put it in a bowl and leave for 5 minutes.
5. We smear the ball with a fat cream and wrap it with yarn, first leaving a large distance between the thread.
6. Gradually reduce the distance between the threads until the whole ball is wrapped with yarn and resembles a cocoon.
7. Cut the thread and glue it to the ball. Leave it to dry (at least a day).
8. Gradually untying the balloon, gently blow it off, and then remove it from the thread cocoon; tie a rope to the thread ball on top for fastening.
9. The balloon is ready!

When making a ball, you can use yarn (threads) of any color or paint with any paint or sparkles (spray). Especially for the New Year, you can decorate this thread ball with tinsel and stars. Hang small balls on the Christmas tree, decorate the room with large ones. Fantasize more!
If you are unable to wind the glue-soaked thread around the ball, you can wind the dry thread, and then carefully soak it with glue with a brush or sponge.
Instead of glue, you can use sugar syrup or starch paste. To prepare the paste, take 3 teaspoons of starch in a glass of cold water, mix thoroughly and bring to a boil. Instead of a thread, you can take a thin copper wire and wind it around the ball in the same way.
9. New Year's do-it-yourself. New Year decoration
Old Christmas balls can be updated by wrapping each of them in a piece of beautiful fabric and tying it with a ribbon.

Such a two-color ball can be used for room decor or as a Christmas tree toy. Colors can be very different.

We will make a ball of white and blue paper.

Take an A4 sheet and fold it in half three times.


Then we take a compass or a round object of a suitable size and draw a circle.


Cut out.


Fold the circles in half twice.

Apply hot glue in a thin line in the middle and glue.

If you don't have a glue gun, you can use double sided tape.


In the same way we glue together all the circles.


We connect the extreme circles with each other, forming a half of our paper ball.


First we attach one half of the ball, then the second.

Fix better with hot glue.


Our paper ball is ready!


How to make a tissue paper ball
Such paper balls will decorate the interior and serve as an excellent decorative element.

To make voluminous paper balls you will need:
- packaging of paper napkins;
- scissors;
- stapler;
- round stencil;
- pencil;
- threads.
Take from 5 to 10 paper napkins, the more layers, the greater the volume and size of the final ball, but the laboriousness of the work increases.

Stack the napkins on top of each other. We take a round stencil. It can be either paper, which will need to be circled with a pencil, or plastic or glass.

A hard stencil can be firmly attached to the paper, strongly pressed on it.

A clear imprint will remain on the napkins, according to which circles can be cut out without even using a pencil.

Cut out the circle using scissors. It is convenient to cut out all the layers of napkins at once, pressing them tightly against each other.

Fasten the middle of the circles with a stapler - one paperclip is enough.

Along the edge of the circle, make cuts going to the center, no more than 2-3 cm.

We bend the napkin in layers to give it volume. Each "ray" can also be slightly bent.

The layers are divided into two parts - one part is bent in one direction, the other in the other. In the end, volumetric balls are obtained, with which you can decorate any room.
The ball can be made of thicker paper than a napkin. They can be given shine or color using colored paper, paint, or glitter varnish.


The thread can be attached to a metal clip, which is located in the center of the ball. You can hang as one ball, and combine them into a garland.

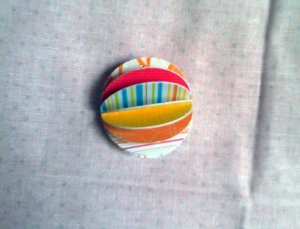
The ball looks like a gorgeous blossoming aster bud. This craft is suitable for any holiday: New Year, March 8 and even May days.

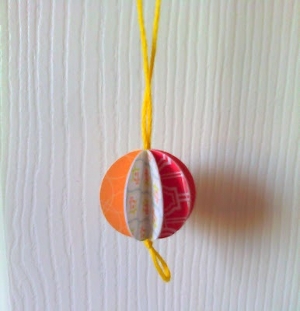
You can choose the paper in any color you like. The ball can be both monophonic and multi-colored - like salute splashes. The best choice is not to be lazy and make a few pieces. For clarity, let's make one side of the craft monophonic, and the other multi-colored. So that it becomes immediately clear which option to choose.
For work you will need:
- double-sided colored paper - 7-8 sheets;
- white cardboard - 1 sheet;
- a compass or a small plate with a diameter of 13 cm;
- simple pencil;
- ruler;
- glue;
- scissors;
- a piece of tape.

We draw colored sheets with a simple pencil. We make squares with sides of 6.5 cm - this is the best and most economical option for a sheet so that there are no extra pieces left. The sides of the square can be made both smaller and larger, then the size of the ball will change accordingly.

We draw with a compass on a sheet of white cardboard two identical circles with a diameter of 13 cm or a radius of 6.5 cm. Cut out the resulting circles.

When all sheets of colored paper are lined, cut out the resulting squares.

Now we fold each square diagonally to make a bag, having previously lubricated one side with glue. Glue is best taken liquid "PVA" milky, it dries faster and holds stronger. We turn all the squares into bags.


Take a circle of white cardboard. On one side we glue plain bags in a circle, with the long side down. We cover the entire surface of the cardboard. Glue the next row on the bottom row and so on until the end, until you get a hat.


On the next circle we stick multi-colored bags. There are two options: either in a chaotic manner, or makes each row of the same color. From darker tones to light, like a cup of a bud.

As a result, you get two hats from the bags.


We take a piece of tape, the length is cut off as desired. The longer the piece, the longer the loop of the ball will be.

Glue the ends of the loop to the back of one of the caps. Glue both free sides of the caps together. This is how a do-it-yourself paper ball turns out. Since both sides of the ball are quite heavy, you need to wait a few minutes for them to stick more firmly to each other.

To make a wonderful ball even more bright and unique, decorate it with sparkles. For this, a colorless varnish is best suited, unlike glue, it will not leave marks. We apply a thin layer of varnish on the tips of the ball and sprinkle glitter on top. Let the ball dry completely.

Now this work of art will look appropriate on a Christmas tree or just as a room decoration.
Ordinary office paper, even used paper, can be used to make a hanging paper ball. A few scraps of old rain, and the decoration will sparkle in the rays of electric bulbs.

Materials for making a large paper ball:
A4 office paper - 6 sheets;
glue;
rain;
decorative tape;
scissors.

Fold each sheet of paper in half (across). Draw a circle on each half. We make it the maximum size that the paper allows. To do this, you can use a compass or just circle something round with a pencil.

Cut out circles from each sheet of paper. We pass the diameter. We make a cut along the radius.

We turn half of the circle into a "bag". We fix it with glue. You can put on a paper clip before the glue dries. 
From the second half of the circle we also turn off the cone. Glue and secure with a staple.

When the blanks dry, we begin to glue them together.

Gradually form a ball.

Cut the rain into small pieces.

Lubricate each with glue and place inside the elements of a paper ball.

When everything dries well, we make a hole in any of the paper cones.
We thread a decorative ribbon into it. We tie the ends with a knot.

We hang the finished ball. Thus, you can quickly and easily decorate the office.


Bright paper balls using the Kusudama technique
Such balls are made using the Kusdam technique by folding paper modules and gluing them together.


You can make completely different balls from paper and for different purposes: to decorate for the New Year or another holiday, to play and leave (an inflatable ball is ideal here), to give your friends and loved ones such a wonderful magic ball, and just for the sake of fun to further improve your origami technique. You will learn how to make different paper balls from this article and various videos.
1. How to make a paper Christmas ball
- colored paper (you can use other paper, including corrugated paper, to create balls);
- ruler;
- scissors;
- a clerical stapler (although you can do without it);
- glue stick or double-sided thin tape.
Paper to create a ball, as already mentioned, you can take any, but only so that it is not very dense. You can take colored paper that has one color - due to the fact that such paper has one side colored and the other white, you get a wonderful effect. One of the most economical options is colored note paper (which we used as an example), since a whole pack of this paper is enough to decorate not only the Christmas tree, but the whole house with balls.
To make a Christmas ball, you need to take 12 pieces of paper (3 different colors - 4 pieces for each color) and put them in one pile. You can use a different number of blanks of paper, and more and less - the splendor of the ball depends on this amount.
Then you need to take any object that has a round shape (we used a glass) and circle it around the contour by drawing a circle on the top sheet.
Take the entire stack of paper and scissors, carefully cut out circles from the paper (you can not cut the entire stack at once, especially if it is too thick, but divide it into smaller stacks to make cutting convenient and possible).
We fasten our circles strictly along the fold line with a stapler (if it is not there, then they can simply be sewn, that is, fastened with threads).
We draw an additional template on a sheet of A4 paper, which will be needed in order to glue the circles in the right place. We mark up, dividing the semicircle into approximately three equal parts, mark 1/3 at the bottom and top, as shown in the image, and draw straight lines, aligning the ruler with the marked points and the center of the circle.
Next, we apply the ruler, aligning it with the line until such time as to lubricate only the necessary area with glue, and apply glue with a glue stick to the upper sector, which is limited by the ruler. (Glue can be applied dotted at the point where the arrow shows 1/3 or glued with a small piece of double-sided tape).
We turn over the page of our round book, gluing it, move the ruler to the lower sector and repeat the procedure again.
So, gluing the sheets alternately from above, then from below, we are gradually approaching the moment when only two parts remain together, unfolding our “book” into a beautiful festive paper ball. Before the last action, when you unfold the craft into a ball, we advise you to paste a beautiful thread inside the ball, on which our decoration will later be hung on a Christmas tree or other things.
It's so easy to make a Christmas ball out of paper.
2. How to make an origami magic ball
This ball, when folded neatly and correctly, folds beautifully on both sides.
It resembles this ball a little bit by bits, but only unlike it, it is created from one sheet of paper. To assemble such a model will require a lot of patience, as it will be necessary to create a large number of neat folds (several hundred). But the result is worth it, as you will create an interesting toy that will appeal to everyone, without exception, both children and adults.
In order to make a magic ball, you need to use a long sheet of paper (15 cm -30 cm), on which you will have to bend many small squares. Watch the video instructions carefully so as not to miss important points. As a result, you should get a great craft that you can use as a gift.
3. How to make a paper balloon
Children love to inflate balloons, as well as kicking, throwing and piercing them. For them, you can create an inflatable paper ball with your own hands.
Watch the video on how to create such a balloon, which can then be inflated. This ball can also turn into a kind of paper bomb if you fill it not with air, but with water - you can throw such a ball.
4. How to do 3D paper ball
To make a 3D ball, you will have to print the picture below on thick paper. Or print on plain paper, and then transfer to thick paper - but just do not use cardboard. You can take velvet paper, pastel paper - it all depends on what you have at home or on your desire (after all, any paper can be purchased at the store). This will look good in both white and color.
Two templates - one for a large ball, and the other for a small one. It's easier to train on a big one. If you decide to start training with a large ball, then print the drawing 2 times - to get 12 parts. Click on the picture and save the template.